
CR 1.0A1 - Dashcam TARGA - Free user manual and instructions
Find the device manual for free CR 1.0A1 TARGA in PDF.
| Product type | Dashcam |
| Brand | Targa |
| Model | CR 1.0A1 |
| Dimensions (L x H x D) | 85.5 x 62 x 32 mm |
| Weight | 70 g |
| Display | LCD TFT 6.9 cm (2.7 inches), 960 x 240 pixels |
| Max video resolution | 1920 x 1080 at 25 fps |
| Max photo resolution | 12 MP (4032 x 3024) |
| Storage | microSD card up to 32 GB, class 6 minimum |
| Battery | Lithium-ion 3.7 V / 330 mAh, approx. 45 min in recording |
| Power supply | USB 5 V or car charger 12–24 V |
| Main features | Loop recording, motion detection, G-sensor, LED lamp, timestamp, video lock, 4x digital zoom |
| Connectivity | HDMI (output), USB, speaker, microphone |
| Operating temperature | 0 to 35 °C |
| Storage temperature | -10 to 55 °C |
| Maintenance and cleaning | Clean with a soft dry cloth; do not use solvents |
| Safety | Do not expose to water, heat, magnetic fields; install away from airbag deployment zone |
| Spare parts and repairability | Replaceable fuse (T2AL 250 V); integrated non-replaceable battery |
| Warranty | 3 years |
| Package contents | Dashcam, car mount, USB cable, car charger, user manual |
Frequently Asked Questions - CR 1.0A1 TARGA
User questions about CR 1.0A1 TARGA
0 question about this device. Answer the ones you know or ask your own.
Ask a new question about this device
Download the instructions for your Dashcam in PDF format for free! Find your manual CR 1.0A1 - TARGA and take your electronic device back in hand. On this page are published all the documents necessary for the use of your device. CR 1.0A1 by TARGA.
USER MANUAL CR 1.0A1 TARGA
DASHBOARD CAMERA CR 1.0 A1
TARGA GMBH
59484 SOEST
GERMANY
Last Information Update - Version des informations -
202/2015-Ident.No.:CR L0 A1 022015-1
G
Dashboard Camera
User manual and service information
(NL)(BE)
Dashcam
Gebrukenhandeligung en serviceiokomme
()
Camera embarquée
Contents 2
Trademarks 5
Introduction. 5
Intended use 5
Package Contents 6
Technical specifications 7
Safety instructions. 8
Explanation of symbols 8
Copyright 11
Overview 12
Controls and displays. 13
Buttons 13
LED indicators 14
Before you start 15
Inserting/removing the memory card. 15
Car mount 15
Charging the battery 16
Charging the battery with a USB cable 17
Charging with the car charger 17
Getting started. 18
Turning on the Dashboard Camera 18
Turning off the Dashboard Camera 18
CR 1.0 A1
Setting the menu language 18
Setting the date / time 19
Turning on and selecting the operating mode 19
Dashboard Camera is not being charged. 19
Dashboard Camera is connected to a PC with a USB cable 20
Dashboard Camera is connected with the car charger 20
Recording videos 20
Video light 22
Exposure compensation 22
Protecting videos from being overwritten during loop recording 23
Taking photos 23
Exposure compensation 25
Playback 25
Video playback functions 25
Photo playback functions 27
29
Main menu 29
The recording menus 32
The playback menus 37
Connectors and sockets 39
Viewing recordings on a television 39
Transferring recordings to a computer 39
Connecting the Dashboard Camera to a Computer 40
CR 1.0 A1
Using a card reader 40
Encoding videos for iOS 40
Replacing the car charger fuse 41
Troubleshooting 42
After use. 43
Storage when not using the product for a longer time 43
Repairs. 43
Cleaning 43
Conformity notes 43
Environmental regulations and disposal information 44
Warranty and Service Information 44
Trademarks
HDMI, the HDMI logo and High-Definition Multimedia Interface are trademarks or registered trademarks of HDMI Licensing, LLC in the USA and other countries.
Microsoft Windows is a registered trademark of Microsoft Corporation, USA.
SD and SDHC are registered trademarks.
USB is a registered trademark.
Apple is a registered trademark of Apple, Inc.
IOS is a trademark or registered trademark in the US and other countries of Cisco Systems.
Other names and products may be the trademarks or registered trademarks of their respective owners.
Introduction
Thank you for purchasing this CR 1.0 A1 Dashboard Camera, hereinafter referred to as the Dashboard Camera. The Dashboard Camera is the ideal vehicle companion. Not only can it record your trips but thanks to the G-sensor, it can also capture details in the event of a crash.
Intended use
The Dashboard Camera is a Consumer Electronics device and is designed exclusively for recording video and photos. Any use other than that mentioned above does not correspond to the intended use. The device may only be used for private purposes, not for industrial or commercial ones.
This device fulfils all relevant standards and directives relating to the European Conformity Declaration. If any changes are made to the device other than those endorsed by the manufacturer, compliance with these standards and directives can no longer be guaranteed. Only use accessories recommended by the manufacturer.
Observe the regulations and laws in the country of use.
Package Contents
Remove all devices and accessories from the packaging. Remove the packaging material and screen protector and check whether all the parts are complete and undamaged. If you find anything missing or damaged, please contact the manufacturer.
Keep the packaging material away from children and dispose of appropriately.
CR 1.0 A1 Car mount USB cable

Car charger User manual
(linearlllustration)
Technical specifications
Dashboard Camera
Display 960× 240 pixels, 2.7 inch (6.9cm) TFT LCD
| Video resolution | 1920x1080, 25 fps | 640x480, 30 fps |
| 1440x1080, 30 fps | 848x480, 30 fps | |
| 1280x720*, 30fps | 320x240, 30 fps | |
| Image resolution | 12M 4032x3024 | 3M 2048x1536 |
| 10M 3648x2736 | 2MHD 1920x1080 | |
| 8M 3264x2448 | 1.3M 1280x960 | |
| 5M 2592x1944 | VGA 640x480* | |
| Aspect ratio | JPG | |
| Zoom 4x digital zoom | ||
| Light 4 white LEDs | ||
| Interfaces | HDMI outputUSB port for PC | |
| Operating modes | Video Recording, Motion Detection, Photo, Playback, PC Camera | |
| Storage media | MicroSD card, 2 to 32 GB, class 6 minimum | |
| Functions | Loop recording (3, 5, 10 minutes, Off)Motion DetectionG-sensor | |
| Built-in battery | Rechargeable Li-Ion battery, 3.7 V / 330 mAhCharging function via USB interfaceTypical run time (video recording) with fully charged battery: 45minutesCharging time approx. 1.5 hours (when powered off) and approx. 2hours (when powered on) | |
| Operating environment | 0 to 35 °C, max. 85% relative humidity | |
| Storage environment | -10 to 55 °C, max. 85% relative humidity | |
| Dimensions | 85.5 x 62 x 32 mm (W x H x D) | |
| Weight | 70g | |
- native Dashboard Camera resolution. All other resolutions are interpolated.
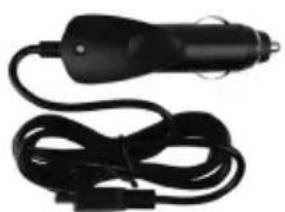
Car charger
Manufacturer Targa GmbH
Model name Car Charger CR 1.0 A1
Input 12 to 24V 350mA
Output 5V600mA
Fuse T2AL, 250V
Chargercable length 200cm
The technical specifications and design can be changed without prior notice.
Safety instructions
Before you use this device for the first time, please read the following notes and heed all warnings, even if you are familiar with handling electronic devices. Keep these operating instructions in a safe pace for future reference. If you sell the device or give it away, pass on the user manual at the same time. The User Manual is part of the product.
Explanation of symbols
In this user manual, warnings are used as follows.


DANGER! This icon and the word "DANGER" alert you to a potentially dangerous situation. Ignoring it can lead to severe injury or even death.
WARNING! This symbol and the word "WARNING" denote important information required for the safe operation of the product and for the safety of its users.
Caution! This symbol and the word "Caution" denote important information that can lead to legal actions when ignored.
This symbol denotes further information on the topic.
WARNING! Always make sure that
- the device is not exposed to direct heat at sources (e.g. radiators)
- the device is not exposed to direct sunlight or bright artificial light
-
the Dashboard Camera may be used within the allowed operating temperature range from 0^ to 35^ only
-
contact with water sprays or drops and corrosive liquids is avoided and the device is never operated near water; in particular the device may never be immersed in liquids (do not place any objects containing liquids, such as vases or drinks, on or near the device)
- the device is never placed near magnetic fields (e.g. speakers)
- no naked flames (e.g. burning candles) are placed on or near the device
- no foreign bodies can penetrate the device
- the device is not exposed to any extreme temperature fluctuations as this can cause moisture through condensation and cause short-circuits. If the device has been exposed to strong temperature variations, wait for it to reach the ambient temperature before switching it on (about 2 hours).
- the device should not be subjected to excessive shocks and vibrations
- the device and its accessories are not damaged in order to avoid any further risks. Therefore you must inspect the device and its accessories regularly for any damage. If you find any component damaged, it must not be used. Never open the Dashboard Camera housing and have all repairs performed by qualified technical stuff only.
Failure to heed the warnings above may result in damage to the device or injury.

DANGER! Children and persons with disabilities
Electrical devices are not suitable for children. Also persons with reduced physical, sensory or mental capabilities should only use electrical devices within the limits of their abilities. Do not allow children or persons with disabilities to use electrical devices unsupervised, unless they are instructed accordingly and supervised by a competent person responsible for their safety. Children should always be supervised to ensure that they do not play with the product. Small parts can represent choking hazards.

DANGER! Risk of suffocation!
Keep small parts and packaging material away from children. Packaging material is no toy. Danger of suffocation!

Warning! Recordings (Photo/Video) of persons and the right to one's own image
Please note that when recording any persons, whether portraits or groups of persons, every person has the right to her/his own image/recording. Recording underage people is subject to the consent of the parents. In order to avoid any legal measures, make sure to respect the legislation of the country of use.
Furthermore, in some jurisdictions it may not be allowed to film or photograph any people (including car drivers and passengers as well as pedestrians, etc.) without telling them first that you are doing so. Please make sure to respect the privacy legislation of the country of use.

DANGER! Using on the road
Please note that using the camera on the road, whether driving a car, riding a bicycle or as a pedestrian may distract you from the traffic resulting in severe accidents. This may harm your health and/or result in legal actions. Also, using the Dashboard Camera may incur legal action in some countries. Please make sure to respect the legislation of the country of use.

DANGER! Installation / Use in the Car
Road safety first! In the event of an accident there is an increased risk of injury from flying objects. Always secure the Dashboard Camera so that the vehicle can be operated safely at all times and so that the driver's visibility is not impaired. Always position all cables in your vehicle so that they do not impede operation of your vehicle. When positioning the cables, take care to ensure that the cables do not limit your field of vision. Under no circumstances must the Dashboard Camera, or parts thereof (interface or power cables), be installed within the airbag deployment area. This constitutes a risk of accident and injury.

DANGER! Battery
Do not throw the Dashboard Camera into a fire. Otherwise there is risk of explosion.
The built-in rechargeable battery cannot be removed for disposal.

DANGER! Risk of Explosion
Improper use could cause explosions or leaks.

DANGER! Screen
Do not apply any pressure to the screen and keep sharp objects away from the display. A broken display represents a risk of injury. Wear gloves when collecting the broken parts and contact the manufacturer if necessary. Collect the broken parts in a suitable container. In the case of scratches or other damage to the screen, take extreme care to ensure that no fluid escapes from the screen. If fluid does escape, proceed as follows:
- If the fluid comes into contact with the skin, wipe off with a clean cloth and rinse with plenty of water. Contact a doctor if necessary.
- If the fluid comes into contact with the eyes, rinse them under running water for at least 15 minutes and contact a doctor immediately.
If the fluid is swallowed, first rinse the mouth out with water and then drink plenty of water. Contact a doctor immediately!

WARNING! Cables
Unplug all cables by holding the plugs and never pull on the cables themselves. Never place pieces of furniture or other heavy objects on the cables and take care that they do not become damaged, especially at the plugs and sockets. Never tie knots in a cable and do not tie them to other cables. All cables must be laid so that nobody can trip over them or be obstructed by them.
Copyright
All the contents of this user manual are protected by copyright and provided to the reader for information only. Copying data and information without the prior explicit written consent of the author is strictly forbidden. This also applies to any commercial use of the contents and information. All texts and diagrams are up-to-date at the time of printing.
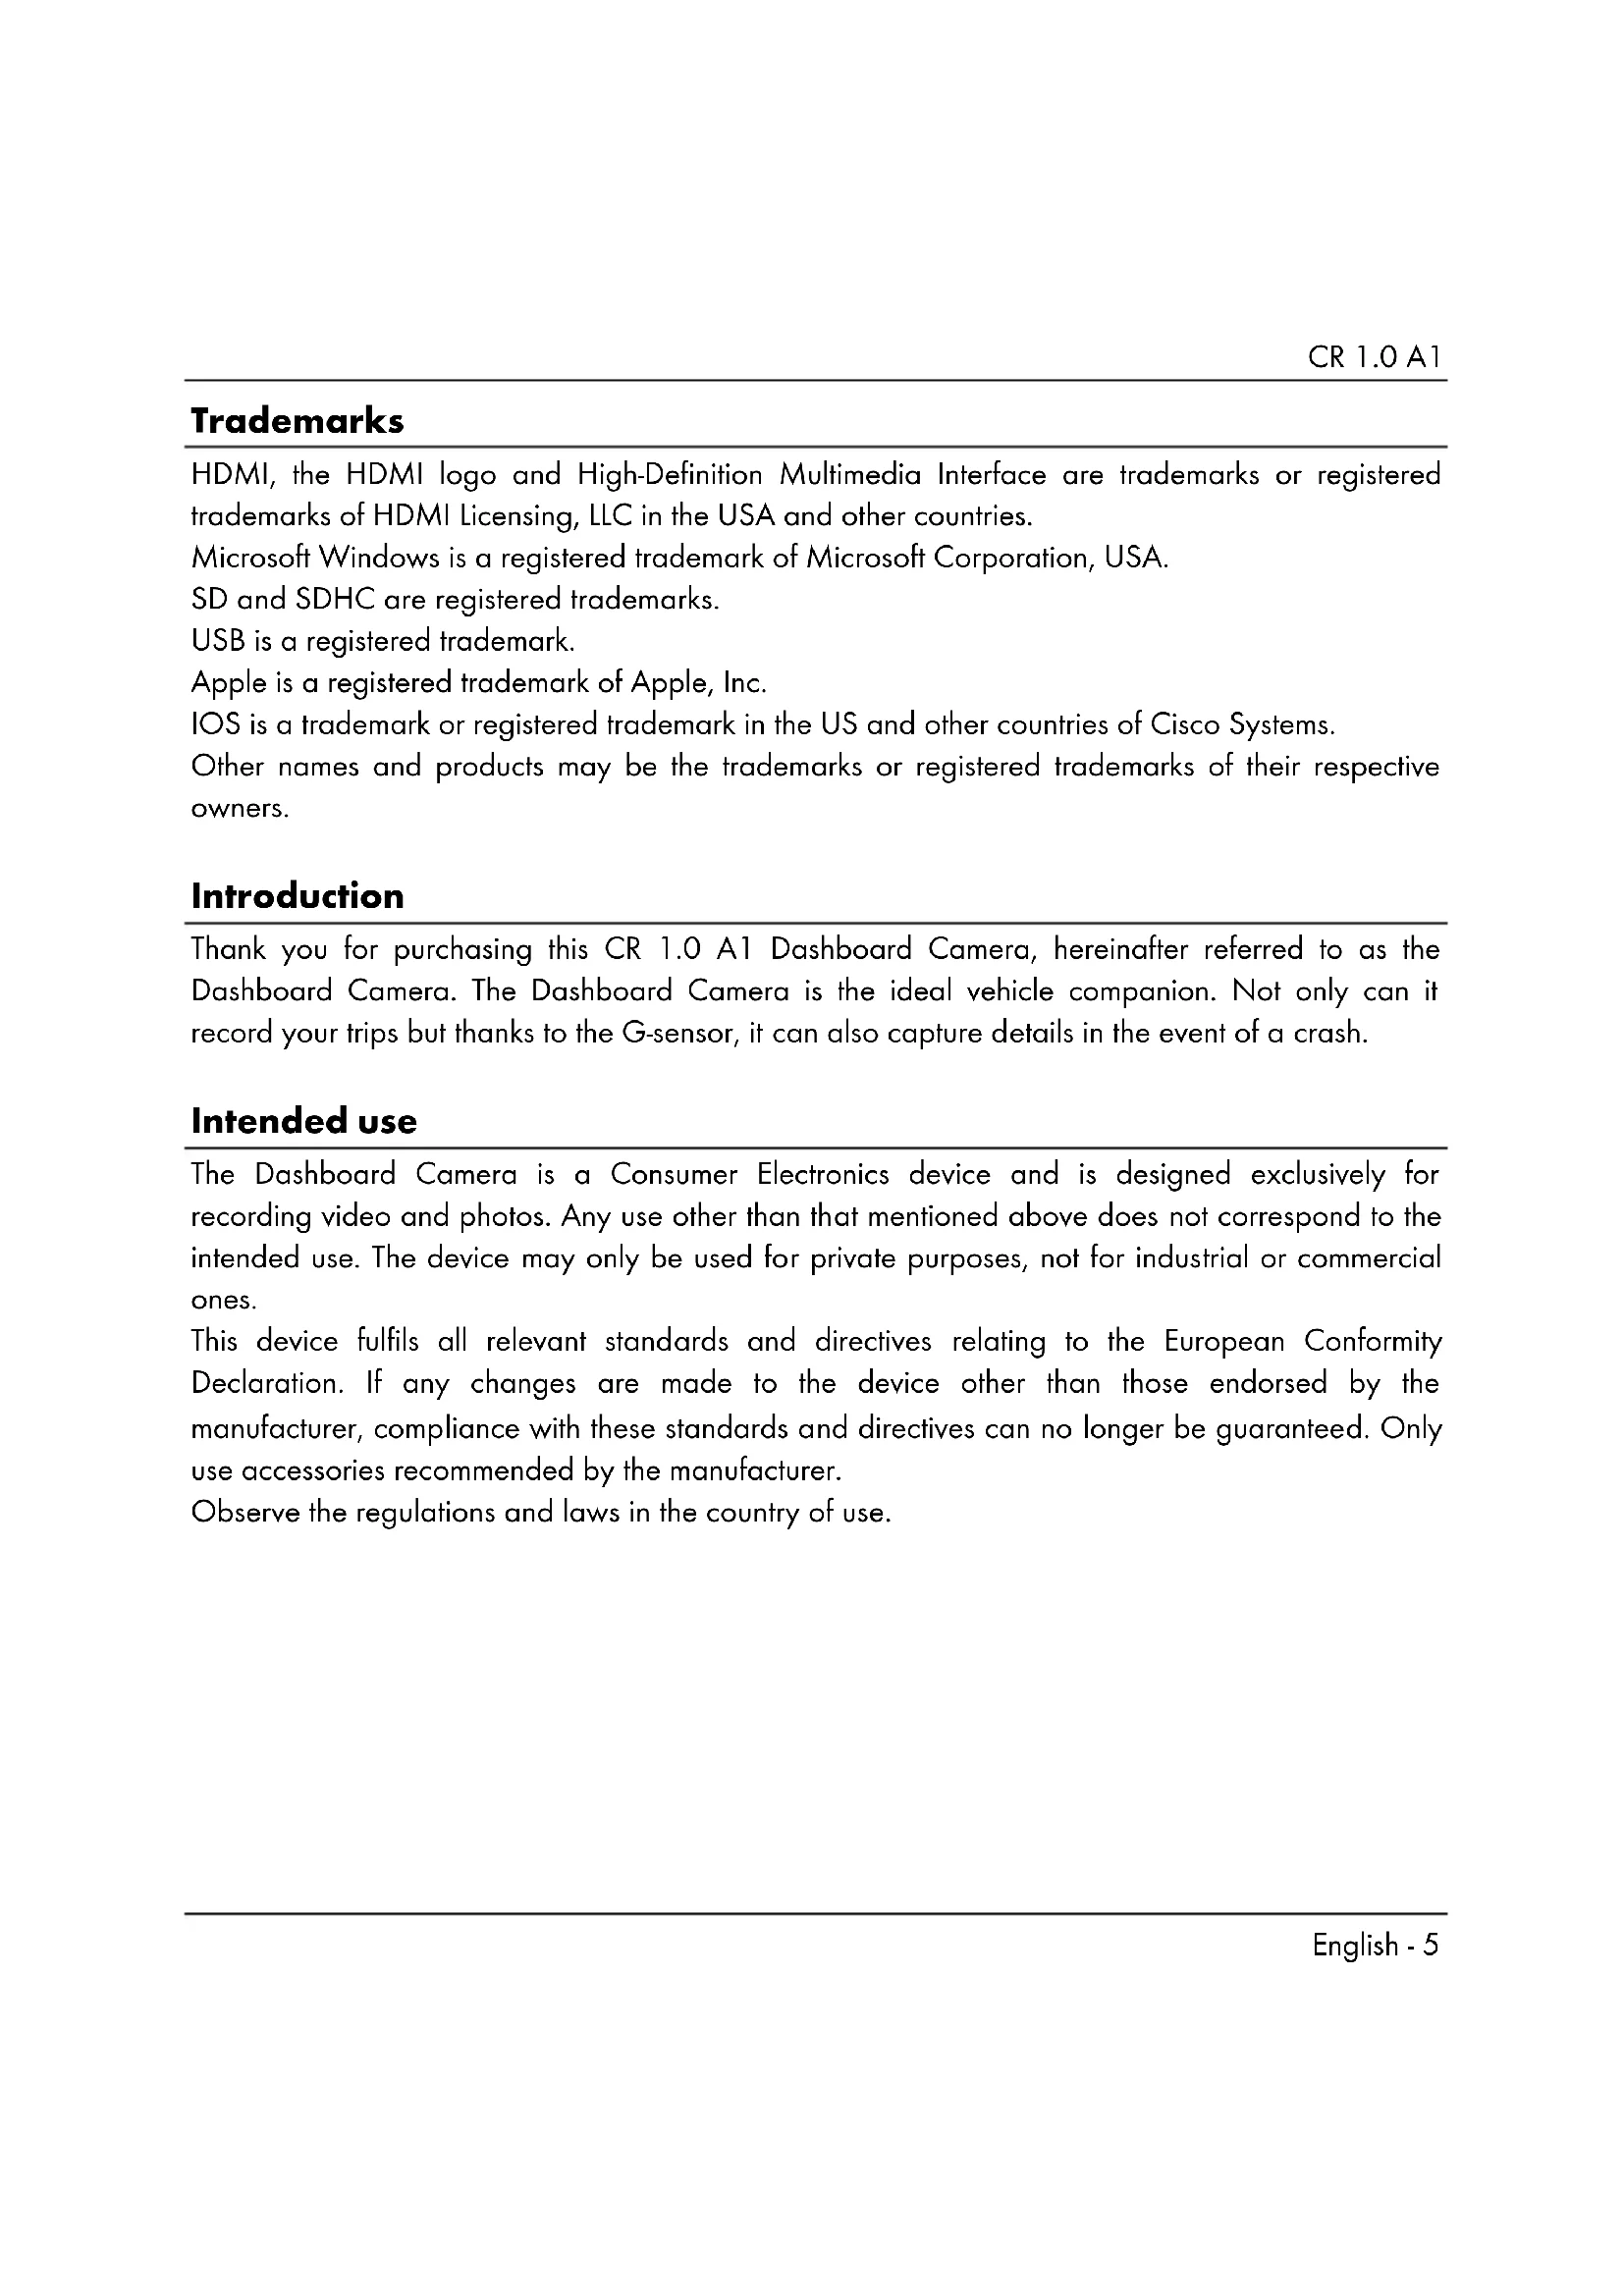
Overview
An additional illustration of the items and controls and their corresponding numbers can be found on the inner page of the fold-out cover of this user manual. You can keep this page folded out whilst reading the different chapters of this user manual. This allows you to refer to the relevant controls at any time.

Left side
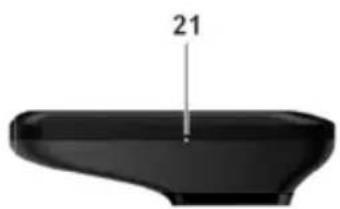
- Reset switch
- microSD card slot (labelled as "T-Flash" on the protective cover)
- HDMI output
- Protective cover
Right side
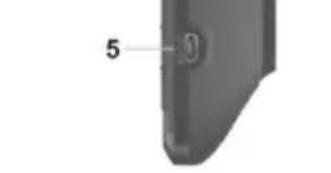
- USB/charging connector
Front
- Lens
- Speaker
8.4 white LEDs

Top
- Thread for car mount

Back
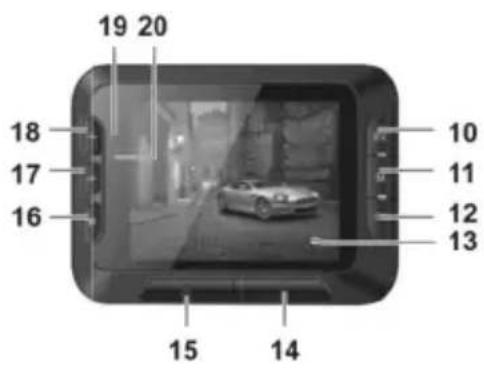
- EV button: adjusts the exposure value
- Menu button: opens the operating mode-specific settings
- OK button
- Display
- On/Off button
- Protect button: to protect the current video recording
- Return button: opens the main menu
-
- button: decreases zoom / down navigation in the menu
-
- button: increases zoom / up navigation in the menu
- Charge LED (orange)
- Recording LED (blue)
Bottom
- Microphone
Controls and displays
Buttons
| Button | Function |
| EV button (10) | Press this button with video recording paused or in Photo mode to set the exposure value using the + (18) and - (17) buttons and the OK button (12). |
| Menu button (11) | Press this button with recording or playback paused and no menu displayed to open the settings menu associated with the current operating mode. |
CR 1.0 A1
| OK button (12) | • Press this button in Video mode to start or stop recording. • Press this button in Photo mode to take a picture. • Press this button while the menu is shown to select a menu item. |
| On/Off button (14) | • Press and hold this button for at least 3 seconds to switch the Dashboard Camera on or off. • Press this button during video recording to switch off the display. Video recording will continue. Press the button again to switch the display on again. • Press this button in Photo mode to switch off the display. Press the button again to switch the display on again. |
| Protect button (15) | • Press this button during video recording to protect the current video and prevent it from being overwritten during loop recording. |
| Return button (16) | • Press this button to display the main menu for operating mode selection. |
| -(17) and + (18) buttons | • Press these buttons during video recording or photo capture to zoom in or out on the scene. • Press these buttons with the Menu displayed to navigate between the various Menu options (up/down). • Press these buttons with a value in the Menu selected to increase or decrease the value. |
LED indicators
| LED | Description |
| Charge LED (19) | • Orange: charging battery |
| Recording LED (20) | • Blue: device is being initialised (after switching on) • Blue flashing: video recording in progress • Blue flashing: Self-timer enabled in photo capture mode |
Before you start
Inserting/removing the memory card
You will need a microSD memory card (not included) to save your photos and videos. If a memory card is inserted, all the content recorded is saved onto it. If no memory card is inserted, recording will not be possible. In this case the message "PLEASE INSERT SD CARD" will appear. Confirm by pressing the OK button (12).
Proceed as follows to insert a memory card:

WARNING! Power the Dashboard Camera off before you insert or remove a memory card.
Only use Speed Class 6 or faster memory cards.
If you have not inserted a microSD memory card the message "PLEASE INSERT SD CARD" will appear when the device is switched on.
- Open the protective cover (4) on the left-hand side of the Dashboard Camera.
- Insert the memory card with the contacts facing towards the front of the device (towards the display (13)) into the microSD card slot (2) until it clicks in place.
- Close the protective cover (4) on the left-hand side of the Dashboard Camera.
To remove the memory card, gently press on the inserted card. The memory card will protrude a little so that you can get hold of it and remove it.
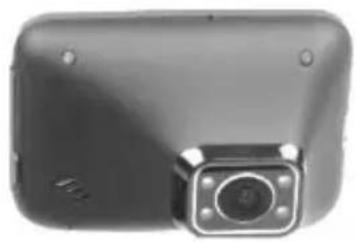
Car mount
The car mount allows the Dashboard Camera to be mounted on the windscreen of your vehicle.
-
Connect the Dashboard Camera to the car mount. To do this, screw the thread for the car mount (9) on to the car mount's threaded pin (22). You can use the knurled nut (23) to fix the Dashboard Camera in place.
-
Then press the suction pad (24) of the car mount against the windscreen and secure by pressing down the lever (26).
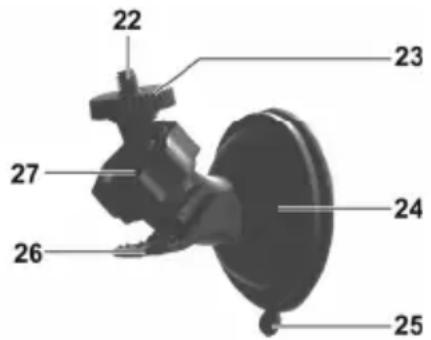

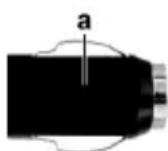
As the thread for the car mount (9) is located at the top of the Dashboard Camera, you should install the car mount such that the Dashboard Camera "hangs" off it (see adjacent image). Otherwise the controls (10 to 20) will be upside down.


DANGER! Do not install the car mount (with or without the Dashboard Camera) within the operating area of the vehicle's airbag and install the car mount so that the driver's view is not obstructed.
- Loosen the knurled screw (27) to line up the Dashboard Camera in the desired position with the help of the ball joint. Re-lighten the knurled screw (27).
- To remove the car mount from the windscreen, flip the lever (26) up again and then pull on the release tab (25) on the suction pad.
Charging the battery
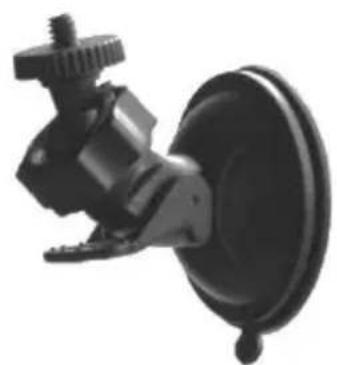
The Dashboard Camera battery can be charged via the USB port on a computer or with the car charger supplied.

In addition to the options below, you can also connect the Dashboard Camera to an external USB power adapter (not supplied) and charge the Dashboard Camera that way. You can purchase a suitable 5V USB power adapter with at least 1A output current from any electronics retail outlet.

WARNING! When using an external power adapter, it must be connected to an easily accessible wall outlet so that it can be disconnected quickly in case of an emergency.
Charging the battery with a USB cable
- Use the USB cable to connect the Dashboard Camera to a USB port on your computer. Insert the small plug (30) of the supplied USB cable into the Dashboard Camera's USB/charge port (5) and the large plug (31) into a USB port on your computer.
The Dashboard Camera will now turn on.

Some computers do not supply USB power while they are turned off. If the Dashboard Camera does not charge, make sure your computer is switched on.
- You will be asked to select the desired operating mode (Mass Storage or PC Camera). On first use we recommend you switch the device off initially, leave the battery to charge for a few hours and then define basic settings such as language, date and time etc. before performing further steps. To power the Dashboard Camera on, press and hold the On/Off button (14) for approx. 3 seconds.
The charge LED (19) lights up orange while charging. Once charging is complete, the charge LED (19) goes out.
Charging with the car charger


WARNING! In order to protect your Dashboard Camera from any sudden voltage surges, connect the car charger after you have started your car engine. You can connect the car charger to a 12V or 24V cigarette lighter.
- Plug the mini-USB connector (29) of the car charger into the USB/charge port (5) on the Dashboard Camera.
- Then connect the car charger to a suitable cigarette lighter in your car.
The Dashboard Camera will then switch on and loop recording will begin.
If the cigarette lighter in your vehicle can be turned on with the ignition key, this will ensure that recording begins each time you start your vehicle's engine and thus all journeys will be recorded automatically.
The charge LED (19) lights up orange while charging. Once charging is complete, the charge LED (19) goes out.
If the charge LED (19) does not light up, you may need to replace the car charger fuse. For more on this, see "Replacing the car charger fuse" on page 41.

WARNING! If your car's cigarette lighter does not switch off with the ignition key but supplies power all the time, the car battery discharges if you leave the Dashboard
Camera turned on. Therefore, to avoid discharging the battery to a level where the engine cannot be started anymore, we recommend you to disconnect the car charger from the cigarette lighter of your car when leaving the car.
Getting started

Please charge the battery before first use of the device.
Turning on the Dashboard Camera
- Press and hold the On/Off button (14) for at least 3 seconds to turn on the Dashboard Camera.
- Or, if you have connected the Dashboard Camera to your car's cigarette lighter using the car charger and this can be turned on and off with the ignition key, switch the ignition on to turn on the Dashboard Camera. In this case, loop recording will start automatically.
Turning off the Dashboard Camera
- Press and hold the On/Off button (14) for at least three seconds to turn off the Dashboard Camera.
- Or, if you have connected the Dashboard Camera to your car's cigarette lighter using the car charger and this can be turned on and off with the ignition key, switch the ignition off to turn off the Dashboard Camera. The message "Shutting down..." will flash for approx. 30 seconds and the Dashboard Camera will turn off automatically.
Setting the menu language

The procedure described below only works when the Dashboard Camera is NOT connected to the computer with the USB cable. If necessary, first disconnect the USB cable from the USB/charge port (5) on the Dashboard Camera.
- Power the device on by pressing and holding the On/Off button (14) for approx. 3 seconds.
- Press the - (17) or + (18) button several times until the "Setup" Menu is displayed.
- Press the OK button (12) to open the "Setup" menu.
- Press the - (17) or + (18) button several times until the "Language" option is selected.
-
Press the OK button (12) to open the "Language" option.
-
Press the - (17) or + (18) button several times to highlight the desired language and press OK (12) to confirm.
- When finished, press the Return button (16) to show the main menu.
Setting the date / time

The procedure described below only works when the Dashboard Camera is NOT connected to the computer with the USB cable. If necessary, first disconnect the USB cable from the USB/charge port (5) on the Dashboard Camera.
- Power the device on by pressing and holding the On/Off button (14) for approx. 3 seconds.
- Press the - (17) or + (18) button several times until the "Setup" Menu is displayed.
- Press the OK button (12) to open the "Setup" menu.
- Press the - (17) or + (18) button several times until the "Date/Time" option is selected and press OK (12) to confirm.
- Press the - (17) or + (18) button several times to set the value currently selected and press the OK button (12) to apply it.
The cursor skips to the next field where you can set the corresponding value. Repeat this procedure to set all values accordingly.
6. When finished, press the Menu button (11) to return to the Setup menu or press the Return button (16) to open the main menu.
Turning on and selecting the operating mode
Once you have switched the device on (hold down the On/Off button (14) for approx. 3 seconds), there are three scenarios depending on whether and how the Dashboard Camera battery is charged.
Dashboard Camera is not being charged
If the Dashboard Camera is not plugged in (USB or car charger) the "Loop recording" option from the main menu will appear after switching the device on.
- Select the "Loop recording" option in the main menu by pressing the OK button (12) to record video in loop recording mode. See also "Loop recording" on page 29. Video recording will now start immediately.
- Alternatively, using the - (17) and + (18) buttons, select a different operating mode and confirm by pressing the OK button (12).
Dashboard Camera is connected to a PC with a USB cable
If there is a USB cable connection from the PC to the Dashboard Camera, a selection menu appears after switching the device on for the "Mass Storage" and "PC Camera" options.

When connected to a computer by cable, the Dashboard Camera can not be used as a video camera or digital (photo) camera, only as a mass storage device or webcam.
Using the - (17) and + (18) buttons, select the desired option and confirm by pressing the OK button (12). See also "Connecting the Dashboard Camera to a Computer" on page 40.
Dashboard Camera is connected with the car charger
If the Dashboard Camera is connected to the car charger and that in turn is connected to the live cigarette lighter in your vehicle, loop recording will start straight away after the device is switched on.
Recording videos
Once you have switched the device on and selected a video recording mode where applicable as described in the previous step, the Dashboard Camera can be used to record videos with or without the car mount while travelling.
- If you are using the Dashboard Camera without the car mount, aim the Dashboard Camera at the desired subject with the help of the display (13).
- Press the OK button (12) to start recording. The recording LED (20) will flash blue while recording.
- If necessary, select a larger or smaller section of the image (zoom) using the + (18) and - (17) buttons. Press the + (18) button to bring the subject closer or the - button (17) to make the subject appear further away.
- Press the OK button (12) to stop recording. The recording LED (20) will no longer flash. The video will be saved automatically under a unique name.
During recording, different icons may appear on the display (13) informing you about the current settings.
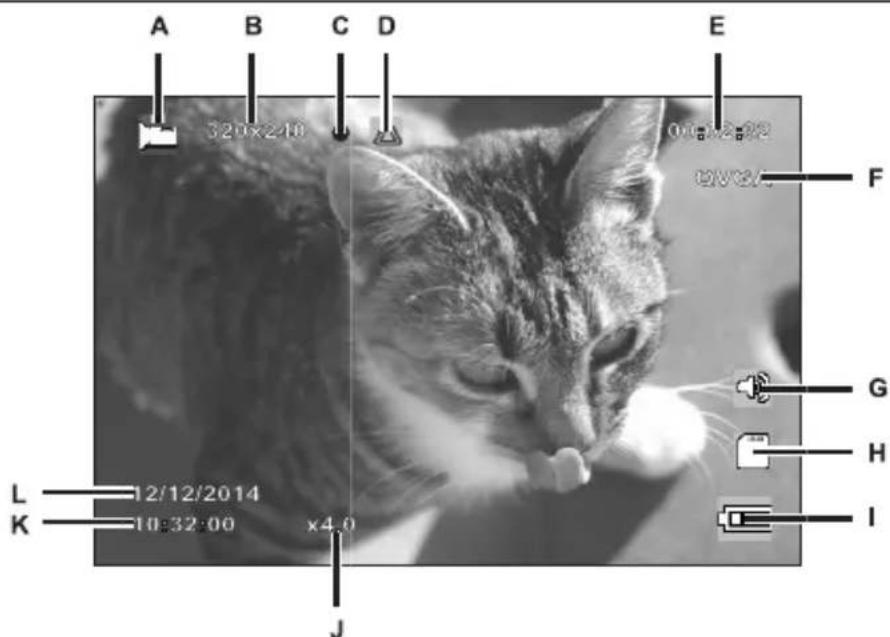
| A | Video mode indicator | |
| B | 320x240 | Resolution in pixels: the possible values are 320x240, 640x480, 848x480, 1280x720, 1440x1080, 1920x1080 |
| C | ● | Recording icon (flashes red while recording) |
| D | This icon indicates that the current recording is protected and will not be overwritten. | |
| E | 00:02:32 | Recording time counter |
| F | QVGA | Resolution: the possible values are QVGA, VGA, WVGA, 720P, 1080P and 1080FHD |
| G | Audio icon: indicates whether or not the video is being recorded with (or without) sound. | |
| H | Memory type: : an SD memory card is inserted and recordings are being stored on it. : no SD memory card is inserted. | |
| I | Battery level : battery fully charged : battery 2/3 full : battery 1/3 full : battery almost empty | |
| J | x4.0 | Zoom indicator |
| K | 10:32:00 | Current time |
| L | 12/12/2014 | Current date |
Video light
In dark environments you can enable the 4 built-in white LEDs (8).
- During the video recording, press the OK button (12) to stop recording and then the Menu button (11) to bring up the menu for the current mode.
- Using the - (17) and + (18) buttons, select the "LED Light" option and confirm by pressing the OK button (12).
- Using the - (17) and + (18) buttons, select the "On" option and confirm by pressing the OK button (12) to turn on the video light.
Alternatively, press the "Off" option and confirm by pressing the OK button (12) to switch off the video light.
Once you have enabled the function, the video light will come on automatically when there is insufficient light. It will remain off in bright conditions to save the battery.
Exposure compensation
You can define an exposure compensation value for video recordings.
- With video recording or photo capture paused, press the EV button (10) to bring up the exposure compensation menu.
- Using the + (18) and - (17) buttons, select the desired option and confirm by pressing the OK button (12). While making your selection the preview image on the display (13) will change in real time so that you can quickly see which exposure value is currently most suitable.
You may choose an exposure value between - 2 and + 2 in 1/3 exposure value increments.
If the picture is too bright, select a negative value for exposure compensation.
If the picture is too dark, select a positive value for exposure compensation.
Protecting videos from being overwritten during loop recording
For the "Loop recording" mode, you can define a length of 3, 5 or 10 minutes for the video in the menu. After that recording time, a new video file is automatically created. As you record videos, the optional microSD memory card fills up. Once the storage space has been used up, the oldest video in the current recording is automatically overwritten. This ensures that recording is always possible, even when the storage space has actually all been used up.
It may be however that you wish to keep a particular scene and prevent it from being overwritten. To do this, proceed as follows:
During video recording, press the Protect current video button (15).

Note that after the preset time of 3, 5 or 10 minutes, a new video will be recorded which will be treated as loop recording again (in other words open to being overwritten after the defined period of time).
If you set the loop recording to "Off", videos can be recorded until the inserted microSD memory card is full. On the one hand, this guarantees that no existing recordings are overwritten, but on the other hand no new videos can be recorded.
Taking photos
Once you have switched the device on, as described in the "Turning on and selecting the operating mode" section on page 19, and selected photo capture mode, you can take photos with or without the car mount during your journey.
- If you are using the Dashboard Camera without the car mount, aim the Dashboard Camera at the desired subject with the help of the display (13).
- If necessary, select a larger or smaller section of the image (zoom) using the + (18) and - (17) buttons. Press the + (18) button to bring the subject closer or the - button (17) to make the subject appear further away.
- Press the OK button (12) to take the photo.
The image will be saved automatically under a unique name.
During recording, different icons may appear on the display (13) informing you about the current settings.
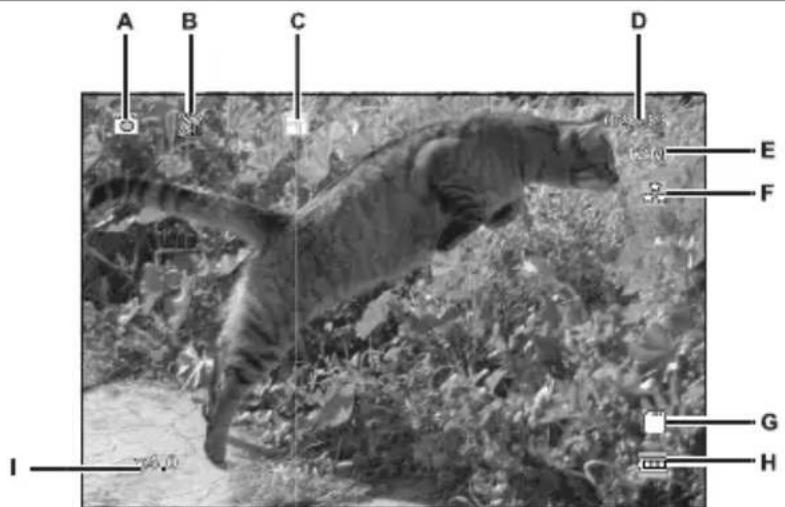
| A | Photo mode indicator | |
| B | Self-timer indicator | |
| C | Continuous shooting indicator | |
| D | 02699 | Remaining number of pictures |
| E | 12M | Resolution: The possible values are 12M, 10M, 8M, 5M, 3M, 2MHD, 1.3M and VGA |
| F | Quality indicator | |
| G | Memory type: : an SD memory card is inserted and recordings are being stored on it. : no SD memory card is inserted. | |
| H | Battery level : battery fully charged : battery 2/3 full : battery 1/3 full : battery almost empty | |
| I | x4.0 | Zoom indicator |
Exposure compensation
You can define an exposure compensation value for photo capture.
- With "Photo" mode selected, press the EV button (10) to bring up the exposure compensation menu.
- Using the + (18) and - (17) buttons, select the desired option and confirm by pressing the OK button (12). While making your selection the preview image on the display (13) will change in real time so that you can quickly see which exposure value is current suitable.
You may choose an exposure value between - 2 and + 2 in 1/3 exposure value increments. If the picture is too bright, select a negative value for exposure compensation. If the picture is too dark, select a positive value for exposure compensation.
Playback
You can play back your recorded videos and photos on the screen to check if the results are satisfactory. The recordings can also be played back on an HDMI-ready television (see also "Viewing recordings on a television" on page 39).
To be able to play back the videos and photos, you must select the "Playback" option in the main menu:
- Power the Dashboard Camera on by pressing and holding the On/Off button (14) for approx. 3 seconds.
- Press the + (18) or - (17) button several times until the "Playback" Menu is displayed.
- Press the OK button (12) to enable Playback mode. The last recorded file (video or photo) will now appear.
- Press the + (18) or - (17) button several times until the recording you wish to play is selected. If the selected recording is a video, the icon will appear at the top left of the screen. If the selected recording is a photo, the icon will appear at the top left of the screen.
- For video files, press the OK button (12) to start playback.
Video playback functions
The following functions are available while playing videos (a toolbar is shown at the bottom of the screen with a guide to the available functions):
Pause: Press the OK button (12) to temporarily pause playback. Press the OK button (12) again to continue playback.
Fast forward/rewind: During playback, press the - button (17) multiple times to rewind the video. Rewind speed will be increased as follows each time the button is pressed: -2x, -4x, -8x. To return to normal playback speed, press the + button (18) as many times as necessary.
During playback, press the + button (18) multiple times to fast forward the video. Playback speed will be increased as follows each time the button is pressed: 2x, 4x, 8x. To return to normal playback speed, press the - button (17) as many times as necessary.
In playback mode you will see further information on the display:
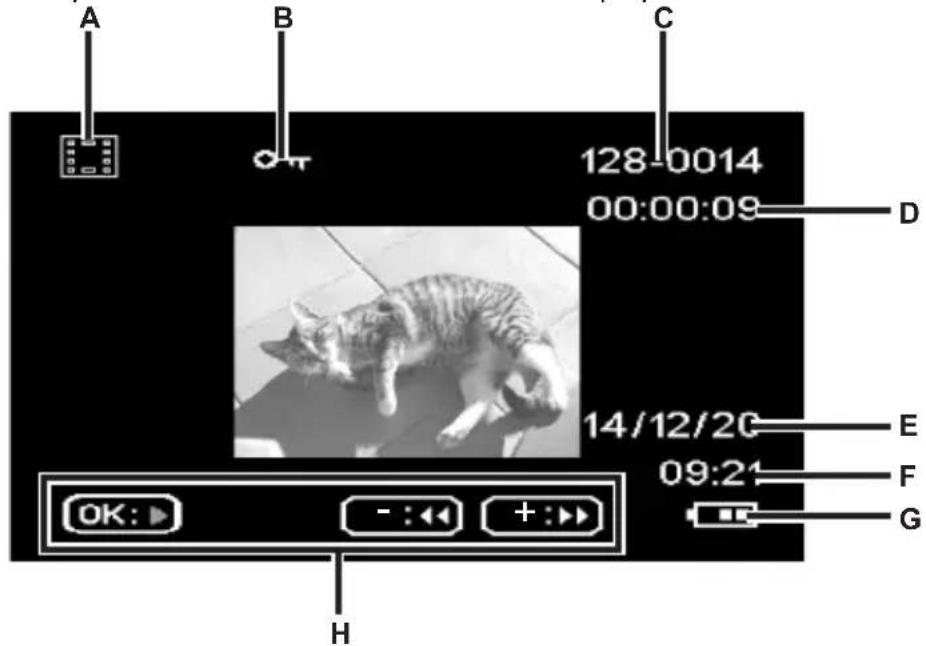
| Symbol | Description | |
| A | Video playback | |
| B | Protected video. This video will not be overwritten during loop recording. | |
| C | 128-0014 | First 3 numbers of the storage folder - sequential number of the recording |
| D | 00:00:08 | Current playback time |
| E | 14/12/20 | Recording date |
| F | 09:21 | Time of the recording |
| G | Battery level : battery fully charged : battery 2/3 full : battery 1/3 full : battery almost empty | |
| H | Help | bar for playback controls |
When video playback is paused, the following functions are available and can be shown via the Menu button (11) and selected using the - (17) and + (18) buttons.
| Delete | This option allows you to delete the video currently being displayed or all saved videos. See also "Delete" on page 37. |
| Protect | Here you can protect one or more videos to prevent accidental deletion or unprotect them. See also "Protect" on page 38. |
| Slide Show | This function allows you to play all captured photos in sequence like a slideshow. To do so, select the desired display time for each image (2, 5 or 8 seconds) in this menu. See also "Slide Show" on page 38. |
Photo playback functions
During photo playback, the following functions are available and can be shown for a displayed image via the Menu button (11) and selected using the + (18) and - (17) buttons.
| Delete | This option allows you to delete the currently displayed image or all saved images. See also "Delete" on page 37. |
| Protect | Here you can protect one or more photos to prevent accidental deletion or unprotect them. See also "Protect" on page 38. |
| Slide Show | This function allows you to play all captured photos in sequence like a slideshow. To do so, select the desired display time for each image (2, 5 or 8 seconds) in this menu. See also "Slide Show" on page 38. |
During photo playback you will see further information on the display:
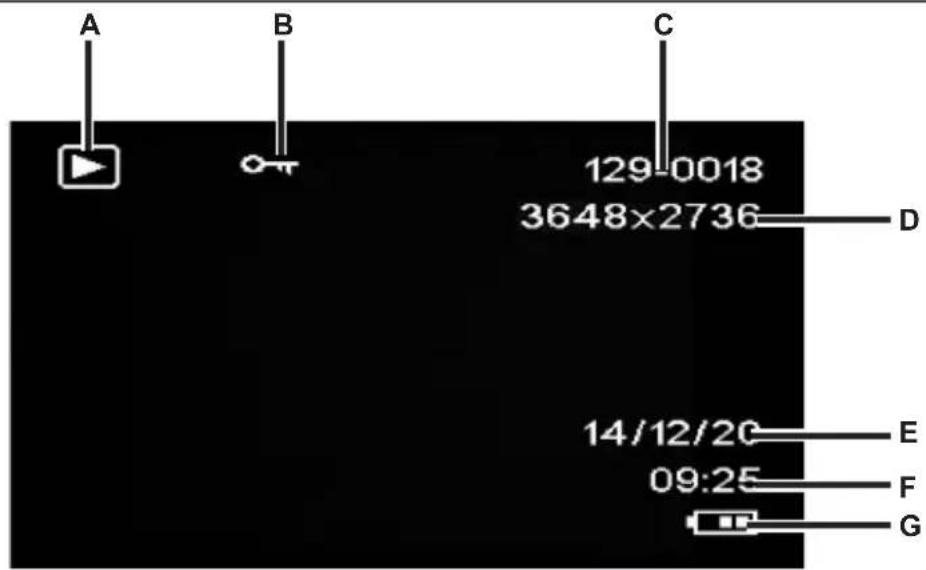
| Symbol | Description | |
| A | Photo playback | |
| B | Protected image. This photo can not be deleted. | |
| C | 129-0018 | First 3 numbers of the storage folder - sequential number of the recording |
| D | 3648x2736 | Resolution |
| E | 14/12/20 | Recording date |
| F | 09:25 Time of the recording | |
| G | Battery level : battery fully charged : battery 2/3 full : battery 1/3 full : battery almost empty | |
Menu
The Dashboard Camera has various menus that provide various settings for the different modes. There is also a setup menu allowing you to set the preferences for your Dashboard Camera.
Main menu
In the main menu you can access the desired recording function, playback function and the Setup menu for your Dashboard Camera. There is also a flashlight function available here so that the Dashboard Camera can be used as a light in the dark.
- Power the Dashboard Camera on by pressing and holding the On/Off button (14) for approx. 3 seconds.
- If the Dashboard Camera is connected to the car charger, press the OK button (12) to stop recording and then the Return button (16) to show the main menu. Otherwise, continue with step 3.
- Press the + (18) or - (17) button several times to select the desired function.
- Press the OK button (12) to enable the selected function.
The available functions are described in the sections below.
Loop recording
Loop recording is a function in which video clips of a certain length (e.g. 5 minutes) are recorded. After that recording time, a new video file is automatically created. As you record videos, the optional microSD memory card fills up. Once the storage space has been used up, the oldest video in the current recording is automatically overwritten. This ensures that recording is always possible, even when the storage space has actually all been used up.
In this mode, you should ensure that any recordings you wish to keep are either protected (see "Protecting videos from being overwritten during loop recording" on page 23) or transferred to a different storage medium (e.g. your PC, see "Transferring recordings to a computer" on page 39).
- Power the Dashboard Camera on by pressing and holding the On/Off button (14) for approx. 3 seconds.
- If the Dashboard Camera is connected using the car charger, press the Return button (16) to display the main menu. Otherwise, continue with step 3.
- Press the + (18) or - (17) button several times to select the "Loop recording" function.
- Press the OK button (12) to enable loop recording.
Photo
In this mode your Dashboard Camera acts like a conventional digital camera that you can take photos with. Further information can be found in the "Photo capture menu" section on page 35 and the "Taking photos" section on page 23.
- Power the Dashboard Camera on by pressing and holding the On/Off button (14) for approx. 3 seconds.
- If the Dashboard Camera is connected using the car charger, press the Return button (16) to display the main menu. Otherwise, continue with step 3.
- Press the + (18) or - (17) button several times to select the "Photo" function.
- Press the OK button (12) to enable the camera function.
Motion Detection
Motion detection is a memory-saving alternative of having videos recorded automatically. This can be useful, e.g. when you have parked your vehicle but still want any parking cars to be filmed in case they dent your number plate with their tow bar while reversing.
Videos recorded via motion detection will be saved in folders named "nnnREVEN" where nnnn is a 4-digit number.
- Power the Dashboard Camera on by pressing and holding the On/Off button (14) for approx. 3 seconds.
- If the Dashboard Camera is connected using the car charger, press the Return button (16) to display the main menu. Otherwise, continue with step 3.
- Press the + (18) or - (17) button several times to select the "Motion Detection" function.
- Press the OK button (12) to enable motion detection.
Playback
You can play back your recorded videos and photos on the screen to check if the results are satisfactory.

You can also play back the recorded videos on a computer or a television. See also "Transferring recordings to a computer" on page 39 and "Viewing recordings on a television" on page 39.
- Power the Dashboard Camera on by pressing and holding the On/Off button (14) for approx. 3 seconds.
-
If the Dashboard Camera is connected using the car charger, press the Return button (16) to display the main menu. Otherwise, continue with step 3.
-
Press the + (18) or - (17) button several times to select the "Playback" function.
- Press the OK button (12) to enable the playback function.
Further information can be found in the "Playback" section on page 25 and in "The playback menus" section on page 37.
FlashLight
Thanks to your Dashboard Camera's 4 white LEDs (8), the device can also be used as a flashlight. How to switch the 4 white LEDs (8) on or off:
- Power the Dashboard Camera on by pressing and holding the On/Off button (14) for approx. 3 seconds.
- If the Dashboard Camera is connected using the car charger, press the Return button (16) to display the main menu. Otherwise, continue with step 3.
- Press the + (18) or - (17) button several times to select the "FlashLight" function.
- Press the OK button (12), select the desired option by pressing the - button (17) and then press the OK button (12) to confirm:
Off: Turns the flashlight function off.
Always Bright: Turns the flashlight function on.
One Second Flash: Turns the flashlight function on. The 4 white LEDs (8) then flash once a second. This mode saves the battery.

If you have enabled the "Auto Power Off" option in the "Setup" menu, the flashlight will also power off after the set time.
Setup
The setup menu contains basic settings for your Dashboard Camera. These include date and time, idle time before automatic shutdown (power-saving function), key press confirmation sound, on-screen menu language, image rotation, formatting function for the inserted SD memory card, factory settings restore and firmware version information.
| Setting | Description |
| Date/Time | Set the date and time (see also "Setting the date/time" on page 19). |
| Auto Power Off | You can set the device to power off automatically after a certain time to save power. If no buttons are pressed during the preset time, the device powers off automatically. The Dashboard Camera can then be switched on again using the On/Off button (14). |
| You can choose between the power-off times of 1 minute, 3 minutes or disable the automatic power-off function. | |
| Beep Sound | Here you can set whether or not the device makes a sound every time you press a button. This option also enables or disables the power-on sound at the same time. |
| Language | Select the desired display menu language (see also "Setting the menu language" on page 18). |
| Frequency | Select the mains frequency to avoid any interference from fluorescent lighting. A mains frequency of 50 Hz is used across Europe; in America the mains uses a frequency of 60 Hz. |
| Image rotation | This function allows you to rotate the image by 180°. |
| Format | This function lets you delete all contents from your memory card (optional accessory) and renew the file saving structure on your card (formatting). Warning! All saved videos and pictures will be erased and cannot be restored. This also applies to protected files. Make sure that all recordings you want to keep have been backed up to a different storage medium. |
| Default Setting | All device parameters will be reset to their factory-default values. This does not erase any data from your memory card. |
| Version | This function displays your Dashboard Camera's current firmware version. You might need this information when contacting customer services for example. |
The recording menus
Video recording menu
The video recording menu allows you to set the different video recording parameters. How to open the video recording menu:
- Power the device on by pressing and holding the On/Off button (14) for approx. 3 seconds.
- By default, the "Loop recording" option appears. Press the OK button (12) to select it or, if the Dashboard Camera is connected to the car charger, wait a few seconds for the "Loop recording" mode to be enabled automatically.
- Press the OK button (12) to stop video recording.
-
Press the Menu button (11) to display the Video Recording menu.
-
Use the - (17) and + (18) buttons to adjust the desired settings (see below) and press OK (12).
- Press the Menu button (11) again to hide the menu.
The following sections contain a description of the different parameters available in the video recording menu.
Resolution
The resolution determines the size of the recording in pixels. As a general rule: the higher the resolution, the more storage space is required.
Your Dashboard Camera supports recording in modern wide-screen format. However, not all of the resolutions available offer a 16:9 aspect ratio. With the 1140 × 1080P , QVGA and VGA settings, the aspect ratio is 4:3.
The following settings are available:
| Resolution | Description |
| QVGA 320x240 Low quality (recommended for Internet applications) | |
| VGA 640x480 VGA screen quality | |
| WVGA 848x480 N normal quality | |
| 1280x720P | Average quality |
| 1440x1080P | High quality |
| 1920x1080P | Very high quality |
Loop recording
The loop recording time can be defined here. After the preset time a new video file will be created.
| Loop recording Description | |
| Off Disables loop recording (i.e. recording stops when the memory card is full and no older files are overwritten). A new video file is automatically created after 10 minutes. To stop the recording, you must press the OK button (12) - recording will not stop automatically after a certain time. | |
| 3 mins. A maximum of 3 minutes will only ever be recorded per video. After that a new video file is created automatically. | |
| 5 mins. A maximum of 5 minutes will only ever be recorded per video. After that a new video file is created automatically. | |
| 10 mins. A maximum of 10 minutes will only ever be recorded per video. After that a new video file is created automatically. |
G-sensor
Your Dashboard Camera features a G-sensor which reacts to vibrations or impacts. If a crash is detected, the Dashboard Camera automatically saves the current video sequence to a folder named "nnnnnEVEN" where nnnn is c 4-digit number. This video sequence is protected automatically. In other words, it will not be overwritten.
You can define the sensitivity of the G-sensor here. Select "Low" for a low sensitivity, "Middle" for an average sensitivity and "High" for a higher sensitivity. Or select "Off" to disable the G-sensor.


Make sure the Dashboard Camera is switched on and already in "Loop recording" mode so that a video of any potential accident scene can be recorded.
Whenever the G-sensor detects an impact, the current video recording is protected. This
is represented by the icon on top of the display (13).
Record Audio
Use this option to define whether or not the video will be recorded with sound or not.
The available options are "On" or "Off".
Date Stamp
Use this option to define whether or not the date and time should be recorded with the video.
The available options are "On" or "Off".
Auto display off
Use this option to define whether the display should be switched off automatically if no buttons are pressed for a certain amount of time.
The available options are "On" or "Off".

If this option is enabled, the display will switch off automatically after approx. 30 seconds. Turn it back on, briefly press the On/Off button (14) again.
LED Light
Enable the LED light to obtain properly exposed recordings even in dark environments. This improves the quality of any night recording s.
The available options are "On" or "Off".
When LED light is enabled, the light will switch on automatically when required (when the ambient light is insufficient).
Photo capture menu
The photo capture menu allows you to set the different still image recording parameters. How to open the photo capture menu:
- Power the device on by pressing and holding the On/Off button (14) for approx. 3 seconds.
- By default, the "Loop recording" option appears. Press the + (18) or - (17) button several times, select the "Photo" menu option and press OK (12) to open it.
- Press the Menu button (11) to open the still image recording menu.
- Use the - (17) and + (18) buttons to adjust the desired settings (see below) and press OK (12).
- Press the Menu button (11) again to hide the menu.
The following sections contain a description of the different parameters available in the still image capture menu.
Capture Mode
This allows you to define whether you wish to capture images with the Dashboard Camera normally or using the self-timer. The delay times of 2 seconds, 5 seconds or 10 seconds are available for the self-timer.
When the self-timer is enabled, the icon will be shown at the top of the display (13) depending on the delay time selected
Resolution
The resolution determines the size of the recording in pixels. As a general rule: the higher the resolution, the more storage space is required. The following settings are available:
| Resolution | Description |
| 12M 4032x3024 Very high quality | |
| 10M 3648x2736 High quality | |
| 8M 3264x2448 Very good quality | |
| 5M 2592x1944 Good quality | |
| 3M 2048x1536 Average quality | |
| 2MHD 1920x1080 PC widescreen quality | |
| 1.3M 1280x960 Low quality | |
| VGA 640x480 VGA screen quality | |
Sequence
When this function is enabled ("On" option), you can press the OK button (12) while capturing images to take 5 consecutive photos. Alternatively, select "Off" to only ever take a single image.
Quality
The Quality setting determines the compression ratio of the captured image when saved onto the memory card. The higher the compression, the more pictures can be stored.
You can capture images using the quality presets Economy, Normal and High. Select the appropriate option. The selected setting will be shown on the right of the display (13) as follows during capture:
| Quality | Description |
| Fine | |
| Normal | |
| Economy |
Quick Review
Quick Review allows you to check that capture was successful immediately after capturing a still image. When you enable the function the captured image will be shown on the display (13) for 2 or 5 seconds depending on the set value. Alternatively, select "Off" to return to the live view immediately after capture.
Date Stamp
This function allows you to mark each image with the current date. The following settings are available:
| Setting | Description |
| Off Images will not be given a date stamp. | |
| Date Images will be marked with the current date. | |
| Date/Time Images will be marked with the current date and time. | |
The playback menus
The following sections contain a description of the different parameters available in the playback menu. In addition to display options, it also contains functions to protect and delete your videos and still images.
- Power the Dashboard Camera on by pressing and holding the On/Off button (14) for approx. 3 seconds.
- Press the + (18) or - (17) button several times until the "Playback" Menu is displayed.
- Press the OK button (12) to enable playback mode. The last recorded file (video or photo) will now appear.
- Press the + (18) or - (17) button several times until the recording you wish to play is selected. If the selected recording is a video, the icon will appear at the top left of the screen. If the selected recording is a photo, the icon will appear at the top left of the screen.
- Press the Menu button (11) to show the playback menu.
- Press the + (18) or - (17) button several times to select the desired function and press the OK button (12) to execute it or display the available options.
The available options are described in the sections below.

The options in the playback menu are virtually identical for both videos and still images. To open the menu for videos, playback must be stopped (do not start video playback).
Delete
This option allows you to delete the currently displayed video or image or all saved videos and images.
- Perform steps 1 to 5 under "The playback menus" (see page 37).
- Press the + (18) or - (17) button several times to select the "Delete" function and press the OK button (12) to display the available options.
Delete Current: Use this option to delete the currently selected video or still image. After selecting this option, confirm with the OK button (12). A safety prompt appears. Select the "OK" option and confirm the deletion by pressing the OK button (12).
Delete All: Use this option to delete all saved videos and still images at once. After selecting this option, confirm with the OK button (12). A safety prompt appears. Select the "OK" option and confirm the deletion by pressing the OK button (12).

Protected recordings can not be deleted with this function. See also the "Protect" section below.
Protect
Here you can protect one or more videos and still images to prevent accidental deletion or unprotect them.

By default, all new still images are protected.
- Perform steps 1 to 5 under "The playback menus" (see page 37).
- Press the + (18) or - (17) button several times to select the "Protect" function and press the OK button (12) to display the available options.
Lock Current: Use this option to protect the currently selected video or still image. Confirm by pressing the OK button (12).
Unlock Current: Use this option to unprotect the currently selected video or still image. Confirm by pressing the OK button (12).
Lock All: Use this option to protect all captured videos and still images. Confirm by pressing the OK button (12).
Unlock All: Use this option to unprotect all captured videos and still images. Confirm by pressing the OK button (12).
Slide Show
This function allows you to play all captured still images in sequence, and in a loop, like a slideshow. This is particularly useful for being able to view all of your still images as a presentation when you have connected the Dashboard Camera to a television (see the section below).
- Perform steps 1 to 5 under "The playback menus" (see page 37).
- Press the + (18) or - (17) button several times to select the "Slide Show" function and press the OK button (12) to display the available options.
- Press the + (18) or - (17) button several times to select the desired display time for the individual images (2, 5 or 8 seconds). Confirm by pressing the OK button (12).
The slide show will now start.
- Press the OK button (12) to stop the slide show.
Connectors and sockets
Viewing recordings on a television
Any recordings that you can view on the Dashboard Camera display can also be played on a normal television. The television set needs to have an appropriate HDMI input.
A HDMI cable with a mini-HDMI connector (not supplied) will also be required. The HDMI cable provides digital images and sound and therefore optimum quality. The HDMI output (3) can be found under the protective cover (4).

While the Dashboard Camera is connected to the TV via the HDMI cable, video recording and still image capture are not available. It is only possible to play already-recorded content.
Simply operate the device as usual. For instance, enable Slide Show to have all images displayed automatically (see also "Slide Show" on page 38).
Connecting the HDMI cable
- Please make sure that the Dashboard Camera is powered off.
- Open the protective cover (4) and insert the small end of the optional HDMI cable into the HDMI output (3) on the Dashboard Camera (see also "Overview" on page 12).
- Plug the larger connector of the HDMI cable into the HDMI receptacle of your TV set.
- Select the HDMI signal source corresponding to the above input connectors on your TV set. If necessary, read the User Manual of your TV set for more information on how to do this.
- Switch on the Dashboard Camera using the On/Off button (14). The device display remains off while the picture will be shown on the TV screen.
Further information can be found in the "Playback" section on page 25 and in "The playback menus" section on page 37.
Transferring recordings to a computer
There are two ways of copying recordings from the Dashboard Camera to a computer.
- by connecting the device to a computer via the USB cable
- by inserting the SD memory card into a card reader.
Connecting the Dashboard Camera to a Computer
- Use the USB cable supplied to connect the Dashboard Camera to a USB port on your computer. To do so, insert the small plug of the supplied USB cable into the USB/charge port (5) of your Dashboard Camera and the large plug into a USB port on your computer.
- The Dashboard Camera will then turn on automatically and you will be asked to select either "Mass Storage" or "PC Camera" mode.
- Press the + (18) or - (17) button several times to select the "Mass Storage" function and press the OK button (12).
The computer will now set up a removable disk that can be used to access your recordings.

When connecting to the PC via the USB cable, the content of the SD memory card will be read-only. This means you will not be able to delete, rename or write to any files on the Dashboard Camera from the PC. It is only possible to play previously recorded content.
Using a card reader
If your computer has a card reader which is compatible with microSD or SD memory cards, you can read the contents of the memory card directly. To do so, remove the memory card from the Dashboard Camera while it is switched off.
- Insert the microSD card directly into the microSD card reader or into the SD card adapter.
- If you are using the SD card adapter, insert it into the SD card reader on your computer (normally labelled SD/MMC).
- The PC will add the memory card contents under the drive letter representing the card reader in My Computer.
- Open My Computer on your PC and double-click on the drive representing the card reader.
- All recorded files can be found in various folders on this disk drive.
- Now you can copy the recorded files from the memory card into a folder of your choice on the computer's hard disk.
Encoding videos for iOS
- Copy the desired video file to your Apple computer. To do this, proceed as described in the previous sections.
- Open the video file context menu and select "Encode Selected Video Files".
- In the menu that appears, click "Continue".
A new video file appears on the desktop.
- Next drag this video file into the "Movies" category of iTunes.
Now the video file is available in the Library under "Home Videos" and can be synchronised from here with an iOS device.
Replacing the car charger fuse
When the 12/24V car charger is connected but the LED indicator of the 12/24V car charger
(28) does not light up, the fuse might be defective.

WARNING! If you need to replace the fuse make sure to use a fuse of the same type (T2A L, 250 V).
To replace the fuse, proceed as follows:
-
Rotate the screw cap (d) counterclockwise and remove it from the cigarette lighter plug housing (a). If necessary, use pliers.
-
Replace the fuse (b) with a new T2A L, 250 V type fuse. You can purchase a suitable fuse from any electronics retail outlet.
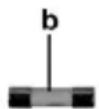
- First insert the fuse (b) into the cigarette lighter plug housing (a).
- Insert the metal contact (c) into the screw cap (d).
- Next, insert the screw cap (d) with the inserted metal contact (c) over the fuse (b) and then screw the cap (d) clockwise onto the cigarette lighter plug housing (a).
Troubleshooting
You can solve most common problems yourself using the table below. If the problem persists after checking the suggested solutions, please contact our Service Hotline (see page 44). Do not attempt to repair the product yourself. Do not open the housing of the Dashboard Camera or of the car charger as they contain no serviceable parts.
| Error | Solution |
| Unable to power the Dashboard Camera on. | The battery is empty. Recharge the battery. |
| The Dashboard Camera suddenly powers off. | The battery is empty. Recharge the battery. |
| Auto Power Off is enabled. Check the setting (see page 31). | |
| The Dashboard Camera fails to respond and cannot be switched off. | Press the Reset switch (1). To do so, open the protective cover (4) and slide the Reset switch (1) to the opposite location using a pointed object. Wait for a few seconds and then slide the Reset switch (1) back to the original position. The Dashboard Camera should then work as normal again. |
| The recordings show stains or shadows. | Clean the Dashboard Camera lens with a soft, dry, lint-free cloth. Do not use any detergents or chemicals. |
| The "SD CLASS6" message is displayed. | The inserted microSD memory card must support at least Speed Class 6. If necessary, insert a faster microSD memory card. |
After use
Storage when not using the product for a longer time
If you won't be using the Dashboard Camera for a longer time, store it at c place that meets the following environmental conditions:
Storage temperature: -10 to 55^
Storage relative humidity: Max. 85%
Please remember that these values may be exceeded inside a car. Therefore it is recommended to store the Dashboard Ca mera in a dry and dust-free room at home.
If you do not use your Dashboard Camera for an extended period, recharge the battery regularly anyway (at least once a month).
Repairs
Repairs are required when the device or its housing has been damaged in any way, for example, when liquids or objects have entered the product, where product does not work normally or when the product has been dropped. If smoke, unusual noises or smells are noticed, power of the device immediately and disconnect all cables. If this occurs, do not continue to use the device and have it checked out by an expert. All repairs must be carried out by qualified service personnel.
Cleaning
- Usea soft, lint-free clth for cleaning.
- Do not use any cleaners, detergents or solvents, as these may enter the housing and cause permanent damage to the product.
Conformity notes

This device complies with the basic and other relevant requirements of EMC Directive 2004/108/EC and the RoHs Directive 2011/65/EU. The corresponding Declaration of Conformity can be found at the end of this User Manual.
Environmental regulations and disposal information


Devices marked with this symbol are subject to the European Directive 2012/19/EU. All electrical and electronic devices must be disposed of separately from household waste at official disposal centres.
Avoid hazards to the environment and dangers to your personal health by disposing of the device properly. For further information about proper disposal, contact your local government, disposal bodies or the shop where you bought the device.
Dispose of all packaging in an environmentally friendly manner. Cardboard packaging can be taken to paper recycling centres or public collection points for recycling. Any film or plastic contained in the packaging should be taken to your public collection points for disposal.
The built-in rechargeable battery cannot be removed for disposal.
Warranty and Service Information
This device is sold with three years warranty from the date of purchase. Please keep the original receipt in a safe place as proof of purchase. Before using your product for the first time, please read the enclosed documentation. Should any problems arise which cannot be solved in this way, please call our hotline. Please have the article number and, if available, the serial number to hand for all enquiries. If it is not possible to solve the problem on the phone, our hotline support staff will initiate further servicing procedures depending on the fault. Within the warranty period the product will be repaired or replaced free of charge as we deem appropriate. No new warranty period commences if the product is repaired or replaced. Consumables such as batteries, rechargeable batteries and lamps are not covered by the warranty.
Your statutory rights towards the seller are not affected or restricted by this warranty.

Service

Phone: 0207-3650744
E-Mail: service.GB@targa-online.com

Phone: 01-2421583
E-Mail: service.IE@targa-online.com

Phone: 800-62175
E-Mail: service.MT@targa-online.com

Phone: 800-92496
E-Mail: service.CY@targa-online.com
IAN:106751

Manufacturer
TARGA
GmbH
Coesterweg 45
59494 SOEST
GERMANY
Table des matieres
Table des matieres 47
Marques commerciales 50
Introduction 50
WAARSCHUWING! Kabels
EU Declaration of Conformity
Address:
Targa GmbH
Coesterweg 45
59494 Soest, Germany
Product:
Dash Cam
Model:
CR 1.0 A1
Identification number:
IAN 106751
The product complies with the requirements of the following European directives:
2004/108/EC
Electromagnetic Compatibility
2011/65/EU
Restriction of the use of certain hazardous
substances in electrical and electronic equipment
Compliance was proved by the application of the following standards:
EMC:
EN 55022:2010 + AC:2011 Class B
EN55024:2010
EN50498:2010
Rohs:
EN50581:2012
Year of CE marking:
2015
Soest. 24.03.2015

Matthias Klauke, Managing Director

- DASHBOARD CAMERA CR 1.0 A1
- CR 1.0 A1
- Turning on and selecting the operating mode 19
- Recording videos 20
- Taking photos 23
- Playback 25
- 29
- Connectors and sockets 39
- Trademarks
- Introduction
- Intended use
- Package Contents
- Technical specifications
- Dashboard Camera
- Car charger
- Safety instructions
- Explanation of symbols
- WARNING! Always make sure that
- DANGER! Children and persons with disabilities
- DANGER! Risk of suffocation!
- Warning! Recordings (Photo/Video) of persons and the right to one's own image
- DANGER! Using on the road
- DANGER! Installation / Use in the Car
- DANGER! Battery
- DANGER! Risk of Explosion
- DANGER! Screen
- WARNING! Cables
- Copyright
- Overview
- Left side
- Right side
- Front
- Top
- Back
- Bottom
- Controls and displays
- Before you start
- Inserting/removing the memory card
- Car mount
- Charging the battery
- Charging the battery with a USB cable
- Charging with the car charger
- Getting started
- Turning on the Dashboard Camera
- Turning off the Dashboard Camera
- Setting the menu language
- Setting the date / time
- Turning on and selecting the operating mode
- Dashboard Camera is not being charged
- Dashboard Camera is connected to a PC with a USB cable
- Dashboard Camera is connected with the car charger
- Recording videos
- Video light
- Exposure compensation
- Protecting videos from being overwritten during loop recording
- Taking photos
- Playback
- Video playback functions
- Photo playback functions
- Menu
- Main menu
- Loop recording
- Photo
- Motion Detection
- FlashLight
- Setup
- The recording menus
- Video recording menu
- Resolution
- G-sensor
- Record Audio
- Date Stamp
- Auto display off
- LED Light
- Photo capture menu
- Capture Mode
- Sequence
- Quality
- Quick Review
- The playback menus
- Delete
- Protect
- Slide Show
- Connectors and sockets
- Viewing recordings on a television
- Connecting the HDMI cable
- Transferring recordings to a computer
- Connecting the Dashboard Camera to a Computer
- Using a card reader
- Encoding videos for iOS
- Replacing the car charger fuse
- Troubleshooting
- After use
- Storage when not using the product for a longer time
- Repairs
- Cleaning
- Conformity notes
- Environmental regulations and disposal information
- Warranty and Service Information
- Service
- Manufacturer
- Table des matieres
- WAARSCHUWING! Kabels
- EU Declaration of Conformity
Brand : TARGA
Model : CR 1.0A1
Category : Dashcam