EAP450 - Air purifier ELECTROLUX - Free user manual and instructions
Find the device manual for free EAP450 ELECTROLUX in PDF.
User questions about EAP450 ELECTROLUX
0 question about this device. Answer the ones you know or ask your own.
Ask a new question about this device
Download the instructions for your Air purifier in PDF format for free! Find your manual EAP450 - ELECTROLUX and take your electronic device back in hand. On this page are published all the documents necessary for the use of your device. EAP450 by ELECTROLUX.
USER MANUAL EAP450 ELECTROLUX
Oxygen™ Air Purifier
EAP150, EAP300
EAP450
BG BPOUYPAC NHCTPYKLIMCS PRIRUCKA KPOUZITDA VEJLEDNINGDE ANLEITUNGEE KASUTUSJUHENDEN INSTRUCTION BOOKES LIBRO DE INSTRUCCIONESFI OHJEKIRJAFR MODE D'EMPLOIHR KNJIZICA S UPUTAMA
HU HASZNALATI UTMUTATO IT ISTRUZIONI LT INSTRUKCIJU KNYGA LV LIETOSANAS INSTRUKCIJA NL GEBRUIKSAANWIJZING NO BRUKSANVISNING PL INSTRUKCJA OBSLUGI PT MANUAL DE INSTRUÇOES RO MANUAL DE INSTRUCTIONSI RU HICTPYKLIMA
SK NAVOD NA POUZIVANIE
SL NAVODILA
SR UPUTSTVO
SV BRUKSANVISING
TR EL KITABI
UK ПОСIBИК KОРЦТУBAHA

CONTENTS
БылгAPСКИ 8
CESTINA 14
DANSK. 20
DEUTSCH 26
EESTI. 32
ENGLISH 38
ESPANOL 44
SUOMI 50
FRANCAIS. 56
HRVATSKI 62
MAGYAR. 68
ITALIANO 74
LIETUVISKAI. 80
LATVIESU 86
NEDERLANDS 92
NORSK 98
POLSKI 104
PORTUGUES 110
ROMANA 116
PYCCKN 122
SLOVENCINA 128
SLOVENsCINA 134
SRPSKI 140
SVENSKA 146
TYRKCE 152
YKPAIHcbKA 158
WE'RE THINKING OF YOU
Thank you for purchasing an Electrolux appliance. You've chosen a product that brings with it decades of professional experience and innovation. Ingenious and stylish, it has been designed with you in mind. So whenever you use it, you can be safe in the knowledge that you'll get great results every time.
Welcome to Electrolux.
Visit our website to:

Get usage advice, brochures, trouble shooter, service information:
www.electrolux.com

Register your product for better service:
www.electrolux.com/productregistration

Buy Accessories and Consumables for your appliance:
www.electrolux.com/shop
CUSTOMER CARE AND SERVICE
When contacting Service, ensure that you have the following data available.
The information can be found on the rating plate. Model, PNC, Serial Number.

Warning / Caution-Safety information

General information and tips

Environmental information
Subject to change without notice.
EAP150


EAP300
EAP450
EAP150
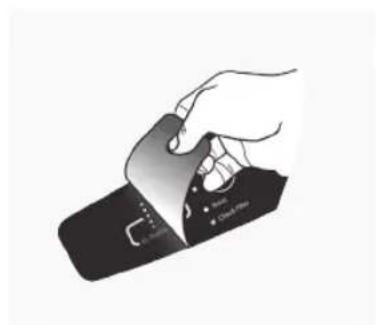
fig.1
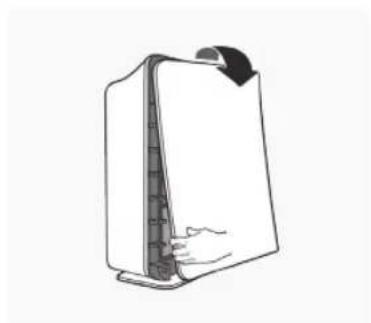
fig.2
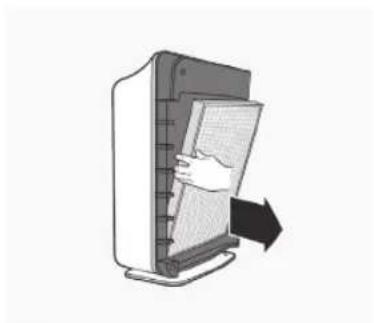
fig.3A
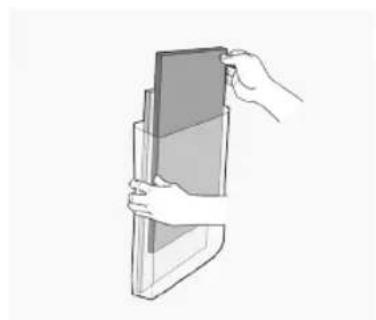
fig.3B
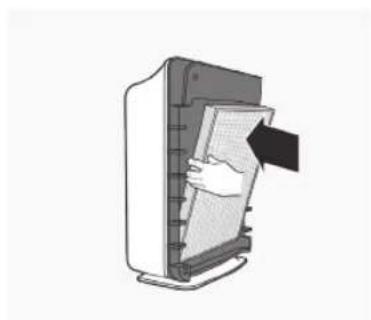
fig.4

fig.5

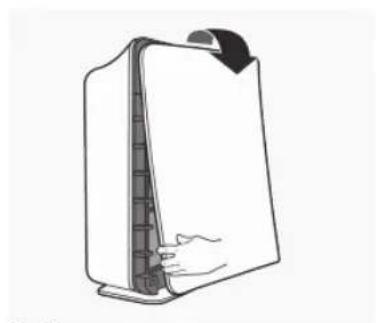
fig.8
EAP300
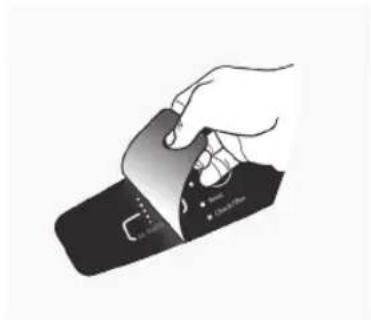
fig.1
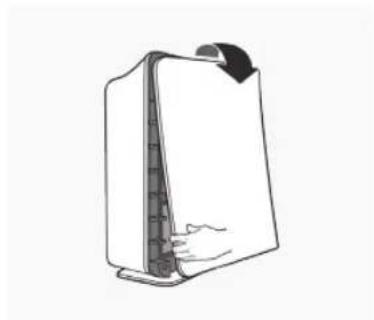
fig.2
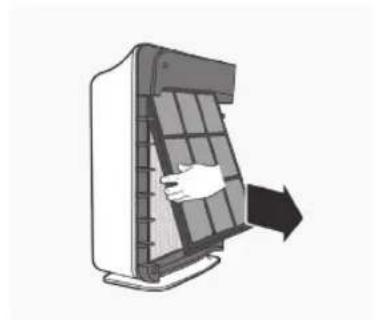
fig.3A
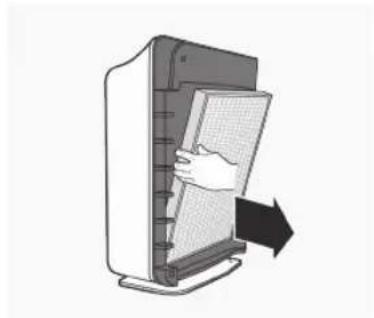
fig.3B
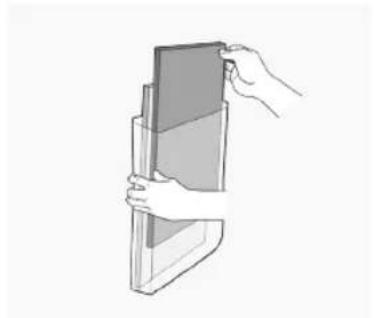
fig.3C
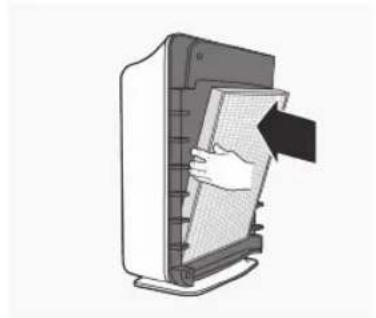
fig.4

fig.5A fig.5A
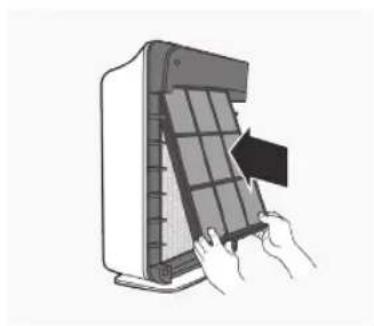

fig.8

EAP450
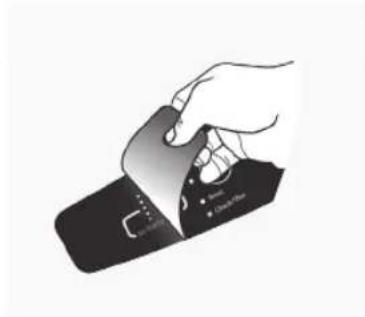
fig.1
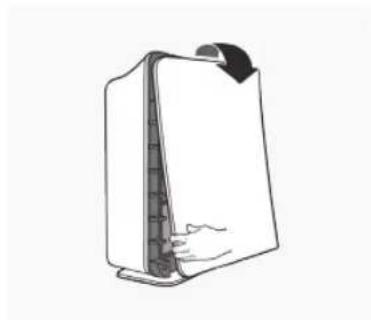
fig.2
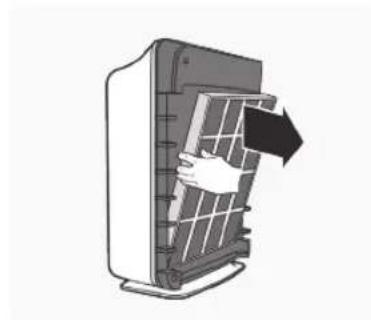
fig.3A
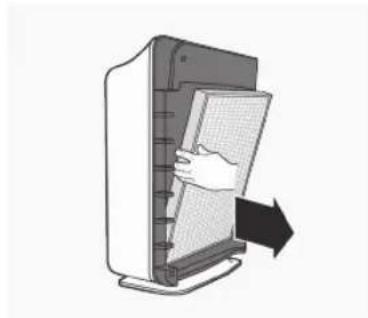
fig.3B
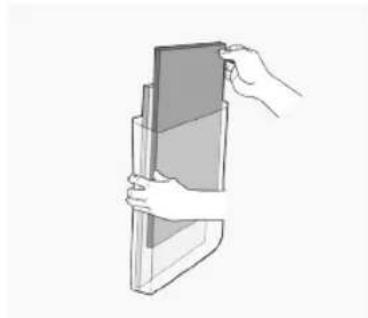
fig.3C
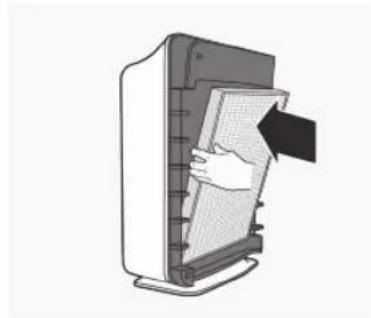
fig.4A
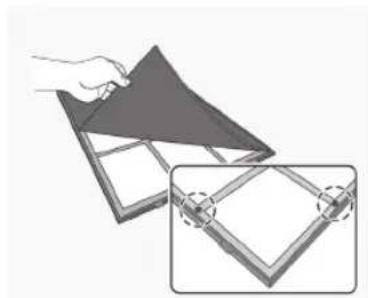
fig.4B fig.4C
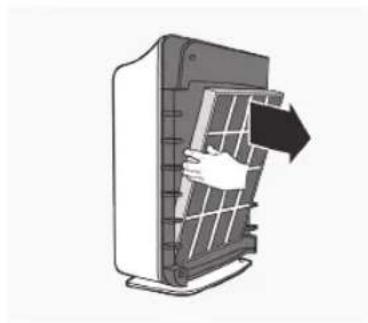
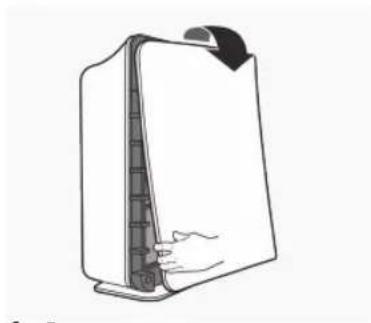
fig.5

CbBET 3A BE3OJNACHOCT
IpochyTe cIeHNHe IHCTpyKcHn BHNMaTeJHo, npedn da n3no3BaTe MaunHaTa 3a NbpBn nbT.
- DeçaTa He Tpǎ6Ba Da cN iRpaTc ypeDa.
-Почиствано И подрьжkaТа He ТразБа Да ce n3ВьршВаТ OT Deца,aco He ca noД Ha6ЛюDEнe.
To3n ypeJ moKe Ja 6bJe n3noJ3BaH OT deca Ha8 roJnHa Bb3paCT, KaKTO n IINuCa C HamaJIeHN n3nueCKN, CeTINBHN uYMCTBeHN Bb3MOXHOCTn IIN IINuCa 6e3 ONIT N IO3HaHnA, cAmO aKO Te ca IoJ Ha6JIIOJEHne IIN 6bDaT INHCTpyKTupAHN OTHOCHO 6e3OnaChaTa yNoTpe6a Ha ypeJa N Bb3MOXHnTe pNCKOBe. - Upei bT MoKe Ia 6bIe CbIp3aH cAmO KbM 3aXpaHBaHe, uNeTo HAnpeXeHne IuYeCTOTA OTROBApT Ha CneUΦnKaunTe Ha TaBeJkata C daHHN.
- Ako ypeT nIIN 3axpaHbauNT ka6e e nobpeDeH, ToI Tp8Ba da ce CMeHn OT npOn3BOdntel, HerOBnC cepBn3eH aReHT nIIN Iuca Cbc CXoHa KBaIINΦkau, 3a Da ce n36erHe onaCHOCT.
He notanayte ypea BbB BOa nn npyra TeuHOCT.
To3n ypeE npedHa3HaueH cMo 3a DomaunHO nOJ3BaHe. Ipon3BODInTeJIrT He Hocn OTROBOPHOCT 3a NOBpeDN B pe3yIITaT Ha HenpaBnHa yNoTpe6a.
He n3noJ3BaIe ypeHa OTKpIto IIN Bbpxy MOKpn NOBbpXHOCTn.
He nbpnaTe n He npenacayte ypea qpe3 herobn Ka6eI, He n3no13BaIte Ka6eNa KaTO dpbXka, He 3aTbapraIte BpaTInTe Bbpxu Ka6eNa n He ro nbpnaTe no ocTp n pb6oBe nnn brrn. DpbXte Ka6eNa daJeU OT HaOpeueHn NOBbpxHOCTn.
He noctabraIte npedmetn B OTbOpnte. He n3noJI3BaIte ypeJa, aKO HAKOJOT OTBOpHTe e 3aNyweH; Na3eTe OT npax, Mbx, KOCMNOT BCNUKOKoTo 6n MoTIO Da HaMaJI N Bb3DyUHnI NOTOK.
He n3no13BaIte ypeDa, aKO fIITpuTe He ca Ha MrcTo. - CbxaHЯBaIte ypeHa Ha 3aKpITo, cyXo I npOxlaIHO MЯCTO.
He n3noI3BaIte ypeDa BbB BlaJxH MeCTa,Ha npImep B 6aHra. Ako B IpeuNCTBaTeIaT Ha Bb3dUx IOnaIHe TeUHOCT, Ro I3KJIIOUeTe N Iro IpeaIte 3a IperIeD OT OToPn3IpaH cepBn3eH ueHTbp Ha Electrolux.
He n3noI3BaIte ypea B 6nI3OCT Do 3anaIIMn ra3OBe.
He nocTabraIte InpeKTHO NOJ DeTeKTOP 3a DNIM, TbN KaTO TOBa MOKe Da HamaJIu ChyBCTBUNHOCTTa Ha DeTeKTOPa.
He nocTaBraIte npEaMeTn Bbpxu nn Bypea.
He 6nokupaTe peweTknTe
He n3KlIOUBaIte 3axpaHbAunKa6eI npEi npueiCTBaTeIaT Ha Bb3dYx Da ce e OxlaAnl.
He noctabray Te npueinCTBaTeYnHa Bb3nyx B 6nn3OCT Do OTOnnIteH ypei.
He n3noJ3BaIe Te npenapat 3a nouchTbaHe Ha ypeHa.
He mnte n He n3noJ3BaIte NOBTOpHo fUITbpa HEPA 13 nn BByrIepoHnI ppe-phiNTbp, (EAP150,EAP300).
XbaHeTe npbKkata Ha Tbp6a Ha ypeHa, 3a da ro npeneCeTe. He ro XBaauTe 3a npednnaHn.
KOMNOHEHTN

EAP150
A. Ппederн панел
B. BbIpeoH npe-ΦnITbp (O6pa6oTeH c aHTn6aKTepeNaHNOkPNTne)
C. ΦπrtpHEPA 13
D. ochobeh Kopnyc
E. I3xOa 3a Bb3duyx
F. Komahdno Ta6nO

EAP300
A. Празден панел
B. PAmKa 3a ΦnTbp
C. BbrrpeoH npe-phiTbp (o6pa6oTeH c aHTn6aKTepeNaIHO nokpntne)
D. ΦηιΤθρ HEPA 13
E. OCHOBEH KOPNYC
XAPAKTEPNUKU

EAP150
BnmaHne: crno6eTe n3qAno Bb3dyuHnHnΦnTbp npEynOTope6a (BX. HactpoiKa Ha npeuNCTBaTeNa Ha Bb3dyx) 3a6enexka: XapaKTePncNTKe BapnP aT B 3aBcMocT ot Moena.
Tnx pexum Ha pa6oTa
C Tpncckopoccten BEHTnntatop B Tnx pexm Ha pa6ota, npeaneh 3a pa6ota npes HooTa.
Cen3op 3a KaueCTBOTO Ha Bb3dyxa
IpoektnpaH c6 ceH3Op 3a KaueCTBOTo Ha Bb3dyxa, KOIT OTKPnBa HAnuNeTo Ha pa3nnuHn 3AmbpcnteNn BBBb3dyxa.

EAP300,EAP450
BHHaHHe: crNo6Te u3zAno Bb3DyHnHnΦnTbp npeDnyoTpe6a (Bx. HacToPoiKa Ha npueNCTBaTeNa HA Bb3DyX) 3a6eJekka: XapakTePncTKite BapnP aB3aBcUmocT oMogena.
Tnx pexmHa pa6oTa
CteHnckOpocTeH BeHTnIaTOp B Tnx pexmHa pa6oTa, ndeJeH 3a pa6ota Ppe3 Ho7a.
PlasmaWave moxe da ce n3Kn. n BkI. c HATnCKaHe Ha 6yToH "AyoTo" 3a 3eKynHd
Cen3op 3a KaueCTBOTo Ha Bb3dYxa
Ipoektnpancbcceh30paKauecTBOToHaBb3dyxa,KoITOnOTKpNBAHauNHTOHa pa3nHHa 3aMbpcNTENbBb3dyxa.YpeBbA BtAMToMaTHUyBeJIuNAbaCKOpOCTTaHaBeHTINAtopa,3aNoCTBaHe HaNo-TOJmO6eMToBb3dyxN3a6bp3o npemXbaHe Ha npimecite.
light sensor* (cBeTINHEn ceH3Op)
BrpaedHnT CBeTIINHeCeHOp DoJIaB KOrA B CTaIa e TbMHO, ABTomATuHNO 3aTbMHBa CBeTIINHTe Ha KOMAHDHTO TaNo I NOHNKaba
CKOPoCTTHa BHeHTnAToP a3 TaTHa n EheprnH0 eEeKTHBnPa6Ota. Ako CTaTa 6bDe 3aTbMHeHa, BEHTnAToPbT He yBeJIuYBa CKoPcTTa He3aBNCmO OT TOBA, KOeTO 3acNuCaHE3OpbT 3a KaHeCTBO Ha Bb3DyXa.
Automatic air cleaning (A B T O M A T N U H O N O U N C T B A H e H a B 3 D y x a)
Cen30p8b3a MiPnIMn 3a3uHa KOnJIeCTBTO Ha pIIMecH BvB Bb3Dyxa N ABTomATNu HOctPoBa CbOTBeTHa cKOpOCT Ha BEHTNAtOPa, 3a Da NODbPka Bb3Dyxa UcT.
F. BeHTnatop PlasmaWaveTM
G. 13xOД 3a Bb3dIyX
H. KomaHDoTa6No

EAP450
A. Прeden nahen
B. Φπιβρητα καετας έντουσιος Κλεδημίνητε γακτή:
B1.Mneue ce aHTn6akTepnaen npe-phiTbp
B2. Mneu ce qnTbp HEPA 13
B3. Pamka 3a Фнтbp
B4.Mneu ce BbIepoedH qnTbp
D. ochobenkopnyc
F. BeHTnIaTop PlasmaWaveTM
G. V3xOД 3a Bb3dUx
H. Komaнда табло
EAP150
3-cteneHHoΦnItpupahe*
BbIepoHnI ppe-phiNtbp c6bnpa rOlenm qactn, KaTO hAnpIMep npax,
Ko3nHa OT domaunn IIO6mUnn mBx. ToI abcopbna ra3OBe,
PnUINHRAuHN MmPn3Mn, Kato HApnpMEp O TcIrapeH dMM,
pa3naIae Ha opraHUNBEWeecCTBa n RotBeHe, KaTO eΦeKTHBO
HOHNKABA pa3BNTneHo BA6kTePNn I Rb6MKn.
3a MaKcImaNHa PpON3BODInTENoCT, CMeHnTfe PhITbPa Ha
BCEKN 3 MeceCa. AHTNbAekTpANHOTo NOKPNTne CleancelTM
PpeOpBpTaBA pa3BNTneTo Ha MhKnPooprHn3Mn.
PhITbPbT HEPA 13 ynab8 99.99% oT qactnnte n pnpMeCnte
c RoEEMHa 0.3 MknPOHa, BKNIOHTeNo DMM, npax, ZbETeH
npaewn npdyn anepreHn. CMeHete PhITbPa, KORATO CBETHe
HHNKATOPbT CHECK FILTER.

EAP300
eAp300 4-cteneHNO fHnTpnpaHe*
BbIepoHnI npE-PhIbIbP cb6bpa rOJIeMn qaCTN, KaTO
HapIMepe npax,
Ko3Ha oT domaHn IIO6mUu nMbX. ToI a6cop6pa ra3Obe,
PiuHnBaau MMn3Mn, Kato HApIMep oT uRapeHdMn,
pa3naIarHe Ha opraHnHBeWeecTBa n RotBeHe, KaTO eFKeTNBHO
NoHNkAba pa3BHTneTo Ha 6akTePNn rB6uKn.
3a MaKcMaJHa pOniMoBDUteNocT, CMeHNe TfeuTbpA Ha
BceKs 3 MeceA. AnTHbAcTePNaHNO To NKpTNHe CleancelTM
PpeDtBPaTaBA p3BNTneTo Ha MInKOpRaHn3Mn.
ΦHnTpBpBT HEPA 13 yNaBra 99.99% ot qactNtne T n pImecnte
C roJeMnHa 0.3 MInKpOHa, BkInouHTeNHO dMn, npax, cBETeH
Pnpaeu andpyr anepreHH. CmeHete fHnTpba, kORATO CBETHe
HHdkaTOpBT CHECK FILTER. TexHoNOrnTa PlasmaWaveTM
3nONl3Ba NonoJxTeHNn n OTPnuATeHN HoHH
3a PpeMaxBaHe Ha Bb3dyUHn 3AmbpcNTeHN, BkInouHTeHNo npax,
dMn, cBETeH npaleuKaKTo n aIepreHH.

EAP450
5-CTeHnO ΦmTpupaHe*
MneuT ce aHTnbakTePnaEn npe-ΦnITbP yDblKaBa XnBOTa Ha BaUNA
fHnTbp Cpye3 ynaBHeHa Ko3HnOa OT Dmua HnIO6bMnI N0rolem Bb3dyuHn YacTnU, yneChraBn KnoNCTBaHETo HaDoma.AntmbakTePnHTo NOKpnte CleancTe npedotbpaTaBA3nttMe To MmKPOoPRaHn3Mn. MmeuTce FhInTbp HEPA13 ynaB99.99%OT acTnUte n pnpMeCte, c rolemHa 0.3MINKPOHa, BKNIOHTENHO dIM, npax, ZBeTeH npaWeu n dpYrAnepreHn. MneuTce BbIpeOeH fHnTbp, cneuaHNOfOpymunpa3aYnaBHe Ha HnepnTHn MmN3MnOT DmuaHnTE IIO6bMn; KaKTO n OT dMM, roTBeHe n dpyrM MmN3Mn OT DmuaKHCTBOTo, KOETO eFekTNBHO peDuypa pa3BNTMETo HA bAkeTpnn I r6b4Kn.TexHoNOrtna PlasmaWaveTM n3NoL3Ba NoIooKtTeHNn O npTuateHn HoHn 3a npemaxBaHe Ha Bb3duHn3aMpcnte, BKNIOHTenHO npax, dMM, zBeTeH npauek KaTOn anepreHn.
KOMAHIO TABIO

EAP150
G. AIR QUALITY SENSOR (Cen3op 3a KaueCTBoto Ha Bb3dyxa): ABTomatNUHO CJEIN HNBOTO HA KaueCTBOTO Ha Bb3dyxa.
H. Reset (Hynpahe): Hynipa lamnukka Ta Ha nHdkaTopa "Check Filter" (npobepka Ha nTba).
I. Hndkatop Check filter (npobepka Ha qntbpa): CnHann 3a CMHa Ha qntpnte.
J. INHINKA Top AIR QUALITY (KaueCTBO Ha Bb3Dyxa): CBeTINHInTE NOCOUBAT KaueCTBOTO Ha Bb3Dyxa.
K. INHINKAtop Fan speed (CKOPoCT Ha BEHTNInaTopa): NOKa3Ba TEkyuata HacTPOJka 3a CkOPOcTTHa BeHTNInaTopa (BnCoka/ cpeHa / Hncka / PekmHa rOTOBHOCT).
L. Fan speed celenktop (ckopocHa BENTnataropa) Perynpa Hactpoikata 3a ckopocTHa H BENTnataropa (Bucoka/ cpedha/Tnxa).
M. on-off (BKN-13Kn.): "on" (BKNIOUBA) n "off" (13KNOUBA) ypeda.

EAP300,EAP450
I. Air Quality ceh3op (3a KaueCTBOTo Ha Bb3dyxa) ABTomATuHcNei HnBOTO Ha KaueCTBOTo Ha Bb3dyxa N HaCTpoiBa CbotBeTHaTa CKOpCT Ha BeHTUJatopa, KORATO e B peKIM "AUTO" (abTomATuHe).
J. Reset (Hynipahe): Hynipa lammukka Ta ha nHnkaTopa "Check Filter" (npobepka Ha phntba).
K. UNdkaTop Check filter (npOBepKa Ha nIbpa): CnHaJI 3a CMHa Ha nItpTe.
L. Auto (abTomatuHoo): ABTomatuHoo HacTpoBnBa CbTBeTHaTaCKoPoCT Ha BeHTnAToP, B 3aBNCmOcT OT KOJIueCTBOTo Ha npIMecTe.
M. plasmaWave™: ПokedаэБа, чу Тхнологита eakTNBHa.
N. INHnKaTop Air Quality (KaueCTBO Ha Bb3dyxa): CBeTJINHInTe NOCOyBaT KaueCTBOTO Ha Bb3dyxa.
O. fan speed INHINKAtop (CKOPCT Ha BEHTNATOpA): Noka3Ba Tekyuata HAcTPOKa 3a CKOpCtTa Ha BEHTNATOpA (Typ6o/Bucoka / cpeHa / Txa).
P. fan speed cenektop (ckopoct Ha BENTnataropa): Perynipa Hactpoikata 3a ckopocT Ha BENTnataropa (Typ6o / Bncoka / cpedha / Tnxa).
Q. on-off (BKN-13KJ.). "on" (BKNIIOYBA) n"off" (N3KNIIOYBA) ypeja.
R. Light Sensor (cBETNIHHe cEH3Op): 3aTbMnBa CBETNIHHe Ha KOMaHdHOTo Ta6No N 3aJaba CKOpocTt Ha BeHTNuTaOpa Ha pexm "Quiet" (Tnx), KoraTo B CTaTe TbMHO. (pa60Tu cMoBpekm "AUTO" (ABTomatuhe)
HACTPOIKA HA INPEUINCTBATEJIHA Bb3dYX

EAP150,EAP300,EAP450
IocTabaIte ypeDaIaueOT npobetpmbn 6bactn, TbKaTo e B3MoxHO cH3OpTe Da He pearupat C tOuHcT. He nocTabaIte B6InIOCT Do 3aBecn, Me6eIN INN dpyrn ppeIMETn, KOITo 6xHa MornJa B3bnpenrTcBat B3dUnHn noTOK. NocTabaTe ypeDa BByPx CTaBUNHA NOBbPXHOCT.
- Maxhete 3aunTHOTo fONIO OT KOMAHHHTO Ta6NO.
- CbaIe npEHHa naHc, Kato BnMaTeHIO n3DbpNaTe DOHaTa My qact. He npunaraTe cna; naHbT 6u Tpr6BaNo da ce n3Ba neKota
EAP150
3.ИЗвадефиNTbpaHEPA13иВьглероДнЯпpe-ФИNTbpOTПlaCTMACOBATAOBVBKA.
4.ИнсалрайфошьраHEPA13taKaYe cTepeKata nokazbaa"air flow"(Bb3duyesh notok)da coyn KBm 3aHata qact Ha npeeuCTBaTeJHa Bb3dyx;6eJnte pa3dEn B rohpata HOnHata qact Ha fUnTbaPbA HEPA 13 ue coat Kb m npednata qact Ha ypeJa.
5.Инсташиразе Вьгелордни пpe-фиntырп peED Фиntыр HePA 13.
6.CMeHeTe pIepHnHa fHbP, Kato 3aKaunTe naHena B rOpHata qact Ha ypeHa.3aBbpteTe nHaena 4pe3 neKo HauTcKaHe Bbpxy BCa Ka CpaHaHa ypeHa nCleD ToBa rO fHKcnpaTe Ha eJHO MRCTO
EAP300
3.ИЗbaTe ΦиТьpaHEPA13иВьглepODнЯпpe-ФиNTbpOTПlaCTMaCoBaTaO6BnBka.
4.ИнсталраитfeфплбраHEPA13taKa,чсстелката nokakbaац"air flow"(Bb3duyewHnotOK)da coyn KBm 3aHaHata qact Ha npuechtsBaTeIHa Bb3dyx;6eInte pa3dien B rophataNdoHATA qactHaфnltbpaHEPA13uecoatKbM npedHata qactHa ypeia.
- MoHTnpaIte BbRpeOpDnH npe-phiNTbp KbM pIaCTMacobata paMka qPe3 npITnCKaHe KbM BCuKN TEKCTUNH BEIKpO KBaIpaTcTaHa TbP6a Ha paMkTa
- MoHTnpaIte PIIactMacOBaTa paMka 4pe3 BmBKBaHe Ha pa3dJeNTe B IpeuHCTBaTeJHa Bb3dyX N JeKO IpNTnCHTe HABbTpe BdoHNpa3dEn, DOKaTo paMaKaTa BHNMaTeHo nache Ha MRCTO.
CmeHeTe npedHnra fHntbp, kato 3akaunte naHena B rOpHaTa
yact Ha ypea. 3abptete NaHena Upe3 neko HatackAhe
Bbpxy BCaKCTa CPTaHa Ha ypea n CneT ToBa r O fHKnPauTe
Ha eJHO MRCTO.

EAP450
3.ИЗbaДеТe ΦИNTbPHaTа Kacетa И МАХHeTe ПlaCTMaCObAТa OБВИВКа OT HeЯ.
4. MoHTnpaIte fHnTbPnHa T KaceTa Ype3 BmBkBaHe Ha pa3dJIeTE B IpeuNCTBaTeJHa Ba3dYx N JIeKo PnITNCHeT HABbTpE B OJINHpa3dEn, DOKaTO pAMKaTa NaCHE Ha MRCTo.
5.CmeHeTe npedHnA FNNTbp, KaTo 3aKaunTe naHena B roPhata qact Ha ypea.
6. 3aBpTeNaHenaUpe3NeKoHaTnCKaHe BbpxyBCKa CTpaHa Ha ypea NcE ToBA rO fKnCpaIte Ha eNHO MRCTO.

EAP150, EAP300, EAP450
- BkIIOUeTe 3axpaHbauNn Ka6en B eJeKtpnueckn KoHTaKT.
- HataChete n 3aPbXte 6yToHa 3a 3axpaHbaHeTo,doKato He ce yye KpaTbK 3ByKO BcHAnJ.
- Huyhncscaokono3-4MmHyn,3a da moKe npeuictBaTeIeHa Bb3dyx Da KaIb6pnpa ceH3opa 3a KaueCTBO Ha Bb3dyxa. Ppe3 TOBA BpeMe lamnnukte Ha ceH3opa 3anoBAT da MnraT.

EAP300,EAP450
- Korato ceH3OpBt e kaIIb6pnpaH, CBETNIHHTe npemHaBaT B peKIM "AUTO" (ABTomAtuH).
CMRAHA HA ΦNITbPA

EAP150
Ima dBa OTdENH fNtbpa:BbrnepoEn npe-fntbnpf nphtbp hepA 13.
IHHaTOpBt Check Filter cHrHaHn3npa, KOrato HacTbHn BpeMe 3a CmHa Ha AnTba hepA 13. NepoObT 3a CmHa Bapu, B 3abcImocT ot ToBa KOJIko Dblro e ON3BaH AnTbPbT,OT KaueCTBOTo Ha Bb3dYxa N ot TOBa KbJe e NoctabEn ypeEb. BbnpKeTo Toba, B NOBEeTO cnYau npri HopMaHa ynOtpe6a, AnTbPbT Tp86Ba Da ce CmHa BcKa rOHa
3a Hn-do6pa npoun3BOUntenHoc, CmHnTeBbIpeoDnHnI pne-ΦnITbp HA BcKn TpN Meceua.
PnCmHa,ΦHnTpnte Tpa6Ba Da ce n3xBpbJr. He MnTe Hne H3nON3BaTe NOBtHO ΦHnTbpa HEPA 13 nn BBrIepoHNH Ipe-ΦHnTp, Tb KaTO TOBA ue DOBeE do HeeΦeKETNBHTO NM DeIcTBNe.
BHMaHHe: n3KIOUeTe IpeuCTBaTEn Ha Bb3dYx N n3KIOUeTe EneKtpueckn Ka6eI ppeDn Da n3BbPbWBe Ta noDpBbKa.
CmHa Ha BvIepoHn npe-ΦnITbP.
1.N3KIOUeTe NpueNCTBaTeJHa NbB3dyN N3KIOUeTe eEJIKeTNPeCKKNaKa6eJ.
2.CaIane Te npednna HaeN, KaTO BHNMaTeHIO n3bPnTaTe DOnHaT Ma YcT. He pnuaarate Cnla, naHeBt 6n Tp8BaJIo Da Ce n3BaDn C neKOTa.
3. OTrpaHTe BByIepoDnHn Ppe-ΦnITbP KaTo Neko ro n3TeTnTe OT DbHTo HArOpE NHaOny OT Bbpxa.
4. OCTpaHete BbIpeoHnI ppe-PhITbp n ro 3XbPneTe.
5.ПпeMaxHeteСмeHENBbInepoH npe-ФИNTbpOT HaNoHOBaTaTOp6uKa 3aMHOROKpaTHa yNtpe6a Nro 3aNeUaTae NOBTOpHO,3aJa ce 3aNa3n CBExEcTTa Ha OCTaBaUHgФIITbp.
6. MoThnpaTne BbTpeOpdHnI ppe-PhntTpBp.

EAP300
Ima da OTeJenHn HnTbpa:BbrnepeH npe-Phntbp n HnTbp hepA 13.
- INHnKaTOpBt Check Filter ue cnHnHaJIIn3npa, KORATO HAcTbN Bpeme 3a CmHa Ha nItpba hepA 13. IepnOaTb 3a CmHa BaInpa, B 3aBcIMoCT OT ToBa KOJko Dblro e NOn3BaH nIITbPbT,OT KaYeCTBOTo Ha Bb3dya N OTOBa KbJe e NoctabEn ypeBt. BbIpneK ToBa, B nobueTeO cnyau npn HopMaHa yonTppe6a, nITbPbT Tp86Ba Da ce CmeH BCaKa rOINHa..
3a MaKcMmaJIHO KaueCTBeHa npOn3BOJNTeJIHOCr, CmEHNrTeBbRrIepoDHHn Ppe-ΦnITbp Ha BCEKN TPN Meceua.
PnCmHa,ΦHnTpIe Tpa6Ba Da ce n3XbBpIaT. He MmTe Hne H3nON3BaIte NOBtOHO ΦHnTbPa HEPA 13 nn BByrpeoHNia Ppe-ΦHnTbp,TbKaTO ToBA ue DoBoeDe Do HeeΦeKTNBHOTo NM DeIcTBNe.
BnmaHne: n3KnIOyTe npeuCTBaTeIHa Bb3dyX n 3KnIOyTe eEKeTpueckn Ka6eI npEi Da n3BbPwBaTe noDpBxka
CmHa Ha BbIepoHn npE-Phntbp.
1.ИЗкlioуeteп electBaTeЯHaВb3duxиИзКlioуete eIeKtpnuecknaKa6en.
2. Cbale Te pndnna Hne, KaTO BnMaTeHNO n3dbpNaTe DOnHaT My uact. He npnaarTa cna, naHeBt 6n TpaBAno da ce n3BaDu c neKota.
- OCTpaHete BbIepoDnHn Ipe-ΦNITbp nPiacTMacOBaTa pAMKa, KaTO JeKO rN 13TeTInTE OT DbHOTo HArOpE N HaOny OT BbPxa.
- OTrpaHETe BbIpeoHNn Npe-PhITbp OT PIACTMacObaTa paMka Iro N3XBpJeTe.
5.Ппeмхнге Смнгьглроги npe-fnntbp ot HauHIOHOBATA Top6uKa 3a MHOrOKpaTHa yNtpe6a N ro 3aNeHataIte NOBTOPO,3aДа CE 3ana3n CBexEcTTa Ha OCTabaunuФnTbp. - MoHTnpaIte BbIpeoHnI npE-PhIbP KbM INaCTMaCOBaTa paMka Ype3 npITnCKaHe KbMa WeCT TeKCTINHN BeIKpo KBAIpaTcTeHa Tbp6a Ha paMKaTa.
EAP450
BnmaHne: n3KIOUeTe IpeuCTBaTeIa Ha Bb3dyx n 13KIOUeTe eIeKTPuueckna Ka6eI npEi Da n3BbPwBaTe noDpBxxka.
EAP150,EAP300,EAP450
BnmaHne: n3KnIOueTe ypeDa n eneKtpnueckna Ka6en, npedn da n3BbPwBaTe kaKBTo n da e o6cnyXbaHe.
Почuctваiteурапн Heo6xOДМОCTчe3 n36bpcBaHe cbc cyxaMeka Kbpna;3a ynpntn netHa n3noI3BaTeToIIa,BlaxKaHKnbpna.
He nol3BaIte IeTnBn TeuHocTn, KaTo HanpImep 6eHc0n, pa3peiTeN Ha 6oI nn a6pa3nBEN npax, TbN KaTo Te MoRaT da nOBpeaT nobbpxHoCTTa. He MokpeTe ypeDa.
Почимста Лков Спрахocмkaчka сензора ЗкачевTOHaВ3dyaHaBCEKINTPmMecea

OTCTPAHRABAHE HA HEN3PABHOCTN

EAP150,EAP300,EAP450
EAP150,EAP300,EAP450
Jednotku neumistujte do migt s pruvanem, protoze senzory by nemusely reagovat presne. Neumistujte ji do blizkosti zavesu, nabytki ci jinich premedetu, ktere by mohly branit proudeni vzduchu. Postavte jegnotku na stabilni plochu.
- Z ovladaciho panelu odstrahte ochrannou folii.
- Jemnym tohem za dolni ccast panelu odstrahte celni panel. Nepouzivejte sifu; panel by mel jit odstranit snadno

EAP450
EAP150.EAP300.EAP450
EAP150,EAP300,EAP450
EAP150,EAP300,EAP450
EAP150,EAP300,EAP450
EAP150,EAP300,EAP450
EAP150,EAP300,EAP450
EAP150,EAP300,EAP450
EAP150,EAP300,EAP450
EAP150,EAP300,EAP450
EAP150,EAP300,EAP450
EAP150,EAP300,EAP450
Asetage seade tombetuolest eemale, kuna andurid voivad vastasel korral valesti reageerida. Arge asetage kardinate, mobli voi muude ohuvoolu takistada voivate esemete lahedusse. Asetage seade stabiilsele aluspinnale.
EAP150,EAP300,EAP450
EAP150,EAP300,EAP450
EAP150,EAP300,EAP450
Read the following instruction carefully before using machine for the first time.
Children shall not play with the appliance.
- Cleaning and user maintenance shall not be made by children without supervision.
- This appliance can be used by children aged from 8 years and above and persons with reduced physical, sensory or mental capabilities or lack of experience and knowledge if they have been given supervision or instruction concerning use of the appliance in a safe way and understand the hazards involved.
- The appliance should only be connected to a power supply if its voltage and frequency comply with the specifications written on the rating plate.
- If the appliance or the supply cord is damaged, it must be replaced by the manufacturer, its service agent or similar qualified person, in order to avoid hazard.
- Do not immerse the appliance in water or any other liquid.
- This appliance is intended for domestic use only. The manufacturer cannot accept any liability for possible damage caused by improper or incorrect use.
- Do not use outdoors or on wet surfaces.
- Do not pull or carry by cord, use cord as a handle, close a door on cord, or pull cord around sharp edges or corners. Keep cord away from heated surfaces.
- Do not put any object into openings. Do not use with any opening blocked; keep free of dust, lint, hair and anything that may reduce airflow.
- Do not use without filters in place.
- Store your appliance indoors in a cool, dry area.
- Do not use in humid places such as bathrooms. If liquid enters the air cleaner, turn it off and have it inspected by an authorized Electrolux service center.
- Do not use near flammable gases.
- Do not place directly beneath a smoke detector, as this could reduce the smoke detector's sensitivity.
- Do not put objects on top of or inside of unit.
- Do not block the grills.
- Do not unplug the power cord before air cleaner has cooled down.
- Do not place the air cleaner near a heater.
- Do not use detergent to clean the unit.
- Do not wash and reuse the HEPA 13 filter or the Carbon Pre-Filter, (EAP150,EAP300). Do not wash and reuse the Carbon filter (EAP450).
- Hold the handle on the back of the unit to transport. Do not hold by the front panel.
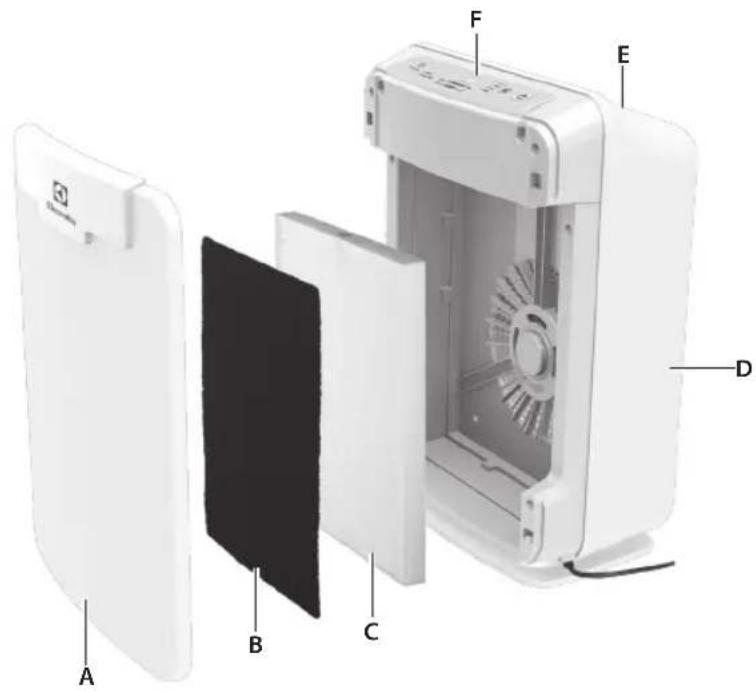
COMPONENTS

EAP150
A. Front panel
B. Carbon Pre-Filter (treated with anti-bacterial coating)
C. HEPA 13 filter
D. Main body
E. Air outlet
F. Control panel

EAP300
A. Front panel
B. Filter frame
C. Carbon Pre-Filter (treated with anti-bacterial coating)
D. HEPA 13 filter
E. Main body
FEATURES

EAP150
CAUTION: Fully assemble air filter before using (See Air cleaner set-up)
Note: Features vary according to model.
Quiet operation
With a three-speed fan with quiet operation that is ideal for nighttime.
Air quality sensor
Built with an air quality sensor that detects the presence of various pollutants in the air.

EAP300,EAP450
CAUTION: Fully assemble air filter before using (See Air cleaner set-up)
Note: Features vary according to model.
Quiet operation
With a four-speed fan with quiet operation that is ideal for nighttime.
PlasmaWave is possible to turn off and on by pressing "Auto" button for 3 seconds
Air quality sensor
Built with an air quality sensor that detects the presence of various pollutants in the air. The unit automatically increases fan speed to clean more air volume and remove the impurities quickly.
Light sensor*
The built-in light sensor detects when the room is dark and automatically dims the lights of the control panel and lowers the fan speed for quiet and energy-efficient operation. Once the room is dim, the fan do not increase speed despite what the air quality sensor detects.
Automatic air cleaning*
The odor sensor detects the amount of impurities in the air and automatically adjusts the fan speed accordingly to keep your air purified.
F. PlasmaWave™ fan
G. Air outlet
H. Control panel

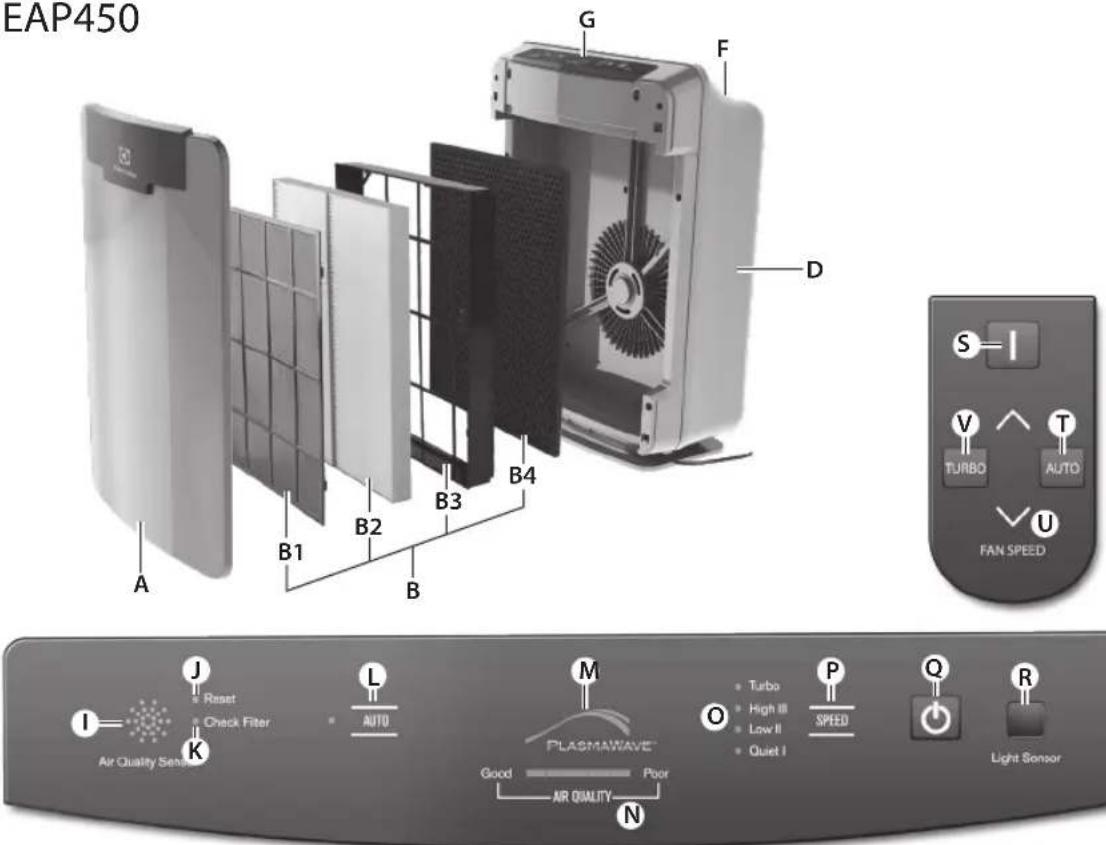
EAP450
A. Front panel
B. Filter Cassette consists of the following:
B1. Washable Anti-Bacterial Pre-filter
B2. Washable HEPA 13 filter
B3.Filter frame
B4. Carbon Filter
D. Main body
F. PlasmaWaveTM fan
G. Air outlet
H. Control panel

EAP150
3 stage filtration*
The Carbon Pre-Filter collects large particles, such as dust, pet hair, and lint. It absorbs odor causing gases, such as those caused by cigarette smoke, organic decay, and cooking, effectively reducing the development of bacteria and fungi. For best performance, replace every 3 months. The Cleanel anti-microbial coating prevents the growth of micro-organisms. The HEPA 13 filter captures 99.99% of particles and impurities as small as 0.3 microns, including smoke, dust, pollen, and other allergens. Replace when the CHECK FILTER indicator light turns on.

EAP300
4 stage filtration*
The Carbon Pre-Filter collects large particles, such as dust, pet hair, and lint. It absorbs odor causing gases, such as those caused by cigarette smoke, organic decay, and cooking, effectively reducing the development of bacteria and fungi. For best performance, replace every 3 months. The CleanelTM anti-microbial coating prevents the growth of micro-organisms. The HEPA 13 filter captures 99.99% of particles and impurities as small as 0.3 microns, including smoke, dust, pollen, and other allergens. Replace when the CHECK FILTER indicator light turns on. PlasmaWaveTM Technology uses positive and negative ions to remove airborne pollutants including dust, smoke, pollen as well as allergens.

EAP450
5 stage filtration*
The washable Anti-Bacterial Pre-Filter extends the life of your filter by capturing Pet Hair and larger airborne particles and makes housecleaning easier. The Cleanelse™ anti-microbial coating prevents the growth of micro-organisms. The washable HEPA 13 Filter captures 99.99% of particles and impurities as small as 0.3 microns, including smoke, dust, pollen, and other allergens. The carbon filter is especially formulated to capture offensive pet odors; as well as smoke, cooking and other household odors effectively reducing the development of bacteria and fungi. PlasmaWave™ Technology uses positive and negative ions to remove airborne pollutants including dust, smoke, pollen as well as allergens.

CONTROL PANEL

EAP150
1
G. AIR QUALITY SENSOR: Automatically monitors the air quality level.
H. Reset: Resets the "Check Filter" indicator light.
1. Check Filter indicator: Signals when to replace filters.
J. AIR QUALITY indicator: Lights indicate the quality of the air.
K. Fan speed indicator: Shows current fan speed setting (High / Med / Low / Sleep).
L. Fan speed selector: Adjusts fan speed setting (High / Med / Quiet).
M. On-Off: Turns the unit "On" and "Off".
AIR CLEANER SET-UP

EAP150,EAP300,EAP450
Place the unit away from drafty areas, as the sensors may not react accurately. Do not place near curtains, furniture, or other items that might inhibit air flow. Place the unit on a stable surface.
- Remove protective film from the control panel.
- Remove the front panel by pulling gently from the lower portion of the panel.
Do not force; the panel should remove easily.

EAP150
- Remove the HEPA 13 filter and the Carbon Pre-Filter from the plastic wrapper.
- Install the HEPA 13 filter with the arrow showing "air flow" pointing in toward the back of the air cleaner; the white tabs at the top and bottom of the HEPA 13 filter will point out to the front of the unit.
- Install the Carbon Pre-Filter in front of the HEPA 13 filter.
- Replace the front panel by hooking the panel on the top of the unit. Swing the panel in by pushing gently on each side of the unit and then lock it into place.

EAP300
- Remove the HEPA 13 filter and the Carbon Pre-Filter from the plastic wrapper.
- Install the HEPA 13 filter with the arrow showing "air flow" pointing in toward the back of the air cleaner; the white tabs at the top and bottom of the HEPA 13 filter will point out to the front of the unit.
- Install the Carbon Pre-Filter onto the plastic frame by pushing against all "hook and loop" squares on the back of the frame.

EAP300,EAP450
I. AIR QUALITY SENSOR: Automatically monitors the air quality level and adjusts fan speed accordingly when in "AUTO".
J. Reset: Resets the "Check Filter" indicator light.
K. Check Filter indicator: Signals when to replace filters.
L. AUTO: Automatically adjusts the fan speed according to the amount of impurities.
M. PlasmaWave™: Shows that the technology is active.
N. AIR QUALITY indicator: Lights indicate the quality of the air.
O. Fan speed indicator: Shows current fan speed setting (Turbo / High / Med / Quiet).
P. Fan speed selector: Adjusts fan speed setting (Turbo / High / Med / Quiet).
Q. On-Off: Turns the unit "On" and "Off".
R. LIGHT SENSOR: Dims the control panel lights and sets the fan speed to "Quiet" when the room is dark. (Only works when is in "AUTO")
- Install the plastic frame by inserting tabs up into the air cleaner and gently pushing in at the bottom tab until the frame fits into place gently.
Replace the front panel by hooking the panel on the top of the unit. Swing the panel in by pushing gently on each side of the unit and then lock it into place.

EAP450
- Remove the Filter Cassette and remove the plastic wrapper from it.
- Install the Filter Cassette by inserting tabs up into the air cleaner and gently pushing in at the bottom tab until the frame fits into place.
- Replace the front panel by hooking the panel on the top of the unit.
- Swing the panel in by pushing gently on each side of the unit and then lock it into place.

EAP150,EAP300,EAP450
- Plug the power cord into a wall outlet.
- Press and hold the POWER button until a short "beep" sound.
- The air cleaner will take 3-4 minutes to calibrate the air quality sensor. During this time the sensor lights will flash on and off.

EAP300,EAP450
- Once the sensor has calibrated, the lights will be on "AUTO" mode.
FILTER REPLACEMENT

EAP150
There are two separate filters: Carbon Pre-Filter and HEPA 13 filter.
- The Check Filter indicator will signal when to replace the HEPA 13 filter. The replacement period will vary depending on the hours of usage, air quality, and location of the unit. However, in most cases of normal use, the filter will need to be replaced annually.
- For best performance, change the Carbon Pre-Filter every three months.
The filters should be disposed off when changed. Do not wash and reuse the HEPA 13 filter or the Carbon Pre-Filter as they will not work effectively.
CAUTION: Turn off the air cleaner and unplug the electrical cord before performing any maintenance.
Carbon Pre-Filter replacement.
- Turn off the air cleaner and unplug the electrical cord.
- Remove the front panel by pulling gently from the lower portion of the panel. Do not force, the panel should remove easily.
- Remove the Carbon Pre-Filter by gently pulling out from the bottom and down from the top.
- Remove the Carbon Pre-Filter and dispose of it.
- Remove a replacement Carbon Pre-Filter from the resalable plastic bag and reseal to maintain the freshness of the remaining filter.
- Install the Carbon Pre-Filter.

EAP300
There are two separate filters: Carbon Pre-Filter and HEPA 13 filter.
- The Check Filter indicator will signal when to replace the HEPA 13 filter. The replacement period will vary depending on the hours of usage, air quality, and location of the unit. However, in most cases of normal use, the filter will need to be replaced annually.
- For best performance, change the Carbon Pre-Filter every three months.
The filters should be disposed off when changed. Do not wash and reuse the HEPA 13 filter or the Carbon Pre-Filter as they will not work effectively.
CAUTION: Turn off the air cleaner and unplug the electrical cord before performing any maintenance.
Carbon Pre-Filter replacement.
- Turn off the air cleaner and unplug the electrical cord.
- Remove the front panel by pulling gently from the lower portion of the panel. Do not force, the panel should remove easily.
- Remove the Carbon Pre-Filter and plastic frame by gently pulling out from the bottom and down from the top.
- Remove the Carbon Pre-Filter from the plastic frame and dispose of it.
- Remove a replacement Carbon Pre-Filter from the resalable plastic bag and reseal to maintain the freshness of the remaining filter.
- Install the Carbon Pre-Filter onto the plastic frame by pushing against six "hook and loop" squares on the back of the frame.

EAP450
CAUTION: Turn off the air cleaner and unplug the electrical cord before performing any maintenance.
| Filter Service | life | Cleaning Cycle | How to clean |
| Washable Pre filter | 12 month Every 3 month | Clean with vacuum cleaner or soft brush, Use warm water when the filter is very dirty | |
| Washable HEPA 13 filter | 12 month Every 3 month | Put the filter into warm water for 30 minutes and dry it out in the shade for 24 hours | |
| Carbon filter | 12 month Every 3 month | Put the filter into warm water for 30 minutes and dry it out in the shade for 24 hours | |
| Filter Cassette | 12 month -- | ||
The Check Filter indicator will signal when to replace the entire Filter Cassette. The replacement period will vary depending on the hours of usage, air quality, and location of the unit. However, in most cases of normal use the filter will need to be replaced annually.
This Filter Cassette should be disposed of when changed.
Filter Cassette replacement
- Turn off the air cleaner and unplug the electrical cord.
- Remove the front panel by pulling gently from the lower portion of the panel. Do not force, the panel should remove easily.
- Remove the Filter Cassette by gently pulling out from the bottom and down from the top.
- Remove all the filters from the plastic frame and dispose of it.
- Remove the replacement filters from the plastic bag and replace them.
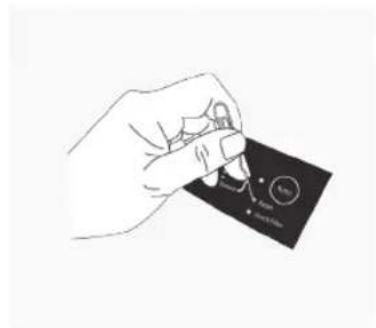
- Plug in air cleaner and press POWER button until short "beep" sounds.
- Press the RESET FILTER button by gently inserting a paperclip into the RESET FILTER hole on the control panel. The light will flash 5 times before a "beep" sounds to indicate the filter has been reset.

REMOTE CONTROL

EAP300,EAP450
Operate the remote control facing the air cleaner.
Operate within 6 metres of the air cleaner.
The remote control has a separate wall-mountable storage cradle that can be conveniently attached to any wall using a screw.
S. POWER: Use the power button to turn the power on and off. A short "beep" will sound when the unit turns on and off.
T. AUTO Mode: Use the AUTO button to put air cleaner in AUTO mode.
U. FAN SPEED: By pressing up or down, the unit will change fan speeds and enter into manual mode.
CARE AND MAINTENANCE

EAP150,EAP300,EAP450
CAUTION: Turn off the unit and unplug the electrical cord before performing any maintenance.
- Clean unit as necessary by wiping with a dry, soft cloth; for stubborn stains, use a warm, damp cloth.
V. TURBO: Use this button to switch from automatic operation and start the maximum amount of room air cleaning and air movement. It will remain in Turbo speed until changed into Auto or manual mode.
Battery replacement
- Squeeze tabs of battery cover and at the same time pull cover out of remote.
- Insert battery as shown and close battery cover.
-
Always use 3V lithium battery CR2025. Incorrect battery usage may cause battery fluid leakage and/or damage.
-
Do not use volatile fluids such as benzene, paint thinner or scouring powder, as they may damage the surface. Keep the unit dry.
- Lightly vacuum air quality sensor every three months.
TROUBLESHOOTING

EAP150,EAP300,EAP450
| Occurrence Possible causes/solution | ||
| Can I wash my filter? No, the filters that come | with the unit will fall apart and be ruined if water is run through them. (The Washable Pre Filter and HEPA 13 Filter for model EAP450 can be washed) | |
| Can I vacuum my filter? No, vacuuming will only spread the dust back into the air. If you think the filter is too dirty, it may be time to replace. (The Washable Pre Filter for model EAP450 can be cleaned with a vacuum cleaner or soft brush) | ||
| There is an odour coming from the unit and I just opened it. | The unit has been concealed in a tightly wrapped package of corrugated cardboard and plastic. Because this has a fan and pulls air through it, it may give off some "new" odours. Depending on sensitivity, this should wear off in several days or perhaps a week depending on how much it is used. | |
| Will this clean a bigger area than what it is rated for? | CADR ratings are provided from a controlled testing environment, if that environment changes, it can affect the performance. However if you have a slightly larger room than what the CADR rating is, it will still help improve the air, but may take a bit longer to do so. | |
| Where should I place the unit? | Allow proper air circulation around the sides and infront of the unit. If there are doors or narrow hallways it may reduce the airflow to the air cleaner, but will eventually circulate near the machine. | |
| The AIR QUALITY light is orange or red, but the air seems clean. | Clear the sensor with a vacuum cleaner, as it may be blocked or clogged. | |
| Sometimes a compressed can of air may unclog the dust in the sensor. | ||
| There is still some dust you can see in the air or on my furniture | The unit will capture most dust and particles, however with opening doors, windows, central HVAC etc... there may still be some level of dust that you can see. | |
| There is nothing holding the filters in place | The filters are meant to rest inside the unit. Once the unit is turned on, the force of air pulled through the machine will create a tight seal of the filters. | |
| I can hear revving of the fan motor | This is normal, especially at night when all environmental sounds are quiet, you may hear the motor running in repetition. | |
| The unit has stopped removing odours effectively, or seems to be emitting an odour. | Make sure the air quality sensor is not blocked or clogged. | |
| Move the unit closer to the offending odours. | ||
| Replace the filters as they may have reached their capacity to absorb pollutants. You may need to replace filters more frequently. | ||
| The CHECK FILTER indicator remains lit after replacing the HEPA filter. | Press the RESET FILTER button by gently inserting a paper-clip into the RESET FILTER button hole. Hold for 3-5 seconds until a "beep" sounds to indicate the unit has been reset. | |
| Can I turn off the sleep mode? No, however you can manually push to the fan speed you prefer which will stay at that speed until you change it. | ||
| Unit makes a ticking sound. This is caused by the PlasmaWave™ technology, it may come and go depending on the environment, but as long as the PlasmaWave™ light is on, the function is working. | ||
| The remote control does not work. Make sure the remote control battery is inserted correctly. | ||
| Replace a worn-out battery. | ||
| Make sure that the remote control has a clear line of sight to the air cleaner. | ||
| EAP450 | ||
| Occurrence Possible causes/solution | ||
| The air quality light is white, but there is still dust/odour in the air. | Make sure the sensor is not blocked or clogged. | |
| Replace the filter | ||
| The unit seems to produce odors. Move the unit closer to the offending odors. | ||
| Replace the filter | ||
| There is still some dust you can see in the air or on my furniture. | The unit will capture most dust and particles, however with opening doors, windows, central HVAC etc, there may still be some level of dust that you can see. | |
| The unit is running on high all the time. | Clear the sensor with a vacuum cleaner, as it may be blocked or clogged. | |
| Sometimes a compressed can of air may unclog the dust in the sensor. | ||
| The CHECK FILTER indicator remains lit after replacing the Filter Cassette. | Press the RESET FILTER button by gently inserting a paper-clip into the RESET FILTER button hole. Hold for 3-5 seconds until a “beep” sounds to indicate the unit has been reset. | |
DISPOSAL
Recycle the materials with the symbol Put the packaging in applicable containers to recycle it. Help protect the environment and human health and to recycle waste of electrical and electronic appliances.
Do not dispose appliances marked with the symbol with the household waste. Return the product to your local recycling facility or contact your municipal office.

EAP150,EAP300,EAP450
EAP150,EAP300,EAP450
EAP150,EAP300,EAP450
EAP150,EAP300,EAP450
EAP150,EAP300,EAP450
EAP150,EAP300,EAP450
EAP150,EAP300,EAP450
EAP150,EAP300,EAP450
EAP150,EAP300,EAP450
REEMPLACEMENT DES FILTRES

EAP150
EAP150,EAP300,EAP450
EAP150,EAP300,EAP450
EAP150,EAP300,EAP450
EAP150,EAP300,EAP450
- Kabel za napajanje ukljucite u strujnu uticnicu.
- Pritisnite gumb POWER i drzite ga pritisnutim sve dok ne Čujete katki zvučni signal.
- Ureduju za procišcavanje zraka potrebno je 3-4 minute za kalibraciju senzora za kvalitetu zraka. Indikatori senzora ukljucivat ce si iskljucivati tijekom tog postupka.

EAP300,EAP450
- Kada je senzor kalibriran, indikatori ce biti na postavci "Auto".
ZAMJENA FILTRA

EAP150
Postojedva zasebna filtra: Ugligi ci predfltar i HEPA 13 filtar.
- Indikator Check Filter naznacit ce kada treba zamijeniti HEPA 13 filtrar. Vrijeme do zamjene moze se razlikovati ovisno o satima upotrebe, kvaliteti zraka i lokaciji jeginice. U vecini slučajeva uobičajene upotrebe filtrar treba zamijeniti Jednom godišnej.
- Kako biste osigurali najbolje rezultate, ugljeni predflitar mistrijajte svaka tri mjeseca.
Filtre prilikom zamjene treba odloziti u OTPad. HEPA 13 filtar i uglični predfiltrar nemojte prati ni ponovo koristiti jer oni nece raditi učinkovito.
EAP150,EAP300,EAP450
EAP150,EAP300,EAP450
| Pojava Moguci uzroci / rješenje | |
| Mogu li oprati filtar? Ne, filtri koji su isporučem | i s Jedinicom pod vodom ce se raspasti i biti unišeni. (Filtri za model EAP450 mogu se prati) |
| Mogu li filtar očistiti usisavačem? | Ne, usisavanje ce prašinu samo vrati u zrak. Ako mislte da je filtar vrlo prljav, možda je vrijeme da ga zamijenite. (Perivi prediltar za model EAP450参加会议 očistiti pomoću usisavača ili meke Četke) |
| Iz jedinice se osjeti miris, a tek sam je otvorio/la. | Jedinica je Čvsto bila zapakirana u ambalažu od kartona i plastike. Buduci da se u jedinici nalazi ventilator koji kroz nju provlaci zrak, može se osjetiti "novi" miris. Ovisno o osjetljivosti, ovaj miris trebao bi se izgubitnik nakan nekoliko dana ili nakan tjedan dana, ovisno o tome kolko se jedinica koristi. |
| Hoće li jedinica pročistiti zrak na većoj površini no što je navedeno? | CADR oznake odnose se na kontrilirano okruženje za testiranje, a promjena takvog okruženja moze utjecati i na rezultate. Ako je vaša prostorija, medutim, nešto veća od one navedene u CADR oznaci, jedinica Če suejedno povoljišati kvalitetu zraka, no za postizanje rezultata možda ēbei potrebno višne vremena. |
| Gdje se jedinica treba postaviti? Osigurajte istpr | ravan protok zraka bočno i ispred uredağ. Ako u prostoru postoje vrata ili uski hodnici, to može smanjiti protok zraka do uredağ za pročićavanje zraka, no zrak ēe u konačnici doci do uredağ. |
| Indikator kvalitete zraka svijeti narančasto ili crveno, no zrak izgleda Čisto. | Senzor očistite usisavačem jer je on možda blokiran ili začepljen. |
| Ponekad komprimirani zrak može izvuči prašinu iz senzora. | |
| U zraku ili na namješaju još uvijek ima prašine | Jedinica ďe uhvatiti vecinu prašine i Čestica, no još može biti vidljive prašine zbog otvaranja vrata, prozura, sustava za grijanje, ventilaciju ili klimatizaciju. |
| Filtre ništa ne drži na mhestu | Filtri nisu fiksirani u jedinici. Kada se jedinica uključi, mlaz zraka koji kroz nju prode napravit Čvstru brtvu od filtrara. |
| Čuje se brujanje motora ventilatora To je noraml | nalno, osobito noću kada su svi ostali zvukovi prigušeni te možete Čuti repetitivno brujanje motora. |
| Jedinica je prestala učinkovito uklanjati neugodne mirise ili se Čini da se iz jedinice osjeti neugodan miris. | Provjerite nili senzor za kvalitetu zraka blokiran ili začepljen. |
| Jedinicu primaknite blije izvoru neugodnih mirisa. | |
| Zamijenite filtre jer su oni možda dosegli svoj kapacitet za upijanje onečiććenja. Možda Čete Češće morati mistrjenati filtre. | |
| Indikator Check Filter i dalje svijeti likon zamjene HEPA filtra. | Pritisnite gumb Reset Filter takdo spajalicu za papir požljivo umetnete u otvor gumba Reset Filter. Zadržite 3-5 sekundi sve dok se ne oglasi zvučni signal koji oznaćava da je jedinica ponovno postavljena. |
www.electrolux.com
EAP150,EAP300,EAP450
EAP150,EAP300,EAP450
EAP150,EAP300,EAP450
EAP150,EAP300,EAP450
EAP150,EAP300,EAP450
EAP150,EAP300,EAP450
EAP150,EAP300,EAP450
EAP150,EAP300,EAP450
EAP150.EAP300.EAP450
- Jikiškite maitinimo laidāj sieninj lizda.
- Pasauskite ir laiky kite nuspauce maitinimo mygtuka, kol iqirsite trpma pytelejima.
- Oro filtras per 3 4 min. sukalibruos oro kokybès jutiklj. Per tag laika sviesos jutiklis sumirkses ir issijungs.

EAP300,EAP450
- kai jutiklis bus kalibruotas, lemputes degs „AUTO" (Automatiniu) režimu.
FILTRO KEITIMAS

EAP150
Yra du atskiri filtrai: Angliies pirminis filtras ir HEPA 13 filtras.
EAP150,EAP300,EAP450
Atsargiai: pries atlikdami bet kokia technine prieziura isjunkite jrenginir istraukite elektros laida.
- Valykite jrenginj, kai to reikia, nušluostydami sausa, minksta šluoste, o jsisenéjusias demes valykite šilta drègna šluoste.
V. Turbo: Siuo mygtuku galima perjungti is automatino veikimo ir paleisti maksimalu kambario oro valyma ir oro judejima. Jis vyks "Turbo" greiciu, kol bus perjungtas i "Auto" (Automatis) arba rankin rezima.
Baterijos keitimas
EAP150,EAP300,EAP450
Novietojiet ierici attalak no caurveja, jo sensors var nereaget precizi. Ierices tuvumā nenovietojiet aizkarus, mēbeles vai citrus priekšmetus, kas var traucē gaisa plūsmai. Novietojiet ierici uz stabilas virsmas.
- Nonemiet aizsargplevi no vadibas panela
- Nonemiet prieksejo paneli, viegli pavelkot aiz panela apaksejas dalas.
Nespiediet ar speku; panelim ir janoemas viegli.

EAP150
- Iznemiet HEPA 13 filtru un ogles prieksfiltru no plastmasas apvalka.
- Uzstadiet HEPA 13 filtru ar bultinu, kurā redzama "gaisa plūsma", virzienā uz gaisa attiritāja aizmuguri. HEPA 13 filtra augspuse un apakspuse esosie baltie izcilniBUS ierices priekspuses virzienā.
- Uzstadiet ogles prieksfiltru pirms HEPA 13 filtra.
- Uzielciet prieksejo paneli, aizakejot to aizierices augsejas das. Ielokiet paneli, viegli uzspiezot icerces katra puse, un pec tam nofiksejiet to vieta.

EAP300
- Iznemiet HEPA 13 filtru un ogles prieksfiltru no plastmasas apvalka.
- Uzstadiet HEPA 13 filtru ar bultinu, kurä redzama "gaisa plūsmā", virziena uz gaisa attiritaja aizmuguri. HEPA 13 filtra augspuse un apakspuse esosie baltie izcilni bus ierices priekspuses virziena.
-
Uzstadiet ogles prieksfiltru plastmasas rami, piespiezot to pret visiem azakeesan sturiem ietvara aizmugure
-
Uzlieciet plastmasas ietvaru, ivietojot izcilnus gaisa attiritaj un viegli spiezot to pamatnes izcilni, lidz ietvars iegulst vieta. Uzlieciet prieksejo paneli, aizakejot to azierices augsejas dalas. Ielokiet paneli, viegli uzspiezot icerces katra puse, un pec tam nofiksejiet to vieta.

EAP450
- Iznemiet filtra kaseti un nonemiet plastmasas apvalku no tãs.
- Ielieciet filtra kaseti, levietojos izcilnus gaisa attiritaj un viegli spiezot to pamatnes izcilni, lidz ietvars ieulst viet
- Uzlieciet prieksejo paneli, aizakejot to aizierices augsejas dalas.
- Ielokiet paneli, viegli uzpiezot iceres katra puse, un pec tam nofiksejiet to vieta.

EAP150,EAP300,EAP450
- Pievienojiet strāvas vadu sienas kontaktligzdai.
- Nospiediet un turiet nospiestu pogu POWER, lidz atskan iss signals.
- Gaisa attiritajam bus nepiecesamas 3 4 minutes, lai kalibretu gaisa kvalitates sensoru. Saja laika sensora lampinas ieslegsies un izslegsies.

EAP300,EAP450
- Kad sensors ir kalibrets, lampiñas degs rezmā "AUTO".
FILTRA NOMAINA

EAP150
Peejami divi atseviški filtri: ogles prieksfiltrs un HEPA 13 filtrs.
- Indikatora lampiña Check Filter informe, kad HEPA 13 filtrs ir janomaina. Intervals starp nomainu atskirsies atbilsto lietojuma stundam, gaisa kvalitatei un ierices atrasanas vietai. Tomér vairumà normalias lietoşanas gadijumu filtrs ir jämaina reizi gadā.
Lai iegutu vislabako daribubu, mainiet ogles prieksfiltrukipec trimmenesiem.
Pec filtra nomainas tas ir jalikvide. Nemazgajiet un nelietojiet atkartoti HEPA 13 filtru vai ogles prieksfiltru, jo tie naradbosies efektivi.
Uzmanibu! Pirms apkopes darbu veiksanas izsledziet gaisa attiritaju un atvienojiet strvas vadu.
Ogles prieksfiltrana nomina
- Izslédziet gaisa attiritaju un atvienojiet strávas vadu.
- Nonemiet prieksjo paneli, viegli pavelkot aiz panela apaksejas dalas. Nespiiediet ar speku; panelim ir janoemas viegli.
- Lai nonemtu ogles prieksfiltru, viegli izvelciet to no apaksdalas un velociet lejup no augsdalias.
- Nonemiet ogles prieksfiltru un izmetiet to.
- Iznemiet rezerves olegs prieksfiltru no vairakreiz aiztaisama plastmasas maisina un aiztaisiet to, lai uzturetu atlikuso filtru svaigu.
- levietojiet ogles prieksfltru.

EAP300
Peejami divi atseviški filtri: ogles prieksfiltrrs un HEPA 13 filtrs.
- Indikatora lampiña Check Filter informe, kad HEPA 13 filtrs ir janomaina. Intervals starp nomainu atskirsies atbilsto lietojuma stundam, gaisa kvalitatei un ierices atrasanas vietai. Tomér vairumà normalas lietosanas gadijumu filtrs ir jämaina reizi gadá.
Lai igutu vislabako darbibu, mainiet ogles prieksfiltru ik pec trim menesiem.
Pec filtra nomainas tas ir jaliqvide. Nemazgajet un nelietojiet atkartoti HEPA 13 filtru vai ogles prieksfiltru, jo tie nedarbosies efektivi.
Uzmanibul Pirms apkopes darbu veiksanas izsledziet gaisa attiritaju un atvienojiet strvas vadu.
Ogles prieksfiltra nomina
- Izslédziet gaisa attiritaju un atvienojiet stravas vadu.
- Nonemiet prieksejo paneli, viegli pavelkot aiz panela apaksejas dalas. Nespiiediet ar speku; panelim ir janonemas viegli.
- Lai nonemtu ogles prieksfiltru un plastmasas ietvara, viegli izvelciet to no apaksdalas un velciet lejup no augsdalias.
- Nonemiet ogles prieksfitru no plastmasas ietvara un izmetiet to.
- Iznemiet rezerves oges prieksfltru no vairakreiz aiztaisama plastmasas maiina un aiztaisiet to, lai uzturetu atlikuso filtru svaigu.
- Uzstadiet ogles prieksfltru uz plastmasas ietvara, piespiezot to pret seiem aizakeesan sturiem ietvara izmugure.

EAP450
Uzmanibu! Pirms apkopes darbu veik'sanas izsledziet gaisa attiritaju un atvienojiet strvas vadu.
| Filtrs Kalpoš | anas ilgums | Tirišanas cikls | Tirišanas veids |
| Mazgajams prieksfltrs | 12 meneši lk | pec 3 menešiem | Tiriet ar putekljucëju vai mikstu birstiti. Ja filtrs ir loti netirs, izmantojiet siltu üdeni. |
| Mazgajams HEPA 13 filtrs Filtrs | 12 meneši lk | pec 3 menešiem | lelieciet filtru siltä üdeni uz 30 minutëm un izăvevjiet to ënă. Pec 24 stundãm |
| Mazgajams ogles filtrs | 12 meneši lk | pec 3 menešiem | lelieciet filtru siltä üdeni uz 30 minutëm un izăvevjiet to ënă. Pec 24 stundãm |
| Filtra kasete | 12 meneši -- |
Indikatora lampina Check Filter informes, ja visa filtra kasete ir jänomaina. Interväls starp nomainu atskirss atbilsto lietojuma stundam, gaisa kvalitatei un ierices atrasanas vietai. Tomér vairuma normalas lietoşanas gadijumu filtrs ir{jämaina reizi gada.
EAP150,EAP300,EAP450
Uzmanibu! Pirms apkopes darbu veiksanas izsledziet IERICI un atvienojiet strvas vadu.
Tiriert ierici pec nepiecesamibas, slaukot ar sausu, mikstu draniu. Piekaltusiem netirumiem izmantojiet silta udeni samitrinatu draniu.
V. TURBO: izmantojiet so pogu, lai parslegtu no automatiskas daribas un saktu maksimalo telpas gaisa attiriisanu un gaisa kustibu. Turbo atrums darbosies, kamer tikns nomainits uz automatisko vai manualo rezimu.
Baterijas nomaina
EAP150,EAP300,EAP450
EAP150,EAP300,EAP450
EAP150,EAP300,EAP450
EAP150,EAP300,EAP450
EAP150,EAP300,EAP450
EAP150,EAP300,EAP450
EAP150,EAP300,EAP450
- Sett stromledningen inn i et vegguttak.
- Trykk pa og holdinne POWER-knappen til du horer et kort lydsignal.
- Luftkvalitetssensoren blir na kalibrert. Dette tar 3-4 minutter. Ilopet av donne tiden blinker sensorlampene.

EAP300,EAP450
RENGJØRING OG VEDLIKEHOLD

EAP150,EAP300,EAP450
EAP150,EAP300,EAP450
EAP150,EAP300,EAP450
EAP150,EAP300,EAP450
EAP150,EAP300,EAP450
M. On-Off: liga (on) e desliga (off) o aparelho.

EAP300,EAP450
EAP150,EAP300,EAP450
EAP150,EAP300,EAP450
EAP150,EAP300,EAP450
EAP150,EAP300,EAP450
EAP150,EAP300,EAP450
EAP150,EAP300,EAP450
Atentie: opriti purificatorul de aer si deconnecta; cabul electric inainte de a efectua orice lucrari de intretnere.
EAP150,EAP300,EAP450
DaTnIKKaueCTBaBO3dyxa
BCTPOEHnDaTnK KaueCTBa BO3yxa No3BOJnReT 6bHapxNBaTb PnCytCTBne pa3nHbix 3arP3HnTeNe B BO3dyxe.
EAP300,EAP450
BHHMaHHe! Npeed nCnoIb3ObaHnem co6epTe Bo3DyHbI
fNtbp nOnIOCTbIO (cm. pa3dien HAcTpoKa BO3DyXooUcHTeTEn)
PpIMeuaHHe: XapaKTePncTKn OtnuauoTc B 3aBNCmOcTn OT
MoJeJi.
Tnxarpa6ota
BentnIaTOp C qTbIpbMRCKOPoCTMaN IeaeAIBHO NOxOHTIINCNOJIb3OBaHn B HcHHe BpeM.
PlasmaWave MOxHO OTKIOUHTb;ДАТОТО HAKMITE u ydePknBaITe KONIKY «ABTO» B TeueHne 3 cekyHd
DaTnK KaecTa Bo3yxa
BCTpoEHHHb dATyHK fHbTaPauu B03Dyxa No3BOnJeT o6HapyKmbTaB npCytCTBE paaMnHbX 3aRpa3HntEeB B03Dyxe. Pnp6op aTOMaTHueckn yBelenuBaET cKOpOcTB BpaSeHnBEHTINrTopa DnI OOHCTKN bOJbWero OBdema B03Dyxa N b6tporo ydaeneHn npImceei.
DaTtukOKOBeueHHOCTn*
BCTpoehnblatqHn onpeDeyet, KOrBa B Komhate TEMHO n ABToMaTHueeCKn 3aTeMHReT OTHn Ha NpHeN ynpabLeHnA, a TaKKe CHNXaET
CKOPOCTb BpauHnBA BeHTINIaTOpA DnI TnxOu N3HePro3ΦΦeKTHBHO pa6oTb. Pnp npRnyuHHom CBeTe BeHTINIaTOp He yBENuBaet CKOPOCTb BHe 3aBnCmOCTn OT NOKaTeNei DaTuNka KaueCTBa BO3Dyxa.
ABTomatuecka OuNTKa BO3dyxa*
DaTnK 3aNaXa onpeDenHET KOINueCTBO npIMeCen B BO3dyx e ABToMaTnueCKN peYnIPye T CKOpocb BpaUeHNBEHTmIaTopo COOTBeCTBHeHNO NIOdEepKaHn YNCOTb BO3dyxa.
F. BeHTnlaTop PlasmaWaveTM
G. BbIXoN Bo3Dyxa
H. NaHembynpabBneHH
EAP450
A. Переднаншь
B. KaccetThbI ΦnIbTp COCTOnT n3 CnEnyIOuNX KOMNOHeHToB:
61. Moouuic aHTn6aKTePnaIbHbI ΦnIbTp npedBaPntbHoJ ONUCTKN
52. Moouinca qnbhepHEPA 13
B3.PamaΦnJIbTpTa
54. Moouinca yrolnbHy fInbTp
B.OchOBHOKOpNyc
F. BeHTnIaTop PlasmaWave
G. BixoB 03dyxa
H. Naheb ynpaBneHn
EAP150
3-cTyneHuaTaA qNlbTpaua
YrOJIbHbI ΦINbTp npEpaTbeHoOncTkn coBnpaet
KpynhbIe YactnCb, TaKne KaK NblB,
Iepctb domaunx xnbOTbIx nny. OH nornooaeT Bbl3bIaembl ra3amn 3anax, takoi kak cnrapetThbl dbIM, oprahnueckm pacnad npnrtoTOBNEHne Npu, eOphiekTNBO yMeHbIaar pa3BNTne 6kAtepei n rpn6KOB.
Длгпушелnomрзвдentьногстпрзвдпerte замену каддье 3 месяа. Анtmнкрбони порьтinue Cleancel"npedotBpaцaelPOTCMLNKPOOPRAHnHIMOB.
ΦnIbTp HEPA 13 3axBaTbIaBcET 99.99% qactu n npimcei paMepomdo 0,3MKM, B TOM Cnue CbMa, TbNl, TbJIbCu bDpynx anlepeHOB. Pnpov3Bodnte 3ameHy npri 3aropahnn HnKnKaTopa CHECK FILTER (PPOBEPbTE ΦNJIbTP).
EAP300
4-cTyneHuaTaeMnBtpaunr
YrOlbHbI pIepBaPteBHO ONUCTKcOcbpaet KpyNbHbI YaCTNbI, TAKHe KAK Nblb, IepCTb DOAmuHnx XnBOThbN uNx. OH NorNoaet BblBaEmbI ra3Amu 3anax, TaKo KaC nIapeTHbI DblM, OprAnHeckm pacnad n nprirotOBHeHne NpU, AeFKeTNBHO yMeHbHa pa3BHTne 6akTeprn n rpn6KB.
Jnnyuynne npon3B0DnEhBnOCTn npon3BOnTe 3aMeHy kKaqDbie 3 Mecra. AHTNMMKpO6Hoe NOKpbTHe Cleancel TnpedOpBaAaet Poct MKNPooPraHn3MOB.
Финьт HEPA 13 3axBaTbIaet 99.99% qactu n npimcei pa3mepomdo0,3MkB TOM YnCne DbIma,Пыл,пылбу npyrnx anleprenoB. Прозвдite 3amey npri 3aropanin HndkaTopa CHECK FILTER (PBOBEPbTE ΦЛьТP).TexHONORI PlasmaWave™ cnnonbyet nonoxKteNbHe n otpruaTeNbHbe NOHbI ydauHEnI m3 BOdya 3aqr3HIOUx WBeCTB, BKIOUay PbIb,ДbIM,ПыltBu a TAKKe aIJIpeRbIy.
EAP450
5-cTyenHuataaФnIbTpauu
MoUncra aHTnb6aKTepeNaHbI bI pnpBaPnteHbO H OCHTKn npDnBeAet cPoK rOAnCTN BaWeroΦNbTPa, 3axBaVBbIg WepcTB DomauHnx JxBtBbIX n KpyNtbe YacTtBu B0zdyXe, n daenr ybOpky Nere.
ANTIMIKpO6Hoe nokpbTne Cleancel mnpoTbpaaet poCT MmKPOOPRAHnM0B. MoUuNcA PhInbTp HEPA 13 3axBaTbBAeT 99.99% qactn u npimcepea3mpem o 0,3MK, B TOM YIcNE dbMa, pbNIn, pbNbCu bDpyrAn aJlepreHo. MoUuNcR yIepoHnh fNlBtp cneuaalhbo pa3pa6oTah
ДлдзхьТаHнрггтбьx3anaxOBOT DomaшнхЖИВOTHbIX, aТakKоE O Tдымп,пи��OTБЛЕнHи ПИСи NДугИХ 6blTOBbIX 3anaxOB,ФeКeNTBHO yMeHbSЯ pa3BnTne 6akTePи nrg6kbO.TEXHONOrIPlaMaWateMcNOLb3yeT NOONOKeTbHbIe N OTPuAteLbHbIe NOnHb IДЯ уdaJIeHnI N3 BO3dYxa 3arp3HIOUnx BeueCTB,BKIIQUaYЯ nbIb,IbIM,IbIb a TaKke anJIepreHbl.
NAHEJIb YNPABJIENIa

EAP150
G.Датунк КачесТВОЗДУХА.АвTomатиесКоНтponИруетуpoBEнь КачесТВОЗДУХ.
H. C6poc. C6poc INHdkaTopa Check Filter (PPOBepbTe ΦnIbTp).
I.Индикатop npOBeRPKn OINbTpA.CnHAnu3npyeTo Heo6xoDnMoCTN 3aMeHbOInbTPOB.
J.ИнДикaTop KaueCTBa BO3dya.ИнДикaTOp,ОпpeДeЯIOUcHи KaueCTBO BO3dya.x.
K. INHINKAtOp CkOPOCTn BEHTNIArTopa. Noka3bIbAeT Kekuuyo HacTpOoi Ky ckOPOCTn BEHTNIArTopa (High/med/Low/Sleep [BbICOKa/ CpeHna/ Hn3Ka/ CoH]).
L. CenekTop ckopocTn BeHTnIaTopa. PerynpobKa hAcTroKnckopocTn BeHTnIaTopa (High / med / Quiet [BbICoA/ CpeHra/Txho]).
M. BkI./BbIK.I.BKIOUcHHeN I BbIKIOUcHHe N np60pa.

EAP300,EAP450
I.Дачнк КачесТВа BO3dYxa.ABToMaTNoeCKN KOHTponb ypoBnKaueCTBa BO3dYxa n peRyInuPoBk cKOpocTN BeHTINrTopa COOTBeTCTBeHNO pRn HaxOxJdeHN B pexIme AUTO(ABTo).
J. C6poc. C6poc INHdNkaTopa Check Filter (PPOBepbte fNlbtp)
K. INHINKAtOp npOBepKn ΦnIbTpA.CuHAn3npyEt O Heo6xOJIMOCnT 3aMeHb FnIbTpOB.
L. Auto (ABTo). ABTomaTnueckar perynIpOBKa ckOpocTN BENTNIATopa B COOTBETCTBNU C O6bemOM PpIMMeCen.
M. plasmaWave™. OTo6paKeHne AKTUBHOCTN TEXHOJOrn.
N.Индкатор каeeCTBa BO3dya.NHdkatop, onpeJeIouu KaeeCTBO BO3dya.
O. INdkaTop CKOpocTN BEHTnlaTopa. Noka3bBaTe TKyUyo Hacptoyk CkOpocTN BeHTnlaTopa (Turbo/ High / med / Quiet [Typ6o / BcKocA/CpeDnA/Tixo]).
P. CenekTop ckopocTN BENTINaTOpA. Perynupobka hactpoiKnckopocTN BeHTNAtopA (Turbo / High / med / Quiet [Typ6o /BicokKa / CpeHra / TmXo]).
Q.BKn./BbIK.BKIOUeHne N BbIKIOUeHne npu6opa.
R.ДатукocceшнocTи.3aTeMHReI INnKaToPbI naHenn npaBHeNyIYCTaHaBnBaE pexim Quiet(TxO)Ipy cnKoPCtN BEHTmIaTOpA, KOrDa I KMhATE cTAHOBNTcIemHO. (Pa60TaT ToJbKO b pexkme AUTO [ABTO])
HACTPOIKA BO3dYXOOUCTNTEJI

EAP150,EAP300,EAP450
PacnojoknTe np6bOp BdaIOn OT npOdyBaembIX oBlaCTe, TAK KAK 3TO MOKET NOBNIaTb Ha TOUHOCT bp6oTb DaTuHKOb. He CTaBtBe 6BImN 70Tp, Me6EHN INpyMx 3JeMeHTOB, KOtOpblc MOyT npEnrTcBOBaTb NToK TY Bo3Dyxa. NOMecTIte np6bOp Ha yctOuHByIO NOBepXHOCTb.
- CHIMMTE 3aunTHyIO nnEHK y cnaHEn ynpabHeHHA.
- CHMnTe nepeHIO IO naHEnb, octopoxHO notaHyB 3a HxHIOU YacTb naHEnI.
He npunarayte ycnnn. NaheB donxhA chHMaTbcra neRko.

EAP150
3.ИЗВЕКИТЕФИЛТРHEPA13UNyROЛБнIФИЛТРпpeДВAPITENHOBOчNTKIN3ПлСТИКОВУNYAKOBKN.
4. UctahOBHTe fHbTp HEPA 13 TaK, TTo6bI cTpeNk a Cya3aHHem NotoKA Bo3dyXa HaxoDnAcB HAnpABHeHN 3aHHe Yactn BDOyXooOCHNTenJI; 6BeIbe BByCTynB b BEPxHn HnxHne Yactx XfNbTa PEA 13 6ydt Yka3bBaTb Na nepdHIOU naHEn np6opa.
5.YCTAHOBHTyeYrOlbHbIyfNtPnpEeBapntEnbHOOnOuNTKN B nepeHneJuaTnFnltPaHEPA13.
6. UctahOBInTe nepeDnIO npHeB, 3aueINb naHEnb Ha BepxHeN qactn npmbopa.PacnoIooNtne naHeBdoJKNbIM 06pa3OM, MrgKo HaxKaB Ha KaXdYIO CTOpOHy np6Opa, 3aTeM 3aΦNKcnpyTe ee Ha MeTe.

EAP300
3.ИЗВЕКИТЕФИЛТРHEPA13UNyROЛБнIФИЛТРпpeДВAPITeNBHоOчNTKиN3ПлСТИКOBОуNAKOBKN.
4. YctahOBITE ΦnIbTp HEPA 13 taK, YTO6bl C TpeNka c yKa3aHHeM NOTOKA BO3dyXa HaxOJnAcB HAnpABNeHH 3aHHeY qACTn BO3dyXooWcHTeTnE; 6BeIbe O603HaueHH B BepxHeN HnHXHeY qCTXq FnIbTa HEPA 13 6ydt Yka3bIBaTb Ha nepeDHHo naneHb np6opa.
5.YctahOBte yrOlbHbI pnpBapntbHoh ouhCTKn Ha nactIKOBy paMy,HaabnBaH BaCneuaNbHbIe KBaPaTbHa 3aHHe CTOpHe paMb.
- UCTaHOBIne pIaCTNKOByIO paMy, BCTaBbN BByCTynbIB BO3dYooCHNTeIb, IN MfKo HaJaBte Ha HnXHm BByCTyn noka pama He BCTaHeT Ha MeCTO. UCTaHOBIne pepeNDIO HAHeIb, 3aCenINB NaHeIb Ha BepxHey qactn npi60pa. PacnoIOXnTe naHeIb DonJXhIM 06p3OM, MfKo Haxab Ha KaXdyIO CTOPHy npi60pa, 3aTeM 3aΦHKcpyIte ee Ha MeCTe.

EAP450
3.ИЗВЕКИТЕΚАССЕТНБΙ ΦИΝΤΥСΗΜΝΥСΕΟΥΟΥΚΑ.
4.YCTaHOBnTe KAcCeTHbI ΦnIbTp, BCTaBnB BbICTynbl B BO3dYXOOHCTnTEnb, N MfRKO HaDaBnTe Ha HnKHN BbICTyn, POKa pAmA He BcTaHeT Ha MeCTO.
5. UctaHOBInTe nepeDnIO nAHeNb, 3aCenNB nAHeNb Ha BepXHeN qactn np60pa.
6. PacnojXnTe naHEnb doJxHbIM o6pa3oM, MraKo HaJaB Ha KaJky CTOpOHy npu6opa, 3aTeM 3aΦnKcnpyIe ee Ha MeCTe.

EAP150,EAP300,EAP450
- BctabBte shyhp nHTaHnB po3ETky.
- Haxmnte u ydepKnBaTKe KhoNkny nTuHnna (PoWER), noka He pa3daCTcK OPOTKn 3ByK.
9.ПоцecкКалбрOBKNдТУнKaКустВаBO3dYxa BO3dYxOoUHcNTeJIЯЗIMeT OТ 3do 4MnHy.T.BTO BpEma INHДиKAtOpbIдТУнKa6dy MnRaTb.

EAP300,EAP450
- Nocne 3aBepeHnKaIb6pOBKn DaTuNkA HndNkATOp 6ydt noka3bBA Tb peKIM AUTO (ABTo).

3AMEHAФЛbTPA

EAP150
IocTyHNO DaOtJeBbIX FmNbTpA - yronbHbI FmNbTp npedBaupTeBHO OuNCTKn FmNbTp HEPA 13.
- INHINKATOP npOBepKN fNtpa CnHnH3npyeTo Heo6xOIMOCNT 3aMeHb fNtbpTa HEPA 13. NepnoD 3aMeHb 3aBNCNT OT KOnIueCTBa YacOB NcNoNb3OBAHn, KaueCTBa BO3dyxa n pacNoJIOKeHn np6opa. OHaKO B 60nbUnHCTBe CnyaeB HopMaJIbHOr NOcNoNb3OBAHn fNtbpHeo6xOIMO 3aMeHrTb exeOrdHo.
Дллушewпpon3BOUnteHbHOCTN ppon3BOUNTe 3aMeHy yronbHorO fHbTpa npedBaPHTeHbHO OuNCTKn KaJdbIe TpN Mecua.
Iocne 3aMeHbI fNtBpbl dONKHbI 6bITyTNiN3npoBaHbI. He MoTe Hne nCnOJb3yIte NOBTOpHO fNtBtp HEPA 13 nn yroJIbHbI fNtBtp IpeDapNTeJIbHOUNCTkN, TaK KaK OHn He 6byT pa6OtaTb 3f0fekTINBHO.
BHHMaHHe! OTKNoUoyaTe BO3DyXooUcNTeNb nI3BNeKaIte shyp nHTaHnpepepeHem texHueckoro 06cnyKmbAHn.
3aMeHa yrolbHoro fIbTpappeBapntelbHOOuNTKn.
1.OTKJIIOHTe BO3dyXooOCTnTeIb N 3BNeKeKITe SHyp nITaHna.
2. CHIMMTE NepeDHOIO naHb, octOpOxHO nOTAHyB 3a HnXHIOu qactb naHIn. He npuiarate ycunn. NaHeb DOnKHa CHIMMaTbCJnerKO.
3. AkkypaTHo I3BnKeKNeTe yOrIbHbI ΦnIbTp npEdbapnteHbHO ouNCTKn, notAHyB eO rCHN3y no HAnpaBneHIO OT BepxHeu qACTn.
4.ИЗБЕКЛТЕуrolьнblйфиьтпpeДВAPNTeHNoOчИСТКИ BbIбрОТеERO.
5.ИЗВЕКИTe yroIbHbI ΦиЛьТРHa 3aMeHy I3 3akpbIbAOUIEROCNOLINSTUNENHOBOr NaKeTa,3aTeM 3aKoPte NaKeT NOBTOPOC UcJIbIO COxpaHEHcBExEcTn OCTABWIXxCФиNbTPOB.
6.YCTaHOBtE yOrIbHbI ΦnIbTp npedBaPnteJbHoO uNCTKn.

EAP300
DocynHO DaO tDeBbIX fNtbpa - yronbHbI fNtbp npedBaupTeNbOH ouCTKn fNtbp HEPA 13.
ИнданкаторnpobovрknФильтpaCnHann3npyeTo Heo6xOДIMOCTN 3aMeHbФиьтpaHEPA13.NepnoD 3aMeHb 3aBNCNTOTKOLNueCTBaYacOB NcNoIb3OBaHnKaueCTBa BO3dyxa npacNoJIOKeHn np6Opa.ODHaKO B6OJIbShINHCTBe CnyaeB HopMaIbHOro NcNoIb3OBaHnФиьTpHeo6xOДIMO 3aMeHrTBexERoJHO.
Для lyшewи npoIN3BOIDNTeHbHOCTn npoIN3BOIDNTe 3aMeHy yronbHorO fInbTpa npeDbapNTeHbHO OuNCTKn KaJdbie TpN Mecua.
Iocne 3aMeHbI fNbTpbl DoJNkhbl 6bItyTnIn3npoBaHbl. He MoTe n He nCnOJb3yIte NOBtOpHo fNlbTp HEPA 13 nn yToJIbHbI fNlbTp PpeBapInTeHbOH OuNCTk, TAK KaK OHn He 6byT pa6oTaB eΦeKtNBHO.
BnmaHne! OTKIOUaIte BO3yXoouCTntTeNb n3BNEkaTe shyp nHTaHna neped npoBeHnem texHuecKOrO 6cbnykBaHn.
3aMeHa yroIbHoro fIuIbTpapnpedBapnteHOBOuCTKn.
- OTKIIOHTe BO3DyXOOUHCTNTeB N H3BNEKUTe WHPY NTaHnA.
- CHIMMATE nepeHIO naHenb, octopoxHO nOTHyB 3a HnKHO IO taeB naHEN. He npuIraTe ycNIM. NaHenb DOxHsCHA HmMaTbCERKo.
- AkkypaTHO n3BnKeTye rObnHbIy pInbTp npedBaPnteHbHO OHCTKN IINlAeTKIOKBOYo pAMy, NOrAHyB erO CHN3y no HnpabReHNO OT BpEXHe YACh.
- INBneKeTe yroIbHbI ΦnIbTp nppeBaPnteHbHO uOcCTKn I3 nlaCTNKOBOro NaKeaTaN Bb6pocNteero.
5.ИЗВЕКITEугльньиФильт ha 3aMeHy n3 3akpbIbAошeroCЯПИЗТУNEHOBORO NaKeta,3aTeM 3aKpOte NaKeT NOBTOPO C ueIbIO COxpaHeHcBEXeCTN OCTABIMIXCAfNtPbO8.
6.YcTaHObTeYrOblBnHbIpnBtpnpEdBaPnteBHoHouCTKnHaPiactIKOByOpamy,HaDaBnBBAHBa BCEcnEuaNbHbkeKBaPaTbHa3aHeNCTOPoepaMbI.

EAP450
BHHMaHHe! OTKIIOuayTe BO3dyXooOuNCTnTeNb I N3BLeKaIteUHyp NiTuHaHNepePeI npOBeDeHMeN TexHueeCKOrO 06CnyKbHaHn.
EAP150,EAP300,EAP450
BHHMaHHe!OTKIIouaTe npI6Op n3BLeKaIte Hyp nHTaHnpeed npOBeeHnem TexHnueckoro 06cIyKnBaHn.
OuHauTe np6op nO Mepe Heo6xOIMocTn, npoTupa cyXo MraKoTKaHbIO;Iy ydaJeHna CToKnx 3arpa3HeHm IcNoJb3yIte TepnyIO BnaJxHy TOKaHb.
He nCnoB3yIe neTyue JxNkocTn, TaKne KaK 6eH3nH, paCTbOpntJIb IINu NCTaIuN npOwOk, TaK KaK OHN MOryt NOBpeDHTb NOBepXHOCTb. DePKeITe npi6Op B CyXOM COCToAHN.
-ДачИК КачEcTБа BOЗdуxa Heo6xOgIMO CnERKa NblIeCoCOnTb KaKdIbe TpN Mecra.

ПОИСК И YYSTРАЕНЕ HENСПAPВHOCTЕN

EAP150,EAP300,EAP450
| Возноковене собittа Возмождая р�чпс/сnocob устраныя. |
| Могу ля мьтб Фильтр? |
| Могу ля nbileсocntы сбой Фильтр? |
| Из пriбор Incxodintаших, оно bolyо толъкчупоста влеса мочьк ддллллллллллллллллллллллллллллллллллллллллллллллллллллллллллллллллллллллллллллллллллллллллллллллллллллдддддддддддддддддддддддддддддддддддддддддддддддддддддддддддддддддддддддддддддддддддддддддддддддддддд徳х. Балъкчу ото огшь? Балъкчу ото огшь. Балъкчу ото oгшь. Балъкчу ото oгшь. Балъкчу ото ogшь. Балъкчу ото ogшь. Балъкчу oто ogшь. Балъкчу oто ogшь. Балъкчу oто ogшь. Балъкчу oто ogшь. Балъкчу oто ogшь. Балъкчу oто ogшь. Балъкчу oто ogшь. Балъкчу oто ogшь. Бал kjвпгь. Балъкчу oто ogшь. Балъкчу oто ogшь. Балъкчу oто ogшь. Балъкчу oто ogшь. Балъкчу oто ogшь. Балъкчу oто ogшь. Балъкчу oто ogшь. Балъкчу ото ogшь. Балъкчу oто ogшь. Балъкчу oто ogшь. Балъкчу oто ogшь. Балъкчу oто ogшь. Балъкчу oто ogшь. Балъкчу oто ogшь. Бал kjвпгь. Балъкчу othead огшь. Балъкчу othead оgшь. Балъкчу othead оgшь. Балъкчу othead оgшь. Балъкчу othead оgшь. Балъкчу othead оgшь. Балъкчу othead оgшь. Балъкчу othead оgшь. Балъкчу othead оgшь. Балъкчс othead оgшь. Балъкчс othead оgшь. Балъкчс othead оgшь. Балъкчс othead оgшь. Балъкчс othead оgшь. Балъкчс othead оgшь. Балъкчс othead оgшь. Балъкчс othead оgшь. Б罗элгь. Б罗элгь. Б罗элгь. Б罗элгь. Б罗элгь. Б罗элгь. Б罗элгь. Б罗элгь. Б罗элгь. Б罗элгь. Б罗элгь. Б罗элгь. Б罗элгь. Б罗элгь. Б罗элгь Б罗элгь Б罗элгь Б罗элгь Б罗элгь Б罗элгь Б罗элгь Б罗элгь Б罗элгь Б罗элгь Б罗элгь Б罗элгь Б罗элгь Б罗элгь Б罗элгь Булгь Булгь Булгь Булгь Булгь Булгь Булгь Булгь Булгь Булгь Булгь Булгь Булгь Булгь Булгь Булгь Булгь |
| Где с想了想 Раслосить пriбор? |
| Инданай Качеба Роригь opанжевим и красьь mьгь. Возноковпь р�чпс. Возноковпь р�чпс. Возноковпь р�чпс. Возноковпь р�чпс. Возноковпь р�чпс. Возноковпь р�чпс. Возноковпь р�чпс. Возноковпь р�чпс. Возноковпь p佩пс. Возноковпь р佩пс. Возноковпь р佩пс. Возноковпь р佩пс. Возноковпь р佩пс. Возноковпь р佩пс. Возноковпь р佩пс. Возноковпь р佩пс. Возноковпь р佩пс. Возноковпь р佩пс Возноковпь р佩пс Возноковпь р佩пс Возноковпь р佩пс Возноковпь р佩пс Возноковпь р佩пс Возноковпь р佩пс Возноковпь р佩пс Возноковпь р佩пс ВознOK教 ВознOK教 ВознOK教 ВознOK教 ВознOK教 ВознOK教 ВознOK教 ВознOK教 ВознOK教 ВознOK教 ВознOK教 ВознOK教 ВознOK教 ВознOK教 ВознOK教 ВознOK教 ВознOK教 Воз钠 Воз钠 Воз钠 Воз钠 Воз钠 Воз钠 Воз钠 Воз钠 Воз钠 Воз钠 Воз钠 Воз钠 Воз钠 Воз钠 Воз钠 Воз钠 Воз钠 Воз钠 Воз钠 Воз钠 Воз钠 Воз钠 Воз钠 Воз钠 Воз钠 Воз纳 Воз纳 Воз纳 Воз纳 Воз纳 Воз纳 Воз纳 Воз纳 Воз纳 Воз纳 Воз纳 Воз纳 Воз纳 Воз纳 Воз纳 Воз纳 Воз纳 Воз纳 Воз纳 Воз纳 Воз纳 Воз纳 Воз纳 Воз纳 Воз纳 Воз納 Воз纳 Воз纳 Воз纳 Воз纳 Воз纳 Воз纳 Воз纳 Воз纳 Воз纳 Воз纳 Воз纳 Воз纳 Воз纳 Воз纳 Воз纳 Воз纳 Воз纳 Воз纳 Воз纳 Воз纳 Воз纳 Воз纳 Воз纳 Воз纳 Воз纳入 Воз纳 Воз纳 Воз纳 Воз纳 Воз纳 Воз纳 Воз纳 Воз纳 Воз纳 Воз纳 Воз纳 Воз纳 Воз纳 Воз纳 Воз纳 Воз纳 Воз纳 Воз纳 Воз纳 Воз纳 Воз纳 Воз纳 Воз纳 Воз纳 Воз钠 Воз钠 Воз钠 Воз钠 Воз钠 Воз钠 Воз钠 Воз钠 Воз钠 Воз钠 Воз钠 Воз钠 Воз钠 Воз钠 Воз钠 Воз钠 Воз钠 Воз钠 Воз钠 Воз钠 Воз钠 Воз钠 Воз钠 Воз钠 Воз納 Воз纳 Воз纳 Воз纳 Воз纳 Воз纳 Воз纳 Воз纳 Воз纳 Воз纳 Воз纳 Воз纳 Воз纳 Воз纳 Воз纳 Воз纳 Воз纳 Воз纳 Воз纳 Воз纳 Воз纳 Воз纳 Воз纳 Воз纳 Воз钠 Воз纳 Воз纳 Воз纳 Воз纳 Воз纳 Воз纳 Воз纳 Воз纳 Воз纳 Воз纳 Воз纳 Воз纳 Воз纳 Воз纳 Воз纳 Воз纳 Воз纳 Воз纳 Воз纳 Воз纳 Воз纳 Воз纳 Воз纳 Воз钠 Воз纳入 Воз纳 Воз纳 Воз纳 Воз纳 Воз纳 Воз纳 Воз纳 Воз纳 Воз纳 Воз纳 Воз纳 Воз纳 Воз纳 Воз纳 Воз纳 Воз纳 Воз纳 Воз纳 Воз纳 Воз纳 Воз纳 Воз纳 Воз纳 Воз纳入 Воз纳入 Воз纳入 Воз纳入 Воз纳入 Воз纳入 Воз纳入 Воз纳入 Воз纳入 Воз纳入 Воз纳入 Воз纳入 Воз纳入 Воз纳入 Воз纳入 Воз纳入 Воз纳入 Воз纳入 Воз纳入 Воз纳入 Воз纳入 Воз纳入 Воз纳入 Воз纳入 Воз纳入 Воз纳 Воз纳 BOLNOK BOLNOK BOLNOK BOLNOK BOLNOK BOLNOK BOLNOK BOLNOK BOLNOK BOLNOK BOLNOK BOLNOK BOLNOK BOLNOK BOLNOK BOLNOK BOLNOK BOLNOK BOLNOK BOLNOK BOLN OK BOLNOK BOLNOK BOLNOK BOLNOK BOLNOK BOLNOK BOLNOK BOLNOK BOLNOK BOLNOK BOLNOK BOLNOK BOLNOK BOLNOK BOLNOK BOLNOK BOLNOK BOLNOK BOLNOK BOLNok BOLNOK BOLNOK BOLNOK BOLNOK BOLNOK BOLNOK BOLNOK BOLNOK BOLNOK BOLNOK BOLNOK BOLNOK BOLNOK BOLNOK BOLNOK BOLNOK BOLNOK BOLNOK BOLNOK BOLNOL BOLNOK BOLNOK BOLNOK BOLNOK BOLNOK BOLNOK BOLNOK BOLNOK BOLNOK BOLNOK BOLNOK BOLNOK BOLNOK BOLNOK BOLNOK BOLNOK BOLNOK BOLNOK BOLNOK BOLNDK BOLNOK BOLNOK BOLNOK BOLNOK BOLNOK BOLNOK BOLNOK BOLNOK BOLNOK BOLNOK BOLNOK BOLNOK BOLNOK BOLNOK BOLNOK BOLNOK BOLNOK BOLNOK BOLNOK BOLN2 BOLNOK BOLNOK BOLNOK BOLNOK BOLNOK BOLNOK BOLNOK BOLNOK BOLNOK BOLNOK BOLNOK BOLNOK BOLNOK BOLNOK BOLNOK BOLNOK BOLNOK BOLNOK BOLNOK BOLN0 BOLNOK BOLNOK BOLNOK BOLNOK BOLNOK BOLNOK BOLNOK BOLNOK BOLNOK BOLNOK BOLNOK BOLNOK BOLNOK BOLNOK BOLNOK BOLNOK BOLNOK BOLNOK BOLNOK BOLN9 BOLNOK BOLNOK BOLNOK BOLNOK BOLNOK BOLNOK BOLNOK BOLNOK BOLNOK BOLNOK BOLNOK BOLNOK BOLNOK BOLNOK BOLNOK BOLNOK BOLNOK BOLNOK BOLNOK BOLNAK BOLNOK BOLNOK BOLNOK BOLNOK BOLNOK BOLNOK BOLNOK BOLNOK BOLNOK BOLNOK BOLNOK BOLNOK BOLNOK BOLNOK BOLNOK BOLNOK BOLNOK BOLNOK BOLNOK BOLN1 BOLNOK BOLNOK BOLNOK BOLNOK BOLNOK BOLNOK BOLNOK BOLNOK BOLNOK BOLNOK BOLNOK BOLNOK BOLNOK BOLNOK BOLNOK BOLNOK BOLNOK BOLNOK BOLNOK BOLNIP BOLNOK BOLNOK BOLNOK BOLNOK BOLNOK BOLNOK BOLNOK BOLNOK BOLNOK BOLNOK BOLNOK BOLNOK BOLNOK BOLNOK BOLNOK BOLNOK BOLNOK BOLNOK BOLNOK BOLNQ BOLNOK BOLNOK BOLNOK BOLNOK BOLNOK BOLNOK BOLNOK BOLNOK BOLNOK BOLNOK BOLNOK BOLNOK BOLNOK BOLNOK BOLNOK BOLNOK BOLNOK BOLNOK BOLNOK BOLNIK BOLNOK BOLNOK BOLNOK BOLNOK BOLNOK BOLNOK BOLNOK BOLNOK BOLNOK BOLNOK BOLNOK BOLNOK BOLNOK BOLNOK BOLNOK BOLNOK BOLNOK BOLNOK BOLNOK BOLNUK BOLNOK BOLNOK BOLNOK BOLNOK BOLNOK BOLNOK BOLNOK BOLNOK BOLNOK BOLNOK BOLNOK BOLNOK BOLNOK BOLNOK BOLNOK BOLNOK BOLNOK BOLNOK BOLNOK BOLNK BOLNOK BOLNOK BOLNOK BOLNOK BOLNOK BOLNOK BOLNOK BOLNOK BOLNOK BOLNOK BOLNOK BOLNOK BOLNOK BOLNOK BOLNOK BOLNOK BOLNOK BOLNOK BOLNOK BOLNIN BOLNOK BOLNOK BOLNOK BOLNOK BOLNOK BOLNOK BOLNOK BOLNOK BOLNOK BOLNOK BOLNOK BOLNOK BOLNOK BOLNOK BOLNOK BOLNOK BOLNOK BOLNOK BOLNOK BOLNIOK BOLNOK BOLNOK BOLNOK BOLNOK BOLNOK BOLNOK BOLNOK BOLNOK BOLNOK BOLNOK BOLNOK BOLNOK BOLNOK BOLNOK BOLNOK BOLNOK BOLNOK BOLNOK BOLNOK BOLNOK BOLNOK BOLNOK BOLNOK BOLNOK BOLNOK BOLNOK BOLNOK BOLNOK BOLNOK BOLNOK BOLNOK BOLNOK BOLNOK BOLNOK BOLNOK BOLNOK BOLNOK BOLNOK BOLNOK BOLNDK BOLNOK BOLNOK BOLNOK BOLNOK BOLNOK BOLNOK BOLNOK BOLNOK BOLNOK BOLNOK BOLNOK BOLNOK BOLNOK BOLNOK BOLNOK BOLNOK BOLNOK BOLNOK BOLNOK BOLNLK BOLNOK BOLNOK BOLNOK BOLNOK BOLNOK BOLNOK BOLNOK BOLNOK BOLNOK BOLNOK BOLNOK BOLNOK BOLNOK BOLNOK BOLNOK BOLNOK BOLNOK BOLNOK BOLNOK BOLNAK BOLNOK BOLNOK BOLNOK BOLNOK BOLNOK BOLNOK BOLNOK BOLNOK BOLNOK BOLNOK BOLNOK BOLNOK BOLNOK BOLNOK BOLNOK BOLNOK BOLNOK BOLNOK BOLNOK BOL.NK BOLNOK BOLNOK BOLNOK BOLNOK BOLNOK BOLNOK BOLNOK BOLNOK BOLNOK BOLNOK BOLNOK BOLNOK BOLNOK BOLNOK BOLNOK BOLNOK BOLNOK BOLNOK BOLNOK BOLNK BOLNOK BOLNOK BOLNOK BOLNOK BOLNOK BOLNOK BOLNOK BOLNOK BOLNOK BOLNOK BOLNOK BOLNOK BOLNOK BOLNOK BOLNOK BOLNOK BOLNOK BOLNOK BOLNOK BOLNZK BOLNOK BOLNOK BOLNOK BOLNOK BOLNOK BOLNOK BOLNOK BOLNOK BOLNOK BOLNOK BOLNOK BOLNOK BOLNOK BOLNOK BOLNOK BOLNOK BOLNOK BOLNOK BOLNOK BOLNGK BOLNOK BOLNOK BOLNOK BOLNOK BOLNOK BOLNOK BOLNOK BOLNOK BOLNOK BOLNOK BOLNOK BOLNOK BOLNOK BOLNOK BOLNOK BOLNOK BOLNOK BOLNOK BOLNOK BOLNCK BOLNOK BOLNOK BOLNOK BOLNOK BOLNOK BOLNOK BOLNOK BOLNOK BOLNOK BOLNOK BOLNOK BOLNOK BOLNOK BOLNOK BOLNOK BOLNOK BOLNOK BOLNOK BOLNOK BOLNPK BOLNOK BOLNOK BOLNOK BOLNOK BOLNOK BOLNOK BOLNOK BOLNOK BOLNOK BOLNOK BOLNOK BOLNOK BOLNOK BOLNOK BOLNOK BOLNOK BOLNOK BOLNOK BOLNOK BOLMOK BOLMOK BOLMOK BOLMOK BOLMOK BOLMOK BOLMOK BOLMOK BOLMOK BOLMOK BOLMOK BOLMOK BOLMOK BOLMOK BOLMOK BOLMOK BOLMOK BOLMOK BOLMOK BOLMOK BOLMNK BOLMOK BOLMOK BOLMOK BOLMOK BOLMOK BOLMOK BOLMOK BOLMOK BOLMOK BOLMOK BOLMOK BOLMOK BOLMOK BOLMOK BOLMOK BOLMOK BOLMOK BOLMOK BOLMOK BOLM2K BOLM2K BOLM2K BOLM2K BOLM2K BOLM2K BOLM2K BOLM2K BOLM2K BOLM2K BOLM2K BOLM2K BOLM2K BOLM2K BOLM2K BOLM2K BOLM2K BOLNOK BOLNOK BOLNOK BOLNOK BOLNOK BOLNOK BOLNOK BOLNOK BOLNOK BOLNOK BOLNOK BOLNOK BOLNOK BOLNOK BOLNOK BOLNOK BOLNOK BOLNOK BOLNOK BOLNMK BOLM2K BOLM2K BOLM2K BOLM2K BOLM2K BOLM2K BOLM2K BOLM2K BOLM2K BOLM2K BOLM2K BOLM2K BOLM2K BOLM2K BOLM2K BOLM2K Bolm2K Bolm2K Bolm2K Bolm2K Bolm2K Bolm2K Bolm2K Bolm2K Bolm2K Bolm2K Bolm2K Bolm2K Bolm2K Bolm2K Bolm2K Bolm2K Bolm2K CMLK CMLK CMLK CMLK CMLK CMLK CMLK CMLK CMLK CMLK CMLK CMLK CMLK CMLK CMLK CMLK CMLK CMLK CMLK CMLK CMLK CMLK CMLK CMLK CMLK CCLMK CCLMK CCLMK CCLMK CCLMK CCLMK CCLMK CCLMK CCLMK CCLMK CCLMK CCLMK CCLMK CCLMK CCLMK CCLMK CCLMK CCLMK CCLMK CCLMK CCLLK CCLLK CCLLK CCLLK CCLLK CCLLK CCLLK CCLLK CCLLK CCLLK CCLLK CCLLK CCLLK CCLLK CCLLK CCLLK CCLLK CCLLK CCLLK CCLLK CCLILK CCLLK CCLLK CCLLK CCLLK CCLLK CCLLK CCLLK CCLLK CCLLK CCLLK CCLLK CCLLK CCLLK CCLLK CCLLK CCLLK CCLLK CCLLK CCLLK CCL5K CCL5K CCL5K CCL5K CCL5K CCL5K CCL5K CCL5K CCL5K CCL5K CCL5K CCL5K CCL5K CCL5K CCL5K CCL5K CCL5K CCL5K CCL5K CCL5K CCL6K CCL6K CCL6K CCL6K CCL6K CCL6K CCL6K CCL6K CCL6K CCL6K CCL6K CCL6K CCL6K CCL6K CCL6K CCL6K CCL6K CCL6K CCL6K CCL6K CCL7K CCL7K CCL7K CCL7K CCL7K CCL7K CCL7K CCL7K CCL7K CCL7K CCL7K CCL7K CCL7K CCL7K CCL7K CCL7K CCL7K CCL7K CCL7K CCL7K CCL8K CCL8K CCL8K CCL8K CCL8K CCL8K CCL8K CCL8K CCL8K CCL8K CCL8K CCL8K CCL8K CCL8K CCL8K CCL8K CCL8K CCL8K CCL8K CCL8K CCL9K CCL9K CCL9K CCL9K CCL9K CCL9K CCL9K CCL9K CCL9K CCL9K CCL9K CCL9K CCL9K CCL9K CCL9K CCL9K CCL9K CCL9K CCL9K CCL9K CCL10K CCL10K CCL10K CCL10K CCL10K CCL10K CCL10K CCL10K CCL10K CCL10K CCL10K CCL10K CCL10K CCL10K CCL10K CCL10K CCL10K Ccl10K Ccl10K Ccl10K Ccl10K Ccl10K Ccl10K Ccl10K Ccl10K Ccl10K Ccl10K Ccl10K Ccl10K Ccl10K Ccl10K Ccl10K Ccl10K Ccl10K |
EAP150,EAP300,EAP450
Neumiestnjuje zariadenie do oblasti s prievamom, inak senzory nebudu fungovat spravne. Neumiestnjuje ho ani do blizkosti zaclon, nabytku, alebo inych predmetov, ktoré mozu zabrinit prudeni vzduchu. Jednotku umiestnite na stabilny povrch.
- Odstrante ochranny film z ovladacieho panela.
- Opatrne vytiahnite predny panel za jeho dolnu cast. Netahajte prilis silno, pretoze panel sa vytahuje laho.

EAP150
EAP150,EAP300,EAP450
EAP150,EAP300,EAP450
EAP150,EAP300,EAP450
EAP150,EAP300,EAP450
EAP150,EAP300,EAP450
- Vtaknite napajalni kabel v stensko vticnico.
- Pritisnite gumb za vklop POWER in ga drzite, dokler nezaslišite katkega piska.
- Cistilnik zraka bo v 3-4 minutah umeril tipalo za kakovost zraka.Medtem bodo lucke tipala utripale.

EAP300,EAP450
- Ko se bo tipalo umerilo, bodo lučke prikazovale samodejno delovanje (AUTO).
FILTER REPLACEMENT

EAP150
V napravista dva locena filtra: ogleni predfilter in filter HEPA 13.
EAP150,EAP300,EAP450
EAP150,EAP300,EAP450
EAP150,EAP300,EAP450
EAP150,EAP300,EAP450
- Ukopčajte kabl za napajanu uzidnu uticnicu.
- Pritisnite zadrzite dugme POWER (napajanje) dok ne cujete kratak zvučni signal.
- Čistacu vazduha je potrebno 3-4 minuta da kalibriše senzor kvaliteta vazduha. Tokom ovog vremena, svetla senzora ce treptati.

EAP300,EAP450
- KaJa ce 3aBpuN kaJIn6paunja ceH3Opa, cBeTna he 6nTu y peKmMy,AUTO" (ayTomatcKn).
ZAMENA FILTERA

EAP150
Postoje dva odvojena filtered: ugljeni pretfilter i HEPA 13 filter
- Indikator Check Filter (proveri filter) daje signale kada treba zameniti HEPA 13 filter. Period zamene ce se menjati u zavisnosti od vremena rada, kvaliteta vizduha i lokacije uredaja. Medutim, u vecini slucajeva kada se normalno koristi, filter treba da se zameni Jednom godisnje.
- Da biste ostvarili najbolje performanse, zamenite ugljeni pretfilter svaka tri mesea.
Filtere treba odloziti u otpad nakon zamene. Nemojte da perete niti ponovo da koristite HEPA 13 filter ili ugljeni pretfilter posto nece raditi efikasno.
EAP150,EAP300,EAP450
EAP150,EAP300,EAP450
EAP150,EAP300,EAP450
EAP150,EAP300,EAP450
EAP150,EAP300,EAP450
EAP150,EAP300,EAP450
EAP150,EAP300,EAP450
EAP150,EAP300,EAP450
EAP150,EAP300,EAP450
BKA3IBKN 3 TEXHIKN B3NEKNI
Ipeed noaTkom KOpntyBaHn npilaom yBaXHo npouHTaTe HabeDeHi HxKye iHctpyKci.
He do3Bolnye dtIyam rpaTc3 npIaDom.
He moxha dopyuatau uuueHHa a6o texHicHe o6cIyROByBaHHa npnilady dtTAM 6e3 BiINOBiDHorO Hargny.
-ДiTиВID8pOKIB,OCO6N3OBMeJHUMNΦi3nUHMN,ceHCOPHUMNуpo3yMOBUMN 3di6HOCTaMn OCO6N 6e3 BiIOBIOHORO DOCBIy Ta3HaHb MOKytb KOpNCYBaTncA ZIM npINaOM NIIe NiD HargIaOM a6o nICJI npOBeDEHHIhCTpyKTaKy CTOCOBHO 6e3neuHOrO KOpNCYBaHHI npINaOM I NOB'3aHNx Pn3NKIB.
- Hanpyra i yactota eIeKtpnHoi MepeXi, do kOi nIKLIOUaETbCn npuJa, MaE BiIDNOBIdaTn 3HaueHHaM, Bka3aHIM Ha Ta6JIuCuI 3 TexHiyHIMn DaHIMN.
- Y pa3i nooKoJxHn npuAyn a60 Ka6eJIO XnBHeHn 3BepHiTbcra Iy NOrO 3aMIn DO BnPo6HnKa, cepBicHO rENTpy uN iHWOI KBaJIΦIKOBaHOI OcO6n. Po6HTn ce camocTiHo He6e3neuHo.
He 3aHypoIte npnaI y Body u n iHw piINHy.
- Zei npilad npin3haueHn BnKIOUHO dIe KOpNCTyBaHHB DOMaHix yMObax. Bnpo6HnK He Hece BiIDNoBIaIbHOcTI 3a MoXJIbI 36NTKn, CnpuHHeH He npabINbHm YH HeHaJIeXHM BnKOpNCaHHM.
- He BnKOpncTObuYte npuaad HaDbopi Ta Ha MOKpIX NOBepxHx.
He TargHItb i He Hocitb npnila3a shHyp, He npntnckaite shHyp DBepuTAMN i CTeKTe, 06 shHyp He 3aunabcra 3a roctpi KpaIy N KyTN. TpmaTe shHyp noDani BiD rapaHx nobepxoHb.
He 3aHnxaIte hiAki npedMeTu B OTBOpu npuaNy. He BnKOpucToBynte npuaIad, kUo kicb Ioro OTBOpu 3abIOkoBaHo. CTeXKe, uO6 B OTBOpu He NotpanJIIN NIIIOKa, nYx, BOLOccs YN 6yDb-uo iHwe, UO MoKe nepeShKOJkaTu NOTOKy NOBiTPra.
He BnKOpncToBnyTe npuJa6e3 BCTaHOBneHx φIbTpIb.
36epiraTe npictpiN y npimiiEHHI B npoxoJOnHnx cyxnx miCzax.
He BnKOpNCToBnyTe y BOIOrnx npMlueHnHex, HApPnKlaD y BaHni. RaKoB OunuBaay NobITpy NOTpaNITb pIDnHa, BmMKHITb Ioro i 3BepHITbcra 3a KOHCyNbTaCiEIO y cepBicnH ueHtp Electrolux.
- He BnKOpncToBvIe N06Jn3y IeRko3aMmCTnx Ra3iB.
He cTaBTe npiJa6e3nocepEHNbO nID DeTeKTopOM dIMy, OckijbKn BiD zuBOrO MoKe 3MeHnHTncb ChTlNBicTb DeTeKTopa.
He cTaBTe npEmdEt Ha npiJa a6o BCEpeDnHy HbOro.
He 3akpnbaiTe BeHTnlauiHi citKn.
He BiJ'eDHyTe UHyp KINBLeHnB BiD MepeXi, NOKN OUYuBaU NOBiTpRe OxOJHOHe.
He cTaBTe ouHcyBaay nobITpy no6n3y o6irpiBaayib.
He BnKOpncToBvIe dIy uIueHnI npicTpoU MIOUci 3acO6N.
- Φиьтг HEPA 13 i Byrilbнi φиьтг рубого очиценя He можна мити
Та викоростовывати посторно (для моdenей EAP150, EAP300).
- Дя пося сени пиладу вкоростову Te pyчky Ha 3adhi nanei. He trpmaite 3a nepeDnIO naneIb.
KOMHOHETN

EAP150
A. Передна насль
B. ByrɪnbHn φɪbTp rpy6o oʊnɛŋHra (3 aHTɪb6aKTePiaIbHm nOKpɪTlʌm)
C. inbTpHEPA13
D. Kopnyc
E. OTrBip nIy BxOdy nobitpr
F. NaHeJIb KepyBaHHa

EAP300
A.переднанель
B. Pamka φijbTpa
C. ByirnbHn #iInbTp rpy6oro ouuueHHa (3 aHTn6aKTepiabHM nOKpTTAM)
D. ΦπbTp HEPA 13
E. Kopnyc
XAPAKTEPNUKNI

EAP150
Ybara! NobHcTIO CKJaIDITb NOBITpHHN fInbTp nepeD BUKOpNCtAHnM pncIPOIO (INB. PO3dIN "BCTaHOBnHnO uNsiyBaVa nobITpr")
PpIMitKa. XapaKTepeNtKu MoKyTb pi3HITncs 3aIeXHO BID moDeni.
Tnxapo6ota
PpnaI6nHaHo 6e3uMmBHeTnAToPOM i3 Tpboma WbNkOCTMa, kmy iaeanbHo nixoDnB IIN BKNOPcTaHHBHOi.
Cehcopakocti nobitpr
PpnaOcHaeHo ceHcOpom kOcTi NOBITpy, AKN BnBnE npcyTHiCtbi3HOMAHITHINX 3a6pydHIObAIB NOBITpr.

EAP300.EAP450
Ybara! NobHcTIO CKJaIbTb NOBITpHm FInbTp nepeD BHKOpNCtAHHM npCTpoIO (INB. PO3dIN "BcTaHOBHeHH OUYyBaVa nobITpr")
PpIMitKa. XapaKTepeNtKm MOkyTb pi3HHTncr 3aJexHo bId moDeni.
Tnxapo6oTa
PpnaOcHaeNo6e3yMnMBeHTnAToPOMi3YoTnpMa
BnKoCTmN,AnIdeaBHoPiXoDntBnRnBkOpNCtAHnBHOi.
FHyKuio《PlasmaWave》MOxHaBMKaTuBaBMKaTu
HaTnCKaOnu KNOnky《Auto》IpOtaRom3ceKyHd
Cencop kocti nobitpr
Ppnaad Ocaaheo cehocopom kokcti nobitpr, knn BnBnE PnpcYTHCTb p3HOMahITHX 3abpydHOBaUH nobitpr. Ppnaad ABTOMaTHOHO 36ilbWye WbNdktBe HENTNAtPOA Jn OUYIeHH 6bnJburo 06cary Nobitpa Ta WbNduWoro UcyeHHA 3abpyDHeB.
CeHcpcBtna
B6yDobAHn ceHcOp cBtNa BnAByE, KOIN B npMiuEHHI CTaTEMHO, i ATOMaTmUHO pRnnyuE CBITNOI INdkaTopo nAHeni KepyBaHH Ta 3NHXyE
WBnDKtB BENTNATOP DnT XTOI Ta EheproeefKTHBOH oboTo npnaady. KOny npmuiueHHI TEMHO, BENTNATOP o6epTaTumetbC3 NoCTiHoU cAtoTOH, He3anExHbID noka3aHb DaTnKA JKOCTI NOBITpR.
ABTomatuhe Ounuennn noBITpra
Cencop 3anaxib BnBnIe 06cra 3a6pydneHb y nobitpi i BiINOBiHM NtHOM aTOMaTHU OpeyIOE WbNdkictb BEHTNlAToPA IINIqTPMKN UCTOTN NOBITPRA.
F. BeHTnIaTOp PlasmaWaveTM
G. OTBIP DnBuxOdy nobITpy
H. NaHenb KepyBaHHa

EAP450
A.Переднй панель
B. KacetHm fJbTp cKaJaTaEBcra 3 TaKx KOMIOHeHTiB:
B1. Baratopazobn aHTnbakTepiabHn fiNbtp rpy6oro OuyiueHH
B2. Baratopazobni jntp HEPA 13
B3. Pamka jnbtpa
B4. Baratopapobn ByrInbHn fJbTp
D. Kopnyc
F. BeHTnIaTOp PlasmaWaveTM
G. OTbip dny Buxoody nobitpr
H. NaHenb KepyBaHHa

EAP150
fInbtpaiaB 3 eTann
ByirnbHn fInbTp rpy6oro ouhneHH 3aTpMMye BENKI
yactOuKn, taikrnn, uepctb DomaunHx TBapn Hnyx. BiN
nOrnHaE ra3n, kriCnpHnHIOBt HnnpHmHI 3anaXn, 3OKpeMa
3anax BiD cnarpeTHOnoDMy, po3KnadaHHopraHvHnx
npodKyTB Ta nprirotyBaHH Iki, i efeKTHBHO 3HNXyCE TEMNI
po3MHoxeHHa KaTepi i rpnskBi.
Дггггггггггггггггггггггггgггggtggtggtggtggtggtggtggtggtggtggtggtggtggtggtggtggtggtggtggtggtggtggtggtggtggtggtggtggtggtggtggtggtggtggtggtggtggtggtggtggtggtggtggtggtggtggtggtggtggtg
Φinbtp HEPA 13 3aTpmye 99.99% nobitprnHex qactouok Ta 3a6pydHnhb p03mipOM do 0,3MkPOHa, 3OKPema dIM, PII, INIOK pocnn ta iHsi aneprenu. PHpTc cnI 3amHHTN, KONB BMNAcBcITnOBIN IHNDATOP CHECK FILTER.

EAP300
fibtpauiB4etann
ByrilbHn fInbTp rpy60o ouuueHHa 3aTpMmyc BENKi
quactOHK, taK knn, uepCTdoMAuHIX TBAPIN i NYX. BIn
nOrnHae ra3n, kI cpiuHnHbTb HnPmEMHI 3aNaXi, 3OKpeMa
3anax Bi nC aPeTeHO DmY, poZkDaAHN oprAhUHX
npOdyKtB Ta npriOTyBaHHI x, I eFekTNBHO 3HNxye TEMNI
poMHoxeHHa 6aKepti i rpn6KIB.
EAP150,EAP300,EAP450
BctahOBJIouTe npnlaD y Micxay, de HemaepoTary, ockinbKn npoTAR moKe cnpuHHTN HeToHpe peayBaHHceHCOPIB. He BCTAHOBJIOTe npnad no6bn3y uTOp, me6bl Ta iHux npedMeTIB, kki Moxytb nepeKoJktaT NOtOKy nobITpA. BCTAHOBJIouTe npnlaD h a CTiKk nObePxHI.
- 3HimTb 3axnCHy nnIBKy 3 naHEni KepyBaHHa.
- 3HIMITb nepedHIO naHeIb, 3nerKa notarHyBwII 3a HxKHO qACTINHY.
HeDoklaaTe 3aBux 3ycunb: naHEnb Ierko 3HimaTbcra.

EAP150
- BntarHirb i3 nactKOBorO naYBaHHa fInbTp HEPA 13 Ta ByrInbHn fInbTp rpy6oO OMHeHH.
- Bctanobitb fInbtp HEPA 13 ctrpiko, 0o Bkaye Hanpamok notOKy nobITpy, y6ik 3adHboi naHeni npnady; 6ini BnCTyni Bropi i Bn3y fInbtpa HEPA 13 6dytb cnprMoBahi do nepeyu npnady.
- BCTaBTe nonepey fInbtpa HEPA 13 ByrInbHn fInbTp rpy6oTo OHuEHHJ.
- BctaHOBITb Ha MlCte nepeDnIO naHeB, 3aYeNMBuI II Bropi npnApy. 3aKpNIte naHeB, 3JeRka HATNCHyBUN 3 06ox 6okIB npnApy, i 3aΦikCyIte.

EAP300
- BntarHtih 3 nactKOBorO nakyBaHHa fInbTp HEPA 13 Ta ByrInbHn fInbTp rpy60r OumueHH.
- Bctanobitb fInbtp HEPA 13 cpiikko, 10o Bkayc Happamok notoky nobitrpa, y6ik 3adhboi nahei npnady; 6ini Bnctyn Bropi i Bn3y fInbtpa HEPA 13 6ydyb cnpmaobani do nepedy npnady.
-
PnpkpiBt ByirbHn fihbTp rpybOro OunieHHa nnactIKBOI paMKn 3a Donomoro Bcx KBApaTHnx 3acti6ok-njnuyQOK ha3dniNobepxHi paMKn.
-
BCTaHOIBt IInactMaOby paMky, BCTaBbUbn II bepxHIMN BuCTynAm B OuyuYBaN oOBITpy i 3nerKa HaTNCyBwn Ha HnKhi BnCTyn, Uo6 pAMKa 3aikcyBaNacr. BCTaHOIBt Ha Micte nepeHIO naHEnb, 3aueNHBm II bropi npnnaIy. 3aknnTe naHEnb, 3nerKa HaTNCyBwn 3 06ox 6okib npnnaIy, i 3aikcyIte.

EAP450
- Bnimitb kaceTHn fInbtp i 3Himt b i3 HbOro nactKOBe naKyBaHHa.
4.BCTAHOBITb KaceTHH JIbTp, BCTABUNN Ioro BEPxHMn BVCTynAMB OCHUByaH NOBITpi 3nerKa HATNCHyBn Ha HxHHi BVCTyn, IO6 3aΦIKCyBaTn. - BctaHOBb Ha Micce nepeHIO nAHeNb, 3aueNMBn II Bropi npnaNy.
6.3akpnnte naHelenb,3nerka HATnchyBwn 3 06ox 6okib npnady,i aphiKcyte.

EAP150,EAP300,EAP450
7.Пд' endaHTe shyP kNbIeHHnDo eJekTpopo3eKn.
8. HataChiB i ytpmMyTe KhoNky POWER, noKn He npOyHaK okoTkn 3ByKObN CnRHaJ.
9.3-4XBnHnH3HaO6bTcBdToro,06OuNcUyBaN NOBITPBAKHOHAB KANI6pyBaHHeHCopa kOcTi NOBITpI.IIacZbOro CBrTINoBI IHnKaTopn CeHCopB 6mMaTMMyTb.

EAP300,EAP450
10.ПicяЗаершнкалбуаннсвлповиндкатрппepeйдьуpeхm"AUTO".

3AMIHAΦIJIbTPA

EAP150
Ppnaad Mae Dba Okpei fInbtpn: ByrInbHn fInbTp rpy6oOuHneHH i InbTp HEPA 13.
IINKATOP"CheckFilter"cHrHanl3y npo notpe6y 3amHH IbtpaHEPA13.TepMH cnyx6n Ibtpa pi3Hntbcra 3aJexHO BID KINbKocTI rOINB BKNOpCTaHH, kOcTI NObitpi i pO3aTuBaHH npuady. Ondak 3a 3BnuHnx yMOB BnKOpCTaHH IbTpnotpHo mHrtu Ondn pa3 Ha pik.
Ipy600 ouuueHHKx Tpu mcaui.
Iicra 3aimi nctapi fipbtp cnid ytni3ybaTn. FInbp HEPA 13 i ByrInhni fInbp rpy60o OunuHHe MoKHa MNTn Ta BHKOpNCTOBvBaTN NOBtOPO, OckinbkN icna cboR BOHN He npaIOBAtMBye eEkeTMBHO.
Ybara!pepe 6ydb-ramTexo6nyrobyBaHmOuHcyBaNa nobirpna nD BnMKNHTiBIDeHaTnBIDeneKtpomepexi.
3aHaByrInbHorophiIbTpraRpy6oOuHHeHHA
- BmKnItb ouuSyBaay nobitpr i bID'edHaTe BiD po3eKn eNEkTpNHH shHyp.
- 3HIMITb nepeDnIO naHeIb, 3JIerKa notaRhyBUN II 3a HNKeHIO qactHy. He JOKnaJaIte 3aBnx 3ycInb: naHeIb IerKo 3HImAcTbcra.
- BnIMtB ByrInbHn fInbTp rpy6oro Ounuenn, o6epexHo notarHyBm Ioro Do ce6e 3a HxHIO qactHy i DOHNy 3a BEPxHIO qactHy.
- BnHbBn ByrInbHn fInbTp rpy6oro ouuueHH, BNKnHbTe noro.
- BnmiMb 3mHHN ByrInbHn fInbTp rpy6o OuHHeH 3 nactIKOBORO naKeta i 3HOBy rePMeTuHNo 3aKnTe naKeT dna 36epexeHnCBiXocTi fInbTa, IIO B HbOMy 3aNNBcA.
- BCTaBTe ByrInbHnФiIbTp rpy6o OuHneHHA.

EAP300
Ppnaad Mae Dba Okpei fInbtpn: ByrInbHn fInbTp rpy6oro OunueHH i InbTp HEPA 13.
IINKaTOp "Check Filter" cunHanl3y npo notpe6y 3amHn fInbtpa HEPA 13. TepmH cnJx6bn fInbtpa pi3HnTbcra 3aJIeXHO BID KINbKOcTi rOINH BnKOpNCtAHN, AKOCTI nobITpr i pO3TaWbAHN npnAyn. ONgak 3a 3BnHnx yMOB BnKOpNCtAHN fInbTp notp6HO mIHrTo OINH pa3 Ha pIK.
Дя ONTIMaIbHoi efeKtNBHOCTi po6To npnlaDy 3MiHOte ByrIbHni φIbTp rpy6Oro OUnIeHHa KoxHnx TpN MiCAJI.
Iicra 3aHn capi pfibtp cnid ytni3yBaTu. FInbTp HEPA 13 i ByrInhHn fInbTp rpy60r OunueHH He moXHa MNTu Ta BHKOpNCTOBvBATN NOBtOPHO, OCKINbKN IcNl CbOTo BOH He npaIOBATMMyTb eEkeKTHBHO.
Ybara! Ppeep 6ydb-RAKIM Texo6cnyrobyBaHHM ONUUBya nobirpna noro cnB BUMKHytn i BiD'eHaTn BiE enekTpomepi.
3aHa ByrInbHoro fInbTpra rpy6o oUmueHHA
- BmKnItb OunuBau nobitpr i biD'EnHaTe BiD po3eKn enEeKTPnHn shyp.
2.3HimTb nepedno naHEnb, 3nerKa nOteRhyBUNI 3a HNHO aCTnHy. He knaadTe 3aBnX 3cInb: naHEn bJeKo 3HimaTeBCr. - BnMItb ByrInhNn fInTp rpy6o OOnuEHHa 3 nactKIOBO pAmKOIO, oBepeKHO NOIeTHyBwH NOrO Do Ce6e 3a HnKHOACTnHy I DOHN3y 3a BEpXHNO ACTnHy.
- Bi'cHaIte ByrInbHn fInbTp rpy6oO ouHneHHa BID pIactIKOBoi paMK Ta BKNHbTe NOrO.
- BnIMtB 3mHnNByrInbHnΦiNbTp rpybOro OunHeHn 3 nactKOBOro NaKeTa i 3HOy RepeMtHNO 3aKpNiTe NaKeT dIe6epEgeHH CBXkOCT ΦiNbTPa, uO b HbOMy 3aNNWBCR.
- PnkpinlB byIbHHn fIbTp rpyoTo OuHHeHn DO nactKOBoi pAMKn 3a donOMoro IOeCTN KBaDpTHNX 3act6ok-lnnyUOK Ha 3aJHi NObepxHl pAMKn.
EAP450
Ybara!peep6ydb-ramTexo6cnyrobyBaHHm ouuzybau noBITpna NorO cnID BnMKHyTu i BiD'edHaTu BId eNEKtpomepexi.
CkepoByte npbT nctaHnHOKepeBaHHB HnpanMky ouuuybaa nobitpa.Padiyc II npbTa-6 M BiD ouuuybaa nobitpr.
IynbT DnctaHuiHoro KepyBaHHa MaE Okpemn HactiHnn TpMaay, kAn MoXHa npKpInNT Do CTiH y 3pyHOMy Micci 3a DOnomorOHO TBINTA.
S. POWER: BnKOpNCTOByTe KhoNky XKnBHeHnIy BmKaHH Ta BmKaHH npuJaNy. Iicra yBimKHeHH a6o BmKHeHH npuJaNy lyHae KOPOTkn 3ByKOBn CuHaJ.
T. Pekm AUTO: KhoNka AUTO BnKOpNCObYeTBcra DnBBIMKHeHHA abOMaTHuHOro peXmU pObotn.
U. FAN SPEED: Bhaicniok HaTnCKaHn KhoNKn Bropy a6o Bn3 npnaad 3MiHOBaTmE WbNkICTb BEHTnIaTopa i nepeJeBpyHn peKm KepyBaHHa.
ДОГЛЯД ITEXOBСЛУГОВBAHнЯ

EAP150,EAP300,EAP450
Ybara!peep6ydb-ramTexo6cIyrobyBaHnM npnilny Ioro cniBumkHytni BID'cnHaTn BiD eneKtpomepexi.
3aNotpe6n npotnpaIte npnilad cyxOIO M'raHcipKO; nla CTiIKnx 3a6pydHeh BnKOpncTOBynt raHcipKy, 3BOLOKeHy TenII BOi.
V.TURBO:uKHOKNKaBnKOpNCbOBycBdIe NpeemukH3aTOMaTHoR0peXmMyi3aNyCKy peXmMy MaKImaJbHOrO OUnSeHHN NOBITp3aMaKImaJIbHOI WbUdkocTi.UBuIkictB Turbo 36epiraTMeTbC,doKnII He 6yHe 3MiHeHO Ha abTOMaTHHn a6o pyHn peXmM.
3aMiHa 6aTapei
- CnchItb BnCTyNk KpnuKn 6aTapeHOrO BiDckiy, OJHOuacHo BNMaIOU NkPnUkY 3 NyBtA.
2.BCTaTe 6aTaPeI,AK NOKa3aHO Ha MaJIOnHcy,I 3aKpIITe KpuKy 6aTapeHoro BIDcIky. - 3aBxDn BnKOpNCToByTe nIiEBy 6aTapeo CR2025 Ha 3 B. BnKOpNCtAHH HeiDnOBiHOi 6aTapei MoKe cnPnHHn BNtIK i3 Hei piHN Ta/abO ii NowKOjKeHH.
He BnKOpncTObyIe neIIOU pIDHH, TaKi Jk 6eH30n HPO3uHHNK, a6o npOwOK IaI yIuEHH, OCKJIbKn BOHN MoKyTB NooKOJITN NOBepxHIO. PpNJad MaE 6yTu 3aBXd cyXmM.
KoXHi TpN MiCauZI 3JeRka YnCTbTe NInococom CeHcop KaOci NOBITpa.

UCYHEHHH HECNPABHOCTE

EAP150,EAP300,EAP450
Share more of our thinking at www.electrolux.com

Printed on recycled paper