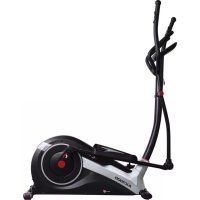
CT 1 - Elliptical bike Christopeit - Free user manual and instructions
Find the device manual for free CT 1 Christopeit in PDF.

| Product type | Elliptical trainer |
| Brand | Christopeit |
| Model | CT 1 |
| Dimensions (L x W x H) | 94 x 51 x 156 cm |
| Device weight | Approximately 23 kg |
| Maximum user weight | 100 kg |
| Power supply | 2 AA 1.5V batteries (not included) |
| Resistance type | Brake band with progressive adjustment |
| Computer | Digital display: speed, distance, time, calories, scan |
| Use | Private domestic, class H/C (EN 957-9) |
| Standards | EN ISO 20957-1, EN 957-9 H,C |
| Required training area | At least 3.5 m² |
| Maintenance | Check screws every 50 h; lubricate axles every 100 h |
| Cleaning | Damp cloth; avoid aggressive solvents |
| Transport | Front wheels; lift the rear foot |
| Spare parts | Ref. 1320; available through the manufacturer |
| Repairability | Use of original spare parts recommended |
| Safety | Consult a doctor before training; do not exceed 60 min/day |
Frequently Asked Questions - CT 1 Christopeit
User questions about CT 1 Christopeit
0 question about this device. Answer the ones you know or ask your own.
Ask a new question about this device
Download the instructions for your Elliptical bike in PDF format for free! Find your manual CT 1 - Christopeit and take your electronic device back in hand. On this page are published all the documents necessary for the use of your device. CT 1 by Christopeit.
USER MANUAL CT 1 Christopeit
Assembly and exercise instructions for Order No. 1320

- Summary of Parts Page 3
- Important Recommendations and Safety Information Page 12
- Parts List (List of spare parts) Page 13 - 14
- Assembly Instructions With Exploded Diagrams Page 15-17
- Cleaning, Checks and Storage Mount, Use & Dismount Page 18
- Computer instructions
- Training Instructions, Warm up
Dear customer,
We congratulate you on your purchase of this home training sports unit and hope that we will have a great deal of pleasure with it. Please take heed of the enclosed notes and instructions and follow them closely concerning assembly and use.
Please do not hesitate to contact us at any time if you should have any questions.
Important Recommendations and Safety Instructions
Our products are all tested and therefore represent the highest current safety standards. However, this fact does not make it unnecessary to observe the following principles strictly.
- Assembly the machine exactly as described in the installation instructions and use only the enclosed, specific parts of the machine. Before assembling, verify the completeness of the delivery against the delivery notice and the completeness of the carton against the assembly steps in the installation and operating instructions.
- Check the firm seating off all screws, nuts and other connections before using the machine for the first time and at regular intervals to ensure that the trainer is in a safe condition.
- Set up the machine in a dry, level place and protect it from moisture and water. Uneven parts of the floor must be compensated by suitable measures and by the provided adjustable parts of the machine if such are installed. Ensure that no contact occurs with moisture or water.
- Place a suitable base (e.g. rubber mat, wooden board etc.) beneath the machine if the area of the machine must be specially protected against indentations, dirt etc.
- Before beginning training, remove all objects within a radius of 2 metres from the machine.
- Do not use aggressive cleaning agents to clean the machine and employ only the supplied tools or suitable tools of your own to assemble the machine and for any necessary repairs. Remove drops of sweat from the machine immediately after finishing training.
- WARNING! Systems of the heart frequency supervision can be inexact. Excessive training can lead to serious health damage or to the death. Consult a doctor before beginning a planned training programme. He can define the maximum exertion (pulse, Watts, duration of training etc.) to which you may expose yourself and can give you precise information on the correct posture during training, the targets of your training and your diet. Never train after eating large meals.
- Only train on the machine when it is in correct working order. Use original spare parts only for any necessary repairs. WARNING! Replace the worm parts immediately and keep this equipment out of use until repaired.
- When setting the adjustable parts, observe the correct position and the marked, maximum setting positions and ensure that the newly adjusted position is correctly secured.
- Unless otherwise described in the instructions, the machine must only be used for training by one person at a time. The exercise time should not overtake 60 min./daily.
-
Wear training clothes and shoes which are suitable for fitness training with the machine. Your clothes must be such that they cannot catch during training due to their shape (e.g. length). Your training shoes should be appropriate for the trainer, must support your feet firmly and must have non-slip soles.
-
WARNING! If you notice a feeling of dizziness, sickness, chest pain or other abnormal symptoms, stop training and consult a doctor.
- Never forget that sports machines are not toys. They must therefore only be used according to their purpose and by suitably informed and instructed persons.
- People such as children, invalids and handicapped persons should only use the machine in the presence of another person who can give aid and advice. Take suitable measures to ensure that children never use the machine without supervision.
- Ensure that the person conducting training and other people never move or hold any parts of their body into the vicinity of moving parts.
- At the end of its life span this product is not allowed to dispose over the normal household waste, but it must be given to an assembly point for the recycling of electric and electronic components. You may find the symbol on the product, on the instructions or on the packing.
The materials are reusable in accordance with their marking. With the re-use, the material utilization or the protection of our environment. Please ask the local administration for the responsible disposal place. - To protect the environment, do not dispose of the packaging materials, used batteries or parts of the machine as household waste. Put these in the appropriate collection bins or bring them to a suitable collection point.
- This machine is a speed-dependant machine, i.e. the power increases with increasing speed, and the reverse.
- The machine is equipped with infinitely adjustable resistance which allows the braking resistance and thereby the training exertion to be reduced or increased. Turning the adjusting knob for the resistance setting towards the minus sign reduces the braking resistance and thereby the training exertion. Turning the adjusting knob for the resistance setting towards the plus sign increases the braking resistance and thereby the training exertion.
- The maximum permissible load (=body weight) is specified as 100 kg. This machine has been tested and certified in compliance with EN ISO 20957-1 and EN 957-9, H, C". This item's computer corresponds to the basic demands of the EMV Directive of 2004/108/EC.
Parts List - Spare Parts List Crosstrainer CT 1 Order No. 1320
Technical data: Issue: 01. 11. 2014
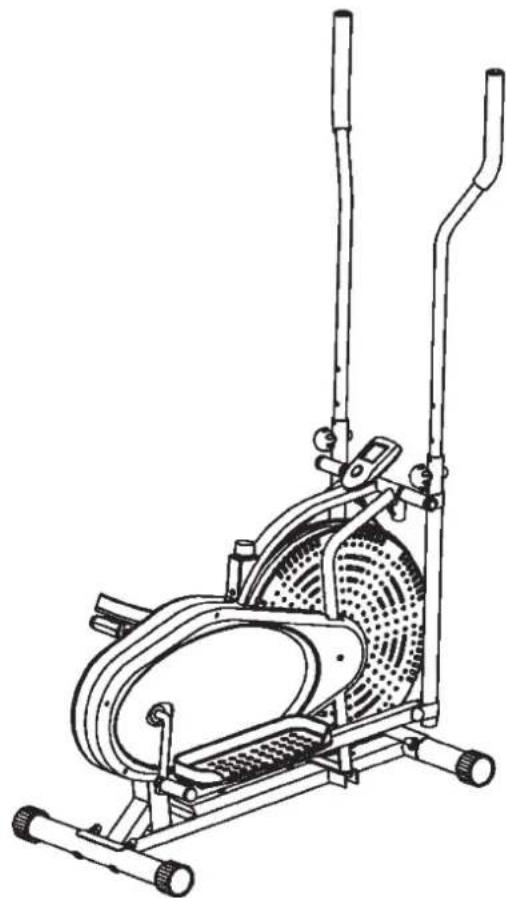
Combination of jogging belt, home trainer and stepper Elliptical movements forwards and backwards Joint-protecting training of the leg, buttock, hip, thigh and arm muscles
friction band braking system
- Infinitely variable resistance adjustment
4-times height adjustable hand grip
hand grip can be blocked
- Front transport rollers
- Easy to use computer with digital display of: speed, distance, time, approx. calorie consumption and scan.
Load max. 100Kg body weight
Weight of item approx.23Kg
Space requirement approx. L 97 x W 52 x H 142 cm
Exercise space approx: min. 3,5m^2
Please check after opening the packing that all the parts shown in the following parts lists are there. Once you are sure that this is the case, you can start assembly.
Please contact us if any components are defective or missing, or if you need any spare parts or replacements in future.
This product is created only for private Home sports activity and not allowed to us in a commercial or professional area. Home Sport use class H/C
| 0 | 5 | 10 | 15 | 20 | 25 | 30 | 35 | 40 | 50 | 60 | 70 | 80 | 90 | 100 mm |
| Illustration No. | Designation Dimensions Quantity Attached to ET number mm | illustration No. | ||
| 1 | Main frame | 1 | 33-9825201-SI | |
| 2 | Front bottom tube | 1 | 33-9825202-SI | |
| 3 | Back bottom tube | 1 | 33-9825203-SI | |
| 4L | Swing bar left | 1 | 33-9825204-SI | |
| 4R | Swing bar right | 1 | 33-9825205-SI | |
| 5 | Chain wheel | 1 | 36-9825222-BT | |
| 6L | Pedal tube left | 1 | 33-9825206-SI | |
| 6R | Pedal tube right | 1 | 33-9825207-SI | |
| 7L | Handle bar left | 1 | 33-9825208-SI | |
| 7R | Handle bar right | 1 | 33-9825209-SI | |
| 8L | Chain cover left | 1 | 36-1320-01-BT | |
| 8R | Chain cover right | 1 | 36-1320-02-BT | |
| 9 | Fly wheel | 1 | 36-9825204-BT | |
| 10 | Wave washer | 16//28 | 1 | 36-9918-22-BT |
| 11L | Pedal left | 1 | 36-1320-04-BT | |
| 11R | Pedal right | 1 | 36-1320-05-BT | |
| 12 | Long axle | 1 | 33-9825210-SI | |
| 13 | Foot caps | 2" | 4 | 36-9825207-BT |
| 14 | Foam grip | 2 | 36-9825208-BT | |
| 15 | End cap | 1" | 2 | 36-9825209-BT |
| 16 | Plastic bushing | 1¼" | 4 | 36-9825210-BT |
| 17 | Knob | 2 | 36-9825211-BT | |
| 18 | Transportation roller | 2 | 36-9825212-BT | |
| 19 | Steel bushing | 5/8" | 10 | 36-9825213-BT |
| 20 | Steel bushing | 3/8" | 4 | 36-9825214-BT |
| 21 | Brass bushing | 10 | 2 | 36-9825215-BT |
| 22 | Fan wheel axle | 1 | 36-9825216-BT | |
| 23 | Axle nut small | 3/8" | 4 | 36-9825217-BT |
| 24 | Oval cover | 2 | 36-1320-06-BT | |
| 25 | Axle nut | 3/8" | 2 | 36-9825219-BT |
| 26 | Sensor | 1 | 36-9825220-BT | |
| 27 | Crank | 1 | 36-9825221-BT | |
| 28 | Bolt | 4,2x18 | 4 | 36-9111-38-BT |
| 29 | Washer | 23/38 | 1 | 36-9713-07-BT |
| 30L | Bearing cover 1 | M22 | 1 | 36-9713-03-BT |
| 30R | Bearing cover 2 | M23 | 1 | 36-9713-06-BT |
| 31 | Ball bearing | 30/45 | 2 | 36-9713-02-BT |
| 32 | Ball bearing holder | 2 | 36-9713-01-BT | |
| 33 | Nut | M22 | 1 | 36-9713-05-BT |
| 34 | Chain | 1 | 36-9825229-BT | |
| 35 | Tension belt | 1 | 36-9825230-BT | |
| 36 | Tension control | 1 | 36-9825231-BT | |
| 37 | Bolt | M8x50 | 4 | 39-9811-SW |
| Illustration No. | Designation Dimensions Quantity Attached to ET number | |||||
| 38 Screw 4,2x20 2 8 | 36-9825233-BT | |||||
| 39 Screw 4,2x40 3 8 | 36-9825234-BT | |||||
| 40 | Cross screw | M5x15 | 1 | 36 | 36-9825235-BT | |
| 41L | Pedal bolt left | 1/2" | 1 | 6L | 36-1320-07-BT | |
| 41R | Pedal bolt right | 1/2" | 1 | 6R | 36-1320-08-BT | |
| 42 Bolt | M6x35 | 2 22 | 39-10000 | |||
| 43 | Screw cap | for M8-13 | 2 | 4 | 36-9988109-BT | |
| 44 | Hex bolt | M10x45 | 4 | 6+11 | 39-10131 | |
| 45 Nylon nut | M10 | 6 44+49 | 39-9981 | |||
| 46 Washer | 8//20 | 4 37 | 39-10232-VC | |||
| 47 Cap nut | M8 4 37 | 39-9900-SW | ||||
| 48L | Nylon nut left | 1/2"x 8 | 1 | 41L | 36-9111-19-BT | |
| 48R | Nylon nut right | 1/2"x 8 | 1 | 41R | 36-9111-20-BT | |
| 49 | Hex bolt | M10x55 | 2 | 4+6 | 39-9976-SW | |
| 50 Computer | 1 1 | 36-1320-03-BT | ||||
| 51 | Spring washer | for 1/2" | 2 | 41 | 36-9825247-BT | |
| 52 | Spring washer | for M10 | 2 | 57 | 39-9995 | |
| 53 | Small chain wheel | 1 | 9 | 36-1320-09-BT | ||
| 54 Nylon nut | 1/4" 2 58 | 36-9825238-BT | ||||
| 55 | Washer | 22//35 | 1 | 27 | 36-9713-04-BT | |
| 56 | D sharp washer | 2 | 57 | 36-9825245-BT | ||
| 57 Bolt | M10x18 | 2 12 | 39-10086 | |||
| 58 | Hex bolt | 1/4"x 2" | 2 | 18 | 36-9825237-BT | |
| 59 | End cap | for M10 | 4 | 45+49 | 36-9988109-BT | |
| 60 | End cap | for M12 | 2 | 48 | 36-1386-24-BT | |
| 61 Tool Set | 1 | 36-1320-10-BT | ||||
| 62 | Assembly and exercise instruction | 1 | 36-1320-11-BT | |||
Assembly Instructions
Remove all the separate parts from the packaging, lay them on the floor and check roughly that all are there on the base of the assembly steps. Please note that a number of parts have been connected directly to the main frame and preassembled. In addition, there are several other individual parts that have been attached to separate units. This will make it easier and quicker for you to assemble the equipment. Assembly time: 30 - 40 min.
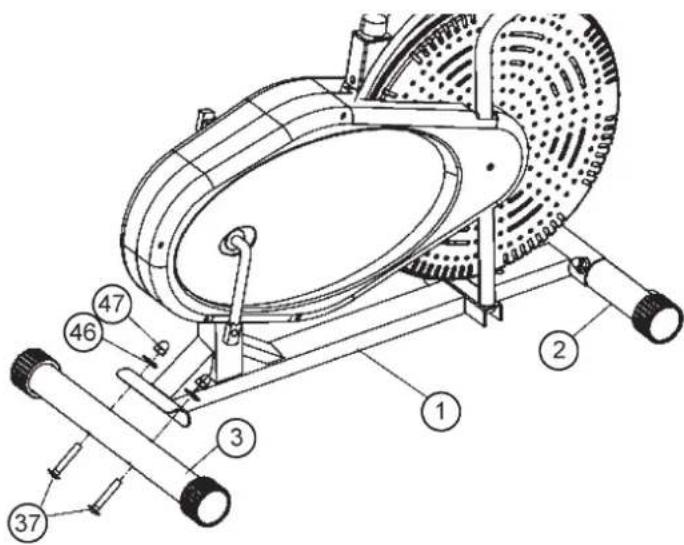
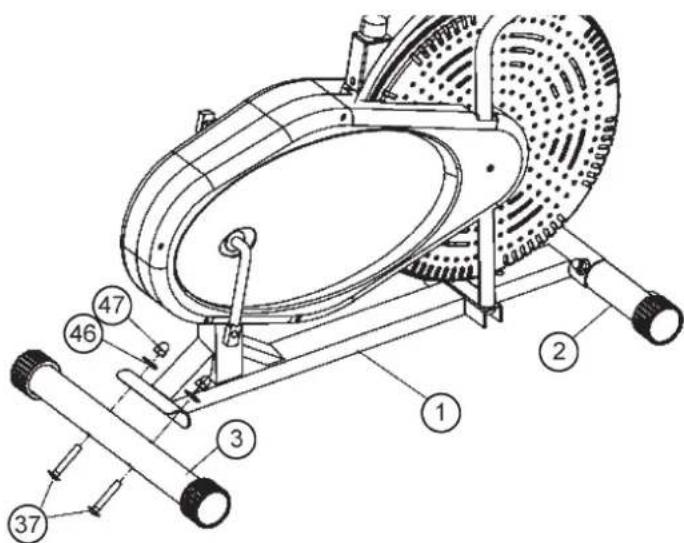
Step 1:
Attach the stabilizer (2 + 3) at main frame (1).
- Attach the front foot (2) with the preassembled transport rollers to the main frame (1). Do this with the two screws M8x50 (37) curved washers 8//20 (46) and cap nuts (47).
- Attach the rear foot (3) to the main frame (1). Do this with the two screws M8x50 (37), curved washers 8//20 (46) and cap nuts (47).
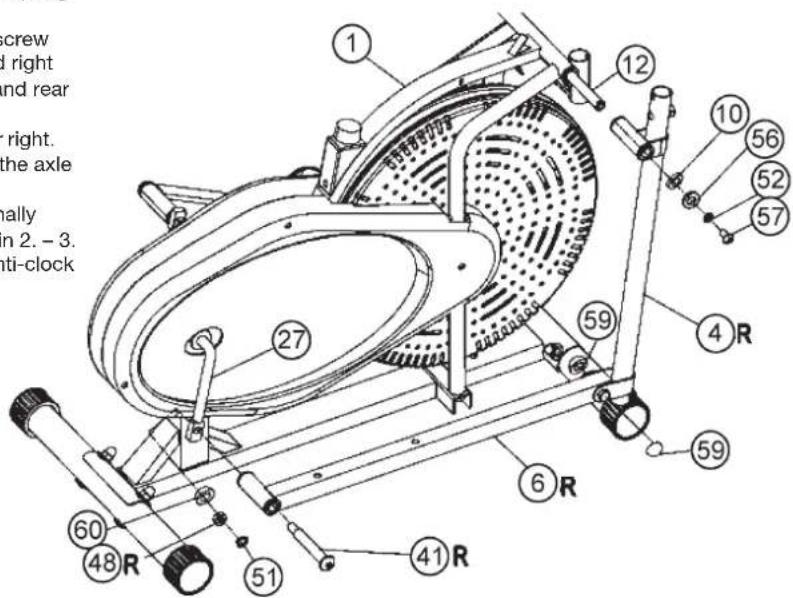
Step 2:
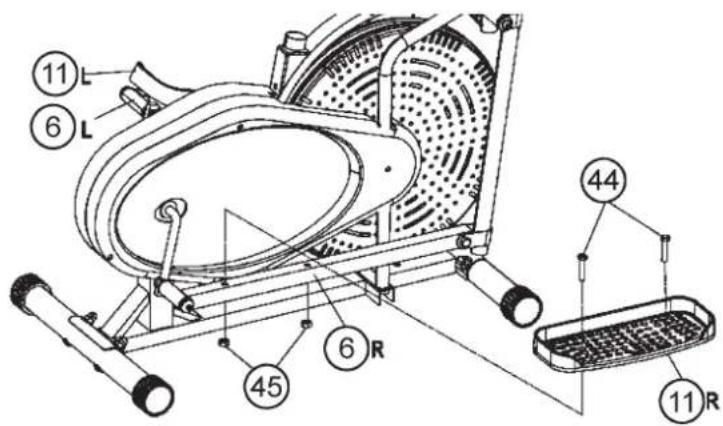
Attach the pedal tube (6) and the swing tubes (4).
- Remove the screws (57), wave washer (10), spring washers (52) and D-shape washers (56) from long axle (12) and push the long axle (12) centered into the holder of main frame (1). Put on one side the wave washer (10) onto one axle (12).
- Place the swing tube right (4R) on the right hand side of the main frame (1) onto the end of long axle (12). (Note: Right is specified as viewed standing on the machine during training.) Put the D-shape washer (56) in position and secure swing tube right (4R) by using screw (57) and spring washer (52).
- Screw the right pedal tube (6R) at the pedal crank (10) with axle screw right (41R) tightly and secure position with spring washer (51) and right nut (48R) firmly. Then put the screw caps (59 + 60) onto the front and rear connection pointsof pedal tube right (6R).
(Note: The screws (41L+R) are marked with "L" for left and "R" for right. Please use appropriate nut for left and right screw. On right side the axle screw and nut have to screw clock wise.)
- Install the left pedal tube (6L) and swing tube (4L) incl. all additionally required parts on the left hand side of the machine as described in 2. -3. (Note: The screw direction on left side for axle screw and nut is anti-clock wise.)
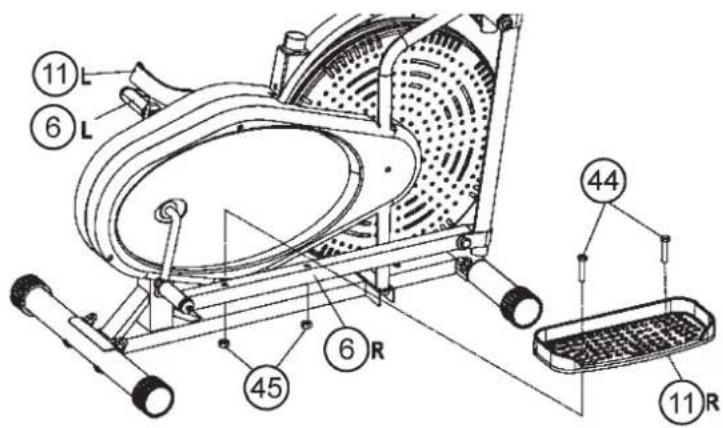
Step 3: Attach the pedals (11) at the pedal tubes (6).
- Push the right footrest (11R) onto the right pedal tube (6R). Adjust the holes in the parts so that they are aligned.
- Push the screws (44) from above through the holes and from the opposite side screw on a nut (45) and tighten firmly.
- Install the left footrest (11L) on the left pedal tube (6L) as described in 1.-2. (Note: The right and left footrests can be discerned by the edges of the longitudinal sides of the footrests. The high edges of the footrests (11L+11R) must point inwards (towards the main frame (1)).)
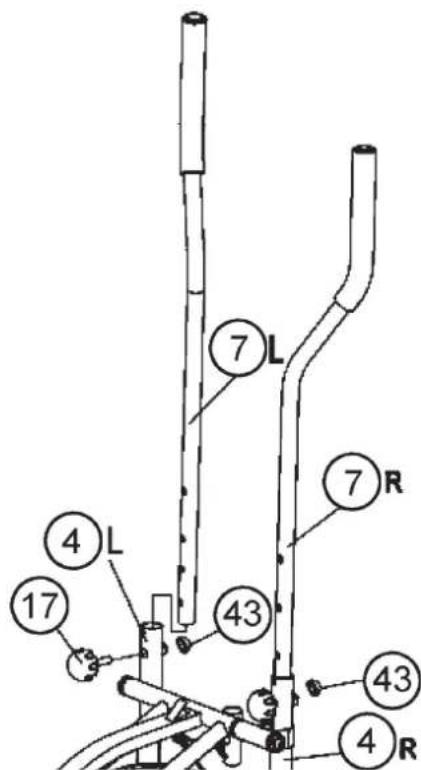
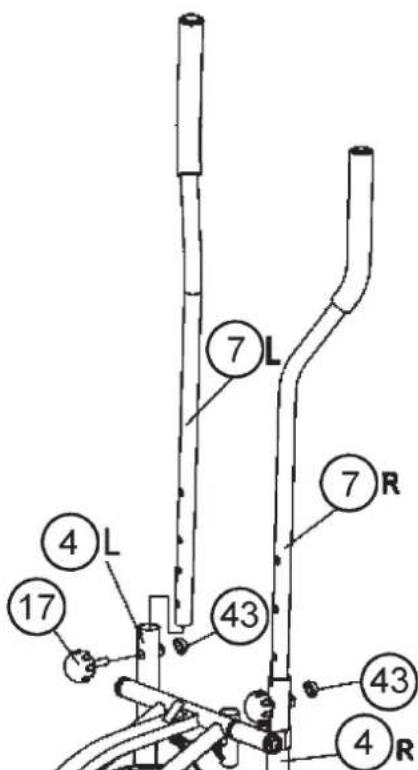
Step 4: Attach the handle bars (7L + 7R) at swing tubes (4) or main frame (1).
- You can easily switch your handlebars (7L+7R) between the dual-action mode and the fixed mode during your workout.
Dual - action mode:
To allow the handlebars to move along with the pedals, attach them to the swing tubes (4L + 4R) . Select a height setting that is comfortable to the user, and make sure both handlebars in place with a hand grip knob (17). Also take care at assembling that the upper bended hand grip has direction towards to your body. Place the screw caps (43) onto the welded nuts on swing tubes (4L + 4R) .
Fixed Mode:
To keep the handlebars (7L+7R) stationary, attach them to the holder at main frame (1). As with the dual-action mode. Set both handlebars at the same comfortable height and secure them with knob bolts (17).
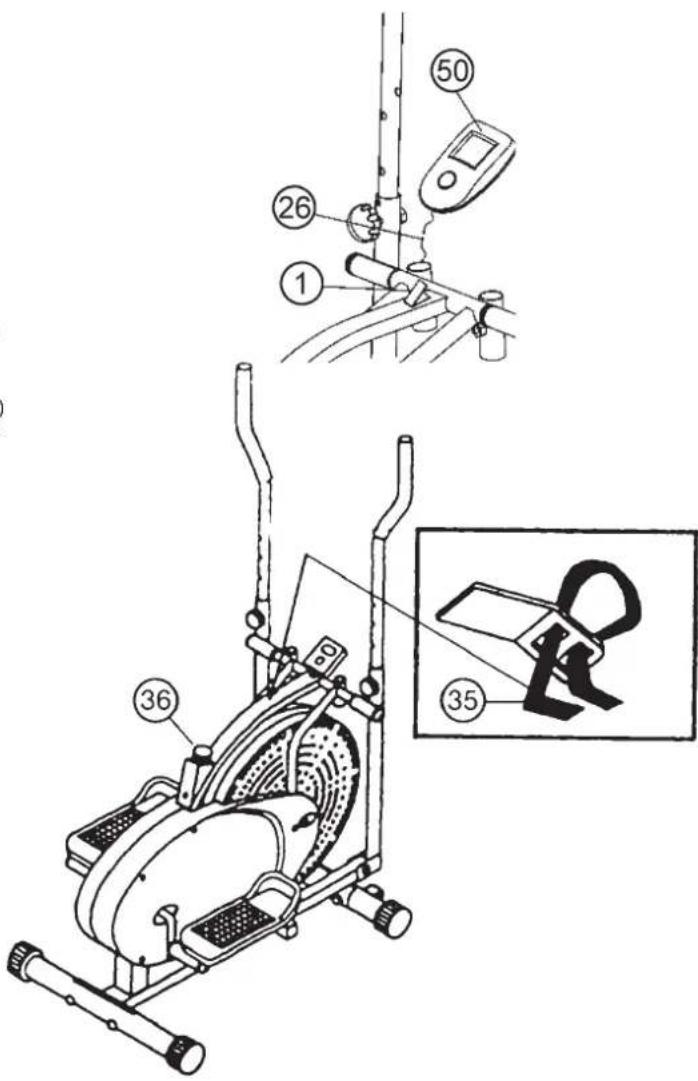
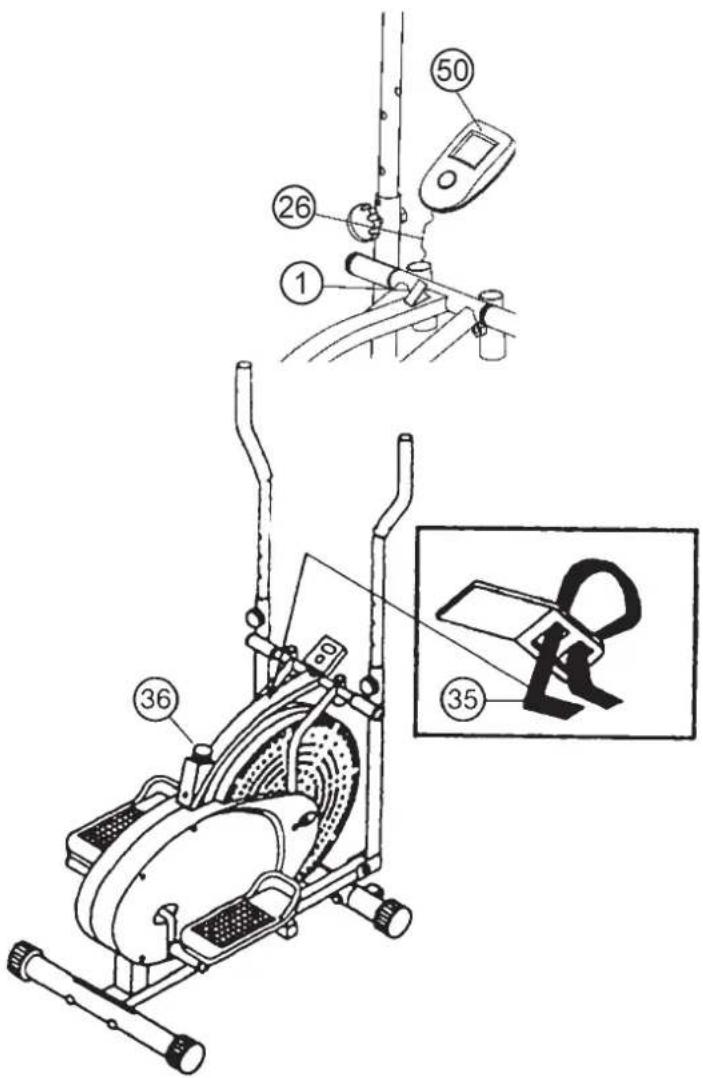
Step 5:
Attach the computer (50) at main frame (1).
- Take the computer (50) that has been supplied out of the packaging and insert the batteries (Type "AA"-1.5 V pencils) by watching for the right polarity on the back of the computer (50).
(Batteries for the computer are not included in this item. Please buy them at your located market.) Push the computer (50) onto appropriate holder of main frame (1) and connect the sensor cable (26).
Function principle of resistance regulation:
By turning the resistance knob in n + ^n or n - ^n direction, the brake belt (35) will get more or less tension over the flywheel so that the exercise resistance decreases or increases. If the brake belt (35) is loosely or be slipped off from the flywheel, so you first have to turn the resistance knob (36) towards n^n . Then put the brake belt (35) in the track on the flywheel (9) and attach the end of the brake belt (35) at base frame by means of a belt loop as shown. (A) Clamp the brake band (35) only slightly by hand and check by turning towards n + ^n of resistance regulation (36) whether the desired level of resistance can be adjusted.
Step 6:
Checks
- Check the correct installation and function of all screwed and plug connections. Installation is thereby complete.
- When everything is in order, familiarise yourself with the machine at a low resistance setting and make your individual adjustments.
Note: Please keep the tool set and the instructions in a safe place as these may be required for repairs or spare parts orders becoming necessary later.
Mount, Use & Dismount
Transportation of Equipment:
There are two rollers equipped on the front foot. For moving, you can lift up the rear foot and drive it to where you would like to locate or store it.
(Attention: If this item hasn't got a fixed handlebar, please use carefully the left and right arms for procedure.)
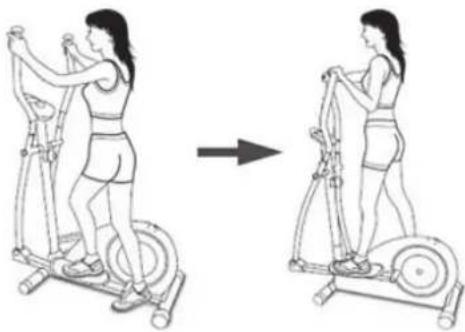
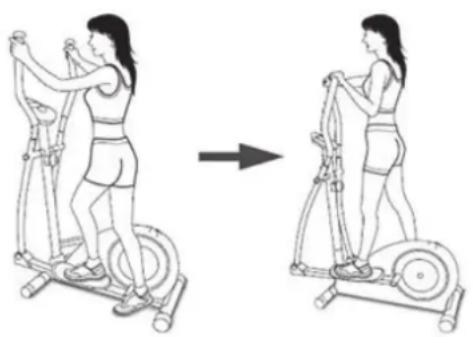
Mount, Use & Dismount Mount:
a. Stand beside the item, put the nearest footrest into deepest position and hold the fixed handlebar tightly.
b. Put your foot onto the footrest, try to put whole body weight on your foot and simultaneously cross over
with your another foot on the other side footrest and place there on the footrest too.
c. Now you are in the position to start your training.
Use:
a. Keep your hands in desired position on the fixed handlebar.
b. Pedal your exercise item by step your feet on footrests and balance the body weight to left and right side of footrest
c. If you like to exercise the upper body too, you can place the hands from fixed handle bar to the left and right handle grips.
d. Then you can increase the pedaling speed gradually and adjust braking resistance levels to increase the exercise intention.
e. Keep always your hands on fixed handle bar or hand grips left and right.
Dismount:
a. Slow down the pedaling speed until it comes to rest.
b. Keep the hands grabbing the fixed handlebar tightly, put one foot cross over the equipment and land on the floor, then land the other one.
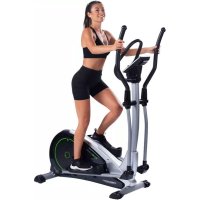
This training equipment is a stationary exercise machine used to simulate a combination of biking, stepping and walking without causing excessive pressure to the joints, hence decreasing the risk of impact injuries.
Exercise this item offer a non-impact cardiovascular workout that can vary from light to high intensity based on the resistance preference set by the user. It will strengthen your muscles of upper and lower body and increase cardio capacity and maintain fitness of your body also.
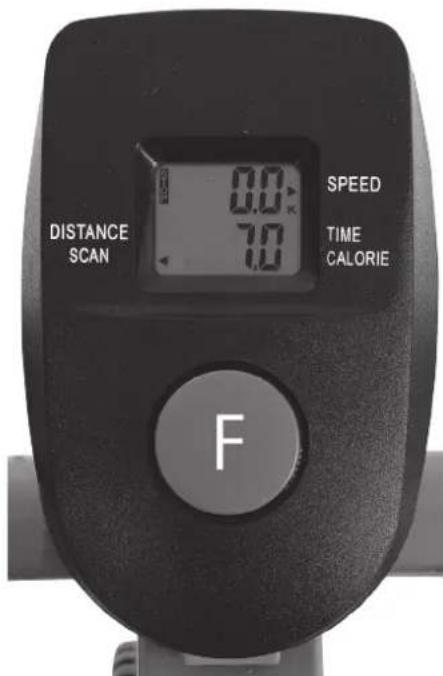
Computer Instructions
The supplied training computer allows the most convenient training. Every value relevant to training is displayed in the two-part window.
The speed, the distance covered during the current training session, the time required, the distance covered for all completed training units and including the current session, the approximate calorie consumption and the pulse rate are shown from the start of the training session. All values count upwards from zero.
Switch the computer on by briefly pressing the 'F' button or moving a pedal slightly.
The speed is indicated on the upper display. All other values are indicated on the lower display.
If you wish to see one value displayed constantly as well as the speed during training, select this with the F^ key. If you wish to see these values in constant alternation, select the SCAN function. The display then changes from one function to the next at intervals of approx. 6 seconds.
Simply begin your training to start the computer. The computer begins to record and display all the values reached.
Simply end your training to stop the computer. The computer stops all measurements and retains the last values that were measured. The most recently reached values in functions KM, TIME and CALORIES are saved and are displayed again when training restarts. You can continue training on the basis of these values.
If you wish to delete the most recently reached values, stop your training session and hold down the 'F' button for around 5 seconds. The values for all displays that can be modified are reset to zero. The computers switches itself off automatically approx. 5 minutes after the end of training and deletes the most recent values. All the displays are reset to zero when the computer is restarted and count upwards.
1. "SCAN" display:
Selecting this function causes the achieved values of the functions KM, TIME and CALORIES to be displayed alternately at intervals of approx. 6 seconds.
2."KM/H" display:
The current speed in kilometres per hour is displayed. The values most recently reached can not be saved in this function, as described above. (Max. display limit is 99.99 kmh)
3. "KM" display:
This shows the number of kilometres covered. The values most recently reached can be saved in this function, as described above. (Max. display limit is 99.99 km)
4. "TIME" display:
This displays the time currently required in minutes and seconds. The values most recently reached can be saved in this function, as described above. (Max. display limit is 99.59 minutes)
5. "CALORIES" display:
The approximate number of calories consumed up to that moment is displayed. The values most recently reached can be saved in this function, as described above.(Max. display limit is 999.9 calories)
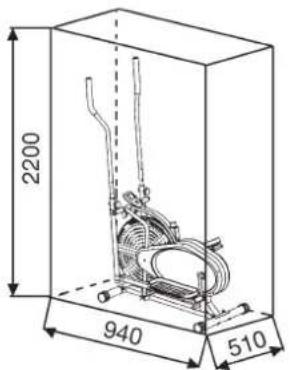
Training area in mm (for home trainer and user)
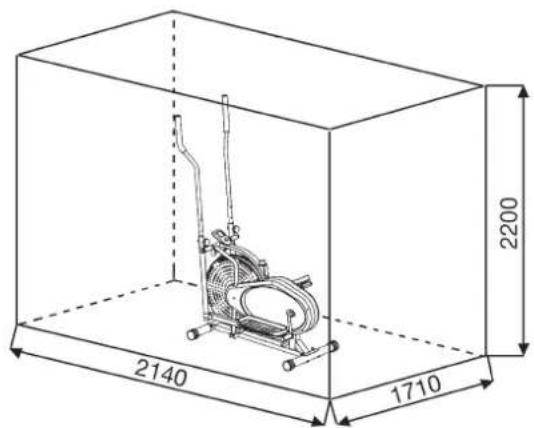
Free area in mm (Training area and security area (rotating 60cm))
Cleaning, Checks and Storage of the exercise product:
1. Cleaning
Use only a less wet cloth for cleaning.
Caution: Never use benzene, thinner or other aggressive cleaning agents for surface cleaning as this damage caused.
The device is only for private home use and for use suitable indoors.
Keep the unit clean and moisture from the device.
2. Storage
Remove the batteries from the computer while intending the unit for more than 4 weeks not to use. Choose a dry storage in-house and put some spray oil at front & rear foot tube connection point and hand grip axle. Cover the bike to protect it from being discolor by any sunlight and dirty through dust.
3. Checks
We recommend every 50 hours to review the screw connections for tightness, which were prepared in the assembly. Every 100 operating hours, you should put some spray oil at front & rear foot tube connection point and hand grip axle.
Troubleshooting
If you cannot solve the problem with the following information, please contact the authorized service center.
| Problem Possible Cause Solution | |
| Computer has no value at Display if you press any key. | No Batteries insert or batteries empty |
| Computer is not counting data and do not switch on after start cycling. | Sensor impulse missing base on not well plugged connection |
| Computer is not counting data and do not switch on after start cycling. | Sensor impulse missing base on not correct position of sensor. |
| Resistance don’t change | Connection of resistance not well |
Training instructions
You must consider the following factors in determining the amount of training effort required in order to attain tangible physical and health benefits:
1. Intensity:
The level of physical exertion in training must exceed the level of normal exertion without reaching the point of breathlessness and / or exhaustion. A suitable guideline for effective training can be taken from the pulse rate. During training this should rise to the region of between 70% to 85% of the maximum pulse rate (see the table and formular for determination and calculation of this).
During the first weeks, the pulse rate should remain at the lower end of this region, at around 70% of the maximum pulse rate. In the course of the following weeks and months, the pulse rate should be slowly raised to the upper limit of 85% of the maximum pulse rate. The better the physical condition of the person doing the exercise, the more the level of training should be increased to remain in the region of between 70% to 85% of the maximum pulse rate. This should be done by lengthening the time for the training and / or increasing the level of difficulty.
If the pulse rate is not shown on the computer display or if for safety reasons you wish to check your pulse rate, which could have been displayed wrongly due to error in use, etc., you can do the following:
a. Pulse rate measurement in the conventional way (feeling the pulse at the wrist, for example, and counting the number of beats in one minute).
b. Pulse rate measurement with a suitable specialised device (available from dealers specialising in health-related equipment).
2. Frequency
Most experts recommend a combination of health-conscious nutrition, which must be determined on the basis of your training goal, and physical training three times a week. A normal adult must train twice a week to maintain his current level of condition. At least three training sessions a week are required to improve one's condition and reduce one's weight. Of course the ideal frequency of training is five sessions a week.
3. Planning the training
Each training session should consist of three phases: the warm-up phase, the training phase, and the cool-down phase. The body temperature and oxygen intake should be raised slowly in the warm-up phase. This can be done with gymnastic exercises lasting five to ten minutes.
Then the actual training (training phase) should begin. The training exertion should be relatively low for the first few minutes and then raised over a period of 15 to 30 minutes such that the pulse rate reaches the region of between 70% to 85% of the maximum pulse rate.
In order to support the circulation after the training phase and to prevent aching or strained muscles later, it is necessary to follow the training phase with a cool-down phase. This should be consist of stretching exercises and / or light gymnastic exercises for a period of five to ten minutes.
You find further information on the subject warm-up exercises, stretch exercises or general gymnastics exercises in our download area under www.christopeit-sport.com
4. Motivation
The key to a successful program is regular training. You should set a fixed time and place for each day of training and prepare yourself mentally for the training. Only train when you are in the mood for it and always have your goal in view. With continuous training you will be able to see how you are progressing day by day and are approaching your personal training goal bit by bit.

Calculation formula: Maximum pulse rate = 220· age (220 minus your age)
90% of the maximum pulse rate = (220 - age) x 0.9
85% of the maximum pulse rate = (220 - age) x 0.85
70% of the maximum pulse rate = (220 - age) x 0.7
Warm up exercises (Warm Up)
Start your warm up by walking on the spot for at least 3 minutes and then perform the following gymnastic exercises to the body for the training phase to prepare accordingly. The exercises do not overdo it and only as far run until a slight drag felt. This position will hold a while.
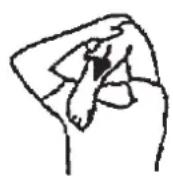
Reach with your left hand behind your head to the right shoulder and pull with the right hand slightly to the left elbow. After 20sec. switch arm.
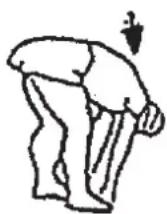
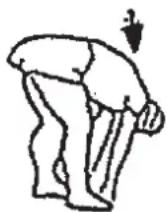
Bend forward as far forward as possible and let your legs almost stretched. Show it with your fingers in the direction of toe. 2 x 20sec.
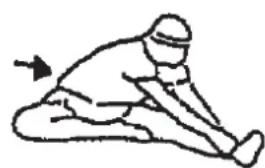
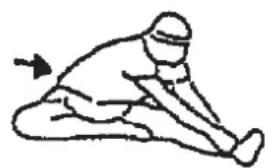
Sit down with one leg stretched out on the floor and bend forward and try to reach the foot with your hands. 2 x 20sec.
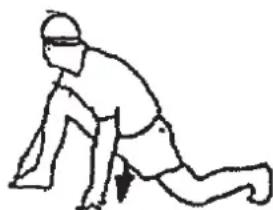
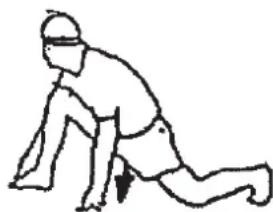
Kneel in a wide lunge forward and support yourself with your hands on the floor. Press the pelvis down. Change after 20 sec leg.
F
Sommaire
Chere cliente, cher client,
3. Planning van de training
Warming-up oefingen (Warm Up)
ObyeHnne IIOuadb: He MeHee 3,5 M
CHAB ynapokky, npoBepbTe NO cnNCKy, BCE Nn DeTaN Ha MeCte. EcIn Bce B nopAKe, To MOxHO HauHnHaB c6OpKy. EcIn KaKoHn6yIb arperaT He B nopAKe IIN OTCyTCTByeT, o6paaainTecb K HAm:
War 1: MoHTaX HOxEK (2+3) Ha oCHOBHyO pamy (1).
- CMOHTnpyTe nepeHIOHOxKy (2) c TpaHCnpTPOBOHbIMPONIkAMHa oCHOBHyO pamy (1).NcNoJIb3yIe dna 3TOrO noDba 6oNTa M8x50 (37), rHyTbe nOdkNaHbIe waIb6bl 8//20 (46)N KOnpAHOKOBBe raIKu (47).
- CMOHTnpyTe 3aHIOHOxKky (3) Ha OCHOBHyO pamy (1).NcnoIb-3ynte DnA 3TOrO NO IBa 6oNTa M8x50 (37), rHyTbie NpOKnaHbIe Wai6bl 8//20 (46) n KONNAKOBBe raIKn (47).
Uar 2: MoHTaX HOxHbIX pbHaROB (6) n coeHNHTeNbHbIX Tpy6 (4).
- YdaIte 60ntb5 (57) c npyKHHbIMn Waa6amn (52), rhyTbe NOdknaHbIe Waa6bI (10) n Waa6bI B fOpMe D (56) C ocN (12), QTO6bI BCaBtB OcB (12) B COOTBeTCTByIOuee KpenneHne Ha OCHOBHO paMe (1).HaedeHbTe C oDHOI CTopoHb IHyTu IOd-KnaDHyo Waa6v (10).
- HaHeHbTe npaByo coeDHHteBHyIO Tpy6y (4R) Ha npaByo cToPOHy oCn (12). (BHMmaHne! IpaBaA cTOpOHa NoDpaZymEbaETcN3 nNoJoxKeHn cTOr Ha TpeHaKepe npu TpeHnpOBke.). HaHeHbTe Wai6y BΦopMe D (56) Ha KOHeU OCN u 3aФNKcnpyTe npaByo coeDHHteBHyIO Tpy6y (4R) Ha oCn (12) c NOMOuIbIO 6oTTOB (57) nPvXHHbIX wai6 (52).
- HadehBe npabBn HOxHO npHar (6R) Ha npaBn WATyH neJaN (27) n npKpyTHe erO K c NOMOuBo npABOrO oceBOro 60nta (41R).
(BHIMaHHe! BONtI MapKnpoBaHbI, L"ДЯ JEBORO n, R" npaBOrO. COOTBETCTBEHNO OTCOPTpyNe raKn. Ha npaBOr CTopoHe 3aTARBaHTe oCEBle 6oNTbI (41R) n oceBbIe raKn (48R) no YacOBn cTpeNke.) 3akpyTne npabIb I OCEBOI 6oNT (41R) c NOMOuBIO npyXHHHO Wai6bl (51) n CamOKoHTpRAueCraIKN (48R). Nocne Yero HaeHbTe KOnNaUKN (59+60) Ha coeDINHeHnHOxHbIX pHiarOB.
4.CMOHTnpyTeJeBbHHOxHOBpbUar(6L)NJeByoCoeHNHTeHyTO Tpy6y(4L)BKIOUaB BCE Heo6xoIMMbIe YAcTn Ha JeBOCTopoHe TpeHaXepa KaK OINCAHO B NYHKtax 2-3.O6paTneBHIMAHHe Ha To,HTOJeBbIOceBOB BoNT (41L)NJeBaHOceBaRaKa(48L)3aTARNABoTCPOTNB YAcBOB CTpeKN.

War 3: MoHTaX KcATOpOB CTOnbl (11) Ha HOxHbIe pbUHaR (6).
- PnpctabbTe npabBf kcatop cTOnbI (11R) Ha npabBn HOxHOBpbUar (6R) TaKIM o6pa3OM, yTO6bI OTBepCTn paCnOlaRanCbdpYHaD ppyROM.BcTaBbTe 60NTbI (44) CBepxY B OTBepCTnHaDeHbTe C O6paTHoCtOpHO bNo OdHO NODKnAdHO Waa6e(45) n KpenKO 3aKpyTne.
- CMOnTnpyuTe JEBbI ΦNKcatOp cTOnbI (11L) Ha JEBbI HOxHOb pByar (6L) KaK OINcAHO BbiE B NyHKtax 1-2. (BHNMaHne! Pa3JNur npaBOrO N JEBoro FIKCatopa cTOnbI (11R+11L) o6paTtHe BHMaHne Ha BbICOTy KaHTa. BbICOKN kaHT dONKeH 6bITb C BHyTpHeHNe cTOpOHbI, T.e. 6JIIXe K OCHOBHO paMe.
Uar 4: MoHTaxk pyKoRtOK cnpaBa u cneBa(7L+7R)
- PykoTkn (7L+7R) BO Bpemr TpeHnpOBKn MOryT 6bIb noDbNK-HbIMN INI HENODBNXKbIMN.
NoDbNkHbIe pyKoA rTkN:
EcnBbXOTnTe,TO6bI pyKoRTKn DnBraJncB BmecTe CneJaRMM, HaeHbTe IN HA CoeHNHHTenbHBe Tpy6bI (4L+4R).
YctaHOBnTe pyKoTKn (7L-F7R) Ha Jxelaemyko BbICOTy n 3aФнкpynte 3Ty no3uHIO C nomOuIbI rpi6kbix 60JTOB (17). O6paTne BHHMaHHe Ha To, YTO6bl pyKoTKn HaxOJIINcB Ha ODNH BbICOTe I npn 3TOM BByHrTyIe qactn pacNoJarANCb B HAnpaBJeHn TynOBnua. HaJeHbTe KOnNaUk (43) Ha npnbapeHbIe raIKN Ha CoedHNHTbHbIX Tpy6ax (4L+4R).
HenoDBnKhbIe pyKoATrk:
Ecnn BbXOTnTe, TTo6bI pyKoTKn (7L+7R) He DnBraIaNcB MecTe CneJaIaMn, HadeHbTe INx Ha KpeIIeHnB OCHOBHOpaMe N yCTaHOBInTe Ha Ha XeNaemyIO BbICOTy. 3aФNKcPnyTe 3Ty nO3uioC NOMou bRp6koBbIX 60NTOB (17).
War 5:
MOnTAX KOMNbTepa (50) Ha oCHOBHyO pamy (1)
- DoctaHbTe KOMnbIOTep (50) n3 ynaKOBKn BCTaBbTe 6aTapeKn (AA - 1,5V) BrHe3do Dnla 6aTapeek, HaxoJrueecn Ha o6paTHoCtopoHe KOMnbIOTepa (50). (PpIMnTe BO BHImaHne, YTO 6aTapeKn He BXOaT B O6bem NocTaBKn. Kynte 6aTapeKn B Ma-ra3InHe.) POnBeDInTe KOMnbIOTep (50) K KpeJIeHIO Ha onOpHoPaMe n CoeHNHTe Ka6ebNb DaTuNka (26) C KOMnbIOTepom (50).
PnHcnn pa60TbI perynnpOBKn cnpOTNBHeHHa:
IocpeiCTBOM NOBOPoTA perynipOBKn cOnpoTnBHeHn B HapabLeHNn ^ + IINn ^ - TopMO3HO pEmeHb (35) HATaRnBaEtca Ha maxoBnK B 60bnwe nnn Mehbswe cTeeneHn, npn 3tOM cOnpoTnBHeHne yBeInuHBaETcN nn yMeHbSaaetc. Ecnl Topmo3HO pEmeHb (35) COckOJIb3HyC mMaxOBnKa, NoBepHnte perynipOBky cOnpOTnBHeHn (36)do ynopa B HApPabNeHn ^ - .HaLoXnTe TOpMO3HO pEmeHb (35) B KOJIeIO Ha MaxOBnke (9) n 3akpennte KoHeC TOpMO3Horo pEmHr (35) Ha OCHOBHO pame C NOMOzbu peMeHHo NtTN KAK IokaHo Ha PncyHke. OcToPOxHO hATaRnBaIte TOpMO3HO pEmeHb (35) pyKoI npOBepnTe Bo3MoXHoCt b YcTaHOBKn perynnpOBKn cOnpOTnBHeHn (36) NocpeiCTBOM NOBOPoTA B HapabLeHNn ^ +
War 6:
Kontrolle
- PpOBepbTe Bce coeHHeHn Ha npaBnIbHocTb c6OpKn npOBeHnTe npOBepky cyHKnHOHaIbHOCTn. Pp3OM MOHTAX CHTaETc3aKOHHeHbIM.
- EcnB BCE B npRAnke, npoBeHnTe npo6HyTo TpeHnpOBky npi MaEnbKO Harpy3Ke, INHDbNduaJbHO HAcTpoTe TpeHaxep.
3ameyane:
Ioxaanyicta, coxpaHnTe Ha6Op HNCTpyMeHTOB nIe NOcneDyUOux BO3MOXhblIX pEmoHTOB INHCTpyKuHIO NIO MOHTaxy dJI RBO3MOXhblIX 3aKa3OB 3anachblx qactei.
Ponb3ObaHne Tpehaxepom
TpaHcnpToPbOBka:
Ha nepeHHe HoxKe HaxOaTcB Dba TpaHCnOpTnpOBoChbIX pOnIka.ДЯ TORO, YTO6bl NepeDBNuHTb TpeHaeKep Ha pyrOe MeCTo IIN NOMeCTNb Ha MEcTo XpaHEnH, BO3bMMTeB 3a pyNb HAKNoHtE TpeHaeKep Ha nepeDHOIO HOKKy TaK, YTO6bl TpeHaeKep MOXHO bblO NERKO nepeDbNuHTb c NOMOuBIO TpaHCnOpTnpOBoCHbIX pONIKOB HA HYKHoe MecTO.
(BHIMAHHe: EcnTpeHaKepe He OCHauee Hpye, octopoxho nepedBnraTe TpeHaKeep 3a npuyHH.)
CauNbTbcn Cnyckatbcn CtpehaXepa:
CaNTbCnHa TpeHaxKeP:
Iocne ycTaHOBLeHn npaBnBHo BbICOTbl CeJna Bo3bMNTecb 3a pynb. YcTaHOBtE 6nXaMyo neJaB HnKHiO IO nO3nIO N BDeHbTe CTynHIO BΦKnCpUoi pemeWoK Tak, YoBo IOA HaxoDnAcb Ha DExeKHM ONOKeHN Ha neDan. PepeKnHbTe dpyIyO Hory Ha npOtNBOnONoxHyO CTOpOHy IN CAdte Ha cSeNIO. PInr 3ToM KpeIKo DEpKtiTeCb DByMa pyKaAM 3a pyNb. Iocne 3TOR BdEhBte dpyIyO CTynHIO BΦKnCpUoi pemeWoK neDan.
NoB3OBAHHe:
DepKntecb DBym pykamn Chaana 3a CkoB By ydo6Hom dna Bac Mece n sharaTe npn OndOBpeMeHHom nepeHOce Beca C OndHn peJaHn Ha dpyryo TAKIM o6pa30m, YTO6bI TObKO pHTKA HEMHORO npINOHNMAJACb OT peJaN n OcyueCTBnIOcPabHomepHoe DBNKeHne.ДЯ OndOBpeMeHHo TpeHnpobKn BepXHe Jactn TeLa DepKntEc 3a DInxKyUmeCnOpYHn Cnpaba N cBeA. CBeyHueHem INn YmEhbWeHn CKOpOCTn N TopMO3HOro conpoTINBHeHn MOKHO perynipOBaT INTEHCMBHOCT TpeHnpOBKn. IocToHHo DepKntecb 3a Cko6y INn NopuyHn BO BpeM TpeHnpOBKn.
Cnyckatbch c tpehaxepa:
Ppekpatnte TpeHnpOBky, KpenKO depjacb 3a HneNoDBNXhble npuyHN. Chmnte chayana OHy CTynHIO C neJaIIN NOCTaBbTe ee HaJeXHOM NoJoxeHN HA non. Chmnte NOTOM DpyryIO CTynHIO C neJaIIN NOCTaBbTe ee Ha noI n coJnte M TpeHaxepa.
3ToT TpeHaxep- HenoDbxNbI DOMaHnI TpeHaxep, NmHTpyIOuMn COeTaHne e3dbI Ha BEnocnneDe, 6era n 3aHrtni Ha CTennepe. IV3-3a TpeHnpOBKn pni IIO60I norOde, 6e3 BHeuHX Bo3deIcTBn, a TaKxe 6e3 dabHeHnI npn e3eB rpynnE yMehBwaetc BepoTHOCb naDeHHnI nepeyTomJIeHHNIA.
I3-3a BO3MOXHOCTN 3MeHeHn COpOToBnEHHn, COyTeAhnE e3DbHa
BeoCnHeDe, 6era n 3aHrTn Ha CTennpe NpeDOCTaBnEe BO3MOxHOCTb
TpeHnpOBKn CepDEuHO-CocYnCTOn CNCTEmbl 6e3 YpeE3MepHOrO HAnpJ
KeHn. Ppi 3OM BO3MOxHa 6oJIe NN MeHee INTEHCnBnAur TpeHnpOBKa.
Ppi 3OM TpeHnpYIOTC BepXHne N HIXHne KOHeHOCHTn, YKpePNIEcTc
cepEHO-CocYnCTaR CNCTema N cNoCo6CTByeTc NOpDepXaHne XopoWei CNOpTnBHOH FopMbI.
OncaHne KOMIbIOTepa
BxOaun B KOMNNEKT O6OpyOBaHn CHapra DA KOMNbIOTeP o6ecneHT Bam MaKcMaIbHbI KOMpOPT BO BPmTpeHnpOBKn. IIO6oB BaXhBn DnA TpeHnpOBOHOro npoceca nokaatae b OTPaxaetc Ha dncnnee.
C MOMeHa NaHApA TpeHnPOBKn OTo6paKaIOTcckOpocTb, IpOJdeHna BO BpEM BCex TpeHnpOBok, BKIOUaer TeKyuIyU, DnCTaHUN, BpEM Pn6blN 3nteNbHbI paXoD kaOpri. Bce npametpyi pIKCnpuyOTc noDCETom C Hynr nO Bo3pactaioe.
KomnbHOTep BkIIOUaETc npocTbIM HaxaTHem KhoNKn ^ nIN npocTo NaHApOM TpeHnPOBKN TpeHnPOBky.
B BepxHem OKoUke Ipon3BODITCn HINKauCn CKOpOCTn. B HIXHem OKoUke npOn3BODITcN HINKauCn BCEX OCTaNbHbIX NOKaTeNei.
EcIn Bb xOHTe, TTO6bI BO BpEMr TpeHnpOBKn BmecTe C INHnkaCnei nOKa3aTeNkOPOCTn Ipn03BODnIacb INHnkaCnI OHOro OnpDeIeHNHO nOKa3aTeN, Bb6epnte 3OT nOKa3aTeNb C NMOU bKNaINu "F". EcIn Bb xOHTe, YTO6bI BO BpEMr TpeHnpOBKn Ipn03BODnIacb INHnkaCnI BCex nOKa3aTeN no OuepeNi, Bb6epnte DyHKnIOo "SCAN". C nepNoDnHocTbBO B 6 cekyHd MeHReTc INHnkaCnI nOKa3aTeN.
KOMnbIOTep BKNIOUOaETc npocTbIM HaxKaTHeM KONKn ^ INI npocTo HAqAnOM TpeHINPOBKn. KomNbIOTep HauHnHaet yHTbIbA Tb BCE nOKa3AHN I OTO6paxKaTb Nx Ha DCnNee. YTObI OCTaHOBtB KOMNbIOTep, Heo6xoDmmo IpocTo 3abepWtB TpeHINPOBky. KomNbIOTep OctaHbNBAe Tce m3MepeHn I demOHCTPnpyET KOHeHbIpezYbTaTb.CamblncneHne pe3yNbTaTb FyHKnIP BPEM, KALOPN, DNTAHLCn I OBUA JNCTAHLNI 3aHOcTcB N naMaTb INPi BO3o6HOBNeHn TpeHINPOBKn Bb MoXeTe Haatb C 3TNX NOKa3aTeNei.
Ecni BbXOTNE CTepeB BCE IOCTnHyTbe NOk3aTeN, npePBNTe TpeHPOBky N B TeueHne 5 cekynd haxmamte Ha KnaBnuy ,F". Bce noka3aTeNyCTAHBnBAIOCTHa Hynb.
KOMnbOpTeP aBtOMaTnueckN oTKIOHuaeTcN pNIMepHO epe3 5 MNHT Nocne OKOHuaHn TpeHnpOBKn. Bce DoCTnHytble O 3TORo NOkazATEnn CTpaIOTcN. PnB03O6HOBNeHm TpeHnpOBKn BCE napametpyIOTcN HOBOI NOCDcETOM C Hyln No BO3pactaIoUeN.
1.Функи用药,SCAN
PnBb6ope daHno fynKun n NOMOUBo KnaBUNn F" B pexmne noCTOHHO cmHeI np6JIn3nteHbHO KaXdbie 6 ckyH, nocJeDoBaTeNbHO
OT6paKaIOTcTeKUe3HaueHnE yHKm KM, BPEM n KAIOPNIM.
2.Функцг „KM/H“/KM/H (CKOPOCTb/SPEED):
PpOn3BOoNTcN INHnkaqnaΦakTneckn DOCTnHyToN CKOpocTN B KInlomet-tpax B yac.CoxpaHHe NocJeHNx n3 DOCTnHybIX NOKa3aTeNeI DN DaHHOyHKuH He npOn3BOoNTcN. (BepxHa rpaHua NOKa3aHn 99,9 KM/4).
MaKc. yactota nylbca = 220 - Bo3pact
(220-Baawbospacr)
90% OT MaKc. YacToTbI NyIbCa = (220 - Bo3pacT) x 0.9
85% OT MaKc. YacToTb nylbca = (220 - Bo3pact) x 0.85
70% OT MaKc. YacToTbI NyIbCa = (220 - Bo3pact) x 0.7
UnpaXHeHnIpa3MHKnpeep TpeHnpOBKo
HaHInTe pa3MnHky C xOdb6bl Ha MeCTe B TeHeHne 3 MmHyT. Nocne 3TOrO BbINOnHInTe cIeNIOUne ynpaxKHeHn, KOtOpBte NOMORY Bam ONTImaJIbHO NOIroTOBnTBcR K TpeHnPOBKe. Bo BpEMBaBbINONHeHn ynpaxKHeHn Bbl He DoJXHbI NCbITbIBaTb 60nl. BbINOnHInTe ynpaxKHeHne do NoRBHeHn TRHyUeTo 4yBCTBa B MbIuSe.

BcTaHbTe poBHO n 3aBeDInTe Ondy pyky 3a rOnoby.
BTopyo pyky noLoXknte CBepxy,BO3BMNTecb 3a IOKOTb N NotAHnTE DO OuyueHnpaTaeKeHHa TpuiencA. OctaHbTebc B 3OM NoOxKeHHn Ha 20 cekyHd, NOBtOpTe npyro pykoI.
HaKnOHNTeCb BnepeI He
Cm6BaHor NnonBtaIeTcB
DocTaTb NaIbCaMn pyK
do nona.BbInOnHnTe
ynpaXHeHne 2 pa3a no 20
cekyHd.
CaIbTe Ha non I BbITAHInTe Ody Hory. HAKIOHNTecb Bnepei nnonpo6yTe DOCTaTb CTynHO. BbINOJIHnTe ynpaxKHeHne 2 pa3a no 20 cekyHd.
B noJoxhen m npokoro Bbina da oobnpntecb pykamn B NOI NOTAHTE MbIuHb Hor. Ype3 20 cekyHn nomeHnTe Hory.
Pocne pa3MNHNIO TnPcNTE HOrAMN IpykAMN, 706bl paccna6bMbIu. He npeKpaauTe TpeHnpOBky BHeaHNO. Chaana yMeHBUNTE TEMTpeHnpOBKN, 706bl npbc onyctncrdo obbyHoro nokaatae (Cool down). Mbl peKOMeHdyem B KOHc TepeHnpOBKn CHOBA BInOnHtB KOMJIeKC ynpaxHeHn dPa3MNHN.

© by Top-Sports Gilles GmbH
D-42551 Velbert (Germany)