
IHF 9.5 A M IX - Range hood INDESIT - Free user manual and instructions
Find the device manual for free IHF 9.5 A M IX INDESIT in PDF.
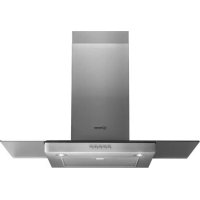


| Brand | Indesit |
| Model | IHF 9.5 A M IX |
| Product type | Kitchen hood |
| Installation | Wall or ceiling mounted |
| Total power consumption | 150 W |
| Lighting | 2 halogen bulbs 40 W (G9 base, 230 V) |
| Voltage | 230 V |
| Air outlet diameter | 150 mm |
| Number of speeds | 3 speeds + stop (T1) |
| Control type | Push buttons |
| Grease filter | Metallic, dishwasher safe |
| Charcoal filter | Optional for recirculation, replacement every 20 months |
| Minimum distance (gas cooktop) | 65 cm |
| Minimum distance (electric cooktop) | 55 cm |
| Grease filter maintenance | Monthly |
| Bulb replacement | Halogen bulbs G9 40 W (or LED, contact after-sales service) |
| Power cord | Replaceable by after-sales service |
| Disposal | Compliant with WEEE |
Frequently Asked Questions - IHF 9.5 A M IX INDESIT
User questions about IHF 9.5 A M IX INDESIT
0 question about this device. Answer the ones you know or ask your own.
Ask a new question about this device
Download the instructions for your Range hood in PDF format for free! Find your manual IHF 9.5 A M IX - INDESIT and take your electronic device back in hand. On this page are published all the documents necessary for the use of your device. IHF 9.5 A M IX by INDESIT.
USER MANUAL IHF 9.5 A M IX INDESIT
Operating Instructions
COOKER HOOD
Contents
Operating Instructions,1
Warnings,10
Assistance,31
Installation,37
GLASS controls,38
Maintenance and care,38
Troubleshooting,39
PT
Portuges
Safety instructions and troubleshooting,63
PL
Polski
Instruction manual
HOOD
Table of contents
! Keep this manual for reference. If you sell, transfer or move the unit to another location, make sure to keep the manual with the product. ! Read the instructions carefully - they contain important installation, user and safety information. ! Do not tamper with the electrical or mechanical equipment of the product or its exhaust ducts.
General safety information
- The distance between the cookware support surface on top of the cooking appliance and the lowest part of the cooker hood must be at least:
65 cm if the hood is installed over a gas cooktop 55 cm if the hood is installed over an electric cooktop.
If the installation instruction manual for the gas cooking appliance specifies a greater distance, this measurement should be taken into account.
- The cooker hood comes with anchor plugs which are suitable for use with most walls/ceilings.
However, you must contact a qualified technician to check the suitability of the materials in relation to the type of wall/ceiling, which must be strong enough to support the weight of the unit.
- Caution! Do not hook the unit up to its electrical power supply until the installation has been completed.
- Before cleaning or servicing the unit, disconnect it from the mains by pulling the power plug or disconnecting the main circuit breaker.
- Always wear work gloves when installing and servicing the unit.
- It is not intended for use by children or persons with sensory or mental disabilities and lack of experience or familiarity, except under the supervision or instruction of a person responsible for their safety.
- Make sure children do not play with the unit.
- Never operate the unit without its grease filter installed!
- NEVER use the hood as a support, unless expressly instructed to do so.
- The room must be adequately ventilated if the hood is used at the same time with other equipment burning gas or other fuels.
- Extracted air must not be conveyed into a duct used for exhausting combustion fumes from gas or other fuel-fired equipment.
- Observe all regulations in relation to air extraction.
- NEVER cook food with an open flame under the hood; open flames will damage the filters and may cause fires. Never do this. Always supervise frying to make sure the heated oil does not catch fire.
- Strictly observe all local regulations in relation to the technical and safety measures to be employed in fumes extraction.
- Clean the product frequently, inside and out (AT LEAST ONCE A MONTH, and in observance of the maintenance instruction given in this manual).
- Failure to observe the hood cleaning and filter cleaning/replacement instructions can result in fires.
- Never use the hood without its bulbs properly installed - electrocution hazard.
- The manufacturer is not liable for any inconvenience, damage or fire caused by the unit as a result of failure to observe the instructions given in this manual.
- Caution! The unit's accessible parts can get very hot when used with cooking equipment.
Warnings
The minimum distance from the supporting surfaces on the cooking hob to the lowest part of the cooker hood must be not less than:
65 cm, if the hood is installed above a gas hob; 55 cm, if the hood is installed above an electric hob.
If the installation instructions for the gas hob specify a greater distance, this must be taken into account when installing the hood.
The hood comes with mounting screws designed for most types of walls and ceilings.
However, it is necessary to consult a qualified technician to verify the suitability of the materials in accordance with the type of wall/ceiling, which must be strong enough to support the weight of the cooker hood.
Warning! Do not connect the appliance to the electrical supply until installation is fully completed.
- Before any cleaning or maintenance work, disconnect the hood from the electrical supply by removing the plug from the socket or switching off the main switch.
- Wear work gloves for all installation and maintenance work.
- The appliance is not intended for use by persons (including children) with reduced physical, sensory or mental capabilities, or lack of experience and knowledge, unless they have been given supervision or instruction concerning use of the appliance by a person responsible for their safety. Children should be supervised to ensure that they do not play with the appliance. Never use the appliance without a correctly installed grease filter! Never use the cooker hood as a supporting surface, unless this is clearly permitted. The room must be well ventilated when the cooker hood is used at the same time as other appliances burning gas or other fuels.
- The extracted air must not be discharged into a flue used for exhausting fumes from appliances burning gas or other fuels.
- Comply with all regulations regarding air discharge.
Categorically forbidden to prepare on an open flame under the hood; an open flame can damage the filters and cause a fire, so its use is categorically forbidden. - It is recommended to continuously monitor the preparation of dishes in the fryer to avoid ignition of hot oil. - The safety rules applicable to the system must strictly comply with the standards of local competent authorities. - It is recommended to regularly clean the appliance both inside and outside (at least once a month, in any case follow the maintenance instructions given in this technical manual). Failure to follow the care rules for the hood, filter replacement, and cleaning leads to the risk of fire. Do not use or leave the hood without correctly installed lamps, as this may lead to electric shock. - The manufacturer disclaims all responsibility for possible damage, harm, or fires that may result from the appliance due to non-compliance with the instructions given in this technical manual. Attention! Exposed parts may become very hot from the burner.
Safety devices
Important: keep this manual so that you can refer to it at any time. In case of sale, transfer, or relocation, make sure that this manual accompanies the appliance.
!Please read the instructions carefully; they contain important information regarding installation, use, and safety. ! Do not make any modifications to the electrical or mechanical components of the appliance, nor to the exhaust duct.
General safety
The minimum distance between the hob surface and the lower part of the hood must not be less than: 65 cm if the hood is installed above a gas hob, 55 cm if the hood is installed above an electric hob. If the installation instructions for the gas hob specify a greater distance, take that into account. - The hood is equipped with fixings suitable for most ceilings/walls. In any case, it is necessary to consult a qualified technician to verify that the materials are suitable for the type of ceiling/wall, which must be strong enough to support the weight of the hood. - Warning! Do not connect the appliance to the electrical mains until the installation is completely finished.
- Before performing any operation on the device or technical maintenance, disconnect the plug from the mains, pulling out the plug or switching off the main switch. All installation and maintenance operations must be performed in protective gloves. The device must not be used by persons with limited physical, mental or sensory abilities, or without proper experience and knowledge, unless they are supervised or instructed by a person responsible for their safety. Do not allow children to play with the device. Never use the device without a properly installed filter! Never insert the plug into the socket with wet hands, unless it is explicitly indicated. The room must be sufficiently ventilated if the hood is used together with other gas or other fuel appliances.
- The hood must not be connected to the flue pipe used for exhausting fumes from appliances burning gas or other fuel. Follow all rules for proper exhaust venting.
It is strictly forbidden to cook food on an open flame under the hood; open flame damages the filters and may cause a fire. Therefore, avoid it in any case. It is recommended to keep constant supervision during cooking and to switch off the hood when it is not in use. For technical and safety dimensions to be applied for exhaust pipes, strictly follow the regulations of local competent authorities. The hood must be cleaned both inside and outside (at least as often as the filters are cleaned; follow the instructions in the manual). Non-compliance with the rules for cleaning the hood and for replacing and cleaning the filters may lead to damage. Do not use the hood without properly installed lamps, as it is dangerous due to the risk of electric shock. The manufacturer declines any responsibility in connection with possible violations of the device's operation, damage or malfunctions resulting from non-compliance with the instructions given in this manual. - Attention! Parts with accessible access may heat up to high temperatures if used together with kitchen stoves.
Warning
Never use the services of an unauthorised technician.
Please have the following information to hand:
- The type of problem encountered. The appliance model (Mod.). The serial number (S/N).
The latter two pieces of information can be found on the data plate located on the appliance.
Assistance
IHF 6.5 AM IX - IHF 9.5 AM IX IHF 6.5F AM IX - IHC 9.5F AM IX IHC 9.5 AM IX - IHC 6.5F AM IX
T1 Reset motore
The installation procedure is illustrated in the first pages of this manual.
The installation must be done by a qualified technician.
Electrical hook up
The mains voltage must match that given on the ratings label inside the hood itself. If the hood has a power plug, connect the hood to an easily accessible regulatory power socket. If it does not (direct connection to the mains), or the socket is not easily accessible, install a two-pole regulatory switch to enable total disconnection from the mains in case of category III overvoltage, as required by the installation regulations.
Caution! Always check that the mains cable is hooked up properly and check that it operates correctly before reconnecting the hood to the mains.
Air exhaust (for ducted units)
Connect the hood to a duct and wall exhaust hole of a diameter equal to that of the air outlet flange. Using a smaller diameter tube and exhaust hole reduces the extraction capacity of the hood and also increases its running noise. The manufacturer is not liable for any consequences of doing so.
Use the shortest duct required to achieve the purpose. Use a duct with as few bends as possible. Avoid suddenly changing the diameter of the duct. The duct must have as smooth an inner surface as possible. The duct must be made of regulatory material. Do not connect the hood to flues carrying combustion fumes from other equipment (boilers, gas appliances, stoves, etc.). Observe the instructions of the competent authorities in relation to the air exhaust. The air being exhausted may not be exhausted into a wall cavity unless the cavity in question is specifically intended for this purpose. Equip the room with air intakes to prevent the hood creating suction pressure in the interior (this must not exceed 0.04 mbar). The manufacturer is not liable for any consequences of failure to observe these instructions.
Filter or ducted?

Ducted version
GB
The hood purifies the air and expels it outdoors via an exhaust duct (dia. 150 mm) connected to its outlet flange. The diameter of the exhaust tube must be equal to that of the outlet flange. Caution! The exhaust duct is not supplied and must be purchased separately.
When routed horizontally, the tube must be angled slightly upwards (around 10 degrees) to enable the air to be conveyed outdoors more easily. If the hood is fitted with charcoal filters, they must first be removed.

Filter version
The hood purifies the air and returns it to the room. This version of the hood requires installation of an accessory active charcoal filter unit.
This version requires an air deflector, a reduction adapter and the charcoal filter/s. The top tube must have its air outlet slots uppermost.
Technical data
| Model | Height (cm) | Width (cm) | Depth (cm) | dia. of exhaust tube (cm) |
| GLASS 60cm 61-82 59.8 50 15/1 | 2 | |||
| GLASS 90cm 61-82 89.9 50 15/1 | 2 |
| Model code Bulb (V) Bulb draw (W) Total draw (W) | |
| IHF 6.5 AM IX | |
| IHF 9.5 AM IX | |
| IHF 6.5F AM IX | |
| IHC 9.5F AM IX | Halogen 2 x 40 150 |
| IHC 9.5 AM IX | |
| IHC 6.5F AM IX |
| Power | Voltage | Cap | Dimensions | |
| Halogen 25 W | 2 x 25 W | 230 V | G9 | L40xØ14 |
| Halogen 20 W | 2 x 20 W | 12 V | G4 | L30xØ10 |
| LED* | Risk Group 1 according to Standard EN 62471 |
| CE | The hoods are conforming to the following EC Directives: ·“Low voltage” Directive 2006/95/EC (12-12-2006) ·“EMC” Directive 2004/108/EC (15-12-2004) |
Your hood is supplied as a ducted unit.
If you wish to use it as a filter unit, you must install the proper accessory kit.
Note: If supplied with the hood, the accessory active charcoal filter unit may already be installed.
Instructions for transforming the hood from the ducted to the filter version are given in this manual (see "Filter version").
- Only available in certain models
GLASS controls
Models with mechanical keypad
IHF 6.5AMIX-IHF9.5AMIX IHF6.5FAMIX-IHC9.5FAMIX IHC9.5AMIX-IHC6.5FAMIX

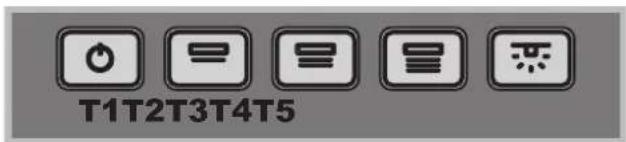
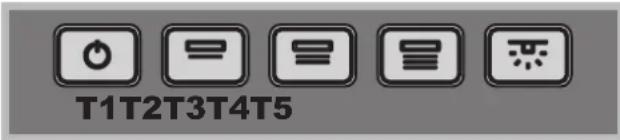
T1T2T3T4T5
T1 Motor reset
Pressing the button while the hood is in operation turns it OFF.
T2 Speed 1
Pressing the button sets the hood to speed 1.
T3 Speed 2
Pressing the button sets the hood to speed 2.
T4 Speed 3
Pressing the button sets the hood to speed 3.
T5 Lights ON/OFF
Maintenance and care
Caution! Before cleaning or servicing the unit, disconnect it from the mains by pulling the power plug or disconnecting the main circuit breaker.
First cleaning
- Remove the protective film
- Clean with a damp sponge and a little neutral soap
- Rinse off with a damp cloth
- Dry with a soft cloth; if the hood is stainless steel, dry along the metal's grain
Periodic cleaning
The hood must be cleaned frequently (at least as often as you service the grease filter), inside and out. Use a damp cloth and a neutral liquid detergent with lukewarm water. Do not use abrasive or corrosive products.
Warning: Failure to observe the hood cleaning and filter cleaning/replacement instructions can result in fires. Follow the instructions carefully. The manufacturer is not liable for any damage to the motor or fires caused by incorrect care or failure to follow the above instructions.
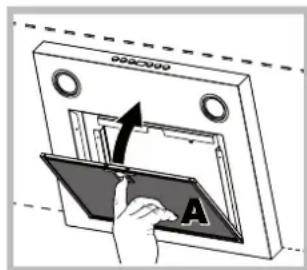
Servicing the grease filter (A)
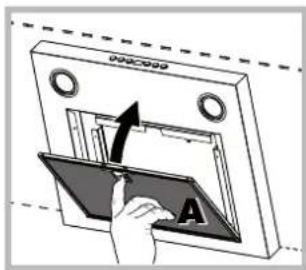
The grease filter retains the particles of grease produced during cooking; it must be cleaned at least once a month with a non-aggressive detergent, either by hand or with a low temperature, short dishwasher cycle.
To extract the grease filter, pull the spring loaded handle.
If washed in a dishwasher, the metal filter may change colour, but this does not affect its performance.
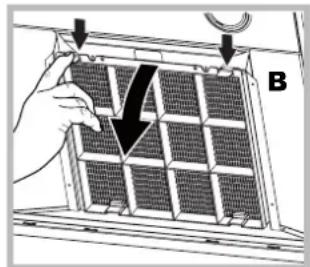
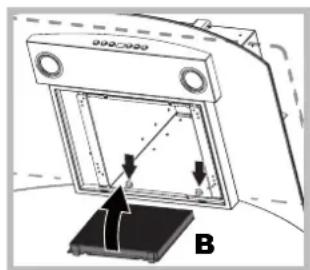
Servicing the charcoal filter (B)
The charcoal filter retains unpleasant cooking odours. The filter saturates after a variable time, depending on the type of cooking and how often the grease filter is cleaned. The cartridge must be replaced at least once every twenty months.
This filter can NOT be washed or regenerated
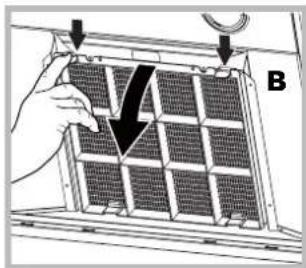
Disassembly: Remove the activated-carbon filter by pressing the two front levers which secure it to the hood.
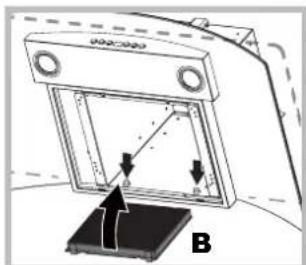
Assembly: Secure the activated-carbon filter first in the back using the hood's metal tabs and then in the front by pressing the two levers.
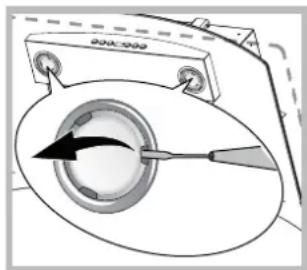
Replacing the bulbs
Disconnect the unit from the mains and remove the grease filter.
Caution! Make sure the bulbs are cool before touching them.
- Extract the guard by prising it out with a small flat head screwdriver or something similar.
- Replace the faulty bulb. Use only bulbs of the same type (for details, see the technical data in the following manual).
- Refit the guard (push it in).
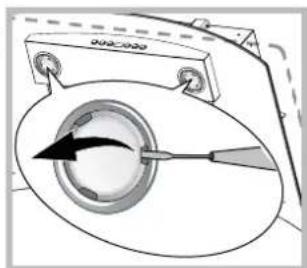
Replacing the lights LED
The hood is fitted with a lighting system based on LED technology. The LEDs ensure optimal lighting, longer life and lower consumption compared with traditional lights. To replace them please contact the assistance service.
Electrical cable
If the power cable is damaged, it can be replaced by the manufacturer or its technical service to avoid any risk.
SCRAPPING
The unit is marked in compliance with European Directive 2012/19/EC on Waste Electrical and Electronic Equipment (WEEE). By ensuring proper disposal of this product, the user helps protect the environment and public health.
The symbol on the product or its accompanying documents indicates that the product must not be treated as household waste but must be handed over to an appropriate collection point for the recycling of electrical and electronic equipment. Dispose of it in accordance with local waste disposal regulations. For more information on the treatment, recovery, and recycling of this product, please contact your local authority, your household waste disposal service, or the retailer where you purchased the product.
Troubleshooting
If something is not working, perform the following simple checks before contacting Technical Service:
If the hood does not operate:
Check that:
the unit is powered on and a speed has been selected.
If the hood is not working effectively:
Check that:
- the selected motor speed is sufficient for the amount of smoke and steam being produced.
- the kitchen is adequately ventilated to allow the unit to draw in air.
- the charcoal filter is not saturated (filter version).
If the hood turns off during normal operation:
Check that:
the unit is powered up. - the circuit breaker has not tripped.
In case of faulty operation, before contacting Technical service, first disconnect the machine from the mains for at least 5 seconds by pulling its plug, then reconnect it. If the fault persists, contact Technical Service.
- Only available in certain models
FR
Installation
IHF 6.5 AM IX - IHF 9.5 AM IX IHF 6.5F AM IX - IHC 9.5F AM IX IHC 9.5 AM IX - IHC 6.5F AM IX





T1T2T3T4T5
IHF 6.5 AM IX - IHF 9.5 AM IX
IHF 6.5F AM IX - IHC 9.5F AM IX
IHC 9.5 AM IX - IHC 6.5F AM IX


T1T2T3T4T5
T1 Reset motor
IHF 6.5 AM IX - IHF 9.5 AM IX
IHF 6.5F AM IX - IHC 9.5F AM IX
IHC 9.5 AM IX - IHC 6.5F AM IX

T1T2T3T4T5


T1 Reset mode
IHF 6.5 AM IX - IHF 9.5 AM IX
IHF 6.5F AM IX - IHC 9.5F AM IX
IHC 9.5 AM IX - IHC 6.5F AM IX

T1T2T3T4T5


T1 Reset motor
IHF 6.5 AM IX - IHF 9.5 AM IX
IHF 6.5F AM IX - IHC 9.5F AM IX
IHC 9.5 AM IX - IHC 6.5F AM IX


T1T2T3T4T5
T1 Reset silnika
IHF 6.5 AM IX - IHF 9.5 AM IX IHF 6.5F AM IX - IHC 9.5F AM IX IHC 9.5 AM IX - IHC 6.5F AM IX
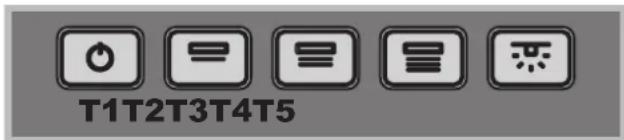
T1 Motor reset
When the button is pressed while the hood is running, the unit turns off (OFF).
T2 Speed 1
When the button is pressed, the hood speed is set to 1.
T3 Speed 2
When the button is pressed, the hood speed is set to 2.
T4 Speed 3
When the button is pressed, the hood speed is set to 3.
T5 Lights ON/OFF
Maintenance and Cleaning
IHF 6.5 AM IX - IHF 9.5 AM IX
IHF 6.5F AM IX - IHC 9.5F AM IX
IHC 9.5 AM IX - IHC 6.5F AM IX

T1T2T3T4T5


By pressing the EXTRACT button, the operating mode switches during operation.
T2 Speed 1
By pressing the EXTRACT button, it switches to speed 1.
T2 Speed 2
By pressing the EXTRACT button, it switches to speed 2.
T2 Speed 3
By pressing the EXTRACT button, it switches to speed 3.
T5 On/Off lighting
Technical maintenance and care
Attention! Before starting any cleaning or maintenance work, disconnect the extractor from the power supply by removing the plug from the wall socket or switching off the main switch in the house.
First cleaning
Remove the protective film. Wipe the surfaces with a damp cloth and a neutral detergent. Wipe thoroughly with a damp cloth. Dry with a soft cloth. If the extractor is made of stainless steel, wipe along the metal grain.
Regular cleaning
Clean the extractor regularly (at least as often as the grease filters) both inside and outside. Use a cloth with neutral detergent and warm water. Do not use detergents containing abrasive substances.
Attention: Failure to follow the care rules for the hood and to replace the filters can lead to fire.
It is recommended to follow the instructions provided.
The manufacturer disclaims all liability for possible engine damage or fire caused by improper care or failure to follow the above warnings.
Maintenance of the oil filter (A)
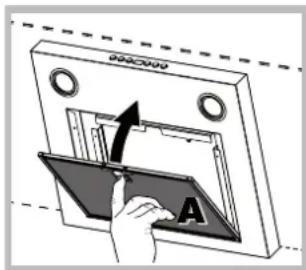
The oil filter retains oil impurities that may be present in the oil during cooking. It is necessary to clean this filter at least once a month with non-abrasive cleaning agents by hand or in a dishwasher at
low temperature on a short program. To remove the oil filter, pull the spring release handle. If the oil filter is washed in a dishwasher, its color may fade, but this does not affect its performance characteristics.
Maintenance of the charcoal filter (B)
The charcoal filter retains unpleasant odors from cooking vapors. Saturation of the charcoal filter occurs after a fairly long period of operation, depending on the type of cooking and the regularity of cleaning the oil filter. In any case, even without analysis, saturation should be replaced with a new filter cartridge at least once every 20 months. This filter cannot be washed or regenerated.
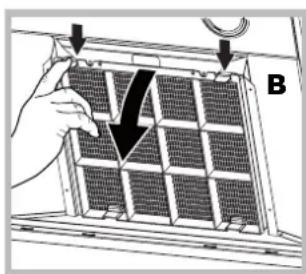
Removal: Remove the charcoal filter by pressing on the two front levers that secure it to the hood.
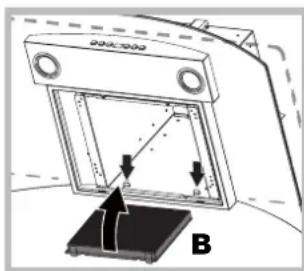
Installation: First attach the charcoal filter to the metal hooks at the rear of the hood, then at the front, pressing on the two levers.
Procedure for replacing the lamps
Disconnect the hood from the power supply and remove the oil filter.
Warning! Before touching the lamps, make sure they are cool.
1. Remove the lamp cover by prying it with a small flat-head screwdriver or similar tool. 2. Replace the burnt-out lamp. Use only lamps with the same characteristics (more detailed data
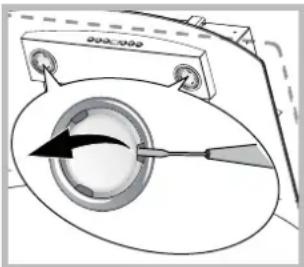
see the technical data provided in the following manual).
- Close the cover (fastening with clip).
Replacing LED lamps
The extractor hood is equipped with LED lamps. LED lamps provide optimal lighting, a long service life, and lower energy consumption compared to traditional lamps. For their replacement, contact the service department.
Mains cable
If the mains cable is damaged, to avoid any risk, its replacement must be carried out by the manufacturer or an authorized service.
Disposal
This product bears the marking of compliance with European Directive 2012/19/EC on waste electrical and electronic equipment (WEEE). Make sure that at the end of its service life, this product is handed in for recycling. This way, you will help preserve the environment.

The symbol on the product or in the accompanying documentation indicates that this product must not be treated as household waste, but must be handed in at a specialized recycling center for electrical and electronic appliances. The product must be handed in for recycling in accordance with local waste disposal regulations. For further information on the processing, recycling, and disposal of this product, contact your local authority, a collection point for household appliances, or the store where you purchased the product.
* Available only on some models
Troubleshooting
RS
If a malfunction occurs, before contacting the service department, perform the following simple checks:
If the extractor hood does not work:
Check:
The presence of power supply - the speed has been selected.
If the extraction efficiency is low:
Check:
- To ensure that the set speed of the engine is sufficient for the volume of air intake.
- To ensure that the room has adequate ventilation for air exchange. Do not use a coal filter (filtering cartridge).
If the hood turns off during operation:
Check:
The presence of electrical power; the thermal switch may have tripped or the multi-pole disconnector may have activated.
In case of possible malfunctions, before contacting service, disconnect the hood from the mains for about 5 seconds, unplug the power cord from the wall socket, then reconnect. If the malfunction persists, contact service.
IHF 6.5 AM IX - IHF 9.5 AM IX
IHF 6.5F AM IX - IHC 9.5F AM IX
IHC 9.5 AM IX - IHC 6.5F AM IX


T1T2T3T4T5
T1 Pre-start of the hood
Pressing the button during operation will cause the hood to switch off.
T2 Speed 1
When pressing this button, the hood switches to the state of previous speed 1.
T3 speed 2
Press the button to switch to state, preliminary speed 2.
T4 speed 3
Press the button to switch to state, preliminary speed 3.
T5 increase/decrease speed
If the button does not work:
Check, 10:
Do not interrupt the power supply. - The speed will be maintained.
If the button works poorly:
Check, 10:
- The air supply is sufficient for the amount of air exhausted and steam. The kitchen is sufficiently ventilated to ensure air exhaust. The air filter is not clogged (see filter maintenance instructions).
If the buttons are pressed during normal operation:
Check, 10:
- Do not interrupt the power supply.
- Do not use the automatic switch.
If the appliance malfunctions, before contacting the service department for assistance, disconnect the power plug for 5 seconds, then plug it back in. If the malfunction cannot be eliminated, contact the service department for assistance.
Installation
Low voltage" Directive 2006/95/EC (12-12-2006) - Directive
on low voltage 2006/95/ES (of 12.12.2006)
EMC" Directive 2004/108/EC (15-12-2004) - Directive on
electromagnetic compatibility 2004/108/ES (of 15.12.2004)
Models with mechanical push-button panel
IHF 6.5AMIX-IHF9.5AMIX IHF6.5FAMIX-IHC9.5FAMIX IHC9.5AMIX-IHC6.5FAMIX


T1T2T3T4T5
T1 Motor reset
Models with mechanical push-button panel
IHF 6.5 AM IX - IHF 9.5 AM IX
IHF 6.5F AM IX - IHC 9.5F AM IX
IHC 9.5 AM IX - IHC 6.5F AM IX


T1T2T3T4T5
T1 Motor reset
Pressing this button during operation switches the vacuum cleaner OFF.
T2 Speed 1
IHF 6.5 AM IX - IHF 9.5 AM IX
IHF 6.5F AM IX - IHC 9.5F AM IX
IHC 9.5 AM IX - IHC 6.5F AM IX
T1 Motor reset
After pressing the button, the vacuum cleaner turns off.
T2 Speed 1
When the button is pressed, the vacuum cleaner operates at speed 1.
T3 Speed 2
When the button is pressed, the vacuum cleaner operates at speed 2.
T4 Speed 3
When the button is pressed, the vacuum cleaner operates at speed 3.
T5 Standby mode
Technical corset for women
Before using, read the instructions carefully and follow them exactly as described.
Washing instructions
Machine wash at 30°C with similar colors. Use a mild detergent, do not bleach, do not tumble dry. If the fabric has a print, turn it inside out.
Hand wash
Hand wash in cold water with mild soap (or, if necessary, with a mild detergent). Do not wring, do not twist, dry flat.
Do not iron the printed areas.
Warning: If washing and care instructions are not followed, damage may occur. Follow the instructions carefully. Damage caused by not following the instructions or by improper care is not covered by the warranty.
Corset for women (A)
When washing, follow the instructions on the label; if necessary, wash by hand with cold water and mild detergent or at a low temperature.
Do not use bleach. Do not dry in a dryer, it may damage the fabric, but it is possible to dry it flat.
Corset for women (B)
The care label on the corset indicates the washing instructions. Follow them carefully. If necessary, hand wash with mild detergent.
Do not use bleach or fabric softener
Drying: After washing, gently squeeze out excess water, reshape, and dry flat.
Caution: Before installation and use, read the operating instructions and the safety instructions carefully. Keep these instructions for future reference.
Installation
Remove the plug from the socket before cleaning.
Warning! When using electrical appliances, basic safety precautions should always be followed.
1. Read all instructions before using the appliance: Keep the appliance away from water and moisture.
2. Do not use the appliance outdoors. Use it only on a flat, dry surface (see the technical data
for the correct voltage).
- Place the appliance on a stable surface (e.g., a table).
Installation LED
There is a risk of electric shock based on the technical design. The LEDs are not replaceable; they are integrated into the device. Do not attempt to replace them yourself; contact a qualified technician.
Power cord
If the power cord is damaged, it must be replaced by the manufacturer, its service agent, or similarly qualified persons in order to avoid a hazard.
DISPOSAL
This symbol on the product or its packaging indicates that the product must not be treated as household waste. Instead, it should be handed over to the applicable collection point for the recycling of electrical and electronic equipment (WEEE) in accordance with the European Directive 2012/19/EU. By ensuring this product is disposed of correctly, you will help prevent potential negative consequences for the environment and human health.

If the device is used for other purposes or installed in a location other than that specified in the technical passport, its warranty may be voided. The manufacturer is not responsible for damage caused by improper use. For any questions regarding installation, connection, and operation, please contact the manufacturer or the organization that sold the device.
WARNING
Before using the device, contact the technical service organization and check the following:
If the device is not working:
Check the following: The plug is inserted. ·The power is turned on.
If the device still does not work:
Check the following:
The motor is overheated and has shut off. Wait for it to cool down and then restart. If the problem persists, contact the technical service organization.
*Only one of the above
If the device is working but not heating:
Check the following:
The plug is inserted. The power is turned on.
If the device is not working, contact the technical service organization. Before doing so, press the reset button for at least 5 seconds. If the problem persists, contact the technical service organization.
Therefore, C1 = S1 = 1/2 * AC * PD
(A)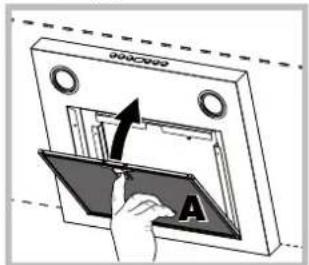
GLASS
(B)
(y)
1-8289.95015/12



- OPERATING INSTRUCTIONS
- COOKER HOOD
- INSTRUCTION MANUAL
- HOOD
- WARNINGS
- SAFETY DEVICES
- GENERAL SAFETY
- WARNING
- ASSISTANCE
- T1 RESET MOTORE
- ELECTRICAL HOOK UP
- AIR EXHAUST (FOR DUCTED UNITS)
- FILTER OR DUCTED
- DUCTED VERSION
- FILTER VERSION
- GLASS CONTROLS
- MODELS WITH MECHANICAL KEYPAD
- T1 MOTOR RESET
- T2 SPEED
- T3 SPEED
- T4 SPEED
- T5 LIGHTS ON/OFF
- MAINTENANCE AND CARE
- FIRST CLEANING
- PERIODIC CLEANING
- SERVICING THE GREASE FILTER (A)
- SERVICING THE CHARCOAL FILTER (B)
- REPLACING THE BULBS
- REPLACING THE LIGHTS LED
- ELECTRICAL CABLE
- SCRAPPING
- TROUBLESHOOTING
- IF THE HOOD DOES NOT OPERATE
- IF THE HOOD IS NOT WORKING EFFECTIVELY
- IF THE HOOD TURNS OFF DURING NORMAL OPERATION
- FR
- INSTALLATION
- T1 RESET MOTOR
- T1 RESET MODE
- T1T2T3T4T
- T1 RESET SILNIKA
- MAINTENANCE AND CLEANING
- TECHNICAL MAINTENANCE AND CARE
- REGULAR CLEANING
- MAINTENANCE OF THE OIL FILTER (A)
- MAINTENANCE OF THE CHARCOAL FILTER (B)
- PROCEDURE FOR REPLACING THE LAMPS
- REPLACING LED LAMPS
- MAINS CABLE
- DISPOSAL
- IF THE EXTRACTOR HOOD DOES NOT WORK
- CHECK
- IF THE EXTRACTION EFFICIENCY IS LOW
- IF THE HOOD TURNS OFF DURING OPERATION
- T1 PRE-START OF THE HOOD
- T5 INCREASE/DECREASE SPEED
- IF THE BUTTON DOES NOT WORK
- IF THE BUTTON WORKS POORLY
- IF THE BUTTONS ARE PRESSED DURING NORMAL OPERATION
- MODELS WITH MECHANICAL PUSH-BUTTON PANEL
- T5 STANDBY MODE
- TECHNICAL CORSET FOR WOMEN
- WASHING INSTRUCTIONS
- HAND WASH
- CORSET FOR WOMEN (A)
- CORSET FOR WOMEN (B)
- INSTALLATION LED
- POWER CORD
- IF THE DEVICE IS NOT WORKING
- IF THE DEVICE STILL DOES NOT WORK
- GLASS
- (B)
Brand : INDESIT
Model : IHF 9.5 A M IX
Category : Range hood