Serea Reply TH528 - Phone THOMSON - Free user manual and instructions
Find the device manual for free Serea Reply TH528 THOMSON in PDF.
| Product Type | Corded telephone with digital answering machine |
| Brand | Thomson |
| Model | Serea Reply TH528 |
| Power supply | AC adapter 100-240V~50/60Hz, output DC6V/500mA (model GCE060050C) |
| Dimensions (WxDxH) | Approximately 22 x 18 x 10 cm |
| Weight | Approximately 0.8 kg |
| Screen type | LCD display |
| Phonebook | Up to 150 contacts with name and number |
| Answering machine capacity | 60 minutes recording (messages up to 2 minutes each) |
| Ring tones | 10 melodies, 5 volume levels + silent |
| Hands-free function | Yes, with built-in speaker |
| Speed dial keys | 3 programmable keys (M1, M2, M3) |
| Call log | Incoming, outgoing, missed (up to 50 numbers) |
| Available languages | French, English, Spanish, German |
| Maintenance and cleaning | Clean with a soft dry cloth; do not use solvents or harsh products |
| Safety | Do not expose to moisture; unplug during a thunderstorm; do not disassemble; use only the provided adapter |
| Spare parts and repairability | AC adapter, coiled cord, telephone cable provided; no user-serviceable parts; contact customer service (sav@logisav.fr) for assistance |
| General information | Indoor use only; requires an ADSL filter if broadband line; complies with directive 1999/5/EC; Thomson brand under license from ADMEA |
Frequently Asked Questions - Serea Reply TH528 THOMSON
User questions about Serea Reply TH528 THOMSON
0 question about this device. Answer the ones you know or ask your own.
Ask a new question about this device
Download the instructions for your Phone in PDF format for free! Find your manual Serea Reply TH528 - THOMSON and take your electronic device back in hand. On this page are published all the documents necessary for the use of your device. Serea Reply TH528 by THOMSON.
USER MANUAL Serea Reply TH528 THOMSON
For instruction manual in another languages, check online at http://www.thomsonphones.eu
François 1
English 26
Espanol 35
Nederland 48
Portugués 61
Contenu
Mise en route
- TOUCHES NUMERIQUES, * (ASTERISQUE), # (DIESE)
Important safety instructions
Important
To reduce the risk of fire, electric shock and injury, always observe the following basic precautions when using your telephone:
- This appliance is intended for indoor use only.
- Observe all markings on the product.
- Do not expose your telephone to moisture and avoid contact with liquids.
- To prevent electric shock, do not disassemble the handset or the telephone base.
- Your telephone may have a slight chance of being damaged by lightning. Unplug the telephone base from the mains and disconnect the telephone line during a thunderstorm.
- Do not use the telephone in the vicinity of a gas leak.
- Clean your telephone with a dry, soft, lint-free cloth. Do not use any cleaning agents or solvents, especially aggressive ones.
- Your telephone does not work in case of power failure and by consequence cannot be used for emergency calls. To avoid such inconvenience, always keep a traditional corded telephone in your home.
- To prevent electric shock, do not use your telephone during a thunderstorm.
- To eliminate any voltage within the telephone, unplug the power cord from the mains.
- The socket-outlet shall be installed near the equipment and shall be easily accessible.
- If the appliance is not use for a period of time, please unplug the adapter in order to save electricity.
- The external flexible cable of the adapter cannot be replaced, If the cord is destroyed, the adapter should be destroyed.
CAUTION
Please use the bundle adaptor for operates the device only. The adaptor model number: GCE060050C
Failure to observe the correct polarity or voltage of the adapter may cause damage to the telephone base.
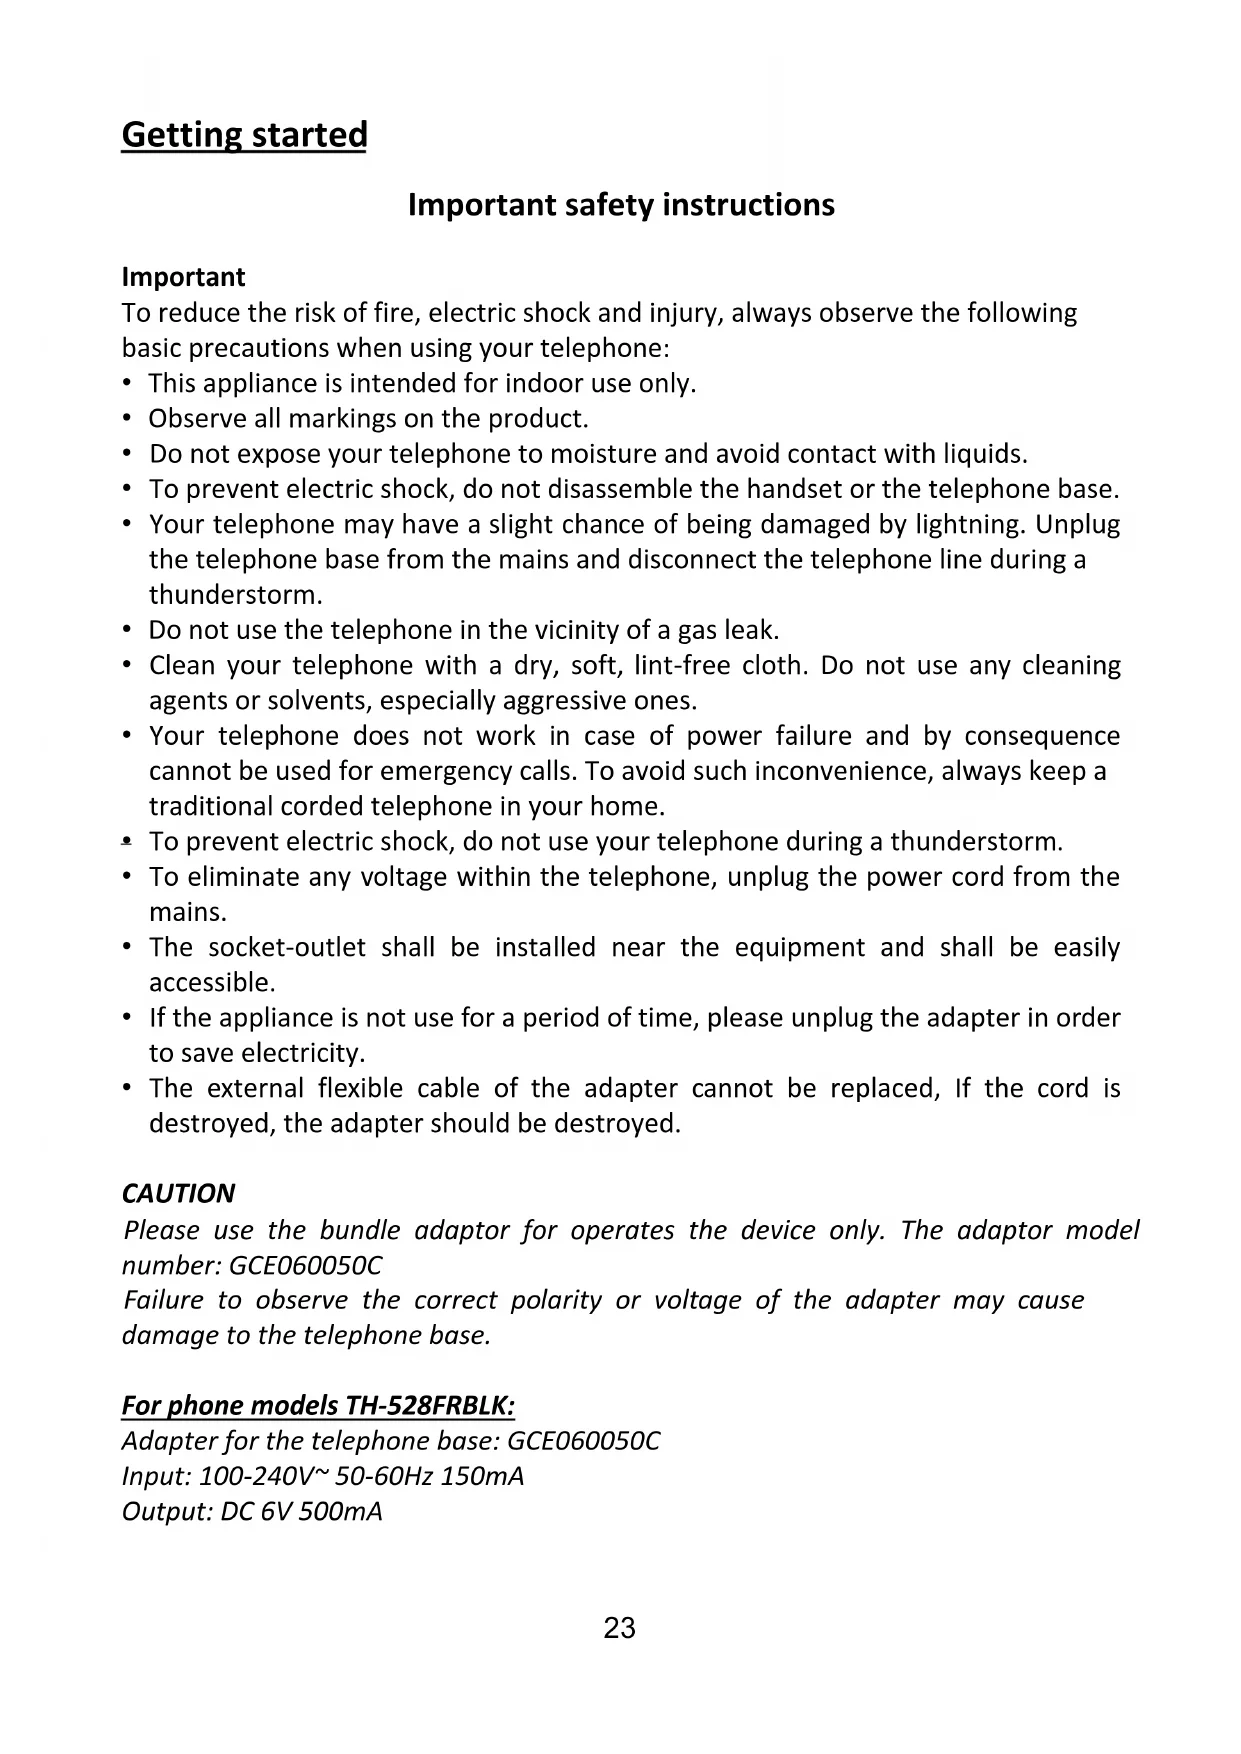
For phone models TH-528FRBLK:
Adapter for the telephone base: GCE060050C
Input: 100-240V~50-60Hz 150mA
Output: DC 6V 500mA
Package contents
| Quantity | |
| Coreded phone | 1 |
| Coiled cable | 1 |
| Telephone cable | 1 |
| Adapter | 1 |
| User manual | 1 |
Important:
YOU ARE USING A BROADBAND OR ADSL LINE
To ensure proper functioning of your telephone, you need to install a filter (not supplied) between the telephone wall jack and the telephone base. Without this filter, you may experience interference to the phone and loss of broadband signal. Consult the instructions to install the filter properly.
Installation
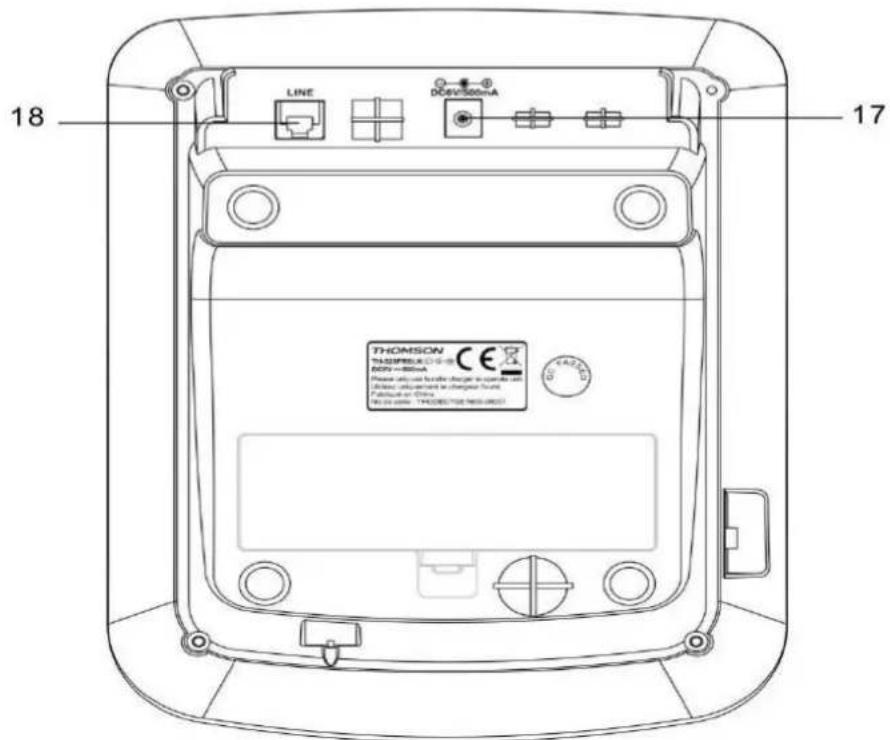
- Insert one end of the RJ11 cable into LINE jack of the phone, the other connect with local network. Insert the plug of the supplied adapter to the DC6V/500mA jack and the other end into an electrical outlet.
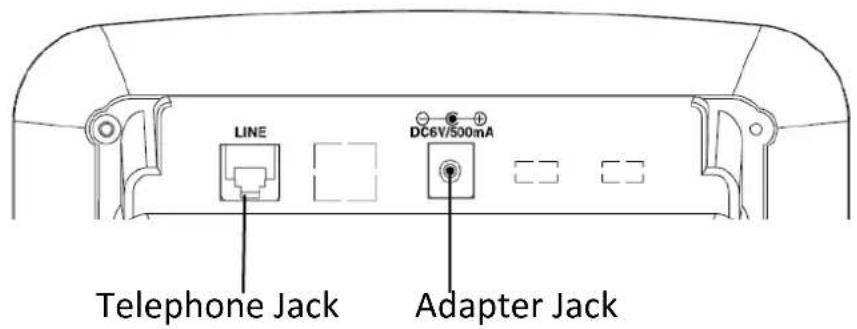
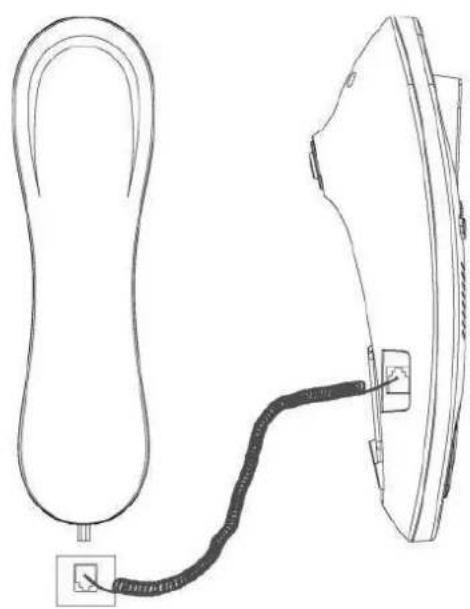
- Use coiled cord to connect the base and handset. The Jack is located on the left side of the unit. Do not connect to the LINE jack on the rear of the unit.
Getting to know your phone
-
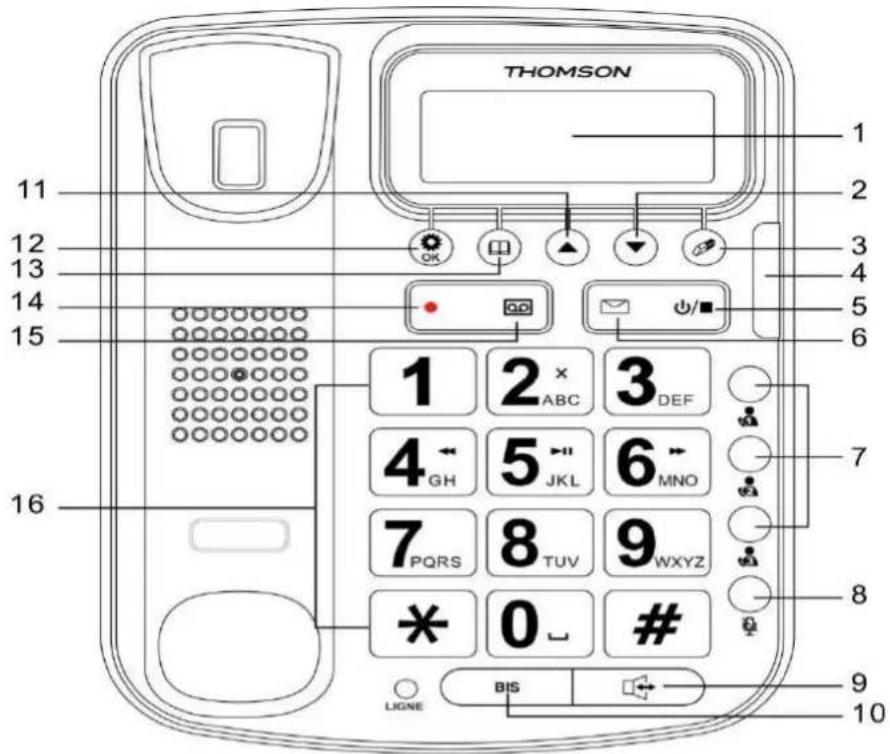
LCD DISPLAY
-
M1/M2/M3
-
PHONEBOOK
-
DOWN
-
MUTE
-
RECORD MEMO
-
DELETE
-
HANDSFREE
-
OGM(OUTGOINGMESSAGE)
-
NEW CALL LED
-
BIS - REDIAL NUMBER
-
NUMBERIC KEYS
-
TAM ON/OFF/S
-
UP
-
POWER INPUT
6.MESSAGE
-
MENU/OK
-
TELECOM RJ11 CABLE
PLAY/PAUSE
- DOWN / OUTGOING
In standby mode, press to enter the outgoing list.
Scroll up through menu options, call lists and phonebook entries.
During a call, press to decrease the earpiece volume.
- DELETE
The key is used to delete contact in phonebook.
To delete the entries while editing memory or per-dialing numbers.
- NEW CALL LED
When there is new call coming, this LED indicator flashes.
- TAM ON/OFF
Press and hold to switch the answering machine ON or OFF;
With TAM ON in standby model, press to select OGM 1 or OGM 2;
When play message, press to stop playing message.
6.MESSAGE
To play answering machine messages or pause the playing
- M1/M2/M3
Pre-dial a phone number, and then long press one of the M1, M2 or M3 keys, and the number is stored on the M1, M2, or M3 key accordingly.
Press M1/M2/M3 key to dial the stored number directly.
- MUTE
During a call, press this key to switch Mute on/off. When mute on, your caller cannot hear your voice.
- HANDSFREE
Press to dial or answer a call in handsfree mode.
- BIS - REDIAL NUMBER
Press and BIS key, the last dialed number will be dialed.
When dialing/storing a number, press to enter a pause.
- UP/ INCOMING
In standby mode, press to enter the incoming list.
Scroll up through menu options, call lists and phonebook entries.
During a call, press to increase the earpiece volume.
- MENU/OK
Press to open the menu.
Press to select menu options and to confirm a displayed option.
- PHONEBOOK / RETURN
In standby/talk mode, press to enter the phonebook.
In menu mode, press to return to the previous menu.
- MEMO
Press and hold this key to record a memo.
When play message, press to play the next message.
- OGM (OUTGOINGMESSAGE)
Press to listen to the current OGM (OGM1 or OGM2).
Press and hold to record current OGM.
When play message, press to play the previous message.
- NUMERIC KEYS, * (ASTERISK), # (HASH) KEYS
Press to enter a number/character
2 : To delete an answering machine message during playing.
4 : To skip back to the previous message during playing answering machine messages.
5 : To play answering machine messages or pause playing.
6: To skip back to the next message during playing answering machine messages.
8: To stop playing answering machine messages.
- TELEPHONE RJ11 CABLE
Use to connect your telephone to the telecom cable.
Store the number in one-touch memory
- In on-hook state, pre-dial a number or scroll to the desired incoming number
- Long press or for 2 seconds, there will be a "beep" sound, means the number was stored.
Dial one-touch memory
In on-hook or off-hook state, press or key, the number is dialed out.
Delete one-touch memory
In on-hook state, press # key twice, then press and hold or key to delete it.
Ring setup
You can set different ringer melodies and adjust the ring volume.
Choose from 10 melodies and 5 volume levels and off.
- Press key, scroll or key to select SETTINGS.
- Press, scroll or key to select RING SETUP.
- Press key, and it will display EXT RING.
- Press key, scroll or key to select the MELODY and VOLUME.
1) If select MELODY: Press key to confirm, scroll or key to select desired melody.
Press to confirm.
2) If select VOLUME: Press key to confirm, scroll or key to select desired ringer volume level from 1 to 5, if you want to switch off select VOLUME OFF. Press key to confirm.
Note: If you select ring VOLUME OFF, there will be a ringing off icon display on screen. When there is an incoming call, the telephone will not ring.
Language
- Press key, scroll or key to select SETTINGS.
- Press key, scroll or key to select LANGUAGE.
- Press key. Press or key to select the language you want.
- Press key to confirm.
Date & time
- Press key, scroll or key to select SETTINGS.
- Press key, scroll or key to select DATE & TIME.
- Press key and the last two digits of the year flashes.
- Edit the year, month, time and date by scrolling or key.
- Press key to confirm.
Note: The date and time will be automatically set when the first caller ID message is received.
USING THE ANSWERING MACHINE (TAM)
This product can record messages from incoming callers or memos. Each message or memo can be up to 2 minutes long, and the total recording time available for all messages/memos is about 60 minutes.
You can operate your answering machine from the base, or remotely from other telephones.
You will need to set the correct date and time (if you have not already done so) so that you will know when each message was received. If you subscribe to Caller display service, the date and time would be set on the base automatically.
Listening to your messages
- Press key, scroll or key to select TAM.
- Press key, the display showsMESSAGE.
- Press key to listen to the new and old messages.
During message playing, press or key to adjust the speakerphone volume, and
- Press 2 to delete a message.
- Press 4: To skip back to the previous message.
- Press 5_jkl^* * : To pause and press again to resume playback.
- Press 6_MNO^- : To skip forward to the next message.
- Press 8To stop playback.
Delete all answering messages
- Press key, scroll or key to select TAM.
- Press key, scroll or key to select DELETE ALL.
- Press key, the display shows CONFIRM?
- Press key, you will hear, "All message deleted".
Record a memo
You can record memo message up to 120 seconds for other users which can be played back like normal messages.
- Press key, scroll or key to select TAM.
- Press key, scroll or key to select MEMO.
- Press key, you will hear, "Please record the memo after the beep". You can now record your memo, press key to end recording.
TAM SETTINGS:
Switch the answering machine on/off
- Press key, scroll or key to select TAM.
- Press key, scroll or key to select TAM SETTINGS.
- Press key, the display shows TAM ON/OFF.
-
Press key, the display shows ON.
-
Press key, the display shows OGM1, scroll or key to select the OGM1 or OGM2.
- Press key to confirm.
Outgoing messages (OGMs)
The outgoing message is the message a caller first hears when the answering machine picks up their call. This product has two pre-recorded outgoing messages, OGM 1 and OGM 2, and you can also record your own.
Select and Listen to OGM 1 and OGM 2
- Press key, scroll or key to select TAM.
- Press key, scroll or key to select TAM SETTINGS.
- Press key, scroll or key to select SET OGM.
- Press key, scroll or key to select OGM1 or OGM 2.
- Press key, the display shows PLAY. Press key to listen to the OGM content.
Set TAM alarm
- Press key, scroll or key to select TAM.
- Press key, scroll or key to select TAM SETTINGS.
- Press key, scroll or key to select TAM ALERT.
- Press key, scroll or key to select ON or OFF.
Note: When setting to ON, you will hear warning tone every 20 seconds in idle mode, if you have new messages.
Set Answer delay
It sets the number of times your product will ring before the answering machine picks up your call and starts playing the outgoing message.
You can change this setting to between 2-9 rings or Toll Saver. The default setting is 5 rings.
- Press key, scroll or key to select TAM.
- Press key, scroll or key to select TAM SETTINGS.
- Press key, scroll or key to select SET RING.
- Press key, scroll or key to select the number of rings required and press key to confirm.
Toll saver
When you call from another phone to access your messages remotely, if your answering machine is set to toll saver, and you have new messages it will answer after 2 rings, if you do not have any new messages, it will ring after 5
rings. This means you can hang up after 3 rings knowing you have no new messages, saving you time and the cost of the call.
Select a language for answering machine
- Press key, scroll or key to select TAM.
- Press key, scroll or key to select TAM SETTINGS.
- Press key, scroll or key to select TAM VOICE.
- Press key, scroll or key to select from ENGLISH, ESPANOL, FRANCAIS and DEUTSCH, press key to confirm.
Set the TAM PIN code
- Press key, scroll or key to select TAM.
- Press key, scroll or key to select TAM SETTINGS.
- Press key, scroll or key to select TAM PIN, press key. The handset will display the current code.
- Enter a new code and then press key to confirm.
***Note: The preset TAM PIN code is 0000.
Restore TAM default
- Press key, scroll or key to select TAM.
- Press key, scroll or key to select TAM SETTINGS.
- Press key, scroll or key to select TAM DEFAULT.
- Press key. The handset will display PIN? Enter the system PIN code (default 0000) and press key to confirm.
Then all the TAM settings would be restored to factory default. And the new TAM message would not be deleted.
Remote access
You can operate your answering machine from other phone by calling your phone and entering the TAM PIN code (default 0000). Using a PIN code prevents other people from accessing your answer machine and messages without permission.
- Dial your telephone number. When you hear your outgoing message, press key. The machine will ask you to enter TAM PIN code.
- Enter your 4-digit PIN code (default 0000) quickly. If the security code is correct, you will hear a voice prompt telling that you have N messages, and will automatically play new messages. If there're no new messages, you will hear, "you have no new message. You have N messages. Message 1...." Then it will play all messages. After playing all messages, you would hear, "end of
messages".
Note: If you enter an incorrect PIN code you, you will hear "wrong security code". It allows one further attempt, if it is still incorrect you will hear "wrong security code" followed by a beep and then you phone will hang up.
-
When messages are playing, simply follow the instruction as indicated below:
-
Press 2: To delete a message. You will hear, "message deleted".
- Press 4: To skip back to the previous message.
- Press 6: To skip forward to the next message
- Press 5: To pause and restart the current message. The maximum pause time is one minute.
-
Press 8: To stop playback
-
When in remote control while not playing messages, you can press keys for below functions:
-
Press 1: To play the main menu
- Press 5: To play messages
- Press 7: To switch the answer machine ON
- Press 9: To switch the answer machine OFF
Note: If you remotely set the answer machine to "OFF" by press 9 key, and then you can't remotely switch to "ON". You can only set the answer machine "ON" by operating on the telephone.
Full instruction manual online
Visit the following internet website to access this device's instruction manual. http://www.thomsonphones.eu
Declaration of conformity
This DECT phone complies with the essential requirements and other provisions of Directive 1999/5/EC.
The declaration of conformity is available at: http://www.thomsonphones.eu

The European directive 2012/19/EU on Waste Electrical and Electronic Equipment (WEEE), requires that old household electrical appliances must not be disposed in the normal unsorted municipal waste stream. Old appliances must be collected separately in order to optimize the
recovery and recycling of the materials they contain and reduce the impact on human health and the environment. The crossed out "wheeled bin" symbol on the product reminds you of your obligation, that when you dispose of the appliance it must be separately collected. Consumers should contact their local authority or retailer for information concerning the correct disposal of their old appliance.
Imported by ADMEA, 12 Rue Jules Ferry, 93110 Rosny sous bois, France.
THOMSON is a trademark of Technicolor SA used under license by ADMEA