
ST 39 E - Vacuum Cleaner TEAM - Free user manual and instructions
Find the device manual for free ST 39 E TEAM in PDF.

| Product type | Canister vacuum cleaner |
| Brand | Team |
| Model | ST 39 E |
| Power supply | 220-240 V ~ 50/60 Hz |
| Nominal power | 2000 W |
| Dust tank capacity | 3.5 L |
| Power cord length | 8 m |
| Filtration type | Washable HEPA filter + nylon filter + air outlet filters |
| Net weight | 5.4 kg |
| Dimensions (L x W x H) | 30 x 25 x 40 cm |
| Included accessories | Combination nozzle, flat nozzle with small brush, telescopic tube, hose |
| Power control | On the body and on the handle (manual) |
| Automatic cord rewinder | Yes, with control button |
| Telescopic tube | Adjustable length |
| Combination nozzle | Adjustable for carpets or hard floors (retractable brush) |
| Flat nozzle | For corners, radiators, drawers |
| Easy-Clean system | Preliminary cleaning of the HEPA filter by rotating the dial |
| Filter maintenance | Wash with warm water, dry fully before reassembly |
| Do not vacuum liquids | Do not vacuum liquids |
| Warranty | 2 years (parts and labor) |
Frequently Asked Questions - ST 39 E TEAM
User questions about ST 39 E TEAM
0 question about this device. Answer the ones you know or ask your own.
Ask a new question about this device
Download the instructions for your Vacuum Cleaner in PDF format for free! Find your manual ST 39 E - TEAM and take your electronic device back in hand. On this page are published all the documents necessary for the use of your device. ST 39 E by TEAM.
USER MANUAL ST 39 E TEAM
Bagless vacuum cleaner
Aspirateur sans sac
1 Crevice tool with foldable upholstery brush
2 Power cord with plug
3 Flexible hose adapter
4 Wheel
5 Main body
6 Switch for automatic power cord rewind
7 Air outlet filter (right-hand side and left-hand side of the vacuum cleaner)
8 Carrying handle
9 Power regulation switch Min ... Max (on the front side of the vacuum cleaner)
10 Carrying handle of the dust container
11 Dust container with filter unit inside
12 ON/OFF switch
13 Flexible hose
14 Handle
15 Manual suction power regulator
16 Telescopic tube
17 Switch for setting the kind of floor (on part 19)
18 Release button of part (16)
19 floor brush
FR
Please read these instructions carefully before using the appliance.
Check that your mains voltage corresponds to that stated on the appliance.
Never leave the appliance unsupervised when in use. Keep out of reach of children or incompetent persons.
From time to time check the appliance for damages. Never use the appliance if cord or appliance shows any signs of damage but have it checked and repaired by a competent qualified service. Should the cord be damaged, it must be replaced by a competent qualified service ()
Only use the appliance for domestic purposes and in the way indicated in these instructions.
Never immerse the appliance in water or any other liquid for any reason whatsoever.
Never use the appliance near hot surfaces.
Unplug the appliance when not in use or when emptying the dust container or cleaning or replacing the filters.
Never use the appliance outside and always place it in a dry environment.
Never use accessories which are not recommended by the producer. They could constitute a danger to the user and risk to damage the appliance.
Never move the appliance by pulling the cord. Make sure the cord cannot get caught in any way. Do not wind the cord around the appliance and do not bend it.
Before plugging in the cord, make sure the switch is set to the off position.
This appliance is not a toy, it is not supposed to be sat on.
Never use the appliance to vacuum matches, pointed objects, cigarettes, butts or other glowing things. Do not use it on wet surfaces or surfaces covered with cement or other substances that are too fine or even toxic when inhaled. Never vacuum any kind of liquid with this appliance.
Do not try to repair the winding-on spool yourself. Make sure it is repaired by a competent qualified electrician (^*)
Do not block the vacuum passage. If this should happen by accident, unplug the appliance before unblocking it.
Make sure not to point the vacuum cleaner at persons or animals, and especially stay clear of eyes and ears.
If you use the appliance with damaged filters the appliance might get damaged. Make sure to check the good quality and placement of the dust container and/or filters.
If your appliance no longer vacuums correctly or if the dust container is full, clean the filter and empty the dust container. Otherwise the appliance might overheat. Guarantee claims will not be accepted if this occurs.
Competent qualified electrician: after sales department of the producer or importer or any person who is qualified, approved and competent to perform this kind of repairs in order to avoid all danger. In any case you should return the appliance to this electrician.
Using the appliance when not all the filters are installed properly and in good shape might damage the appliance. No guarantee claims will be accepted for damages due to that reason.
ASSEMBLING THE VACUUM CLEANER
Unpack the appliance and its accessories.
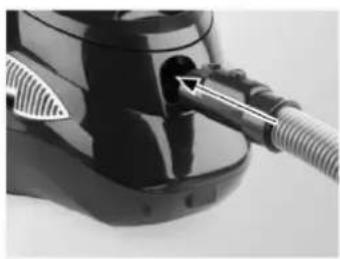
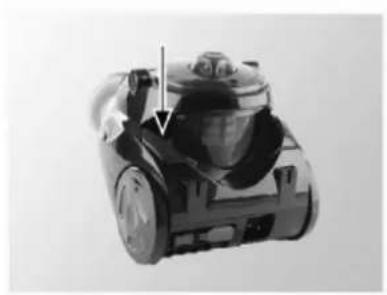
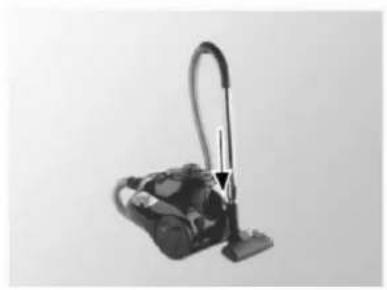
Insert the connection piece of the flexible hose into hose connection inlet on the front part of the appliance. Press until it clicks.
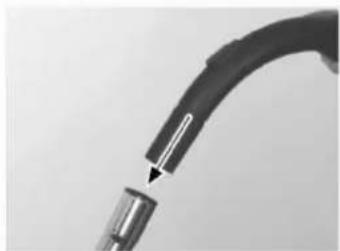
Fit the telescopic tube to the handle.

Fit the floor brush to the other end of the telescopic tube.

Disassembly of all connections:
Switch OFF the unit by using the ON/OFF switch.
Pull the power plug out of the power socket.
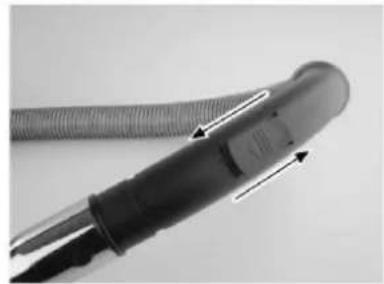
Press the release button on top of the hose connection piece and pull the flexible hose out of the connection inlet.
For the other connections, you just have to pull them out.
USING OF BRUSHES AND REGULATORS

Floor brush - foot switch tipped up: In this position the floor brush can be used for cleaning of carpets & carpet floors.

Floor brush - foot switch tipped down: In this position the floor brush can be used for cleaning of hard floors. The comb of the brush is lowered.

The crevice tool you will find inside the accessory compartment (left-hand side next the power cord). It can be used for cleaning of heaters, radiators, corners & compartments etc.

The crevice tool with flipped open upholstery brush can be used for cleaning of upholstery, car seats, mattresses & futons and e.g. PC keyboards
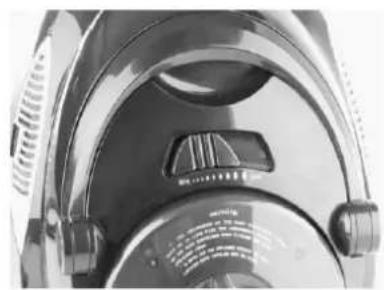
You can select the suction power infinitely variable by moving the power regulation switch. Use minimum suction power for furniture and other sensitive surfaces. Use maximum suction power for carpets & carpet floors.
In case of need you can set the suction power by using the manual suction power regulator at the handle.

Select the right length of the telescopic tube by pushing the button for unlocking and moving the tube in and out at the same time.
STARTUP
- Attention: Using the unit without the filter can damage the engine! Never use the vacuum cleaner without filter or without dust container!
If assembling of the vacuum cleaner is finished, you only need to pull out the power cord for the wished length (not longer than the red mark on cable will be visible). Stick the power plug into the power socket.
Before use always check the fill level of the dust container. Please empty out the container if the maximum level is reached (see chapter cleaning of dust container & filter).

Please check if the power regulation switch is on "MIN" position. If not, please switch it to this position.

To switch on the vacuum cleaner press the ON/OFF button.
AFTER USE
Attention!
During the winding up the power cord, please guide the cord with your hand. Therewith you will avoid wounds, damages on the power cord or scratches on the housing of the cleaner.

Please switch OFF the unit by pushing the ON/OFF switch.
Pull the power plug out of the power socket.
Press the button for automatic cord rewinding and guide the cord with your hand.
For storage, please stick the hook on the floor brush inside one of the grooves at the backside of the vacuum cleaner.
CARE
Cleaning of dust container & filters
Attention
Before you start cleaning the dust containers and filters please read the chapter _IMPORTANT SAFEGUARDS".
Attention
When you set in the HEPA-filter, the locking device on the lid needs to be clicked in. The lid closes only, if the locking device is standing in inner direction.
Please empty out the dust container if the maximum level is reached. Clean the filter regular after every using in order to avoid faults & trouble of serviceability. Please change the HEPA-filter once a year or earlier if necessary.


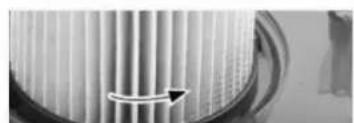
LE ON TOP OF THE FILTER CONTAINER SEVERAL TIMES INTO LEFT & O PRE-CLEAN THE HEPA-FILTER (EASY-CLEAN-SYSTEM).

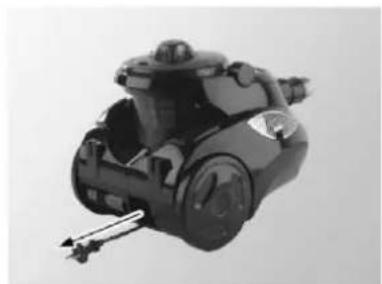
Pick up the handle of the dust container and pull out the container.

Keep the dust container over your dustbin.
Push the button in order to open the bottom of dust container. Empty the container and after this, please close the bottom again.

Turn the lid of the dust container, so that the arrow shows in direction "OPEN" and take out the lid.

Turn the lid of the filter upside down, so that the filter looks upturned.

Turn the nylon-filter counter clockwise out of the socket and take the nylon-filter away.

Assembly page 19/72
TURN THE HEPA-FILTER COUNTER CLOCK OUT OF THE SOCKET AND TAKE THE HEPA-FILTER AWAY.
Clean the dust container, the HEPA-filter and the nylonfilter by using running lukewarm water.
Give all the filters & dust container enough time to dry out completely.
Insert the HEPA-filter back into the lid. Turn the HEPA-filter clockwise till it stops inside the socket.
Insert the nylon-filter back into the lid. Turn the nylon-filter clockwise till it clicks inside the socket.
Put the lid back on the dust container, so that the arrow on the lid shows in direction "OPEN".
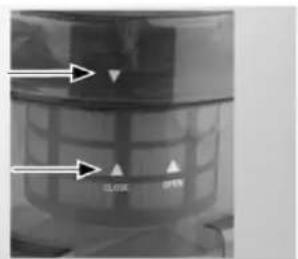
Close the lid of the dust container. Therefore turn the lid fill the arrow shows in direction „CLOSE" and the lid will be locked when you hear a click. Insert the dust container back into the unit.
embly page 20/72

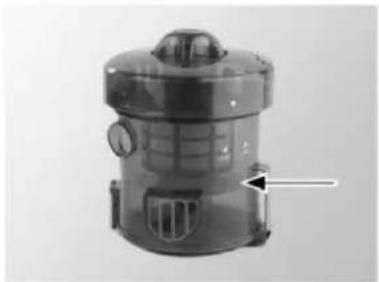
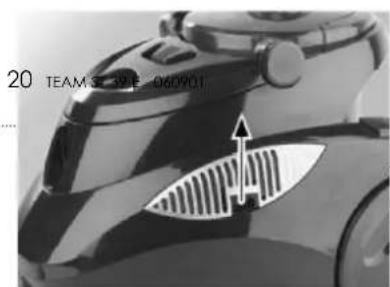
Edge up the button at the air outlet filter on the left-hand and right-hand side of the vacuum cleaner and take it out of the socket.
Take out the filter-fleece and clean it by using of running, lukewarm water. Give the filter-fleece enough time to dry out completely.
Put the air outlet filter back into the socket. The air outlet filter will lock in place audible.
CLEANING
- Do not use abrasive or chemical cleaning agents.
Clean your vacuum cleaner by using standard plastic cleaning agents.
MALFUNCTION
Blocked up brushes, flexible hose or telescopic tube can cause a malfunction of the unit (unusual sound or lower suction power). Full filters or defective electrical parts can also cause a malfunction.
- Check the brushes, the flexible hose and the telescopic tube regularly for this matter.
- Check the fill level of the dust container and check if the filters are full.
If you cannot solve the problem this way, please call the customer service.
PROTECTION OF THE ENVIRONMENT- DIRECTIVE 2002/96/EC
In order to preserve our environment and protect human health, the waste electrical and electronic equipment should be disposed of in accordance with specific rules with the
implication of both suppliers and users. For this reason, as indicated by the symbol on the rating label or on the packaging, your appliance should not be disposed of as unsorted municipal waste. The user has the right to bring it free of charge to a municipal collection point performing waste recovery by means of reuse, recycling or use for other applications in accordance with the directive.
FR MODE D'EMPLOI
POUR VOTRE SECURITE

- FR
- ASSEMBLING THE VACUUM CLEANER
- USING OF BRUSHES AND REGULATORS
- STARTUP
- AFTER USE
- Attention!
- CARE
- Attention
- LE ON TOP OF THE FILTER CONTAINER SEVERAL TIMES INTO LEFT & O PRE-CLEAN THE HEPA-FILTER (EASY-CLEAN-SYSTEM).
- TURN THE HEPA-FILTER COUNTER CLOCK OUT OF THE SOCKET AND TAKE THE HEPA-FILTER AWAY.
- CLEANING
- MALFUNCTION
- PROTECTION OF THE ENVIRONMENT- DIRECTIVE 2002/96/EC
- FR MODE D'EMPLOI
- POUR VOTRE SECURITE
Brand : TEAM
Model : ST 39 E
Category : Vacuum Cleaner