
MP1500 - Mp3 player Difrnce - Free user manual and instructions
Find the device manual for free MP1500 Difrnce in PDF.
| Product Type | MP3 Player |
| Brand and Model | Difrnce MP1500 |
| Power Supply | Built-in rechargeable lithium-ion battery |
| Battery Life | Up to 6 hours of playback |
| Screen | LCD Screen |
| Connectivity | USB 2.0 |
| Supported Audio Formats | MP3, WMA, WMV, ASF, ACT, WAV |
| Supported Video Formats | AMV (via conversion) |
| Voice Recording | WAV and ACT formats, 8 kHz sampling rate |
| FM Radio | Normal band (87-108 MHz) and Japan band (76-90 MHz), up to 20 preset stations |
| Image Viewer | JPEG |
| Text Reader | TXT files |
| Memory Capacity | Flash memory from 128 MB to 2 GB |
| Supported Operating Systems | Windows 98/SE/ME/2000/XP, Mac OS 10.3, Linux Redhat 8.0 and above |
| Available Languages | Multilingual |
| Private Function | Memory partition with password protection |
| Equalizer | Natural, Rock, Pop, Classic, Soft, Jazz, DBB |
| A-B Repeat Function | Yes |
| Playback tracking (Learn mode) | Yes, with recording and comparison |
| Video Conversion to AMV | Software provided for converting WMV to AMV |
| Firmware Update | Via PC software |
| Included Accessories | Earphones, USB cable, Software CD |
Frequently Asked Questions - MP1500 Difrnce
User questions about MP1500 Difrnce
0 question about this device. Answer the ones you know or ask your own.
Ask a new question about this device
Download the instructions for your Mp3 player in PDF format for free! Find your manual MP1500 - Difrnce and take your electronic device back in hand. On this page are published all the documents necessary for the use of your device. MP1500 by Difrnce.
USER MANUAL MP1500 Difrnce
natural_image
Illustration of a mobile phone with sound waves and icons (no text or symbols)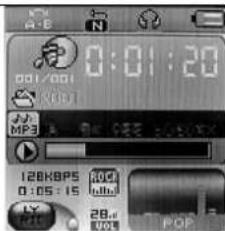
text_image
0:01:20 001/001 MP3 128Kbps 20Hz 0:05:15 128.4 POPMuziekmodus
text_image
ROOT REC10 2004/01/05 0:00:00 Total : 009 Remaining Time 16:25:29Opnamemodus
text_image
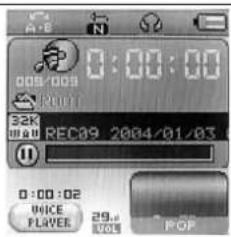
0:00:00 000-009 23K REC89 2004/01/03 0:00:02 WICE FLAVES 29.# POPDictafoonmodus

text_image
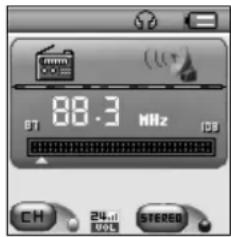
88.3 MHz CH 24.0 VOL STUDIORadiomodus
natural_image
Black and white close-up of a cluster of roses with visible petals and leaves (no text or symbols)JPG-viewer.
text_image
Sys Set Clock LCD set Language Power off Replay mode Online ModeSysteeminstellingen
text_image
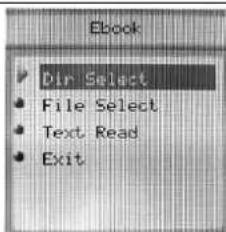
Ebook Dir Select File Select Text Read ExitLeesmodus
text_image
00:00:00 00:00:00 00:00:00 00:00:00 00:00:00 00:00:00 00:00:00 00:00:00 00:00:00 00:00:00 00:00:00 00:00:00 123 89+fu.anv 123 088Kbps 0.01.08 167V PLAYER 24... POPVideo
natural_image
Black-and-white photo of two people standing indoors, possibly in a retail or store setting (no visible text or symbols)natural_image
Camera icon set with shooting lens and control buttons (no text or symbols)
text_image
RECORD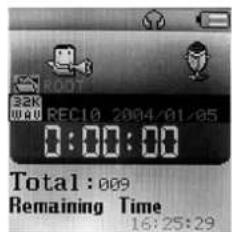
text_image
B4K WOU REC10 2004/01/05 0:00:00 Total : 009 Remaining Time 16:25:29
text_image
Record Local folder REC type Exittext_image
Record REC type ► Fine REC ● Long REC ● Fine VOR ● Long VOR
natural_image
Camera interface showing a MP3 camera with control buttons and display (no readable text or symbols)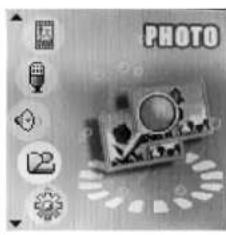
natural_image
Illustration of a camera with control panel and surrounding icons (no readable text or symbols)
text_image
View Picture ROOT rcr.jpg s8r.jpg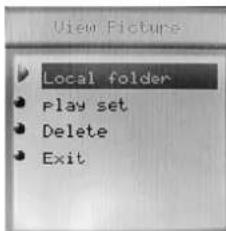
text_image
View Picture Local folder Play set Delete Exit
natural_image
Black and white close-up of a cluster of roses (no visible text or symbols)IX. Text read (tekst lezen)
text_image
Ebook Dir Select File Select Text Read ExitX. Systeeminstellingen.
text_image
Sys Set LCD set • brightness • black • Exit• Language (taal)
text_image
Sys Set Language • Simple Chinese ► English • Trad Chinese • Japanese • French- Uitschakelen
text_image
Sys Set Power off Off time Sleep timetext_image
Music Local folder Delete Repeat Exit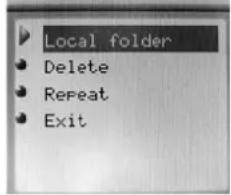
text_image
Local folder Delete Repeat ExitC. Herhaalmodus
- Follow Reading (Leesopname)
(c) Bestanden uploaden
natural_image
Close-up of a car with visible wheels and side-mounted sensors (no text or symbols)
natural_image
Close-up of a metallic surface with two rectangular objects and a small protrusion, no visible text or symbols.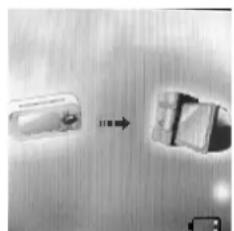
natural_image
Close-up of a metallic door with a small component and a close-up view of a cut (no text or symbols visible)text_image
Open Look in: JS REC01.act File name: Files of type: Record Files(*.act; *.rcd; *.rec) Open Canceltext_image
AMV convert Tool Input file: 01.mmv Output file: C:\Documents and Settings Output Info Start time: 0:00 Finish time: 4:02 Elapsed time: 4.02 Total time: 4.02 Select Name audio files Status Time 0 F:\Flashfxp\01.mmv Converlag 4.02 Progress 51%text_image
MP3 Player Disk Tool Format Partition and Encrypt Partition Disk total capacity 245 Mb Setting encrypted disk capacity 45 Mb Set username and password Partition and Encrypt Old username Old password New username New password New password confirm Start Close Help(a) Sluit de speler aan op de PC.
(b) Run de "MP3 Player Disk Tool" software op de meegeleverde CD.
(c) Selecteer "Divide and add password", stel de gewenste geheugenruimte in. Klik dan op "Set user and password". Voer de "New User", 'New
text_image
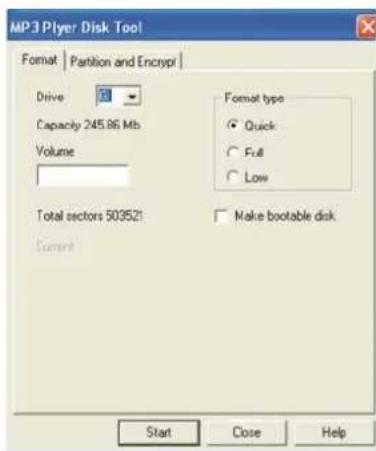
MP3 Ployer Disk Tool Format | Partition and Encrypi | Drive Capacity 245.86 Mb Volume Total sectors 503521: Current Format type ● Quick ○ Full ○ Low □ Make bootable disk Start Close Helptext_image
MP3 Player / Disk Tool Format Partition and Encrypt Partition Disk total capacity 245 Mb Setting encrypted disk capacity 45 Mb Success Complete setting disk partition and password! OK Dis password New username New password New password confirm Start Close Help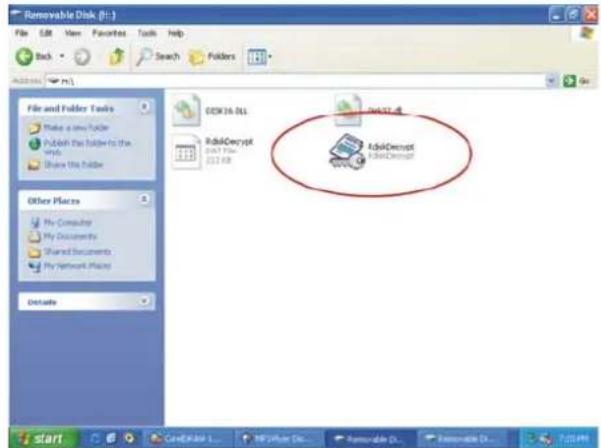
text_image
Renewable Disk (R-1) File Edit View Favorites Tools Help Back Search Folders File and Folder Tools Make a new folder Publish the folder to the help Show the folder Other Places My Computer My Documents Shared Documents My Network Files Details DECK36.DLL AddCrypt Add Crypt Add Crypt Add Crypttext_image
Removable Disk (R) File and Folder Tasks Make a new folder Publish the folder to the Web Share the folder Other Places My Documents Shared Documents My Network Files Details DISK15.DLL Disk32.dll RisikDecrypt DAR File ZS1 KB RisikDecrypt Disk32.dll Removable disk decay... Username: user Password: OK CancelXIV. Firmware Upgrade
A. USE DIFFERENT FOLDER (STOP TO USE SUB-MENU)....14
B. FILES DELETE INDICATION 14
C. REPEAT OPERATION 14
D. TEMPO RATE ADJUSTMENT 15
E. REPLAY FUNCTION 15
XII. FLASH DISK....16
A. CONNECT TO PC 16
B. FLASH DISK FUNCTION/ DOWNLOAD MP3 FILES 16
C. TRANSFORM ACT FILES TO WAV FILES 18
D. CONVERT VIDEO FILES INTO AMV 18
XIII. PRIVACY FUNCTION....20
XIV. FIRMWARE UPGRADE....22
XV. TROUBLE SHOOTING....23
XVI. TECHNICAL SPECIFICATIONS 23
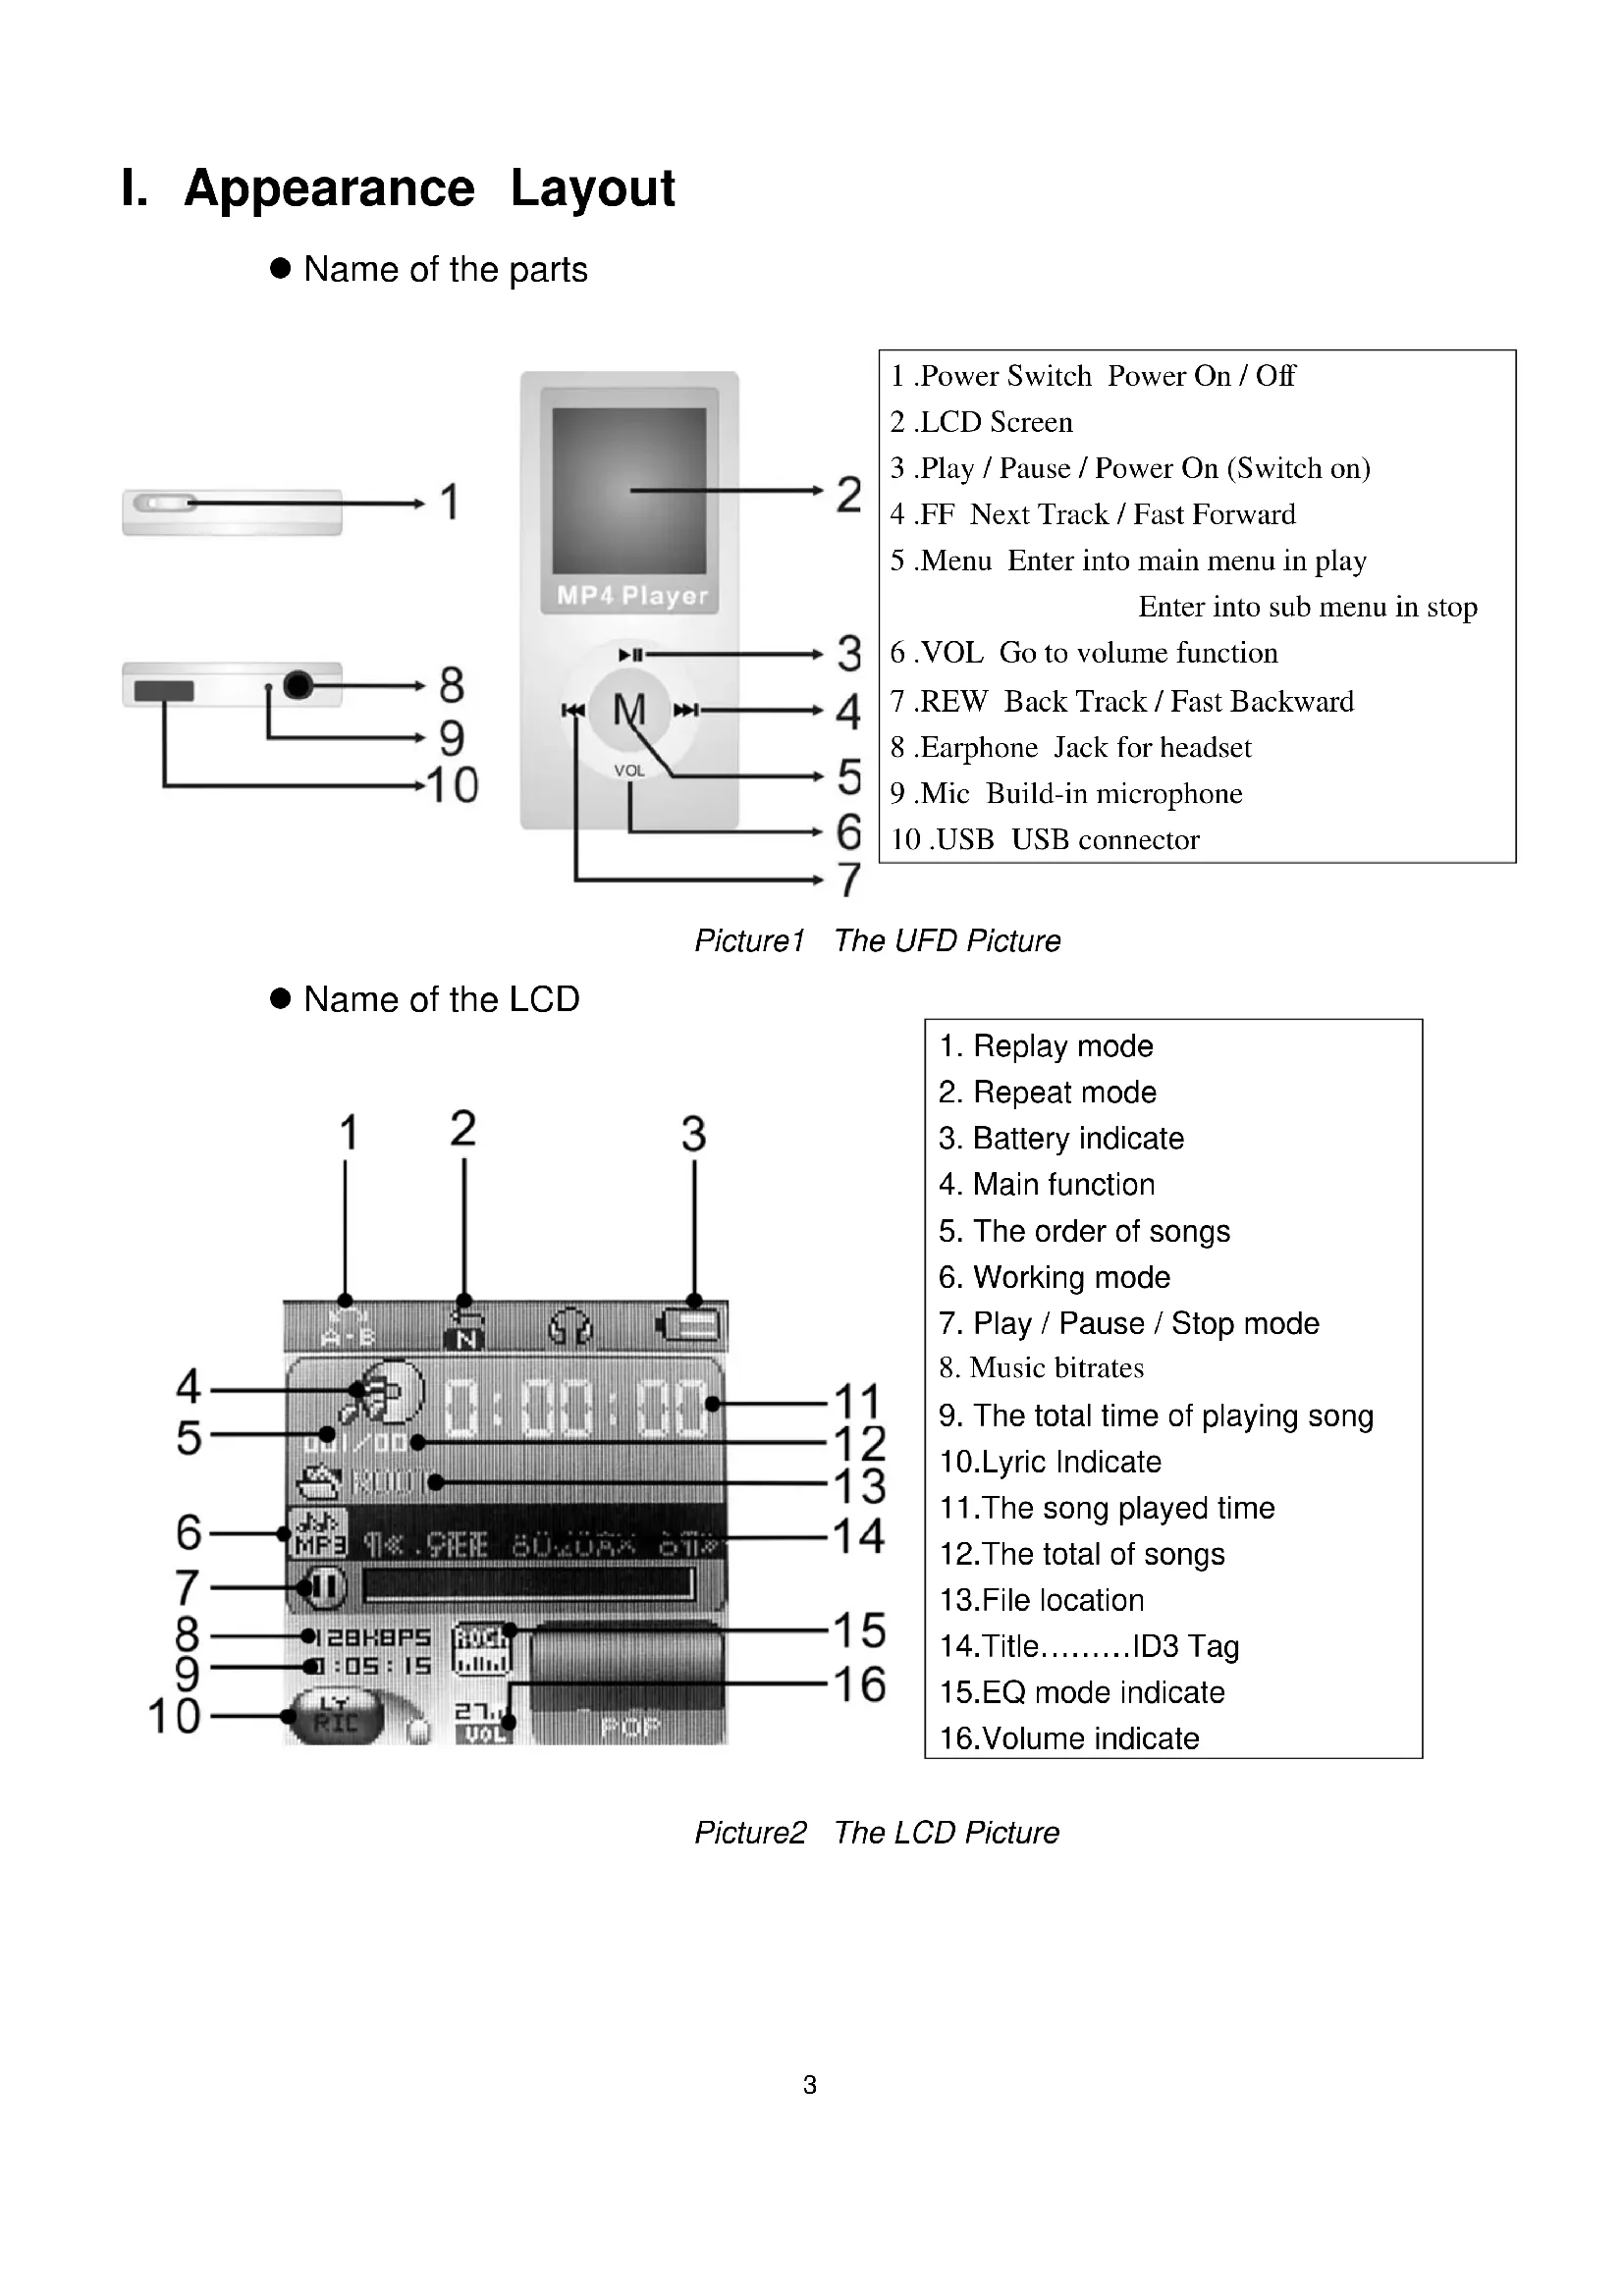
I. Appearance Layout
- Name of the parts
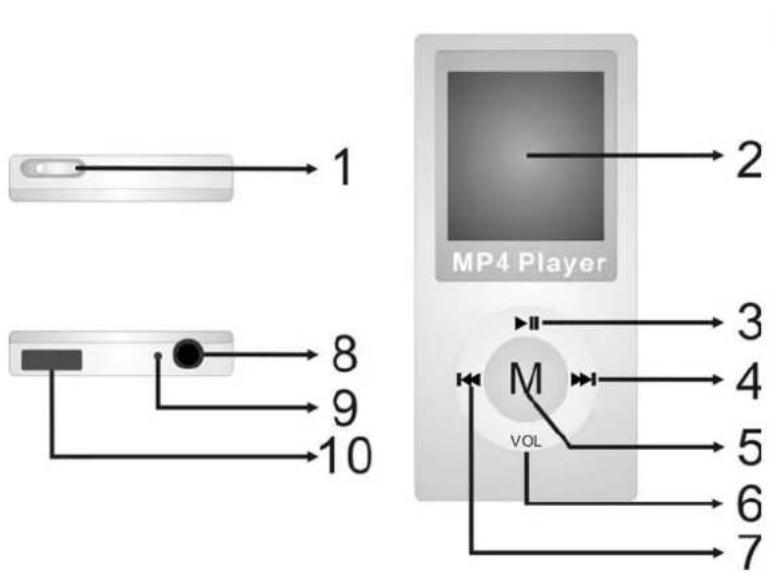
text_image
1 2 MP4 Player 3 8 9 10 M VOL 4 5 6 7- Power Switch Power On / Off
- LCD Screen
- Play / Pause / Power On (Switch on)
4 .FF Next Track / Fast Forward - Menu Enter into main menu in play Enter into sub menu in stop
- VOL Go to volume function
- REW Back Track / Fast Backward
- Earphone Jack for headset
9 .Mic Build-in microphone
10 .USB USB connector
Picture1 The UFD Picture
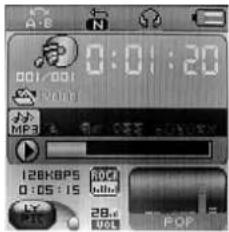
- Name of the LCD
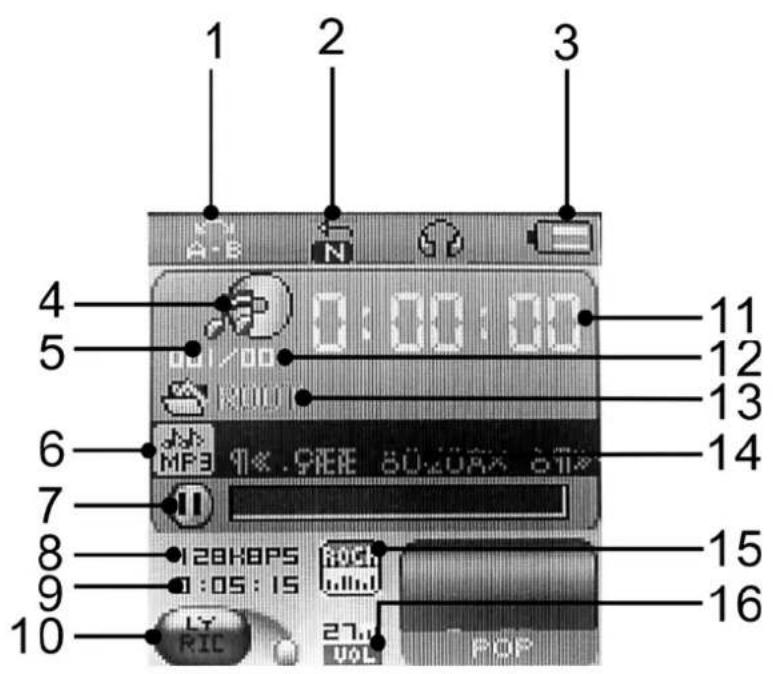
text_image
1 2 3 4 5 6 7 8 9 10 11 12 13 14 15 16 0:00:00 0:00:00 RIOU MFB 9#.SEE 80.00X 01# 120K0PS 0:05:15 RICH MINI LY RIC 27V VOL POP- Replay mode
- Repeat mode
- Battery indicate
- Main function
- The order of songs
- Working mode
- Play / Pause / Stop mode
- Music bitrates
- The total time of playing song
10.Lyric Indicate - The song played time
- The total of songs
13.File location - Title.....ID3 Tag
15.EQ mode indicate
16.Volume indicate
Picture2 The LCD Picture
- Battery
There are 9 levels of battery control
When the battery indicates is full. It will slowly decrease according to the battery storage.
□ When the battery storage is nearly used up, it will indicate empty. Please recharge the battery.
II. Basic Function
(a) Enter the Main Menu
Make use of key MENU to select the different functions. There is main function menu (long press key MENU when it is in stop status), sub menu when in play status (press key MENU to enter), and sub-menu when in stop status (press key MENU to enter).
(b) Preview operation
A. Press key ▶ or ◀ for music selection.
B. When songs are playing, press key VOL to enter adjust volume mode; and press key ▶ or ◀ for adjust volume increase or decrease.
(c) Enter different modes
You can enter different menu from the main function's menu
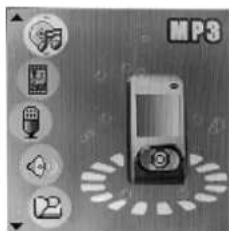
● Main Menu: (Long press key MENU to enter)
natural_image
Illustration of a video player with sound waves and icons (no text or symbols)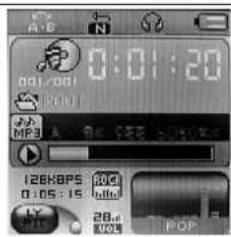
text_image
0:01:20 00/001 MP3 126Kbps 0.05:15 28.4 10kV POPMusic Mode Record Mode Voice Mode Radio Mode

text_image
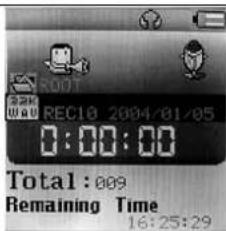
ROOT REC10 2004/01/05 0:00:00 Total : 009 Remaining Time 16:25:29
text_image
Sys Set Clock LCD set Language Power off Replay mode Online Mode
natural_image
Black and white close-up of a cluster of roses (no visible text or symbols)JPG View
text_image
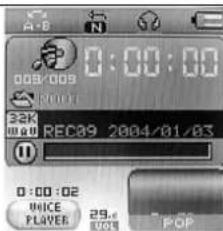
0:00:00 009/009 REC09 2004/01/03 0:00:02 MICE PLAYER 29.0 Vol POP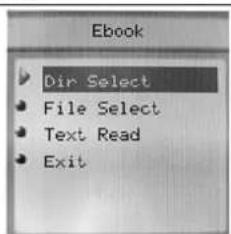
text_image
Ebook Dir Select File Select Text Read ExitReader Mode
text_image
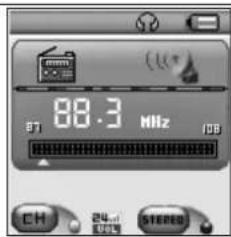
88.3 MHz CH 24... STEREO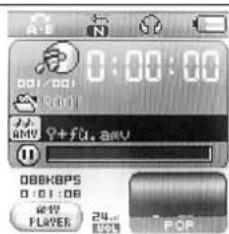
text_image
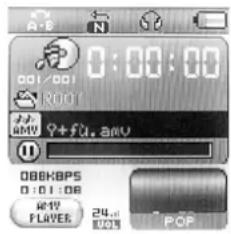
0:00:00 001/001 001/001 9+fu.8KV 006KOPS 0:01:00 40Hz PLAYER 24.00 POPVideo
III. Play movie files
A. Operation
(a) Simple Operation
● Well connect the earphone to the earphone jack.
● Make sure the key Power is on.
● Long press key ▶ ■ and the player will enter to last mode.
- Press key MENU to main menu.
- Press key ▶ or ◀ to select Movie Mode, and press key MENU to enter Music Menu.
● Music selection: Press key ▶ or ◀ to select movie files.
- Press key ▶ to play movie file.
● Volume adjustment: Press key VOL to enter adjust volume mode, then press key ▶/◀ to adjust volume.
● Cautions: The player will turn off automatically when it is not in play status.
- Press key ▶ or ◀ to select the AMV files.
- Caution: In playing AMV file, you can't choose any others functions. (For example adjust volume, go to the submenu.
- If the screen is show 'Format error!' it says that the player is not support this AMV files. Please check the file.
text_image
0:00:00 001/001 BOOTY 9+fu.anv 088KBPS 0.01.08 @1V PLAYER 24... POP
natural_image
Black-and-white photo of two children standing in a hallway, no visible text or symbolsIV. Music Mode
A. Keys Operation
Music Mode
Note: Short: press the key for 1 second
Long: press the key for 3 seconds
| Keys | Press | Stop Status Play Status | Submenu of play status | Submenu of stop status | ||
| Play | Long | Power off Power off | Power off Power off | |||
| Short | Play Stop Exit menu | Exit Menu | ||||
| Menu | Long | Enter Menu | Go to lyrics mode | Enter Menu | Enter Menu | |
| Short | Enter the submenu of stop status | Enter the submenu of play status | Confirmation or enter | Confirmation or enter | ||
| ▶ | Long | Next | Fast forward | Move the submenu | Move the submenu | |
| Short | Next Next and Play | Move the | submenu | Move the submenu | ||
| ◀◀ | Long | Previous Fast backward | Move the | submenu. | Move the submenu | |
| Short | Previous Previous and Play | Move the submenu | Move the submenu | |||
| Voi | ▶▶ | Short | Increase volume Increase volume | X | X | |
| ◀◀ | Short | Decrease volume Decrease volume | X | X | ||
B. Instruction
(a) Simple Operation
● Well connect the earphone to the earphone jack.
● Make sure the key Power is on.
● Long press key ▶ ■ and the player will enter to last mode.
- Press key ▶ or ◀ to select Music Mode, and press key MENU to enter Music Menu.
● Music selection: Press key ▶ or ◀ to select the songs.
- Volume adjustment: Press key VOL to enter adjust volume mode, then press key ▶/◀ to adjust volume.
● Cautions: The player will turn off automatically when it is not in play status.
(b) Equalizer
- When music is play:
- Press key MENU to enter the submenu of play status
- Press key ▶/◀ to select Equalizer.
- Short press key MENU to confirm.
- Then press key ▶/◀ for EQ selection: Natural, Rock, Pop, Classic, Soft, Jazz and DBB
(c) Lyrics' Switch
This player supports *.LRC files. If there is lyrics file under the same folder of the MP3 with the same name; the player will play MP3 and lyrics synchrony.
If there is a lyric for the song, the LCD at "LYRIC" will display a green light.
text_image
0:01:20 00/001 MP3 128KBPS 20Hz 0.05/15 LT 28Hz POP
text_image
0:01:20 00/001 MP3 128KBPS 0:05:15 28.0 001 POP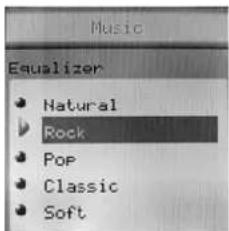
text_image
Music Equalizer Natural Rock Pop Classic Soft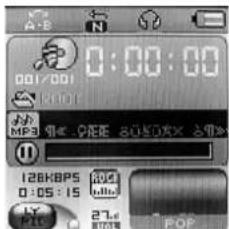
text_image
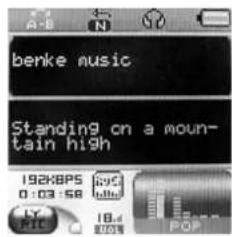
00/00 0:00:00 MP3 MP4 PEE AUSDX X 5% 126Kbps AGC 0:05:15 PIC 27 POP- If there is a lyric, the lyrics indicate light will show green.
● Long press key MENU to enter Lyrics interface - Lyrics will display on the screen.
- Press key MENU will return title interface:
text_image
berke music Standing on a mountain high 192KBPS 0:03-58 18.1 POPV. Voice Record
A. Button Operation
Record Mode
| Keys | Press | Stop | $status | Record |
| Play | Long Power off Stop Recording | |||
| Short Start Recording | Pause | Recording | ||
| Menu | Long | Enter Main Menu | X | |
| Short | Enter submenu | X | ||
St
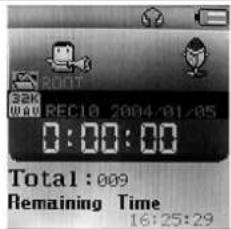
Make sure that the player has enough battery storage before you record. The player supports 99 files for each folder.
B. Instruction
(a) Record Mode
- Enter the main menu:
- Press key ▶/◀ to select Record:
- Press key MENU to enter:
- Press key ▶ to start record.

text_image
MP3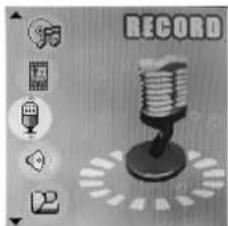
natural_image
Illustration of a vintage microphone with control buttons and a circular base (no text or symbols on the device itself)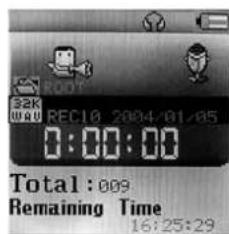
text_image
2K WU REC10_2004/01/05 0:00:00 Total : 009 Remaining Time 16:25:29
The recorded voice will be saved in the root folder in the submenu of record stop status/main menu.

If the LCD displays "Memory Full", there is no memory storage for new records.
Please delete some of the files for memory release.

If the LCD displays "Folders full", there are already 99 files in the folder. Please change another folder.
text_image
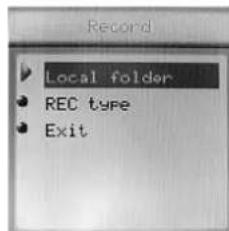
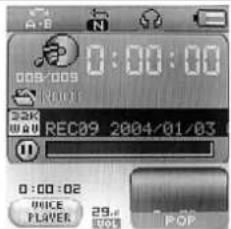
Record Local folder REC type Exit(b) Types of Record Format
● Enter the stop record status interface:
- Press key MENU to enter the submenu of record mode:
- Press key ▶/◀ to select Record Type:
- Press key MENU to enter:
- Press key ▶/◀ for selection.

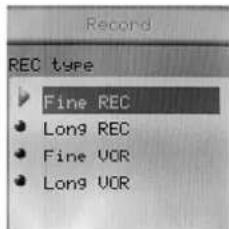
: Fine REC, wav format, good voice quality.

: Long REC, act format, normal voice quality.

: Fine VOR, wav format (voice record control, pause when with no voice).
text_image
Record REC type ► Fine REC ● Long REC ● Fine VCR ● Long VCR- Press key MENU for confirmation
- Press key ▶//■ to start record.
VI. Play Voice files
- Enter the main menu:
And the Key Operation is the same with Music Mode.
- Press key ▶ to select Voice Mode:
- Press key MENU to enter play voice interface:
- Press key ▶//■ to start playing voice.
- Voice selection: Press key ▶ or ◀ to select the voice.
- Volume Adjustment: Press key VOL to enter adjust volume mode, then press key ▶/◀ to adjust volume.

text_image
VOICE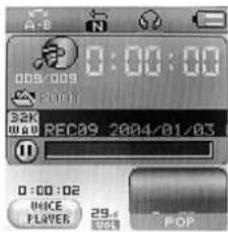
text_image
0:00:00 003/009 REC39 2004/01/03 0:00:02 VOICE PLAYER 29.001 POPVII. FM Mode
A. Button Operation
FM Mode
| Keys | Press | Stop Status Record Status | |
| Play | Long | Power Off Power Off | |
| Short | Have saved channels : NextNo saved channel : X | EXIT | |
| Menu | Long | Enter Main Menu Enter Main Menu | |
| Short | Enter submenu Confirmation or enter | ||
| ▶ | Short | Increase the frequency of 100KHz Move the submenu | |
| Long | Increase the frequency of 100KHz continuously | Continue to move forward | |
| ◀ | Short | Decrease the frequency of 100KHz Move the submenu | |
| Long | Decrease the frequency of 100KHz continuously | Continue to move backward | |
B. Instruction
(a) Enter to the Main Menu
(b) Press key ▶ to select FM
(c) Short press key MENU to enter the FM
(d) Auto detect
text_image
88.3 MHz CH 24.10 VOLT STEREOPress key ▶ / ◀ for hold 2 second. The UFD will Increase / Decrease the frequency of 100KHz continuously, and will stop in searched station; If you want stop search, Press Key ▶ / ◀ will stop search.
(e) Fine-tune
- Press Key ◀ : Decrease the frequency of 100KHz
- Press Key ▶ : Increase the frequency of 100KHz
(f) Save the searched radio channel
- Press key MENU to enter the submenu of FM mode
● And short press key Menu one time to save the station
(g) Choose the saved radio channels
- Press key Play can change radio channels which you saved.
(h) Volume Adjustment:
- Press key VOL to enter adjust volume mode, then press key ▶/◀ to adjust the volume.
Caution:
You can choose `Normal Band` (FM 87 - 108MHz) and `Japan Band` (FM 76 -
90MHz ) , In the different countries(Press key Menu go to the FM submenu , press key
▶ / ◀ to choose )
- If the radio channel is use by stereo, the LCD will show the sign.

: "Normal Band" and "Japan Band" can saved twenty radio channels by it's self.
VIII. JPG Viwer
A. Instruction
(a) Enter to the Main Menu
(b) Press key ▶ to select Picture
(c) Short press key MENU to enter the Picture
B. Enter the file selection
(a) Press key "Play" to browse JPEG.
(b) Press key “▶/◀” to select the next/last file.
(c) Press the "MENU" button, enter the stop submenu.
C. Submenu
There are four modes in following points.
- Local folder: select the folder to play pictures.
- Play set: manual play and auto play
- Delete file.
- Exit
Press the “▶/◀” button to play the next/last picture Long press the “menu” button to enter pervious menu
text_image
MP3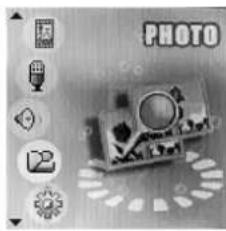
natural_image
Black-and-white photo of a vintage camera with control panel and display (no readable text or symbols)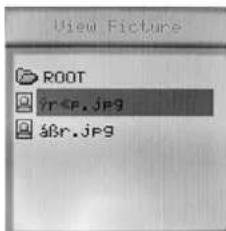
text_image
View Picture ROOT ir.p.jpg abr.jpg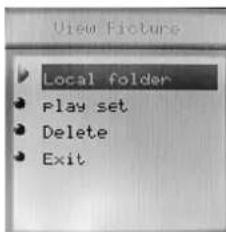
text_image
View Picture Local folder Play set Delete Exit
natural_image
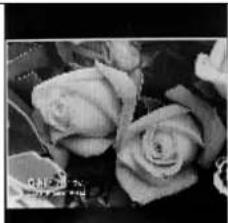
Black and white close-up of a bouquet of roses (no text or symbols visible)IX. Text Read
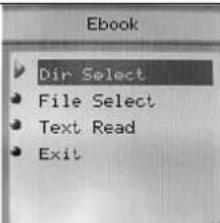
Use the E-Book function. The function is only support text files, so when you copy the txt files into this player. You can read the file in this player.
A. Instruction
(a) Enter to the Main Menu
(b) Press key ▶ to select Text Read function. And press key MENU again to get into the function.
(c) Dir Select:
- Press key ▶ or ◀ to select folder.
● And press key MENU to confirm.
(d) File Select:
- Press key ▶ or ◀ to select text file.
● And press key MENU to confirm.
(e) Text Reader:
- Press key ▶ or ◀ to next/back page.
- Press key MENU to exit text reader.
B. Caution
- If you want to read the txt file in folder, you must select folder at first step.
- Second step, select text file.
● Third step, read text file. - If LCD screen shows 'No Files!' please check the step.
text_image
MP3
text_image
E-BOOK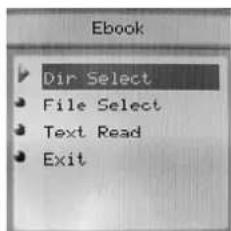
text_image
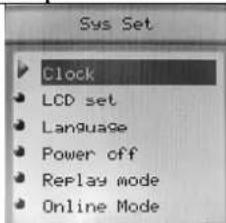
Ebook Dir Select File Select Text Read ExitX. System Setting
- Enter the main menu:
- Press key ▶ to select Setting:
● Short press key MENU to enter:
A. Icon
text_image
MP3
text_image
SETUP| System Time Setting date and time when saving recorded file | |
| LCD set | Set the screen off |
| Language | Choosing different languages |
| Power off | Set off time or sleep time |
| Replay mode | Setting repeat status |
| Online mode | Set the disk show on the PC when connecting the PC via USB |
| Memory info. | Check memory space and usage status |
| Firmware version | Version of player's firmware |
| Firmware upgrade | Use for upgrade firmware |
| Exit | Exit from Setting interface |
Picture3 System icon
B. Instruction
- System Clock Enter the system interface and then select Record Time:
√ Press key MENU to enter:
√ Press key ▶ from year to start setting, the display year will flicks
√ Press key ▶ will increase the number (◀ will decrease)
√ Press key MENU when finish and exit.

text_image
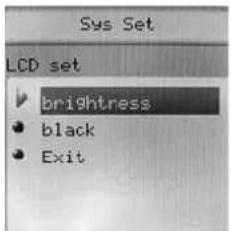
Sys Set Clock 2004 01 05 05 : 43 : 01- LCD set
√ Brightness: Set the LCD brightness value.
√ Black: Set the time about LCD screen to be closed LCD backlight.
text_image
Sys Set LCD set • brightress • black • Exit- Language
Make use of key ▶/◀ to select the language you want in the Language mode.
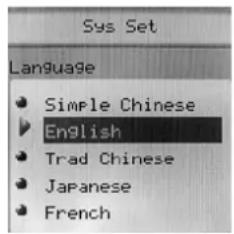
text_image
Sys Set Language • Simple Chinese ► English • Trad Chinese • Japanese • French- Power off
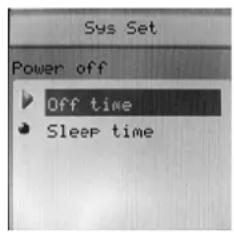
√ Enter the system interface and then rotate key MENU to select Power off.
√ Press key MENU to enter. There will be 2 selections:
I. Off time: the player will
automatically at a certain time without any key is pressed in stop status.
text_image
Sys Set Power off Off time Sleep timeII. Sleep time. The player will shut down automatically
at a certain time without any key is pressed in any status.
- Replay mode
√ Operation is the same as "Language".
√ Manual Replay: Replay by manually
√ Auto Replay: Replay automatically.
- Online Mode Operation is as "Language".
√ Some operating systems do not support 2 UFD, and so you can set it as “Normal Only/Encrypted Only”.
- Memory Info
Display the total memory storage, and the percentage used up.
- Firmware version
D i s p lay the firmware version.
- Firmware upgrade
Use to upgrade the firmware; the firmware must be first transfer to the player for upgrade.

Note: Press key MENU after system are set and then press key Play for exit.
XI. Other Function
A. Use different folder (stop to use sub-menu)
User can separate different types of files into different folders (created from the PC) for convenient use. The player supports 9 submenus.
(a) Go to stop (pause) status (of any mode)
(b) Press key MENU to enter the submenu:
(c) Press key MENU to enter the folder interface:
(d) Press key ▶ or ◀ to select the folder you want:
(e) Press key MENU to confirm.
Caution: The submenu of Music, Record and Voice mode are individually. That is, each mode has a different folder.
text_image
0:00:00 001/001 R001 JW AMV +fu.8mV 088Kbps 0:01:08 417 PLAYER 24... POP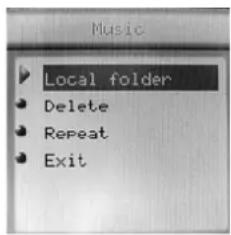
text_image
Music Local folder Delete Repeat ExitB. Files Delete indication
You can delete files in music or voice mode
(a) In stop status, press key MENU to enter the submenu
(b) Press key ▶ or ◀ to select Delete file/ Delete all.
(c) Press key MENU to delete file.
Caution: "Delete all" will delete all the files in that mode. (Once files are deleted cannot be recovered).

text_image
Music Local folder Delete Repeat ExitC. Repeat operation
You can select different play mode in music or voice mode.
(a) Press key Play to start playing music
(b) Press key MENU to enter and select "Repeat".
(c) Then press key MENU again to enter. There are various selections, such as
- REPEAT
| Normal | Playing music files in sequence until the end of folder |
| Repeat One | Repeat single music file |
| Folder Play all music files in folder | |
| Repeat Folder Repeat all music files in folder | |
| Repeat All Repeat all music files | |
- SHUFFLE
| Random Play music files in | folder randomly |
- INTRO
| Intro | Play the 10s of each music files in sequence |
D. Tempo Rate adjustment
You can select different playing speed while playing music (MP3 only) without any change to the voice quality.
(a) Press key MENU while playing music
(b) Press key ▶ or ◀ to select “Tempo rate”
(c) Press key MENU again to enter.
(d) Press key ▶ or ◀ to adjust the speed.
Caution: Once you adjust the rate, all songs will be played as set.
E. Replay function
● A-B Repeater
(a) Press key MENU while playing music
(b) Press key ▶▶ or ◀◀ to select “Replay”
(c) Press key MENU again to enter. The LCD will display 📋 with “A” blinking.
(d) Press key ▶ to confirm the start point “A”. The LCD will display with “B” blinking.
(e) Press key ▶ to confirm the end point “B”. The LCD will display stable and the player will play repeatedly from A to B can rotate key ◀ to reset point A and B.

You can press key ◀ to set the tempo rate in Replay mode.
- Follow Reading
(a) In A-B repeater status, press key ▶ to enter follow reading function.
(b) The LCD will display -B instead of -B and the player will start to record, the record time length as the length of A-B repeater.
(c) The player will play the original voice, the LCD will display ▶. You can press key ▶ to enter compare reading.

In this status, press key ◀ will return to A-B repeater status.
- Compare Reading
(a) In contrast reading, the LCD will display and the player will play the
original voice.
(b) When finished, the LCD will display recorded follow reading voice.
and the player will play the
(c) The player will repeat playing the original voice and the recorded voice continuously until key MENU is pressed.

In this status, press key ◀ will return to follow reading mode.

In the above 3 status, press key MENU will quit Replay mode.
- Repeat times
√ Operation is as "Backlight".
√ The numbers of times in repeating A-B repeat and then exit.
- Replay Gap
√ Operation is as "Backlight".
√ This is to determine the time (in seconds) of pausing after playing each song.
XII. Flash Disk
This device does not need to install any driver system for Win ME/2000/XP, except for Win 98, format or recovery. It also support Windows 2K or above, Mac OS 10.3, Linux Redhat 8.0 or above.
The player also support Suspend mode
A. Connect to PC
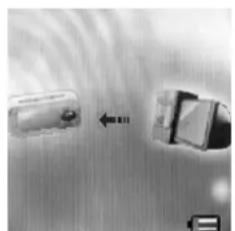
After connected to the PC, the player will display 3 different pictures according to its status:
(a) Waiting Mode
(b) Downloading files
(c) Uploading files
natural_image
Top-down view of a car with two vehicles and a directional arrow, no visible text or symbols
natural_image
Close-up of a metallic surface with two small electronic components and a labeled part (no readable text or symbols)
natural_image
Close-up of a metallic surface with two rectangular objects and a small arrow pointing to one (no visible text or symbols)B. Flash Disk Function/ download MP3 files
Our product do not need to install any actuate system (except WIN98), you can immediately download any format of files by plug-in the USB hub to your PC.
(a) Once you switch on our product, the UFD would connect to the PC
through the USB port. The system would detect a new hardware, follow the steps shown for installation. (WinMe/Win2000/XP can automatically finish installation). If the volume of the UFD is too large and cannot be connected to the USB port, you can use our extended USB line attached.
(b) After installation, the LCD would display『USB MUSIC DISK』 and on『MY COMPUTER』 and『FILE MANAGER』 would appear「REMOVABLE DISK.」
(c) Drag or Copy the files you need to the『Removable Disk』to start downloading. Downloaded MP3 files can put into the main menu while others in the submenu. You can make use “FILE SELECTION” to play the files which is in the submenu.
(d) While downloading, the LCD would display the animation as shown, you are required to wait until the animation disappeared and furthermore five seconds before you can plug out the UFD.
C. Transform ACT files to WAV files
You can make use of the attached software disk to transform WAV files.
(a) Run "Sound Converter" and then click "Open".
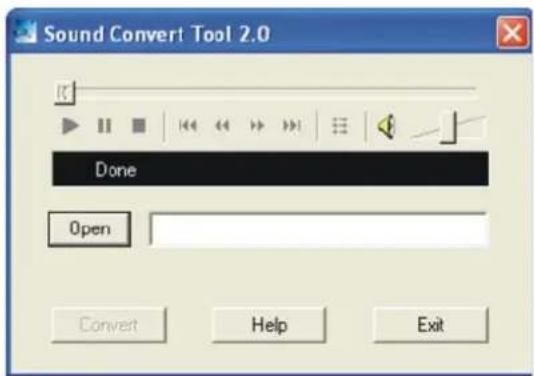
text_image
Sound Convert Tool 2.0 Done Open Convert Help Exit(b) Select the act files for transform:
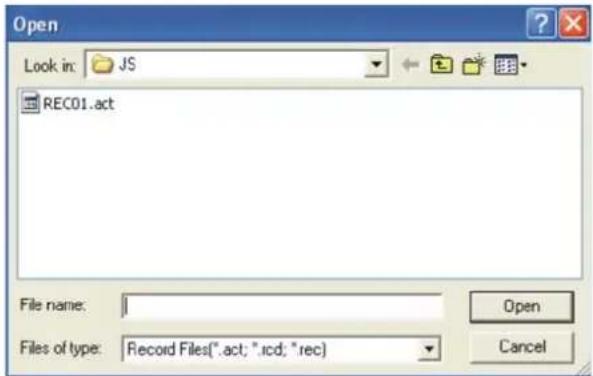
text_image
Open Look in: JS REC01.act File name: Files of type: Record Files(*.act; *.rcd; *.rec) Open Cancel(c) Click "Transform" to start files transform to wav files You can also transform WAV files to MP3 files.
D. Convert Video files into AMV
This program is used to convert video files into AMV format, currently only WMV format is supported.
(a) Run “AMV Convert Tools”, click 📋 to choose the folder where to save the AMV files, then click 📋 to select the folder where the original files are 。
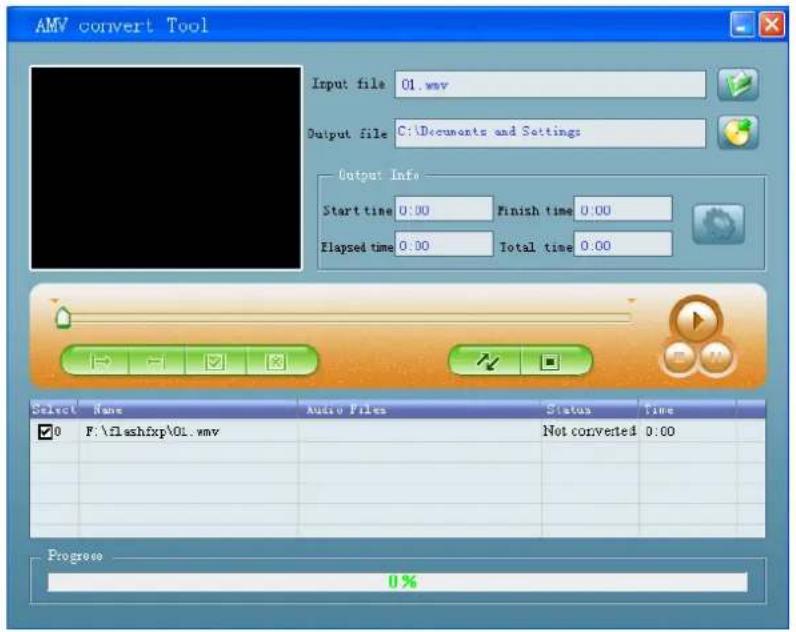
text_image
AMV convert Tool Input file 01.mmv Output file C:\Documents and Settings Output Info Start time 0:00 Finish time 0:00 Elapsed time 0:00 Total time 0:00 Select Name Audio Files Status Time F:\flashfxp\01.mmv Not converted 0:00 Progress 0%(b) Click ↗ to start converting。
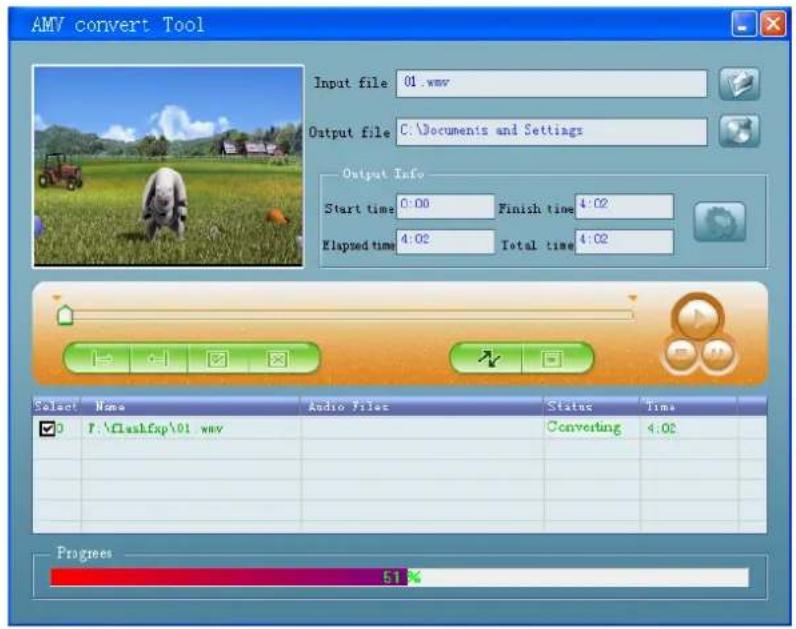
text_image
AMV convert Tool Input file 01.wav Output file C:\Documents and Settings Output Info Start time 0:00 Finish time 4:02 Elapsed time 4:02 Total time 4:02 Select Name Audio Files Status Time F:\Flashexp\01.wav Converting 4:02 Progress 51%(c) After convert, the AMV files will be played automatically.
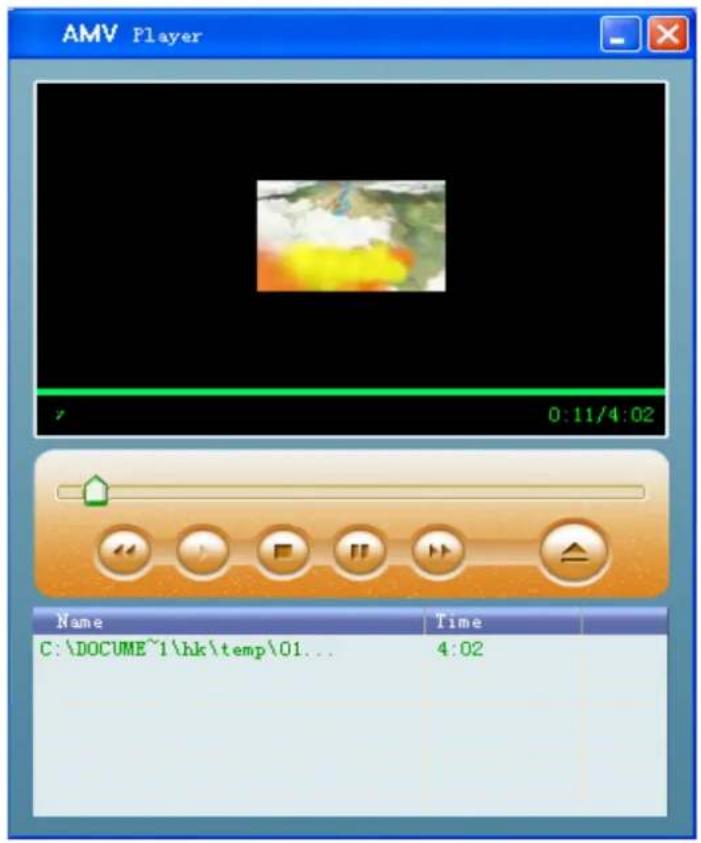
text_image
AMV Player 0:11/4:02 Name Time C:\DOCUME~1\hk\temp\01... 4:02XIII. Privacy Function
Most users will delete some files or secret files before lending it to friends, in order to protect your privacy. This is very inconvenient! MP3 Pleyer Disk Tool
From now on, this player will provide you a function to protect your own privacy.
User can make use of the attached software in the CD to divide the drive memory as two (users can see 2 flash disk in the computer, for Windows 2K user must install SP4). Add password for one of the disk, and store your secret files in that disk. In this way only password can enter.
(a) Connect the player to the PC.
(b) Run the attached software CD "MP3 Player Disk Tool".
(c) Select “Divide and add password”; set a desirable memory for needed. Then click “Set user and password”. Fill in the “new user”, “new password” and “repeat password (same as new password”). Then click “Start” to start disk divide.
text_image
MP3 Player Disk Tool Format Partition and Encrypt Partition Disk total capacity 245 Mb Setting encrypted disk capacity 45 Mb Set username and password Partition and Encrypt Old username Old password New username New password New password confirm Start Close Help
text_image
MP3 Ployer Disk Tool Format | Partition and Encrypt | Drive Capacity 245.86 Mb Volume Total sectors 503521 Current Format type ● Quick ○ Full ○ Low □ Make bootable disk Start Close Help(d) The window will display as show when finished, click "OK" and the window will re-start again
(e) You will see 2 flask disks on your computer after it is restated. Click to the disk added password (the 2nd unit) and you will see 3 files; 2 of them are invisible and one of it is .exe file, the disk memory is about 300K.

text_image
MP3 Player Disk Tool Format Partition and Encrypt Partition Disk total capacity 245 Mb Setting encrypted disk capacity 45 Mb Success Complete setting disk partition and password! OK Old password New username New password New password confirm Start Close Help
text_image
Removable Disk (F1) File Edit View Favorites Tools Help Back Search Folders File and Folder Tasks Make a new folder Publish the folder to the Web Share the folder Other Places My Computer My Documents Shared Documents My Network Places Details OK16.DLL Dok16.DLL Dok16.DLL Dok16.DLL Dok16.DLL Dok16.DLL Dok16.DLL Dok16.DLL Dok16.DLL Dok16.DLL Dok16.DLL Dok16.DLL Dok16.DLL Dok16.DLL Dok16.DLL Dok10.DLL Dok10.DLL Dok10.DLL Dok10.DLL Dok10.DLL Dok10.DLL Dok10.DLL Dok10.DLL Dok10.DLL Dok10.DLL Dok10.DLL Dok10.DLL Dok10.DLL Dok10.DLL Dok10.DQL Dok10.DQL Dok10.DQL Dok10.DQL Dok10.DQL Dok10.DQL Dok10.DQL Dok10.DQL Dok10.DQL Dok10.DQL Dok10.DQL Dok10.DQL Dok10.DQL Dok10.DQL Dok10.DQL dok16.DLL dok16.DLL dok16.DLL dok16.DLL dok16.DLL dok16.DLL dok16.DLL dok16.DLL dok16.DLL dok16.DLL dok16.DLL dok16.DLL dok16.DLL dok16.DLL dok16.DLL Dok16.DLL Dok16.DLL Dok16.DLL Dok16.DLL Dok16.DLL Dok16.DLL Dok16.DLL Dok16.DLL Dok16.DLL Dok16.DLL Dok16.DLL Dok16.DLL Dok16.DLL Dok 23.45 Dok 23.45 Dok 23.45 Dok 23.45 Dok 23.45 Dok 23.45 Dok 23.45 Dok 23.45(f) Run "RdiskDecrypt.exe" and a window will pop up as shown below, type in your user name and password. If it is correct, the disk will be open.
text_image
Removable Disk DRL File Edit View Favorites Tools Help Search Folders File and Folder Tasks Make a new folder Publish the folder to the Show the folder Other Places My Documents Shared Documents My Network Files Details DSR16.DLL Rid8Crypt GPT Web 22.48 Disk32.dft Rid8Crypt Rid8Crypt Web Removable disk dcry... Username: User Password: OK Cancel(g) You must enter your use name and password to enter the disk every time.
(h) If you don't want to use this function (cancel this function), please format the player by this program and all data will be deleted.


Caution: Disk memory divide or combine will delete all the files in the player.
Caution: Never forget your user name and password, or else you cannot enter the disk. You must need to combine (format) the disks to cancel password and this will delete all the files
XIV. Firmware Upgrade
Make use of the installed software in the computer to upgrade the firmware.
(a) Enter the main menu
(b) Press key ▶ to select "Setting".
(c) Press key MENU to enter.
(d) Press key ▶ again to select "Firmware upgrade"
(e) Press key MENU to enter
(f) Connect the player to the PC.
(g) Make use the attached disk, run "MP3 Player Update" and then click "New firmware version".
(h) Select the new firmware (can be found in the attached CD, or download from the website)
(i) Click "Start" to start firmware upgrade.
(j) The player will display the following picture when finished.
Firmware upgrade is for better results; it is not necessary and will not influence the operation of the player itself.
Mistakes firmware upgrade will lead to abnormal operation! Please read carefully before you upgrade the player or ask advice from technician.
The firmware of this player is not suitable for any other players and vise versa.
XV. Trouble Shooting
| No power | ● Is the battery install correctly● Make sure that it is turn on |
| Unable to listen from the earphone | ● Make sure that the volume is not 0, and the earphone is well connected.● Make sure that the earphone is clean● Damaged MP3 will lead to various levels of noise or unable to be played. Make sure that the file is complete. |
| LCD display wrong characters | ● Make sure that you select the right Language |
| Unable to download music | ● Make sure that the USB connecting wire is not damage or it well connected.● Is the driver installed?● Make sure that there is enough memory storage left. |
XVI. Technical Specifications
| Dimensions | ||
| LCD | ||
| USB version USB2.0 | ||
| Memory | Flash memory:128M~2GB | |
| Battery | Max. play time: 6 hrs. | |
| Built-in rechargeable Lithium-ion Battery | ||
| Record | Sampling rate 8KHz | |
| Record format WAV (32K bps), ACT (8K bps) | ||
| Record time 35hrs.(ACT, 128M Flash) | ||
| MP3, WMA, WMV, ASF | Output | 10mW |
| MP3 frequency 8K bps ~ 320K bps | ||
| WMA, WMV, ASF frequency | 5K BPS~384K BPS | |
| Input | 20Hz~20KHz | |
| Voice rate 85dB | ||
| File format MP1, MP2, MP3, WMA, ACT, WAV, ACT | ||
| Language | Multi Language | |
| Operating system | Windows98/SE/ME/2K/XP | |
Note: Product design and spec may change without notice.
Manuel
Modèle: MP1500
【Manuel】
I. PRÉSENTATION DE L'APPAREIL....3
II. FONCTION DE BASE....4
III. LECTURE DE FICHIERS VIDÉO ....5
A. FONCTIONNEMENT....5
IV. MODE MUSIQUE ....5
A FONCTION DES TOUCHES....5
B INSTRUCTIONS....6
V. ENREGISTREMENT VOIX....7
A FONCTIONS DES BOUTONS....7
B INSTRUCTIONS....7
VI. LECTURE DE FICHIERS VOIX....8
VII. MODE FM 9
A FONCTIONS DES BOUTONS....9
B INSTRUCTIONS....9
VIII. VISIONNEUSE JPEG 10
A INSTRUCTIONS....10
B ACCÉDER À LA SÉLECTION DE FICHIERS....10
C SOUS-MENU....10
IX. LECTURE DE TEXTES: 11
A INSTRUCTIONS....11
B ATTENTION....11
X. RÉGLAGE DU SYSTÈME 12
A ICÔNE....12
B INSTRUCTIONS....12
XI. AUTRES FONCTIONS ....14
A UTILISER UN DOSSIER DIFFÉRENT (ARRÊTER POUR UTILISER UN SOUS-MENU)......14
B INDICATION D'EFFACEMENT DE FICHIERS....14
C FONCTIONNEMENT DE REPEAT....14
D RÉGLAGE TEMPO RATE (RYTHME)....15
E FONCTION REPLAY (RELECTURE)....15
XII. FLASH DISK....16
A CONNECTEZ AU PC....16
B. FONCTION FLASH DISK/ TÉLÉCHARGER DES FICHIERS MP3 16
C. CONVERTIR DES FICHIERS ACT EN FICHIERS WAV 18
D. CONVERSION DE FICHIERS VIDÉO EN AMV 18
XIII. FONCTION PRIVÉ ....20
XIV. FIRMWARE UPGRADE....21
XV. GUIDE DE DÉPANNAGE 23
XVI. SPÉCIFICATIONS TECHNIQUES....23
natural_image
Black and white close-up of a cluster of roses (no visible text or symbols)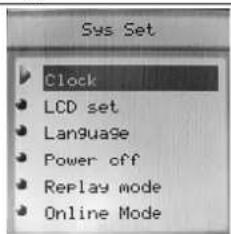
text_image
Sys Set Clock LCD set Language Power off Replay mode Online Mode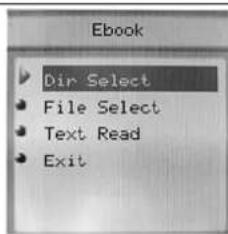
text_image
Ebook Dir Select File Select Text Read Exit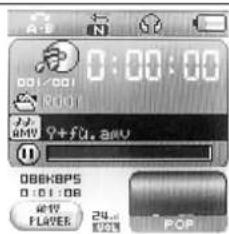
text_image
0:00:00 00:00:00 00:00:00 00:00:00 00:00:00 00:00:00 00:00:00 00:00:00 00:00:00 00:00:00 00:00:00 00:00:00 POPtext_image
Record Local folder REC type Exitnatural_image
Black-and-white illustration of a megaphone with sound waves and icons, no readable text or symbolstext_image
View Picture Local folder Play set Delete Exit
natural_image
Black and white close-up of a cluster of roses (no visible text or symbols)text_image
Ebook Dir Select File Select Text Read Exittext_image
MP3 SETUPA Icône
- REPEAT (RÉPÉTITION)
text_image
Music Local folder Delete Repeat Exit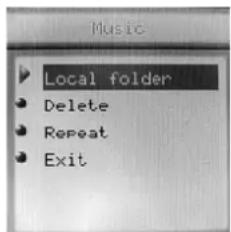
text_image
Music Local folder Delete Repeat ExitE Fonction Replay (Relecture)
- Répétition A-B
- Compare Reading (comparer la lecture)
natural_image
Two vehicles with motion blur effect, one moving toward a vehicle (no visible text or symbols)
natural_image
Close-up of a metallic surface with two small electronic components and a labeled part (no readable text or symbols)
natural_image
Close-up of a metallic door with a small rectangular component and a close-up view of a mechanical part (no text or symbols visible)text_image
Open Look in: JS REC01.act File name: Files of type: Record Files(*.act; *.rcd; *.rec) Open Canceltext_image
AMV convert Tool Input file 01.mmv Output file C:\Documents and Settings Output Info Start time 0:00 Finish time 4:02 Elapsed time 4:02 Total time 4:02 Select Name Audio Files Status Time ✓ 0 F:\flashfxp\01.mmv Convorting 4.02 Progress 51%text_image
MP3 Plyer Disk Tool Format Partition and Encrypt Partition Disk total capacity 245 Mb Setting encrypted disk capacity 45 Mb Set username and password Partition and Encrypt Old username Old password New username New password New password confirm Start Close Helptext_image
Removable Disk (F:) File Edit View Favorites Tools Help Back Search Folders Add Add Add File and Folder Tools Make an new folder Publish the folder to the Web Share the Folder Other Places My Computer My Documents Shared Documents My Network Places Details DISK18.0L RidakDecrypt SAT File 212 KB EdskDecrypt RidakDecryptXIV. Firmware upgrade
natural_image
Icon set showing a CD or DVD player with surrounding icons (no readable text or symbols)
text_image
0:01:20 001/001 MP3 126Kbps 0:05:15 28.4 POPMusik
text_image
ROOT REC10 2004/01/05 0:00:00 Total : 009 Remaining Time 16:25:29Aufnahme
text_image
0:00:00 00:00 REC09 2004/01/03 0:00:02 VOICE PLAYER 29.8 POPSprachaufzeichnung

text_image
88.3 MHz CH 24µV STERESRadio
natural_image
Black and white close-up of a cluster of roses (no visible text or symbols)Foto

text_image
Sys Set Clock LCD set Language Power off Replay mode Online ModeSystemeinstellungen
text_image
Ebook Dir Select File Select Text Read ExiteBook

text_image
0:00:00 001/001 2001 P+fu.8mV 08KBPS 0:01:08 4679 FLAVES 24m POPVideo
natural_image
Black-and-white photo of two children standing in a room with brooms and furniture (no visible text or symbols)IV. Musik
A. Tastenbelegung
Musikmodus
natural_image
Microcontroller monitor interface with MP3 label and control icons (no readable text or symbols on screen)
natural_image
Black-and-white photo of a vintage microphone with sound effect icons and a 'RECORD' label (no readable text on device)
text_image
KOUT REC10 2004/01/05 0:00:00 Total : 009 Remaining Time 16:25:29
text_image
Record Local folder REC type Exit(b) Aufnahmeformate
text_image
Record REC type ▶ Fine REC • Long REC • Fine UCR • Long UCRtext_image
88.3 MHz CH 24.1 VOLT STEREOtext_image
View Picture Local folder Play set Delete Exit
natural_image
Black and white close-up of a cluster of roses (no visible text or symbols)IX. eBook
text_image
MP3 E-BOOK Ebook Dir Select File Select Text Read Exitnatural_image
Close-up of a black-and-white photo of a MP3 phone with control buttons and a circular dial (no readable text or symbols)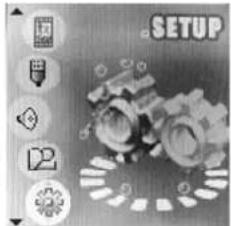
text_image
SETUPtext_image
Sys Set Language • Simple Chinese ► English • Trad Chinese • Japanese • French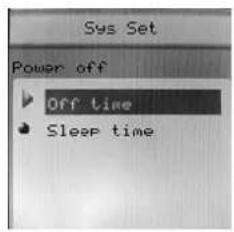
text_image
Sys Set Power off Off time Sleep timetext_image
Music Local folder Delete Repeat ExitB. Dateien löschen
text_image
Music Local folder Delete Repeat Exitnatural_image
Two vehicles with visible motion blur effect, no text or symbols present
natural_image
Close-up of a metallic door with two buttons and a cutout (no visible text or symbols)
natural_image
Close-up of a metallic door with a small rectangular component and a close-up view of a cut (no text or symbols visible)text_image
Open Look in: JS REC01.act File name: Files of type: Record Files(*.act; *.rcd; *.rec) Open Canceltext_image
AMV convert Tool Input file 01.wav Output file C:\Documents and Settings Output Info Start time 0:00 Finish time 4:02 Elapsed time 4:02 Total time 4:02 Select Name Audio Files Status Time F:\Flashexp\01.wav Converting 4:02 Progress 51%text_image
MP3 Player Disk Tool Format: Partition and Encrypt Partition Disk total capacity 245 Mb Setting encrypted disk, capacity 45 Mb Set username and password Partition and Encrypt Old username Old password New username New password New password confirm Start Close Helptext_image
MP3 Player Disk Tool Format | Partition and Encrypt | Drive Capacity 245.86 Mb Volume Total sectors 503521 Current Format type ● Quick ○ Full ○ Low □ Make bootable disk Start Close Helptext_image
MP3 Player Disk Tool Format Partition and Encrypt Partition Disk total capacity 245 Mb Setting encrypted disk capacity 45 Mb Success Complete setting disk partition and password! OK Old password New username New password New password confirm Start Close Help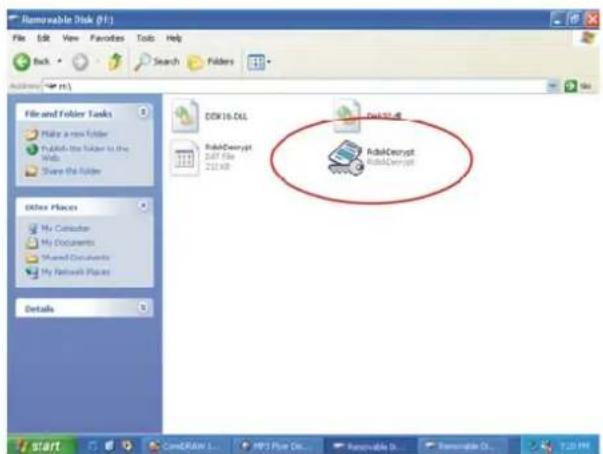
text_image
Removable Disk (F1) File Edit View Favorites Tools Help Back Search Folders File and Folder Tasks Make a new Folder Publish the Folder to the Web Share the Folder Other Places My Computer My Documents Shared Documents My Network Places Details DSK16.DLL RdskScript S47 File 212 KB RdskScript RdskScript Dok32.45 RdskScript Dok32.45 Start CineDRAW 1... MP3 Plan Cl... Renewable Cl... Removable Cl... T2:00 PMXIV. Firmware Upgrade
natural_image
Illustration of a digital audio workstation with icons for recording, music, radio, and video player (no text or symbols on main elements)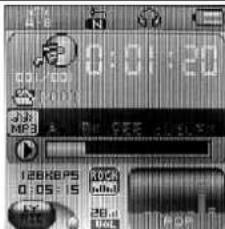
text_image
0:01:20 MP3 126 Kbps 0.05-15 26.4 Vol. 100% CF CFE CFE CFE CFE CFE CFE CFE CFE CFE CFE CFE CFE CFE CFE CFE CFE CFE CFE CFE CFE CFE CFE CFE CFE CFE CFE CFE CFE CFE CFE CFE CFE CFE CFE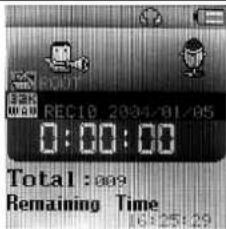
text_image
REC10 2024/01/05 0:00:00 Total : 009 Remaining Time 16:25:29
text_image
0:00:02 REC09 2004/01/03 0:00:02 VOICE PLAYER 25.0 OK
text_image
88.3 MHz CH 24.0 Vol STUDIO
natural_image
Black and white close-up of a cluster of roses with visible petals and stems (no text or symbols)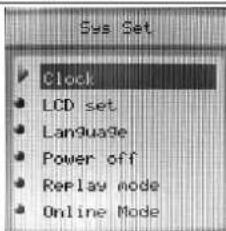
text_image
Sys Set Clock LCD set Language Power off Replay mode Online Mode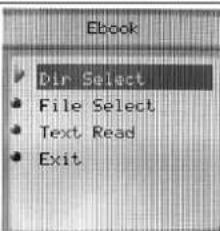
text_image
Ebook Dir Select File Select Text Read Exit
text_image
00/001 24(01) 006kbps 0:01:08 OFF FLIVER 24.1 COM POPImmagini JPG
natural_image
Black-and-white photo of two people standing in a dimly lit room with shelves and equipment (no visible text or symbols)IV. Modalità musica
A. Tasti
Modalità musica 🎨
text_image
benke music Standing on a mountain high 192MPS 0:03:58 18.4 18.4V. Registrazione
A. Pulsanti
text_image
Local folder REC type Exitnatural_image
Illustration of a vintage camera with lens and control buttons, no readable text or symbols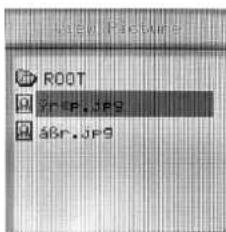
text_image
ROOT $BR.JPG $BR.JPG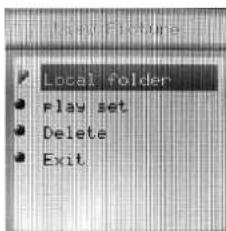
text_image
Local folder Play set Delete Exit
natural_image
Black and white close-up of a rose with visible petals and stem (no text or symbols)text_image
Ebook Dir Select File Select Text Read Exittext_image
Sys Set LCD set • brightness • black • Exit- Lingua
text_image
Sys Set Language • Simple Chinese • English • Trad Chinese • Japanese • French- Spegnimento
text_image
Sys Set Power off Off time Sleep timetext_image
Music Local folder Delete Repeat Exit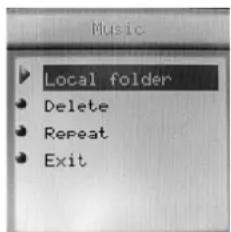
text_image
Music Local folder Delete Repeat Exit- INTRO
natural_image
Microscopic view of a material surface with vertical striations and a central arrow indicating direction (no text or symbols)
natural_image
Close-up of a metallic surface with vertical striations and a small inset image showing a rectangular object (no text or symbols visible)
natural_image
Abstract pattern of vertical lines and a small rectangular object with a dot, no text or symbols presenttext_image
Open Look in: JS REC01.act File name: Files of type: Record Files(*.act; *.rcd; *.rec) Open Canceltext_image
AMV convert Tool Input file 01.mmv Output file C:\Documents and Settings Output Info Start time 0:00 Finish time 4:02 Elapsed time 4:02 Total time 4:02 Select Name Audio Files Status Time F:\Flashfxp\01.mmv Converting 4:02 Progress 51%text_image
MP3 Player Disk Tool Format Partition and Encrypt Partition Disk total capacity 245 Mb Setting encrypted disk capacity 45 Mb Set username and password Partition and Encrypt Old username Old password New username New password New password confirm Start Close Help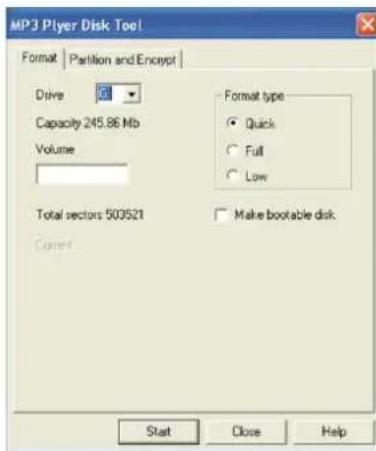
text_image
MP3 Player Disk Tool Format | Partition and Encrypt | Drive G Capacity 245.86 Mb Volume Total sectors 503521 Conert Format type ● Quick ○ Full ○ Low □ Make bootable disk Start Close Helptext_image
E:\Users\Disk (V1) File Edit View Favorites Tools Help Back Search Folders File and Folder Tasks Home or more folders Publish the folder on the links Share the folder Other Files My Computer My Documents Shared Documents My Network Provider Details EERK IS.DLL RiduCrypts DCT File DL748 FiduCrypts FiduCrypts Start CancelView... MP300000000000000000000000000000000000000000000000000000000000000000000000000000000000000000000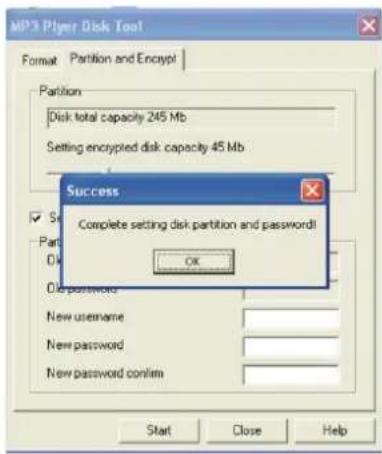
text_image
MP3 Player Disk Tool Format Partition and Encrypt Partition Disk total capacity 245 Mb Setting encrypted disk capacity 45 Mb Success Complete setting disk partition and password! OK New username New password New password confirm Start Close Helptext_image
Somalia Disk (DL) File Edit View Documents Help Help Search Followers File List File Adder Accounts Adder Accounts Adder Accounts Adder Accounts Other Files My Documents My Documents Shared Documents My Network Files Details DSSCK.DL Adder Dsgnpt Adder Dsgnpt Adder Dsgnpt Adder Dsgnpt Remove disk decryption... Username: none Password: OK Cancelnatural_image
Iconic image of a CD or audio device with sound waves and control buttons, no readable text or symbols.(c) Aceder a modos diferentes
natural_image
Black and white close-up of a cluster of roses with visible petals and stems (no text or symbols)text_image
Sys Set Clock LCD set Language Power off Replay mode Online Mode
text_image
Ebook Dir Select File Select Text Read Exitnatural_image
Black-and-white photo of two people standing indoors, no visible text or symbols. Modo de música
text_image
Local folder REC type Exittext_image
Local folder • play set • Delete • Exit
natural_image
Black and white close-up of a blooming rose with visible petals and leaves (no text or symbols)text_image
Ebook Dir Select File Select Text Read Exittext_image
Sys Set LCD set • brightness • black • Exit- Idioma
text_image
Sys Set Language • Simple Chinese • English • Trad Chinese • Japanese • French- Desligar
text_image
Sys Set Power off Off time Sleep timetext_image
Music Local folder Delete Repeat Exit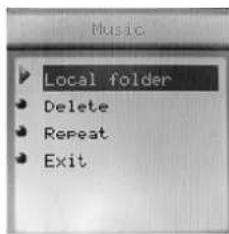
text_image
Music Local folder Delete Repeat Exitnatural_image
Close-up of a metallic object with a small inset showing a rectangular feature, possibly part of a mechanical or architectural component (no visible text or symbols)
natural_image
Close-up of a metallic surface with vertical striations and a small inset image (no text or symbols visible)
natural_image
Close-up of a metallic object with a small inset showing a rectangular feature, against a striped background (no text or symbols visible)text_image
Open Look in: JS REC01.act File name: Files of type: Record Files(*.act; *.rcd; *.rec) Open Canceltext_image
AMV convert Tool Input file 01.wwv Output file C:\Documents and Settings Output Info Start time 0:00 Finish time 4:02 Elapsed time 4:02 Total time 4:02 Select Name Audio Files Status Time F:\FlashExp\01.wwv Converting 4:02 Progress 51%text_image
MP3 Ployer Disk Tool Format Partition and Encrypt Partition Disk total capacity 245 Mb Setting encrypted disk capacity 45 Mb Set username and password Partition and Encrypt Old username Old password New username New password New password confirm Start Close Helptext_image
MP3 Player Disk Tool Format | Partition and Encrypt Drive Capacity 245.86 Mb Volume Total sectors 503521 Current Format type ● Quick ○ Full ○ Low □ Make bootable disk Start Close Helptext_image
MP3 Player Disk Tool Format Partition and Encrypt Partition Disk total capacity 245 Mb Setting encrypted disk capacity 45 Mb Success Complete setting disk partition and password! OK Old password New username New password New password confirm Start Close Help
text_image
Removable Disk (M1.1) File Edit View Favorites Tools Help Back Search Folders Accessories File and Folder Tools Make a new folder Publicly do folder to the Book Share this folder Other Places My Computer My Documents Shared Documents My Network Files Details IEF: 15.DLL Indexkey Indexkey Indexkey Indexkey Indexkeytext_image
Remove disk (DL) File Edit View Applications Tools Help Search Folders File and Folder Tasks Make a new folder Publish the folder to the Show the folder Other Places My Computer My Documents Shared Documents My Network Place Details Disk16.DLL Rid&Encrypt Edit Web Disk32.dll Rid&Encrypt Edit Web Remove disk dcry... Username: user Password: OK Cancelnatural_image
Monochrome illustration of a portable electronic device with circular buttons and icons (no readable text or symbols)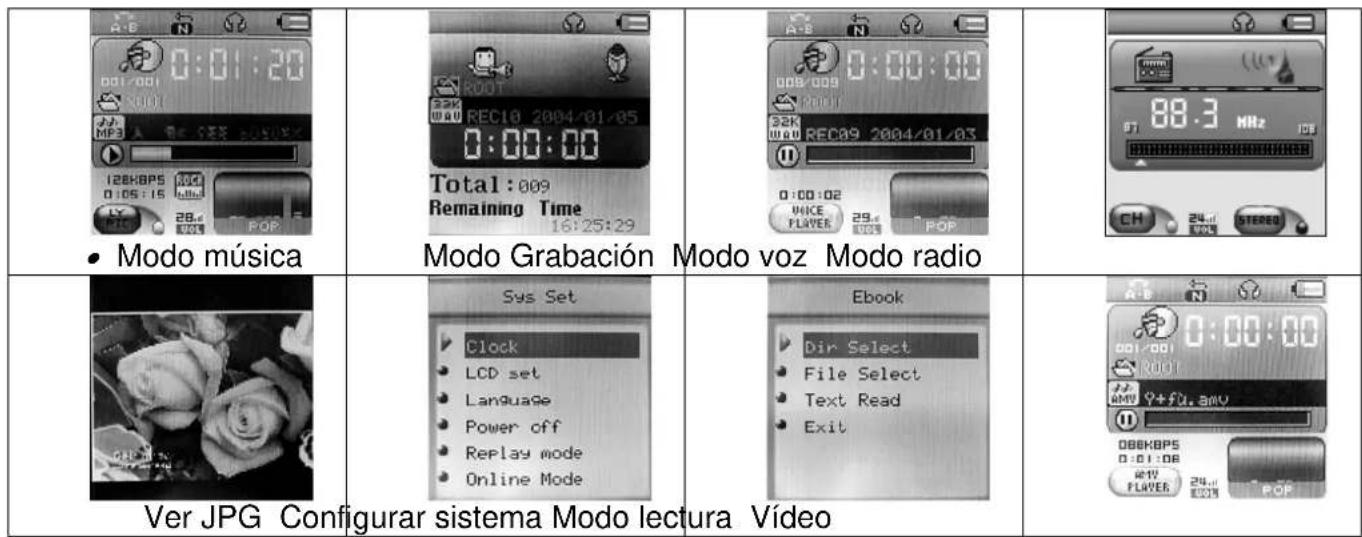
text_image
Modo música Modo Grabación Modo voz Modo radio Sys Set Clock LCD set Language Power off Replay mode Online Mode Ebook Dir Select File Select Text Read Exit Ver JPG Configurar sistema Modo lectura Vídeonatural_image
Black-and-white photo of two people standing in a room with shelves and equipment (no visible text or symbols)IV. Modo música
text_image
0:00:00 126 Kbps 2.0Hz 0.05/15 1.0Hz 27.0 Hz A B C D E F G H I J K L M N O P Q R S T U V W X Y Znatural_image
Illustration of a vintage microphone with a stand and circular design (no text or symbols)
text_image
2024 WAL REC 10 2024/01/05 0:00:00 Total : 009 Remaining Time 16:25:29text_image
Local folder REC type Exittext_image
Second REC type ✓ Fine REC ● Long REC ● Fine UCR ● Long UCR- Pulse MENU para confirmar
text_image
Ebook Dir Select File Select Text Read ExitB. Precaución
text_image
Sys Set LCD set • brightness • black • Exit- Language
text_image
Sys Set Language • Simple Chinese • English • Trad Chinese • Japanese • French- Power off
text_image
Sys Set Power off Off time Sleep time- Replay modo
text_image
Music Local folder Delete Repeat Exit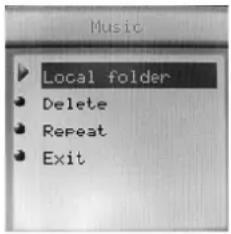
text_image
Music Local folder Delete Repeat Exit- INTRO
natural_image
Close-up of a car with visible exhaust plume and side-mounted sensor array (no text or symbols)
natural_image
Close-up of a metallic surface with vertical striations and a small inset image (no text or symbols visible)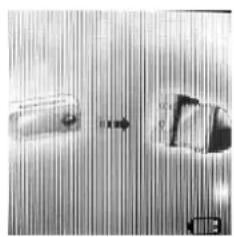
natural_image
Abstract grayscale image with diagonal striations and two blurred rectangular shapes, no visible text or symbolstext_image
AMV convert Tool Input file 01.wmv Output file C:\Documents and Settings Output Info Start time 0:00 Finish time 4:02 Elapsed time 4:02 Total time 4:02 Select Name Audio Files Status Time F:\Flashfap\01.wmv Converting 4.02 Progress 51text_image
MP3 Pleyer Disk Tool Format Partition and Encrypt Partition Disk total capacity 245 Mb Setting encrypted disk capacity 45 Mb Set username and password Partition and Encrypt Old username Old password New username New password New password confirm Start Close Helptext_image
MP3 Player Disk Tool Format | Partition and Encrypt | Drive Capacity 245.86 Mb Volume Total sectors 503521 Current Format type ● Quick ○ Full ○ Low □ Make bootable disk Start Close Helpdivisión del disco.
text_image
Removable Disk [F1.1] File Edit View Favorites Tools Help Back Search Followers Address H3 File and Folder Tasks Make a new folder Publish this folder to the week Share this folder Other Places My Computer My Documents Shared Documents My Network Places Details DESK16.DLL RackDocument DAT File 25148 Insert off Addercript Addercript start Cardifier HP User Dis Newable Dis Newable L... 20 Pre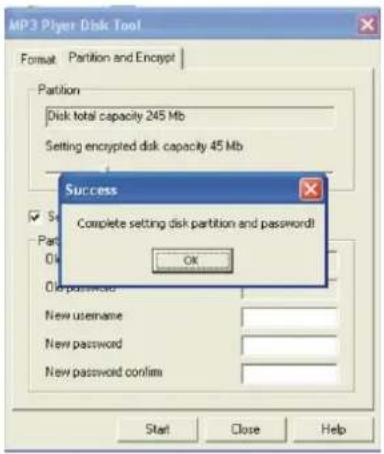
text_image
MP3 Player Disk Tool Format Partition and Encrypt Partition Disk total capacity 245 Mb Setting encrypted disk capacity 45 Mb Success Complete setting disk partition and password! OK New username New password New password confirm Start Close Helptext_image
Remove disk (DL) File Edit View Favorites Search Help Search Folders File and Folder Tools Help a new folder Publish this folder to the View the folder Other Places My Computer My Documents Shared Documents My Network Files Details OSK36.DLL Adder except 241 KB 20 KB Disk32.dl Adder except 241 KB Adder except 241 KB Remove disk copy Username: user Password: OK Cancelnatural_image
Iconic image of a CD player with sound waves, no text or symbols present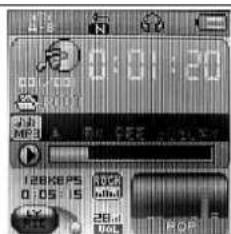
text_image
0:01:20 128 KB PS 0:05:15 26.0 VolMüzik Konumu

text_image
REC18 2004-01-05 0:00:00 Total : 009 Remaining Time 16:25:29Kayıt Konumu

natural_image
Black and white close-up of a rose with visible petals and stem (no text or symbols)JPG Gösterimi

text_image
Sys Set Clock LCD set Language Power off Replay mode Online ModeSistem AYARI
text_image
Ebook Dir Select File Select Text Read ExitOkuma Konumu
Video
natural_image
Black-and-white photo of two people standing indoors, possibly in a retail or store setting (no visible text or symbols)IV. Müzik Konumu
A. Tuşla Çalıştırma
Müzik Konumu
text_image
benke music Standing on a mountain high 192Kbps 0:03:58 18.0 PSRV. Ses Kaydı
text_image
Local folder REC type Exittext_image
REC type ✓ Fine REC ● Long REC ● Fine UOR ● Long UORnatural_image
Camera icon set with MP3 label and control buttons (no readable text or symbols)
natural_image
Black-and-white photo of a vintage camera with visible lens and control buttons (no readable text or symbols)
text_image
ROOT YRKE.JPG ABR.JPG
text_image
Local folder Play set Delete Exit
natural_image
Black and white close-up of a rose with visible petals and stem (no text or symbols)IX. Metin Okuma
natural_image
Microcontroller MP3 interface with control buttons and display (no readable text or symbols)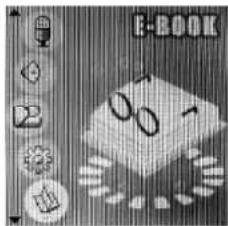
text_image
E-BOOK 0° 1°
text_image
Ebook Dir Select File Select Text Read ExitX. Sistem Ayarı
text_image
Sys Set LCD set • brightness • black • Exit• Dil
text_image
Sys Set Language • Simple Chinese • English • Trad Chinese • Japanese • French- Kapanma
text_image
Sys Set Power off Off time Sleep timetext_image
Music Local folder Delete Repeat Exittext_image
Music Local folder Delete Repeat ExitC. Tekrar Konumu
natural_image
Close-up of a metallic object with a small inset showing a crosshair, possibly part of a mechanical or electronic component (no visible text or symbols)
natural_image
Close-up of a metallic surface with vertical striations and a small inset image showing a cut edge (no text or symbols)
natural_image
Abstract grayscale image with vertical striations and two blurred rectangular shapes, no text or symbols visibletext_image
Open Look in: JS REC01.act File name: Files of type: Record Files(*.act; *.rcd; *.rec) Open Canceltext_image
AMV convert Tool Input file 01.wmv Output file C:\Documents and Settings Output Info Start time 0:00 Finish time 4:02 Elapsed time 4:02 Total time 4:02 Select Name Audio Files Status Time F:\Flashfap\01.wmv Conversion 4.02 Progress 51%text_image
MP3 Player Disk Tool Format Partition and Encrypt Partition Disk total capacity 245 Mb Setting encrypted disk capacity 45 Mb Set username and password Partition and Encrypt Old username Old password New username New password New password confirm Start Close Help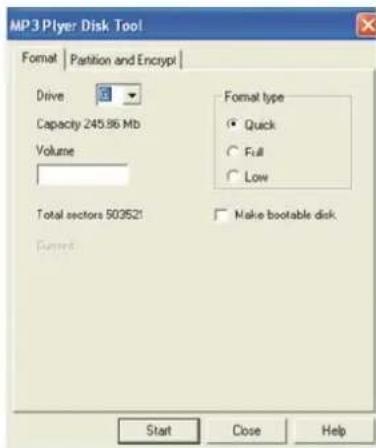
text_image
MP3 Ployer Disk Tool Format | Partition and Encrypt | Drive Capacity 245.86 Mb Volume Total sectors 503521 Format type ● Quick ○ Full ○ Low □ Make bootable disk Start Close Helptext_image
MP3 Player Disk Tool Format Partition and Encrypt Partition Disk total capacity 245 Mb Setting encrypted disk capacity 45 Mb Success Complete setting disk partition and password! OK New username New password New password confirm Start Close Help