
SF 450 - Fan PROLINE - Free user manual and instructions
Find the device manual for free SF 450 PROLINE in PDF.
| Brand | Proline |
| Model | SF 450 |
| Product type | Floor fan with oscillation |
| Power supply | 220-240 V ~ 50 Hz, 60 W |
| Speeds | 4 speeds (1 to 4) |
| Oscillation | Horizontal, vertical, or both |
| Timer | From 30 minutes to 8 hours (in 30-minute increments) |
| Remote control | Yes, with AAA batteries (2 batteries included) |
| Display | LED screen with information (speed, timer, mode) |
| Ventilation modes | Normal air, sleep breeze |
| Adjustable height | Yes, by telescoping the pole |
| Tilt | Manual (raise/lower the grille) |
| Protection grille | Front and rear, assembly with clamps and screws |
| Cleaning | Exterior with damp cloth and soapy water; do not immerse |
| Safety | Programmable automatic shut-off; do not use near water or flammable liquids |
| Reparability | No user-serviceable parts; contact customer service |
| Intended use | Household only, indoor |
Frequently Asked Questions - SF 450 PROLINE
User questions about SF 450 PROLINE
0 question about this device. Answer the ones you know or ask your own.
Ask a new question about this device
Download the instructions for your Fan in PDF format for free! Find your manual SF 450 - PROLINE and take your electronic device back in hand. On this page are published all the documents necessary for the use of your device. SF 450 by PROLINE.
USER MANUAL SF 450 PROLINE
IMPORTANT SAFETY INFORMATION
Read all instructions and save them for future reference.
Do not use outdoors.
Stand the appliance on a stable flat surface before use.
Check that the voltage marked on the appliance rating plate matches your local mains supply.
Close supervision is necessary when your appliance is being used near children or infirm persons.
Do not use any electrical extension cord with this fan.
Do not insert fingers or any other object into the front guard or any part of the fan.
Do not let children play or insert fingers or any other object into the front guard or any part of the fan.
Do not let hair, net curtains, tablecloths or loose clothing come into contact with the moving parts of the fan as it may cause damage or injuries.
Do not use the fan if the mains cord or plug gets damaged in any way. Return the fan to an authorised service agent or after-sales department for examination, electrical adjustment or mechanical repair.
Do not let the power cord hang over the edge of a table or counter top.
Do not let the power cord touch any hot surface.
The appliance is for household use only. Do not use the appliance for other than its intended use as laid out in these instructions.
Do not try to repair this fan yourself there is no user serviceable parts inside all servicing and repair must be undertaken by the manufacturer, its after-sales service or by similarly qualified person in order to avoid a hazard.
Do not use this fan near a window that may have condensation on it.
Do not use this fan with any external semi-conductor speed controller.
Do not use this fan in areas where flammable liquids are used or stored.
Do not use this fan in a damp area such as in a bathroom or near water of any kind.
The fan should be unplugged from the mains supply when not in use.
Never unplug the fan by pulling the mains cord, always disconnect by removing the plug from the mains socket.
Turn the fan off and unplug from the mains socket before moving it from one place to another or cleaning.
This fan must be used on a flat area away from any obstructions that may stop the fan from oscillating.
Before any cleaning or maintenance of the fan, please switch the fan into the 0 position and remove the mains plug clean with mild soap and a damp cloth.
Do not submerge the fan or its lead in water or other liquid.
WARNING:
This appliance is intended for domestic household use only and should not be used for any other purpose or in any other application, such as for none domestic use or in a commercial environment.
If the supply cord is damaged, it must be replaced by the manufacturer, its service agent or similarly qualified persons in order to avoid a hazard.
Ensure that the fan is switched off from the supply mains before removing the guard. Do not use this appliance near bathtubs, showers, basins or other vessels containing water.
This appliance is not intended for use by persons (including children) with reduced physical, sensory or mental capabilities, or lack of experience and knowledge, unless they have been given supervision or instructions concerning use of the appliance by a person responsible for their safety.
Children should be supervised to ensure that they do not play with the appliance.
Battery handling and usage
BATTERY WARNING: Only adults should handle the batteries. Do not allow a child to use this product unless the Battery Compartment Cover is securely attached to the Battery Compartment in accordance with all product usage instructions.
- Follow the battery manufacturer's safety and usage instructions.
- Keep the battery away from children and pets.
- Insert the batteries observing the polarity marking inside the battery compartment.
- Failure to properly align the battery polarity can cause personal injury and/or damage. The battery compartment is located on the rear of the remote.
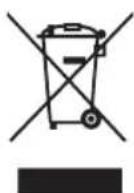
- To protect the environment please use local recycling facilities for battery disposal.
- To prevent the risk of electrolyte leakage or explosions, never recharge non-rechargeable battery.
- Do not dispose of batteries in a fire as this constitutes an explosion hazard.
The batteries type used in this remote is 2 AAA size. These batteries are located in the remote control and are readily accessible.
Remove the battery cover on the rear of the remote control and remove the batteries.
These batteries must be disposed of at your local recycling point.

ASSEMBLY INSTRUCTIONS
CAUTION:
DO NOT insert the mains plug into the mains socket until the fan has been completely assembled. Never operate the fan with a cracked or damaged fan blade.
Description
- Front guard
- Retaining nut
- Fan blade
- Locking nut
- Rear guard
- Motor shaft
- Motor housing
- Neck
- Control box
- Screw
- Internal pole
- Height adjustment ring
- Outer pole
- Base
- Locking lever
- Remote controller

Base Assembly
- Unscrew the locking lever from the base.
- Insert the outer pole into the base then locks it into place by fastening the locking lever.
- Slide the internal pole up from the outer pole to the desired height then securely hold this position by turning the height adjustment ring clockwise.
- Unscrew the screw of the control box.
- Insert the internal pole into the control box then fasten the screw to securely attach the pole to the control box.
Fan Assembly
Rear guard assembly
Unscrew the retaining nut from the motor spindle in a clockwise direction. Unscrew the locking nut from the fan motor in an anti-clockwise direction. Position the rear guard onto the motor housing, making sure the handle on the rear guard is upward above the motor housing. Insert the locking nut and turn in a clockwise direction to lock the rear guard into position.
Fan blade assembly
Insert the fan blade onto the motor spindle, making sure the motor spindle is f seated into the blade groove. Screw the retaining nut of the fan blade in an anti-clockwise direction to tighten the fan blade to the motor spindle.
Front guard assembly
Attach the front guard to the rear grill ensuring the side and bottom clips are clamped to secure two guards. Secure in position by tightening the screw.
OPERATION
-
Once the fan has been assembled correctly connect the mains plug to the mains socket.
-
To turn fan on press ① on the control box or on the remote.
-
When fan is on, it will start in low speed and the display shows "SPEED 1". Repeatedly press to select the desired fan speed from 1 to 4.
-
To turn fan off press on the control box again or on the remote.
-
To make the fan oscillate press repeatedly and the fan will oscillate in horizontal or vertical or both directions.
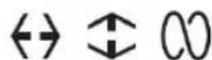
The corresponding light will illuminate to show what oscillation mode you choose.
To stop the fan from oscillating, press 00 repeatedly until the light go out.
- Tilting Adjustment
The airflow can be adjusted upward or downward by simply pushing the guard up or down as required.
- Mode
Press repeatedly to select the desired wind mode. The corresponding light will illuminate to show what wind mode you choose.

Normal wind

wind

- Timer
You can set the fan to automatically turn itself off within a desired time period
from 0.5 to 8 hours.
Press repeatedly as desired. "TIMER" will flash
The time you have set will be displayed by the illuminated light.
- When "TIMER" stops flashing, the set is confirmed.
With each pressing of , the time will advance in half an hour increment.
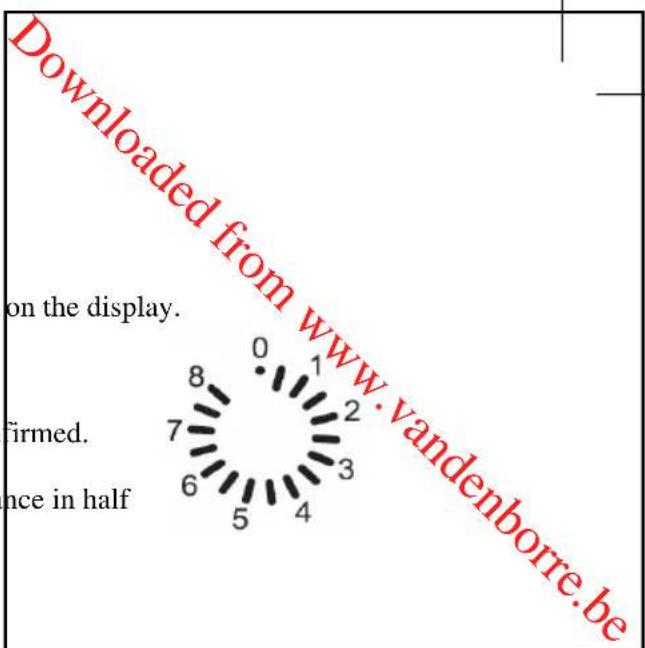
- DISP
Press on the remote repeatedly to turn on or off the display.
-
When the function is activated, "DISP" will light on the display.
To deactivate the function, press repeatedly until "DISP" disappears on the display. -
Program
Press on the remote and the time dial light comes on.
The first finger light flashes then press on the remote repeatedly to select the light on or off during the first half hour.
After the setting is finished, press on the remote to set the second half an hour. Repeat the above procedure to turn fan on or off automatically during 8 hours.
Remote Control
Be sure to point the remote control no more than 5 meters from the remote sensor on the front of the fan and keep with a ± 30^ angle.
Installing the batteries
- Remove the battery compartment cover at the rear of the remote.
- Insert two AAA size batteries observing the proper polarity (+/-) as indicated inside the battery compartment.
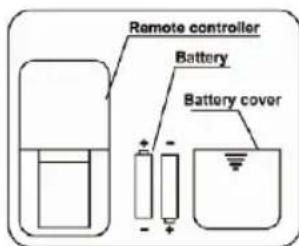
CAUTION: Do not mix old and new or different types or makes of batteries.
- Replace the battery compartment cover.
Using the remote
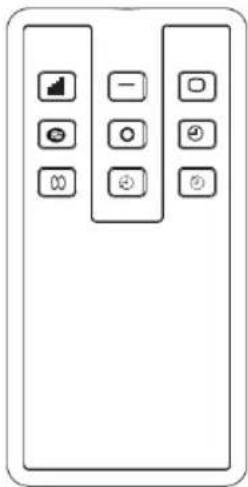
The buttons on the remote will respond in the same manner as the buttons on the fan.
You will hear a beep from the fan and see illuminated lights on the fan control panel while using the remote. This shows you that the remote is working.
CLEANING AND CARE
Be sure to unplug from the mains socket before cleaning.
To disassemble the fan, do the assembly in the reverse order.
Wash all removable parts in warm soapy water.
Wipe the fan body with a damp cloth. Do not immerse the motor housing into water or other liquid.
Do not use harsh abrasives, solvents, chemical cleaners, petrol or similar to clean this appliance as these may damage the plastics.
When not in use store your appliance in a safe and dry place.
SPECIFICATIONS
220-240V\~50Hz 60W
IMPORTANT DISPOSAL INSTRUCTIONS
As a responsible retailer we care about the environment.
As such we urge you to follow the correct disposal procedure for your product and packaging materials. This will help conserve natural resources and ensure that it is recycled in a manner that protects health and the environment.
You must dispose of this product and its packaging according to local laws and regulations. Because this product contains electronic components, the product and its accessories must be disposed of separately from household waste when the product reaches its end of life.
Contact your local authority to learn about disposal and recycling.
The product should be taken to your local collection point for recycling.
Some collection points accept products free of charge.
We apologise for any inconvenience caused by minor inconsistencies in these instructions, which may occur as a result of product improvement and development.
Kesa Electricals HU1 3AU 06/12/2010

INFORMATIONS DE SECURITE IMPORTANTES
Battery cover = Couvercle du compartment de piles
Remote controller = Télecommande
Kesa Electricals UK, HU1 3AU 22/02/2010

DÔLEŽITÉ BEZPEČNOSTné INFORMÁCIE
Kesa Electricals UK, HU1 3AU 22/02/2010
DÔLEŽITÉ BEZPEČNOSTné INFORMÁCIE
Kesa Electricals UK, HU1 3AU 22/02/2010

- IMPORTANT SAFETY INFORMATION
- WARNING:
- Battery handling and usage
- ASSEMBLY INSTRUCTIONS
- CAUTION:
- Description
- Base Assembly
- Fan Assembly
- Rear guard assembly
- Fan blade assembly
- Front guard assembly
- OPERATION
- Remote Control
- Installing the batteries
- Using the remote
- CLEANING AND CARE
- SPECIFICATIONS
- IMPORTANT DISPOSAL INSTRUCTIONS
- INFORMATIONS DE SECURITE IMPORTANTES
- DÔLEŽITÉ BEZPEČNOSTné INFORMÁCIE
Brand : PROLINE
Model : SF 450
Category : Fan