USER MANUAL EC5FRESH PROLINE
natural_image
White cylindrical air conditioner unit with black ventilation grille and indicator lights (no visible text or symbols)
IMPORTANT SAFETY INSTRUCTIONS
PLEASE READ THE FOLLOWING SAFETY WARNINGS AND THE INSTRUCTIONS CAREFULLY BEFORE USING THE APPLIANCE AND KEEP FOR FUTURE REFERENCE.
Warnings
- This appliance is intended for domestic household use only and should not be used for any other purpose or in any other application, such as for non-domestic use or in a commercial environment.
- If the supply cord is damaged, it must be replaced by the manufacturer, its service agent or similarly qualified persons in order to avoid a hazard.
- This appliance can be used by children aged from 8 years and above and persons with reduced physical, sensory or mental capabilities or lack of experience and knowledge if they have been given supervision or instruction concerning use of the appliance in a safe way and understand the hazards involved.
Children shall not play with the appliance.
Cleaning and user maintenance shall not be made by children without supervision.
- Unplug the appliance during filling and cleaning.

• Clean the water tank every three days.
- Be aware that high humidity levels may encourage the growth of biological organisms in the environment.
- Do not permit the area around the humidifier to become damp or wet. If dampness occurs, turn the output of the humidifier down. If the humidifier output volume cannot be turned down, use the humidifier intermittently. Do not allow absorbent materials, such as carpeting, curtains, drapes, or tablecloths, to become damp.
- Never leave water in the reservoir when the appliance is not in use.
• Empty and clean the humidifier before storage. Clean the humidifier before next use.
- Warning : Micro-organisms that may be present in the water or in the environment where the appliance is used or stored, can grow in the water reservoir and be blown in the air causing very serious health risks when the water is not renewed and the tank is not cleaned properly every 3 days.
- Empty the tank and refill every third day. Before refilling, clean it with fresh tap water or cleaning agents if required by the manufacturer. Remove any scale, deposits, or film that has formed on the sides of the tank or on interior surfaces, and wipe all surfaces dry.
- Regarding the detailed information of filling, cleaning and descaling, refer to the section "OPERATION, CLEANING, MAINTENANCE AND DESCALING" on pages 4 of the manual.
- The battery must be removed from the appliance before it is scrapped.
- The appliance must be disconnected from the supply mains when removing the battery.
• The battery is to be disposed of safely.
- Different types of batteries or new and used batteries are not to be mixed.
- Batteries of the same or equivalent type as recommended are to be used.
- Batteries are to be inserted with the correct polarity.
- Exhausted batteries are to be removed from the product.
- The supply terminals are not to be short-circuited.
- Attention should be drawn to the environmental aspects of battery disposal. Don't throw used batteries in dustbin. Please contact your retailer in order to protect the environment.
- The batteries (batteries installed) shall not be exposed to excessive heat such as sunshine, fire or the like.
- If battery leakage occurs, avoid contact with skin. Isolate the leaking battery in a sealed plastic bag and put it in the scrap following the instructions environmental protection. If contact with the skin, mucous membranes or eyes, rinse thoroughly with water and contact your doctor or ophthalmologist.
- Do not recharge non-rechargeable batteries because of the risk of explosion.
- Turn off and unplug the appliance from the mains socket when not in use, refilling the water tank, and before cleaning.
- Do not pull the power cord to unplug the appliance from the mains socket. Always grasp the plug to pull out.
- Do not use outdoors.
- Do not leave the appliance unattended while in operation.
-
Do not cover the air inlet or outlet on the appliance. Do not place items on the appliance.
-
Do not have the air inlet and outlet of the unit close to walls, curtains and other objects, or they may block the airflow and affect air supply.
- Do not insert or allow objects to enter any ventilation or exhaust opening.
- Do not operate the appliance with wet hands.
- Do not put any combustible item over the appliance while in operation.
- Use the appliance only on a flat surface.
- Never locate or use the appliance where it may fall into a bathtub or other water container.
- Do not use the appliance in areas where gasoline, paint or other flammable goods and objects are stored.
- The appliance has a safety switch. If the honeycomb filter support has not been installed well, the appliance will not work. When the appliance is working, do not remove the honey comb filter frame.
• Always unplug the appliance from the mains socket when moving from one location to another.
- When the appliance is running, do not knock at or shake it heavily, which may lead to automatic shutdown. When this case occurs, restart the appliance.
- Do not place the appliance directly below the power outlet.
- Do not use the appliance under direct sunshine.
- Do not use the appliance near a window. Rain may create an electrical hazard.
PRODUCT OVERVIEW
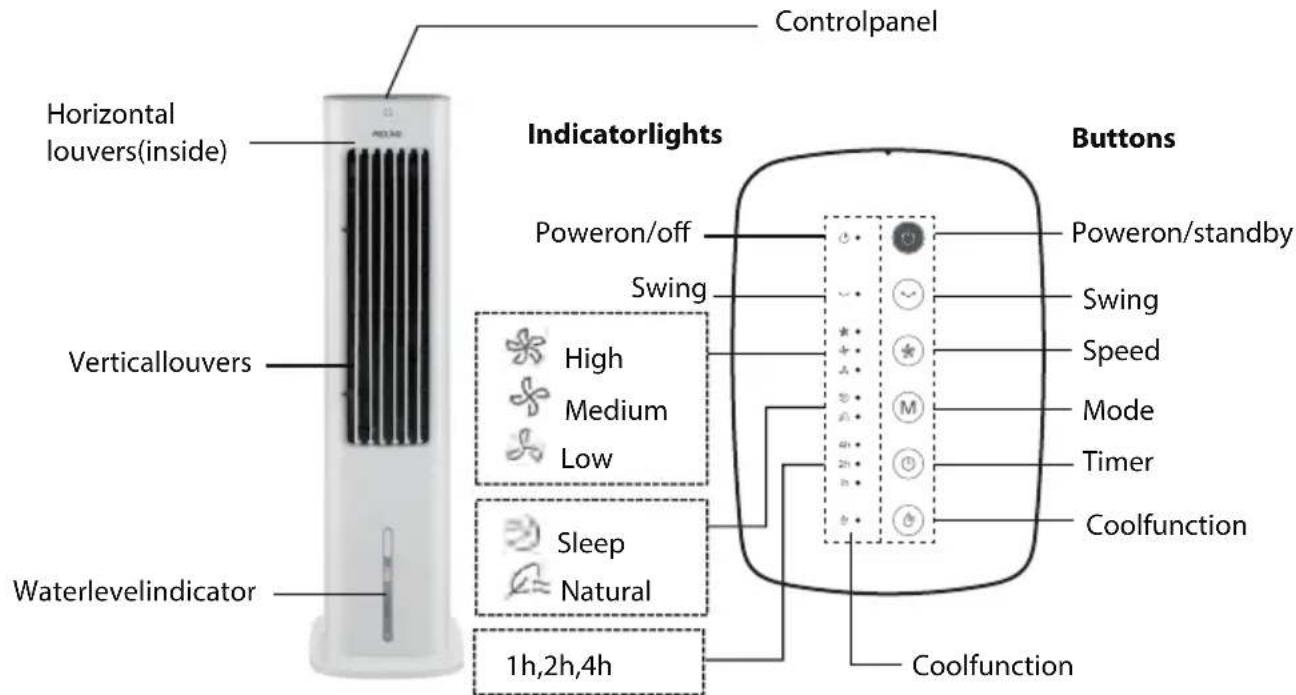
OPERATION
The appliance feature the function soffan, cooling and humidification.

NoWater
Useasafan

AddWater
Useasacoolingfan+humidifier

natural_image
Simple line icon of a propeller and a snowflake, no text or symbols present
AddFrozenIceBoxesinWater
Helpcoolwaterfaster
AddWater
If you want to use the humidification and cooling functions, you need to fill the tank with sufficient water.
Makesuretopositiontheapplianceonafirmlevelsurface.
natural_image
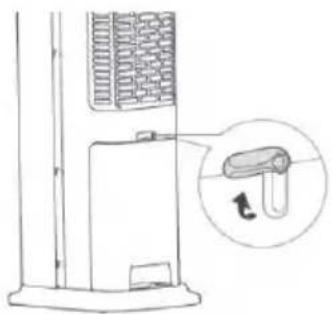
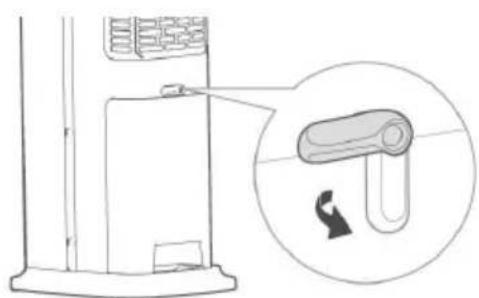
Diagram of a vertical device with a magnified inset showing a mechanical component (no text or symbols)
1 Rotatethelatchtokeepit horizontal.
natural_image
Simple line drawing of a kitchen appliance with a bag and water drop symbol (no text or labels)
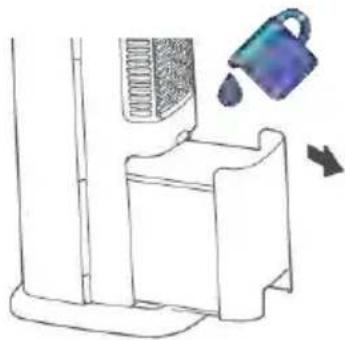
② Slideoutthewatertankandfillthetankwith cleancoldwater.
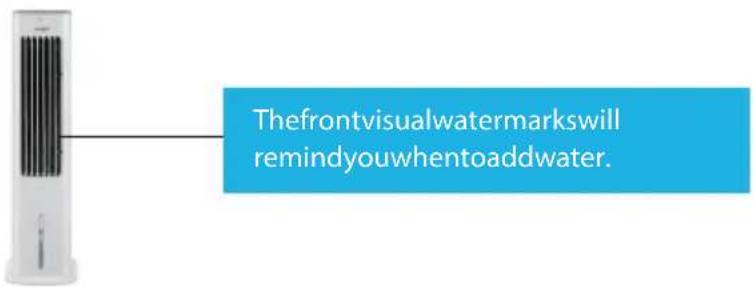
Besurewaterinthetankisalwaysbetween the "max" and "min" waterlevelmarks.
AddFrozenIceBoxesinWater
Your air cooler is equipped with 2 ice boxes to enhance cooling performance. Theiceboxescanbefrozenrepeatedlyandrecycled.

natural_image
Line drawing of a mechanical device with a red arrow indicating motion or force, no text or symbols present
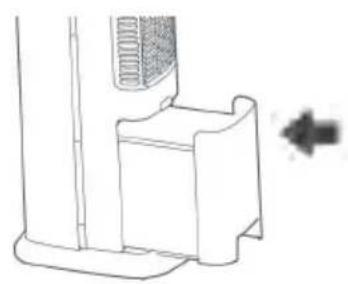
Tousetheiceboxes,followthestepsbelow:
- Puttheiceboxesinyourfreezerandwaitforthem tofreeze.
- Removefrozeniceboxesfromthefreezer.Put theminthewatertank.

NOTE: Donotexceedthe "max" markafter the frozen ice boxes in the tank.
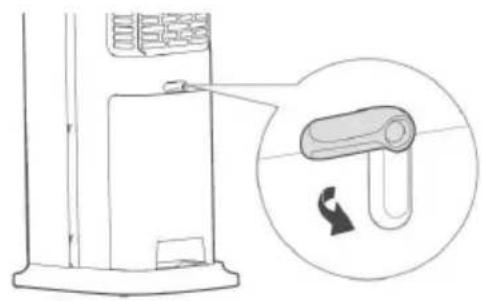
Slowly push the water tank inside the appliance. Rotate the latch to the vertical position.
natural_image
Line drawing of a mechanical device with a fan and base, no text or symbols present
natural_image
Diagram of a refrigerator with a magnified inset showing a scroll and directional arrow (no text or symbols)
Plug in the appliance and press to turn on the appliance.
• Thepowerindicatorlightwillilluminate.
- Toturnofftheappliance,press again.Thepowerindicatorlightwillgoout.
SPEED

Repeatedlypresstoselectthedesiredfanspeed.
• The corresponding indicator light will illuminate to indicate the selected speed.
LowMediumHigh
MODE M
Repeatedlypresstoselectthedesiredmode.
- The corresponding indicator light will illuminate to indicate the selected mode.
| No indicatorlight | Normal Mode: The appliance will operate at the selected speed. |
| SleepMode:Theappliancewilldecreasethefanspeedstepbystep andgooncircularly. |
| Natural Mode: The appliance will stimulate the wind in the natural environment. It will operate among different fan speeds and go on circularly. |

SWING
Presstoactivatetheswingfunction.
- Thecorrespondingindicatorlightwillilluminateandtheverticallouverswillbegintomovefrom sidetosideautomatically.
- When you have the desired horizontal wind direction, press again, the vertical ouvers will be stopped at your selected position.
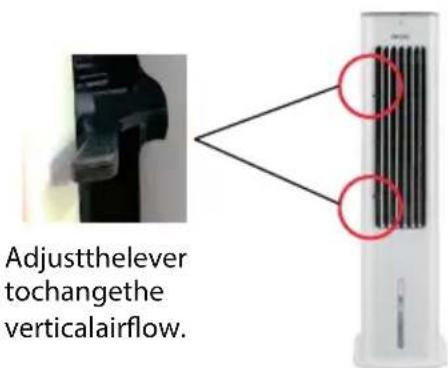
- You can manually adjust the horizontal louvers to change vertical airflow.
Todeactivatethisfunction, press

again.Thecorrespondingindicatorlightwillgoout.
COOLFUNCTION

Presstoactivatethisfunction.
• Thecorrespondingindicatorlightwillilluminate.
Todeactivatethisfunction, press

again.Thecorrespondingindicatorlightwillgoout.

NOTE:
Check water level in the water tank before running the COOL function.
Make sure that water in the tank is always above the "min" water level mark.
WATERSHORTAGEALARM
If there is insufficient water in the tank, the appliance will beep a few times and the cool indicator light will flash.
Torefillthewatertank:
-
Unplugtheappliance.
-
Wait for 2 minutes before removing the water tank to allow any excess water in the honeycomb cooling
padtodripintothetank.
-
Fill the watertank with clean cold water up to the "max" water level mark.
-
Replacethewatertankintheappliance.

NOTE:
- Do not use the cool function with stale water in the tank. Empty the tank and refill it with fresh water if thewaterhasbeenleftinthetankforanextendedperiodoftime.
- Itisrecommendedtorefillthetankwithfreshwateratleastonceeverytwodays.
ON/OFFTIMER

You can use this function if you want the appliance to turn on or off automatically.
- Offtimer:
Inrunningstatus,repeatedlypress

until the corresponding indicator light(s) illuminate(s). The
timerallowsyoutoprogramtheapplianceforupto7hoursofuse.
Once the set time has elapsed, the appliance will automatically turn off.
- Ontimer:
Inoffstatus, repeatedlypress

until the corresponding indicator light(s) illuminate(s). The
timer allows you to program the appliance for up to 7 hours.
Youcansetthedesiredmode,speed,swingandcoolfunctions.
Once the set time has elapsed, the appliance will automatically operate at your settings.
UsingtheRemoteControl
■ Insertingorchangingthebatteries
natural_image
Diagram of a cylindrical battery with internal components and three separate battery cells (no text or symbols)
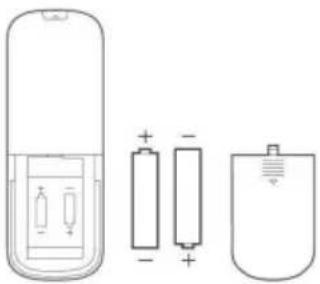
① Openthebatterycover.
② InserttwoAAAbatteries(notincluded),observing the polarities in the battery compartment.
③ Closethebatterycover.Youwillhearaclick.
Batteryhandlingandusage:
Only adults should handle the batteries. Do not allow a child to use this remote control unless the battery coverissecurelyattachedtotheremotecontrol.
The battery type used in this remote is two AAA size batteries (not included). These batteries are located in theremotecontrolandarereadilyaccessible.
Battery removal : Follow the above steps to open the battery cover and then remove the batteries.
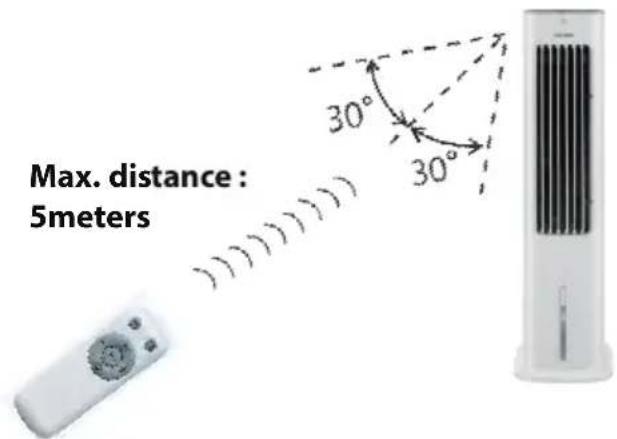
■ Howtousetheremotecontrol
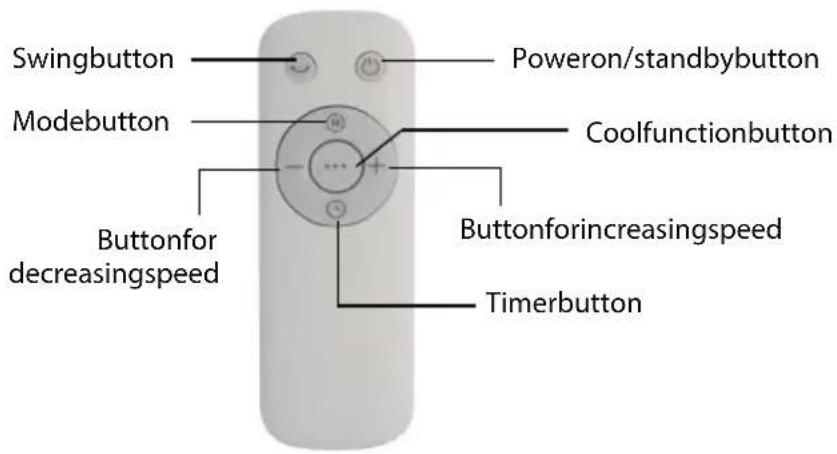
Point the remote control at the front of the appliance and press the desired button. Thebuttonsontheremotecontrolworkwiththesamefunctionsasthecontrolpanel. If you will not use the remote control for an extended period of time, please remove the batteries.
CLEANING, MAINTENANCE AND DESCALING
Turn off and unplug the appliance from the mains socket before cleaning. To clean the outside, use the slightly damp cloth to remvoe dirt and dust. Do not immerse the appliance in water or any other liquid. Never use abrasive or chemical cleaning agents.
Emptying and Cleaning the Water Tank
Please empty and clean the water tank at least once every 3 days.
Wait for 2 minutes before removing the water tank to allow any excess wa honeycomb cooling pad to drip into the tank.
- Rotate the tank latch to the top position and then pull out the water tank.
- Remove the ice boxes from the water tank.
- Remove the water pump module.
Twistthisknob.
- Remove the water tank from the appliance and empty the tank.
- Clean the water tank under running water using a damp cloth or a soft b
Descaling the Water Tank
If there is minal desposits in the water tank, fill the tank with a 50/50 solution and white vinegar. Let the tank to soak for an hour or two.
Empty the tank and then you can also rinse the tank with warm soapy water. Use brush or cloth to clean the water tank. Rinse thoroughly with clean water
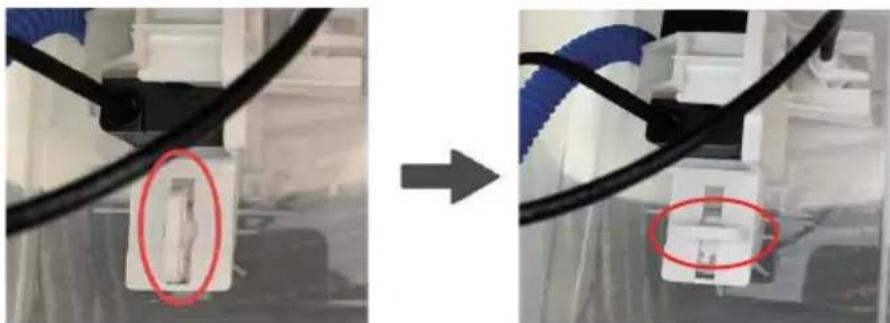
Replacing the water tank
After cleaning and descaling the water tank, make sure it is dry before rep appliance.
- Attach the water pump module to the water tank.
Protrusion
Insert the protrusion into the hole on the bottom of the watertank.
Slot
Aligntheknobwith theslotandthenlowerthe waterpumpmodule.
natural_image
Two-panel image showing a mechanical component before and after transformation, with red circles highlighting features (no text or symbols present)
3 Twisttheknobtolock thewaterpumpmodule inplace.

NOTE:
Ensure the water pump module is installed correctly, or the appliance may not work properly.
- Refill the tank with sufficient clean cold water up to the maximum level.
- Slowly push the tank inside the appliance and then rotate the tank latch to the vertical position.
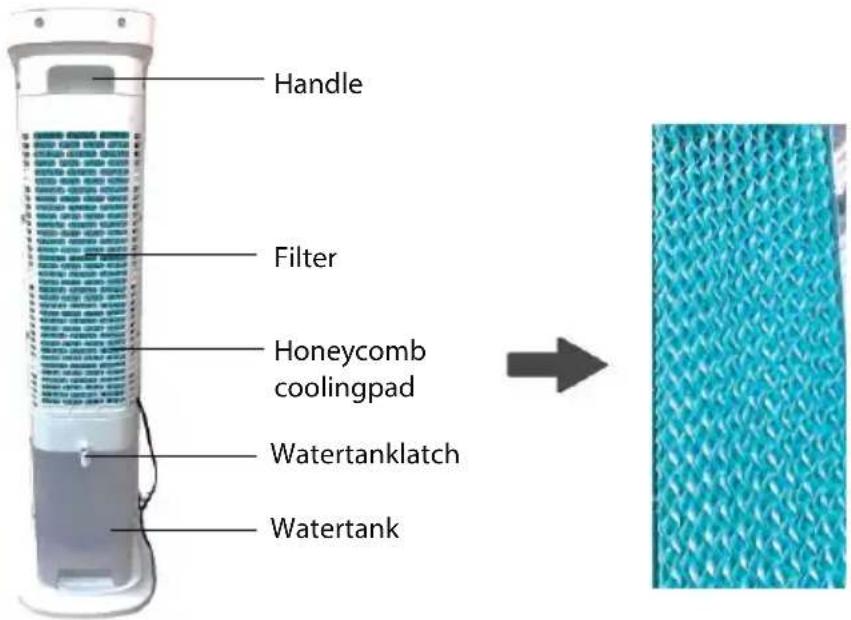
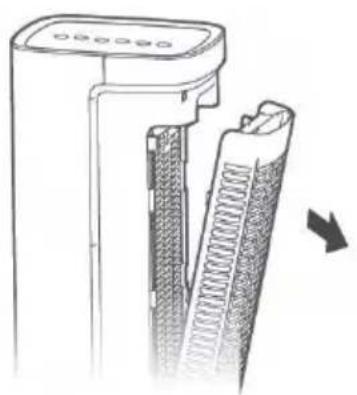
Cleaning the Filter and Honeycomb Cooling Pad
It is recommended to regularly clean the filter and honeycomb cooling pad to maintain the cooling performance and remove particles filtered from the air.
- Remove the filter and then remove the honeycomb cooling pad.
natural_image
Diagram of a device with a textured internal structure and directional arrow (no text or symbols)
natural_image
Technical line drawing of a mechanical component with a magnified inset showing internal structure (no text or symbols)
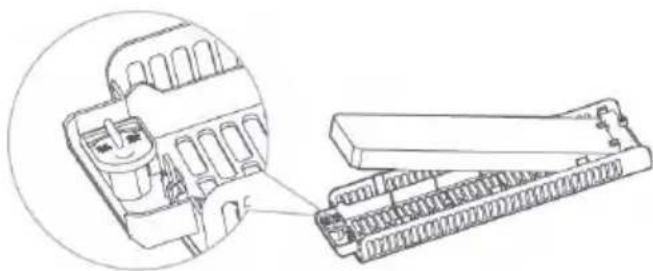
Rotate the latch at the bottom of the filter to the horizontal position. Then remove the honeycombcoolingpad.
-
Clean them with a clean cloth or a soft brush to remove all the dust and dirt particles. If necessary, clean them under running water. Dry thoroughly.
-
Attach the honeycomb cooling pad to the filter and rotate the latch cloc it in place.
- Attach the filter to the appliance. You will hear a click.
NOTE :
Ensure the filter is installed correctly, or the appliance may not work pr
SPECIFICATIONS
Ratings:220-240V\~50Hz
55W
| Description | Symbol | Value | Unit |
| Maximumfanflowrate | F | 5,80 | m3/min |
| Fanpowerinput | P | 41,00 | W |
| Servicevalue | S_V | 0,14 | (m3/min)/W |
| Standbypowerconsumption | P_SB | 0,21 | W |
| Offpowerconsumption | P_OFF | — | W |
| Fansoundpowerlevel | L_WA | 62,65 | dB(A) |
| Maximumairvelocity | C | 1,87 | meters/sec |
| Seasonalelectricityconsumption | Q | 13,36 | kWh/a |
| Measurementstandardforservice value | EN60704-2-7:1998 |
| EN 60704-1:2010+A11:2012 |
| EN50564:2011 |
| ENISO5801:2008 |
| Contactdetailforobtainingmore information | EtablissementsDarty&fils© |
| 129 Avenue Gallieni, 93140 Bondy, France |
| Website:www.darty.com |
As a responsible retailer we care about the environment. As such we urge you to follow the correct disposal procedure for the appliance and packaging materials. This will help conserve natural resources and ensure that it is recycled in a manner that protects health and the environment.
You must dispose of this appliance and its packaging according to local laws and regulations. Because this appliance contains electronic components, the appliance and its accessories must be disposedofseparately from household waste when the appliance reaches its end oflife.
Contact your local authority to learn about disposaland recycling. The appliance should be taken to your local collection point for recycling. Some collection points accept appliance free of charge.
We apologise for any inconvenience caused by minor inconsistencies in these instructions, which may occur as a result of product improvement and development.
EtablissementsDar ty&fils©,129AvenueGallieni,93140Bondy,Fr ance16/11/2020
MISES EN GARDE IMPORTANTES
MERCI DE BIEN VOULOIR LIRE LES CONSIGNES DE SÉCURITÉ ATTENTIVEMENT AVANT D'UTILISER L'APPAREIL ET CONSERVER POUR RÉFÉRENCE ULTÉRIEURE.
Attention
natural_image
Simple line icon of a propeller and a snowflake, no text or symbols present
natural_image
Diagram of a vertical cylindrical device with a U-shaped component and a magnified inset showing a circular arrow (no text or symbols)
natural_image
Simple line drawing of a kitchen appliance with a water dispenser and directional arrow (no text or symbols)
natural_image
Line drawing of a mechanical device with a red arrow pointing to a component, no text or symbols present
natural_image
Line drawing of a mechanical device with a bracket and handle, no text or symbols present
natural_image
Diagram of a refrigerator with a close-up inset showing a curved tube and a hanging hook (no text or symbols)
natural_image
White cylindrical air conditioner with black ventilation grille and indicator lights (no text or symbols visible)
MINUTEURDEMISEENMARCHE/ARRÊT

natural_image
Diagram of a cylindrical device with two battery cells and one separate motor case, showing polarity markings (no text or symbols)
natural_image
Close-up of a mechanical component with a red circle highlighting a small feature, no visible text or symbols.