BQS 3444 - Electric grill CLATRONIC - Free user manual and instructions
Find the device manual for free BQS 3444 CLATRONIC in PDF.
| Brand | Clatronic |
| Model | BQS 3444 |
| Product type | Electric grill |
| Power | 2000 W |
| Supply voltage | 230 V~, 50 Hz |
| Net weight | 3.50 kg approx. |
| Water tank capacity | 1.5 L maximum (MIN/MAX marks) |
| Grid material | Metal |
| Thermostat type | Adjustable with operation indicator light |
| Safety | Safety switch preventing heating outside the base |
| Recommended use | Outdoors only, in dry weather |
| Included accessories | Grid, reflector, air deflector, feet (tabletop or leg mounting) |
| Cleaning | Hand wash removable parts; do not immerse the heating element |
| Protection class | Class I (requires earthed socket) |
| Recommended residual current protection | Residual current device (FI/RCD) ≤ 30 mA |
| Safety distance | 30 cm from flammable objects, 15 cm from wall |
| Height adjustment | Yes, via legs (2 heights) |
| Indicator light | Yes, indicates operation of the heating element |
| Spare parts | Genuine accessories recommended |
Frequently Asked Questions - BQS 3444 CLATRONIC
User questions about BQS 3444 CLATRONIC
0 question about this device. Answer the ones you know or ask your own.
Ask a new question about this device
Download the instructions for your Electric grill in PDF format for free! Find your manual BQS 3444 - CLATRONIC and take your electronic device back in hand. On this page are published all the documents necessary for the use of your device. BQS 3444 by CLATRONIC.
USER MANUAL BQS 3444 CLATRONIC
WAARSCHUWING: Brandgevaar!
Thank you for choosing our product. We hope you will enjoy using the appliance.
Symbols in these Instructions for Use
Important information for your safety is specially marked. It is essential to comply with these instructions in order to avoid accidents and prevent damage to the machine:

WARNING:
This warns you of dangers to your health and indicates possible injury risks.

CAUTION:
This refers to possible hazards to the machine or other objects.

NOTE:
This highlights tips and information.
General Safety Instructions
Read the operating instructions carefully before putting the appliance into operation and keep the instructions including the warranty, the receipt and, if possible, the box with the internal packing. If you give this device to other people, please also pass on the operating instructions.
-
The appliance is designed exclusively for private use and for the envisaged purpose. This appliance is not fit for commercial use.
-
The device is suitable for limited outdoor use. Keep it away from sources of heat, direct sunlight, humidity (never dip it into any liquid) and sharp edges. Do not use the appliance with wet hands. If the appliance is humid or wet, unplug it immediately.
- When cleaning or putting it away, switch off the appliance and always pull out the plug from the socket (pull the plug itself, not the lead) if the appliance is not being used and remove the attached accessories.
- Do not operate the machine without supervision. If you leave the room you should always turn the device off. Remove the plug from the socket.
- The device and the mains lead have to be checked regularly for signs of damage. If damage is found the device must not be used.
- Do not try to repair the appliance on your own. Always contact an authorized technician. To avoid the exposure to danger, always have faulty cable be replaced only by the manufacturer, by our customer service or by qualified person and with a cable of the same type.
- Use only original spare parts.
- For the safety of your children, keep any packing parts (plastic bags, cartilage, Styrofoam etc.) out of their reach.

WARNING!
Don't let small children play with foils for danger of suffocation!
- Pay careful attention to the following "Special Safety Instructions".
Special Safety Precautions for this Device

WARNING: hot surface!
Danger of burns!
During operation the temperature of accessible surfaces can be very high.
- Only take hold of the appliance at the thermostat and handles.
- Please ensure that the mains lead does not come into contact with the hot sections of the device.

WARNING: Fire hazard!
Keep sufficient safe distance (30 cm) to inflammable objects such as furniture, curtains, etc. There must be at least a 15 cm gap to the wall.

WARNING:
- Do not use charcoal or similar combustibles with this device.
- The device is suitable for outdoor use. Only use the device outdoors if weather conditions are absolutely dry. Never leave the device outside after use.
- The device must be supplied by a residual current operated protected device (FI/RCD) with a maximum release current of 30mA .
- The power cord must be regularly inspected for signs of damage. If the power cord is damaged, the device may no longer be used.
-
The device must be connected to a shockproof socket.
-
Do not operate the device with a timer or separate telecontrol system.
- Put the device on a flat, heat resistant surface.
- Fill the grill base with water to a maximum of 1.5 liters. Use the "MIN" and "MAX" marks.
- Allow the device to completely cool down before putting away.
- Do not pour water into hot grease.
- This appliance can be used by children aged from 8 years and above and persons with reduced physical, sensory or mental capabilities or lack of experience and knowledge if they have been given supervision or instruction concerning use of the appliance in a safe way and understand the hazards involved.
Children shall not play with the appliance. - Cleaning and user maintenance shall not be made by children unless they are older 8 years and supervised.
- Keep the appliance and its cord out of reach of children less than 8 years.
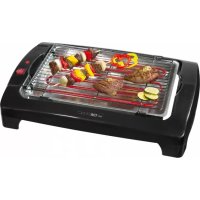
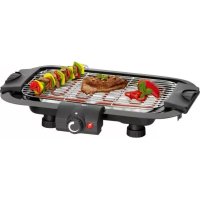
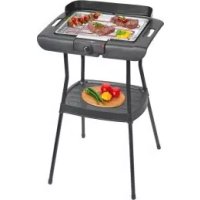
Location of Controls
1 Wind deflector
2 Grid
3 Handle
4 Heating element with thermostat and temperature control
5 Indicator light
6 Reflector
7 Grill base
8 Stand support
9 Rack
10 Legs
Unpacking the device
- Unpack the device.
- Remove all packaging materials such as foils, filling material, cable ties and cardboard packaging.
- Check the scope of delivery.

NOTE:
There might be particles or production remains on the device. We recommend you wipe the enclosure with a damp cloth.
Installation
You can assemble the grill as a standing grill using the stand or as a table top device without the stand.
Refer to the left hand figure on page 3.
- Remove the grid (2) and the heating element (4).
- Remove all packaging materials.
Assembling the stand
- Tum the grill base (7) on its head.
- Insert the legs (10) with the open ends into the feet (8) of the grill base so that the wing nuts face inwards.
- Loosen the wing nuts from the legs. Leave the Philips head screws in the holes in the legs.
- Fit the holes on the rack (9) onto the Philips head screws thread.
- Attach the rack to the legs using the wing nuts.
- Place the device onto the stand.
- Check whether all the legs are attached to the feet.
Stand or table top device
- Clean the grid and the reflector (6) with a damp cloth.
- Put the reflector plate into the grill base.
- Pour 1.5 liters of cold water into the grill base, as to cover the plate.
You will find a "MIN" / "MAX" marking inside the grill base on the rear wall.

CAUTION:
Fill with water until above the reflector plate. The water bath and the plate will prevent excessive radiated heat near the base of the device. Therefore always barbecue using water and the fitted reflector plate.
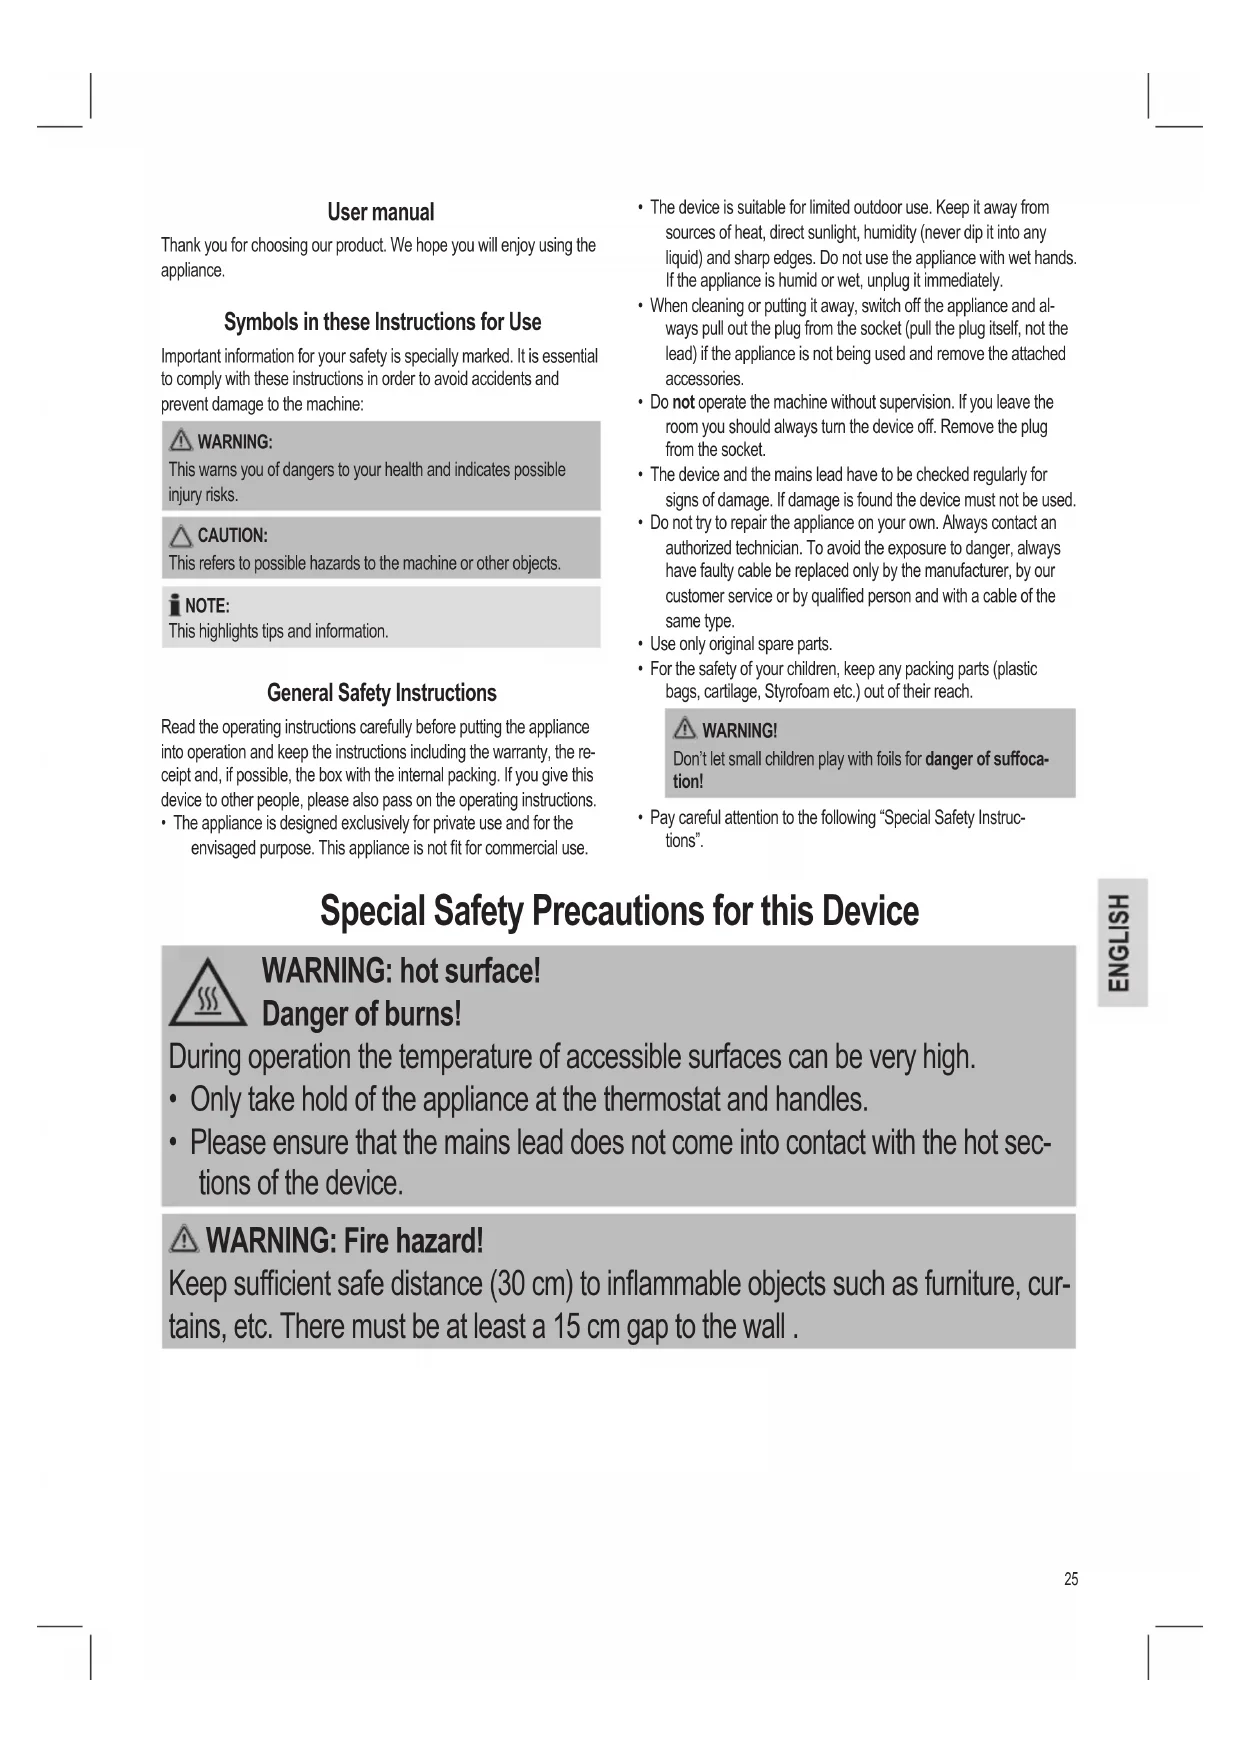
- Attach the heating element with the thermostat (4) to the grill base:
Using the recess, guide the thermostat horizontally onto the grillbase. In doing so, tilt the heating element upwards slightly so that the plate (B) rests in the grill base.

NOTE:
The thermostat is equipped with a safety switch (A). It prevents the operation of the heating element outside of the grill base. Check the correct fitting of the thermostat in the grill base.
Electric installation
- Be sure the voltage of the device (rating plate) is in accordance with the mains voltage.
- Connect the mains plug to a properly installed shockproof socket only.
Connected load
The device is intended for a maximum power intake of 2000 W. This connected load recommends a separate input lead secured with a 16 amp protected switch.

CAUTION Overload:
- When using extension cords, these should have a cable cross-section of at least 1.5mm^2
- Do not use gang plugs, because the device is too powerful.
Prior first-time operation
- Operate the device without barbecue for 15 minutes whilst grill base is filled with water.
- Turn the temperature control on the thermostat to the highest position.
- The protective foil on the heating element will be removed.
NOTE:
Slight formation of smoke is thereby normal. Ensure sufficient ventilation.
Your appliance is now ready for use.
Operating your device
NOTE:
For efficient heat utilization, attach the wind deflector (1).
- Place the reflector plate into the grill base.
- Pour 1.5 liters of cold water into the grill base until reaching the "MAX" level.
- Preheat the operable device for about 5 minutes prior use.
- Set the temperature control according to the intended use: Low or middle settings for keeping warm or cooking, highest setting for fast cooking or barbecuing. The indicator light (5) indicates the operation of the heating.
- Place your grill items directly on the grid. Turn the barbecue from time to time.
- The height of the grill can be adjusted. To do so, refer to the right hand figure on page 3.

CAUTION:
If the water level falls below the "MIN" marking after long time of barbecuing, please first un Plug the device and then add more water, until reaching the "MAX" level.
Do not pour cold water over the hot heating element. It might get damaged.
Switching off
Turn the temperature control anti-clockwise as far as it will go and unplug the device.
Troubleshooting
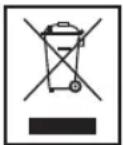
The thermostat is equipped with a safety switch (A). It prevents the operation of the heating element outside of the grill base.
If the heating cannot be switched on, please check the mains connection and the correct fitting of the thermostat in the grill base.
Cleaning

WARNING:
- Always unplug the device and allow the device to cool down before cleaning.
- Do not under any circumstances immerse the heating element into water for cleaning. Danger of electric shock or fire!

CAUTION:
- Do not use a wire brush or other scratching objects.
-
Do not use acid or abrasive cleaning agents.
-
Remove grid, heating element and reflector from the grill base. Pour out the water from the grill base.
- Rinse clean the grill, reflector plate, wind deflector and grill base by hand in a bowl of water. Use a nylon brush to remove heavy stains.
- Wipe the heating element with a damp cloth.
- Attach all parts again.
Technical Specifications
Model: BQS 3444
Voltage supply: 230 V~, 50 Hz
Power input: 2000 W
Protection class:
Net weight: approx. 3.50kg
Specifications are subject to change!
This device complies with all current CE directives, such as electromagnetic compatibility and low voltage directive and is manufactured according to the latest safety regulations.
Disposal
Meaning of the "Wheelie Bin" Symbol
Take care of our environment, do not dispose of electrical appliances via the household waste.
Dispose of obsolete or defective electrical appliances via municipal collection points.
Please help to avoid potential environmental and health impacts through improper waste disposal.
You contribute to recycling and other forms of utilization of old electric and electronic appliances.
Your municipality provides you with information about collecting points.
PmMb MoXHa BnKOpNCtOByBaTH OkpeMo 3 nIDCTaBkoHO a6o BcTaHOBbUHn Ha CTOnI Be3 nIDCTaBKn.
Dvibtbca MaIIOHOK JIbOpyu Ha cTOpIHcI 3.
- 3HIMtB peuitky (2) i enemEHT HarpibaHHA (4).
- 3HIMtB yBeCb nakyBaJIbHm MaTePian.
MOHTyBaHHH niDCTaBKn
3.ПepeBepHbTbOChOByIpyIaT (7)DOrOpN DHom.
4.BCTABTe hixkM (10) BIDKPNTMN KINHcMM N IaKN (8) B OCHOBI rtnr Tak, 06braKn 6yIn CNprrMOBAni BCEpeiny.
5. Nocna6Te Kpunbucti rauKn Ha hixkax. 3auiuTe roIOBKn TBHNTIB Philips B OTbopax HIXOK.
6. Pnpnacyte OTBOPn Ha peuitci (9) Ha roNobkn TBHnTrib Philips.
7. Pnpkinitb peuity Ko do HIXOK 3a donomoro KO kpiubactnx raioK
8. BctaHOBITb BpiipHa niiCTaBky.
9. IpepeBipTe, YH BcI HIXK MCTaBHei B TaIKM.
Okpemn npctpi Ha nidaTabci Hn HactbHnn pncptpi
- Nocntte pei itky i peefektophy nactny (6) Bnoro h raHicpkoio.
- Bctabe pepeNekTOpHy nlaactHb B OCHOBy rpnia.
- HaninTe 1,5 nItpa xoIooHOI BODN B OCHOBy rpiIra Bnue piBnR noBepxHi.
BcepeHniOCHOBn rnil Ha 3adHn CTiHci e no3naKn "MIN" / MAX".
YBFA:
HaHnBaIte BDOy Bnue pIBHpePneKTopHOI nactHH.Boa i InactNa 3axnCTaB OCHOBy npncToIO BId HndMpHoro Tenna. Tomy 3abXdN iD qac CmaKeHH M'ra BkOpNCTOByTe BoYi BiNoBDHy pePneKtopHy nactHy.
- Пикpinite lemeHT HarpiBaHH 3 TepmoctaTOM (4)do ochOBn rnilr:
3a donomoroBIMKn Cnpmyntepmoctat ropn0HTanbHO B OCHOBYrnpia. IpyIbOro 3nerka haxnniHb HarpibanbHneMeHENTBropy, Ta o6 nactina (B) prrna B OCHOBYrnpia.
IIPIMITKA:
TePmoctat 6nadaHao 3ano6ixHHM BmHKaHem (A). BiH 3ano- 6irae pOboti enemeHTa HarpibaHHI03a OCHOBOI rPnI.
PipebiTe, Hn HaneXHM YHOM BCTAHOBHeHO Tepmoctat B OCHoby rPnI.
BctaHOBHeHHeIeKtpuHnX3'EDHaHb
- YneBHItbcra, 10 Happya npncpTO (Ta6Nvka 3 nacnopTHIMM daHMM) BiDnOBiAc Happy3i y Mepeki.
2.Пд' endaHTe uTekep do HanekhoI ydapocTkoI pO3eTkn.
3ACTEPEXEHHHIODOIPEBAHTAXEHHH:
IIOOBoKyuOi Ka6eJI MaOTb MaTn nepeciHn nepeTn npHaMHi 1,5 MM2.
He BnKOpncToBvIe KInbKa ITeKeepiB, OckInbKn npNCTpiHnAdTOnTOyKHN.
Ipeep noaTkom po60Tu
noBepTaIe peryIaTOp TempepaTyPi npOTn rOIMHHKOBoi CTpiIKN, NOKI PnCTpH He BMMKHeTBcA.
YcyHenHHeCnpaBHOCTe
TePmoctat 6nlaHAno 3anobixHHM BmMkaHem (A).Bih 3an06irae pO60ti enemeta HarpibaHnno3 oCHOBOI rnilra.
Kp0peXMM HarpBHaHH He BMKaεTbca, nepeBipTe niδeHahHn do DkepeJxNWBHeHH Ta BnPapBe 3'εDHaHH TepMoCTata B OCHOBi rpiJI.
YiHHeHHa
PONIEPEDKEEHNA
- PpeaHyHM 3aBxDn BiDcHyTe npctpiBid Mepeki i daBaIte Nomy OXONHYTN.
3a kOdHnX o6cTaBnH He 3aHypHoiTe eneMeHT HarpiBaHHy y BOy dIy NmUeHH. IChyE He6e3IeKa ypaKeHHa CTpyMOM a60 BHNKHeHHa NOKeJI.
YBARA:
He BnKOpncTObyIte npToIHy uIky a60 iHui npEmdTeN, moKyTb nOprpAntn npCtpi.
- He BnKopncToBvIe ToCrtpi a60 a6pa3uBHi 3ac6oN dIyIuIeHnH.
- 3Himitpeiitky, eemeHTnHarpiBaHHI peepneKTopHy nactHy 3 OCHOBn rnpna. BnniTe BOy 3 OCHOBn rpnia.
- BpyuHNY nomnIte rpiJIb, peΦIeKToPHy nlaCTIny, kPmUky BiD BitpyIOCHOBYrpINB EMHOCTI 3BOHOU. LIO6 yCyHyTN cKnAaHi 3a6pydHeHHN, BIKOPICTOByTe NIIue HeHNoHOBy UITKy.
- Bnptitb enemt HarpiBaHHa BOJorO raHuyipkoIO.
4.3NobyPiEJdHaJIteBcIyacTINH
Texhi xapaKTepeNCTnK
MoIeIb: BQS 3444
Hanpyra: 230 B\~, 50 T
Bxinda notykhicb. 2000 Bt
Klac 3axncty:
Bara HeTro: npn6n.3,50K
Texhi xiapaiktepiNkoMcyt b6ytn 3mHeH!
Ley npctpi neptnoikobao BIDNOBIDHO do iIOuHx Hopm PE, Hapnknad HOPm eNEKTPomarHITHOi Cymichocti i H3bKOi HApnyi, i CKOHCTpynoBAHO BIDNOIBHO do octAHHX xapaTepcNTk 1 texHki6e3neKn.
PykoBOCTBO NOIb3OBATeTn
Cnacnbo 3a BbIbOp hauero npOdykTa. Hadeemc, OH Bam nIOhpabITcR.
CIMBOI npimehyemble B daHOM pyKOBOCTBe NOlb3OBaTeJI
Baxhble pekomehdaqnnI DnO bcneuehenBaWei 6eOnacHocTn
0b03haueHbI NO Oc0beHHOMy.ObraTeNbHO CnEynTE 3TMpeKoMeHaJzma, YTObI ppeOTbpaNTb HeCuaCTbI CNyau ININ NONOMky
N3dJIa:
IPEyTNPEKDEHNE:
Ipeynpekdaetobonacnoctnndra3dopobbnaB03MOKHOM pncke nonyeHn TpaBMbl.
BHIMAHHE:
Yka3bBAeT HbO3MOxHky ONaCHOCtB DnI N3DJIIN N DpyTNX OKpyKaHOUx INpeDMETOB.
IIPIMEAYAHNA:
Daet COBETbN INHΦOPMaIHO.
06une yka3aHnno no texhne 6e3oNaChOCTn
Ipeed Hauanom 3KcNpyataunn pnpbopa BHmateBno npoHTaTe npnnaeMyIO INCTpykUIO NO 3KcNpyatauHn COxpaHNTe ee B naexHOM MecTe, Bmte C rapaHTmHBIM TaHOHom, KaccOBbIM YekOM n, NO BO3MOXHOCTn, KAPTOHHO Kopo6bOc yNAKOBOHbIM MaTePnAiom. Ecn daTe KOMyHbO nnOpNb3ObaTbCpnp6Op, ObraTeNbHO daTe BnpuHaHy daHHy IO NcNpyataunn.
YcTpaHHeH HeNCnPaBHOCTe
TePMoCTaT OCHaUeH 3aUHTbHM BbKJIouYateIeM (A). OH npenrTCTByeT pa6ote HArpeBaTeIbHO rIeMeHtA pRn OTcoEINHeHm OT OCHOBAHn IprJIA.
EcHn HbKIOHuaeTcHarpeB, npOBepTe NoIOKnIOHeMe K CeTm npaBnIbHyIO yCTaHOBYK TePMoCTaHa OCHOBAHn rpnIy.
OuInCTka
NPEDYNPPEKDEHNE:
-ПередческйобязателноOTcoeINHITe yctpoCTBO OT cETNидпTe EMYOCtItb.
3anpeaetcno pykahtb harpebaTeNbHbI 3neMeHT BBOy dIraOuHCTKn. ONaCHOctb npaXeHnE 3NeKtpueeCKM TOKOM nn nojapa.
BHIMAHINE:
He nIcnoJIb3yIe npOBOnOuHbIe IeTKn I npOHe capanaIOUe npEIMetbl.
- He nCnoJIb3yIe pa3beJaIOuIe nn a6pa3NtBhIe YnCTaIue BcIeCTBa.
- CHIMITE peuETky, HaraBeATElbHbI 3neMeHT n peFKeTTop c ochOBaHn rpnIy. BbIeIte BOy n 0CHOBaHn rpnIy.
- BpyuHny npomOte rpiNb, pnaCTnHy pePneKToPa, BetpOBoI uHTOK n OCHOBaHne rpiJI B YAWe C BODo. C NOMUbNo HeNHOBOI UeTKn ydaJInTe YcToHbBle 3aqrpa3HeHnI.
- IpoTnTe HArpeBaTeIbHbI 3IeMeHT CnerKa yBnaXHeHHoTKaHbIO.
- CoeINHtE BCE 3nEMHeTbI.
TexHueckne xapaKTeepnCTnKn
Moelb: BQS 3444
3NeKtpoIHTaHHe: 230 B\~,50 T
Iotpe6nemamMOuHocTB: 2000BT
Knacc 3auntbI:
Bec HeTTo: npn6n.3,50K
U3MeHENMA MOrT BHOCTbC8e3 pIeBapntb-HORo yBeOMnHEnia!
JaHHoe yCTPOIcTBO COOTBETCTByET BCEM TEKUzIM DupeKtNBAM CE, TAKIM KAK 3JNEKTPo- MaHHTHAR COBMECTMIOCTb HN3KOe HApPRAKeHHe; OHO pON3BeDEHO B COOTBETCTBnC HOBEiUHMn PpaBUNaMn TEXHNK Be3ONaCHOCTN.

CLATRONIC
INTERNATIONAL GMBH
D-47906 Kempen/Germany - Industriering Ost 40
Internet: http://www.clatronic.de·email: info@clatronic.de