
GG 3590 - Electric grill CLATRONIC - Free user manual and instructions
Find the device manual for free GG 3590 CLATRONIC in PDF.
| Brand | Clatronic |
| Model | GG 3590 |
| Product type | Gas barbecue |
| Gas category | I3B/P (50) |
| Permitted gas types | Butane, propane or LPG mixtures |
| Gas pressure | 50 mbar |
| Total power consumption | 5.50 kW (400 g/h) |
| Nozzle diameter | 0.73 mm |
| Maximum gas hose length | 150 cm |
| Number of burners | 2 |
| Ignition | Integrated piezo electric |
| Cooking grid material | Chrome steel |
| Lid | With integrated thermometer |
| Cooking functions | Grilling, cooking, roasting (with lid closed) |
| Usage | Outdoor only |
| Cleaning | Mild detergent and warm water; avoid abrasive products |
| Maintenance | Annual inspection by a qualified technician |
| Pressure regulator replacement | Every 2 years |
| Gas hose replacement | Every 5 years |
| Gas cylinder capacity | 5 to 11 kg |
| Target countries | Austria, Germany, Switzerland |
Frequently Asked Questions - GG 3590 CLATRONIC
User questions about GG 3590 CLATRONIC
0 question about this device. Answer the ones you know or ask your own.
Ask a new question about this device
Download the instructions for your Electric grill in PDF format for free! Find your manual GG 3590 - CLATRONIC and take your electronic device back in hand. On this page are published all the documents necessary for the use of your device. GG 3590 by CLATRONIC.
USER MANUAL GG 3590 CLATRONIC
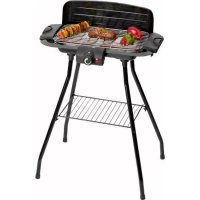
natural_image
Exterior view of a modern outdoor grill with open pan, cooking utensils, and food items (no visible text or symbols)DEUTSCH Seite 3
FRANÇAIS ...... page 18

Consignes relatives au transport
⚠ AVERTISSEMENT : RISQUE D'INCENDIE ET D'EXPLOSION

natural_image
Line drawing of a Gancio 6 pz electric cart with wheels and handle (no text or symbols on the diagram itself)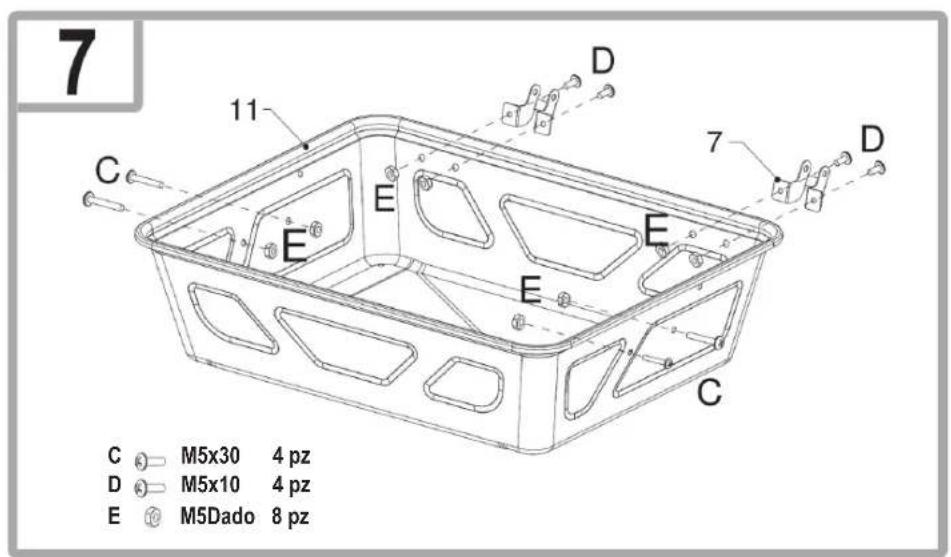

Assembling the Grill: 49
Gas Connection: 56
Operating the Gas Barbecue: 56
Troubleshooting: 57
Cleaning the Gas Barbecue: 57
Storing the Gas Barbecue: 57
Disposal: 58
Safety Notes
You have bought a safe product. However, the customer shares responsibility for the proper set up of the barbecue as well as for its operation and maintenance.
Various pieces of safety equipment protect you from damage and injuries. In these instructions, we have put together everything that you need to know for your safety. You will acquire knowledge and know-how. Read and follow the operating instructions before assembling and putting the appliance into use.
In particular, read the safety instructions. Only use the appliance as described in these instructions.
Non-compliance with the instructions may result in explosions and fires!
Keep these instructions safe for reading later on. When passing this appliance on, please enclose these instructions.
Symbols used in these operating instructions
Important instructions for your safety are specially marked. In order to avoid accidents and damage to the appliance, make sure you follow these instructions:
WARNING:
Warns of dangers for your health and indicates potential risks of injury.
△ CAUTION:
Indicates potential dangers for the device or other objects.
i NOTE:
Highlights tips and information for you.
Intended purpose
The gas barbecue should only be used for outdoor barbecues.
⚠ WARNING: Note for children and persons with limited capacities
This appliance is not intended for use by children or persons with limited capacities. It should only be used by persons who are in a position to use the appliance safely.
General hazards
WARNING:
The gas barbecue has sharp edges which you could cut yourself on. When assembling, servicing and cleaning, wear protective gloves.
Unpacking the device
WARNING:
- For the safety of your children, keep any packing parts (plastic bags, cartilage, Styrofoam etc.) out of their reach.
WARNING:
- Don't let small children play with foils for danger of suffocation!
Connecting the gas system
⚠ WARNING: RISK OF FIRE AND EXPLOSION
- The gas barbecue should only be operated with a low pressure regulator. The enclosed pressure regulator has been correctly set in the factory for operation with liquid petroleum gas (LPG). In addition, read and follow the separate assembly and usage instructions which accompany the pressure regulator.
- If necessary, the gas hose has to be exchanged if there are corresponding national requirements.
• Make sure that there are no sources of naked flames (or similar) in the vicinity when you change the gas cylinder. - When buying or renting the gas cylinder, let the store advise you.
- The appliance must be connected in the way that is described in these instructions.
• Make sure that the gas hose is not buckled or worn. - After assembling the gas system, check all of the connections for tightness with a standard leak detection spray or soapy water. It is strictly prohibited to test the seal with a naked flame!
Operating the gas barbecue
WARNING: RISK OF FIRE AND EXPLOSIONS
- Do not smoke when handling the gas system. Do not place the gas cylinder in the vicinity of a naked flame.
- Only use the gas barbecue outdoors. Make sure that the gas barbecue is protected from the wind.
- Protect the barbecue from rain, moisture, water splashes, etc.
- Place the gas barbecue on a level, stable and fireproof surface.
- Protect the gas cylinder from direct sunlight.
- Before operating the appliance, always check the hose and the pressure regulator for cracks and damage.
- Do not operate the gas barbecue if the pressure regulator, hose or gas cylinder are defective or if they are not sealed.
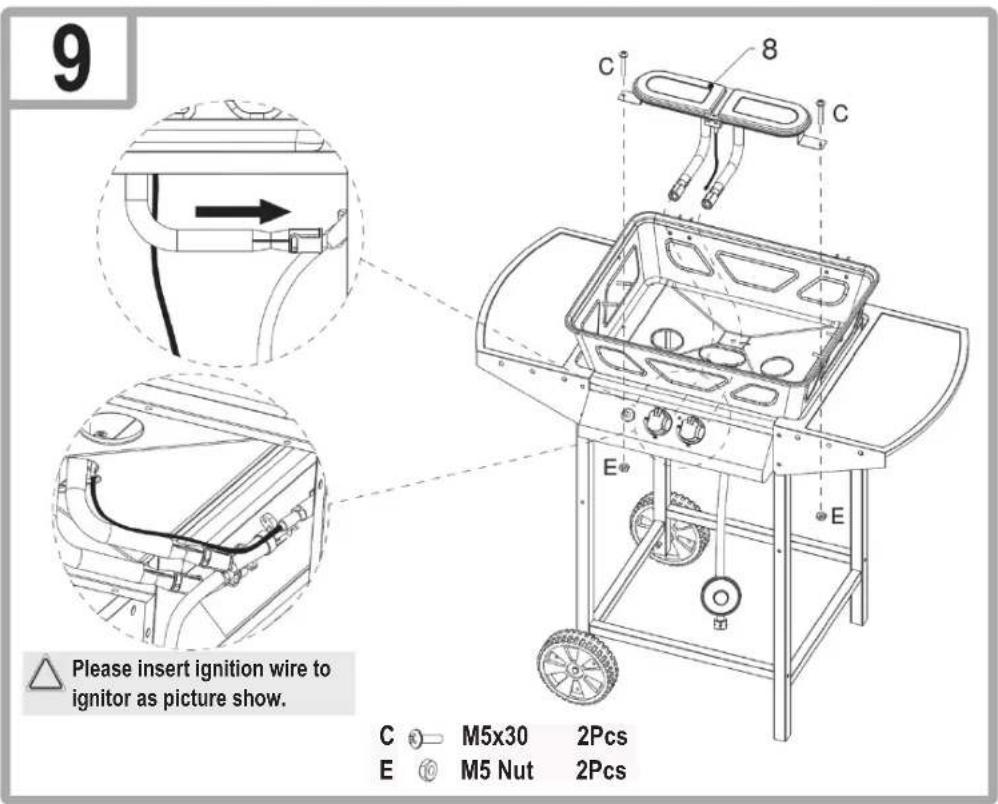
- Insects often build nests in the pipes of the burner. Before operating the burner, always check it for foreign objects. Remove foreign objects with a brush (bottle brush, pipe cleaner).
- Do not ignite the gas flame with a naked flame. To ignite, use the electrical ignition that is installed in the appliance.
- In order to protect against gas that flows out by accident, the cylinder valve on the gas cylinder should only be opened when the gas barbecue is operational. After you shut off the barbecue grill, always make sure that you shut the cylinder valve.
- Whilst operating the appliance, make sure that you maintain a safe distance from combustible and heat sensitive materials. The distance should not be less than 1 m.
- Make sure that there are no objects or parts of the building above the gas barbecue.
- During operation, the surfaces of the gas barbecue are very hot. Warn people who are standing around and keep well away from children.
- During operation, do not leave the gas barbecue unattended.
• In the case of a fault, shut the valve of the gas cylinder. - Before changing the position of the barbecue it must be switched off, the valve of the gas cylinder must be shut and the gas cylinder must be removed from the bottom part of the barbecue in order to protect the pressure regulator and the hose.
Servicing the gas barbecue
WARNING: RISK OF FIRE AND EXPLOSION
- Repairs and servicing of the gas system should only be carried out by authorised experts. Do not carry out any changes to the gas barbecue or the pressure regulator.
- Replace the pressure regulator after at least 2 years and the hose after 5 years, even if there are no visible external signs of damage. Make sure that the pressure regulator is approved for the gas that is used and is set to the correct output pressure (see Technical data). A new hose should not be longer than 1.5m .
• Together with oil, gas forms an explosive mixture. Never attempt to free stiff valves and control knobs with oil or penetrating oil.
Action when fighting fires
- Move persons who are standing around to a safe place! If possible, close the valve of the gas cylinder. Cool the gas cylinder with water. At the same time, ensure your own safety! Spontaneous and explosive re-ignition is possible.
- Only extinguish leaking, burning gas if you cannot stop gas from escaping. All extinguishers can be used.
First aid measures
- Measures after inhaling gas
- High concentrations can cause suffocation. Symptoms can include loss of mobility and consciousness. The victim does not realise the suffocation are suffocating. Low concentrations can result in dizziness, headaches, nausea and coordination problems.
- Bring the patient into the open air. Inform a doctor or the emergency services. In the event that the patient stops breathed, perform artificial respiration.
- Measures following major burns or scalding
- There is a risk of hypothermia and shock. Call the emergency services straight away!
- Extinguish any burning clothing with water straight away or smother the flames with a thick blanket.
- In the case of scalding: Remove clothing straight away.
• In the case of burns: Keep clothing on the body. - Cool with cold water for at least 15 minutes until the pain eases.
- Cover the affected area with a sterile Metalline bandage (for burns). Apply the side coated with Metalline to the wounded skin and loosely fix with a gauze bandage or a triangular cloth.
- Do not use household remedies such as ointments, powder, oils, disinfectants etc.!
- Measures following minor burns or scalding
- In the case of scalding: Remove clothing straight away.
- In the case of burns: Only remove clothing if it is not sticking.
- Cool with cold water for at least 15 minutes until the pain eases.
- In the case of small burns or scalding without any formation of a blister, allow to heal through exposure to the air. Do not cover with a plaster or bandage.
Instructions concerning transportation
WARNING: RISK OF FIRE AND EXPLOSION
- Where possible, do not transport the gas cylinder in vehicles where the storage area is not separated from the driver's cab. The driver must be aware of the possible dangers associated with the load and he must know what to do in the event of an accident or emergency.
WARNING: RISK OF FIRE AND EXPLOSION
- Transport the gas cylinder standing upright and secure the gas cylinder from falling over or sliding.
- Make sure that the valve of the gas cylinder is closed and has a good seal.
Storage notes
⚠ WARNING: RISK OF FIRE AND EXPLOSION
- If the appliance is not being used, the gas cylinder must be disconnected from the appliance.
- Keep the gas cylinder out of the reach of children.
- Keep the gas cylinder away from oxidising gases and other materials that help fires.
- The liquid gas that escapes is heavier than air and it sinks to the ground. Do not store the gas cylinder indoors under ground level (e.g. basement, shaft, underground garage etc.) or in non-ventilated areas where escaping gas could collect.
- Protect the gas cylinder from direct solar radiation and other sources of heat.
- If the temperature is less than 50°C, store the gas cylinder in a place that is well-ventilated, shady and protected against weathering.
- Store the gas cylinder so that it is standing and secured from falling over.
- Empty gas cylinders always contain a residual quantity of liquid gas. Follow the storage instructions, even for empty gas cylinders.
Intended use
This device is intended for
• for grilling (barbecues) and baking toppings of solid foods.
It is designed exclusively for this purpose and may only be used therefor.
It may only be used in the manner described in this instruction manual. The appliance may not be used for commercial purposes.
Any other use is considered not as intended and may lead to damage to property or even personal injury.
The manufacturer assumes no liability for damage resulting from use other than the intended purpose.
Technical Data
| Manufacturer | Hong Hua |
| Model code: | GG 3590 (G2082) |
| Total absorbed heat all categories of gas: | 5.50 kW (400g/h) |
| Gas category: | I_3B/P(50) |
| Gas type: | Butane, propane or mixtures thereof |
| Gas pressure: | 50 mbar |
| Gas jet: | 0.73 mm CE_0359-14 |
| Maximum hose length: | 150 cm |
| Identification number: | 0359BU1034 |
| Target countries: | AT, DE and CH |
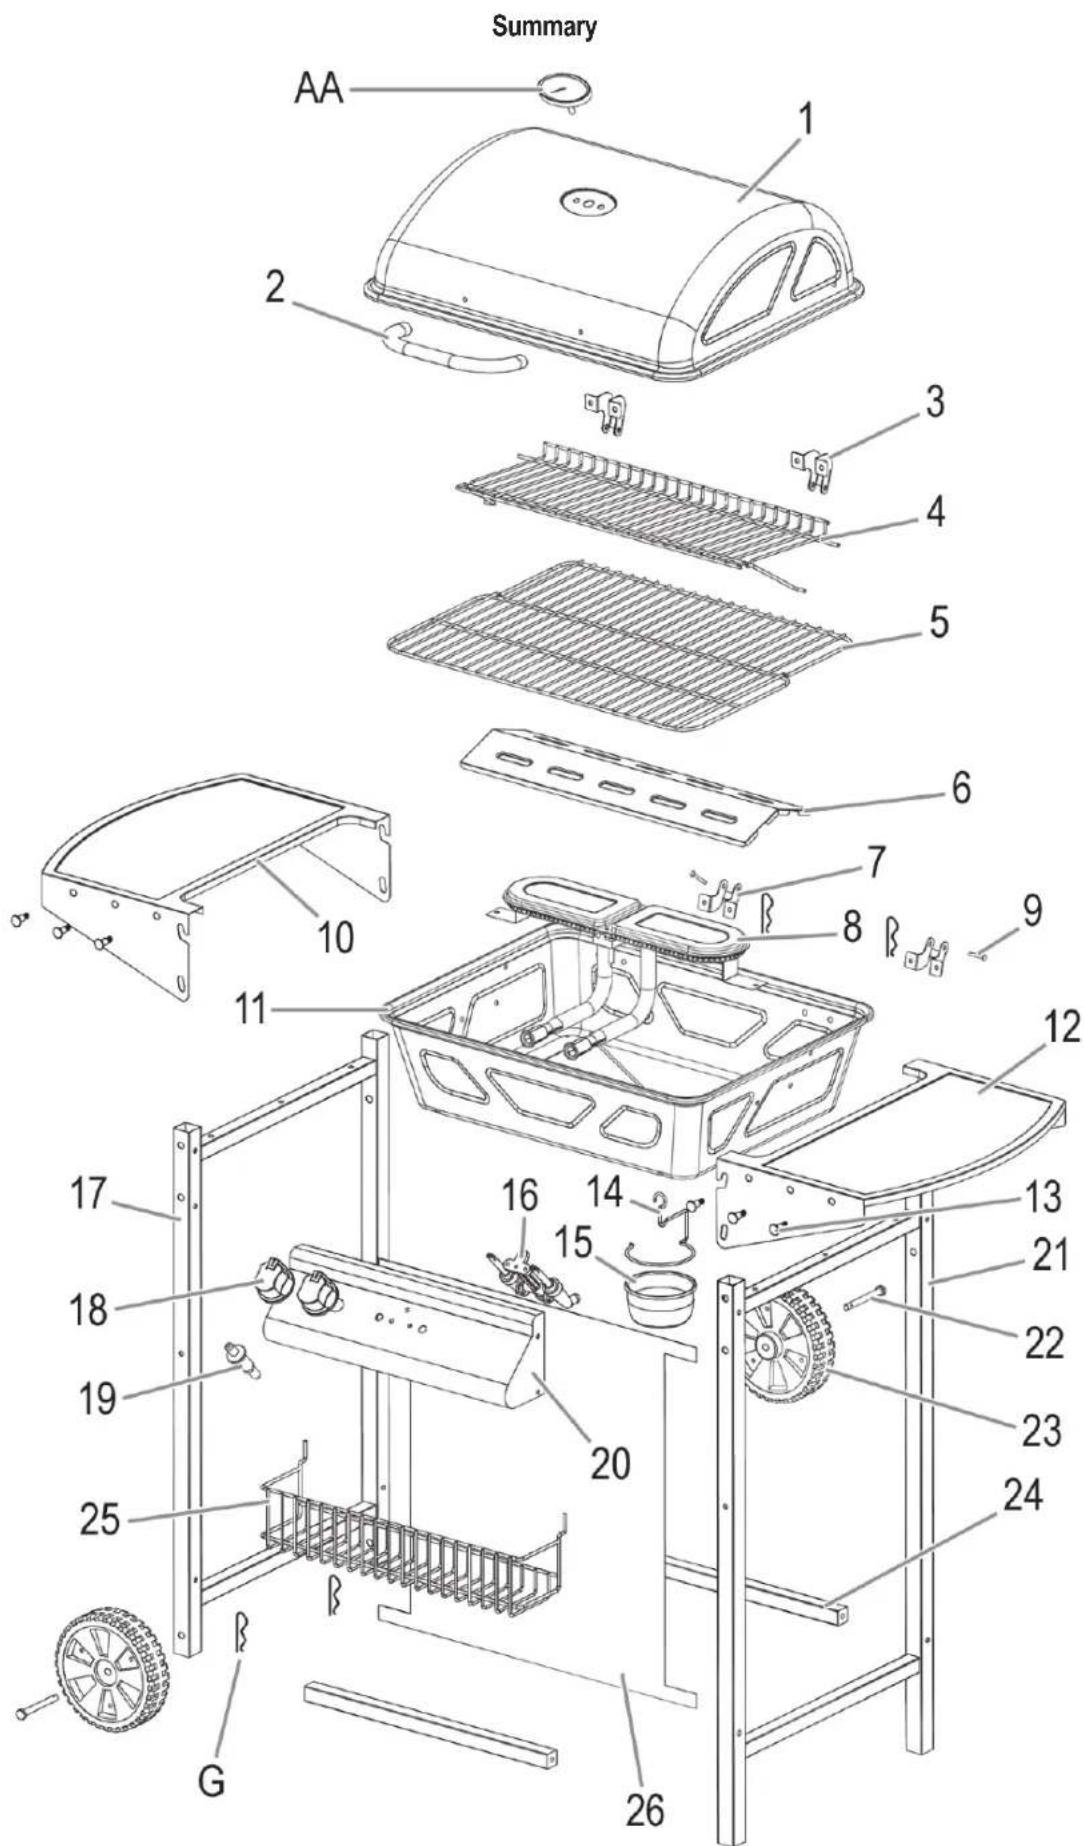
List of Pieces
| Item Description Image pc. Item Description Image pc. | |||||||
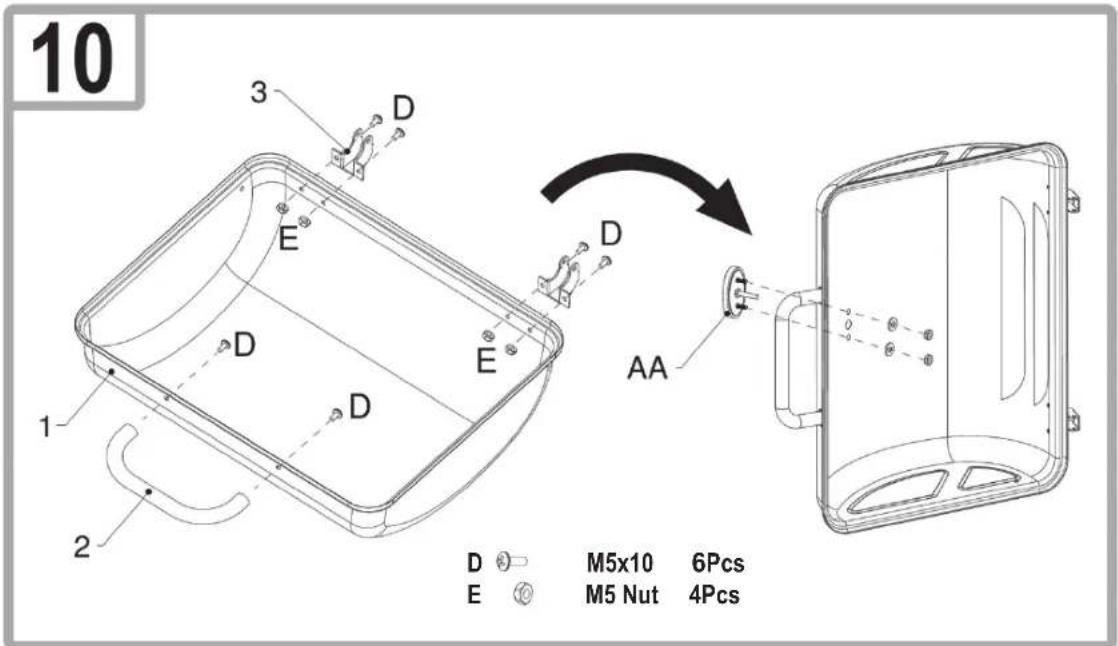
| 1 Lid |  | 1 18 | Locking bolt 2 |  | |||
| 2 Handle |  | 1 19 | Igniter 1 |  | |||
| 3 Hinge, lid |  | 2 20 | Control panel 1 |  | |||
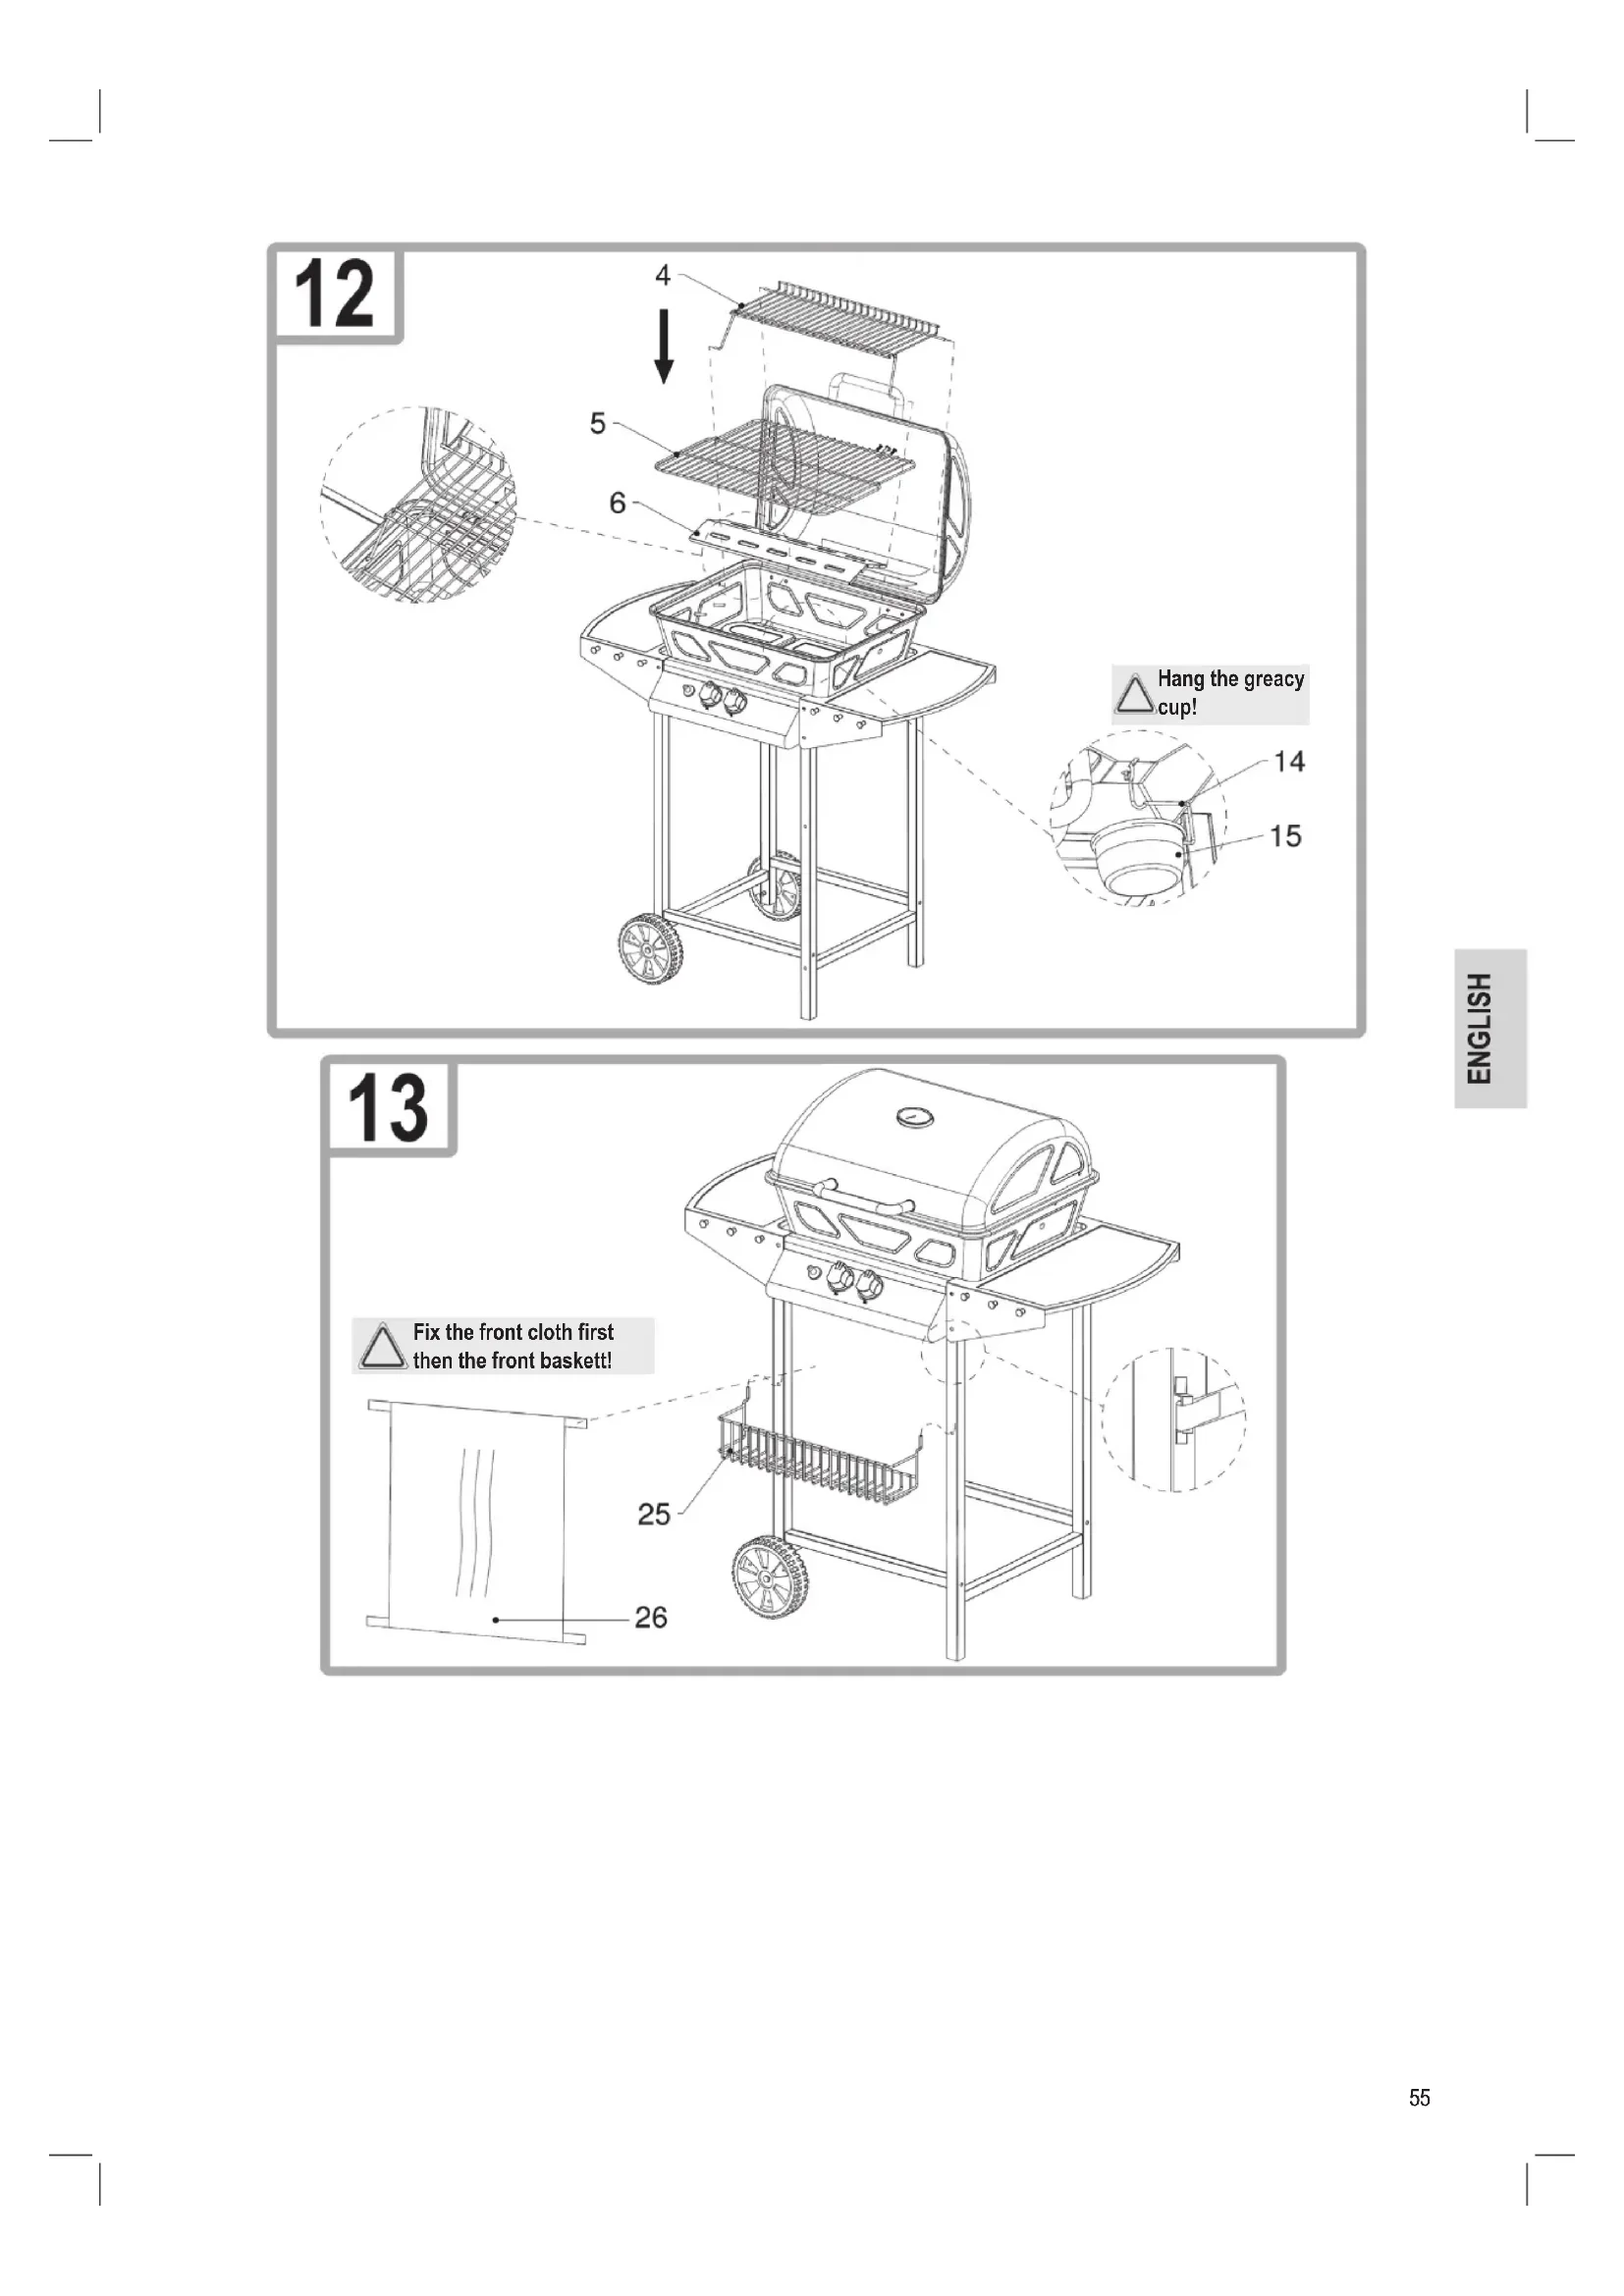
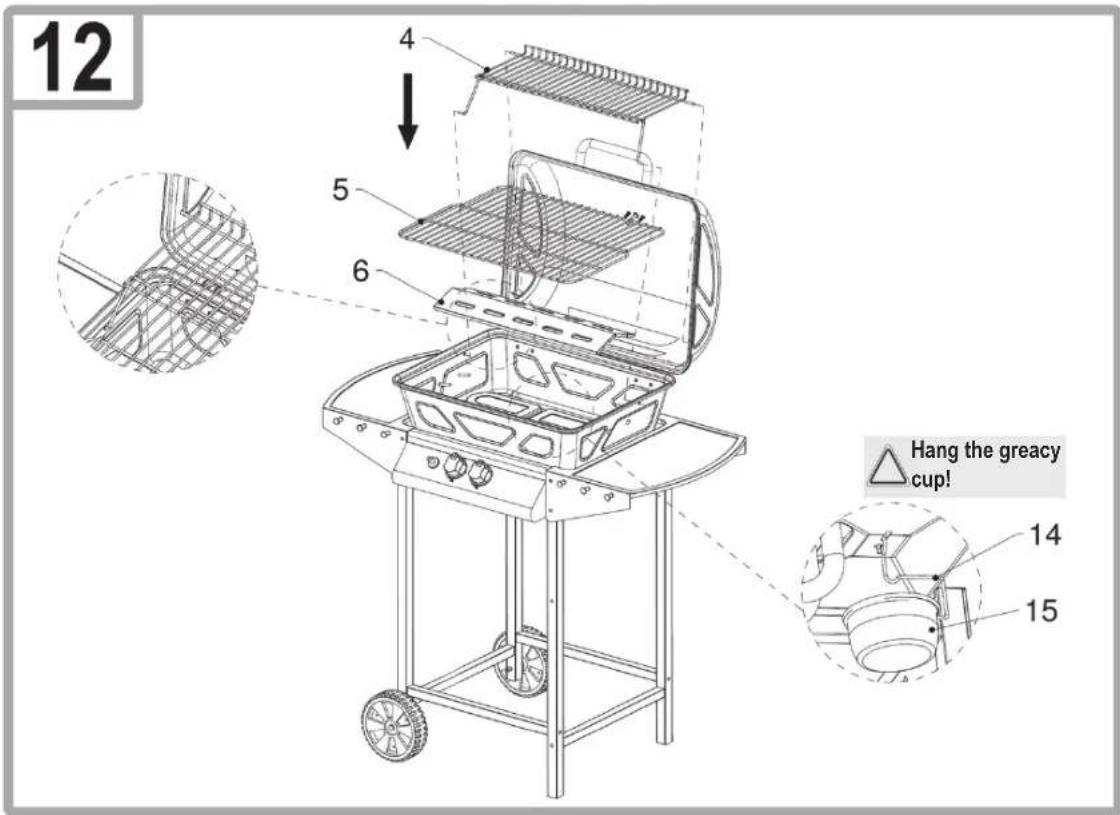
| 4 Warming rack | 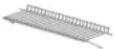 | 1 21 | Supporting leg, right 1 | 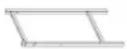 | |||
| 5 Grill rack | 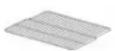 | 1 22 | Shaft 2 |  | |||
| 6 Flame cover | 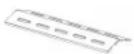 | 1 23 | 6" wheel |  2 2 | |||
| 7 Hinge, housing |  | 2 24 | Cross beam |  | |||
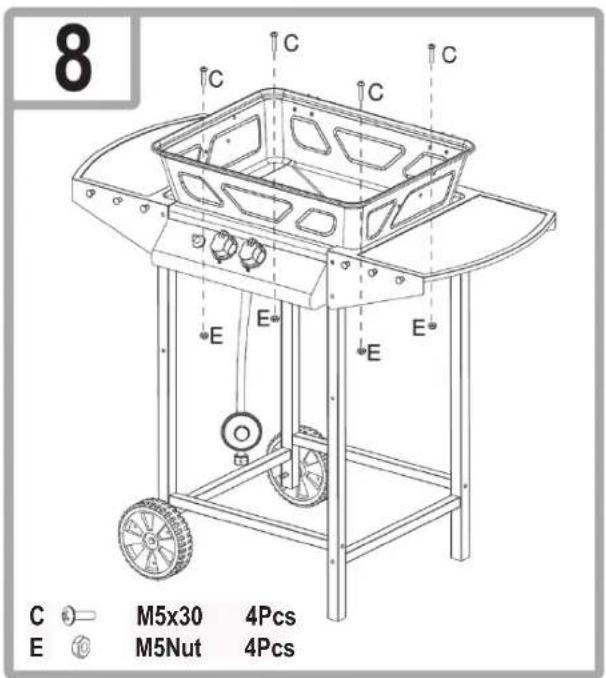
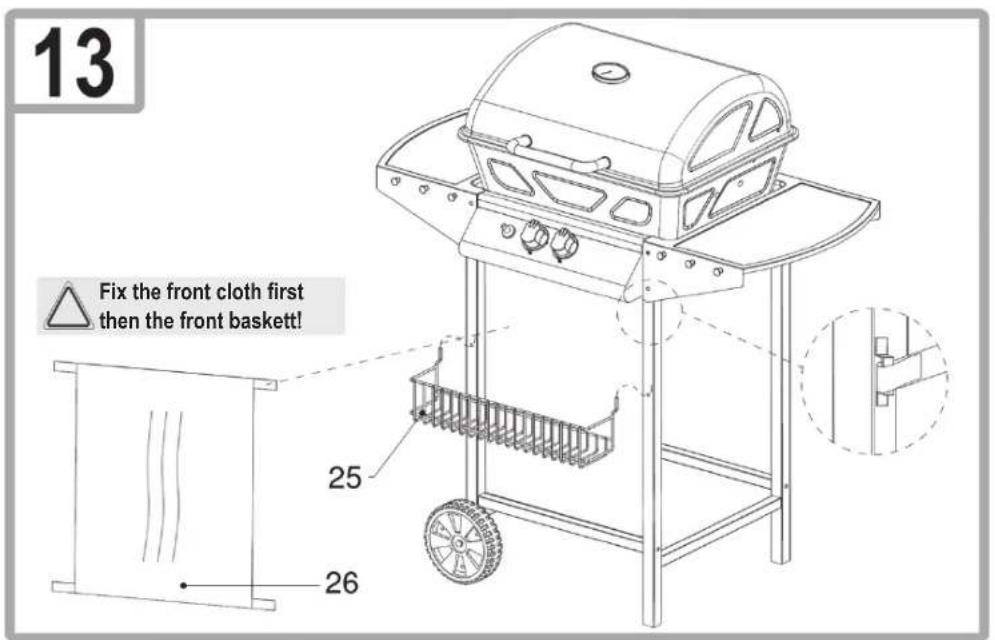
| 8 Burner |  | 1 25 | Basket |  | 1 | ||
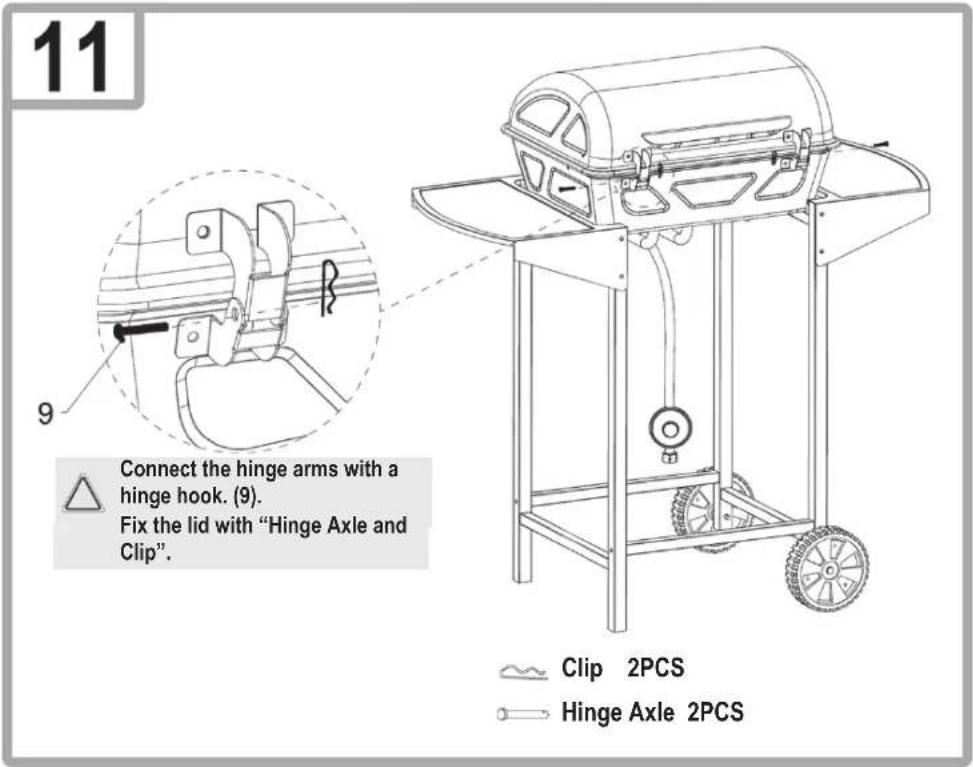
| 9 Hinge hook |  | 2 26 | Front cover |  1 1 | |||
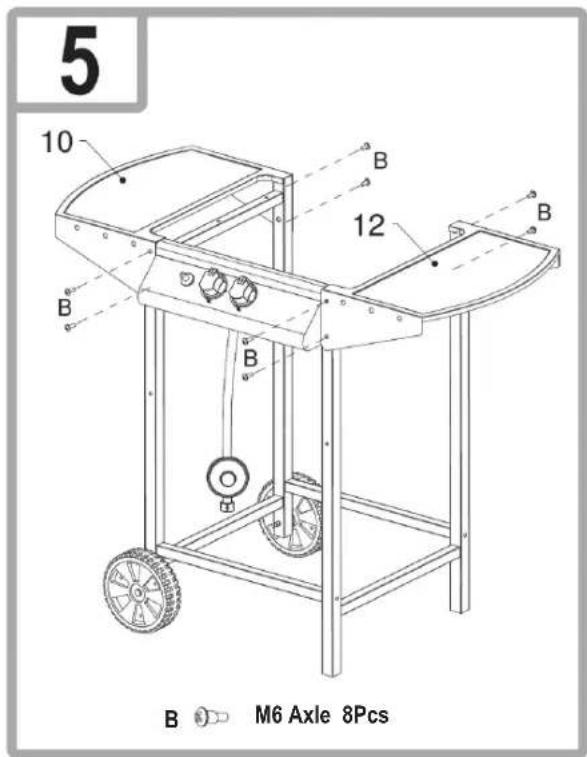
| 10 Panel, left |  | 1 | AA Thermometer |  | 1 | ||
| 11 Housing |  | 1 | A Screw M6x40 |  | 4 | ||
| 12 Panel, right |  | 1 | B Stud-bolt M6 |  | 8 | ||
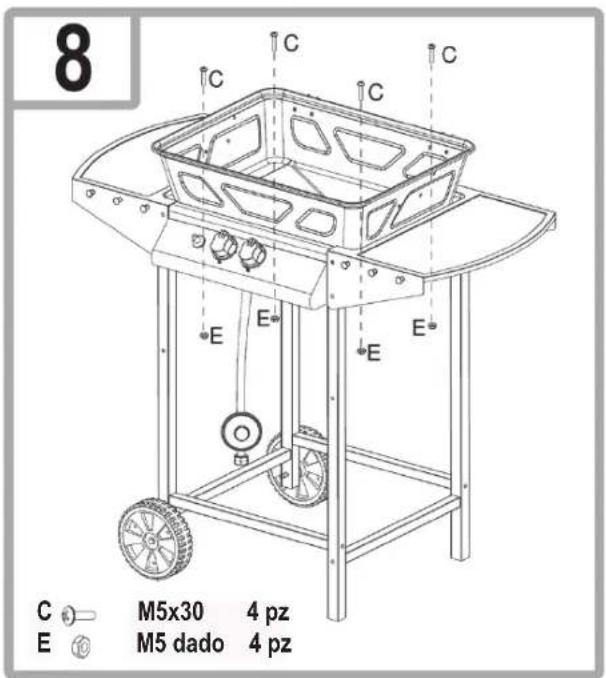
| 13 Peg |  | 6 | C Screw M5x30 |  | 10 | ||
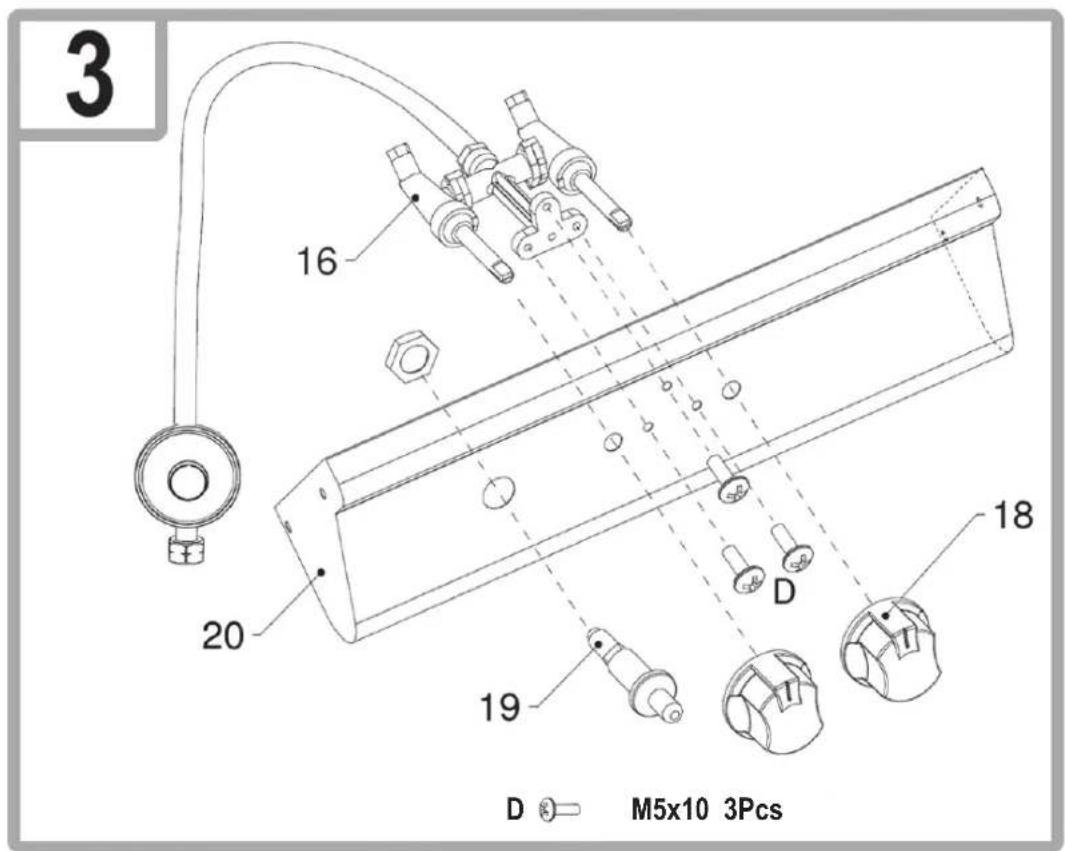
| 14 Holder |  | 1 | D Screw M5x10 |  | 13 | ||
| 15 Grease trap |  | 1 | E Nut M5 |  | 18 | ||
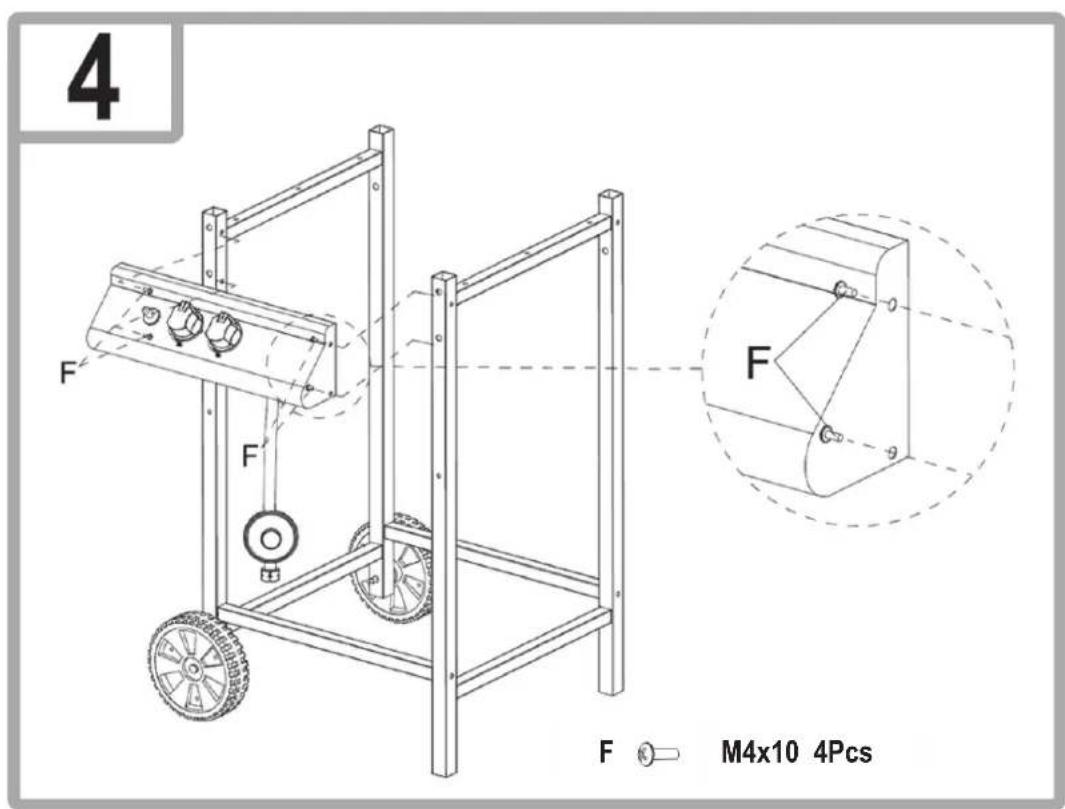
| 16 Valve |  | 1 | F Screw M4x10 |  | 4 | ||
| 17 Supporting leg, left |  | 1 | G Clip |  | 4 | ||
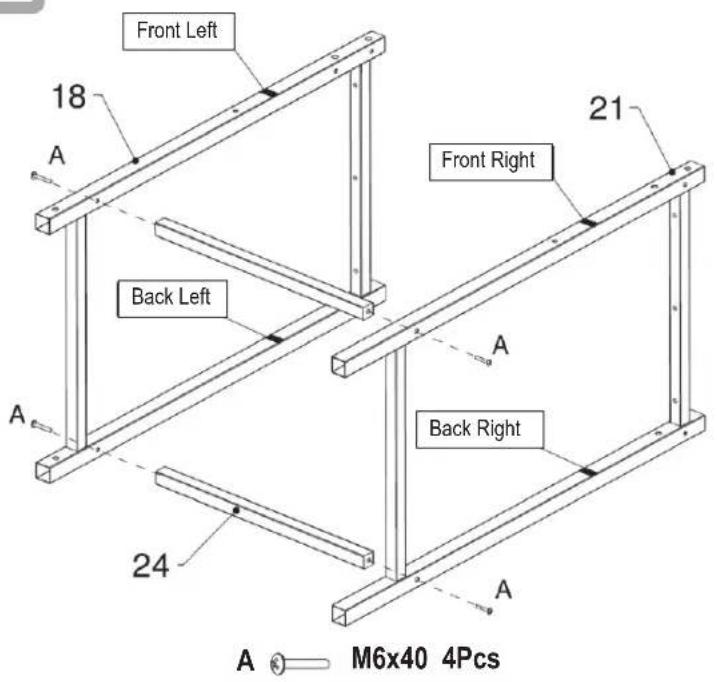
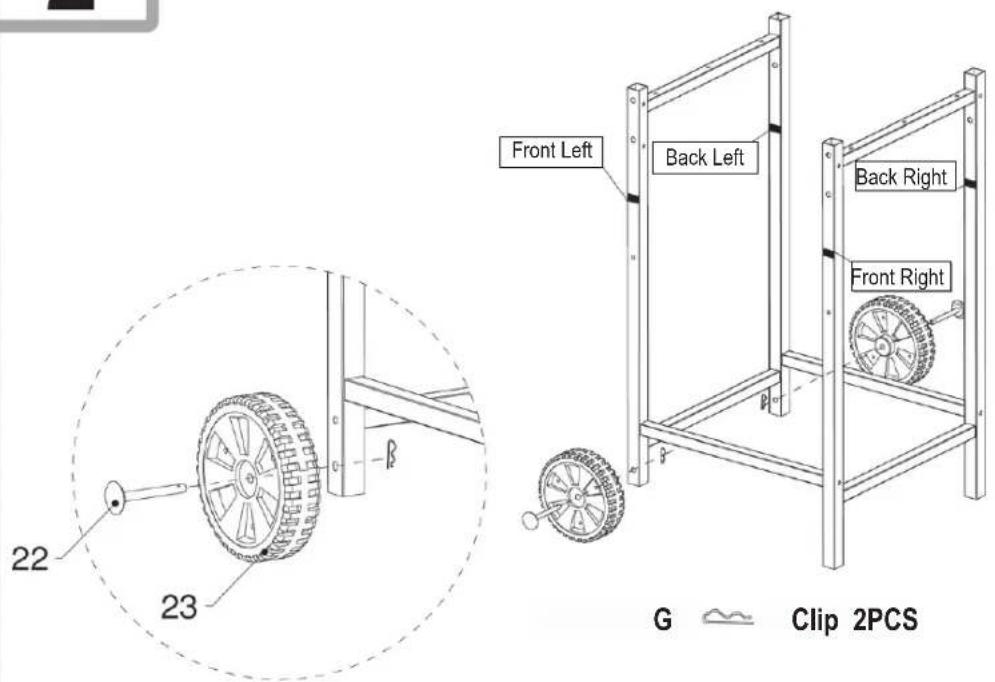
Assembling the Grill
To assemble the barbecue, you will need:
• 2 persons
- Protective gloves
• If necessary, put a blanket downbase
- SW 8 screw wrench
• PZ1 and PZ2 screw driver
- Pliers
Beforehand, remove the protective film that is attached to the surfaces.
When assembling, familiarise yourself with the list of parts and the illustrated assembly instructions:
1
2
natural_image
Line drawing of a 6-inch outdoor table cart with wheels and control knobs (no text or symbols on the device itself)
Gas Connection
General information
The barbecue can be operated with gas cylinders weighing between 5 kg and 11 kg. Low pressure butane, propane and LPG gas mixtures are approved.
Your barbecue works best with propane gas and LPG mixtures. Butane can be used, on account of the power rating of the appliance, the gas cylinder may however freeze. As a result of this, the gas pressure drops and your barbecue does not provide full power.
Use a regulator which is certified in accordance with DIN EN 12864:2001.
i NOTE:
For information concerning the correct regulator for gas cylinders, please consult your LPG dealer.
Regulator and hose
These parts are supplied with the barbecue. You can obtain spare parts from your dealer or an approved LPG supplier. Only use hoses and regulators at the pressure stated above which are approved for LPG. Normally, the service life of a regulator is 2 years. It is recommended that the regulator is replaced within 2 years of the production date.
WARNING:
- The hose that is used must correspond to statutory regulations.
- The use of unsuitable hoses and incorrect regulators is dangerous.
- Before operation, make sure that you use the correct parts.
Connecting the gas cylinder
A connection is established via a flexible hose and the correct low pressure regulator. The low pressure regulator should be fitted onto the gas cylinder.
- Remove the protective cap and the thread protector on the gas cylinder.
- Select a suitable wrench and tighten the coupling nut (attention: left thread) of the low pressure regulator on the gas cylinder hand-tight.
- Select a suitable wrench and tighten the coupling nut (attention: left thread) of the hose on the low pressure regulator hand-tight.
Connecting the appliance
Spider's webs and insects can block the burner or pipe. Before connecting, make sure that the burner and the burner ports are clean.
The gas connection is located between the two pipes of the burner.
- Select a suitable wrench and tighten the coupling nut (attention: left thread) of the hose on the barbecue.
The screw connections of the hose must be securely connected to the appliance and the low pressure regulator.
Finding areas with a bad seal
△ WARNING: Before use, check to make sure there are no areas with a bad seal.
- Never look for sections with a bad seal using a naked flame.
- Use a leak detection spray or soapy water.
Sections with a bad seal soon become apparent in soapy water. You will need approx. 50 ml (mix ratio 1:3).
- Make sure that all adjustment knobs are in the 12 o'clock position (OFF).
-
Once you have connected all components as described above, turn the gas on.
-
Spread the soapy water on the hose and all connections. If bubbles appear at a particular point, the section has a bad seal and it must be repaired before use.
- Repeat the test after the repair.
- After the test, shut the valve on the gas cylinder.
If you find a section with a bad seal that you cannot repair, refer the problem to a gas technician
Operating the Gas Barbecue
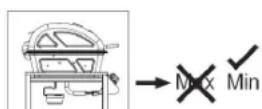
△ CAUTION: If the hood is closed, only barbecue at a low setting!

NOTE: When using for the first time
Before preparing food for the first time:
Close the lid and let the gas burn at a LOW setting for 15 minutes.
The smells from the treated surface are eliminated by the high temperature.
Installation site
The barbecue is for outdoor use only. During use, always place the barbecue and the gas cylinder on even, stable ground.
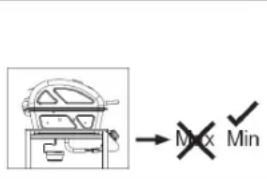
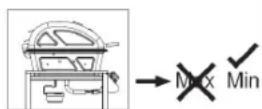
△ CATUION:
During operation, the gas cylinder should not be placed in the barbecue.
- The appliance should be protected from drafts and dripping water (e.g. rain water).
- Remove combustible materials within a radius of 3 m.
- Make sure there is clearance of at least 1 m around the rear and side walls of the appliances.
- There should not be any obstructions above the barbecue, because of the rising heat.
- In order to not obstruct the ventilation, do not cover the barbecue in any way.
If you notice the smell of gas
- Close the gas valve on the cylinder.
- Extinguish naked flames and do not use electrical devices in the vicinity.
- Ventilate the area.
- Look for areas with a bad seal (as previously described).
- If you can still smell gas, refer to your dealer or gas specialist.
Switching the gas barbecue on
- Before igniting the burner, open the hood of the barbecue.
- Turn all switches in a clockwise direction to a 12 o'clock position (OFF).
- Connect the gas hose to the gas cylinder and the barbecue.
- Shut off the gas supply on the gas cylinder.
- Is the system properly sealed? Check the connections for leaks using soapy water or leak detection spray.
△ CAUTION: Always start with the left adjusting knob/burner! The right burner is ignited by an ignition duct.
-
Press the left control knob and turn it anti-clockwise until completely open.
-
At the same time press the igniter "4 to 5 times.
- Check whether the flame is burning. Otherwise, repeat the process.
- If the burner still does not ignite, wait 5 minutes and repeat from step 6 onwards.
- If the burner does not ignite electrically, contact your gas dealer for the ignition to be repaired.
- Tum the adjustable knob in order to regulate the heat between MAX and MIN.
- Ignite the right burner by pressing the right control knob and turning it anti-clockwise. The right burner is ignited by the ignition duct located between the burners.
- In order to switch off the barbecue, close the valve on the gas cylinder.
- Following this, turn the adjustable knobs to the 12 o'clock position (OFF).
Tips for barbecue cooking
The gas barbecue is a multifunctional appliance. With the hood closed, you can use your gas barbecue like an oven.
- You don't have to only barbecue meat, fish, vegetables and fruit, you can also cook them.
- With a closed hood, the temperature should not be allowed to get too high. A low temperature results in gentle cooking of the barbecue food.
- Monitor the temperature on the thermometer and if necessary, adjust it.
- The following applies as a rule of thumb: If smoke emerges from a closed hood, the temperature is too high!
Troubleshooting
Malfunctions are often just caused due to minor problems. Before contacting our customer service, please check the table below:
| Problem Possible cause Notes / solution | ||
| The burners cannot be ignited by the ignition system. | 1. Gas cylinder is empty2. The regulator is damaged3. The burner is blocked4. The gas jets or hose is blocked5. The electrode wiring is loose or separated from the electrode or ignition6. The electrode or cable is damaged, faulty switch ignition | 1. Replace the gas cylinder2. Check or replace the regulator3. Clean the burner4. Clean the jets and the hose5. Reconnect the cable6. Replace the electrode and the cable Replace the ignition device |
| Burner does not ignite with a lit match | 1. Gas cylinder is empty2. The regulator is damaged3. The burner is blocked4. The gas jets or hose is blocked | 1. Replace the gas cylinder2. Check or replace the regulator3. Clean the burner4. Clean the jets and the hose |
| No yellow flame or back coupling (fire in the burner line – hissing or bubbling noise) | 1. Gas cylinder is too small2. Burner blocked (insect nest?)3. The gas jets or hose is blocked4. Draft | 1. Use a larger cylinder2. Clean the burner3. Clean the jets and the hose4. Set the barbecue up in a protected location |
Cleaning the Gas Barbecue
WARNING: HOT SURFACES
Before cleaning, wait until the gas barbecue has cooled down sufficiently.
⚠ WARNING: RISK OF FIRE AND EXPLOSION
- Before cleaning the gas barbecue, remove the gas cylinder.
- Do not use any flammable detergents.
CAUTION:
- Do not use a wire brush or other abrasive utensils for cleaning.
- Do not use any oven cleaners. Oven cleaner attacks painted surfaces.
- Clean the barbecue after each use!
i NOTE:
If you allow both burners to burn at full power for approx. 15 minutes without food, the residual deposits will be burn away completely.
Exterior surfaces
- Use mild detergents, caustic soda and hot water.
- Mild abrasive agents can be used for stubborn stains.
- Following this, rinse thoroughly with water.
Interior surfaces
Does the inner surface of the grill lid look as if paint may flake off? There is burnt-on grease which is flaking.
- Clean the surface thoroughly with highly concentrated, hot soap suds.
- Rinse thoroughly with water and allow the lid to dry.
Interior surface of the barbecue tray
- Remove residue with a cleaning brush.
- Using soap suds and a sponge, finish by washing the surface.
- Rinse thoroughly with water and allow the surface to dry.
Barbecue grille
- Use mild soap suds.
- Mild abrasive agents can be used for stubborn stains.
- Following this, rinse thoroughly with water.
Cleaning the burner
- Turn the adjustable knob to the 12 o'clock position (OFF).
- Disconnect the gas cylinder.
- Remove the grille.
- Clean the bumer with a soft brush or compressed air, and wipe down with a cloth.
- Clean clogged ports with a pipe brush or a rigid wire.
- Check the burner for damage (cracks or holes). In the case of damage, refer to your service team or your gas technician.
Servicing
Your gas barbecue should be serviced annually by a technician.
Storing the Gas Barbecue
- If the barbecue is clean and dry, you can protect it with a blanket.
- Store the barbecue in a frost-free, dry room.
- Shut the valve of the gas cylinder and store it out of the reach of children.
- Concerning storage, also refer to the information in the section entitled "Safety notes".
Gas cylinder
- Always handle the gas cylinder with care!
- If the appliance is not in use, shut the gas cylinder and remove the low pressure regulator.
- Close the cylinder and replace the protective cap.
- During operation, the gas cylinder should not be in the barbecue!
- Gas cylinders should stand upright outdoors and should be stored out of the reach of children.
- Do not store the cylinder in a basement, as leaking gas can collect on the floor.
- Never store the gas cylinder in places where temperatures can exceed 50^ .
- Do not place the gas cylinder in the vicinity of a naked flame or other sources of ignition.
Disposal
Packaging
The product packaging mostly consists of reusable materials. Help protect the environment! Dispose of materials in the relevant recycling containers provided.
Gas barbecue
At the end of its service life, do not dispose of the gas barbecue with the household waste! Ask your local authority or a local recycling company about the proper way to dispose of your product.
This appliance has been tested in compliance with all of the relevant EC Directives (CE), e.g. the European Directive 2009/142/EC relating to gas appliances and has been built in compliance with current safety regulations.


GARANTIEKARTE
warranty card · garantiekaart · carte de garantie · scheda di garanzia · tarjeta de garantía · cartão de garantia · garantikort · karta gwarancyjna · záruční list · kartica jamstva · carte de garanție · Гаранционна карта · záručný list · garancijski list · garanciajegy · гарантійнийформуляр · Гарантийный талон
بطاقة ضمان
GG 3590
24 Monate Garantie gemäß Garanteeerklärung · 24 months warranty according to warranty declaration · 24 maanden garantie volgens garanteeverklaring · 24 mois de garantie selon la déclaration de garantia · 24 meses de garantia de acuerdo com la declaración de garantia · 24 meses de garantia, de acordo com a declaração de garantia · 24 mäneders garanti i henhold tí garantibetingelsene · 24 miesiące gwarancji na podstawie oświadczenia gwarancyjnego · záruka 24 mésicú podle prohlásení o záruce · 24 mjesecnó jamstvo u skladu s jamstvenom deklaracijom · 24 luni garantie conform declaratiei de garantie · 24 meseça гаранция в съответствие с гаранционната декарация · 24-mesačnă záruka podla vyhlásenia o záruke · 24-mesečna garancija, skladno z garancijsko izjavo · 24 hónap garancia a garanciafeltetelekben leirtak szerint · гарантия на 24 місяці відповідно залів про гарантию · Гарантия 24 месяца согласно заявленным гарантийным правилам ·
Kaufdatum, Händlerstempel, Unterschrift - date of purchase, dealer stamp, signature - aankoopdatum, dealerstempel, handtekening - date d'achat, tampon du concessionnaire, signature - data di acquisto, timbro del rividatore, firma - fecha de compra, sello del distribuidor, firma - data de compra, carimbo do distribuidor, assinatura - kapistato, forhandlerstempel, signatur - data zakupu, pieczęć sprzdecavy, podpis - datum zakupenui, razliko predejice, podpis - datum kupovine, Zig trigova, podpis - data de achiziže, stampila fumoturulis, semnatura - Dáta na hauvukrata, Fleurvi na Pradovaca. Plancis - datum nakupu, peštaka oblastika ostrada. Dáta na hauvukrata, filgara - datum nakupu, Zig trigova, podpis - vásáris distima, lareskedő belyégozó ákávas - data pradbánion, nechatva prodazań, plídnis - Data preprobretenia, Shaanit prodazań. Podpis-

CATRONIC®
INTERNATIONAL GMBH
www.clatronic.com

- Consignes relatives au transport
- ⚠ AVERTISSEMENT : RISQUE D'INCENDIE ET D'EXPLOSION
- Safety Notes
- Non-compliance with the instructions may result in explosions and fires!
- Symbols used in these operating instructions
- WARNING:
- △ CAUTION:
- i NOTE:
- Intended purpose
- ⚠ WARNING: Note for children and persons with limited capacities
- General hazards
- Unpacking the device
- Connecting the gas system
- ⚠ WARNING: RISK OF FIRE AND EXPLOSION
- Operating the gas barbecue
- WARNING: RISK OF FIRE AND EXPLOSIONS
- Servicing the gas barbecue
- WARNING: RISK OF FIRE AND EXPLOSION
- Action when fighting fires
- First aid measures
- - Measures after inhaling gas
- - Measures following major burns or scalding
- - Measures following minor burns or scalding
- Instructions concerning transportation
- Storage notes
- Intended use
- Assembling the Grill
- Gas Connection
- General information
- Regulator and hose
- Connecting the gas cylinder
- Connecting the appliance
- Finding areas with a bad seal
- △ WARNING: Before use, check to make sure there are no areas with a bad seal.
- △ CAUTION: If the hood is closed, only barbecue at a low setting!
- NOTE: When using for the first time
- Installation site
- △ CATUION:
- If you notice the smell of gas
- Switching the gas barbecue on
- △ CAUTION: Always start with the left adjusting knob/burner! The right burner is ignited by an ignition duct.
- Tips for barbecue cooking
- Troubleshooting
- Cleaning the Gas Barbecue
- WARNING: HOT SURFACES
- CAUTION:
- - Clean the barbecue after each use!
- Exterior surfaces
- Interior surfaces
- Interior surface of the barbecue tray
- Barbecue grille
- Cleaning the burner
- Servicing
- Storing the Gas Barbecue
- Gas cylinder
- - Always handle the gas cylinder with care!
- Disposal
- Packaging
- Gas barbecue
- GARANTIEKARTE
- GG 3590
Brand : CLATRONIC
Model : GG 3590
Category : Electric grill