
PCKM 1063 - Food Processor PROFICOOK - Free user manual and instructions
Find the device manual for free PCKM 1063 PROFICOOK in PDF.
| Product type | Multifunction food processor |
| Brand | ProfiCook |
| Model | PCKM 1063 |
| Power supply | 220-240 V~, 50/60 Hz |
| Nominal power | 1000 W |
| Maximum power | 1200 W |
| Protection class | II |
| Net weight (with kneading bowl) | Approx. 2.60 kg |
| Main functions | Knead, mix, whisk, chop, slice, grate, juice citrus, blend |
| Working bowl capacity | Up to 1.5 kg of dough |
| Mixing container capacity | Up to 1750 ml |
| Speeds | Continuous adjustment + pulse mode (PULSE) |
| Max. continuous operating time | 5 minutes, then cooling for 10 minutes |
| Safety | Safety switches; sharp blades; do not put hands in the bowl |
| Care and cleaning | Motor housing: damp cloth; accessories: hand wash (not dishwasher); blades: handle with care |
| Included parts | Working bowl, lid, pusher, whisk, beater, chopping blade, slicing/shredding discs, citrus press cone, sieve, mixing container with lid, scraper |
| Compatible accessories | Use only original accessories |
| Warranty | Standard manufacturer warranty (not specified in the manual) |
Frequently Asked Questions - PCKM 1063 PROFICOOK
User questions about PCKM 1063 PROFICOOK
0 question about this device. Answer the ones you know or ask your own.
Ask a new question about this device
Download the instructions for your Food Processor in PDF format for free! Find your manual PCKM 1063 - PROFICOOK and take your electronic device back in hand. On this page are published all the documents necessary for the use of your device. PCKM 1063 by PROFICOOK.
USER MANUAL PCKM 1063 PROFICOOK
natural_image
Assorted kitchen appliances including a blender, blender with a side panel, and a food processor with a side bowl (no visible text or labels)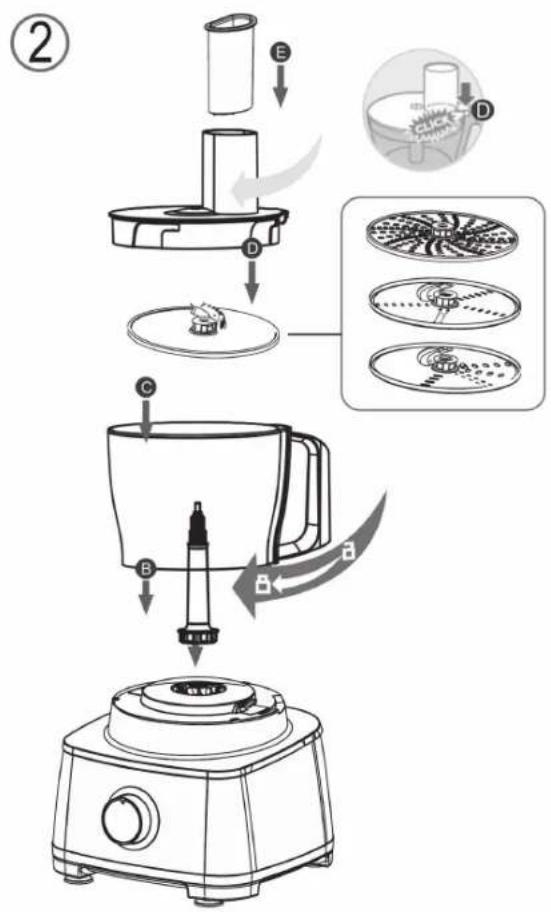
flowchart
graph TD
    A["Raw Material"] --> B["Add Paper"]
    B --> C["Add Cover"]
    C --> D["Add Dish"]
    D --> E["Add Bottle"]
    E --> F["Final Cooker"]

    subgraph Process Steps
        G["Step 1: Raw Material mixed"]
        H["Step 2: Add Paper"]
        I["Step 3: Add Cover"]
        J["Step 4: Add Dish"]
    end

    G --> K["Product"]
    H --> L["Product"]
    I --> M["Product"]
    J --> N["Product"]
    K --> O["Final Cooker"]
natural_image
Line drawing of a blender with handle and control knob, showing a right-hand rule labeled B (no text or symbols on the device itself)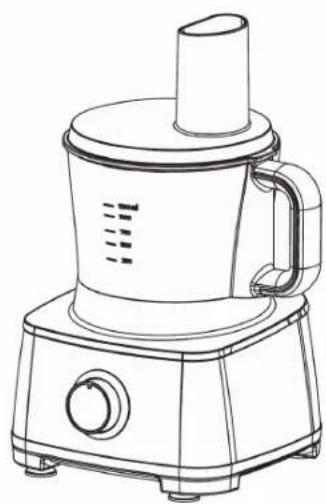
natural_image
Line drawing of a blender with handle and side panel (no text or symbols)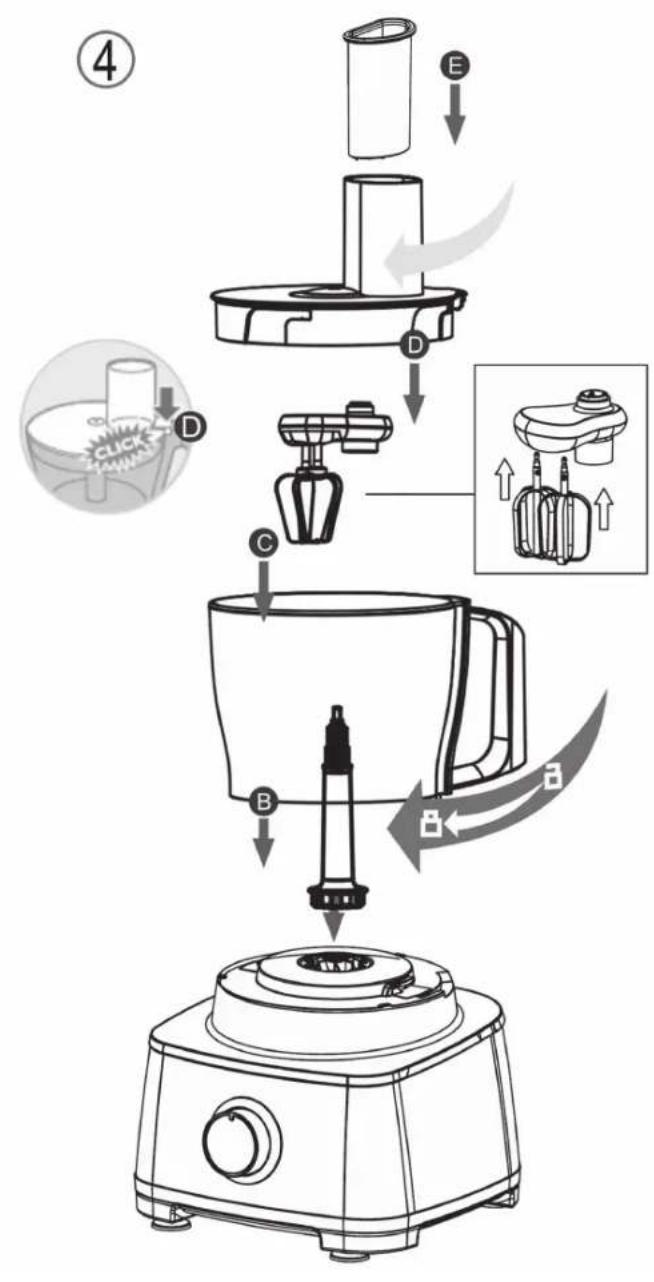
flowchart
graph TD
    A["Raw Material Input"] --> B["Add Box"]
    B --> C["Add Box with Paper"]
    C --> D["Add Box with Paper"]
    D --> E["Add Box with Paper"]
    E --> F["Add Box with Paper"]
    F --> G["Add Box with Paper"]
    G --> H["Add Box with Paper"]
    H --> I["Add Box with Paper"]
    I --> J["Add Box with Paper"]
    J --> K["Add Box with Paper"]
    K --> L["Add Box with Paper"]
    L --> M["Add Box with Paper"]
    M --> N["Add Box with Paper"]
    N --> O["Add Box with Paper"]
    O --> P["Add Box with Paper"]
    P --> Q["Add Box with Paper"]
    Q --> R["Add Box with Paper"]
    R --> S["Add Box with Paper"]
    S --> T["Add Box with Paper"]
    T --> U["Add Box with Paper"]
    U --> V["Add Box with Paper"]
    V --> W["Add Box with Paper"]
    W --> X["Add Box with Paper"]
    X --> Y["Add Box with Paper"]
    Y --> Z["Add Box with Paper"]

natural_image
Line drawing of a blender with a handle and control knob, showing a right-hand rule (no text or symbols)
natural_image
Line drawing of a blender with handle and control knob (no text or symbols)Bedienungsanleitung
Stop bediening....18
Reinigen....18
Motorbehuizing....18
⚠ WAARSCHUWING: Risico op letsel!
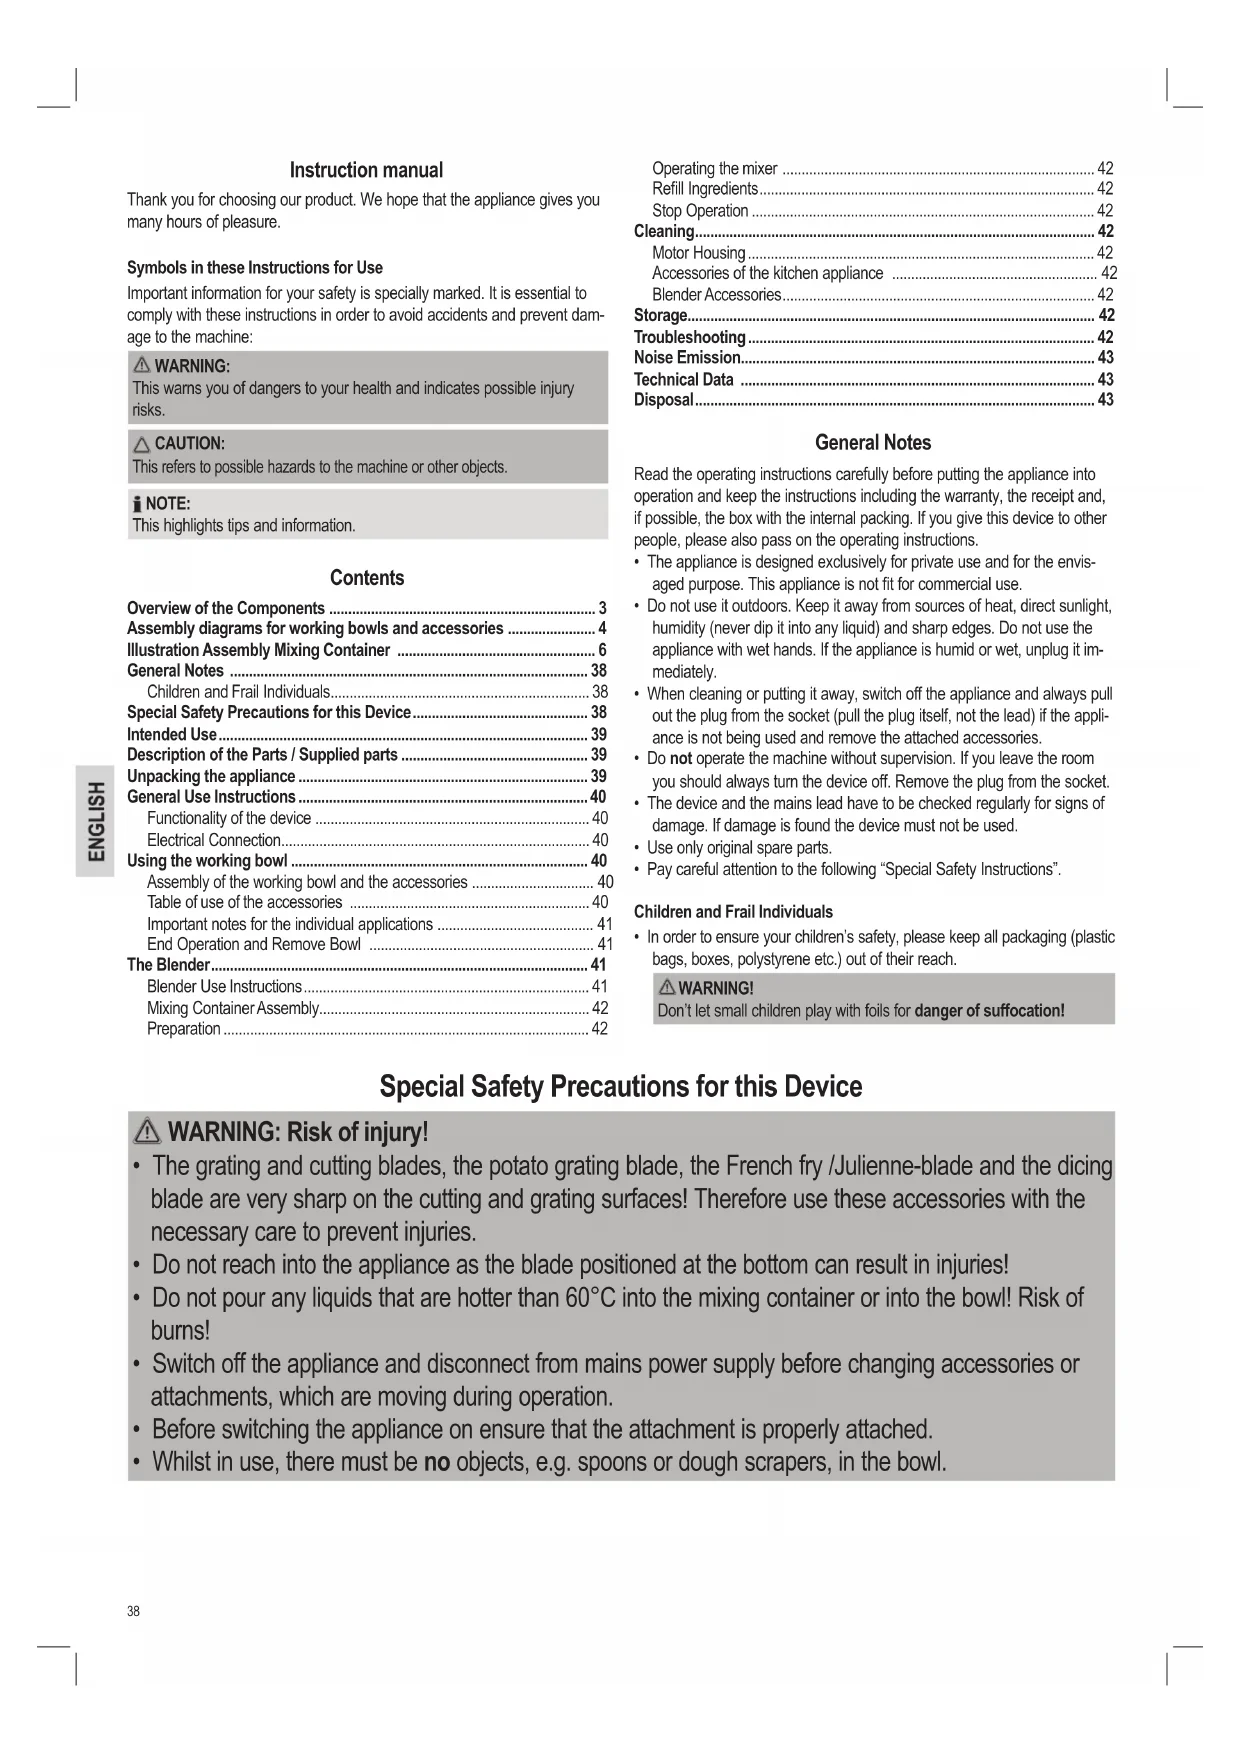
Thank you for choosing our product. We hope that the appliance gives you many hours of pleasure.
Symbols in these Instructions for Use
Important information for your safety is specially marked. It is essential to comply with these instructions in order to avoid accidents and prevent damage to the machine:

WARNING:
This warns you of dangers to your health and indicates possible injury risks.

CAUTION:
This refers to possible hazards to the machine or other objects.

NOTE:
This highlights tips and information.
Contents
Overview of the Components 3
Assembly diagrams for working bowls and accessories .... 4
Illustration Assembly Mixing Container 6
General Notes 38
Children and Frail Individuals....38
Special Safety Precautions for this Device 38
Intended Use....39
Description of the Parts / Supplied parts 39
Unpacking the appliance 39
General Use Instructions 40
Functionality of the device 40
Electrical Connection....40
Using the working bowl 40
Assembly of the working bowl and the accessories 40
Table of use of the accessories 40
Important notes for the individual applications 41
End Operation and Remove Bowl 41
The Blender 41
Blender Use Instructions....41
Mixing Container Assembly 42
Preparation 42
Operating the mixer 42
Refill Ingredients....42
Stop Operation 42
Cleaning....42
Motor Housing 42
Accessories of the kitchen appliance 42
Blender Accessories....42
Storage....42
Troubleshooting 42
Noise Emission....43
Technical Data 43
Disposal 43
General Notes
Read the operating instructions carefully before putting the appliance into operation and keep the instructions including the warranty, the receipt and, if possible, the box with the internal packing. If you give this device to other people, please also pass on the operating instructions.
- The appliance is designed exclusively for private use and for the envisaged purpose. This appliance is not fit for commercial use.
- Do not use it outdoors. Keep it away from sources of heat, direct sunlight, humidity (never dip it into any liquid) and sharp edges. Do not use the appliance with wet hands. If the appliance is humid or wet, unplug it immediately.
- When cleaning or putting it away, switch off the appliance and always pull out the plug from the socket (pull the plug itself, not the lead) if the appliance is not being used and remove the attached accessories.
- Do not operate the machine without supervision. If you leave the room you should always turn the device off. Remove the plug from the socket.
- The device and the mains lead have to be checked regularly for signs of damage. If damage is found the device must not be used.
- Use only original spare parts.
- Pay careful attention to the following "Special Safety Instructions".
Children and Frail Individuals
- In order to ensure your children's safety, please keep all packaging (plastic bags, boxes, polystyrene etc.) out of their reach.

WARNING!
Don't let small children play with foils for danger of suffocation!
Special Safety Precautions for this Device

WARNING: Risk of injury!
- The grating and cutting blades, the potato grating blade, the French fry /Julienne-blade and the dicing blade are very sharp on the cutting and grating surfaces! Therefore use these accessories with the necessary care to prevent injuries.
- Do not reach into the appliance as the blade positioned at the bottom can result in injuries!
- Do not pour any liquids that are hotter than 60^ into the mixing container or into the bowl! Risk of burns!
- Switch off the appliance and disconnect from mains power supply before changing accessories or attachments, which are moving during operation.
- Before switching the appliance on ensure that the attachment is properly attached.
- Whilst in use, there must be no objects, e.g. spoons or dough scrapers, in the bowl.
WARNING: Risk of injury!
- When pushing down the food, always use the supplied pusher and not your fingers, a fork or other objects in order to prevent injuries or hazards.
- Do not repair the device by yourself. Please contact authorized personnel. In order to avoid hazards, a damaged mains cable must be replaced with an equivalent cable by the manufacturer, our customer service or any other qualified specialist.
• This appliance shall not be used by children. - Keep the appliance and its cord out of reach of children.
• Children shall not play with the appliance. - Appliances can be used by persons with reduced physical, sensory or mental capabilities or lack of experience and knowledge if they have been given supervision or instruction concerning use of the appliance in a safe way and if they understand the hazards involved.
CAUTION:
- Do not immerse the device into water for cleaning. Please follow the instructions as stipulated in the chapter "Cleaning".
- Do not fill the vessels with any hard food such as coffee beans, nutmeg or large pieces of cooking chocolate! The knives may be damaged by doing so!
- The device is equipped with safety switches. Do not operate the appliance if there is a fault or if the safety switches have been tampered with!
- Place the device on a flat, level and sturdy surface.
- Do not operate the appliance without any content.
- Only process foodstuffs with this device.
- Never turn off the appliance by turning the blender jug or the bowl or the lid of the bowl. Always use the knob or one of the buttons when turning off the appliance.
- Do not move the appliance during operation; always turn it off first and disconnect from mains power supply. Always carry the appliance with both hands!
Intended Use
This appliance is designed as a
- kneading / mixing machine for preparing dough, crèmes, cream, whipped egg white;
- multi-chopper for the chopping of easy to cut food;
- citrus press for extracting the juice from citrus fruit;
- blender to puree, whip or mix.
It is designed solely for these purposes and may only be used for them.
It may only be used in the manner described in this instruction manual.
The appliance may not be used for commercial purposes.
Any other use is considered not as intended and may lead to damage to property or even personal injury.
The manufacturer assumes no liability for damage resulting from use other than the intended purpose.
Description of the Parts / Supplied parts
Overview controls on page 3:
1 Pusher
2 Lid of the working bowl with feed shaft
3 Cone for kneading / mixing attachment or guillotine knife
4 Working bowl
5 Guide pin
6 Drive shaft
7 Control panel
8 Motor housing
9 Whisk attachment with whisks
10 Dicing blade
11 French fry /Julienne blade
12 Potato grating blade
13 Fine grating / cutting blade
14 Coarse grating / cutting blade
15 Citrus press cone
16 Filter sieve
17 Blender jug cap
18 Blender jug lid with filler hole
19 Blender jug
Not shown: Dough scraper
Unpacking the appliance
⚠ WARNING: Risk of injury!
Some parts of the accessory are very sharp!
- Remove the packaging of the appliance.
-
Remove all packaging material such as plastic film, filler material, cable ties and box packaging.
-
Check that all parts are in the box.
i NOTE:
Dust or production residues may still be found on the appliance. We recommend that you clean the appliance as described under "Cleaning".
General Use Instructions
Functionality of the device
- The appliance is equipped with safety switches. The appliance can only be operated if you observe the following:
- When fitting onto the motor housing, the working bowl or the blender jug with the knife block must audibly click into place.
- When using the working bowl, either the lid or the filter sieve must audibly click into place onto the bowl.
- You can variably adjust the speed with the control knob. Always start slowly with a low speed. Slowly increase the speed.
- PULSE = Pulse mode: Hold the control knob in this position to run the appliance at the maximum speed setting.
- 0 is the off position.
CAUTION:
• Always set the control knob to 0 before plugging in.
- Do not use the appliance longer than 5 minutes continuously. Let it first cool down for 10 minutes.
- Disconnect the plug from the socket after use.
Using the working bowl
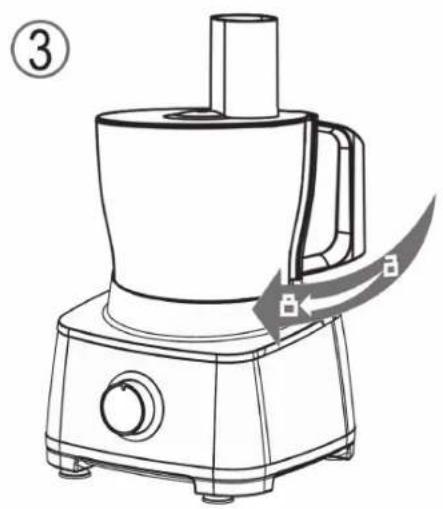
Assembly of the working bowl and the accessories
Please refer to the figures 1 to 5 on pages 4 and 5 for this purpose.
WARNING:
The grating and cutting blades, the potato grating blade, the French fry / Julienne-blade and the dicing blade are very sharp on the cutting and grating surfaces! Therefore use these accessories with the necessary care to prevent injuries.
- Place the guide pin onto the drive shaft of the motor part.
i NOTE:
On fig. 3: The bowl has a mark at the bottom. The symbols 📋 and 🏠 can be found on the motor.
- Align the bowl marking with the symbol. Turn the bowl a short distance clockwise. It latches into place.
- Select an attachment. Place it onto the guide pin.
- Close the working bowl with the lid. Tighten it by turning it clockwise until it audibly clicks into the lock mechanism of the handle.
Using the appliance as a citrus press
Assemble the working bowl as described above.
- Place the filter sieve onto the guide pin. Turn it clockwise until it audibly clicks into the lock mechanism of the handle.
- Place the citrus press cone onto the guide pin.
Electrical Connection
Ensure that your mains power corresponds with the specifications on the type label.
Table of use of the accessories
| Product / Type of preparation Quantity Tool Maximum operating time | ||||
| Heavy dough (e.g. yeast dough) | Max. 1.0 kg Kneading / Stirring tool Point 1 2 Minutes | |||
| Mixing dough (Biscuit dough or waffle dough) | Max. 1.5 kg (1 Liter) | Kneading / Stirring tool Point 1 - 2 2 Minutes | ||
| Whipped egg white | Minutes 2 egg whites Max. 8 egg whites | Kneading / stirring tool Point 3 - MAX | 4 Minutes | |
| Scrambled eggs | Min. 2 eggs Max. 7 eggs | Kneading / stirring tool | Point 1 – MAX | 1 Minutes |
| Cream | Min. 200 ml Max. 800 ml | Kneading / stirring tool | Point 1 Point 2 - 3 | 2 Minutes 4 Minutes |
| Whipped egg white | Min. 2 egg white Max. 8 egg white | Egg whisk | Point 3 – MAX | 4 Minutes |
| Cream | Min. 200 ml Max. 800 ml | Egg whisk | Point 3 – MAX | 1 Minutes 4 Minutes |
| Milk foam (3.5% fat content) | Min. 100 ml Max. 250 ml | Egg whisk | Point 2 – MAX Point 3 - MAX | 30 seconds 2 Minutes |
| Dressing, Pudding, pancake batter | Min. 125 ml Max. 750 ml | Egg whisk | Point 1 – 2 Point 1 | 1 Minutes 30 Seconds |
| Liquids, shakes | Min. 100 ml Max. 750 ml | Egg whisk | Point 1 | 30 Seconds |
| Chopping fruit, veggies, herbs | Min. 200g Max. 700g | Dicing blade | MAX 30 Seconds | |
| Puree vegetables | Max. 700g | Dicing blade | Point 2 – 3 | 1 Minutes |
| Chopping nuts | Min. 100g Max. 700g | Dicing blade | MAX | 1 Minutes |
| Grating cooking chocolate | Min. 100g Max. 500g | Dicing blade | MAX 30 Seconds | |
| Dicing meat | Min. 200g Max. 500g | Dicing blade | MAX 30 Seconds | |
| Product / Type of preparation Quantity Tool Maximum operating time |  | ||||
| Crushing ice cubes | Min. 200gMax. 500g | Dicing blade MAX 20 Seconds | |||
| Shredding cucumbers, carrots Max. 1.2 | Liter Cutting blade Point 1 5 Minutes | ||||
| Grating carrots, radish, cheese Max. 1.2 | Liter Grating blade Point 1 5 Minutes | ||||
| Grating potatoes, hard cheese Max. 1.2 | Liter Potato grating blade Point 1 5 Minutes | ||||
| Cutting potatoes, kohlrabi, carrots | Max. 1.2 Liter | French fry / Julienne blade | Point 1 5 Minutes | ||
| Pressing citrus fruit | Max. 1.2 Liter | Filter sieve and press cone | Point 1 5 Minutes | ||
Important notes for the individual applications

CAUTION:
- Do not chop up hard food such as coffee beans, nutmeg, turmeric or large pieces of cooking chocolate! The blade could be damaged as a result!
- Do not exceed the quantities and operating times listed in the table.
- Always fit the kneading / stirring attachment or the dicing blade into the bowl before you add the ingredients. Press the attachment to the bottom of the bowl.
- If you are kneading heavy dough, do not add all the ingredients into the working bowl all at once. Only start the kneading process with flower, sugar, and eggs. Slowly add liquids through the feed shaft during the kneading process.
• First, cut the food that you want to chop into small pieces.
- If ingredients are stuck to the kneading/ stirring tool or the dicing blade or if they settle on the inside wall of the bowl, then proceed as follows:
-
Tum off the appliance. Wait for the attachment to stop running.
-
Remove the lid from the bowl.
-
Use the dough scraper to remove the ingredients from the attachment or from the inside wall of the bowl.
- If you whip the egg whites, ensure that the bowl and the whisk are dry and completely free of grease. The egg white should be at room temperature.
- To grate chocolate, only use the dicing blade, not a grating blade. The chocolate must be well chilled.
- When you cut up hard cheese or chocolate, do not let the appliance run too long. These ingredients can melt through the warming of the appliance and may become lumpy.
- When chopping and grating, fill the ingredients into the feed shaft. Use the pusher to push the food down into the filler hole. Do not apply too much pressure to the pusher.
- If you use the appliance as a citrus press, please observe the following:
- The press cone will start to turn as soon as you turn on the appliance.
- Only work at the lowest speed setting.
- Cut the citrus fruits in half. Press half of the fruit onto the press cone.
- Interrupt the process from time to time to remove the pulp from the filter sieve.
- Turn off the appliance before you remove the bowl with the filter sieve and the press cone.
- Chill the citrus juices for no longer than one day.
- Never store the citrus juice in a metal container. The acid of the juice will corrode the metal surface. Metal ions will form that spoil the taste of the juice.
End Operation and Remove Bowl
- Turn the appliance off. Wait until the attachment stops running.
- Disconnect the mains plug.
- Tum the lid or the filter sieve anticlockwise from the lock to open the bowl.
- Remove the attachment.
- Twist the working bowl out of the lock by turning anticlockwise. Lift the bowl upwards away from the motor housing. Watch out for the guide pin.
- Use the dough scraper to remove the contents of the bowl.
- Clean all the parts used as described under "Cleaning".
The Blender
Blender Use Instructions

WARNING: The knife in the blender is sharp!
- Never reach with your hands into the assembled mixing container!
- There is a risk of injury when cleaning and emptying the mixer jug! Handle the blender knife with great care!
- Do not pour liquid ingredients hotter than 60°C into the mixing container!

CAUTION:
- Do not place hard ingredients such as nuts or coffee beans in the mixing container.
- The knife in the mixing container is not suitable for crushing ice cubes only.
i RECOMMENDATION:
- When preparing drinks with crushed ice only add the ice cubes during mixing. The ice cubes will be crushed during mixing.
- Do not use the blender without ingredients!
- Do not exceed the maximum capacity (1750 ml) as indicated on the mixing container!
- If you are using lightly foaming liquids (e.g. milk), fill a pour it into the blender jug to a maximum of 900 ml.
- Only turn on the mixer with the lid and the fitted cap. Secure the lid by turning it a short distance clockwise.
- Do not remove the lid during operation! Wait until the blade comes to a stop before you open the lid.
- Should you not be satisfied with the mixing results, proceed as follows:
- Turn off the appliance.
- Remove the lid from the blender jug.
- Loosen any stuck-on ingredients with the dough scraper. Stir the ingredients with the dough scraper. Maintain a distance of at least approx. 2 cm to the blade while doing so.
- Remove some of the contents. Process smaller quantities or add some liquid.
Mixing Container Assembly
For this, please also refer to figures 6 and 7 on page 6.
i NOTE:
On fig. 6: The mixer jug has a mark at the bottom. The symbols 📋 and
can be found on the motor part.
- Align the mixer jug marking with the symbol.
- Tum the mixer jug a short distance clockwise. It latches into place.
Preparation
- Cut all ingredients in small pieces.
- Fill the ingredients into the mixing container. Observe the maximum capacity.
- Fit the lid onto the blender jug.
- Close the lid with the stopper (17).
Operating the mixer
Any speed can be selected with the control knob.
If the jug is very full or the liquid foams, select a lower speed.
Refill Ingredients
- Switch the appliance off. Wait until the blade comes to a stop.
- Fill in ingredients or spices through the stopper opening.
- Close lid and stopper opening again.
- Continue operation.
Stop Operation
- Switch the appliance off. Wait until the blade comes to a stop.
- Disconnect from mains power supply.
- Turn the blender jug anticlockwise from the motor housing.
- Remove the lid before pouring out the contents.
- Clean all used parts as described under "Cleaning".
IMPORTANT NOTE:
Do not store citrus juices or acidic foodstuffs in metal containers.
Cleaning

WARNING:
• Always disconnect the mains plug before you remove the accessories and clean the appliance!
- Do not immerse the motor part in water for cleaning in any case. This may lead to electric shock or fire.
- Some parts of the accessories are very sharp. There is risk of injury!

CAUTION:
- Do not use a wire brush or other abrasive utensils for cleaning.
- Do not use aggressive or abrasive cleaning agents.
Motor Housing
- Clean the housing only with a damp cloth and a squirt of washing-up liquid. Dry with a cloth.
Accessories of the kitchen appliance

WARNING: Risk of injury!
Some parts of the accessory are very sharp!

CAUTION:
- The attachments are not suitable for dishwasher. Heat and aggressive cleaning agents may warp or discolour the attachments.
-
Do not rinse the whisk attachment in a bowl of hot water or under running water. If water penetrates inside the attachment, it cannot be removed.
-
You may clean all other components that have come in contact with food in a bowl of hot water.
- Rinse with clean water and dry thoroughly.
- The two whisks can simply be pulled off from the attachment. Fit them back into the attachment after cleaning and drying. Check that the whisk is secure.
Blender Accessories
Pre-Cleaning
Fill the mixing container half with water and run the appliance for approx. 10 seconds. Dispose of the liquid.
General cleaning
- Remove the mixing container for thorough cleaning.

WARNING: Risk of injury!
Knife and knife assembly are sharp.
- You can clean the blender jug and the lid with cap in a bowl of hot water. Afterwards, rinse with clean water and dry the parts off.
Storage
- Clean the appliance as instructed. Ensue that all accessories are completely dry.
- We recommend that you keep the appliance in the original packaging if it will not be used for long periods.
- Always store the appliance out of the reach of children in a dry, well ventilated place.
Troubleshooting
The appliance does not function
Possible cause:
The appliance has no power supply.
Remedy:
- Check the socket with another appliance.
- Plug in the mains plug correctly.
- Check the main circuit breaker.
Possible cause:
The appliance is faulty.
Remedy:
- Contact our service center or a specialist.
Further possible causes:
Your appliance is equipped with safety switches.
They prevent accidental motor start.
Remedy:
- Check correct position of
- the working bowl
- the lid of the working bowl or
- the filter sieve or
- the blender jug.
Noise Emission
The sound pressure level was measured at the ear of a user (LpA) in compliance with DIN EN ISO 3744.
Determined sound pressure level: 82 - 90 dB(A) (no limit)
Technical Data
Model: PC-KM 1063
Power supply: 220-240 V\~, 50/60 Hz
Rated power consumption: 1000 W
Max. power consumption: 1200 W
Protection class: ...... II
Net weight (basic appliance with mixing bowl and kneading tool): ....approx. 2.60 kg
The right to make technical and design modifications in the course of continuous product development remains reserved.
This device complies with all current CE directives, such as electromagnetic compatibility and low voltage directive and is manufactured according to the latest safety regulations.
Disposal
Meaning of the "WEEE Bin" Symbol
Take care of our environment, do not dispose of electrical appliances via the household waste.
Dispose of obsolete or defective electrical appliances via municipal collection points.
Please help to avoid potential environmental and health impacts through improper waste disposal.
You contribute to recycling and other forms of utilization of old electric and electronic appliances.
Your municipality provides you with information about collecting points.
Instrukcja obsługi
CTC Clatronic Sp. z o.o


- Bedienungsanleitung
- ⚠ WAARSCHUWING: Risico op letsel!
- Symbols in these Instructions for Use
- WARNING:
- CAUTION:
- NOTE:
- Contents
- General Notes
- Children and Frail Individuals
- WARNING!
- Special Safety Precautions for this Device
- WARNING: Risk of injury!
- Intended Use
- Description of the Parts / Supplied parts
- Unpacking the appliance
- ⚠ WARNING: Risk of injury!
- i NOTE:
- General Use Instructions
- Functionality of the device
- Using the working bowl
- Assembly of the working bowl and the accessories
- Electrical Connection
- Important notes for the individual applications
- End Operation and Remove Bowl
- The Blender
- Blender Use Instructions
- WARNING: The knife in the blender is sharp!
- i RECOMMENDATION:
- Mixing Container Assembly
- Preparation
- Operating the mixer
- Refill Ingredients
- Stop Operation
- Cleaning
- Motor Housing
- Accessories of the kitchen appliance
- Blender Accessories
- Pre-Cleaning
- General cleaning
- Storage
- Troubleshooting
- The appliance does not function
- Noise Emission
- Technical Data
- Meaning of the "WEEE Bin" Symbol
- Instrukcja obsługi
Brand : PROFICOOK
Model : PCKM 1063
Category : Food Processor