CCTVSETW1 - Surveillance Camera Perel - Free user manual and instructions
Find the device manual for free CCTVSETW1 Perel in PDF.
| Product type | Wireless surveillance system with touchscreen monitor |
| Brand | Perel |
| Model | CCTVSETW1 |
| Camera dimensions | 151 x 74 x 49 mm |
| Monitor dimensions | 184 x 128 x 28 mm |
| Total weight | 1600 g |
| Power supply | 5 VDC / 1 A (adapter included) |
| Sensor type | CMOS 1/4" |
| Viewing angle | 64° |
| Night vision | 20 IR LEDs, range 8 m |
| Protection rating | IP66 |
| Max. video resolution | 640 x 480 pixels (VGA) at 25 fps (1 camera) |
| Video compression | H.264 |
| Video format | PAL |
| Video transmission | Encrypted digital, 2.4 GHz |
| Monitor | 7" touchscreen |
| Storage | SDHC card up to 32 GB (not included) |
| Monitor battery life | Approximately 1.5 h (Li-ion battery 1800 mAh) |
| Main functions | Remote surveillance via OMGuard app, motion detection, scheduled recording, 2x digital zoom, two-way audio |
| Network connectivity | Docking station with RJ45 port and built-in Wi-Fi |
| Maintenance and cleaning | Disconnect before cleaning. Protect from dust and extreme heat. |
| Safety | Do not open the housing (risk of electric shock). Use only original accessories. |
| Spare parts and repairability | Contact the dealer. No spare parts listed. |
Frequently Asked Questions - CCTVSETW1 Perel
User questions about CCTVSETW1 Perel
0 question about this device. Answer the ones you know or ask your own.
Ask a new question about this device
Download the instructions for your Surveillance Camera in PDF format for free! Find your manual CCTVSETW1 - Perel and take your electronic device back in hand. On this page are published all the documents necessary for the use of your device. CCTVSETW1 by Perel.
USER MANUAL CCTVSETW1 Perel
natural_image
Two black surveillance cameras: one with a wireless mounted sensor and the other with a gas station display (no visible text or symbols)INSTALLATION AND QUICK START 5
INSTALLATIE EN SNELSTART 11
INSTALLATION ET DÉMARRAGE RAPIDE 17
natural_image
Technical diagram of a mechanical assembly with screwdriver, tool, and clamped components (no text or labels)B 2

text_image
90°B 3
natural_image
Technical line drawing of a mechanical assembly with a vertical plate and support bracket (no text or symbols)C
text_image
Diagram of a scientific apparatus with labeled components including a power source, switch, and funnelD
text_image
1 2 3 4 5 6INSTALLATION AND QUICK START
1. Introduction
To all residents of the European Union
Important environmental information about this product

This symbol on the device or the package indicates that disposal of the device after its lifecycle could harm the environment. Do not dispose of the unit (or batteries) as unsorted municipal waste; it should be taken to a specialized company for recycling. This device should be returned to your distributor or to a local recycling service. Respect the local environmental rules.

If in doubt, contact your local waste disposal authorities.
Thank you for choosing Perel! Please read the manual thoroughly before bringing this device into service. If the device was damaged in transit, don't install or use it and contact your dealer.
2. Available documentation
This document describes the installation and basic instructions on using the camera. For detailed information about the use of this device, please refer to the full manual (English only) available on www.velleman.eu (search for product code CCTVSETW1).
3. Safety Instructions
 | Keep the device away from children and unauthorised users. |
 | Risk of electroshock when opening the cover. Touching live wires can cause life-threatening electroshocks. |
 | Always disconnect mains power when the device is not in use or when servicing or maintenance activities are performed. Handle the power cord by the plug only. |
4. General Guidelines
Refer to the Velleman® Service and Quality Warranty on the last pages of this manual.
 | Keep this device away from dust. | |
 | Keep this device away from extreme heat.Make sure the ventilation openings are clear at all times. | |
 | Protect this device from shocks and abuse. Avoid brute force when operating the device. |
- Familiarise yourself with the functions of the device before actually using it.
- All modifications of the device are forbidden for safety reasons.
- Only use the device for its intended purpose. Using the device in an unauthorised way will void the warranty.
- Damage caused by disregard of certain guidelines in this manual is not covered by the warranty and the dealer will not accept responsibility for any ensuing defects or problems.
- Do not use this product to violate privacy laws or perform other illegal activities.
CCTVSETW1
- Keep this manual for future reference.
5. Overview
Refer to the illustrations on page 2 of this manual.
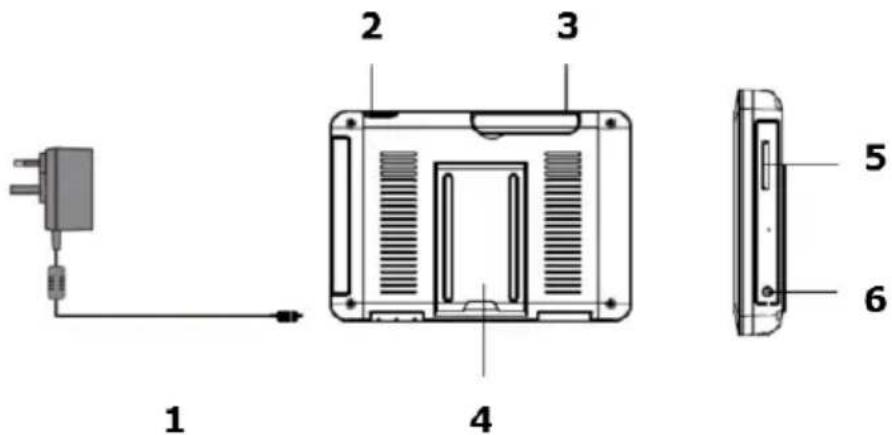
Monitor (back panel)
| 1 | antenna slot |
| 2 | reset button |
| 3 | power on/off |
| 4 | SD slot |
| 5 | AC power connection |
| 6 | camera stand |
Cradle
| 7 | power dock |
| 8 | RJ45 network connection |
| 9 | AC power connection |
Camera (front)
| 10 | power status |
| 11 | link status |
| 12 | light sensor |
Camera (back)
| 13 | antenna connector |
| 14 | microphone |
| 15 | power cable |
| 16 | power/pair button |
6. Camera Installation
Required tools
- electric drill
- 5 mm masonry drill bit
• 15 mm masonry drill bit
• no. 2 Philips screwdriver
Guidelines
- It is recommended to test the camera before mounting it on its final spot.
- Mount the camera at about 2.5 m from the floor.
- Avoid positioning the camera so that it is facing directly at the sun as this will impair the picture quality viewed.
- Avoid pointing the camera lens directly through clear glass as the night vision LEDs will cause a blurred image at night.
- Avoid pointing the camera directly at any bushes, tree branches or moving objects that might naturally move due to winds. This is also because if you need to use the motion detection feature in the PC software to record movement the software might record unnecessarily.
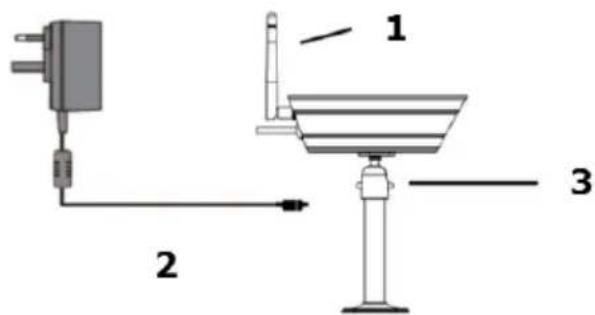
Setting up the camera
See image C on page 4.
- Extend the antenna.
- Connect the power adapter to the camera and then to a wall outlet.
- Plug the power adapter into a wall outlet.
Setting up the monitor
See image D on page 4.
V. 02 - 07/01/2014
6
© Velleman nv
CCTVSETW1
- Insert an SD card into the monitor [5] (up to 32 Gb).
- Connect the power adapter to the monitor and then to a wall outlet [1].
- Flip out the camera stand [4].
- Press and hold the power button for about 3-4 seconds [2].
A Welcome screen appears for a few seconds, then the camera view appears.
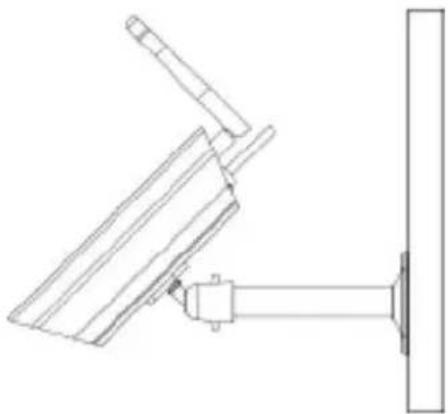
Mounting the camera
See images B1 to B3 on page 3.
- Attach the camera mount at about 2.5 m from the floor.
- Loosen up the thumb screw.
- Choose a proper viewing angle and secure the joint.
- Mount the camera onto the bracket
Note: SD card
- If you are planning to record long videos, it is recommended to use a SD card with high capacity.
• Always turn off the display before removing an SD card.
7. Use
Parts of the screen

text_image
2 3 4 5 6 SCAN QUAD Cam1 Cam2 Cam3 Cam4 7 8 11 pop-up menus
2 SD card status
3 battery status
4 internet connection status
5 record status
6 camera number - signal strength
7 motion indicator
8 pop-up menu tab
Turn on the the display
- Press and hold the Power button for about 3-4 seconds.
A Welcome screen appears for a few seconds, then the camera view appears.
Turn off the display
- Press and hold the Power button until the display shuts off.
Camera modes: quad view and full screen
- When you switch on the display, the display shows the quad view (up to 4 cameras in a single screen).
- Tap one of the camera views to display it full screen.
- Tap on the full view to return to quad view.
Zooming
- Zooming only works in full screen view.
- If the display is in quad view, tap a camera view to set it full screen.
- Tap the Zoom icon.
- Select the area you want to zoom in.
- Tap the zoom out icon to turn off zoom.
- Tap again to return to full screen view.
Manually recording v ideo
• In quad view, tap the Record icon.
• The icon flashes during recording.
- Tap the icon again to stop recording.
CCTVSETW1
You can also schedule video recording. See the full manual on www.velleman.eu for details (search for product code CCTVSETW1).
Using the menu
The display has an on screen display menu (OSD).
This menu gives access to the device settings.
To show or hide the menu, shortly press the power button.
The menu remains displayed for 30 seconds.
Playback
To view recorded video:
- On the display, tap

and then

- Select the day you want to view on the calendar.
The days containing video are highlighted.
-
If necessary, use the scroll bar on the right to browse through the recordings.
-
Tap on the recording you want to view.
The recording displays on the screen.
- Tap any empty area of the screen to bring up the progress bar.
- Drag the progress bar to fast forward or rewind the video.
- Tap any empty area of the screen to hide the progress bar.
Remote surveillance
- You can use access the camera remotely from your mobile device with the OMGuard app (available for iPhone, iPod, iPad and Android devices).
- Remote viewing only works of the monitor is in the cradle and if the Internet connection type is set to "Connect to Internet".
• See the full manual on www.velleman.eu for details (search for product code CCTVSETW1).
Icons and buttons
The screen has several icons and buttons:
| Icon | Name | Function |
 | Home | In a menu: Tap to go back to main screen |
 | Back | In a menu: Tap to go back one level |
 | Camera mode | Tap to select between camera modes:- scan mode- quad view- full screen |
 | System settings | Tap to access system settings |
 | Volume | Tap to adjust the volume level of the camera |
 | SD capacity | Shows available space on SD card |
 | Battery level | Shows battery level |
 | Camera number | Displays the number of the camera and the signal strength |
 | Record status | Tap to start manual recording.The button has a status light:- Always on: not recording- Flashing: recording |
| CCTVSETW1 | |||
| Icon | Name | Function | |
 | Connected to the internet | Appears when device is connected to the internet | |
 | Connected to the intranet | Appears when device is connected to the intranet | |
 | Remote Viewing | Appears when remote viewing is in progress | |
 | Motion detection | Flashes when device records after detecting motion detection | |
 | Scheduled recording | Appears when scheduled recording is in progress | |
 | Pop up menu tab | Tap to open or close pop up menus | |
 | No SD card | Appears when SD card is missing or damaged. | |
 | Zoom in | Tap to zoom in on a subject | |
| Zoom out | Tap to zoom out on a subject | ||
See the full manual on www.velleman.eu for details (search for product code CCTVSETW1).
8. Advanced settings
The Settings menu contains settings for:
• Camera setup (pairing, camera on, brightness)
- Recorder setup (motion detection, scheduled recording)
• Network setup (internet setup, security code, network information)
• Alarm setup (period, melody)
- System setup (power saving, screen auto lock, time, format storage, system upgrade, language)
See the full manual on www.velleman.eu for details (search for product code CCTVSETW1).
9. Technical Specifications
| video format | PAL |
| video compression H.264 | |
| video transmission | 2.4 GHz encrypted digital transmission |
| camera | pick-up element: 1/4" CMOS sensor |
| lens: 3.6 mm | |
| lens angle: 64° | |
| night vision: 20 IR LEDs (8 m range) | |
| IP rat ing: IP66 | |
| maximum recording rate | single camera: 640 x 480 pixels (VGA) (25 FPS) |
| multiple cameras: 320 x 240 pixels (QVGA) (25 FPS) | |
| monitor battery | capacity: 1800 mAh Li-ion (3.7 V) |
| operating time: maximum 1.5 h | |
| monitor size | 7" touch screen |
| recording | on SDHC card (not incl.) (max. 32 GB) |
| recording mode | manual / timer / motion |
| audio | built-in microphone |
| network connection | via docking station |
| remote surveillance: plug and play via smart phone applications | |
| digital zoom | 2x |
CCTVSETW 1
| video loss detection | yes |
| power source (docking and camera) | 5 Vdc / 1 A |
| dimensions | camera: 151 x 74 x 49 mm |
| monitor: 184 x 128 x 28 mm | |
| weight 1600 g |
Use this device with original accessories only. Velleman nv cannot be held responsible in the event of damage or injury resulting from (incorrect) use of this device.
For more info concerning this product and the latest version of this manual, please visit our website www.perel.eu.
The information in this manual is subject to change without prior notice.
Windows, Windows XP, Windows 2000, Windows Vista, Windows Aero, Windows 7, Windows 8, Windows Mobile, Windows Server are registered trademarks of Microsoft Corporation in the United States and other countries.
iPad, iPod, iPod touch, iPhone, Mac, iMac, MacBook, PowerBook, Power Mac, Mac OS are trademarks of Apple Inc., registered in the U.S. and other countries.
Android is a trademark of Google Inc.
© COPYRIGHT NOTICE
The copyright to this manual is owned by Velleman nv. All worldwide rights reserved. No part of this manual may be copied, reproduced, translated or reduced to any electronic medium or otherwise without the prior written consent of the copyright holder.
INSTALLATIE EN SNELSTART
1. Inleiding
Monitor (paine I traseiro)
Velleman® Service and Quality Warranty
Since its foundation in 1972, Velleman® acquired extensive experience in the electronics world and currently distributes its products in over 85 countries. All our products fulfil strict quality requirements and legal stipulations in the EU. In order to ensure the quality, our products regularly go through an extra quality check, both by an internal qualify department and by specialized external organisations. If, all precautionary measures notwithstanding, problems should occur, please make appeal to our warranty (see guarantee conditions).
General Warranty Conditions Concerning Consumer Products (for
- All consumer products are subject to a 24-month warranty on production flaws and defective material as from the original date of purchase.
- Velleman® can decide to replace an article with an equivalent article, or to refund the retail value totally or partially when the complaint is valid and a free repair or replacement of the article is impossible, or if the expenses are out of proportion. You will be delivered a replacing article or a refund at the value of 100% of the purchase price in case of a flaw occurred in the first year after the date of purchase and delivery, or a replacing article at 50% of the purchase price or a refund at the value of 50% of the retail value in case of a flaw occurred in the second year after the date of purchase and delivery.
• Not covered by warranty:
- all direct or indirect damage caused after delivery to the article (e.g. by oxidation, shocks, falls, dust, dirt, humidity...), and by the article, as well as its contents (e.g. data loss), compensation for loss of profits;
- consumable goods, parts or accessories that are subject to an aging process during normal use, such as batteries (rechargeable, non-rechargeable, built-in or replaceable), lamps, rubber parts, drive belts... (unlimited list);
- flaws resulting from fire, water damage, lightning, accident, natural disaster, etc....;
- flaws caused deliberately, negligently or resulting from improper handling, negligent maintenance, abusive use or use contrary to the manufacturer's instructions;
- damage caused by a commercial, professional or collective use of the article (the warranty validity will be reduced to six (6) months when the article is used professionally);
- damage resulting from an inappropriate packing and shipping of the article; - all damage caused by modification, repair or alteration performed by a third party without written permission by Velleman®.
- Articles to be repaired must be delivered to your Velleman® dealer, solidly packed (preferably in the original packaging), and be completed with the original receipt of purchase and a clear flaw description.
- Hint: In order to save on cost and time, please reread the manual and check if the flaw is caused by obvious causes prior to presenting the article for repair. Note that returning a non-defective article can also involve handling costs.
- Repairs occurring after warranty expiration are subject to shipping costs. - The above conditions are without prejudice to all commercial warranties.
The above enumeration is subject to modification according to the article (see article's manual).
NL
R&TTE Declaration of Conformity
We, Velleman NV Address: Legen Heirweg, 33
9890 Gavere
Belgium
declare on our own responsibility that the finished product:
Perel
Trade name: WIRELESS TOUCH-SCREEN SECURITY SYSTEM WITH RECORDING AND NETWORK
CCTVSETW1
constituting the subject of this declaration, conforms with the essential requirements and other relevant stipulations of the R&TTE Directive (2011/65/EU).
The product is in conformity with the following standards:
GPSD: EN 60950-1:2006 +A11:2009 +A1:2010 +A12:2011
EMC: EN 301 489-1 V1.9.2 EN 301 489-14 V2.2.1
Power supply model nr.: KSAS0060500100VED
LVD: EN 60950-1:2006 +A11:2009 +A1:2010 +A12:2011
EMC: EN55013:2001 +A1:2003 +A2:2006 EN 55020:2007 +A11:2011
EN 55024:2010
EN 61000-3-2:2006 +A1:2009 +A2:2009 EN 61000-3-3:2008
Technical data are available and can be obtained from the address above.
Place and date of issue:
Gavere, 20/12/2013
Authorised signatory for the company:
Vince Van Balberghe - Quality Manager


velleman ^ NV
CE
Type of model: CCTVSETW1
Vince Van Balberghe - Quality Manager

velleman ^ NV
CE
Vince Van Balberghe - Quality Manager
DE

velleman ^
ES
CE
Vince Van Balberghe - Quality Manager
PT
CE
Vince Van Balberghe - Quality Manager
Vince Van Balberghe - Quality Manager