MX272 - Blender KENWOOD - Free user manual and instructions
Find the device manual for free MX272 KENWOOD in PDF.
| Product Type | Food mixer (stand mixer) |
| Brand | Kenwood |
| Model | MX272 |
| Power supply | 220-240 V, 50/60 Hz |
| Number of speeds | 12 speeds with electronic control and slow start |
| Bowl capacity (flour for shortcrust pastry) | 500 g flour |
| Total maximum capacity (fruit cake) | 2 kg mixture |
| Maximum capacity (firm bread dough) | 600 g flour |
| Maximum capacity (soft bread dough) | 650 g flour |
| Maximum number of egg whites | 12 (minimum 2) |
| Bowl material | Stainless steel |
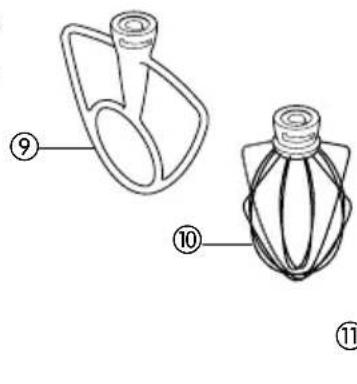
| Included accessories | Beater, whisk, dough hook, pouring shield with pour spout |
| Functions | Mix, beat, whisk, knead |
| Safety | Slow start, disconnect before cleaning, use under supervision |
| Care and cleaning | Motor unit: wipe with a damp cloth; accessories and bowl: dishwasher safe or hand wash |
| Spare parts | Bowl, beater, whisk, dough hook, pouring shield |
| Repairability | Kenwood after-sales service; power cord replaceable only by an authorized repairer |
| Weight | Approximately 5.5 kg (estimated) |
| Dimensions (W x D x H) | Approximately 40 x 25 x 35 cm (estimated) |
| Warranty | Standard Kenwood (refer to after-sales service) |
Frequently Asked Questions - MX272 KENWOOD
User questions about MX272 KENWOOD
0 question about this device. Answer the ones you know or ask your own.
Ask a new question about this device
Download the instructions for your Blender in PDF format for free! Find your manual MX272 - KENWOOD and take your electronic device back in hand. On this page are published all the documents necessary for the use of your device. MX272 by KENWOOD.
USER MANUAL MX272 KENWOOD
Instructions & Baking Recipes
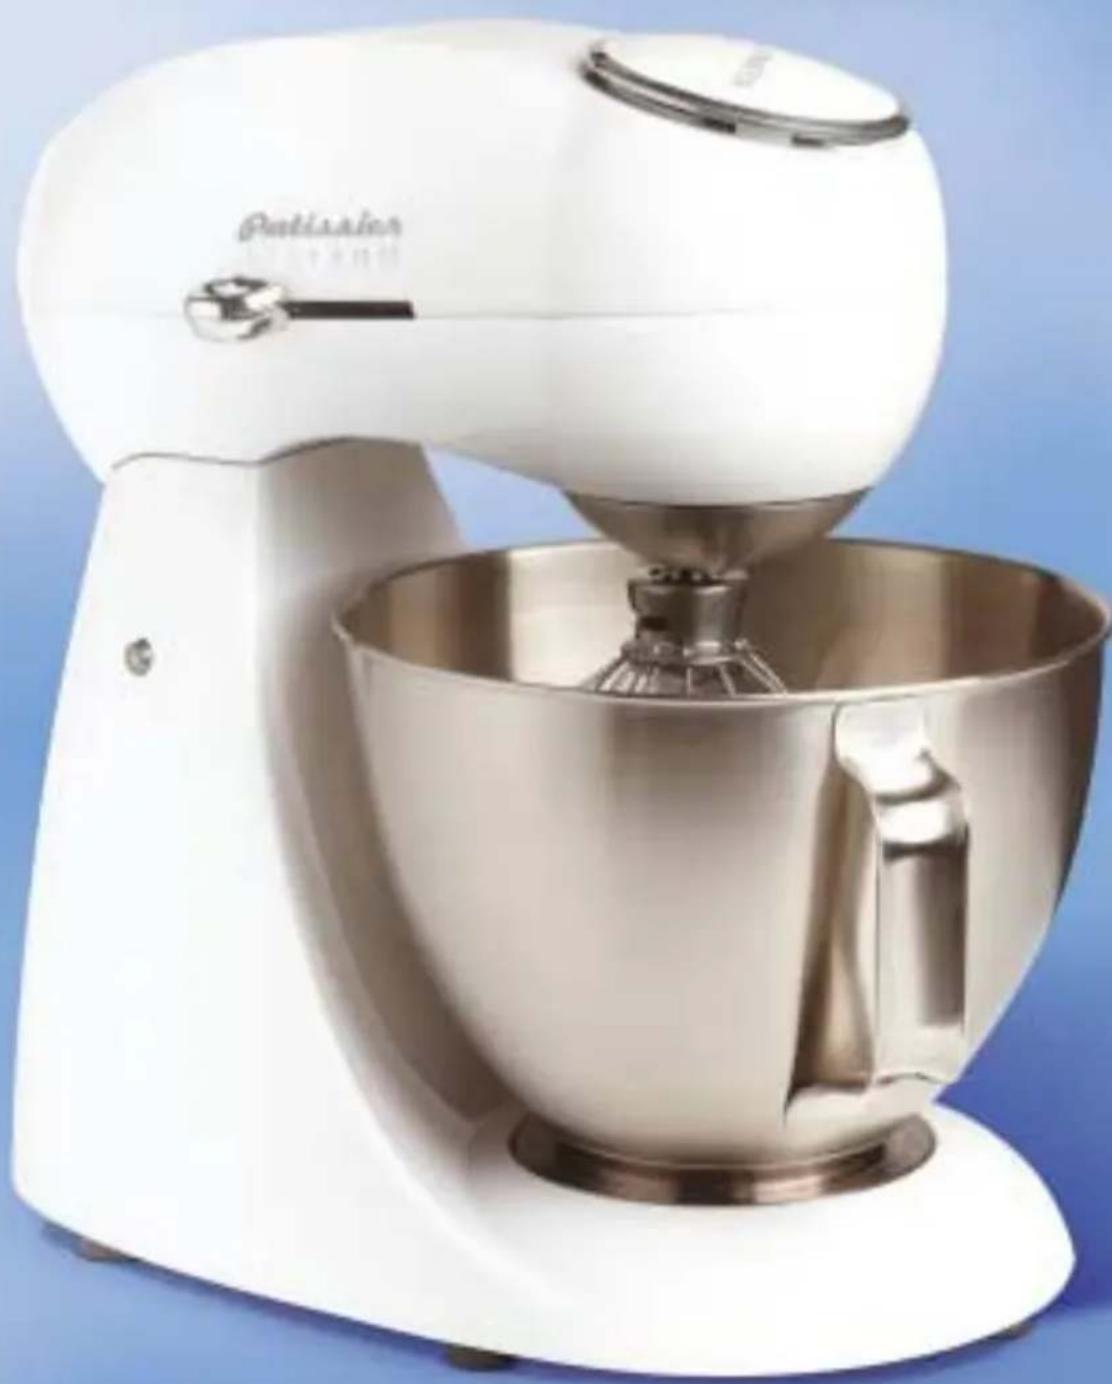
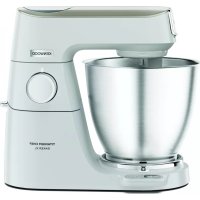
natural_image
White kitchen stand mixer with stainless steel bowl and control knob (no visible text or symbols)English 1 - 14
Nederlands 15 - 29
Français 30 - 45
Deutsch 46 - 60
Italiano 61 - 76
Dansk 77 - 91
Svenska 92 - 106
Suomi 107 - 121
Ελληνικά 122 - 137
Español 138 - 142
Português 143 - 147
Norsk 148 - 151
Türkçe 152 - 156
Česky157 - 161
Magyar162 - 166
Polski167 - 171
Русский172 - 176
know your Kenwood kitchen machine
safety
- Switch off and unplug before fitting or removing tools, after use and before cleaning.
- This machine is not intended for use by infirm persons without supervision.
- Keep children away from the machine and never let the cord hang down where a child could grab it.
- Keep your fingers away from moving parts and fitted tools. Never put your fingers etc in the hinge mechanism.
- Never leave the machine on unattended.
- Never use a damaged machine. Get it checked or repaired: see 'service', page 4.
- Never use an unauthorised tool.
- Never exceed the maximum capacities on page 2.
- Don't let children play with this machine.
- Only use this machine for its intended domestic use.
- Take care when lifting this appliance as it is heavy. Ensure the head is locked and that the bowl, tools, and cord are secure before lifting.
important - UK only
before plugging in
- Make sure your electricity supply is the same as the one shown on the underside of your machine.
- The wires in the cord are coloured as follows: Green and Yellow = Earth, Blue = Neutral, Brown = Live.
- The appliance must be protected by a 13A approved (BS1362) fuse.
• WARNING: THIS APPLIANCE MUST BE EARTHED.
Note:
- For non-rewireable plugs the fuse cover MUST be refitted when replacing the fuse. If the fuse cover is lost then the plug must not be used until a replacement can be obtained. The correct fuse cover is identified by colour and a replacement may be obtained from your Kenwood Authorised Repairer (see Service).
- If a non-rewireable plug is cut off it must be DESTROYED IMMEDIATELY. An electric shock hazard may arise if an unwanted non-rewireable pug is inadvertently inserted into a 13A socket outlet.
- This machine complies with European Economic Community Directive 89/336/EEC.
before using for the first time
1 Remove all packaging, including the fitment around the bowl.
2 Wash the parts: see 'care and cleaning', page 4.
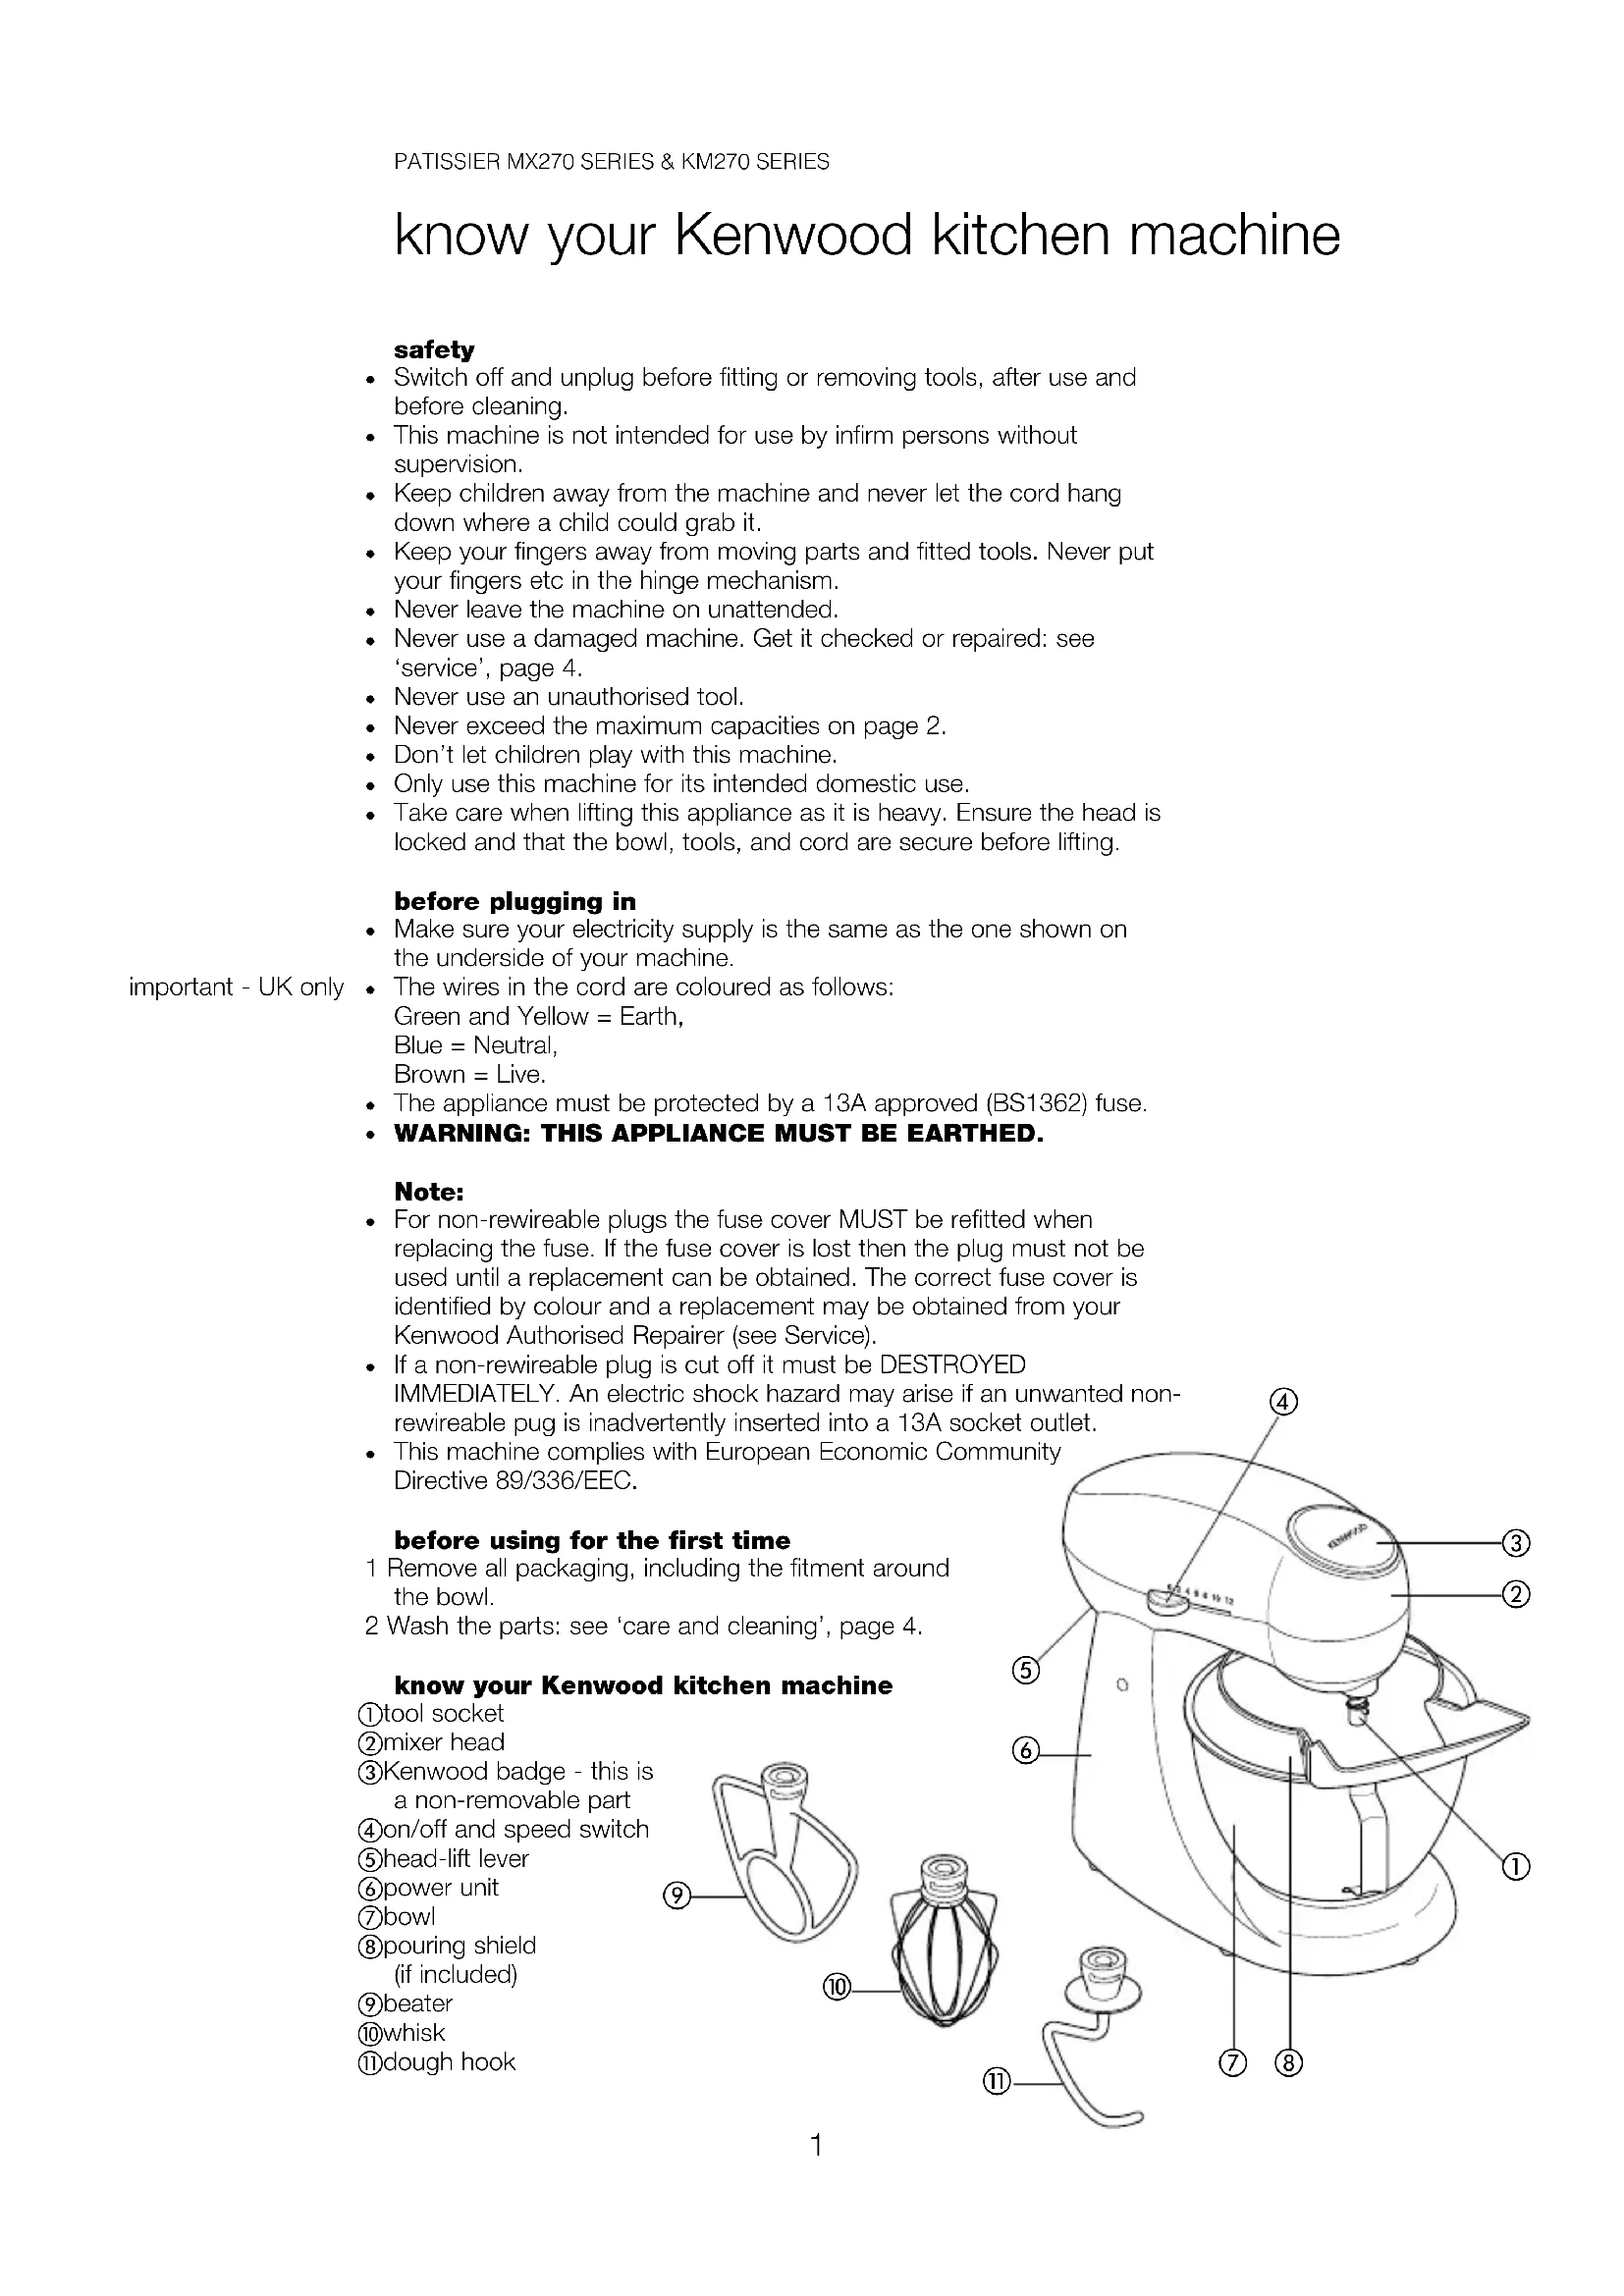
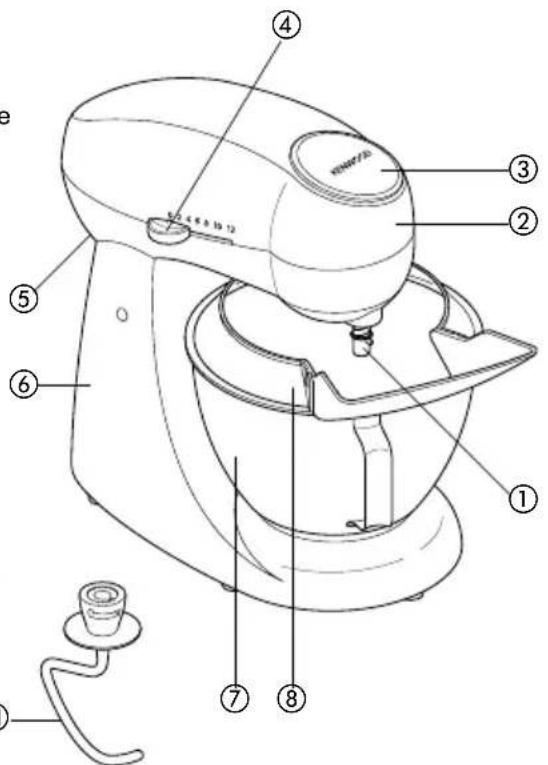
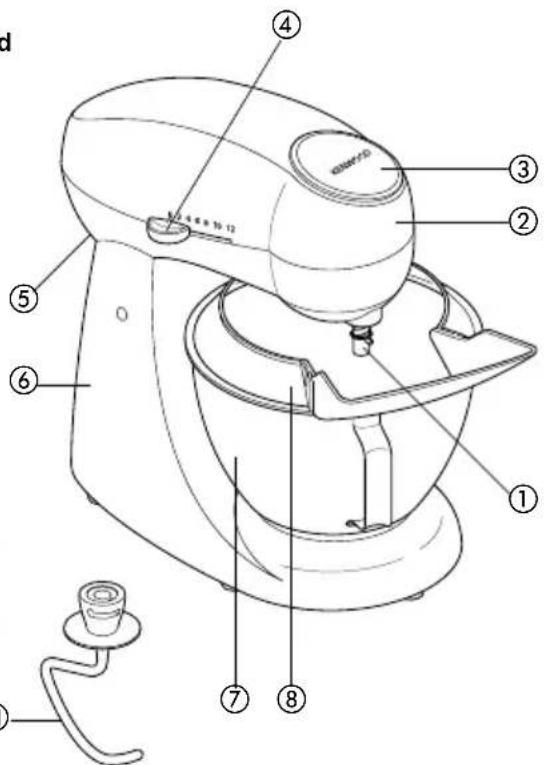
know your Kenwood kitchen machine
①tool socket
②mixer head
③Kenwood badge - this is a non-removable part
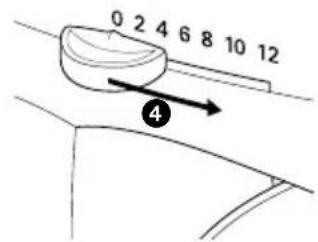
④on/off and speed switch
⑤head-lift lever
⑥power unit
⑦bowl
⑧pouring shield (if included)
⑨beater
⑩whisk
⑪dough hook

the mixer
the mixing tools and some of their uses
beater whisk
- For making cakes, biscuits, pastry, icing, fillings, éclairs and mashed potato.
- For eggs, cream, batters, fatless sponges, meringues, cheesecakes, mousses, soufflés. Don't use the whisk for heavy mixtures (eg creaming fat and sugar) - you could damage it.
- For yeast mixtures.
to use your mixer
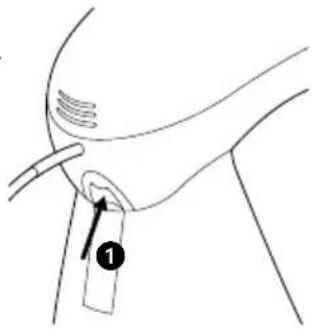
1 Push up on the head release lever at the back of the appliance ① and at the same time lift the head until it locks in the raised position.
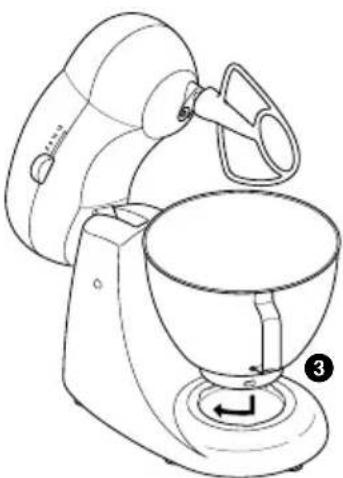
to insert a tool 2 Line the pin on the shaft with the slot on the inside of the tool, push up and turn clockwise to lock ②.
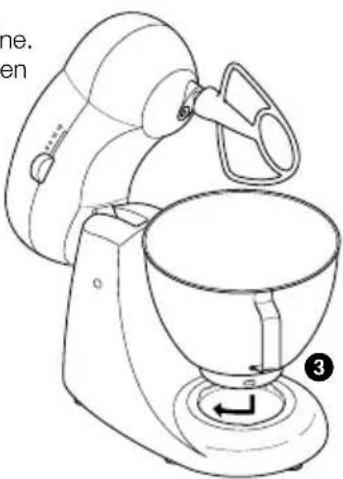
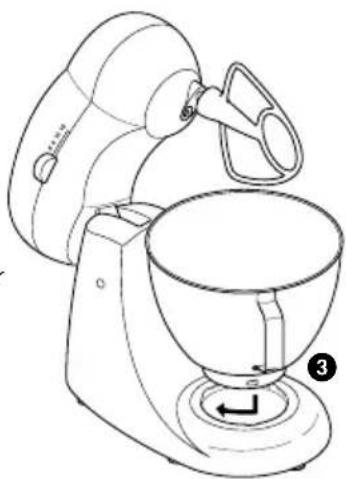
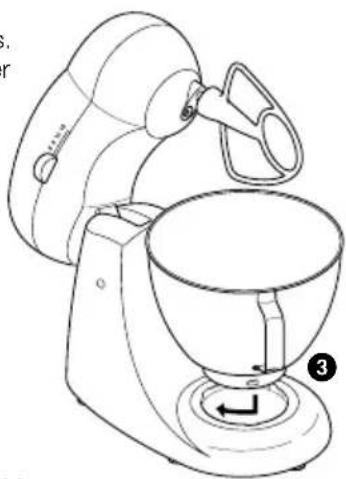
3 Fit the bowl onto the base, press down and turn clockwise to lock ③.
4 Push up on the head release lever and at the same time lower the mixer head ①.
5 Switch on and move the speed switch to the desired setting 4.
to remove a tool 6 Push up, turn anti-clockwise and pull off.
hints
- Switch off and scrape the bowl with a spatula when necessary.
- Eggs at room temperature are best for whisking.
- Before whisking egg whites, make sure there's no grease or egg yolk on the whisk or bowl.
- Use cold ingredients for pastry unless your recipe states otherwise.
- When creaming fat and sugar for cake mixes, always use the fat at room temperature or soften it first.
- Your mixer has been fitted with 'soft start' feature to minimise spillage. However if the machine is switched on with a heavy mixture in the bowl such as bread dough, you may notice that the mixer takes a few seconds to reach the selected speed.
natural_image
Line drawing of a medical procedure with a labeled arrow pointing to a device (no text or symbols present)
natural_image
Diagram showing a mechanical assembly with a pin labeled '2' pointing to a component (no text or symbols present)important
points for bread making
- Never exceed the maximum capacities below - you will overload the machine.
- To protect the life of the machine always allow a rest of 20 minutes between loads.
- Some movement of the mixer head is normal. If you hear the machine labouring, switch off, remove half the dough and do each half separately.
• The ingredients mix best if you put the liquid in first. - At intervals stop the machine and scrape the mixture off the dough hook.
- Different batches of flour vary considerably in the quantities of liquid required and the stickiness of the dough can have a marked effect on the load imposed on the machine. You are advised to keep the machine under observation whilst the dough is being mixed; the operation should take no longer than 5 minutes.
natural_image
Line drawing of a kitchen mixer with handle and control knob (no text or symbols)speed switch
beater
These are a guide only and will vary depending upon the quantity of mix in the bowl and the ingredient being mixed.
- creaming fat and sugar start on 2, gradually increasing to 12.
- beating eggs into creamed mixtures 6 - 12.
- folding in flour, fruit etc 2 - 4.
- all in one cakes start on speed 2, gradually increase to 12.
• rubbing fat into flour 2 - 4.
• Gradually increase to 12.
whisk dough hook
- Start on 2, increasing to 4 or 6.
maximum capacities
shortcrust pastry fruit cake mix stiff bread dough soft bread dough egg whites
- 500g flour
- 2 Kg total mix
- 600g flour
- 650g flour
• 12 (A minimum of 2 medium size egg whites can be whisked).

electronic speed sensor control
Your mixer is fitted with an electronic speed sensor control that is designed to maintain the speed under different load conditions, such as when kneading bread dough or when eggs are added to a cake mix. You may therefore hear some variation in speed during the operation as the mixer adjusts to the load and speed selected - this is normal.
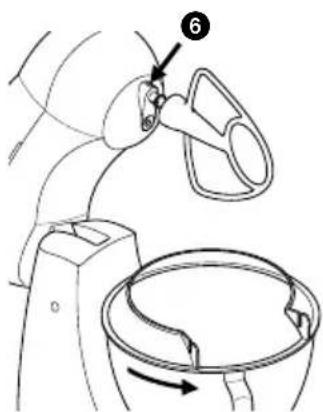
to fit and use your pouring shield
1 Raise the mixer head until it locks.
2 Fit the bowl and the desired tool.
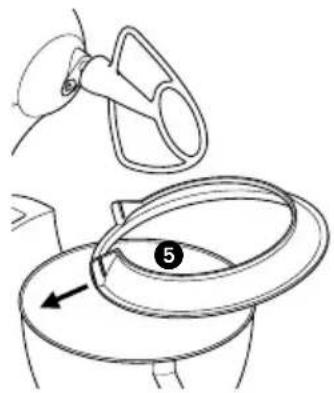
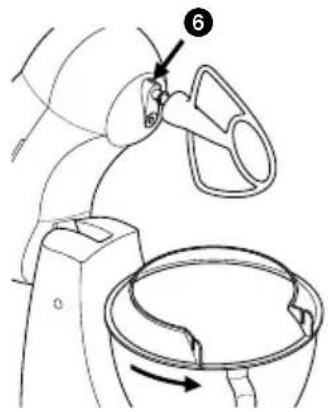
3 Slide the narrow section of the pouring shield under the mixer attachment ⑤.
4 Fit the pouring shield onto the bowl.
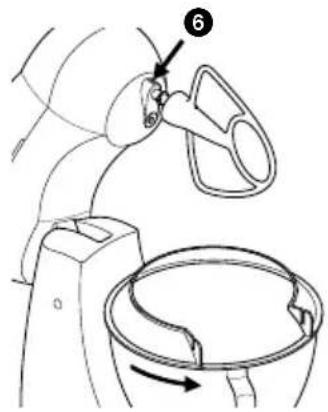
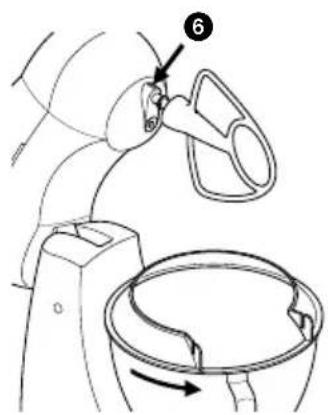
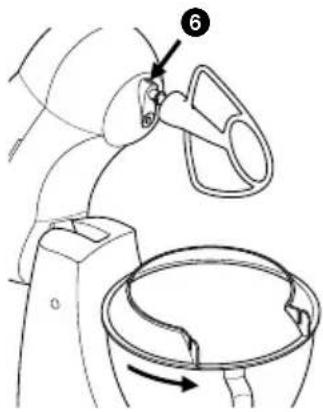
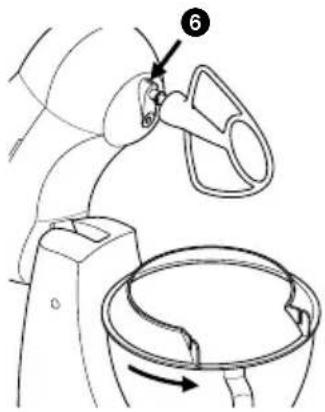
5 Turn the pouring shield until the narrow section of the shield aligns with the groove on the tool socket 6.
6 Lower the mixer head.
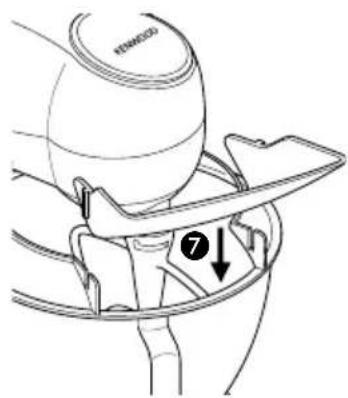
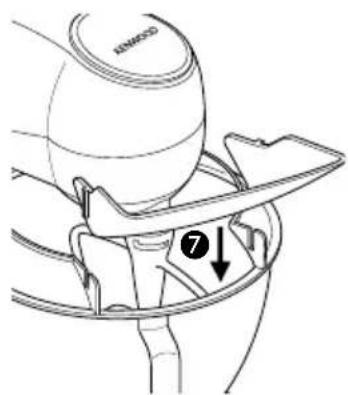
7 Turn the opening of the pouring shield to the desired position.
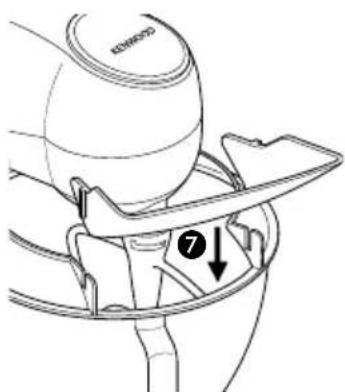
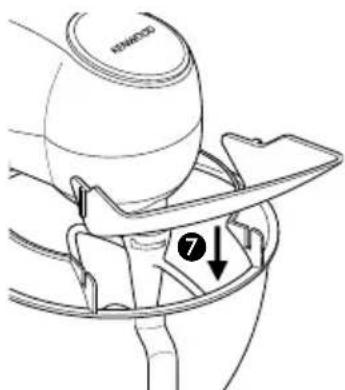
8 Fit the chute onto the pouring shield by locating the tabs in the slots ⑦.
9 To remove the pouring shield reverse the operation.
- During mixing, ingredients can be added directly to the bowl via the chute.

cleaning and service
care and cleaning
• Always switch off and unplug before cleaning.
power unit
- Wipe with a damp cloth, then dry.
- Never use abrasives or immerse in water.
bowl, tools, pouring shield
- Wash by hand, then dry thoroughly or wash in the dishwasher.
- Never use a wire brush, steel wool or bleach to clean your stainless steel bowl. Use vinegar to remove limescale.
- Keep away from heat (cooker tops, ovens, microwaves).
service and customer care
- If the cord is damaged it must, for safety reasons, be replaced by KENWOOD or an authorised KENWOOD repairer.
UK If you need help with:
• using your machine
• servicing or repairs (in or out of guarantee)
call KENWOOD Customer Care on 023 92392333.
Have your model number ready - it's on the underside of the mixer.
- spares and attachments
call 0870 2413653.
Eire other countries
• See our advertisement in Golden Pages.
- Contact the shop where you bought your machine.
guarantee UK only
- If your machine goes wrong within one year from the date you bought it, we will repair or replace it free of charge provided:
- you have not misused, neglected or damaged it;
- it has not been modified;
- it is not second-hand;
- it has not been used commercially;
- you have not fitted a plug incorrectly; and
- you supply your receipt to show when you bought it.
This guarantee does not affect your statutory rights.
recipes
Fill your home with the delicious aroma of cakes, pastries and cookies that your Patissier mixer has helped create!
page
strawberries and cream sponge 6
rich chocolate cake 6
gingerbread 7
raspberry streuselkucken 7
lemon curd tartlets 8
shortcrust pastry and variations 8
citrus meringue pie 9
pavlova 9
white chocolate mousse 10
walnut, almond and hazelnut biscuits 10
white chocolate chip brownies 10
biscotti 11
pecan tart 11
white chocolate cake 12
mediterranean fruit ring 12
chocolate chip walnut loaf 13
crushed blackberry syllabub 13
no bake lemon cheesecake 13
carrot cake 14
royal Icing 14
recipes
strawberries and cream sponge
serves 8-10
150g (5oz) plain flour 300ml ( 12 pint) double cream
25g (1oz) corn flour 15ml (1tbsp) caster sugar
6 eggs grated rind and juice of 1 orange
75g (3oz) caster sugar 225g (8oz) strawberries
75g (3oz) butter, melted icing sugar, for dusting
1 Preheat the oven to 180^ C/350°F/Gas 4. Grease and base line a 23cm (9 inch) round spring-form deep cake tin. Sift the flour and cornflour together.
2 Fit the whisk, place the eggs and sugar in the bowl and whisk at speed 12 until very thick, pale and mixture leaves a trail.
3 Using a metal spoon gently fold in half the flour mixture. Pour half the butter around the edge of the bowl and fold in. Gradually fold in the remaining flour mixture and butter.
4 Pour into prepared tin and bake for 45-50 minutes, until well risen and golden. Turn out onto wire rack and leave to cool.
5 Using the whisk on speed 12, whip the cream, sugar and orange juice together until it forms soft peaks. Fold in the orange rind. Reserve 5 strawberries for decoration and slice the remainder.
6 Split the deep cake in half and fill with the whipped cream and sliced strawberries. Decorate the top with the reserved strawberries, dust with icing sugar and serve.
rich chocolate cake
serves 8-10
200g (7oz) good quality plain 75g (3oz) self-raising flour, sifted chocolate, broken into pieces 15ml (1tbsp) cocoa powder, sifted 175g (6oz) butter, softened For the Chocolate Ganache: 175g (6oz) caster sugar 400ml (14fl oz) double cream 4 eggs, separated 225g (8oz) good quality plain 100g (4 oz) ground almonds chocolate, broken into pieces
1 Preheat the oven to 180^ C/350°F/Gas Mark 4. Grease and base line a 20 cm (8inch) round spring-form cake tin. Place the chocolate in a bowl and set over a pan of simmering water, until melted.
2 Using the beater on speed 8, beat the butter and sugar together in the bowl, until pale and fluffy. Gradually beat in egg yolks.
3 On speed 2, mix in ground almonds and melted chocolate. Mix in the flour and cocoa powder and transfer to a large bowl.
4 Using the whisk on speed 12, whisk the egg whites until stiff. Using a metal spoon, fold the egg whites into the cake mixture, until well combined.
5 Transfer to the prepared tin and bake for 45-50 minutes or until just firm to the touch. Cool in tin for 5 minutes and then transfer to a wire rack to cool.
6 Meanwhile for the ganache: place the cream in a saucepan and bring to the boil. Remove from the heat, add the chocolate pieces and stir until melted. Leave to cool and chill until thickened.
7 Split the cake and use the ganache to sandwich back together and spread remaining over the top, giving a swirled effect.
recipes
gingerbread
serves 8
300g (10oz) plain flour 100g (4oz) light brown
10ml (2tsp) ground ginger muscovado sugar
5ml (1tsp) mixed spice 150ml ( ^1/_4 pint) milk
2.5ml (1/2 tsp) baking powder 2 eggs
7.5ml (1½ tsp) bicarbonate of soda 100g (4oz) drained stem ginger
100g (4oz) butter in syrup, thinly sliced
50g (2oz) treacle 30ml (2tbsp) stem ginger syrup or
150 g (5oz) golden syrup warmed golden syrup, to serve
1 Preheat the oven to 170^ C/325°F/Gas Mark 3. Grease and line a 18cm (7 inch) square cake tin. Sift the flour, ground ginger, mixed spice, baking powder and bicarbonate of soda into the bowl.
2 Place the butter, treacle, golden syrup and sugar in a small saucepan and heat gently, stirring occasionally, until butter is melted.
3 Using the beater on speed 2, mix the melted mixture, milk, eggs and 75g (3oz) of stem ginger into the dry ingredients until well combined. Pour into the prepared tin and sprinkle over the remaining stem ginger.
4 Bake for 1-1 14 hours, or until risen and just firm. Leave to cool in the tin for 10 minutes and turn out onto a wire rack and allow to cool completely. Cut into 8 pieces. Serve drizzled with a little of the stem ginger syrup or warmed golden syrup.
raspberry streuselkucken
serves 6-8
250g (9oz) self-raising flour 75g (3oz) ground almonds
5ml (1tsp) ground cinnamon 1 egg
175g (6oz) butter, softened 350g (12oz) raspberries
100g (4oz) caster sugar 5ml (1tsp) cornflour
1 Preheat the oven to 200^ C/400°F/Gas Mark 6. Grease a 23 cm (9inch) round cake tin. Place the flour, cinnamon and butter in the bowl, using the beater on speed 2 mix together until the mixture starts to stick together.
2 Add the caster sugar and ground almonds and mix to a coarse, crumbly texture. Do not over mix.
3 Weigh 175g (6oz) of the mixture and set aside. Add the egg to the remainder and using the beater mix to a dough.
4 Transfer to the prepared tin and using a metal spoon and fingers press over the base and about 2.5cm (1 inch) up the sides of the tin.
5 Toss together the raspberries and cornflour and place in the tin.
6 Sprinkle over the reserved crumble mixture and bake for 25-30 minutes, or until golden. Leave to cool for the 30 minutes and then remove from tin and place on a wire rack to cool.
recipes
lemon curd tartlets
serves 6
1 quantity of nut shortcrust juice of 2 lemons pastry 2 eggs
For filling: 125ml (4fl oz) single cream 75g (3oz) ricotta cheese raspberries or blueberries, to decorate 75g (3oz) caster sugar icing sugar, to dust
1 Roll pastry out on a lightly floured work surface and using a 11cm (4 ½ inch) round plain or fluted cutter, cut out 6 rounds and use to line 6 jumbo muffin tins. Prick the cases with a fork, line with non-stick baking parchment and fill with baking beans. Cover and chill for 20 minutes.
2 Pre-heat the oven to 190^ C/ 375^ F/Gas 5 and bake the pastry cases for 10 minutes. Remove the baking beans and paper and bake for a further 5 minutes.
3 Meanwhile to make the filling: using the whisk on speed 4, whip the ricotta cheese and sugar together in the bowl, until well combined. Then with the whisk still running gradually whip in the lemon juice, until smooth. Whisk in eggs and cream.
4 Reduce the oven to 180^ C/350°F/Gas 4. Divide the lemon filling between the tartlet cases and bake for 20 minutes or until filling is set.
5 Transfer the tartlets to a cooling rack and leave until cold. Top with a few raspberries or blueberries and sprinkle with icing sugar.
shortcrust pastry and variations
makes sufficient enough pastry for 20-23cm (8-9inch) flan case
175g (6oz) plain flour 75g (3oz) butter or margarine cut to small pieces pinch of salt 3 tbsp cold water
1 Place the flour, salt and butter in the bowl. Using the beater at speed 2, mix until it resembles fine breadcrumbs.
2 Add the water to the mixture, whilst the beater is still turning until the mixture forms a dough.
3 Turn out onto a lightly floured work surface and knead lightly. Do not over-handle the dough. Wrap in clear film and leave to chill and rest in the fridge for 30 minutes before rolling out.
Variations:
Nut Pastry: add 25g (1oz) very finely chopped or ground almonds, hazelnuts or walnuts to the breadcrumb mixture at the end of step 1.
Rich Flan Pastry: use an egg yolk or whole egg, lightly beat into the mixture in step 2, adding the egg first, then add sufficient water to form a dough.
Sweet Rich Flan Pastry: add 10-15ml (2-3 tsp) caster sugar at the end of step 1.
recipes
citrus meringue pie
serves 6-8
1 quantity of rich flan pastry For the meringue:
see page 8 3 egg whites
1 lemon 150g (5oz) caster sugar
2 oranges grated lime zest, to decorate
2 limes
65g (2½ oz) cornflour
50g (2oz) caster sugar
3 egg yolks
1 Roll out pastry on a lightly floured work surface and use to line a 23cm (9inch) fluted flan tin. Prick the base with a fork and chill for 30 minutes. Preheat oven to 190°C/375°F/Gas 5.
2 Line the pastry case with greaseproof paper and baking beans and bake blind for 15 minutes. Remove the paper and beans and bake for a further 5 minutes. Meanwhile grate the rind from the lemon and 1 orange and set aside. Halve the citrus fruits and squeeze the juice and make up to 450ml ( 3/4 pint) with cold water.
3 Mix the cornflour to a smooth paste with 120ml (4fl oz) cold water.
4 Place the citrus juice mixture in a saucepan with the lemon and orange rind and sugar and bring to the boil. Remove the pan from the heat and allow to cool slightly. Beat in the cornflour mixture, return to the heat and heat gently, stirring constantly, until thickened. Beat in the egg yolks and pour into the pastry case.
5 To make the meringue, place the egg whites in the bowl and using the whisk on speed 12, whisk the egg whites until stiff but not dry. Gradually whisk in the caster sugar until very stiff.
6 Spoon the meringue over the citrus filling. Bake for 5-10 minutes or until golden. Serve warm or cold.
pavlova
serves 6-8
4 egg whites 300ml ( 12 pint) double cream
225g (8oz) caster sugar 450g (1lb) fresh soft fruits
5ml (1tsp) cornflour eg strawberries, raspberries or
5ml (1tsp) white wine vinegar peaches, plums and pineapple sliced
2.5ml (1/2 tsp) vanilla essence
1 Preheat the oven to 130^ C/250°F/Gas 12 . Line a baking sheet with baking parchment paper and draw a 23cm (9inch) round circle.
2 Place the egg whites in the bowl. Using the whisk at speed 12, whisk the egg whites, until stiff. Gradually add the sugar, a few spoonfuls at a time, whisking well after each addition until stiff and glossy.
3 Mix the corn flour, vinegar and vanilla essence together and fold in using a metal spoon. Spoon the meringue onto the prepared baking sheet to fill the circle, making a large shallow well in the centre.
4 Bake for 1 12 hours or until dry but still a little soft in the centre. Switch off the oven and leave the meringue to cool in the oven for a least 3 hours. Transfer to wire rack to cool.
5 Using the Whisk on speed 12, whip the cream until it forms soft peaks. Fill the centre of the meringue with whipped cream and pile the fruits on top.
recipes
white chocolate mousse
serves 4
175g (6oz) white chocolate, 1.25ml ( ^1/_4 tsp) lemon juice broken into pieces 225ml (8fl oz) double cream 90ml (3fl oz) milk grated plain chocolate, to decorate 2 egg whites
1 Place the chocolate in a large bowl set over a pan of simmering water, until melted. Stir in the milk and set aside.
2 Using the whisk on speed 12, whip the egg whites and lemon juice until stiff, then using a metal spoon fold into the chocolate mixture, until well combined.
3 Using the whisk on speed 12, whip the double cream, until it forms soft peaks. Gently fold into the chocolate mixture.
4 Divide the mousse between four glasses and chill for at least 2 hours. Sprinkle with grated chocolate and serve.
walnut, almond & hazelnut biscuits
makes 20 biscuits
100g (4oz) hazelnuts 50g (2oz) chopped walnuts 5 egg yolks finely grated rind of 1 orange 100g (4oz) caster sugar 50g (2oz) flaked almonds 2.5ml (½tsp) vanilla essence
1 Preheat the oven to 150^ C/300°F/Gas 2. Chop hazelnuts. Using the beater on speed 6-8, cream together the egg yolks, sugar and vanilla essence in the bowl. Add the walnuts, hazelnuts and orange rind.
2 Line a baking sheet with baking parchment paper and spoon small amounts of the mixture onto the prepared sheet, pressing down slightly. There should be enough mixture for 20 biscuits.
3 Sprinkle the flaked almonds over the biscuits, pressing in slightly and bake for 18-20 minutes, until golden brown. Leave to cool on the baking sheet then store in an airtight container.
white chocolate chip brownies
makes 16
100g (3½oz) hazelnuts or walnuts 2 eggs 75g (3oz) white chocolate 75g (3oz) caster sugar 175g (6oz) white chocolate chips 5ml (1tsp) vanilla essence 50g (2oz) butter 75g (3oz) self-raising flour
1 Preheat the oven to 180^ C/350°F/Gas 4. Lightly grease and line an 18cm (7 inch) square tin. Roughly chop the nuts and set aside for later.
2 Place the white chocolate broken into pieces into a small saucepan with the butter and heat very gently until melted, stirring continuously. Leave to cool for 5 minutes.
3 Place the eggs, sugar, flour, vanilla and melted mixture into the bowl and mix together with the beater on speed 8, until smooth. Add the chopped nuts and the white chocolate chips. Mix to combine.
4 Transfer to the prepared tin and bake for 30-35 minutes. Leave to cool in the tin then cut into small squares to serve.
recipes
biscotti
makes 24
50g (2oz) flaked almonds 225g (8oz) plain flour
50g (2oz) butter, softened 10ml (2tsp) baking powder
100g (4oz) caster sugar 5ml (1tsp) ground coriander
1 egg 40g (1 oz) polenta
15ml (1tbsp) orange liqueur 50g (2oz) pistachio nuts, finely grated rind 1 small orange roughly chopped
1 Preheat the oven to 170^ C /325°F/Gas 3. Roast almonds for 5-10 minutes, cool and very coarsely chop. Lightly grease a baking sheet.
2 Using the beater on speed 12, beat the butter and sugar in the bowl, until pale and smooth. Beat in the egg, liqueur and orange rind. Add the flour baking powder, ground coriander and polenta to the bowl and mix at speed 2 to make a soft dough. Add the nuts and beat at speed 2, until well combined.
3 Turn out onto a lightly floured work surface and knead slightly. Halve the mixture and shape each into a 5cm wide, 2cm ( 34 inch) deep rectangular shape.
4 Place on the prepared baking sheet and chill for 20 minutes. Bake for about 30 minutes until just firm. Transfer to a wire rack to cool for about 10 minutes then cut diagonally into 1cm ( 12 inch) wide slices.
5 Place the Biscotti cut side down on the baking sheet and bake for a further10 minutes, until crisp. Cool on a wire rack, store in airtight container.
pecan tart
serves 6
1 quantity of rich flan pastry 40g(1 12 oz) butter, melted see page 8 5ml (1tsp) vanilla essence 175g (6oz) pecan nuts 180ml (6floz) evaporated milk 175g (6oz) light soft brown sugar 2 eggs, beaten 15ml (1tbsp) golden syrup
1 Roll out the pastry and use to line a 23cm (9inch) fluted flan tin. Prick the base with a fork and cover and chill for 20 minutes.
2 Preheat the oven to 190^ C/375°F/Gas Mark 5. Line the pastry case with greaseproof paper and baking beans and bake for 10 minutes. Remove the beans and paper and bake for a further 5 minutes. Remove from the heat. Reduce the oven temperature to 170^ C/325°F/Gas Mark 3.
3 Chop 100g (4oz) of the pecan nuts and set aside the remaining. Using the whisk on speed 10, whisk together the remaining ingredients, until well combined.
4 Pour onto the pastry case and arrange the reserved pecan halves in concentric circles on top.
5 Bake for 35-40 minutes, until golden and firm to the touch. Serve accompanied by ice cream or whipped cream.
recipes
white chocolate cake
serves 8
For the cake: 2.5ml ( ^1/_2 tsp) salt
150g (5oz) butter, softened 280ml (8floz) milk
300g (10oz) caster sugar 250g (9oz) white chocolate, melted
4 eggs For the truffle topping:
1 tsp vanilla extract 250g (9oz) white chocolate, broken into pieces
350g (12oz) plain flour 280ml (8floz) double cream
12.5ml (2½tsp) baking powder Dark chocolate shavings, to decorate
1 For the cake: preheat the oven to 180^ C/350°F/Gas 4. Grease and line the bases of two 20cm (8 inch) round cake tins.
2 Using the beater on speed 8, beat the butter to soften. Add the sugar and beat until pale and fluffy. Gradually beat in the eggs and vanilla essence, adding a little flour, to prevent curdling.
3 Sieve the remaining dry ingredients into the bowl beating in at speed 2. Blend the chocolate and milk together and then beat into the cake mixture.
4 Divide the batter between the two tins and bake for 30 minutes. Cool in the tins for 10 minutes and then turn out onto a wire rack to cool.
5 To make the topping, place the chocolate in a bowl set over a pan of simmering water until melted. Remove from the heat.
6 Using the whisk at speed 12, whip the cream until soft peaks form. Fold the chocolate into the cream and use to sandwich the cakes together and spread the remaining mixture over the top of the cake. Decorate with the dark chocolate shavings. Chill before serving.
mediterranean fruit ring
serves 6
makes 1 loaf
450g (1lb) strong plain white flour 75g (3oz) sultanas
5ml (1tsp) ground cinnamon 50g (2oz) caster sugar
2.5ml (1/1 tsp) ground ginger grated rind of 1/2 lemon
2.5ml (1/2tsp) salt 15ml (1tbsp) olive oil
7g sachet (1½ tsp) fast action 300ml (½ pint) lukewarm milk
dried yeast beaten egg, to glaze
50g (2oz) chopped almonds
or walnuts
1 Sift the flour cinnamon, ginger and salt into the bowl. Add the yeast, nuts, sultanas, sugar, lemon, olive oil and milk. Fit the dough hook and mix to a soft dough on speed 2.
2 Then increase speed to 4-6 and knead for a further 7 minutes until smooth and elastic. Remove the dough from the bowl and form into a ball. Return to the bowl, cover, leave to rise in warm place for 1 - 112 hours or until doubled in size.
3 Transfer the dough to a floured surface and divide into 3 equal pieces. Roll each into a rope shape 62cm (25 inches) long. Lay them side by side.
4 Starting at one end, plait the pieces together. Bring the ends together to form a circle and pinch to seal.
5 Place on a lightly oiled baking sheet, cover with oiled clear film and leave in a warm place to rise for 30-45 minutes until doubled in size. Preheat oven to 200°C/400°F/Gas 6.
6 Brush with beaten egg to glaze and bake for 20-25 minutes or until risen and golden. Transfer to wire rack to cool. Serve sliced.
recipes
chocolate chip walnut loaf
serves 6
makes 1 loaf
75g (3oz) caster sugar 5ml (1tsp) vanilla extract
85g (3½oz) flour 30ml (2tbsp) currants or raisins
5ml (1tsp) baking powder 25g (1oz) walnuts, chopped
60ml (4tbsp) corn flour grated rind of 12 a lemon
130g (4½oz) butter, softened 45ml (3tbsp) plain chocolate chips
2 eggs icing sugar, for dusting
1 Preheat the oven to 180^ C/350°F/Gas 4. Grease and line a 450g (1lb) loaf tin. Sprinkle 10ml (2tsp) of the caster sugar into the pan evenly to coat the base and sides.
2 Sift the flour, baking powder and corn flour into a bowl. Using the beater on speed 10-12, cream the butter to soften. Add the remaining sugar and continue beating until light and fluffy. Gradually beat in the eggs, adding a little of the flour mixture to prevent curdling.
3 Gently fold in the remaining flour mixture, do not over mix. Fold in the vanilla, currants or raisins, walnuts, lemon rind and chocolate chips until combined.
4 Spoon into the tin and bake for 45-50 minutes. Allow to cool in the tin for 15 minutes, before transferring to a wire rack to cool completely. Dust over an even layer of icing sugar before serving.
crushed blackberry syllabub
serves 4-6
300g/10oz ripe blackberries 300ml ( /pt) double cream
75g/3oz caster sugar 30ml (2tbsp) brandy
finely grated rind and juice of 12 lemon
1 Using the beater on speed 6, crush the blackberries with the sugar and lemon zest until you have knobbly, runny mush. Beat in the lemon juice and the cream.
2 Change the beater to a whisk and on speed 10, whisk the mixture, adding the brandy when its beginning to thicken. Carry on whisking until thick and light, but still floppy.
3 Spoon into individual glasses. Either serve immediately or chill until ready to eat.
no bake lemon cheesecake
serves 6-8
175g (6oz) digestive biscuits 150g (5oz) caster sugar
50g (2oz) butter grated rind and juice of 3 large lemons
25g (1oz) Demerara sugar 450ml ( ^3/_4 pt) double cream
350g (12oz) full fat soft cheese Fresh seasonal fruit, to decorate
1 Finely crush digestive biscuits in a bag with a rolling pin. Melt the butter in a pan and add the Demerara sugar and biscuit crumbs and stir well to mix.
2 Turn biscuit mixture into 20cm(8inch) round spring-form cake tin and press firmly with a spoon.
3 Using the whisk on speed 4, beat the soft cheese and sugar together, until smooth. Gradually add lemon zest and juice and beat until well combined. Spoon into a separate bowl.
4 Using the whisk on speed 10, whip the double cream until it forms soft peaks. Fold the whipped cream into the cheese mixture.
5 Slowly pour cheese mixture into the cake tin so that it evenly covers biscuit bottom. Level surface, cover and leave in refrigerator overnight until well chilled and set.
6 Loosen tin side from cheesecake and slide onto plate. Decorate with seasonal fresh fruit.
recipes
carrot cake
makes 24
10ml (2tsp) baking powder 3 eggs
10ml (2tsp) bicarbonate of soda 250g (9oz) crushed pineapple
2.5ml (1/2 tsp) salt with juice
10ml (2tsp) ground cinnamon 175g (6oz) chopped toasted
5ml (1tsp) ground nutmeg pecans or walnuts
2.5ml (1/2 tsp) ground cloves 50g (2oz) desiccated coconut
60ml (4tbsp) vegetable oil 250g (9oz) grated carrots
225g (8oz) caster sugar 175g (6oz) raisins
65g (2½ oz) light soft brown sugar 500g (1lb2 oz) plain flour
10ml (2tsp) vanilla essence
1 Preheat oven to 180^ C / 350^ F / Gas 4. Grease a 33cmx 25cm (13 x 9 inch) cake tin. Sift the flour, baking powder, bicarbonate of soda, salt, cinnamon, nutmeg and cloves into a bowl and set aside.
2 Using the beater on speed 4-6, beat together the oil, sugar, brown sugar, vanilla, and eggs, until smooth. Reduce speed to 2 and add pineapple, walnuts, coconut, carrots and raisins until well mixed.
3 Gradually beat in the flour mixture on speed 2, until will be combined. Pour mixture into the tin and bake for 40-50 minutes. Turn out onto a wire rack to cool. Cut into 24 pieces. Serve on its own or with butter.
royal icing
six egg whites
1500gms (50oz) of icing sugar
1 Add the six egg whites to the bowl
2 Fit the beater, on speed 2 gradually add the icing sugar over a period of approx. 2 to 3 minutes increasing the speed to 12 as the ingredients combine.
3 As soon as the ingredients have combined continue to run for a further 45 seconds.
4 Makes a quantity suitable for 2 x 20cm (8inch) round cakes
- Voor gistmengsels.
de mixer gebruiken
natural_image
Line drawing of a medical procedure with a labeled arrow pointing to a device (no text or symbols present)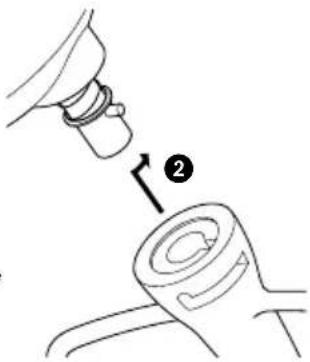
natural_image
Diagram showing a mechanical assembly with a pin labeled '2' and an arrow indicating direction (no text or symbols present)
natural_image
Line drawing of a kitchen mixer with handle and control knob (no text or symbols)snelheidsschakelaar

natural_image
Anatomical line drawing of a surgical procedure on a hip joint, showing a finger placement and a numbered label (1) with an arrow pointing to the area.
natural_image
Diagram showing a mechanical assembly with a component labeled '2' and an arrow pointing to it (no text or symbols present)
natural_image
Line drawing of a kitchen mixer with handle and control knob (no text or symbols)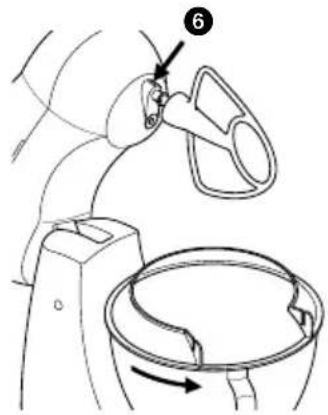
natural_image
Medical illustration showing a surgical procedure on a joint (no text or symbols present)
natural_image
Diagram showing a mechanical assembly with a component labeled '2' and an arrow pointing to it (no text or symbols present)
natural_image
Line drawing of a kitchen mixer with handle and control knob (no text or symbols)natural_image
Line drawing of a hand holding a small object above a bowl, with an arrow indicating direction (no text or symbols)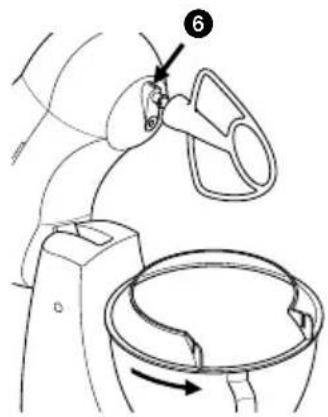

natural_image
Anatomical line drawing of a medical procedure with labeled point (1), showing a surgical instrument inserted into a body cavity (no text or symbols beyond the label)per montare un
suggerimenti
natural_image
Line drawing of a kitchen mixer with handle and control knob (no text or symbols)importante
natural_image
Line drawing of a hand holding a small object above a circular component, with an arrow indicating direction (no text or symbols)

natural_image
Line drawing of a medical procedure with a labeled arrow pointing to a device (no text or symbols present)
natural_image
Line drawing of a kitchen mixer with handle and control knob (no text or symbols)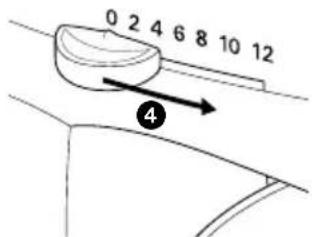
hastighedskontakt

natural_image
Line drawing of a medical procedure with a labeled arrow pointing to a component (no text or symbols present)
natural_image
Line drawing of a kitchen mixer with handle and control knob (no text or symbols)hastighetsreglage

2.5ml bakpulver 150ml mjölk
(white chocolate chips) 75g mjöl
50g smör 7,5ml bakpulver
2 ägg
natural_image
Anatomical diagram of a medical procedure showing a finger placement on a curved surgical instrument (no text or labels present)natural_image
Diagram showing a mechanical assembly with a tool and a numbered component (no text or symbols present)vihjeitä
natural_image
Line drawing of a kitchen mixer with handle and control knob (no text or symbols)
enimmäismäärät
murotaikina
hedelmäkak-
kutaikina
natural_image
Line drawing of a hand holding a small object above a bowl, with an arrow indicating direction (no text or symbols)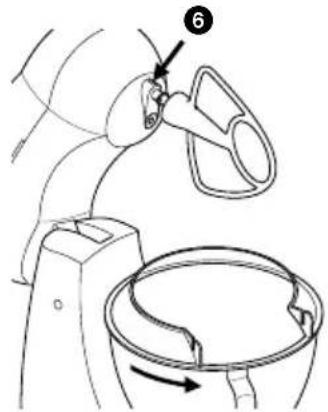
perushuolto
perushuolto
natural_image
Anatomical diagram of a surgical procedure showing a tool inserted into a catheter (no text or labels present)
natural_image
Line drawing of a mechanical component with a pin labeled '2' pointing to a cylindrical part (no text or symbols beyond the number)
natural_image
Line drawing of a kitchen mixer with handle and control knob (no text or symbols)

natural_image
Anatomical line drawing of a human shoulder joint with a labeled arrow pointing to a specific area (no text or symbols present)consejos
natural_image
Line drawing of a kitchen mixer with handle and control knob (no text or symbols)
para introduzir um
natural_image
Diagram showing a mechanical assembly with a pin labeled '2' and an arrow indicating direction (no text or symbols present)sugestões
natural_image
Line drawing of a kitchen mixer with handle and control knob (no text or symbols)the mixer

natural_image
Line drawing of a medical procedure with a numbered arrow pointing to a component (no text or symbols present)
natural_image
Line drawing of a kitchen mixer with handle and control knob (no text or symbols)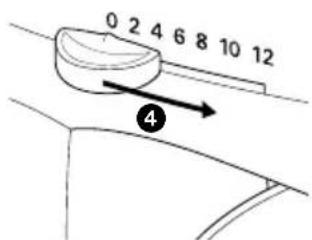

natural_image
Anatomical diagram of a surgical procedure showing a needle inserted into a catheter (no text or labels present)
natural_image
Diagram showing a mechanical assembly with a pin labeled '2' pointing to a cylindrical component (no text or symbols present)
natural_image
Line drawing of a kitchen mixer with handle and control knob (no text or symbols)hız düğmesi

temizlik ve bakım
bakım ve temizlik
natural_image
Line drawing of a medical procedure with a labeled arrow pointing to a component (no text or symbols present)
natural_image
Diagram of a mechanical assembly showing a pin inserted into a housing with a numbered arrow indicating direction (no text or symbols present)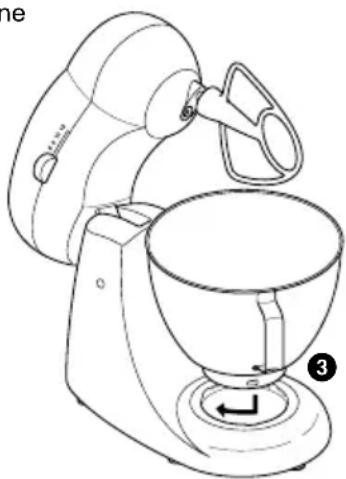
natural_image
Line drawing of a kitchen mixer with handle and control knob (no text or symbols)volič rychlosti


čištění a servis
údržba a čištění
natural_image
Anatomical diagram of a surgical procedure showing a needle inserted into a catheter (no text or labels present)
natural_image
Diagram showing a mechanical assembly with a component labeled '2' and an arrow pointing to it (no text or symbols present)
natural_image
Line drawing of a kitchen mixer with handle and control knob (no text or symbols)sebesség kapcsoló

mikser
natural_image
Line drawing of a medical procedure with a labeled arrow pointing to a clip (no text or symbols present)
natural_image
Diagram showing a mechanical assembly with a tool and a numbered component (no text or symbols present)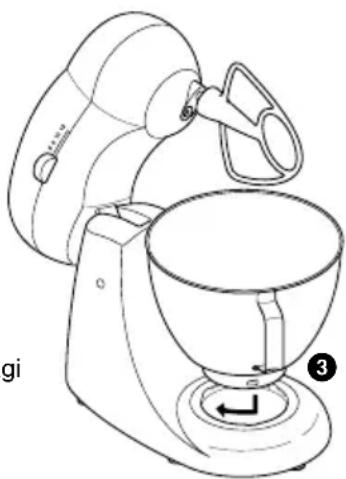
natural_image
Line drawing of a kitchen mixer with handle and control knob (no text or symbols)
миксер
natural_image
Line drawing of a medical procedure with a labeled arrow pointing to a device (no text or symbols present)
natural_image
Diagram showing a mechanical assembly with a component labeled '2' and an arrow pointing to it (no text or symbols present)советы
natural_image
Line drawing of a kitchen mixer with handle and control knob (no text or symbols)важная информация
natural_image
Anatomical diagram of a surgical procedure showing a needle inserted into a catheter (no text or labels present)
natural_image
Line drawing of a kitchen mixer with handle and control knob (no text or symbols)