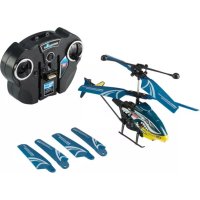
VRSHOT - Remote control toy Revell - Free user manual and instructions
Find the device manual for free VRSHOT Revell in PDF.
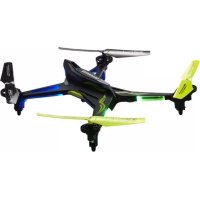
| Product type | Radio-controlled quadcopter with camera |
| Brand | Revell |
| Model | VRSHOT |
| Model power supply | Rechargeable Li-Po battery 3.7 V / 500 mAh / 1.85 Wh |
| Remote control power supply | 4 AA 1.5 V batteries (not included) or USB 5 V charging |
| Flight time | Approximately 5 to 7 minutes |
| Charging time | Approximately 75 minutes |
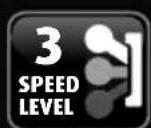
| Flight functions | Forward/backward flight, lateral translation, rotation, flips, 3 speed levels (40 %, 70 %, 100 %) |
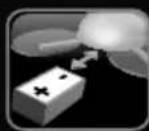
| Pilot modes | Remote control, smartphone (via Wi-Fi app), VR headset |
| Video transmission | Direct Wi-Fi (hotspot), HD resolution |
| Recording | Photo and video on smartphone or microSD card |
| VR headset | Included, compatible with smartphone |
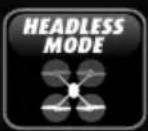
| Headless mode | Yes (activation by button) |
| Recommended age | From 14 years |
| Usage | Indoor and outdoor (dry weather, no wind) |
| Safety | Read the manual before use, adult supervision mandatory, liability insurance mandatory for outdoor flight |
| Maintenance | Clean with a damp cloth, avoid water, protect from sun |
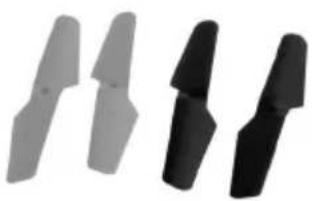
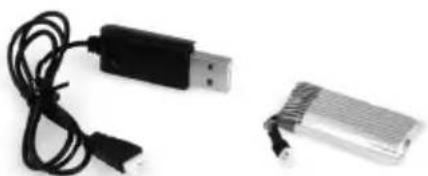
| Spare parts | Propellers (4 color-coded pieces), Li-Po battery, USB charger |
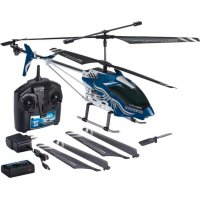
| Box contents | Model, remote control, VR headset, USB charger, battery, 4 landing skids, 4 propellers, USB cable, screws, manual |
| Warranty | Standard Revell warranty (consult the manufacturer) |
Frequently Asked Questions - VRSHOT Revell
User questions about VRSHOT Revell
0 question about this device. Answer the ones you know or ask your own.
Ask a new question about this device
Download the instructions for your Remote control toy in PDF format for free! Find your manual VRSHOT - Revell and take your electronic device back in hand. On this page are published all the documents necessary for the use of your device. VRSHOT by Revell.
USER MANUAL VRSHOT Revell
natural_image
Three black and white propeller blades with 'Control' branding, arranged diagonally (no text or symbols on blades)natural_image
Black VR headset and a handheld device with circular buttons (no visible text or symbols)VR-Brille VR Glasses
43630
natural_image
Close-up of three cylindrical electronic components with black wires, no visible text or symbolsnatural_image
Close-up of multiple screws spilling out (no text or symbols visible)natural_image
Close-up of a rectangular electronic device with a black cable and connector (no visible text or symbols)natural_image
Black USB device with coiled cable, no visible text or symbolsnatural_image
Two black curved metal brackets with a small mark below, no text or symbols visibleLandegestell Landing Gear
43635

natural_image
Abstract line drawing of intersecting curved shapes with no text or symbolsSchutzringe Protection Rings
43636

Getriebe Gearbox
43637
natural_image
Black plastic mechanical component with cutouts and mounting holes (no text or symbols visible)Batteriefachdeckel Battery Compartment Cover
Revell Control

text_image
®Revellwww.revell-control.de
VR QUAD
VR SHOT
© 2016 Revell GmbH, Henschelstr. 20-30, D-32257 Bünde. A subsidiary of Hobbico, Inc. REVELL IS THE REGISTERED TRADEMARK OF REVELL GMBH, GERMANY. Made in China.
WIFI-LIVESTREAM

FREE APP: HD MAX
USER MANUAL


Inhalt
Table of contents
Contenuto
ontenic
natural_image
Black-and-white photo of a quadcopter drone with four propellers and extended wings (no text or symbols visible)Modell
Model
Modèle
Model
Modelo
Modello
natural_image
Three abstract black and gray geometric shapes arranged horizontally (no text or symbols)Ersatz-Propeller
Replacement propeller
Hélice de rechange
Reserve-propeller
Hélices de recambio
Elica di ricambio
natural_image
Two electronic devices: a USB cable and a rectangular charging case, both without any visible text or symbols.USB charging unit and battery
natural_image
Close-up of a black handheld electronic device with multiple circular lights and a top-mounted antenna (no visible text or symbols)Remote control with smart phone holder
natural_image
Black and white photo of a portable electronic device with straps and buttons (no visible text or symbols)VR-Brille
VR goggles
Casque VR
VR-bril
Gafas VR
Occhiali VR
Bedienungsanleitung
Operating manual
Mode d'emploi
Gebruiksaanwijzing
natural_image
Close-up of a black game controller casing with labeled component '2M' (no other text or symbols visible)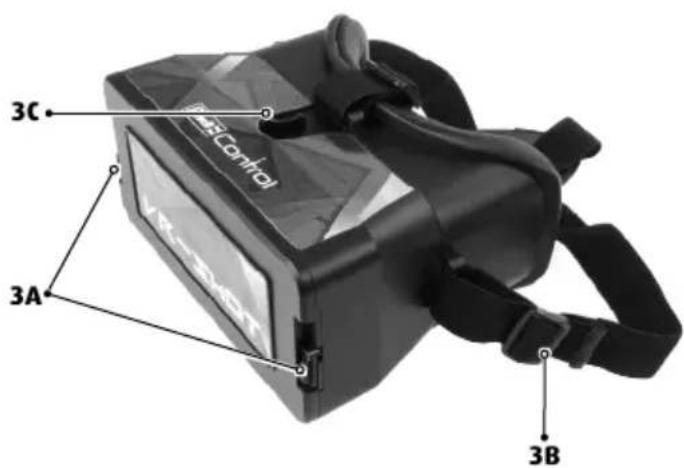
text_image
3C 3A 3B4
natural_image
Close-up of a black game controller with a screwdriver inserted, showing internal components and a circular arrow indicating rotation (no text or symbols)4A4B
natural_image
Close-up of a black electronic device with four rectangular battery cells and a cable, no visible text or symbols.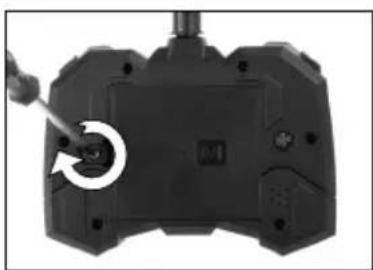
natural_image
Close-up of a black gaming controller with a screwdriver inserted, showing the button and control buttons (no text or symbols visible)4C
5

natural_image
Close-up of a mechanical assembly with visible brackets and mounting holes (no text or symbols)5A

natural_image
Close-up of hands installing or adjusting a mechanical component with a white arrow pointing to a detail (no visible text or symbols)5B5C
natural_image
Close-up of a hand adjusting a small metallic component on a drone-like structure (no visible text or symbols)6
natural_image
Close-up of a hand holding a black drone component with a cable inserted, no visible text or symbols6A
natural_image
Mechanical assembly diagram showing two views of a mechanical component with rotational arrows indicating motion (no text or symbols)6B6C
natural_image
Close-up of a black electronic device with a coiled cable and a separate plastic connector (no text or symbols visible)7
natural_image
Close-up of hands assembling electronic components with arrows indicating assembly (no visible text or symbols)7A
natural_image
Close-up of a mechanical assembly with visible brackets and mounting holes (no text or symbols)7B7C

natural_image
Close-up of hands holding a black electronic device with wires and components (no visible text or symbols)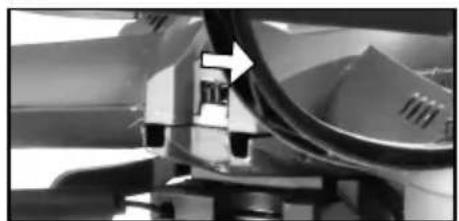
natural_image
Close-up of mechanical components with a blue arrow pointing to a section (no visible text or symbols)7D7E7F
natural_image
Close-up of a hand pressing down on a black mechanical component with a downward arrow (no text or symbols visible)8

natural_image
Close-up of a hand pressing down on a black game controller with a downward arrow indicator (no text or symbols)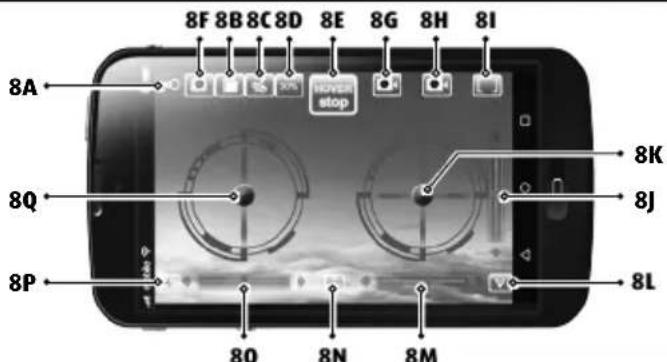
text_image
8F 8B 8C 8D 8E 8G 8H 8I 8A 8Q 8P 8O 8N 8M 8K 8J 8L10
natural_image
Black VR headset with 'VR-SHOT' branding and circular arrows indicating motion (no readable text beyond branding)10A10B10C
natural_image
Black VR headset with open case and plastic tray (no visible text or symbols)
natural_image
Close-up of hands holding a black flip phone (no visible text or symbols)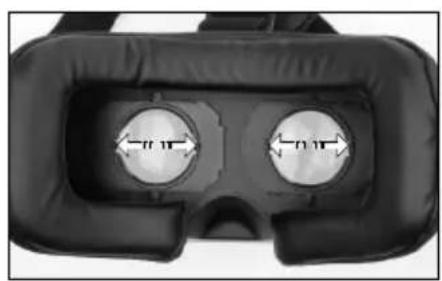
natural_image
Close-up of a black VR headset with two circular lenses and measurement arrows indicating width (no text or symbols)10D10E10F
natural_image
Close-up of a hand pressing down on a black electronic device with visible traces (no text or symbols)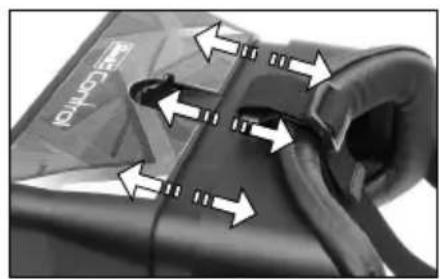
text_image
RECEPTO11
text_image
11A 11B2C·
natural_image
Close-up of a mechanical component with directional arrows indicating movement or force (no text or symbols visible)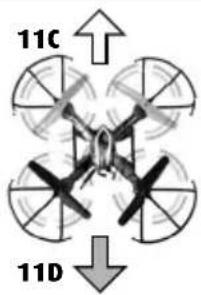
text_image
11C 11D2J·
natural_image
Top-down view of a spacecraft cockpit with visible cockpit, control panel, and directional arrows (no text or symbols)
natural_image
Top-down view of a four-bladed drone with multiple propellers and a central cockpit (no text or symbols visible)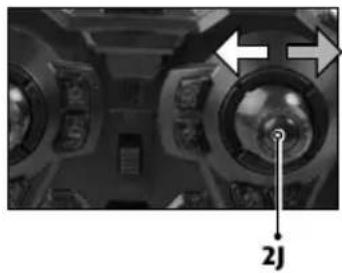
natural_image
Interior view of a ship's dashboard with visible steering wheel and control panel (no text or symbols)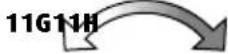
natural_image
Top-down view of a four-bladed drone with multiple propellers and a central cockpit (no text or symbols visible)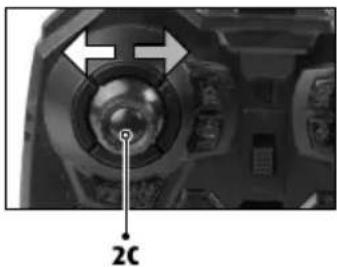
natural_image
Close-up of a camera lens and head panel with no visible text or symbols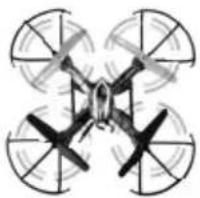
natural_image
Top-down illustration of a four-bladed drone with visible propellers and rotor blades (no text or symbols)Speed
natural_image
Close-up of a mechanical component with a labeled section '2B' (no other text or symbols visible)
natural_image
Diagram of a boat with curved arrows indicating rotation, labeled 'Flip' below (no text or symbols on the diagram itself)
natural_image
Close-up of a mechanical component with a 2K scale indicator (no text or symbols on the object itself)12
natural_image
Top-down diagram of a four-bladed drone with directional arrows indicating flight or movement (no text or symbols)
natural_image
Close-up of a mechanical device with a circular dial and labeled component '21' (no readable text or symbols beyond label)
natural_image
Diagram of a four-bladed drone with directional arrows indicating rotation or movement (no text or symbols)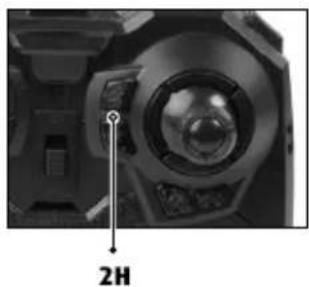
natural_image
Close-up of a camera lens with a 2H indicator and control panel (no text or symbols on the lens itself)14
natural_image
Top-down diagram of a four-bladed drone with labeled points A and B (no text or symbols on the drone itself)14A

natural_image
Close-up of a mechanical component with a rotating knob and curved blades (no visible text or symbols)14B
natural_image
Close-up of a propeller with a circular arrow indicating rotation (no text or symbols visible)14C
WICHTIGE MERKMALE
Modell:
text_image
QR code image containing encoded data, no visible human-readable text

text_image
QR code image containing encoded data, no visible human-readable text
• Establishes its own WLAN hotspot
• Live video feed to your smart phone
- Record directly to your smart phone
- Can be controlled with the supplied transmitter or your smart phone

Safety instructions:
- Before using for the first time, make sure that you have read and understood the entire manual.
- This model is suitable for pilots who are at least 14 years of age. Adult supervision is required when flying it.
- This model is suitable for use indoors and in outdoor areas when there is no wind or rain.
- Keep your hands, face and loose clothing away from the model during operation.
- Switch off the transmitter and model when they are not in use.
- Remove the batteries from the transmitter when it is not in use.
• Always maintain visual contact with the model in order to avoid losing control of it. Inattentive and careless use can lead to considerable damage.
- Please keep this operating manual safe for later use.
- The user should only operate this model in accordance with the instructions for use in this operating manual.
- Do not use the model near people, animals, bodies of water or power lines.
- This model is not suitable for people with physical or mental disabilities. We recommend that people who are unfamiliar with model helicopters operate the model under the guidance of an experienced user.
• A model should never be operated under the influence of drugs or alcohol.
- In general, it must be ensured that the model cannot injure anyone in consid-
eration of potential malfunctions and defects.
• The product may only be repaired or modified with approved original parts. Otherwise, the model can be damaged or pose a danger.
• In order to prevent risks, always operate the model from a position which provides an easy line of retreat, if necessary.
Safety instructions for flying models:
- You are operating your aircraft in the general air space. As the pilot, you are responsible for your model. You are liable for your model and any damage resulting from its operation.
- If you want to use your aircraft commercially, you need an ascent permit.
- Before using for the first time, familiarize yourself with the functions of the model.
- Check that the product is working correctly before every flight.
- Observe the instructions of the manufacturer at all times.
• Always note the wind and weather conditions and any obstructions. - You must always swerve away from manned aircraft immediately and land right away.
- Please be aware of the privacy of others: never take photographs of people without their permission and observe all regulations governing personal privacy. Photographs are only for private use and may not be sold.
- Do not fly over private property owned by other people, crowds of people, military objects, hospitals, power plants,
correctional facilities and similar.
- Do not fly close to airfields (<1.5 km).
- Never fly without direct visual contact with the model, it must be in the direct field of vision at all times. It is illegal to control a model using only a video image.
- Failure to observe these safety instructions may make you liable to prosecution!
• Information and additional help is available from the Association for Unmanned Air Vehicles under "http://www.uavdach.org" - Flying models outdoors has required mandatory liability insurance since 2005. Contact your private liability insurer and make sure that your new and earlier models are included in your insurance coverage. Request written confirmation and keep this in a safe place. Alternatively, the DMFV offers a trial membership free of charge online at www.dmfv.aero. This includes insurance.
Transmitter safety instructions:
• We recommend new alkali manganese batteries for the transmitter. Single-use batteries for this transmitter and other electrical devices operated in the home can be replaced with environmentally-friendly rechargeable batteries.
- As soon as the transmitter no longer functions reliably, new batteries should be inserted and/or the batteries should be charged.
Safety instructions for batteries:
- Rechargeable batteries must be removed from the transmitter prior to recharging.
• Non-rechargeable batteries may not be charged. - Rechargeable batteries may only be charged under the supervision of an adult.
• The combination of different types of batteries as well as new and used batteries must be avoided. - Only recommended batteries or those of an equivalent type may be used.
• Batteries must be inserted according
to the correct polarity (+ and -).
- Depleted batteries must be removed from the transmitter.
- The connection terminals may not be short-circuited.
- Remove the batteries from the transmitter if they are not to be used for an extended period of time.
Charging unit safety instructions:
• Non-rechargeable batteries may not be charged.
- This charging unit is not suitable for people (including children) with physical or mental limitations, or those with insufficient knowledge and experience of charging units, unless under supervision or following proper directions from a parent or legal guardian.
• Children must be supervised – the charging unit is not a toy!
• Transformers, mains adapters or chargers that are used together with the model must be checked regularly for damage to cables, plugs, housings and other parts and any damages must be repaired before the devices may be used again.
The model is equipped with a rechargeable lithium polymer battery. Please observe the following safety instructions:
- Never throw LiPo batteries into a fire or store them in a hot location.
- Only use the supplied charger to charge the battery. The use of a different charger may lead to the permanent damage of the battery and neighbouring parts, as well as physical injury!
- Never use a charger for NiCd/NiMH batteries!
• Always ensure that the charging process takes place on a fireproof surface in a fire-resistant environment. - Do not leave the battery unsupervised during the charging process.
- Never disassemble or alter the battery contacts. Do not damage or puncture the battery cells. There is a risk of explosion!
• The LiPo battery must be kept out of reach of children.
- When disposing of batteries, they must be discharged or their capacity must be fully depleted. Cover exposed terminals with adhesive tape in order to prevent short-circuiting!
Maintenance and care:
- Please only use a clean, damp cloth to wipe off the model.
- Protect the model and batteries from direct sunlight and/or direct heat.
- Never allow the transmitter and charging unit to come into contact with water, because the electronics will be damaged as a result.
Technical changes and differences in color reserved!
Health and epilepsy warning
If feelings of nausea, fatigue, headaches or dizziness are experienced during flight, use of the VR goggles should be discontinued immediately until the discomfort passes. If symptoms persist, consult with a physician. A very low percentage of the population can react to certain light stimulus or patterns - which could be portrayed in the VR
goggles - with epileptic seizures. This can also pertain to persons having no prior history of epileptic seizures. Should such cases arise for you or members of your family, consult with a physician before using the VR goggles. Do not use the goggles if you are tired or have not slept enough. Take a break for 15-30 min. after each flight.
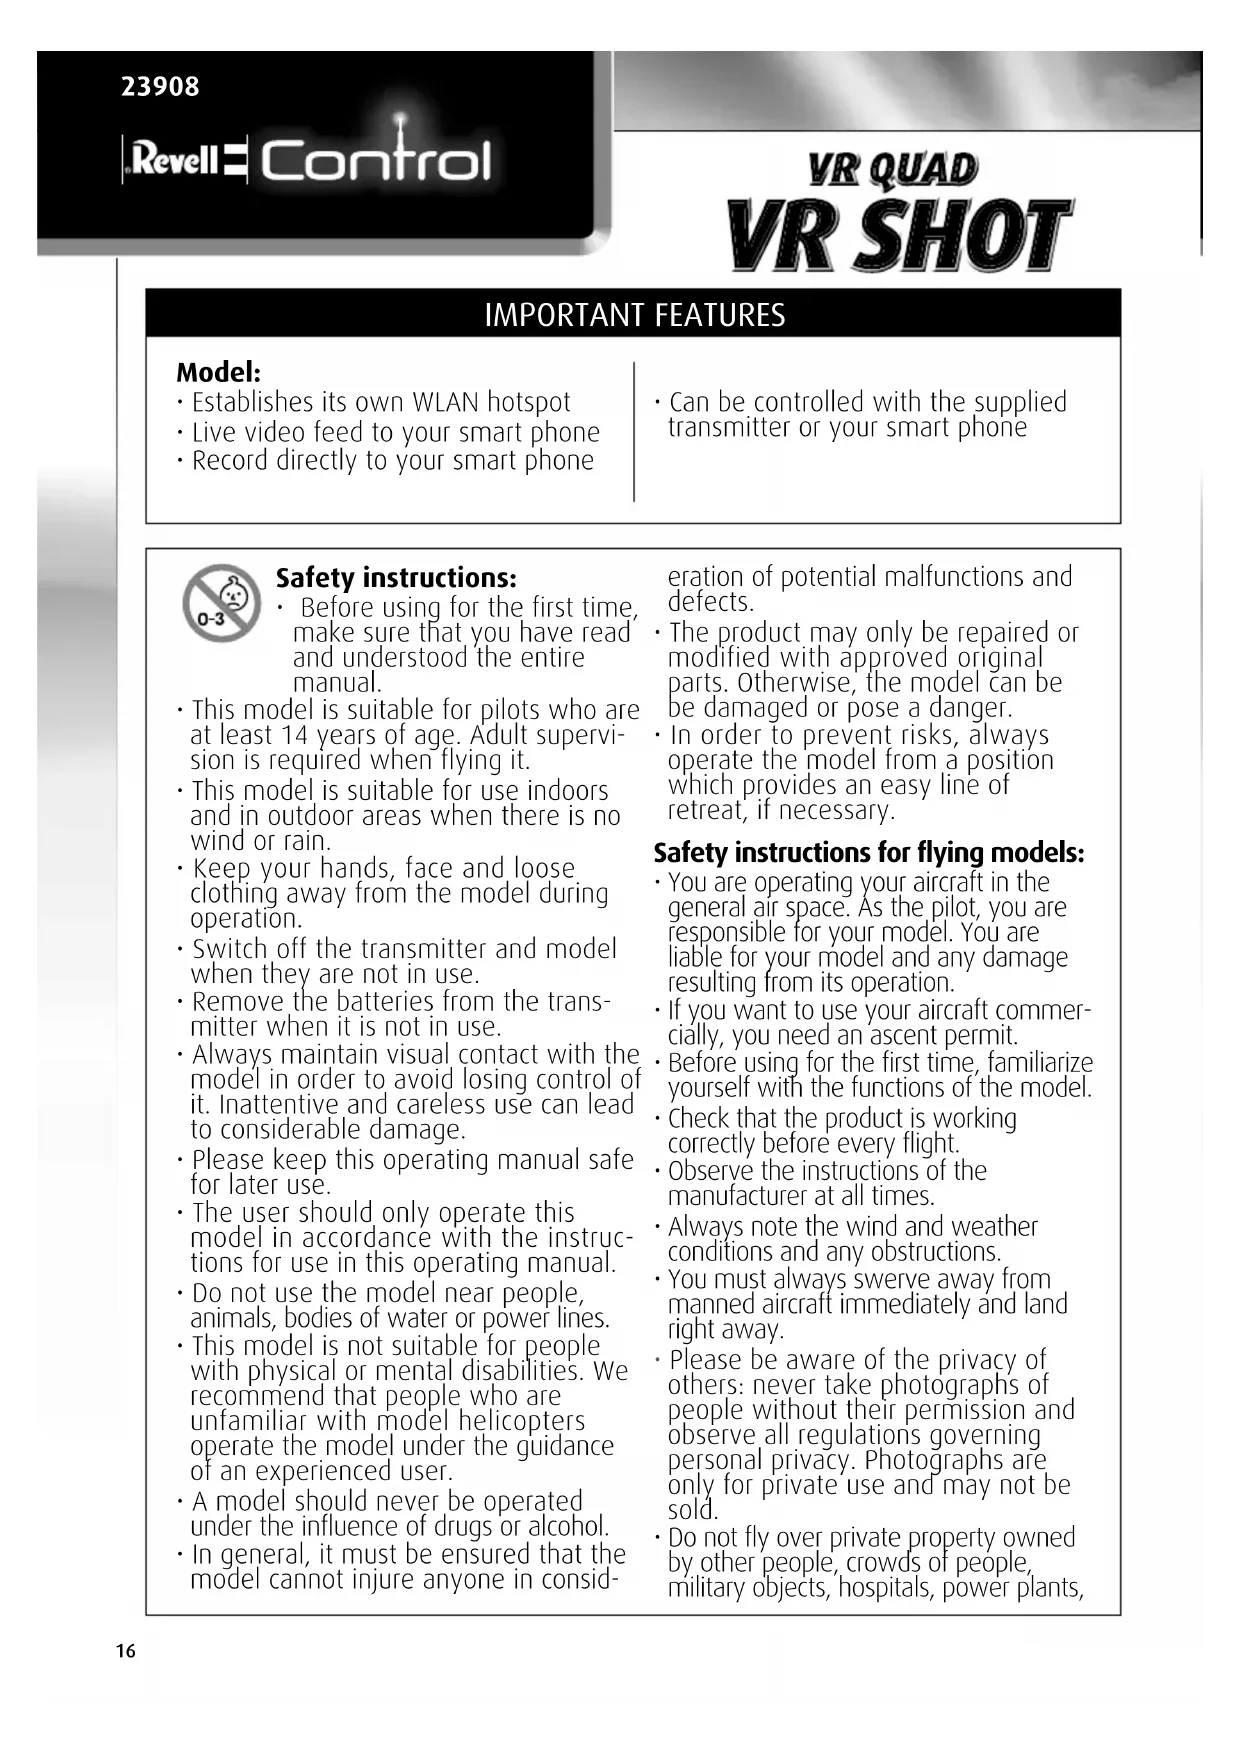
Batteries for the model:
Power supply: =
Rated output: 1 x DC 3,7 V / 500 mAh / 1,85 Wh rechargeable LiPo battery (included)
Batteries for the remote control:
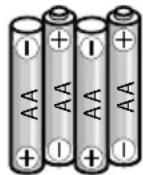
Power supply: DC 6 V Batteries: 4 x 1.5 V "AA" (not included)
USB Charger:
Power supply: DC 5 V== via USB-Port, 500 mA or higher Rated output: 5 V / 500 mA max.

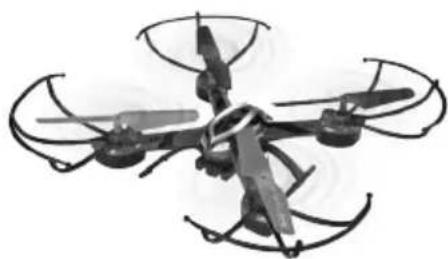
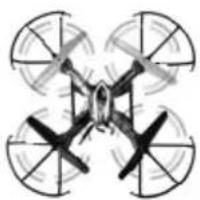
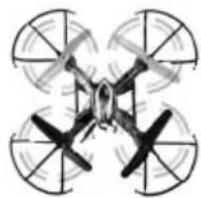
1 MODEL
1A Landing skid
1B Propeller
1C Protective rings
1D Camera and WLAN transmitter
1E Antenna
1F ON/OFF switch
1G MicroSD card slot
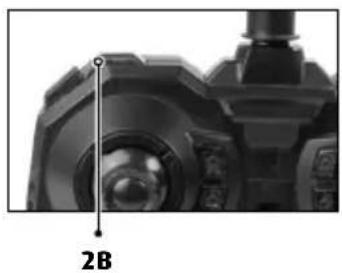
2 REMOTE CONTROL
2A Video button
2B Button for flight speed (40%, 70%, 100%) and Headless Mode
2C Control for thrust and rotation
2D Trim for rotation
2E Photo button
2F ON/OFF switch
2G Power-LED
2H Trim control for forwards/backwards
21 Trim control for sideways
2J Control for forwards/backwards and sideways
2K Button for flip function
2L Smart phone holder
2M Battery compartment cover
3 VR GOGGLES
3A Lock 3B Belt 3C Rotary knob
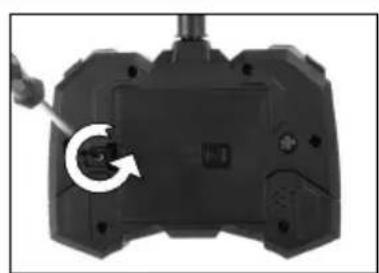
4 INSERTING BATTERIES
4A Unscrew and remove the cover.
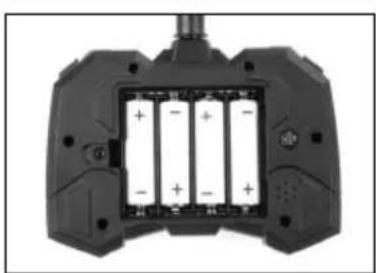
4B Insert 4 x 1.5 V AA batteries and pay attention to the polarity, as shown in the battery compartment.
4C Close the battery cover and secure with the screw.
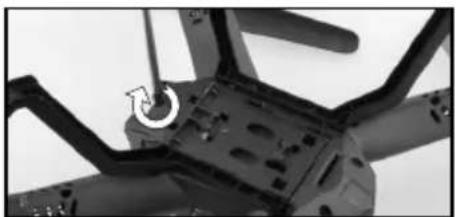
5 ASSEMBLY
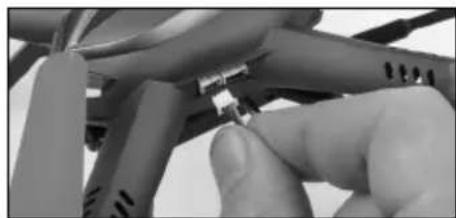
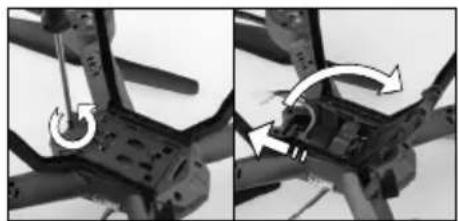
5A Insert the feet in the bottom of the model and fasten them with the accompanying screws.
5B Slide the camera into the front of the battery compartment cover until it clicks into place.
5C Insert the cable in the corresponding jack. Pay attention to the correct polarity - DO NOT USE FORCE.
4 CHARGING THE MODEL
Attention: The battery and motor must cool down for 10 to 15 minutes before charging and after every flight. Otherwise they can be damaged. The charging process must be constantly monitored. Always ensure that the charging process takes place on a fireproof surface in a fire-resistant environment.
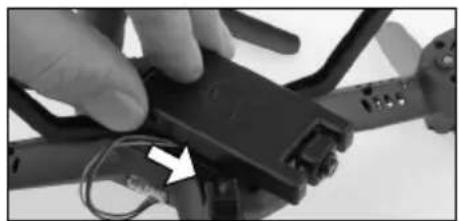
- Slide the camera forwards to detach it (6A).
- Unscrew the securing screw of the battery compartment cover and slide it back to open it (6B).
- Remove the battery from the model (do not pull on the cable).
- Plug the battery into the charging socket of the charger, ensuring correct polarity. The battery must be gently inserted into the charging socket - DO NOT USE FORCE. If the battery is not correctly inserted into the charging socket, the battery may become damaged and, under certain circumstances, cause injury.
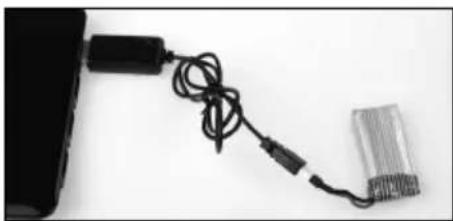
- Insert the USB charger in a free USB port; it will illuminate (6C).
- The charging process is complete when the USB charger light goes out.
- Disconnect the battery from the USB charger and disconnect the USB charger from the USB port once charging is complete.
After a charge time of approx. 75 minutes the model can fly for approx. 5-7 minutes.
Warning notice: The battery does not normally heat up while charging. If it should become warm or even hot and/or changes to the surface begin to appear, immediately discontinue the charging process!
7 START PREPARATION
Always observe the sequence when switching on! When switching off, always switch off the model before the transmitter.
Install the free app to operate the model:
Switch on the model:
- Slide the camera forwards to detach it (see 6A).
- Unscrew the securing screw of the battery compartment cover and slide it back to open it (see 6B).
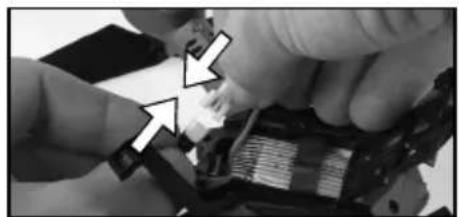
- Push the battery into the battery compartment. Insert the battery cable in the connection cable on the model (7A).
- Close the battery compartment cover and secure it with the screw (7B).
- Fit the camera on the battery compartment cover (7c).
- Then switch the ON/OFF switch on the model (1F) to ,ON'. The LEDs on the model start to blink.
- After approx. 30 seconds, the model has activated a WLAN hotspot (HelicMax-XXXXXX). Connect your smartphone to it.

text_image
QR code image containing encoded data, no visible human-readable text

text_image
QR code image containing encoded data, no visible human-readable textImportant! When switching on your model, always place it on an even horizontal surface – the control electronics aligns its neutral position to the subsurface.

Switch on the remote control:
- Set the ON/OFF switch on the transmitter (2F) to the „ON“ position. The power LED (2G) on the transmitter illuminates.
- Move the control for thrust and rotation (2C) completely up once and then completely down again to unlock the transmitter. The model is now ready to start.
Switch off the model: Then switch the ON/OFF switch on the model (1F) to the 'OFF' position. Remove the battery from the model.
Switch off the transmitter: Set the ON/OFF switch on the transmitter (2F) to the 'OFF' position.
8 USING THE APP
Note: Some functions of the app are not intended for this model and are deactivated. Start the app and select ,HD'.
Important functions:
8A Back to the app start screen
8B File management
8C Motion Control on/off
8D Button for flight speed (40%, 70%, 100%)
8E Button for motor start
8F Photo button
8G Video button (recording on the smart phone)
8H Video button (recording on SD card)
81 Adjust view
8J Trim for forwards/backwards
8K Control for forwards/backwards and banking
8L Not assigned
8M Trim for banking
8N Not assigned
80 Trim for rotation
8P Not assigned
8Q Control for thrust and rotation
Select the 'FULL' symbol (8D) for use with the smart phone holder, then the joysticks are hidden.
Select the ,Goggles' symbol (8D) for use with the VR goggles, then the display is doubled.
Control with the smart phone:
- Switch on the model as described under 7.
- Start the app on your smartphone. Important: Do NOT switch on the transmitter.
- Once the LEDs are continuously lit, the model is ready.
9 USING THE SMARTPHONE HOLDER
- Start the app and select ,HD'.
- After pressing button (81), select the 'FULL' symbol and the joysticks on the display of the telephone are hidden.
- Centre your smart phone on the suction cups of the holder.
10 USING THE VR GOGGLES:
Attention! Never fly without direct visual contact with the model, it must be in the direct field of vision at all times. It is illegal to control a model outdoors using only a video image! Alternatively, you can put on the goggles while another pilot controls the model without VR goggles. Control of the model with the video image is permitted within enclosed rooms.
- Start the app and select ,HD'.
- After pressing the button to the top right, press the ,Goggles' symbol and the display of the telephone is divided.
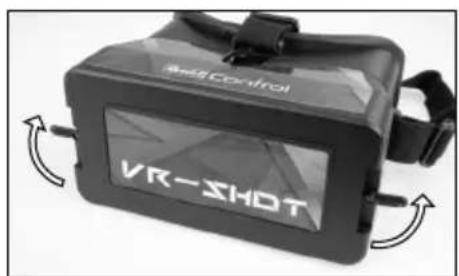
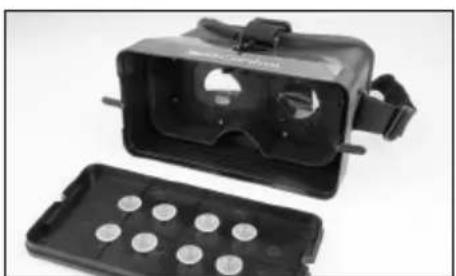
- Unscrew the two locks on the front side of the goggles and remove the cover (10A), (10B).
- Centre your smart phone on the suction cups in the cover (10c).
- Replace the cover on the goggles and close the locks.
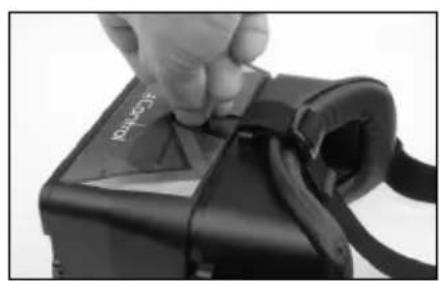
- Adjust the strap on the goggles for an appropriate fit.
- Adjust the distance between the lenses to fit your eyes (10D).
- Loosen the rotary knob on the top of the goggles. Now you can adjust the distance from the smart phone display to your eyes until the screen becomes sharp. Tighten the rotary knob again (10E), (10F).
Note:
- Do not use the video from the VR goggles to control your model until you have completely mastered control of the model! First practice with the remote control only and with a direct line of sight.
- Have a second person help you while flying by watching your model and warning you of danger.
11 FLIGHT CONTROL
Note: Only minimal corrections of the controls are necessary for a smooth flying behaviour of the model! The direction information applies if the model is viewed from behind. If the model is flying towards the pilot, it must be moved in the opposite direction.
Starting:
Transmitter:
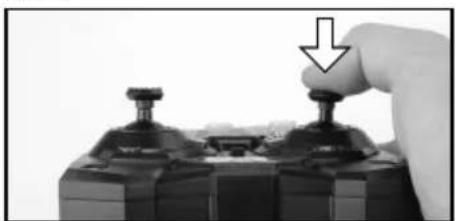
Press the right control for forwards/backwards and banking, the motors start up (7E).
Press the left control for thrust and rotation and banking, the motors start up and the model climbs to an altitude of approx. 0.5-1 m (7F).
Smart phone:
Press the button for motor start (8E), the motors start up.
Flying:
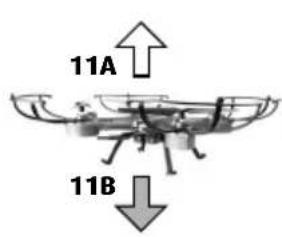
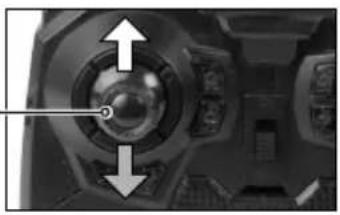
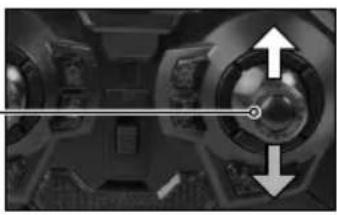
11A Take off or increase altitude by carefully moving the control for thrust and rotation (2C/8Q) up.
11B Land or decrease altitude by carefully moving the control for thrust and rotation (2B/8Q) down.
11C Fly forwards by moving the control for forwards/backwards and sideways (2J/8K) flight carefully up.
11D Fly backwards by moving the control for forwards/backwards and sideways (2J/8K) flight carefully down.
11E Fly to the left by moving the control for forwards/backwards and sideways (2J/8K) flight carefully to the left.
11F Fly to the right by moving the control for forwards/backwards and sideways (2J/8K) flight carefully to the right.
11G Turn the model around to the left by moving the control for thrust and rotation (2C/8Q) to the left.
11H Turn the model around to the left by moving the control for thrust and rotation (2C/8Q) to the left.
Flight speed
By pressing the button for flight speed (2B/8D), the sensitivity of the control can be adjusted in two steps (30%, 60%, 100%). Attention! Only switch to a higher level when you have mastered the lower one.
Performing flips - only for experienced users! Once you have mastered your model, you can try your hand at the stunt flying function. Make sure that you have sufficient room in each direction (at least 10 meters). Also comply with the safety height - fly at a height of at least 5 m, as your model loses height when rolling over and has to be height corrected afterwards!
Please note: Flips are more successful when the battery is still relatively full. Now climb to the safety height. Press the button for the flip function (2J). The transmitter beeps. Press the control for forwards/backwards and banking forwards. The model executes a forward flip – flips in a different direction are executed according to the movement of the controller. Then be ready to correct, as the altitude, direction and speed after the flip depend largely on the wind and previous flight movements.
Landing:
Press the left controller for thrust and rotation and banking (7F), the model lowers to the ground and the motors switch off.
You can also land manually. Then press the right control for forwards/backwards and banking (7E), the motors switch off.
Emergency off button:
In case of an emergency, press the right control for forwards/backwards and banking (7E), the motors switch off. Attention! Then the model falls to the ground!
12 TRIM ADJUSTMENT OF THE CONTROL
The correct trim is a basic requirement for fault-free flying behaviour of the model. Its adjustment is simple, but it requires some patience and a feel for it. Please observe the following instructions precisely: Carefully move the thrust control up and raise the model approximately 0.5 to 1 metre in altitude.
12A If the model moves by itself slowly or quickly to the left or right ... press the trim control for sideways (2I/8M) incrementally in the opposite direction.
12B If the model moves by itself slowly or quickly forwards or backwards ... press the trim control for forwards/backwards (2H/8J) incrementally in the opposite direction.
12C If the quadrocopter moves by itself slowly or quickly around its own axis ...
gradually press the trim for rotation (2D/80) in the opposite direction.
13 HEADLESS MODE
When Headless Mode is activated, the model reacts to control commands, as though the tail of the model always faced the pilot, regardless of the direction of the model. Therefore, it can also be controlled 'normally' without thinking.
Press the button for flight speed (40%, 70%, 100%) and Headless Mode (2B) for longer than 3 seconds to switch Headless Mode on and off.
Attention: To function correctly, Headless Mode must be activated when the tail of the model is pointing directly towards the pilot.
INSTRUCTIONS FOR SAFE FLYING
GENERAL FLYING TIPS:
• Always place the model on a level surface. An inclined surface can, under certain circumstances, have a negative impact on the starting behaviour of the model.
• Always operate the controls slowly and with a gentle touch.
• Always maintain visual contact with the model and do not look at the transmitter!
- If the model lowers, move the control for thrust and rotation slightly upward again.
- If the model climbs, move the control for thrust and rotation down slightly.
• To fly along a curve, tapping the controls very slightly in the respective direction often suffices. There is a general tendency during preliminary attempts at flight to
operate the model's controls too aggressively. Always operate the controls slowly and carefully. Never fast and erratic.
- Beginners should first master trimming before attempting to master the control for thrust and rotation. The model does not necessarily have to fly straight at the beginning – initially, it is more important to maintain a constant height of approximately one metre above the ground by repeatedly tapping the control for thrust and rotation. Only then should the pilot practice steering the model left and right.
BATTERY STATUS:
- If the model begins to lose thrust or the LED on the underside begins to blink, the battery is depleted. Land immediately in order to avoid crashing.
ATTENTION!
Flying models outdoors has required mandatory liability insurance since 2005. Contact your private liability insurer and make sure that your new and earlier models are included in your insurance coverage. Request written confirmation and keep this in a safe place. Alternatively, the DMFV offers a trial membership free of charge online at www.dmfv.aero, which includes insurance.
14 CHANGING THE PROPELLERS
If the rotor blades of the model are damaged, they must be replaced. Proceed as follows:
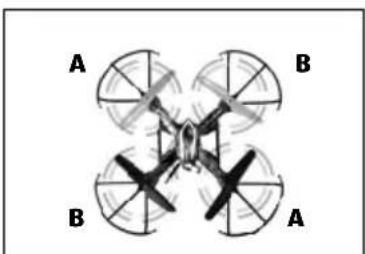
14A Prior to installation, make sure that you do not mix up the propellers. The model has 4 different propellers, which differ in colour and direction of rotation. If the propellers are mixed up, the model will not fly. Position each propeller as per diagram below.
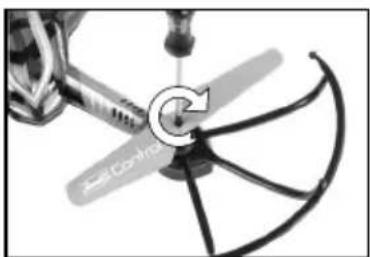
14B Loosen the screw in the center of the propeller and pull it off the shaft.
14C Place the new propeller on the shaft and tighten the screw again.

text_image
Front left: Blue A Rear left: Black B
text_image
Front right: Blue B Rear right: Black ATROUBLESHOOTING
Problem: The propellers do not move.
Cause: 1. No connection has been established.
- The battery is too weak or depleted.
Remedy: 1. Switch everything off and switch on again in the correct sequence (see point 7).
- Charge the battery.
Problem: The model stops and descends during flight for no apparent reason.
Cause: · The battery is too weak.
Remedy: · Charge the battery.
Problem: It isn't possible to control the model using the remote control.
Cause: 1. The ON/OFF switch is in the "OFF" position.
-
The batteries were not inserted correctly.
-
The batteries do not have enough power.
Remedy: 1. Set the ON/OFF switch to the "ON" position.
-
Check whether the batteries are inserted correctly.
-
Insert new batteries.
Problem: The model only turns on its vertical axis or rolls over when started.
Cause: · Incorrect arrangement of the propellers.
Remedy: · Install the propellers as outlined in the manual (see point 14).
Problem: The model won't fly a flip manoeuvre.
Cause: · Battery too weak.
Remedy: · Charge battery.
Problem: The video image on the display does not play back.
Cause: · No existing WLAN connection
Remedy: · Re-establish WLAN connection
Additional tips and tricks can be found online at www.revell-control.de.
SERVICE NOTES
Go to www.revell-control.de for ordering information and tips on replacing spare parts, plus other useful information on all Revell Control models.

www.revell-control.de
CARACTÉRISTIQUES PRINCIPALES
Modèle :
Alimentation : DC 6 V === Piles : 4 x 1,5 V "AA" (non fournies)
Chargeur USB :
text_image
QR code image containing encoded data, no visible human-readable text

text_image
QR code image containing encoded data, no visible human-readable text
INDICATIONS DE SERVICE
text_image
QR code image containing encoded data, no visible human-readable text

text_image
QR code image containing encoded data, no visible human-readable text
Zender inschakelen:
text_image
QR code image containing encoded data, no visible human-readable text

text_image
QR code image containing encoded data, no visible human-readable text
text_image
QR code image containing encoded data, no visible human-readable text

text_image
QR code image containing encoded data, no visible human-readable text
13 MODALITÀ HEADLESS
Electrical and electronic waste
ordinance: After the end of use, remove all batteries and separately dispose of all electrically operated devices at the communal collection centres for electrical and electronic waste. Dispose of the remaining parts with household waste. Thank you for your cooperation!
Attention: Risk from heat development and rotating parts during operation! Adult supervision is required!
Revell GmbH hereby declares that this product conforms with the basic requirements and the additional applicable provisions of Directive 1999/5/EC. The Declaration of Conformity can be found at www.revell-control.de.