SSR 1080 B2 - Satellite receiver SILVERCREST - Free user manual and instructions
Find the device manual for free SSR 1080 B2 SILVERCREST in PDF.
User questions about SSR 1080 B2 SILVERCREST
0 question about this device. Answer the ones you know or ask your own.
Ask a new question about this device
Download the instructions for your Satellite receiver in PDF format for free! Find your manual SSR 1080 B2 - SILVERCREST and take your electronic device back in hand. On this page are published all the documents necessary for the use of your device. SSR 1080 B2 by SILVERCREST.
USER MANUAL SSR 1080 B2 SILVERCREST
TANU TAMHAR
Lagos University, 41
D-50948
Sudan
- 2013-06-28, 2013-07-29
http://www.cs.uab.fr/2013/05/01/201302
IAN71270
RECEPTEUR SATELITE NUMERIQUE HD
DIOITALIER HD-SAT RECEIVER
T
Gdlnnne nnnnne nee eae
DIOITAL HD SAT RECEIVER
IAN 71270
Francais 2
Nederland 36
Deutsch 70
English 104
Table des matieres
Entree SAT IF 950 MHz a 2 150 MHz
Impedance 75 Ohms
Entree Prise jack femelle
Sortie Prise jack femelle
Antenne
Alimentation tete LNB 13/18V (max.450mA)
Cher client, chere clientele,
Common Interface 61
System 62
Informatie 62
Standaardinstelling 62
This item incorporates copy protection technology that is protected by U.S. patents and other intellectual property rights of Rovi Corporation. Reverse engineering and disassembly are prohibited.
Einleitung
Common Interface CI/CI+
Timer max. 10 Ereignisse
Tuner
SAT-ZF Eingang
Operating Environment 108
Note on Mains Separation 109
Batteries 109
Cables 109
Children and Persons with Disabilities 109
Copyright 109
Storing When Not Using the Product 109
Overview 110
Controls and buttons 110
Connectors and Sockets 110
Remote control. 111
Before You Start 112
Inserting the Batteries into the Remote Control 112
Connecting the Satellite Receiver 113
HDMI Jack 113
Getting Started. 114
Selecting the Menu Language 114
Time Setting. 114
Channel List. 115
Search Option. 115
OSD Menu 116
Edit Channels 116
Edit Channels 117
Edit Favorite Channels 118
Installation 119
Automatic search satellite. 120
DiSEqC Switch 120
DiSEqC Port 120
Search Range 120
TV Only. 120
Network Search 120
Manual search satellite 121
Edit 121
TP 123
Scan 124
User Setup 125
Language Setting 125
Menu Language 125
1st Audio Language 125
2nd Audio Language 125
1st Subtitle Language 125
2nd Subtitle Language 125
EPG Language 125
Time Setting. 126
Time Setting 126
Summer Time 126
Time Zone. 126
Date 126
Time 126
Parental Control 126
Change Password 126
Menu Lock. 126
A/V Control 127
TV Type 127
TVScart 127
Aspect Ratio 127
Display Format 127
Video Format 127
AC3 127
OSD Setting 128
Display Time 128
OSD Transparency 128
Automatic Power Down 128
Time Option 128
Timer 128
Timer List. 129
New Timer 129
Common Interface 129
System 130
Information 130
Default Setting 130
Delete Channels 130
Factory Reset. 130
Update 131
Transponder 131
Auto OTA 131
Auto OTA Time. 131
Everyday Use. 132
Operation 133
EPG - Electronic Program Guide 133
EPG Timer 133
EPG Info. 133
Programme Information 134
Selecting Audio Channels 134
Adjusting the Volume 134
Selecting Channels 134
Using the Numeric Buttons. 134
Using the Channel List. 134
Displaying Subtitles 135
Teletext 135
Sleep Timer. 135
Troubleshooting 135
Maintenance / Cleaning. 136
Environment and Recycling 136
Conformity notes 136
Warranty and Service Information 136
This item incorporates copy protection technology that is protected by U.S. patents and other intellectual property rights of Rovi Corporation. Reverse engineering and disassembly are prohibited.
Introduction
Thank you for purchasing this SilverCrest SSR 1080 B2 satellite receiver. The SilverCrest SSR 1080 B2 is a pure digital receiver for receiving unscrambled satellite programmes. It requires a digital-enabled satellite antenna. This satellite receiver features a high-end HDMI output for connecting to plasma, LCD or LED TV sets. The digital video signal offers optimum picture quality. You will clearly notice enhanced sharpness and depth compared to signals transferred via a conventional SCART (Euro AV) connection. The device also features a PCMCIA-compliant CI slot for inserting CI/CI+ modules.
Intended Use
This is a consumer electronics device. It requires a digital-enabled satellite antenna. It may only be used for private use, not for industrial or commercial purposes. Furthermore, the device may not be used outdoors or in tropical climates. Only cables and external devices that comply with safety standards and the electromagnetic compatibility and shielding quality of this device may be used. This device complies with all aspects of EC Conformity, relevant norms and standards. Any modifications to the device may result in these directives no longer being met. The manufacturer is not liable for any damage or interference resulting from non-compliance with the above instructions. Only use the accessories recommended by the manufacturer. Any use other than that mentioned above does not correspond to the intended use.
If you are not using the device within the Republic of Germany, you must observe the regulations and laws in the country of use.
Package Contents
Please check that delivery contents are complete using this list:
SilverCrest SSR 1080 B2 Digital HD Satellite Receiver
Remote control
- 2 AAA branded batteries, 1.5V (Micro)
- This User Manual
If you find any items missing or damaged, please phone our hotline. The number can be found in the last chapter, "Warranty and Service Information".
Technical Specifications
General
Dimensions (W× H× D)260× 50× 230mm
Weight approx. 1.3kg
Operating temperature 5^ to 35^
Operating humidity max. 75% rel. humidity
Input voltage 230V AC / 50 Hz
Power consumption Standby < 1 W
Powered on max. 23 W
Programme presets 5000
Display 4-digit
Teletext 800 pages storage capacity
Common Interface Cl / Cl+
Timers max. 10 events
Tuner
SAT IF input 950 MHz to 2,150 MHz
Impedance 75
Input F connector jack
Output F connector jack
Ohms
Antenna
LNB power supply 13/18 V 450mA max.
Switching signals DiSEqC 1.0 / DiSEqC 1.2 motor control, Usals, Unicable
Video
Connection HDMI: 5761 / 576P / 720P / 1080I / 1080P / Auto
TV SCART: RGB and CVBS
Video
Audio
Outputs Cinch Analogue Stereo (L/R)
Digital audio PCM / AC-3 / dts optical signal
Remote control
Dimensions (W× H× D) 48× 194× 24mm
Weight approx. 83g (without batteries)
Operating voltage 2 batteries type AAA, 1.5V (Micro)
Safety Instructions
Before you use this device for the first time, please read the following notes in this manual and heed all warnings, even if you are familiar with handling electronic devices. Keep this manual safe for future reference. If you sell the device or pass it on, it is essential that you also hand over this manual.

This icon denotes important information for the safe operation of the product and the user's safety.

This icon denotes further information on the topic.
Operating Environment
Position the device on a stable, even surface and do not place any heavy objects on the device. The device is not designed for use in environments with high temperatures or humidity (e.g. bathrooms), and must be kept free of dust. Operating temperature and operating humidity: 5^ to 35^ , max. 75% RH.

Always make sure that
- there is free circulation of air (do not place the device on shelves, on a thick carpet, on a bed, or anywhere that obstructs the ventilation slots, and leave at least 10cm clearance on all sides);
- no direct heat sources (e.g. radiators) can affect the device;
- no direct sunlight or bright artificial light reaches the device;
- contact with spray and dripping water and abrasive liquids must be avoided and the device should never be operated near water, and it must especially never be immersed (do not place any objects filled with liquids such as vases or drinks near the device);
the device is never placed in the immediate vicinity of magnetic fields (e.g. loudspeakers); - no fire hazards (e.g. burning candles) are placed on or near the device;
- no foreign bodies enter the device;
the device is not subject to any great temperature changes as this may cause moisture through condensation and short-circuit;
the device should not be subject to excessive shocks or vibrations.

Note on Mains Separation
The power switch (16) located on the back panel of this device does not fully disconnect the device from the mains. Furthermore, the device consumes electricity in the Standby mode. In order to completely disconnect the device from the mains, the power plug must be pulled out from the wall outlet. The device should be positioned in such a way that ensures direct and unobstructed access to the wall outlet so that the power plug can be immediately pulled out in an emergency situation. To avoid the risk of fire if the device is not going to be used for a long while (e.g. during holidays), it should always be disconnected from the power socket. Before stormy weather when there is the danger of lightning, disconnect the device from the power supply.

Batteries
Insert the batteries with the correct polarity. Do not try to recharge any non-rechargeable batteries and do not throw batteries into the fire. Do not mix batteries (old and new or carbon and alkaline, etc.). Remove the batteries when the device is not to be used for a long time. Non-intended use may cause explosion and danger to life. Respect the environment! Old batteries do not belong in with domestic waste! They must be handed in to a collection point for waste batteries.

Cables
Unplug all cables by holding the plugs and never pull on the cables themselves. Never place the appliance, pieces of furniture or other heavy objects on the cables and take care that these do not become trapped, especially at the plugs and sockets. Never tie knots in the cable and do not tie it together with other cables. All cables should be positioned so that nobody can trip over them or be obstructed by them. A damaged power cord can cause a fire or an electric shock. Inspect the power cord from time to time. Never use adapter plugs or extension cables that do not comply with the current safety regulations in your country, and do not modify any of the power cords or electrical installations yourself!

Children and Persons with Disabilities
Electrical devices do not belong in the hands of children. People with disabilities should only use electrical devices in appropriate circumstances. Do not allow children or persons with disabilities to use electrical devices when not under supervision. They may not comprehend the presence of potential risks. Batteries and small parts represent potential choking hazards. Keep the batteries in a safe place. If a battery is swallowed, seek medical help immediately. Keep the packaging away from children and persons with disabilities too as there is danger of suffocation.
Copyright
The entire content of this User Manual is copyrighted and is provided to the reader for information purposes only. Copying data and information without prior explicit written approval by the author is strictly forbidden. This also applies to any commercial use of the contents and information. All texts and diagrams are up-to-date from the date of print release.
Storing When Not Using the Product
If you do not plan to use the device for an extended period of time, unplug the power cord from the mains and remove the batteries from the remote control. Also make sure that the storage temperature is maintained at between 5^ and 40^ . Humidity must not exceed 90% RH.
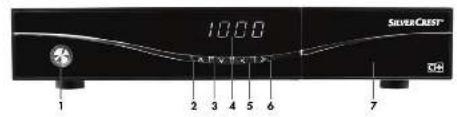
Overview
Controls and buttons

1 Switches the device on or into standby mode. / Standby LED
2 Next channel / menu navigation up
3 Previous channel / menu navigation down
4 4-digit display
5 Decrease volume / menu navigation left
6 Increase volume / menu navigation right
7 CI slot (behind cover)
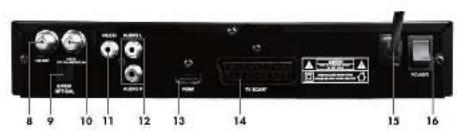
Connectors and Sockets
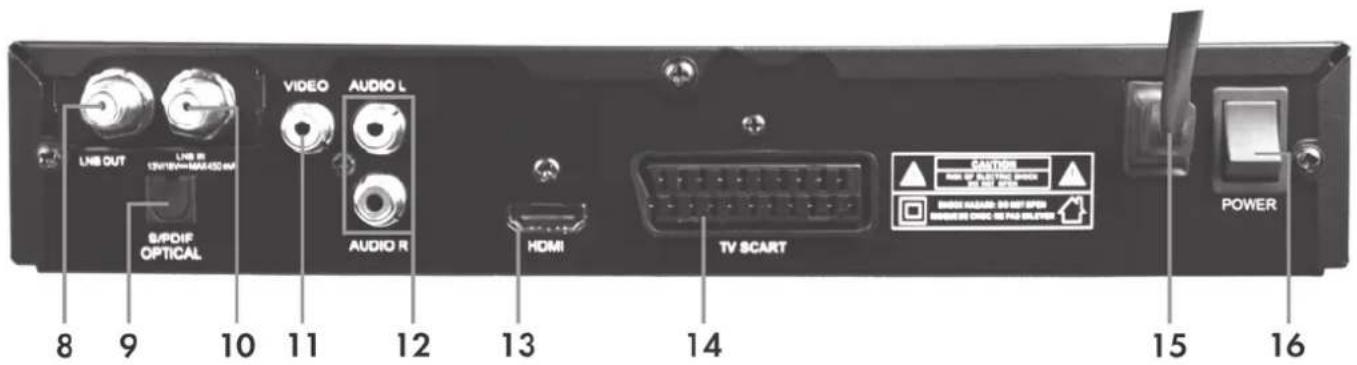
8 LNB OUT To connect another satellite receiver*
9 S/PDIF OPTICAL Digital audio output (optical)
10 LNB IN LNB input from satellite system
11VIDEO Analogue video connector (Composite)
12 AUDIO L/R Stereo audio output for connecting a hi-fi system
13 HDMI HDMI connector to connect a TV set
14 TV SCART SCART connector to connect a TV set
15 Power cable Power input 230V AC, 50 Hz
16 Power switch
Remote control
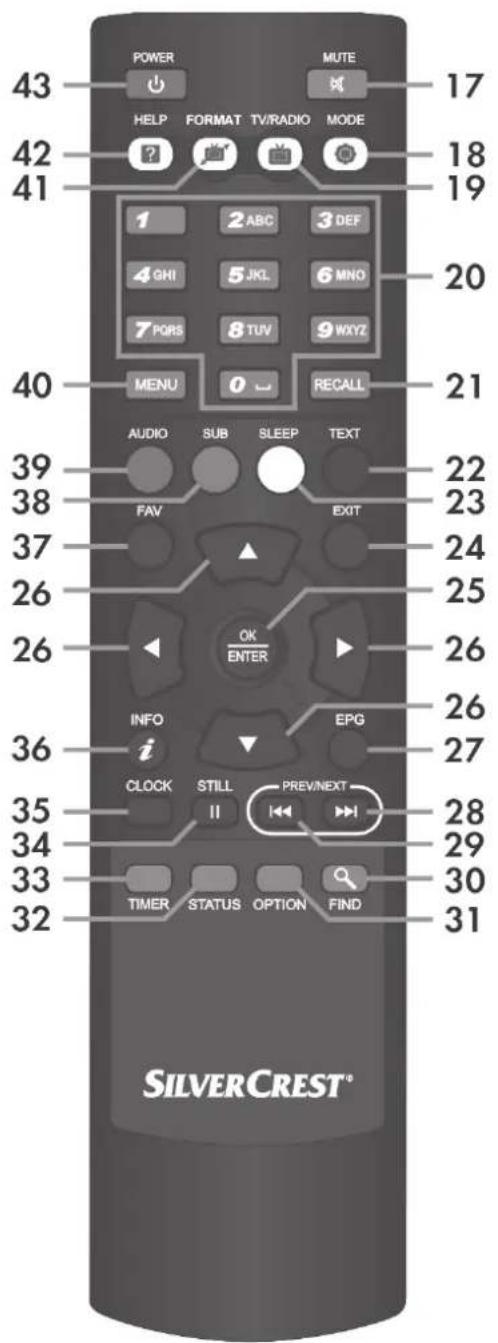
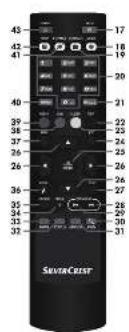
17 MUTE To mute or to restore the audio volume.
18 MODE To change the aspect ratio.
19 TV/RADIO Toggles between TV and radio mode.
20 Numeric buttons 0 To switch to a specific channel or to enter numeric to 9 information
21 RECALL Opens a list of recently selected channels.
22* TEXT Launches Teletext display.
23* SLEEP Auto power off function.
24 EXIT Exits the menu.
25 OK/ENTER Open the channel list and confirms a menu selection
26 Navigation In a menu: ▲▼, △▶.
buttons Or to switch channels up or down: ▲▼.
Or to adjust the sound volume:
27 EPG Electronic Programme Guide
28 NEXT Scrolts the channel list downwards. Scrols down page-by-page whenever programme information, favourite or any other list is shown on screen.
29 PREV Scrolts the channel list upwards. Scrols up page-bypage whenever programme information, favourite or any other list is shown on screen.
30 FIND Searches for a channel in the channel list.
31 OPTION Option button for MultiFeed channels.
32 STATUS Shows various information about your satellite receiver.
33 TIMER Opens the timer list.
34 STILL Freezes the picture.
35 CLOCK Displays/ hides the clock.
36 INFO Displays information.
37 FAV Opens the favourite list for activation.
38* SUB Displays subtitles (if available).
39* AUDIO Displays all audio channels available.
40 MENU Displays the menu.
41 FORMAT Changes the HDMI resolution from 576i up to 1080p.
42 HELP Displays the help menu (if available).
43 POWER Switches the device on or into standby mode.
Before You Start
Inserting the Batteries into the Remote Control
Insert the batteries supplied into the remote control. Proceed as follows:
- Open the battery compartment on the underside of the remote control.
- Insert the batteries supplied (size AAA) into the remote control with the correct polarity (see illustration).
- Close the battery compartment.


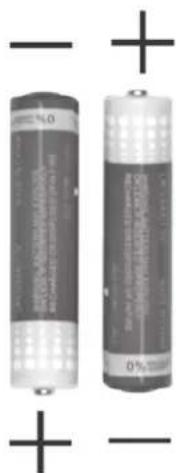

Remove the batteries from the remote control if you are not going to use the device for an extended period of time or the remote control could get damaged by leaky batteries.
Connecting the Satellite Receiver

You should only connect your satellite receiver to the mains once all other cable have been connected.. This prevents accidental damage to the satellite receiver or any external devices.
- Connect the LNB of the satellite antenna to the LNB IN (10) of your satellite receiver.
Connect the TV set (or beamer) to the HDMI connector (13) of your satellite receiver (see next chapter - HDMI Connection).
If your TV set (or beamer) does not have an HDMI port, you can use the TV SCART (14) terminal to connect it to the satellite receiver.
You can also connect your TV set (or beamer) to the VIDEO Composite Video output (11) of your satellite receiver.
To obtain good sound quality, you can use the AUDIO L/R stereo outputs (12) of your satellite receiver to connect an external hi-fi amplifier.
If your amplifier has an optical SPDIF input, you can use the S/PDIF OPTICAL (9) terminal to connect it to the satellite receiver. - You can use the LNB OUT (8) output of your satellite receiver to connect another satellite receiver.
Once you have connected all the cables, connect the power cable (15) to a wall outlet and turn the power switch (16) to position POWER.
*If you wish to use the device with satellite systems capable of receiving more than one satellite, you need to use DiSEqC® LNB instead of a universal LNB.

Do not connect your satellite receiver via a VCR. Video signals passed through a VCR may influence the copy protection resulting in a distorted picture.
HDMI Jack
Use an HDMI cable to connect your satellite receiver to the TV set. This connection type guarantees optimum and loss-free transmission of the video and audio signals to the TV Set. As soon as a TV set is connected to the satellite receiver using an HDMI cable, your satellite receiver will automatically toggle to HDMI signal output. Next, enable the corresponding HDMI input on your TV. See the User Manual for your TV set.
You can use the satellite receiver menus to optimise screen resolution for HDMI mode. You can choose from the following resolutions: 576P, 720P, 1080I or 1080P. For optimum resolution on a modern flat-screen display, we recommend using the 1080P or 720P setting. Please note that the picture may disappear when you switch the resolution. If the screen remains blank, the resolution you have set is probably not supported by your TV. In this case, use a SCART cable to connect your satellite receiver to the TV set in order to access the menus again.
Video and Audio Signal Connection:
All settings required can be found in the "User Setup | A/V Control" section (see page 127).
The following video signals are supported:
HMI: HDMI output guarantees optimum video and audio quality. Note: This device has a standardised HDMI output. However, it is possible that picture or sound distortion may occur if you connect devices with first-generation HDMI input interfaces.
In such cases, you can select one of the following connection options:
RGB: Very good picture and sound quality via a conventional (21-pin) SCART (Euro AV) cable.
Video: This output only provides video signals with embedded colour signals (CVBS).
Dolby Digital Sound (AC3)
Please note that Dolby Digital sound, if broadcast by the relevant channel, will only be available on the digital audio output and HDMI output modes if they are connected to an external AV receiver.
Getting Started
Once you have read the Safety Instructions carefully and finished connecting the devices as described, you can power them up. The satellite receiver has already been configured in the factory so that only changes need to be made, if any. When using the satellite receiver for the first time or after carrying out a factory reset, an installation wizard appears to help you set the most important parameters. The buttons that you may need to press to adjust a setting are shown on screen. Please note that the coloured buttons [Red] (39), [Green] (38), [Yellow] (23) and [Blue] (22) have different functions assigned. The functions currently assigned to the coloured buttons are shown on the screen. To navigate, press the navigation buttons (26).

Some menus have a help function. Where this is available, the help button is shown on screen. You can show or hide the help function by pressing the HELP button (42).
Selecting the Menu Language
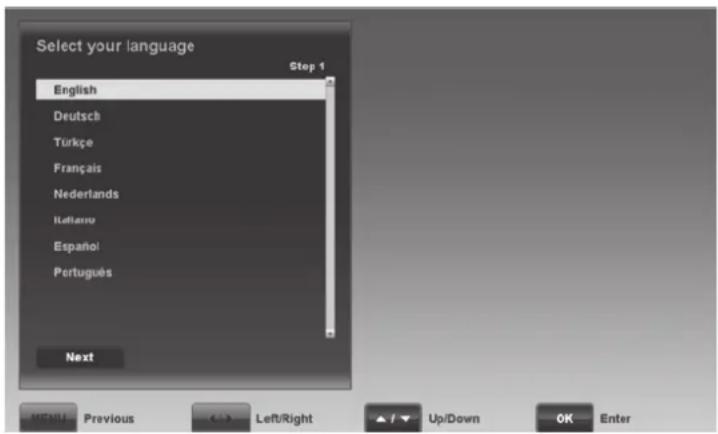
Use the or navigation buttons (26) to select the desired language and then press OK/ENTER (25) or the [Blue] button (22) to confirm.
Time Setting
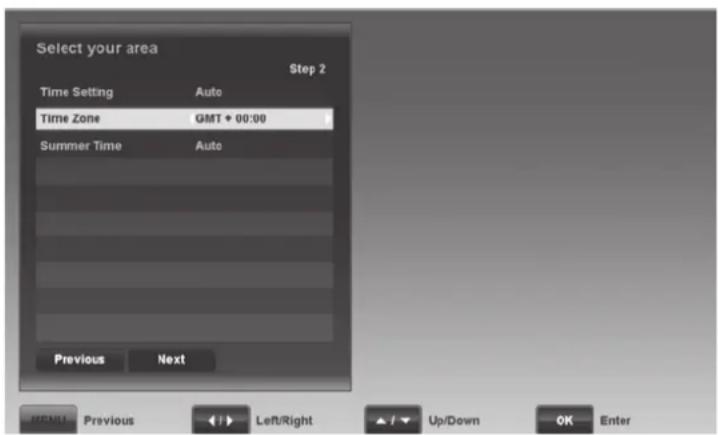
In order for the time to be displayed correctly and for the timer to start at the desired time, you need to check the Local Time Setting and amend it if necessary.
Time Setting
Auto Date and time are set automatically based on the time zone.
Manual You can enter the date and time manually using the navigation buttons (20).
Time Zone
Here you can set the time zone for -12 to +12 hours offset via the or navigation buttons (26).
Select GMT + 00:00 for Western European time.
GMT is the short for Greenwich Mean Time and is the reference value for the different time zones.
Summer Time
Here, you can use the "Auto" setting to enable the automatic daylight saving function for your region. Once you have enabled automatic Summer time for your region, you won't need to re-adjust the time for summer or winter.
The "On" and "Off" options are used to set daylight saving manually.
Use the OK/ENTER button (25) or the [Blue] button (22) to continue to the next step.
Channel List
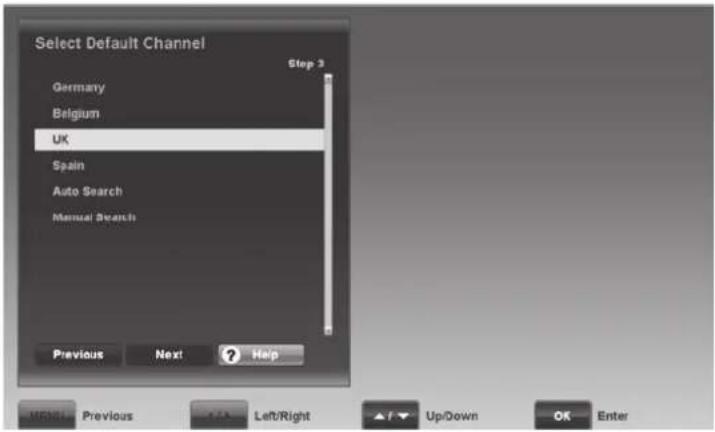

Next select a preset channel list or select "Auto Search" or "Manual Search" to launch a channel search.
We recommend you choose a preset channel list or use the "Auto Search" function. Press the OK/ENTER button (25) or the [Blue] button (22) to continue to the next step.
If you have selected a preset channel list, you can start using your satellite receiver now. If you have chosen "Auto Search", please proceed as follows:
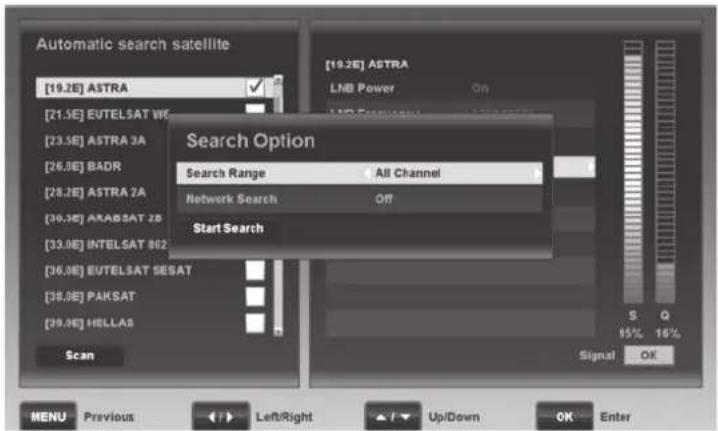
Select the satellite that you want to scan for channels from the list and press the OK/ENTER button (25). A new window opens on the right hand side of the screen. The following options are greyed out and cannot be edited: "LNB Power", "LNB Frequency" and "0/22KHz".
DiSEqC Switch
To successfully launch a channel search, you need to adjust your satellite receiver to the antenna installed. If you want to receive only one satellite, select "No". If you want to receive more than one satellite, please read the chapter on "Installation" starting from page 119.
DiSEqC Port
If you have selected the option "No" for the "DiSEqC Switch" setting above, this is automatically set to "No".
Signal Level Indicators
The signal strength (S) and the signal quality (Q) are displayed on the right. Point your antenna so that the signal strength and signal quality reach their maximum.
Press the [Blue] button (22) to continue to the next step.
Search Option
Search Range
Select the channels you wish to search for.
All Channel
The device will search for all channels (unscrambled, scrambled, radio and TV channels).
Free Channel
The device will search for unscrambled channels only.
Scrambled Channel
The device will search for scrambled channels only.
TV Only
The device will search for TV channels only.
Network Search
Some satellites support what is known as a network search. They broadcast a table (NIT = Network Information Table) containing all available channels. This allows the satellite receiver to obtain information about all channels.
You can choose whether to perform a network search or not here.
Press the [Blue] button (22) to launch the channel search.
Wait for the channel search to finish. This process may take a few minutes. You can press the [Red] button (39) to cancel the channel search at any time.
When the channel search is completed, the "Do you want to save" dialogue appears. Select "Yes" to save the found channels or select "No" to discard them.
OSD Menu
You can use the OSD (On Screen Display) menu to customise your satellite receiver. The OSD menu is explained in more detail in the pages below. From this menu, you can open different submenus allowing you to adjust some of your satellite receiver's settings. You can customise the look of the OSD menu, add or remove channels, customise the satellite receiver for your satellite system, install new software, and much more. However, it is also possible to miss-set some parameters and obtain a blank screen. You should therefore read the following instructions carefully.
To open it, press the MENU button (40). To close the OSD press the EXIT button (24). The OSD menu is clearly structured and any buttons that you may need to press to change a setting are shown on screen. Please note that the coloured buttons [Red] (39), [Green] (38), [Yellow] (23) and [Blue] (22) have different functions assigned. The functions currently assigned to the coloured buttons are shown on the screen. The OSD menu is navigated using the navigation buttons (26).
Opening and Navigating Submenus
Press the or (26) navigation buttons to toggle between the main menu and the submenu items. Press the OK/ENTER button (25) to open the submenus. Press the or (26) navigation buttons to highlight the desired submenu item and then press OK/ENTER (25) to open it.
Closing the Menu
Any submenus opened can be closed one by one by pressing the MENU button (40). Pressing the EXIT button (24) exits the OSD menu immediately.

Some menus have a help function. Where this is available, the help button is shown on screen. You can show or hide the help function by pressing the HELP button (42).
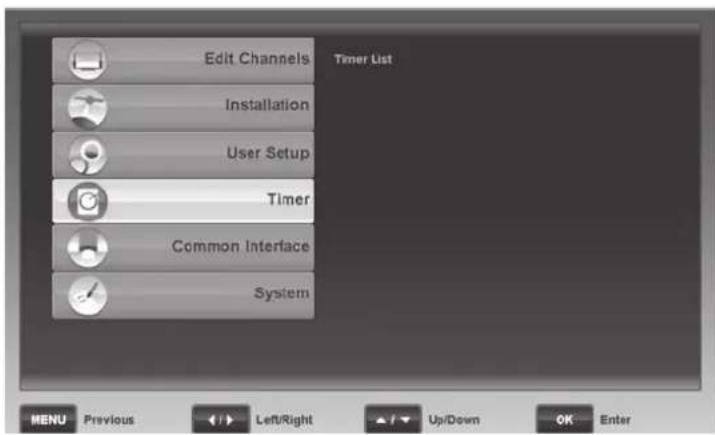
Edit Channels
To edit the channel and favourite lists.
The editing procedure is the same for both TV and radio lists. To edit a radio list, first press the TV/RADIO button (19) to toggle to radio mode.
Edit Channels
On the left, you can see the channel list, while in the upper-right corner, there is a live preview for the channel selected. Underneath, there is information about the satellite and frequency as well as the signal strength (S) and signal quality (Q).
In the channel list, press the or navigation buttons (26) to select the channel that you wish to edit. You can use the following buttons for editing:
OK/ENTER (25)
Press this button to select the channel currently highlighted. You can also select multiple channels using this function in order to edit them simultaneously (e.g. deleting or moving). However, you cannot rename multiple channels at the same time.
[Red] (39) - Delete
Deletes the selected channel. Any channels marked for deletion will appear in red. If you decide not to delete a channel marked for deletion, press this button again.
[Green] (38) - Lock
Locks the selected channel. Any channels marked for locking will be marked with a lock icon. Locked channels can be viewed only once the correct password is entered. The factory-default password is: 0000. If you decide to unlock a locked channel, press this button again. *1
[Yellow] [23].-Skip
You can skip specific channels when switching channels via the or navigation buttons (26). Press this button to skip the selected channel. Any channels marked for skipping will be marked with a icon. If you decide not to skip a channel marked for skipping, press this button again. Note: You can still watch a channel that has been marked for skipping by directly selecting it via the numeric buttons (20).*1
[Blue](22) - Move
Press this button to move the selected channel. Press the or navigation buttons (26) to move the channel to the desired channel preset and press this button again to confirm. *1
 - Move - 1](/content/2026/02/392070/images/d0541acbab8c0c53651aa31dd331003c7a1d153e309e779ff2c6f4f7dd7c66b8.jpg)
*1 When deleting, locking, skipping and moving channels, the changes are applied after closing the menu and confirming the safety prompt.
 - Move - 2](/content/2026/02/392070/images/061ffaafced111f18b0af6f97564d15ffced1441985d6f1c7a45f9e637d004c1.jpg)
INFO (36) - Name
Press this button to rename the selected channel. Press the navigation buttons (26) on the remote control to select the desired characters. Press the OK/ENTER button (25) to apply the character. Press the [Green] button (38) to delete the character or press the [Yellow] button (23) to erase the entire entry. Use the [Blue] button (22) to display a different character set. Press the [Blue] button (22) again to return to the previous character set. Press the [Red] button (39) to save the entry. Press the EXIT button (24) to discard.
Edit Favorite Channels
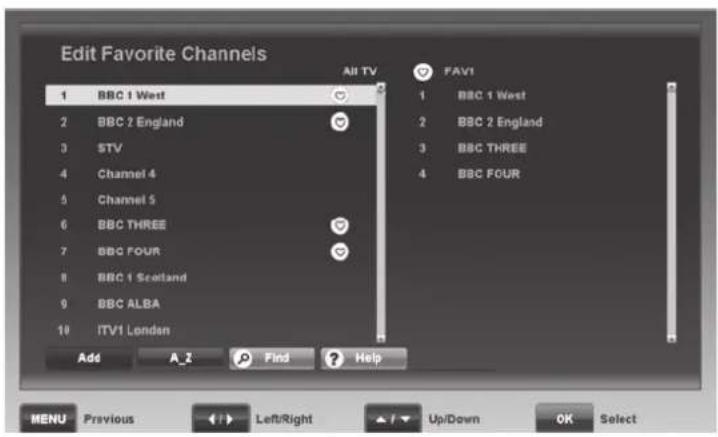

FIND (30)-Find
If you wish to locate a specific channel quickly, press the FIND button (30) to open a search box. Press the navigation buttons (26) on the remote control to select the letters of the channel you are looking for and then press OK/ENTER (25) to apply the selected characters. The left window will only show the channels matching the character sequence entered. You can use the [Red] button (39) to delete the entire entry or the [Green] (38) button to delete one character. When you see the channel you want, press the [Yellow] button (23) to move to the left window where you can select the channel.
Press EXIT (24) or MENU (40) to quit editing the channel list. If you have made any changes, a corresponding prompt will appear. Select "Yes" to save or select "No" to discard.
The channel list is displayed on the left, the selected favourite list on the right. When you open this menu for the first time, the first favourite list appears.
In the channel list, press the or navigation buttons (26) to select a channel. You can use the following buttons for editing:
OK/ENTER (25)
Press this button to select the channel currently highlighted. You can also select multiple channels by using this function in order to add them to the favourite list at the same time.
[Red] (39) - Add
Press this button to add the selected channel to the favourite list.
[Green] (38) - A_Z
Press this button to sort the channel list alphabetically.
FIND (30)-Find
To locate a specific channel quickly, you can press the FIND button (30) to open a search box. Press the navigation buttons (26) on the remote control to select the letters of the channel you are looking for and then press OK/ENTER (25) to apply the selected character. The left window only shows the channels matching the character sequence entered. You can use the [Red] button (39) to delete the entire entry or the [Green] button to delete one character. As soon as you see the desired channel press the [Yellow] button (23) to move to the left window. Close the search box by pressing the OK/ENTER button (25) Press the [Red] button (39) to add the selected channel to the favourite list.
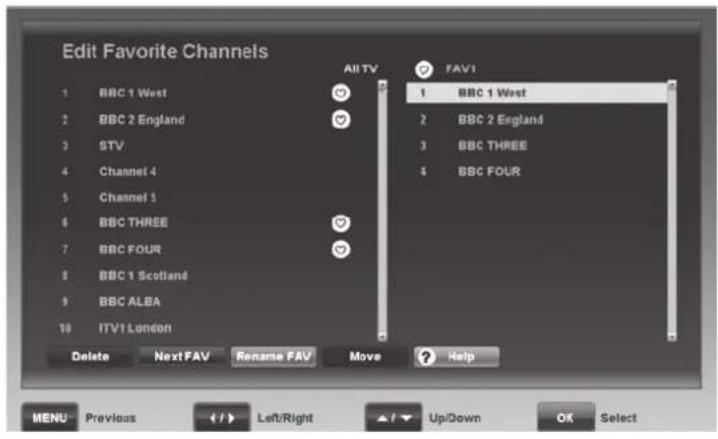
Press the or (26) navigation buttons to toggle between the channel list and the favourite list. In the favourite list, you can apply options with the following buttons:
OK/ENTER (25)
Press this button to select the channel currently highlighted. You can also select multiple channels by using this function in order to edit them simultaneously (e.g. deleting or moving).
[Red] (39) - Delete
Deletes the selected channel from the favourite list.
[Green] (38) - Next FAV
Press this button to move to the next favourite list. There are 8 favourite lists to choose from. The name of the favourite list currently selected is shown in the top-right corner.
![SILVERCREST SSR 1080 B2 - [Green] (38) - Next FAV - 1](/content/2026/02/392070/images/eae390ef6e64022a964626270ea89e8a9ae370df699d4b3a459158c202c62ee3.jpg)
[Yellow] [23]-FAV Name
Press this button to rename the favourite list selected. Press the navigation buttons (26) on the remote control to select the desired characters. Press the OK/ENTER button (25) to apply the character. Press the [Green] button (38) to delete the character or press the [Yellow] button (23) to erase the entire entry. Use the [Blue] button (22) to display a different character set. Press the [Blue] button (22) again to return to the previous character set. Press the [Red] button (39) to save the entry.
[Blue](22)·Move
Press this button to move the selected channel. Press the or navigation buttons (26) to move the channel to the desired position and press this button again to confirm.
Press EXIT (24) or MENU (40) to quit editing the favourite list. If you have made any changes, a corresponding prompt will appear. Select "Yes" to save or select "No" to discard.
Installation
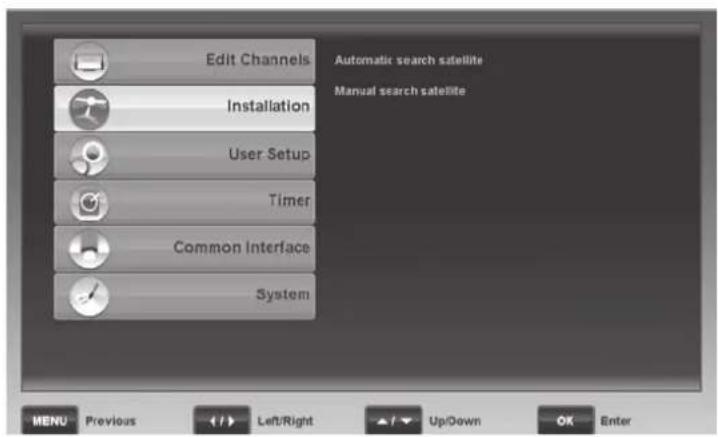
This menu allows you to launch a channel search. Choose between automatic or manual channel search.
Automatic search satellite
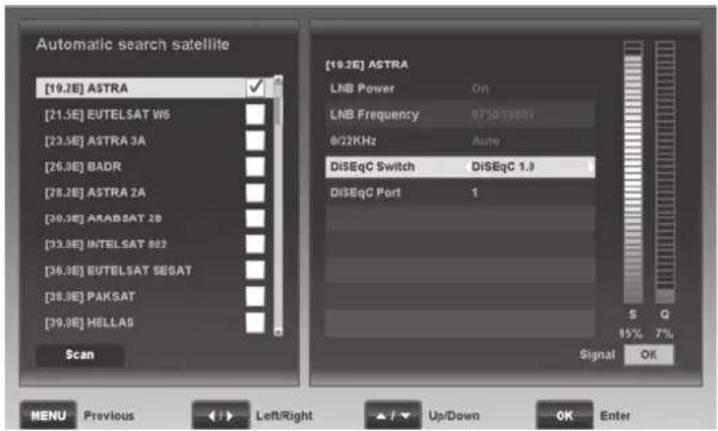
This option carries out an automatic search for all available transponders for a satellite position. Select the satellite that you want to scan for new channels and press the OK/ENTER button (25). A new window opens on the right hand side of the screen. The following options are greyed out and cannot be edited: "LNB Power", "LNB Frequency" and "0/22KHz".
DiSEqC Switch
To launch a channel search successfully, you need to adjust your satellite receiver to the antenna installed. If you wish to receive one satellite only, select "No". If you want to receive more than one satellite, you can use the "DiEqC 1.0", "DiEqC 1.1", "DiEqC 1.2" and "USALS" functions.
DiSEqC Port
Here, you can assign the DiSEqC port desired to the satellite position previously selected. This setting is only necessary if you want to receive more than one satellite.
For instance, instead of using two LNBs pointing to two different satellites (e.g. Astra and Hotbird), you can use a DiSEqC LNB and a DiSEqC switch. For example, for "DiSEqC Switch" select the "DiSEqC 1.0" option. Then you can assign port "1" for Astra and port "2" for Hotbird under "DiSeqC Port".
Note: Some DiSEqC switches are labelled with letters (A, B, C, D, etc.) instead of numbers. However, the order is identical.
Press the [Blue] button (22) to continue to the next step.
Search Range
Select the channels that you want to search for.
All Channel
The device will search for all channels (unscrambled, scrambled, radio and TV channels).
Free Channel
The device will search for unscrambled channels only.
Scrambled Channel
The device will search for scrambled channels only.
TV Only
The device will search for TV channels only.
Network Search
Some satellites support what is known as a network search. They broadcast a table (NIT = Network Information Table) containing all available channels. This allows the satellite receiver to obtain information about all channels.
You can choose whether to perform a network search or not here.
Press the [Blue] button (22) to launch the channel search.
Wait for the channel search to finish. This process may take a few minutes. You can press the [Red] button (39) to cancel the channel search at any time.
When the channel search is completed, the "Do you want to save?" dialogue appears. Select "Yes" to save the channels found or "No" to discard them.
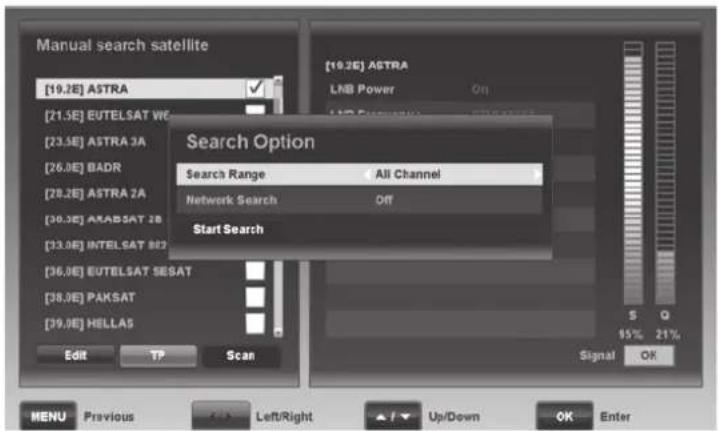
Manual search satellite
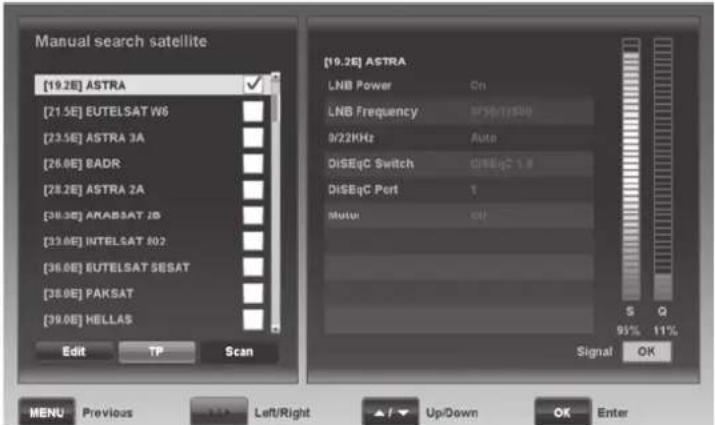
This option lets you scan an individual trans additional antenna settings. Select the satellite that you want to scan for new channels and press the OK/ENTER button (25). A new window with default settings opens on the right hand side of the screen.
Edit
Press the [Green] button (38) to edit additional antenna settings or to scan an individual transponder. A new window will open (see figure opposite).
Signal Level Indicators
The signal strength (S) and quality (Q) are displayed on the right. Point your antenna so that the Signal Strength and Signal Quality reach their maximum.
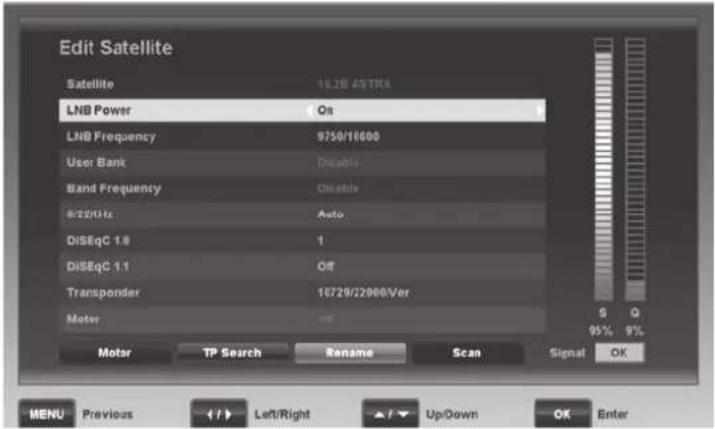
Satellite
Shows the satellite position currently selected.
LNB Power
This option is used to supply power to the LNB and allows polarity switching.
Note: We recommend that you always have the LNB Power on, unless you are explicitly instructed to disable this function. This is occasionally necessary for antennas for larger community buildings.
LNB Frequency
The default value "9750/10600" is normally good for all conventional LNBs. Please select the settings below only if explicitly instructed to do so in the antenna installation manual.
User Bank
You cannot change this option. This setting is adjusted automatically for Unicable systems.
Band Frequency
You cannot change this option. This setting is adjusted automatically for Unicable systems.
0/22KHz
The 22kHz signal is used to switch the frequency band for a universal LNB (off = Low Band, 22 kHz = High Band). Select "Auto" to have the system switch automatically. If you are not using a conventional LNB, you may need to adjust this setting manually here.
DISEqC 1.0
DiSEqC 1.0 allows up to four different satellites to be received. If using DiSEqC 1.0, you can assign a port for every satellite position selected. If you're not using DiSEqC 1.0, select "Off".
DiSEc1.1
DiSEqC 1.1 allows up to 16 different satellites to be received. If using DiSEqC 1.1 you can assign a port for every satellite position selected. If you're not using DiSEqC 1.1, select "Off".
Transponder
Choose a transponder for the satellite selected. You can use the Signal Intensity and Signal Quality indicators to verify that all settings are correct.
Motor
If you have a motor-driven antenna system, press the [Red] button (39) to set it up. Please also see the User Manual for your antenna motor.
We cannot provide any further descriptions at this stage, as the individual settings for each motor-driven antenna are very specific.
The following additional functions are available:
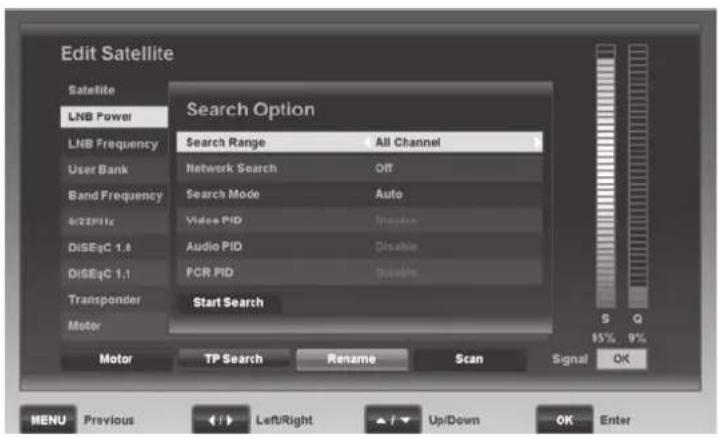
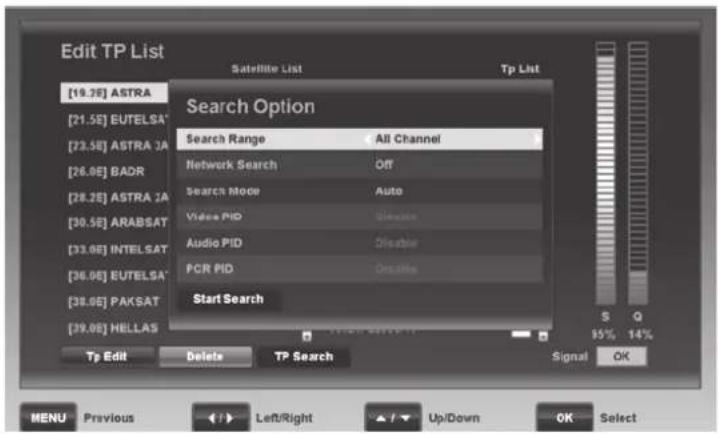
TP Search
To scan an individual transponder selected under "Transponder" press the [Green] button (38).
Select the channels that you want to scan under "Search Range". The following options are available: "All Channel", "Free Channel", "Scrambled Channel" and "TV Only".
Under "Network Search", choose whether you want to carry out a network search or not.
Under "Search Mode", specify whether you want to enter the settings for "Video PID", "Audio PID" and "PCR PID" manually or if you want to find them automatically.
Press the [Blue] button (22) to start the search for the selected transponder.
Name
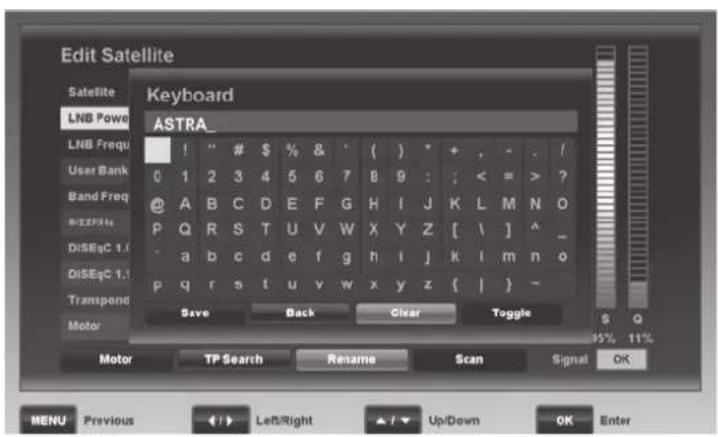
Press the [Yellow] button (23) to rename the satellite. Press the navigation buttons (26) on the remote control to select the desired characters. Press the OK/ENTER button (25) to apply the character. Press the [Green] button (38) to delete the character or press the [Yellow] button (23) to erase the entire entry. Use the [Blue] button (22) to display a different character map. Press the [Blue] button (22) again to return to the previous character map. Press the [Red] button (39) to save the entry.
Scan
Press the [Blue] button (22) to perform a channel search. For more information, please read the "Automatic search satellite" chapter on page 120.
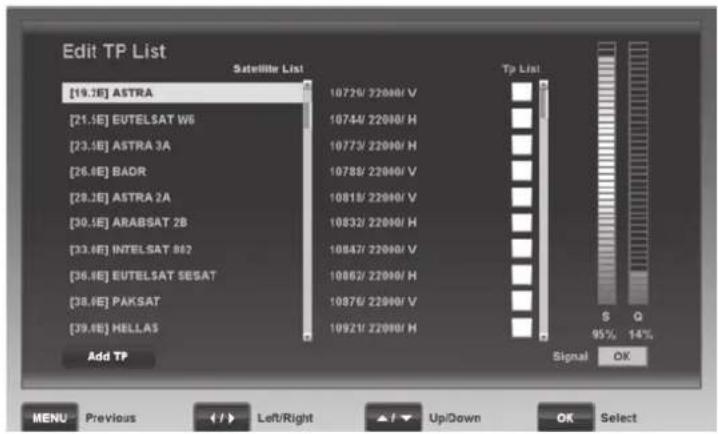
TP
Press the [Yellow] button (23) to edit the transponder lists. In the first column you can press the or navigation buttons (26) to select a satellite position. The second column shows the existing transponders. The signal strength (S) and signal quality (Q) of the selected transponder are displayed.
Press the [Red] button (39) to add a new transponder for the selected satellite.
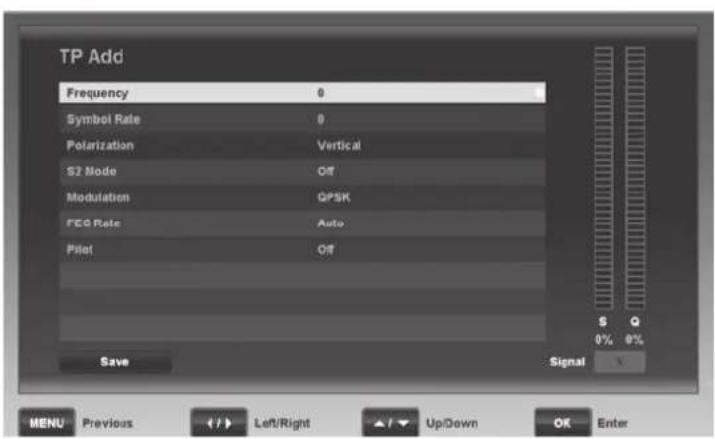
Frequency
Enter the frequency of the satellite transponder. You can enter the value directly by using the numeric buttons (20).
Symbol Rate
The most common symbol rates of satellite transponders use the 27500 or 22000 values. You can enter the value directly by using the numeric buttons (20).
Polarization
Satellites broadcast signals with vertical and horizontal polarity. Select the desired polarity Horizontal or Vertical.
Note: The common notation 12480H means: Frequency 12,480
MHz and horizontal (H) polarisation.
S2 Mode
Specify whether the transponder broadcasts in DVB S2 mode or not.
Modulation
Select the modulation. The following options are available: QPSK and 8-PSK.
FEC Rate
Enter the FEC rate or select Auto to have the system set this value automatically.
Pilot
Select the pilot parameters. The following options are available: On Off.
To save the settings, press the [Red] button (39).
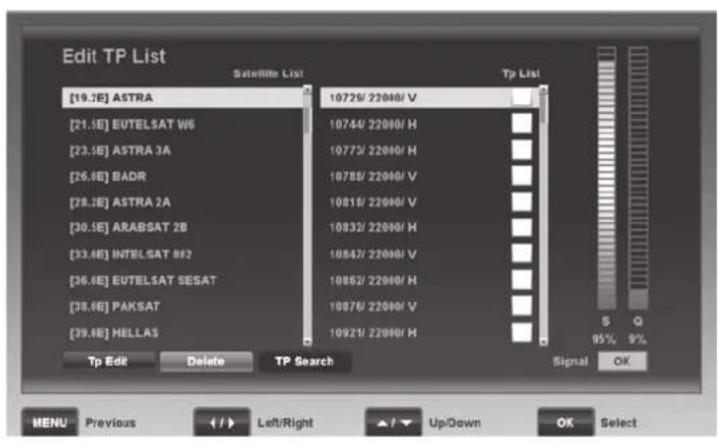
Press the navigation button (26) to switch to the transponder list. Use the or navigation buttons (26) to highlight the desired transponder and then press OK/ENTER (25).
Tp Edit
Press the [Green] button (38) to edit the selected transponder. Refer to the settings described above.
Delete
Press the [Yellow] button (23) to delete the selected transponder. A safety prompt will appear. Select "Yes" on the safety prompt to delete the transponder definitely. Or select "No" to cancel.
Note: Here you can select and delete multiple transponders by pressing the OK/ENTER button (25).
TP Search
Carries out a channel search on the transponder currently selected. To do so, press the [Blue] button (22).
Under "Search Range", select the channels that you want to scan. The following options are available: "All Channel", "Free Channel", "Scrambled Channel" and "TV Only".
Under "Network Search", choose whether you want to perform a network search or not.
Under "Search Mode", specify whether you want to enter the settings for "Video PID", "Audio PID" and "PCR PID" manually or if you want to find them automatically.
Press the [Blue] button (22) to start the search for the selected transponder.
Note: Here you can select and scan multiple transponders by pressing the OK/ENTER button (25).
Scan
Next press the [Blue] button (22) to perform a channel search without any further settings. Then enter the search range and decide if you want to perform a network search or not. For more information about Search Range and Network Search, please read the "Automatic search satellite" chapter on page 120.
Press the [Blue] button (22) to start the channel search.
Wait for the channel search to finish. This process may take a few minutes. You can press the [Red] button (39) to cancel the channel search at any time.
When the channel search is completed, the "Do you want to save" dialogue appears. Select "Yes" to save the found channels or select "No" to discard them.
User Setup

You can adjust different custom settings here.
Language Setting
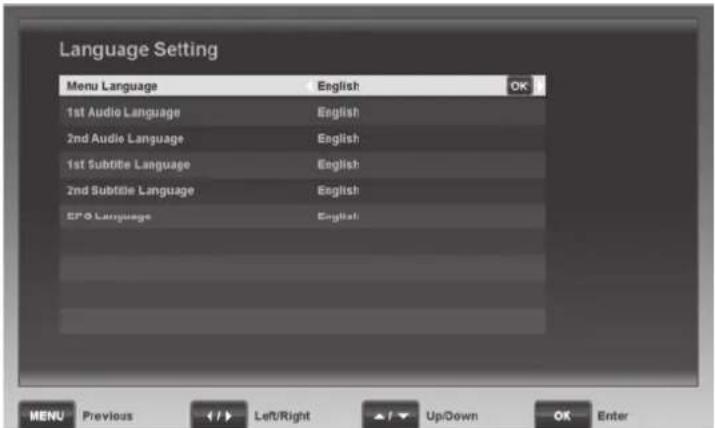
Menu Language
Select the language you want for the on-screen menus. Press the or navigation buttons (26) or press the OK/ENTER button (25) to select the language you want from a list using the or navigation buttons (26). Press the OK/ENTER button (25) to confirm your selection.
1st Audio Language
Select the audio language that you want to listen to for any programmes broadcast with multiple audio languages (if available).
2nd Audio Language
Select the audio language that you want to listen to for any programmes being broadcast with multiple audio languages (if available) whenever the "1st Audio Language" is not available. If neither of the two preferred languages is available, the programme's default audio language is used.
1st Subtitle Language
Some programmes are broadcast with multilingual subtitles. Select the language you want.
2nd Subtitle Language
Select the subtitle language that you want to display for any programmes being broadcast with multiple subtitle languages (if available) whenever the "1st Subtitle Language" is not available. If neither of the two preferred languages is available, the programme's default subtitle language will be used.
EPG Language
Select the language you want for the Electronic Programme Guide (EPG).
Time Setting
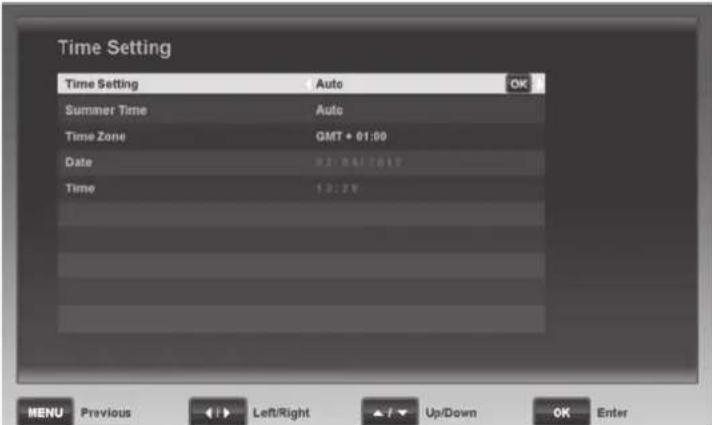
Time Setting
Auto Date and time are set automatically based on the time zone.
Manual You can enter the date and time using the numeric buttons here (20).
Summer Time
Here you can use the "Auto" setting to enable the automatic daylight saving function for your region. Once you have enabled automatic Summer time for your region, you won't need to re-adjust the time for summer or winter.
The "On" and "Off" options are used to set daylight saving times manually.
This function is available only if the "Time Setting" option is set to "Auto".
Time Zone
You can set the time zone for -12 to +12 hours offset via the or navigation buttons (26) here.
Select GMT + 00:00 for Western European time.
GMT is short for Greenwich Mean Time and is the reference value for the different time zones.
This function is available only if the "Time Setting" option is set to "Auto".
Date
You can enter the date via the numeric buttons (20) here. However, this is only possible after you have set the "Time Setting" option to "Manual".
Time
You can enter the time via the numeric buttons (20) here. However, this is only possible after you have set the "Time Setting" option to "Manual".
Parental Control
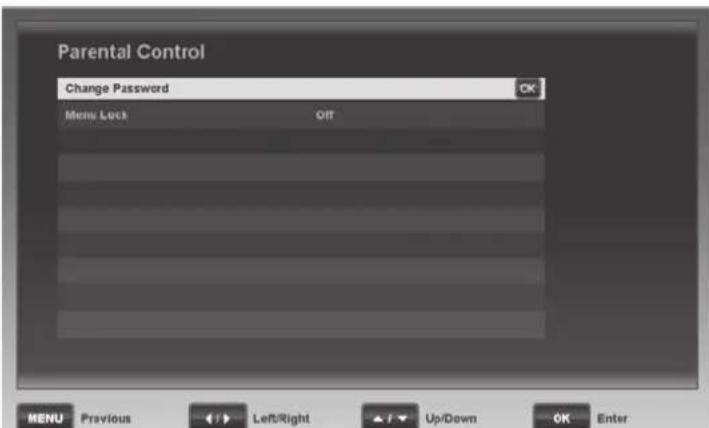
You can protect the menu from unauthorised access. This means it can only be accessed by entering a 4-digit password. The factory-default password is: 0000.
Change Password
To change the preset password, press the OK/ENTER button (25) and enter a new password. Next confirm the new password. Please make sure you remember the password or keep it in a safe place.
Menu Lock
To protect the OSD menu, set the Menu Lock to "On". If you do not wish to password-protect the menu, select "Off".
A/V Control
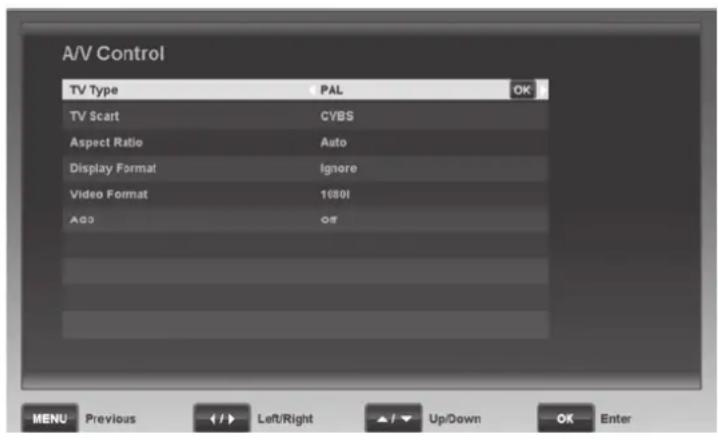
TV Type
Select the TV standard for your country.
PAL Used in most European countries.
SECAM Used in France and Eastern Europe.
This setting applies only to the video output but not the picture in HDMI mode.
TV Scart
Sets the type of video signal to be used on the TV-SCART connector. The RGB option guarantees high colour accuracy and picture sharpness by transmitting the red, green and blue colour channels separately. If the device connected does not support "RGB" output, select "CVBS".
Aspect Ratio
If your TV set has a 16:9 aspect ratio screen, select "16:9". For 4:3 screens you can choose the "4:3" setting. Or select "Auto" to have the system set the aspect ratio automatically.
Display Format
Select the desired display format.
Ignore Select this option if your TV set converts the aspect ratio automatically.
Pan & Scan If you have a 4:3 TV set, any 16:9 programmes appear without the typical black strips at the top and bottom of the picture. This enlarges the overall picture; however, the left and right edges of the picture are not shown.
Letter Box A 4:3 TV set displays the entire picture, but black strips appear at the top and bottom when programmes broadcast in 16:9 format are received.
Video Format
You can optimise the picture resolution for HDMI output here. Please note that the picture may disappear when you switch the resolution. For optimum resolution on a modern flat-screen display we recommend using the 1080P or 720P setting. You can also choose "Auto" (automatic adjustment to the TV set).
AC3
Specify which port should output the Dolby Digital/AC audio signals. If you select "Off", the Dolby Digital/AC audio output is disabled. Select "SPDIF" to output digital sound via the SPDIF terminal or select "SPDIF + HDMI" to output it via the SPDIF and HDMI terminals.
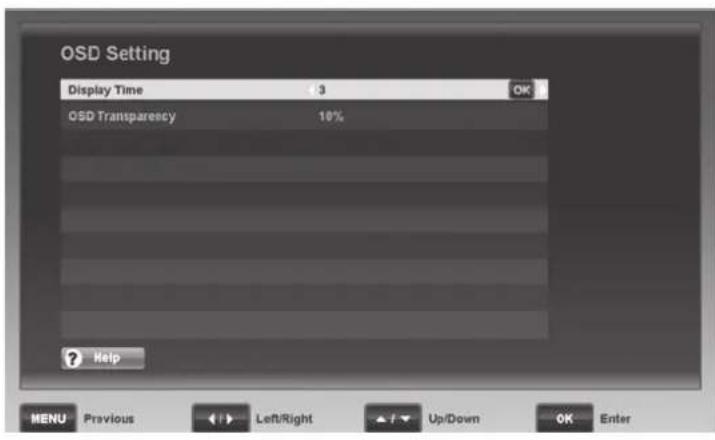
OSD Setting
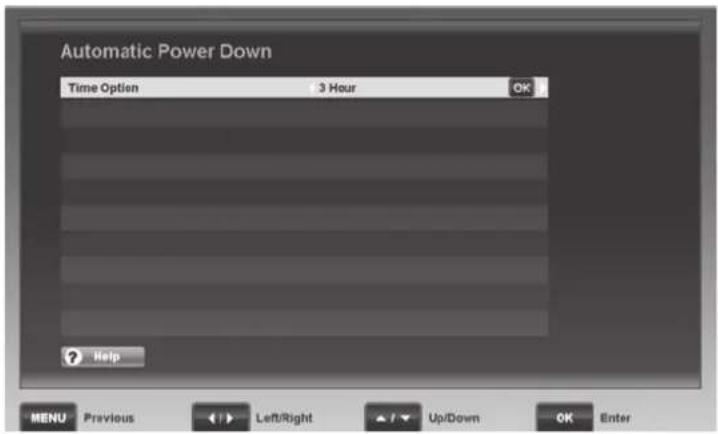
Automatic Power Down
Timer
Display Time
You can have the OSD menu visible for 2, 3, 5 or 10 seconds.
OSD Transparency
You can set the OSD menu transparency between 10% (background barely visible) and 80% (high transparency),
Time Option
This function powers the device off automatically if it has been left on accidentally. You can set a time between 30 minutes and 3 hours in 30 minute intervals. The satellite receiver will power off automatically after the set time (if any) if no input has been received via the remote control or via the buttons on the device. Select "No" to disable the auto power-off function.
This item allows you to show or edit the timer list.
Timer List
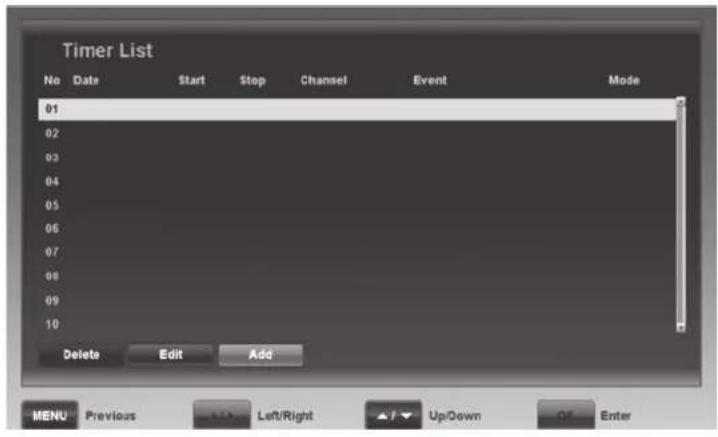
You can programme up to 10 timer events. For instance, you can schedule programmes that you don't want to miss. Press the [Red] button (39) to delete an entry, press the [Green] button (38) to edit an entry or press the [Yellow] button (23) to add an entry.
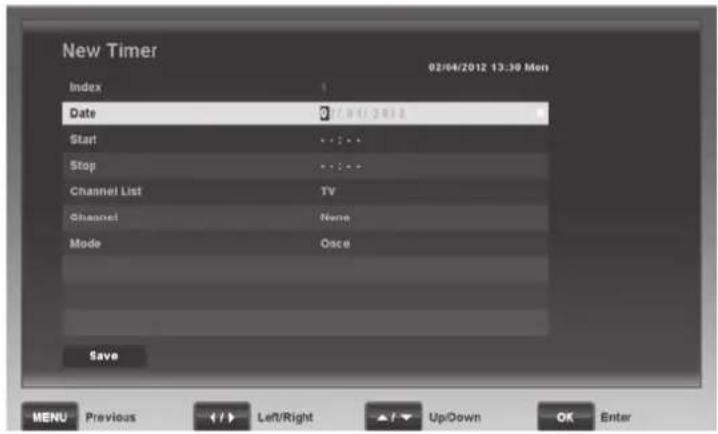
New Timer
Press the [Yellow] button (23) to programme a new timer.
The current date and time is displayed in the top right corner.
Index
Shows the sequential number of scheduled timers from 1 to 10.
Date
Enter the date you want using the numeric buttons (20).
Start
Enter the 4-digit start time of the programme using the numeric keys (20).
Stop
Enter the 4-digit stop time of the programme using the numeric keys (20).
Channel List
You can specify whether the timer applies to a TV or a radio channel here.
Channel
Select the channel you want.
Mode
The Mode defines how often the timer is activated: once, daily or weekly.
Press the [Blue] button [22] to save the scheduled event or press MENU (40) to cancel.
Common Interface
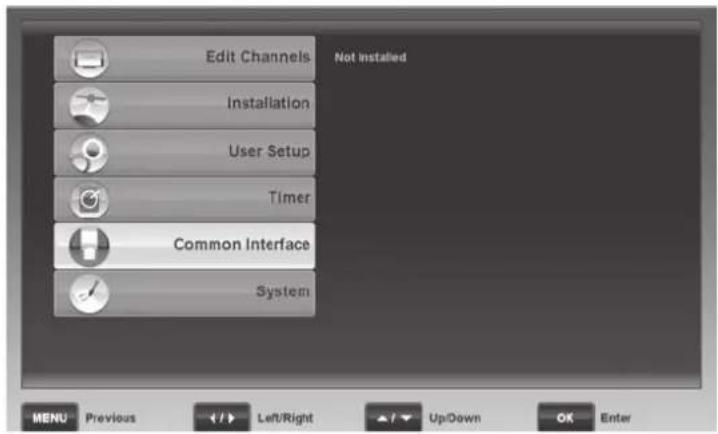
You need a special CI/CI+ decoding module to watch scrambled channels. There are multiple coding algorithms on the market and you will need a specific smart card for the channel or channel set that you want to watch. Your TV service provider will inform you about the coding algorithms, decoding and prices.
Your satellite receiver features a PCMCIA-compliant CI slot for inserting Cl / Cl + modules. Power the satellite receiver down prior to inserting the Cl / Cl + module. Insert the channel provider's smart card into the Cl / Cl + module's slot.
After powering the satellite receiver up, the Cl / Cl+ module will initialise and you should be able to decode the scrambled channels without any problems. If this does not happen, contact your channel provider to see if the signal needs to be unlocked for you first.
The Common Interface menu lets you select the CI module detected and adjust further settings for the CI/CI+ module.
Note: The settings, information and languages available depend on the CI/CI+ module inserted. Please make sure you read the Operating Instructions from the module manufacturer and of the channel provider.
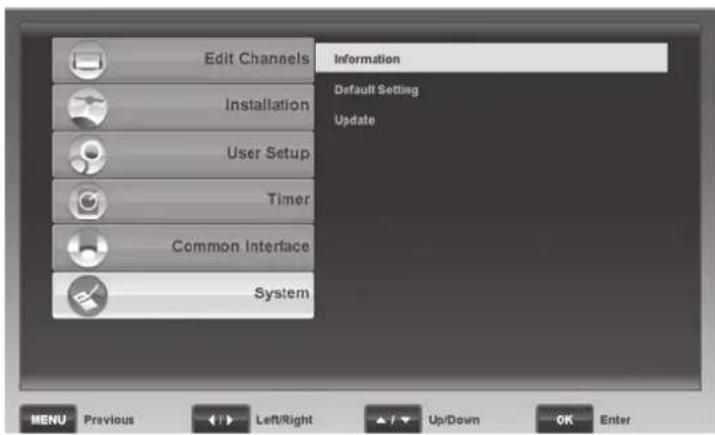
System
Information
Shows information about the software version of your satellite receiver. You will need this information when contacting Technical Support.
Default Setting
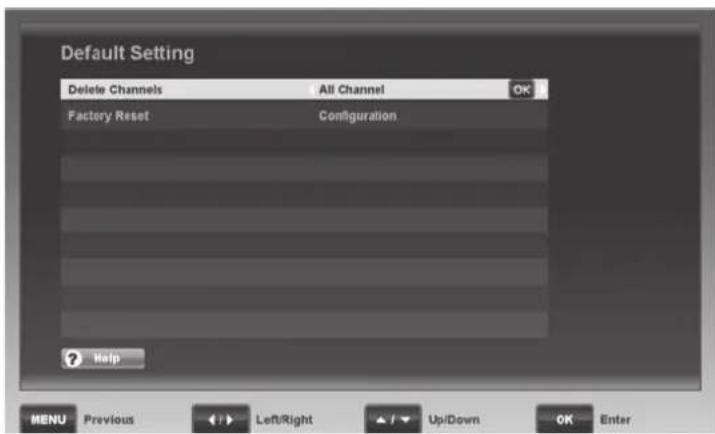
To open this menu, you have to enter the password. The factory-default password is: 0000.
Delete Channels
This allows you to delete the channel lists. Select "All Channel" to delete all channels or select "TV" to delete TV channels. Select "Radio" will delete all radio channels. Press the OK/ENTER button (25) to delete the selected channels. A safety prompt appears. Select "Yes" on the safety prompt to delete the selected channels definitely. Or select "No" to cancel.
Factory Reset
Here you can reset the configuration or load the factory-default values. Select "Configuration" to reset all changed settings to the factory-default values. Select "Default Setting" to delete all channel lists and to reset any settings changed to the factory-default values. Press the OK/ENTER button (25) to apply the option selected. A safety prompt appears. Select "Yes" on the safety prompt to apply the selected option definitely. Or select "No" to cancel.
Update
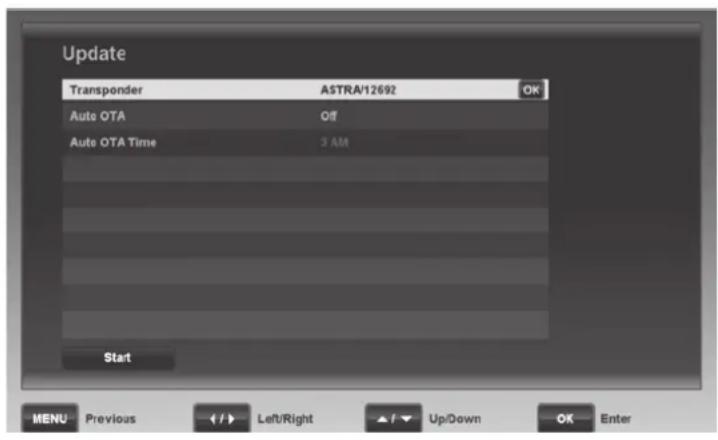
This item allows you to upgrade your satellite receiver software.
Transponder
The most up-to-date software can be obtained (as soon as available) via the ASTRA (19.2^ East) satellite. Please do not change these settings, unless you are instructed to do so by our Customer Service.
Auto OTA
This lets you search for software updates automatically once a day. As soon as new software is available for your satellite receiver, it will install automatically. Select the "On" option to enable this function. Selecting "No" disables this function.
Auto OTA Time
Press the or navigation buttons (26) to select the start time for the automatic software search. You can adjust the time in one-hour intervals between "1 AM" and "8 AM". Please note that this function is available only after setting the "Auto OTA" option to "On".
Press the [Red] button (39) to check for software updates immediately. Searching and loading may take several minutes.
Do not power the device off or disconnect it from the mains during the software update! This could result in permanent damage to your device.
Everyday Use
Powering the Device Up/Down
Power the satellite receiver up by pressing the On/Standby button (1) on the device or the On/Standby button (43) on the remote control. Pressing the On/Standby button (1/43) again will power the device back down. The device then switches to standby mode. If you cannot switch the device on by using the On/Standby button (1/43), check the main power switch POWER (16) on the back panel and switch it to the POWER position.
Selecting Channels
Using the Channel Up/Down Buttons
Press the navigation buttons or (26) on the remote control to move to the next or previous channel.
Using the Numeric Buttons
Enter the channel number you want using the numeric buttons (20).
Using the Channel List
Press the OK/ENTER button (25) to open the Programme List. You can highlight the channel you want using the or navigation buttons (26). Press the OK/ENTER button (25) to switch to the channel selected. Press the PREV (29) and NEXT (28) buttons to scroll through the list faster. Groups are a really easy way of accessing a specific channel. When you open the TV or Radio Channel List, you can use the [Red] button (39) to select different groups. Groups allow you to filter the channel list by the following criteria: "Satellite", "Favourite", "Provider" and "Scramble". If you select the "All TV" or "All Radio" group, all saved channels will be displayed again (no filter is applied). The group currently selected is shown in the first line of the channel list. Press the [Green] button (38) to sort the selected channel list as follows: "Numeric", "Alphabet" and "FTA to CAS" (unscrambled first, then scrambled). Press the FAV button (37) to open the list of your favourite channels. Press the or (26) navigation buttons to move between the different lists. To locate a specific channel quickly, you can press the FIND button (30) to open a search box. Press the navigation buttons (26) on the remote control to select the letters of the channel you are looking for and then press OK/ENTER (25) to apply the selected character. The left window will only show the channels matching the character sequence entered. You can use the [Red] button (39) to delete the entire entry or the [Green] (38) button to delete one character. When you see the channel you want press the [Yellow] button (23) to move to the left window where you can select the channel.
Adjusting the Volume
Press the or navigation buttons (26) to adjust the volume of your digital receiver. Press the MUTE button (17) to mute or to restore the sound output.
Helpful Special Functions
Press the TEXT button (22) to launch the Teletext view. Press the EPG button (27) to open the Electronic Programme Guide. If subtitles are available, press the SUB button (38) to show the subtitles. Press the TV/RADIO button (19) to switch between TV and radio channels.
Info Button
The INFO button (36) lets you display information about the current programme. Press this button once to show information about the current and next programmes. Press this button twice to display advanced information about the current programme. Press the or navigation buttons (26) to switch between the advanced information for the current programme and the next one. Press the INFO button (36) again to close the information window.
Operation
EPG - Electronic Program Guide

Your satellite receiver supports the Electronic Program Guide feature. Pressing the EPG button (27) displays programme information for individual or multiple channels. This gives you an overview of current programmes or any programmes for today and the coming days.

Please note that EPG information is broadcast only from channels broadcast on a transponder. To obtain EPG information from another channel, press the or navigation buttons (26) to switch to the channel you want and press the OK/ENTER button (25).
The start and end times, the name and the day of the week / date of the selected programme are shown in the top left corner. The left column contains the channel list with the channel currently selected. The right column shows the programme schedule for the relevant channel. Press the navigation buttons (26) to navigate around this window. The yellow line shows the current time. The [Yellow] button (23) lets you scroll back one day in the programme schedule and the [Blue] button (22) lets you scroll further one day.

Press the [Green] button (38) to show a list of all programmes scheduled on the current channel.
The first row shows the day of the week of the programme currently highlighted. Underneath this, you see a list of the scheduled programmes and their start times. You can navigate this list using the or navigation buttons (26). Press the or (26) navigation buttons to toggle between the days of the week.
Press the [Green] button (38) to return to the EPG overview.
EPG Timer
To schedule a timer using the EPG, press the TIMER button (33) in the EPG overview. The settings of the highlighted programme are automatically added to the timer list. Press the EXIT button (24) and confirm the prompt with "Yes" if you do not want to make any further changes to the scheduled timer.
However, there are more options available. For example, you can press the [Red] button (39) to delete an entry, the [Green] button (38) to edit an entry or the [Yellow] button (23) to add an entry. For more information about timers, see page 128.
EPG Info
You can display a short description of a programme. To do this, first use the navigation buttons (26) to select a programme from the programme overview. Then press the INFO button (36) to show further information about the highlighted programme. You can press the PREV (29) or NEXT (28) buttons to scroll through longer blocks of text. Press the INFO button (36) or the EXIT button (24) again to return to the EPG overview.
Programme Information
When you power up or switch to a different channel, an information window about the current programme appears:
Programme preset
- Channel name
Time
- Scrambled/unscrambled
- Locked/not locked
- Subtitles available/not available
- Teletext available / not available
Dolby Digital/AC3 sound available/not available
- Title of the current programme
Progress bar for current programme
- Title of the next programme
- Signal found/no signal
The amount and detail of the information displayed depends on the channel provider. For example, some channels do not broadcast any detailed programme information. You can display the information window at any time by pressing the INFO button (36). Press the EXIT button (24) to close the information window.
Note: If you cannot access a specific channel, a group or favourite list is probably active. To access all channels again, proceed as follows: Press the OK/ENTER button (25) to open the programme list. Next, press the [Red] button (39), select the "All TV" or "All Radio" group and press the OK/ENTER button (25) to confirm. Press the EXIT button (24) to quit the group list.
Selecting Audio Channels
Some programmes are broadcast with multiple audio channels. These audio channels can be different audio languages or different radio channels. To select an audio channel or a language, press the AUDIO button (39). Use the or navigation buttons (26) to select the option you want from the list, press OK/ENTER (25) to confirm and then press EXIT (24) to close the list.
You can also use the or navigation buttons (26) to choose the left or the right audio channel. The default is Stereo sound. To be able to play Dolby Digital/AC3 sound, your TV set needs a specific decoder or you can connect your satellite receiver to an AC3-compatible amplifier.
Adjusting the Volume
To adjust the volume, press the or navigation buttons (26). To disable the sound immediately, press the MUTE button (17). To restore the sound, press the MUTE button (17) again or press the or navigation buttons (26).
Selecting Channels
With channel numbers constantly increasing, it is difficult to maintain an overview. Many channels target specific regional audiences (e.g. foreign language), other channels are scrambled and can only be viewed by paying a subscription and others may not interest you. There are different channel groups and sorting criteria which allow you to organise the numerous channels available into Channel Lists. Channels can be accessed in different ways:
Using the Numeric Buttons
If you know the programme preset where the channel you want has been stored in the Channel List, you can recall it directly by entering it using the numeric buttons (20). After a few seconds, the satellite receiver will show the channel you want. TIP: Press the RECALL button (21) to open a list with the 10 most recent channels selected. You can press the RECALL button (21) twice to toggle between the current and the most recent channel.
Using the Channel List
Press the OK/ENTER button (25) to open the Program List. You can highlight the channel you want using the or navigation buttons (26). Press the OK/ENTER button (25) to switch to the highlighted channel. Press the PREV (29) and NEXT (28) buttons to scroll through the list faster. Groups are a really easy way of accessing a specific channel When you open the TV or Radio Channel List, you can use the [Red] button (39) to select the different groups. Groups allow you to filter the channel list by the following criteria: "Satellite", "Favorite", "Provider" and "Scramble". If you select the "All TV" or "All Radio" group, all saved channels will be displayed again (no filter is applied). The group currently selected is shown in the first line of the channel list. Press the [Green] button (38) to sort the selected channel list as follows: "Numeric", "Alphabet" and "FTA to CAS" (unscrambled first, then scrambled). Press the FAV button (37) to open the list of your favourite channels. Press the or (26) navigation buttons to move between the different lists. To locate a specific channel quickly, you can press the FIND button (30) to open a search box. Press the navigation buttons (26) on the remote control to select the letters of the channel you are looking for and then press OK/ENTER (25) to apply the characters selected. The left window will only show the channels matching the character sequence entered. You can use the [Red] button (39) to delete the entire entry or
the [Green] (38) button to delete one character. As soon as you see the desired channel press the [Yellow] button (23) to skip to the left window where you can select the channel.
Displaying Subtitles
Some programmes are broadcast with subtitles, for instance for the hearing-impaired or in different languages. Press SUB (38) to open the subtitle selection. Note: DVB subtitles are rarely broadcast and differ from common Teletext subtitles.
Teletext
Many channels broadcast additional information and services. Teletext pages are like "electronic magazines" allowing you to view news, sport, weather information, special offers and much more. The availability and content depends on the channel provider. The start or Index page is always page 100. On this page, you will find an overview of the other pages. Press the TEXT button (22) to launch the Teletext view. To enter a page number, always use 3 digits on the numeric buttons (20) or use the coloured special function buttons (22, 23, 38 and 39). The function currently assigned to these control buttons appears at the bottom of the Teletext window. Pressing the STATUS button (32) several times changes the transparency of the Teletext window. Press EXIT (24) to exit the Teletext pages.
Sleep Timer
You can use the SLEEP button (23) to set an automatic power off countdown. Pressing the SLEEP button (23) several times changes the countdown or disables the sleep timer. The following options are available: "10 min", "20 min", "30 min", "1 Hour", "1 Hour 30 min", "2 Hour" and "Off".
Troubleshooting
No signal
No signal is shown on the device or on the OSD menu signal indicators.
-
First check the antenna cable: The braided lead of the external wire and the aluminium film must have good contact with the F connector and must not touch the inner (centre) wire!
-
Check the reception settings and edit them if necessary. To further locate the problem we recommend that you temporarily connect the LNB directly to the receiver and do not use any switches or splitters.
Functional fault
-
The device shows the wrong broadcasting times in the EPG or shows the wrong time. Once powered up, the satellite receiver needs to read and process the channel data. Depending on the transponder, this can take some time. Sometimes it may be necessary to re-open the EPG or to change the channel.
-
The device fails to respond. Unplug the power cord or switch the device off using the main power switch (16). Wait several seconds and reconnect the device to try again.
Small number of channels
-
Make sure that you have enabled the correct Channel List. Press the OK/ENTER button (25) to open the programme list. The first line shows the channel list currently selected. To select a different channel list, press the [Red] button (39). Press or navigation buttons (26) to select the desired channel list and press the OK/ENTER button (25) to confirm. To obtain the entire channel list, select the "All TV" or "All Radio" group and press the OK/ENTER button (25) to confirm. To close the group and channel list, press the EXIT button (24) as many times as necessary to hide all windows.
-
The antenna has been moved to the wrong satellite. When positioning the antenna you may receive satellite broadcasting on similar frequencies which causes the signal indicators on your satellite receiver to go up. When you switch channel, suddenly foreign channels or the message "No Signalt" appear. Normally, you just need to move the antenna a few degrees East or West to receive the channels you want.
No sound, distorted sound
- If there is no sound or only interference, your TV set or AV receiver may not be capable of decoding Dolby Digital/AC3 audio via the HDMI port. Solution: Press the AUDIO button (39) to select Stereo sound. If the channel does not transmit stereo sound, connect the digital S/PDIF audio output (9) to your Surround/AC3/Dolby Digital sound system.
- If there is no sound, check whether the MUTE function has been enabled. If the sound is muted, press the MUTE button (17) again to resume the sound output.
- If the sound is very low or there is no sound at all, double-check the volume setting and, if necessary, increase the volume via the navigation button (26). Please also check the volume setting on your TV set or your hi-fi amplifier, if one is connected.
Maintenance / Cleaning
Servicing is required when this device has been damaged in any way, for example, if the power plug, power cord or housing is damaged, if liquid or objects have entered the device, if the product has been exposed to rain or moisture, if the product does not work normally or if the product has been dropped. If you notice any smoke, unusual noise or strange smells, switch off the device immediately and pull the plug from the wall outlet. If this occurs, the device should no longer be used and should be inspected by authorised service personnel. Please contact qualified personnel if your device needs servicing. Never open the housing of the device. Opening the housing exposes you to lethal electric shocks. Only use a clean, dry cloth for cleaning. Never use any corrosive liquids. Do not attempt to open the housing of the device, as this will void your warranty.
Environment and Recycling

Devices marked with this symbol are subject to European Directive 2002/96/EC. All electric and electronic devices must be disposed of separately from household waste at official disposal centres. Proper disposal of old devices avoids damage to the environment and to your health. For further information about proper disposal, contact your local council, recycling centre or the shop where you bought the device.
Respect the environment. Old batteries do not belong with domestic waste. They must be handed in to a collection point for waste batteries. Please note that batteries must be disposed of fully discharged at appropriate collection points for old batteries. If disposing of batteries which are not fully discharged, take precautions to prevent short circuits.
Recycle the packaging material properly too. Cardboard packaging can be taken to paper recycling containers or public collection points for recycling. Any film or plastic contained in the packaging should be taken to your public collection points for disposal.
Conformity notes

This device complies with the basic and other relevant requirements of the EMC Directive 2004/108/EC, the Low-voltage Directive 2006/95/EC and the ErP Directive 2009/125/EC. The corresponding Declaration of Conformity can be found at the end of this User's Manual.
Warranty and Service Information
Warranty of Targa GmbH
Dear Customer,
This device is sold with three years warranty from the date of purchase. In the event of product defects, you have legal rights towards the seller. These statutory rights are not restricted by our warranty as described below.
Warranty conditions
The warranty period commences upon the date of purchase. Please keep the original receipt in a safe place as it is required as proof of purchase. If any material or manufacturing faults occur within three years of purchase of this product, we will repair or replace the product free of charge as we deem appropriate.
Warranty period and legal warranty rights
The warranty period is not extended in the event of a warranty claim. This also applies to replaced and repaired parts. Any damage or defects discovered upon purchase must be reported immediately when the product has been unpacked. Any repairs required after the warranty period will be subject to charge.
Scope of warranty
The device was carefully manufactured in compliance with stringent quality guidelines and subjected to thorough testing before it left the works. The warranty applies to material and manufacturing faults. This warranty does not cover product components which are subject to normal wear and which can therefore be regarded as wearing parts, or damage to fragile components such as switches, rechargeable batteries or components made of glass. This warranty is void if the product is damaged, incorrectly used or serviced. To ensure correct use of the product, always comply fully with all instructions contained in the user manual. The warnings and recommendations in the user manual regarding correct and incorrect use and handling of the product must always be observed and complied with. The product is solely designed for private use and is not suitable for commercial applications. The warranty is rendered void in the event of incorrect handling and misuse, if it is subjected to force, and also if any person other than our authorised service technicians interfere with the device. No new warranty period commences if the product is repaired or replaced.
Submitting warranty claims
To ensure speedy handling of your complaint, please note the following:
Before using your product for the first time, please read the enclosed documentation or online help carefully. Should any problems arise which cannot be solved in this way, please call our hotline.
Always have your receipt, the product article number as well as the serial number (if available) to hand as proof of purchase.
If it is not possible to solve the problem on the phone, our hotline support staff will initiate further servicing procedures depending on the fault.

Service

Phone: 0207-3650744
E-Mail:
service.GB@targa-online.com

Phone: 01-2421583
E-Mail:
service.IE@targa-online.com

Phone: 800-62175
E-Mail:
service.MT@targa-online.com

Phone: 800-92496
E-Mail:
service.CY@targa-online.com
IAN:71270

Manufacturer
Please note that the following address is not a service address. First contact the service point stated above.
TARGA
GmbH
Postfach 22 44
D-59482 Soest
www.targa.de
C E
EC Declaration of Conformity
Address: Targa GmbH Lange Wende 41 59494 Soest, Germany
Product: CI-HD Digital Receiver Model: SilverCrest SSR 1080 B2
The product complies with the requirements of the following European directives:
2004/108/EC Electromagnetic Compatibility
2006/95/EC Low Voltage
2009/125/EC Energy Related Products
Compliance was proved by the application of the following standards:
EMC: EN 55013:2001+A1:2003+A2:2006 EN 61000-3-2:2006+A1:2009+A2:2009 EN 61000-3-3:2008 EN 55020:2007
Safety: EN 60065:2002+A1:2006+A11:2008
ErP: Regulation 1275/2008
Year of CE marking: 2012

Soest, 13th of February 2012
Matthias Klauke, Managing Director