
NKE 103 - Heating AEG - Free user manual and instructions
Find the device manual for free NKE 103 AEG in PDF.
| Product Type | Radiant Convector |
| Brand | AEG |
| Model | NKE 103 |
| Power Supply | 230 V ~ 50 Hz |
| Nominal Power | 1500 W (estimated) |
| Protection Class | II |
| Protection Index | IP24 |
| Installation | Wall-mounted, fixed (except in France) |
| Operating Modes | Comfort, Eco, Frost-Free, Off |
| Control | By carrier current (pilot wire) |
| Temperature Adjustment | Knob with adjustable range |
| Controls Lock | Possible (knob and switch) |
| Maintenance | Dust the grilles twice a year; interior check every 5 years |
| Cleaning | Damp cloth, do not use abrasive products |
| Authorized Locations | Volume 2 of wet rooms (IP24) |
| Minimum Distances | Follow the diagrams in the manual |
| Warranty | 2 years (30 months max without proof of purchase) |
| Supplied Accessories | Mounting bracket, wall plugs |
| Countries of Use | France, Belgium, Switzerland, etc. (local standards) |
Frequently Asked Questions - NKE 103 AEG
User questions about NKE 103 AEG
0 question about this device. Answer the ones you know or ask your own.
Ask a new question about this device
Download the instructions for your Heating in PDF format for free! Find your manual NKE 103 - AEG and take your electronic device back in hand. On this page are published all the documents necessary for the use of your device. NKE 103 by AEG.
USER MANUAL NKE 103 AEG
Thermal wave convector
Operation and installation 5
2.3.4 Wandinstallation (Bld 8)
Caution very hot surface.
CAUTION: Portions of this product may become hot and cause burns. Pay particular attention to the presence of children and vulnerable people.
-
Keep away from this unit child under 3 years unless they are under continuous surveillance.
-
Children between 3 and 8 years must only turn on & off the unit as long as it has been installed in a normal position, that these children have supervision, have received instructions to use of the device safely and have understood the potential dangers. Children between 3 and 8 years must not connect, adjust or clean the appliance, or make the user maintenance.
- This device should not be used by unsupervised children under 8 years old and by people with physical, sensory or mental reduced capabilities and by persons with lack of experience or knowledge, unless they can benefit through a person responsible for their safety of prior instructions. Children must not play with the appliance. Cleaning and maintenance by the user must not be performed by unsupervised children.
- This device must be plugged or connected according to the rules and standards applicable by an authorized person.
- The instruction book of this product is available by contacting the after-sales service with the number indicate on the warranty part included in this manual service.
- If the power cable is damaged, it must be replaced by the manufacturer, its after sales service or similarly qualified persons in order to avoid any danger.
| Caution: to avoid overheating and for safety reasons, do not cover the panel heater. | |
| Devices with this symbol should not be disposed with household waste but must be collected separately and recycled. The collection and recycling of end of life must be made according to the provisions and local ordinances (DEEE 2002/96/CE). | |
| The installation of the device in high altitude causes an increase of the temperature air outlet (about 10 °C per 1000 m elevation). |
2. Installation
2.1 Where to install your heater?
- This equipment was designed to be installed in a residence. Please ask your distributor before using it for any other purpose.
- The panel heater should be installed according to normal trade practice and incompliance with legislation in the relevant country (NFC 15-100 for France).
- The equipment is class 2 and is protected against splashed water IP 24. The device can be installed in volume 2 of a bathroom (Figure 1). It's forbidden to install the device in the volume 1. The device is to be installed so that switches and other controls cannot be touched by a person in the bath or shower.
- Comply with the minimum clearance distances for positioning of the panel (Figure 2).
- The wall bracket allows keeping a free space behind the device to not disturb its regulation. The distance between the unit and the wall should not be obstructed.
2.2 Do not install the panel heater
- In a draught that might affect adjustment (for example, under a central mechanical ventilation unit etc...). Under a fixed power socket (Figure 3) or near curtains or other combustible materials.
- In a non-conform position.
- The air outlet grid and the control unit is visible in the upper part of the device. It is forbidden to install a vertical unit horizontally and vice versa (Figure 4).
2.3 How to install the panel heater?
2.3.1 Preparation
a. Release the appliance's hook-on bracket (Figure 5)
- We recommend that you place the panel heater flat, face down. Take a flat head screwdriver and lift the tab taking care not deform. While holding the tab lifted, push the locking bracket to the bottom of the unit to release the upper hooks. Rotate the attachment tab around the lower hooks and remove the attachment tab.
b. Fix the hook-on bracket (Figure 6)
- Place the bracket on the ground and against the wall and mark the drilling points A. These give the position of the bottom fasteners. Replace the brackets in alignment with the drilling point A to locate drilling points B. These give the position of the upper fasteners. In case of special support, use proper anchors. Position and screw the wall brackets.
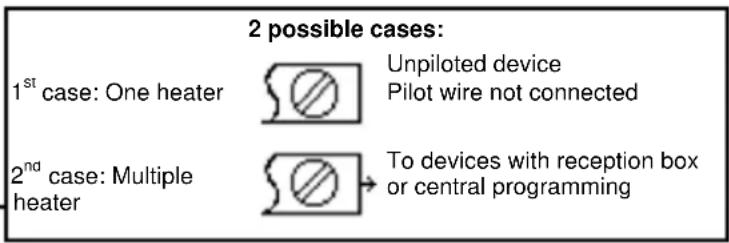
2.3.2 Electrical connexion
- The appliance should have a 230V / 50Hz power supply. The panel heater must be connected to the mains by a 2-wire cable with plug or 3-wire cable (Brown= Phase, Blue = Neutral, Black = Pilot wire) by means of a connexion box. In humid
areas such as bathrooms and kitchens the power socket must be installed at least 25cm above the floor. The installation should be fitted with a double pole break device with a break of at least 3mm .
- Connection to earth is prohibited / Do not connect the pilot wire (black) to earth. If a master appliance or a slave appliance is protected by a 30mA differential (e.g. for bathroom) it is necessary to protect the power supply of the pilot wire on that differential, too.
| Commands Received | No signal | Complete alternation 230 V | Negative Half/alternation - 115V | Positive Half/alternation + 115V |
| Oscilloscope Ref/Neutral | ||||
| Mode obtained | CONFORT | ECO | ANTI-FREEZE | STOP HEATING LOAD SHEDDING |

Panel heater cable
2.3.3 Wall mounted installation (Figure 7)
- Place the device inclined on the brackets C and rotates the device to place it on the brackets D. Lowering the device on the bracket. A click indicates that the device is attached and locked. To unlock the attachment tab, grab a screwdriver and push the tab (at the top left of the attachment tab behind the device) towards the wall. Lift the device while holding the tab with the screwdriver. Tilt it forward and remove it from the supports C.
3. Utilisation
3.1 How to fix the comfort mode? (Figure 8)
- The Comfort mode allows setting the desired temperature using the control knob.
- Put the switch H on, and then set the control knob I on the desired position, the heating indicator G lights if the ambient temperature is lower than desired one. Wait until the temperature stabilizes.
3.1.1 How to fix the Eco mode?
- ECO mode allows lowering the temperature of Comfort mode from 3 to
4^ during unoccupied periods of the room. It is recommended that this mode should be used if the room is unoccupied for more than 2 hours. Put the switch H on ECO and then set the control knob I to the desired position, the heating indicator G lights if the ambient temperature is lower than desired ECO temperature. Wait until the temperature stabilizes.
3.1.2 How to fix the Frost Free mode?
- It is the position of the switch that keeps the temperature at approximately 7^ C in the room during prolonged absence from the house (usually more than 24 hours). Put the switch H on
3.1.3 How to program your device in Comfort, ECO or Frost Free mode?
-
Devices equipped with an electronic thermostat are able to receive orders. There are two solutions:
-
By pilot wire (black wire) for devices without plug thanks to the system Chronopass or a wall pilot wire box
- By carrier current with an interface on each device in addition to a Chronopass system or a wall carrier current box.
3.1.4 How to lock the commands (Figure 9)?
It is possible to lock or limit the use of the control knob I and to lock the switch H to prevent manipulation. Lift the unit from the wall bracket. On the back of the thermostat, remove the pins J from their support:
- The K position allows locking the control knob.
- The L position allows limiting the utilisation of the control knob.
- The M position allows locking the H switch on the desired mode.
4. Recommendations for use
- There is no point in setting maximum heating; the room temperature will not rise any quicker. If you leave for several hours, remember to reduce the temperature.
- If you have several units in a room, let them operate simultaneously. This will give you a more uniform temperature without increasing electricity consumption. This also applies for an unoccupied room; it is more interesting to let the device operate on a lower setting than turn it off completely.
5. Maintenance
- To maintain performances of your unit, you should clean the upper and lower grids of the unit about twice a year using a vacuum cleaner or a brush.
- Have a professional check the inside of the unit every five years. Dirt may collect on the grids of the unit if the atmosphere is polluted. This phenomenon is due to the poor quality of the ambient air. In this case, it is recommended to check that the room is well ventilated (ventilation, air inlet, etc.), and that the air is clean. The unit will not be replaced under the guarantee because of this type of dirt. The unit casing should be cleaned with a damp cloth, never use abrasive products.
6. Trouble-Shooting
- The device does not heat: Make sure that the installation circuit breakers are switched on, or that the load shedding (if you have one) has not switched off the unit power supply. Check the air temperature in the room. For the device equipped, check that the programmer is in Comfort mode.
- The unit is permanently heating: Make sure that it is not in a draft and that the temperature setting has not been changed.
- The unit does not carry out programming orders (Device equipped): Make sure that the programming unit is being correctly used (refer to its user's manual) or that the Chronocarte is properly inserted in its housing and that it is operating normally (batteries). The device with electronic control is equipped with a microprocessor that can be distributed by some severe mains voltage disturbances (outside EC standards defining the disturbance protection level). If there are any problems (thermostat blocked, etc.) switch off the unit power supply (fuse, circuit breaker, etc.) for about 5 minutes to allow the unit to start again. If this phenomenon occurs frequently, control the power supply by your energy supplier.
- The device is very hot on the surface: It is normal that the device when working, the maximum surface temperature is limited in accordance with standards. However, if you believe that your radiator is still too hot, make sure the power is adapted to the surface of your room (we recommend 100W / m2 ) and the unit is not placed in a stream of air that would disrupt its regulation.
7. Warranty conditions
KEEP THIS DOCUMENT IN A SAFE PLACE
(This certificate should only be produced if you are making a complaint, attached with the invoice of the purchase)
- This guarantee is applicable for 2 years from the date of original purchase and shall be valid for no more than 30 months from the date of manufacture.
- The warranty covers the replacement and supply of accepted defective parts except damages and interest components.
- Labour costs, travel and transportation are under the responsibility of the user.
- Damage linked to an improper installation, to a supply network not complying with standards, to an abnormal using or to the non-compliance to the instructions of the manual are not covered by the warranty.
- Present this certificate only in case of claim with your distributor or installer attaching your invoice.
- The provisions of these warranty conditions are not exclusives of benefits for the purchaser of the legal guarantee for defects and hidden defects that apply in any case in terms of articles 1641 and following of the Civil Code.

- This information is shown on the plate which can be seen on the left-side or behind the front grille of the unit
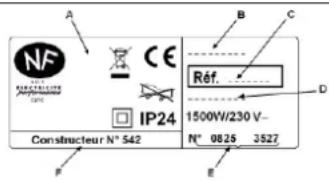
A Standards, quality labels
B Commercial name
C Commercial reference
D Manufacturing reference
E Serial Number
F Manufacturer number
| Type of Device * | |
| Serial Number * | |
| Name and address of the customer * |
Mise en garde (FR)

| A Standards, quality labels |
| B Commercial name |
| C Commercial reference |
| D Manufacturing reference |
| E Serial Number |
| F Manufacturer number |
b. YcTaHOBnTe KpOHWeH Ha CTeHe (PucyHok 6
PacnoIoxnTe KPOHHTeH y cTeHbHa ypoBHe nOJa. HAmetbe ToKn CBepHeHg A dN HxHnx OTBepCTn KPOHHTeHa. PpInoHNMTte KPOHHTeH, COBmecTb NBtMck C HxHKNM NTBPcTnM KPOHHTeHa, NocJe Yero HAMetbe OCTabuimeca Dba MeTa dN BepXnX OTBepCTn KPOHHTeHa B. PpocBepNTe OTBepCTn N 3aΦNKcpyTe KPOHHTeH Ha CTHe npN NOMOUs IIO6JIe H BNHTOB. He 3a6yDbTe BCTaBnTB pOKnaKn MExdy KPOHHTeHOM n CTHeH npN Heo6xoDnMoCTn. YctahOBnTe n 3akpenite HAcTeHHbIe KPOHHTeHbI.
2.3.2 3JIeKTpIueCkoe noJKnIOUeHne
-Приборпразданauthердя сети 230/50Hz.
2.3.4 YcTaHOBKa npi6opa Ha KpoHtTeHHe (PncyHOK 7)
- NocTabbTe np6Op Ha HnKHe BbICTynbl KPOHSeHnHa C. PnKMMte np6Op K BepXHM BbICTyNam KpoHTeHnDA. 3aueJKNHTe KOHBekTOp Ha KPOHSeHne No HanpaBHeHHo CBepx Bn3. YTo6bl Chr8b np6Op c KPOHTeHnA, C NOMOUBIO NLOCKO OTBePTKn HaxMITE Ha Ra3bUOK (B JEBOM BepXhem yIpy KPOHTeHnA) K CTHe. POnHMNTe np6Op, Depka Ra3bUOK C NOMOUBIO OTBePTKn. POnTOKNHTe erO BnpeD, 3aTEM CHMNTe C BbICTyNOB C.
3. Mcnonb3ObaHne
3.1 KaK yctaHOBntb peXHM KomΦoPT? (PcCyHOK 8)
- PexkM KomΦopt NO3BOJnEYcTaHOBnTb XeJaemyo TempeaTypy nCNoJIb3yR pyKy KOHTpOJa.
- YctaHOBnTe nepeKNIuOaTeJIb H Ha a 3aTeM ycTaHOBnTe pykky KOHTPOI I Ha JKeNaEmyIO HAcTPOIKy, INHdNkaTOp HArpeBa G ropIT, ecNI OKpyKaIOUaIa TeMnepaTpya HIXe JKeNaEMoI. NpOxKnTe, noka TempePaTpyc Ta6HnIN3npyETc.
3.3 Ka yctaHOBtB AHTNo6JeDeHeHHe?
- 3To no3nua nepeknioyateJRA, KOtopa NOdepxnBaet TemnepaTpy OKoJO 7^ CB KOMHaTe BO Bpemr DInTeHoro OTCYCTBnA DomA (O6bHuHO 60nee 24 yacOB). YcTaHOBITE nepeknioyateJb H on
3.4 KaK 3anporpammmpoBaT np6Op B pexImax Komfopt, ECO nIIN AHTno6neHeHHe?
- UcTpoIcTBa, obOpyIOBaHHbIe 3NeKToPONHbIM TepMOCTaOM, MoryT 6bITb 3AnporpAMMnPOBaHbI. Yepe3 ynpAIBHOUIN npoBOD (uehbl npoBOD) drr yctpoiCTB 6e3 BUNIK 6bnOapr cncTeMe Chronopass nln HactEHOMy nporpaMMatopy,
3.5 KaK 3a6bKnOpBaTb KOMaHDbI (PcCyHOK 9)?
I pyepoBpaueHn 3meHn Hacpoek Bbl MoKeTe 3a6JIOKpuObaT uN OrpaHnHTb NCNoJIb3OBaHne peryIaTopa I n 3a6JIOKpuObaT BbIKNUOaTeJIb H. Chmnte np6op c KPOHtEHa. Ha 3aHHe Yactn TepMOCTata ydaJIHTb WtNΦTb J OT INx NOpePkK:
-ПозицяК дonsуckaetблokировkyperynatopa ynpablenia.
- L noJIOXHeHne no3BOJnAeT orpaHnHTb nCNoJIb3OBAHne peRyIaTOPa ynpabJIeHna.
-No3nIaM nO3BONaTe6JIOKINPOBky BbIKIOUaTeJIa H Ha HyXhbl peXm.
4. PekomeHdaun no 3KcnIyataun
- 5ecnone3Ho yctaHabnBaTb HactpoKn np6opa Ha MaKcMym, TemnepaTypa B KomHaTe He CtaHet NOnHMaTbCra OT 3Toro 6bIcTpe. EcIn Bbl yXoJte Ha HeckOJIbKO YacOB, He 3a6yDbTe NOnH3ntb TemnepaTyp.
- Ecnn B nomeuhen HeckoBko OTOnnteBbIX np6obopOB, nycb OHn pa6oTaHOT oNHOpeMeHHO - 3TO oBeceuHT 60onee paBHOMepHbI OboRpeB C oNDHOpeMeHHo ONTmIm3aueNe pacXoDB Ha 3JNEKtpUcTeBO. PpN yxoJe, BmecTo nONHoro OTKnIOUeHnnp6oPA, Lyuwe octabte erO BKIOUeHHbIM Ha 60nee cna6bI o6orpeB.
5.06cnyxmbHae
-Дя подержаня paobotb Bawero npibopa, ouuuaite BepxHne n HxHne peeETkn npibopa kak MHHmym Dba pa3a B roD c NOMOsbIO nbJncocca nIIN UeTKN.
-Korda Bbl npoBeTpnuBaTe nOmeuHne, BBiKnIouaHTe o6OrpeB, NOCTaBb KypCop Ha
-ПиИSCNoIb3OBaHnII np6Opa B CnJIbHO 3arPra3HeHHo aTmocpepe Ha NOBepxHOCTN peWetOK np6Opa MOrYT NOBHTcR PTHa. TAKne IOBepxHOCTHbE 3arPra3HeHnI He NOKpbIAbOTcR rapaHTmeI np6Opa I He YBJIaIOTc OCHOBaHNEM IЯ erO 3aMeHbI. PtNi HAIuHnI Upe3MepHO 3arPra3HeHHoro BO3dYxa B NOMeUeHNIX PeKOMeHdyETcR ocUyecTBbOJee cactbIe npOBeTpNbAHnI b6OJe qAcTo npoBOdITb YcNcTKy np6Opa. Kopnyc np6Opa Heo6XoDIMO OChUaTb BlaXHoT TprKnOi.
-BHMaHHe:HnB Koem cIyae He nCnoNb3OBAtB dIpy OUCSTKn a6pa3NBhIe N arpeccNBhIe MaTePnaIbI, KOToPbE MOrTyT NOBpeINb NOBepxHOCTb np6opa
- KaKdIe IaTb Iet BHyTpEHHne KOMnOHeHtbl npi6opa DoJxHbI 6bITb npoBepeHbI n IpOTecTnpoBaHbI KBaJIuΦnUpOBAHHbIM CneuaJIInCTOM.
6. B cnyuae npo6nem
- Pnp6op He rpeet: Y6eINTecb, qTo np6op noDKIIOueH K cETn. PpOBepbTe Temnepatpy Bo3dyxa B KOMHaTe. IJRA MOJIeB KOMNNEKTAAUHO, KOtOpBX BXoNT nporpaMMATOp, y6eINTecb B TOM, qTO np6op HaxODNTCB PexKIMe KOMΦOPT. Pnp6op noCTOaHHo rpeet: Y6eINTecb, qTo OH He hXoNTcRa HA CKBO3HKe N qTO yCTaHOBA KEMpePATpyHe 6blna n3MeHena. Pnp6op He cIeDyET ZAnporpaMMPOBaHHbIM KOMaHdAm: Y6eINTecb B TOM, qTO npOrpaMMnpoBaHHe 6blno KopkeTHO npimeHeno (cm. uHCTpyKuNo Ha 3to), uNo qTO Chronocarte npabInbHO BCTaBNeHa B rHe3do, uTO OHa fYHKUHOHPuyET HopMaJIbHO (npOBepbTe 6aTaapeKn). Ha pa6Ot yIeKTPoHHoro np6opa, coEprKaUero MKNpOnpoeeCOP Mory T NOBNIAB Tomexn B 3eKTPuYeCKoCkTu (3a npedeJamn EC cTaHApTbONpeDeJeHbI yPoBhem HapuWeHnra 3auNTbl). B clyuae BO3NKHOBeHnra KaNX II60 np6lme (tePMoCTaT n.T.D.) OTKIOHTe np6op OT nCTOHNka NITAHnra (PpeDOxPAHnteIN, BblKIOUATEEN n T.D.) npe3aanyctnte erO uee3 5 MNHyT. B clyuae Yactoro BO3NKHOBeHnra np6IeM, npOBepbTe nCTOuHNK NITAHnra INI ObpaTTEcB K BaWemy noctabunky 3eKTPo3Heprnn.
-Поверхноctь рибopa оунь roрая:УбeДиTeCBВ TOM,чTO MOLHOCb COOTBeTCTByET NIOUaDN NOBepxHOCTN (peKOMeHnyetcra 100W ha m2)ИчTo пибор He haxOHTcRa CKBO3HЯKE, KOTOpBIMor 6bl NOBJIryTb Ha HAcTpOKn..
7. ycnoBra rapaHTn
Dokyment noJb3ObaTeJIa
Urzhumskaya street 4,
building 2
129343 Moscow
Tel. 0495 7753889
Fax 04957753887
Switzerland
STIEBEL ELTRON AG
Industrie West
Gass 8
5242 Lupfig
Tel. 056 4640-500
Fax 0564640-501
