
DDLE OKO TD 18 - Heating AEG - Free user manual and instructions
Find the device manual for free DDLE OKO TD 18 AEG in PDF.

| Product Type | Electric Heater |
| Brand | AEG |
| Model | DDLE OKO TD 18 |
| Category | Heating |
| Dimensions (H x W x D) | 450 mm x 300 mm x 150 mm |
| Weight | 4.5 kg |
| Power Supply | 220-240 V, 50 Hz |
| Power Consumption | 1800 W |
| Heating Type | Convection heating |
| Thermostat | Adjustable thermostat with temperature control |
| Heat Output | Up to 20 m² room size |
| Safety Features | Overheat protection, tip-over switch, child lock |
| Operation | Manual controls with ON/OFF switch and temperature dial |
| Modes | Eco mode, frost protection mode |
| Maintenance | Clean with a soft damp cloth; do not use abrasive cleaners |
| Filter | Washable dust filter |
| Mounting | Freestanding or wall-mounted (mounting kit included) |
| Noise Level | < 35 dB |
| Energy Efficiency Class | A |
| Spare Parts | Available: heating element, thermostat, fan motor (if applicable) |
| Repairability | Repair by qualified technician; user-replaceable parts: filter, fuse |
| Warranty | 2 years |
Frequently Asked Questions - DDLE OKO TD 18 AEG
User questions about DDLE OKO TD 18 AEG
0 question about this device. Answer the ones you know or ask your own.
Ask a new question about this device
Download the instructions for your Heating in PDF format for free! Find your manual DDLE OKO TD 18 - AEG and take your electronic device back in hand. On this page are published all the documents necessary for the use of your device. DDLE OKO TD 18 by AEG.
USER MANUAL DDLE OKO TD 18 AEG
Instantaneous water heater with full electronic control with FBM Comfort wireless remote control
Operation and installation 22
D0000037816
8.3.1 Error Menü
26_02_02_1345
natural_image
Diagram of a door with a screwdriver and directional arrows indicating movement (no text or symbols)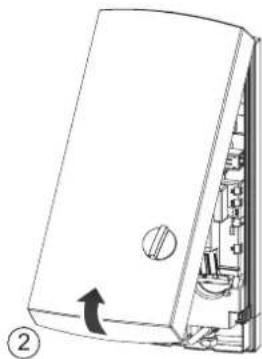
natural_image
Diagram of a device with an arrow indicating rotation, showing internal components without any text or symbols.26_02_02_0766
natural_image
Mechanical assembly diagram showing a component with pins and a tool, no readable text or symbols presentnatural_image
Technical diagram showing two mechanical assembly configurations with arrows indicating direction (no text or labels)26_02_02_0948

Hinweis
natural_image
Diagram showing a screwdriver inserted into a component, with no visible text or symbols26_02_02_0950
natural_image
Technical line drawing of an industrial equipment cabinet with control panel and piping (no text or symbols)26_02_02_0884
natural_image
Technical line drawing of an electrical enclosure with internal components and a close-up inset showing a speaker (no text or symbols present)26_02_02_0885
natural_image
Diagram showing two mechanical components connected by a spring, with arrows indicating motion direction (no text or symbols)D0000041925
26_02_02_0890
85_02_02_0003
9.3.6 Montage Temperaturfunktaster
26 02 02 0888
26_02_02_0949
- General information 23
- Safety 23
- Equipment description 24
- Operation....26
- Maintenance and care....29
- What to do if 29
INSTALLATION
- Safety 30
- Equipment description 31
- Assembly....33
- Commissioning....36
- Handover 36
- Troubleshooting 37
- Specification 37
- Maintenance....39
GUARANTEE
ENVIRONMENT AND RECYCLING
SPECIAL INFORMATION
• The appliance may be used by children aged 8 and older and persons with reduced physical, sensory or mental capabilities or a lack of experience and know-how, provided that they are supervised or they have been instructed on how to use the appliance safely and have understood the resulting risks.
- Risk of burns: The tap can reach temperatures in excess of 60 °C.
• The appliance must be able to be separated from the power supply by an isolator that disconnects all poles with at least 3 mm contact separation.
- Secure the appliance as described in chapter „Installation / Installation“.
- Observe the maximum permissible pressure (see chapter „Specification / Data table“).
- Drain the appliance as described in chapter „Installation / Maintenance / Draining the appliance“.
OPERATION
1. General information
The chapters „Special Information“ and „Operation“ are intended for both the user and qualified contractors.
The chapter „Installation“ is intended for qualified contractors.

Note
Read these instructions carefully before using the appliance and retain them for future reference.
Pass on the instructions to a new user if required.
1.1 Safety instructions
1.1.1 Structure of safety instructions

KEYWORD Type of risk
Here, possible consequences are listed that may result from failure to observe the safety instructions.
» Steps to prevent the risk are listed.
1.1.2 Symbols, type of risk
| Symbol Type of risk | |
| Injury | |
| Electrocution | |
| Burns(burns, scalding) | |
1.1.3 Keywords
| KEYWORD Meaning | |
| DANGER | Failure to observe this information will result in serious injury or death. |
| WARNING | Failure to observe this information may result in serious injury or death. |
| CAUTION | Failure to observe this information may result in non-serious or minor injury. |
1.2 Other symbols in this documentation

Note
General information is identified by the symbol shown on the left.
» Read these texts carefully.
| Symbol Meaning | |
| Material losses(appliance damage, consequential losses and environmental pollution) | |
| Appliance disposal | |
» This symbol indicates that you have to do something.
The action you need to take is described step by step.
1.3 Units of measurement

Note
All measurements are given in mm unless stated otherwise.
2. Safety
2.1 Correct use
This appliance is designed for domestic use. It can be used safely by untrained persons. The appliance can also be used in a non-domestic environment, e.g. in a small business, as long as it is used in the same way.
This appliance is a pressure appliance for the heating of cold water to DIN 1988 that can supply one or several draw-off points. The appliance is suitable for reheating preheated water up to 45°C. The maximum permissible supply temperature is 60°C. The appliance can be damaged at higher temperatures. "Error" is displayed from 45°C. With the "central thermostat" (see chapter "Special accessories"), the maximum supply temperature can be limited to 60°C.
Any other use beyond that described shall be deemed inappropriate. Observation of these instructions is also part of the correct use of this appliance. Any changes or modifications to this appliance void all warranty rights.
2.2 Safety instructions
Observe the following safety information and instructions. All steps up to the commissioning of this appliance must only be carried out by qualified contractors.
The contractor is responsible for adherence to all currently applicable regulations during installation and commissioning.
Operate this appliance only if it is fully installed and all safety equipment is fitted.

Note
wireless remote control is supplied with power by a circular lithium battery.
Remove spent batteries. Leaking batteries result in damage which is excluded from any warranty.
Never install rechargeable NiCad batteries.

Risk of scalding!
There is a risk of scalding at outlet temperatures in excess of 43^ C.

WARNING Injury
The appliance may be used by children aged 8 and up and persons with reduced physical, sensory or mental capabilities or a lack of experience provided that they are supervised or they have been instructed on how to use the appliance safely and have understood the resulting risks. Children must never play with the appliance. Children must never clean the appliance or perform user maintenance unless they are supervised.

CAUTION Risk of burns!
If operating with preheated water, e.g. from a solar thermal system, the DHW temperature may vary from the selected set temperature.
3. Equipment description
The appliance heats water as it flows through it. The DHW outlet temperature can be infinitely adjusted at the temperature selector. From a certain throughput, the control unit regulates the correct heating output, subject to the temperature selected and the cold water temperature. The throughput is automatically reduced by the flow regulator valve when supply temperatures are low and the selected outlet temperature is high. This ensures that the required temperature can be achieved reliably. An ERROR is displayed if the appliance is operated with preheated water above 45 °C.
Temperature selector
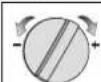
You can infinitely adjust the required temperature by turning the rotary selector. The adjusted temperature is shown on the display. The available temperature range is specified in the chapter "Specification".
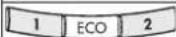
Memory keys 1 and 2
These keys enable you to quickly select two different temperatures. You can determine these temperatures.
ECO key
This key enables you to switch the ECO function ON and OFF. Switching the ECO function ON illuminates a green LED below the key. In addition the ECO symbol appears on the display.
The ECO function limits the flow rate to the ECO throughput and sets the preselected ECO temperature. You can match both values via this key.

Note
Any temperature adjustment on the appliance (with temperature selector or via the memory keys) results in the ECO function being cancelled. If required you may then have to restart the ECO function.
If the temperature is selected via the wireless remote control, the ECO function will also be restarted automatically after the draw-off event has been completed.
INFO menu
You reach the INFO menu by pressing the ECO key, where you can set comfort functions individually and/or scan values (see chapter "Selecting ECO"): The ECO key also enables you to determine the display brightness and the orientation light.
You call up the setting options by holding down the ECO key longer than three seconds.
If you now keep pressing the ECO key, you will reach the respectively next function.
Once you have called up the required function, make your function adjustments by turning the rotary temperature selector.
Remote control via wireless remote control
With the wireless remote control you can influence the appliance temperature from a distance (for example from the kitchen sink).
The wireless remote control features four keys (38 °C and 55 °C permanently set; + and - adjustable in steps of 0.5 °C) for temperature selection. The transmission of signals to the appliance is indicated by the red LED on the wireless remote control illuminating. The transmitter is waterproof and can be used whilst showering or bathing.
With the appliance in ECO mode, the ECO function is suspended for the next draw-off event if a key on the wireless remote control is pressed. Two minutes after drawing has ceased, the appliance is reset to ECO mode. In standard mode, a constant temperature setting can be achieved via the wireless remote control (see chapter "Wireless remote control key").
Dynamic anti-scalding protection
The appliance is equipped with dynamic scalding protection. The user that selects a temperature first, either at the appliance or at the remote control, determines the temperature for the next draw-off event. No other user can increase the temperature above 43 °C within the next two minutes, during the draw-off event, or for two minutes after the event.
Child-proof system
You can set the appliance to a maximum temperature (see chapter "Start childproofing").
Wellness comfort function
You can permanently select the Wellness comfort function, which reduces the temperature by 10 °C after three minutes' draw-off and raises it again 10 seconds later. After a further 10 seconds, the temperature is again reduced by 10 °C, and then raised after another 10 seconds (see chapter "Setting Wellness comfort functions"). These temperature changes continue until the draw-off event ends.
Automatic water volume control
You can select an automatic water volume control that reduces the throughput to approx. 4 l/min after a specified volume has been drawn off (see chapter "Setting automatic water volume control"). That way you can influence the amount of water drawn as well as the duration of a shower. The selected automatic water volume control applies only to the next draw-off event.
Display backlighting
The appliance display is backlit. If you set temperatures up to 42.5 °C, the backlighting illuminates in blue; at temperatures from 43.0 °C, the colour of the display changes to red.
The display backlighting is switched ON as soon as you press any key, turn the rotary temperature selector, or if water flows through the appliance with a greater throughput than the start volume.
If no water is drawn off or the appliance is not operated for 30 seconds, the background lighting switches off (only if a deactivated orientation light has been selected).
The brightness is dimmed if draw-off continues longer than 15 minutes (Reduction only with the setting >20%).
You can adjust the brightness individually for red and blue in five stages (see chapter "INFO menu settings").
Orientation light
The orientation light then lights up with the intensity of the set background lighting.
Second line of display
You can select what other information should be shown on the second line of the display (see chapter "INFO menu settings"):
l/min Flow rate
kWh Energy consumption *
m^3 Water volume *
Time Time **
* You can reset the values of these consumption displays to zero.
** The clock has to be reset after a power interruption.
Anti-scalding protection
Your contractor can set a permanent temperature limit (see chapter "Customer service mode") to prevent any water being drawn from the appliance at temperatures that could lead to a risk of injury.
Air detection
The appliance is equipped with an air detector that largely prevents damage to the heating system. If, during operation, air is drawn into the instantaneous water heater, the equipment shuts down the heating load for one minute, thereby protecting the equipment.
4. Operation
4.1 Operation and displays on the appliance
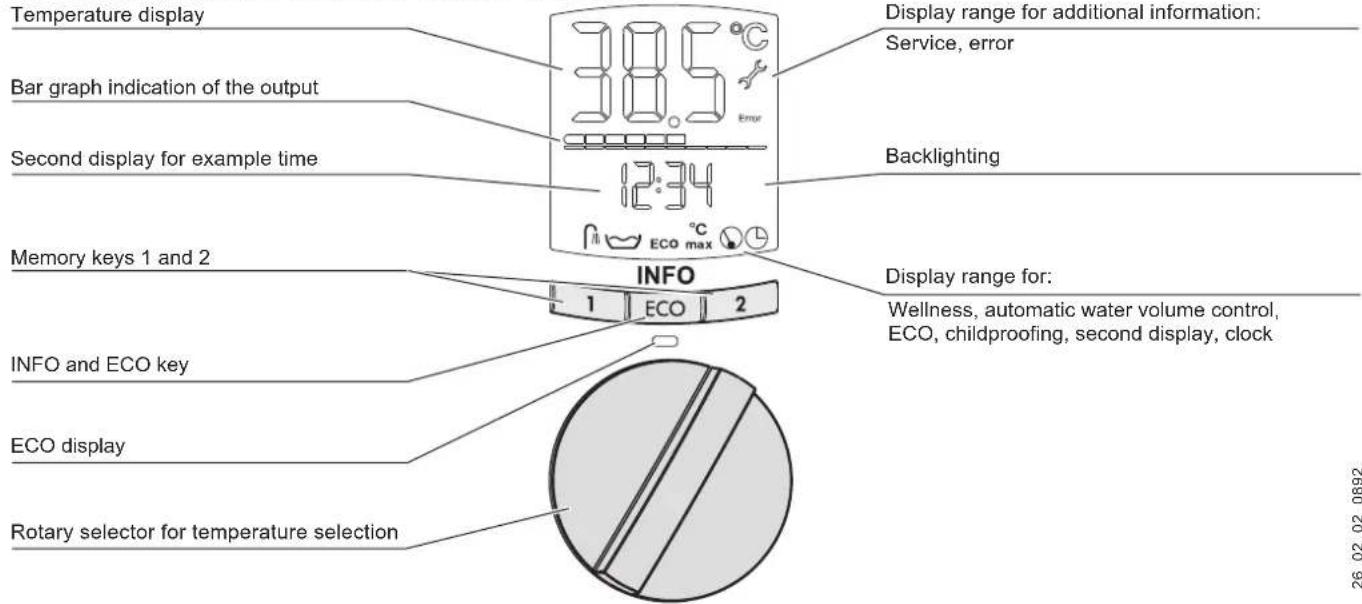
Display range for:

"Wellness"

"Automatic water volume control"

"Orientation light"
ECO
"ECO" mode
"Child-proof system"

"Second line"
"Clock"

Display area for additional information; notify your contractor if these symbols are shown.
Error "Error"; see chapter "Customer service mode"

"Service"; see chapter "Customer service mode"
4.1.1 Temperature setting
| Operation Display indication | ||
 | » Temperature selection 30 ... 60°C, infinitely adjustable. | For example 43°C. |
| OFF = heating is switched OFF. | ||
4.1.2 Allocating memory keys
4.1.3 Scanning memory keys
» Hold down key 1 or 2.
For example 38°C and 43°C.
4.1.4 Selecting / deselecting ECO
»Press ECO: Select ECO.
ECO, green LED illuminates.
»Press ECO: Deselect ECO.
No ECO; LED does not illuminate.
4.2 INFO menu settings
| INFO menu settings | ||
| Operation Display indication: Appliance as factory-set | ||
 | » Hold down ECO for three seconds. | ECO 38°C |
| All settings in the INFO menu are immediately accepted. | ||
| Exit the menu | ||
 | » Hold down ECO for three seconds. | Selected settings. |
| You exit the INFO menu if no key is pressed for approx. 40 seconds. | ||
4.2.1 ECO temperature setting
| 1 ECO 2 | » Hold down ECO for three seconds. | ECO 38°C |
 | »Temperature setting, 30 ... 60 °C. For example 40 °C. |
4.2.2 Setting the ECO flow rate
| 1 ECO 2 | » Hold down ECO for three seconds. | ECO 38°C |
| 1 ECO 2 | »Briefly press ECO. 8.0 l/min | ECO |
 | » Set flow rate 4 ... 15 l/min. | For example ECO 6.0 l/min. |
4.2.3 Setting the brightness of blue and red backlighting
| 1 ECO 2 | » Hold down ECO for three seconds. | ECO 38°C |
| 1 ECO 2 | » Briefly press ECO several times. | bluered |
 | » Select the brightness for blue and red. | 100%20% |
4.2.4 Switching orientation light on/off
| 1 ECO 2 | » Hold down ECO for three seconds. | ECO 38°C |
| 1 ECO 2 | »Briefly press ECO several times. | LOFF |
 | »Select "OFF" / "ON". | OFF: switched OFF.ON: switched ON. |
4.2.5 Switching childproofing on/off; setting
| 1 ECO 2 | » Hold down ECO for three seconds. | ECO 38°C |
 | »Briefly press ECO several times. | °Cmax OFF |
| »Select "OFF" / "ON". | OFF: switched OFF.ON: switched ON. | |
| 1 ECO 2 | »Briefly press ECO. | °Cmax 43°C |
 | »Set the temperature. | °CFor example max 36°C. |
4.2.6 Switching Wellness comfort function on/off
| 1 ECO 2 | » Hold down ECO for three seconds. | ECO 38°C |
 | »Briefly press ECO several times. | OFF |
| »Select "OFF" / "ON". | OFF: switched OFF.ON: switched ON. |
4.2.7 Switching automatic water volume control on/off; setting
| 1 ECO 2 | » Hold down ECO for three seconds. | ECO 38°C |
 | »Briefly press the ECO key several times. | OFF |
| »Select "OFF" / "ON". | OFF: switched OFF.ON: switched ON. | |
 | »For "ON setting", briefly press the ECO key. | 80 l |
| » Water volume setting 5 ... 200 l. | For example 150 l. |

4.2.8 Selecting second line of display
| 1 ECO 2 | »Hold down ECO for three seconds. | ECO 38°C |
| 1 ECO 2 | »Briefly press ECO several times. | |
 | »Select display value of second line: l/min Flow rate kWh Energy consumption m3 Water volume Clock Time | Selected display. |
| Reset consumption display "Energy consumption and water volume" to zero. | |
| 1 ECO 2 | »Press keys 1 and 2 in the INFO menu simultaneously when the corresponding consumption value is shown on the display. |
| 1 ECO 2 | »Hold down ECO for three seconds. | ECO 38°C |
| 1 ECO 2 | »Briefly press ECO several times. | |
 | »Select the time. For example 12:15 | Note:Reset the time after a power interruption. |
4.2.9 Setting the time
4.2.10 Wireless remote control - scan / - log on / - log off
| Wireless remote control - scan at appliance | ||
| 1 ECO 2 | » Hold down ECO for three seconds. | ECO 38°C |
| 1 ECO 2 | » Briefly press ECO several times. | rc 1 ... 4: Number of wireless remote controls that are logged on (rc: remote control). |
| Wireless remote control - log on to appliance | ||
| 1 ECO 2 | » Hold down ECO for three seconds. | ECO 38°C |
| 1 ECO 2 | » Briefly press ECO several times. | rc 1. |
| 1 ECO 2 | »Press key 1; self-learning phase is enabled.»Press any key on the wireless remote control. | Bar graph indication runs.rc 2: Bar graph indication extinguishes; wireless remote control recognised. |
| Wireless remote control - log off appliance | ||
| 1 ECO 2 | » Hold down ECO for three seconds. | ECO 38°C |
| 1 ECO 2 | »Briefly press ECO several times. rc 2. | |
| 1 ECO 2 | »Press key 2 in "rc" mode. | rc 0: All wireless remote controls logged off. |
4.3 Resetting to factory settings
| 1 ECO 2 | »Hold down keys 1 and 2 simultaneously for two seconds. | ECO 38°CDisplay flashes to confirm. |
Anti-scalding protection and self-learning wireless remote control are not reset. Factory settings (see chapter "Specification").
4.4 Wireless remote control operation
| Wireless remote control operation | ||
| »Press 38° | 38°C | |
| »Press 55° | 55°C | |
| »Press + | Press once: Set value raised by 0.5°C. | |
| »Press - | Press once: Set value lowered by 0.5°C. | |
You can switch the appliance heater to OFF using the mini wireless remote control. To do so, press and hold the minus key for ≥ 3 seconds. Press any key to switch it back on.
4.5 Recommended settings
4.5.1 Energy saving
You will consume the least amount of energy with the following recommended settings:
- 38 °C for basins, showers, baths,
- 55 °C for sinks.
4.5.2 Thermostatic valve
If you operate the appliance with a thermostatic valve, we would recommend that you set the temperature at the appliance to the maximum level (temperature selector at 60 °C). You can then select the required temperature at the thermostatic valve.
5. Maintenance and care
A damp cloth is sufficient for cleaning the casing. Never use abrasive or corrosive cleaning agents.
6. What to do if ...
6.1 ... the water supply is interrupted

Risk of damage! After an interruption to the water supply, take the following steps prior to returning the appliance into use.
» Remove fuses or trip the appropriate MCBs.
» Open a draw-off valve, downstream of the appliance, long enough to vent all air from the appliance and its upstream cold water supply line.
» Replace the fuses or reset the relevant MCBs.
6.2 ... the wireless remote control batteries are spent
| Fault | Cause | Remedy |
| LED on wireless remote control flashes during and after sending. | Batteries in the wireless remote control spent. | Replace batteries. |
» Open the wireless remote control casing by undoing the two screws at the back and pivoting the casing open.
» Remove the old battery and insert the new one.

Ensure correct polarity of the new battery: Positive (+) must be at the top. Observe the information in chapter "Environment and recycling".
» Close the casing. Observe the casing recess in the edge of the lid. The recess determines the correct positioning of the lid and ensures the casing is tightly sealed.
6.3 ... faults occur on the appliance?
| Fault | Cause | Remedy |
| The heating system will not start in spite of the tap being fully open. | No voltage. | Check the fuse/MCB in your fuse box/distribution panel. |
| Low flow rate, shower head/perlators scaled-up. | Clean and / or descale perlators. | |
| Heating system faulty. | Call customer service / your contractor. | |
| Cold water flows briefly. | The air sensor detects air in the water and briefly switches the heater OFF. | Appliance starts again after one minute. |
| Flow rate too low. | ECO mode is enabled, and the throughput in ECO mode is set too low. | Select a higher ECO throughput. |
| Shower head/ perlators scaled-up. | Clean and / or descale perlators. | |
| Temperatures above 43 °C cannot be selected. | Dynamic anti-scalding protection is enabled. | Cancelled automatically 2 minutes after drawing has ceased. |
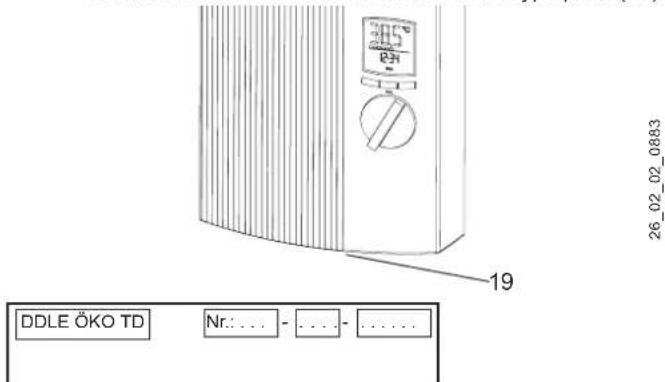
Where a fault can only be remedied by a contractor, they can better and more speedily remedy the fault if you provide them with some of the details from the type plate (19):
INSTALLATION
7. Safety
7.1 Instructions and regulations
- All steps until the commissioning is completed as well as the maintenance of this appliance must only be carried out by a qualified contractor in accordance with these instructions.
- Perfect function and safe operation can only be assured when using original accessories and spare parts intended for this equipment.
- Observe all locally applicable instructions and regulations regarding water and electrical connections.
- Observe all regulations of your local water and electricity supply utilities.
- The specific electrical resistance of the water used must not fall below that stated on the type plate. In a linked water network, observe the lowest electrical water resistance (see chapter "Application areas"). Your water supply utility will advise you of the specific electrical water resistance or conductivity.
• Install the appliance only in an enclosed room free from the risk of frost. Store the dismantled appliance in a room free from the risk of frost, as water residues remain inside the appliance.
• The protection IP 25 (hoseproof) can only be ensured with a correctly fitted cable grommet.
7.2 Water installation
- Cold water line Permissible materials: Galvanised steel pipe, stainless steel pipe, copper pipe or plastic pipe.
- DHW line Permissible materials: Stainless steel pipe, copper pipe or plastic pipe.
- Operating temperatures can reach up to 60 °C. In case of faults, loads up to 95 °C / 1.2 MPa can occur temporarily in the installation. Any plastic pipework used must be suitable for these conditions.
- A safety valve in the hot water pipe is not permissible.
- Never use taps/valves for open vented equipment.
• If you are using thermostatic valves, observe chapter Recommended settings.

The appliance is suitable for preheated water up to 60°C.
The maximum permissible supply temperature is 60 °C. The appliance can be damaged by higher temperatures. With the "central thermostat" (see chapter "Special accessories"), the maximum supply temperature can be limited to 60 °C.
7.3 Electrical installation
• The power supply must be connected permanently.
- The appliance must be able to be separated from the mains power supply, for example by fuses that disconnect all poles with at least 3 mm contact separation.
8. Equipment description
The bare wire heating system is suitable for soft and hard water areas (see chapter "Specification").
8.1 Equipment layout
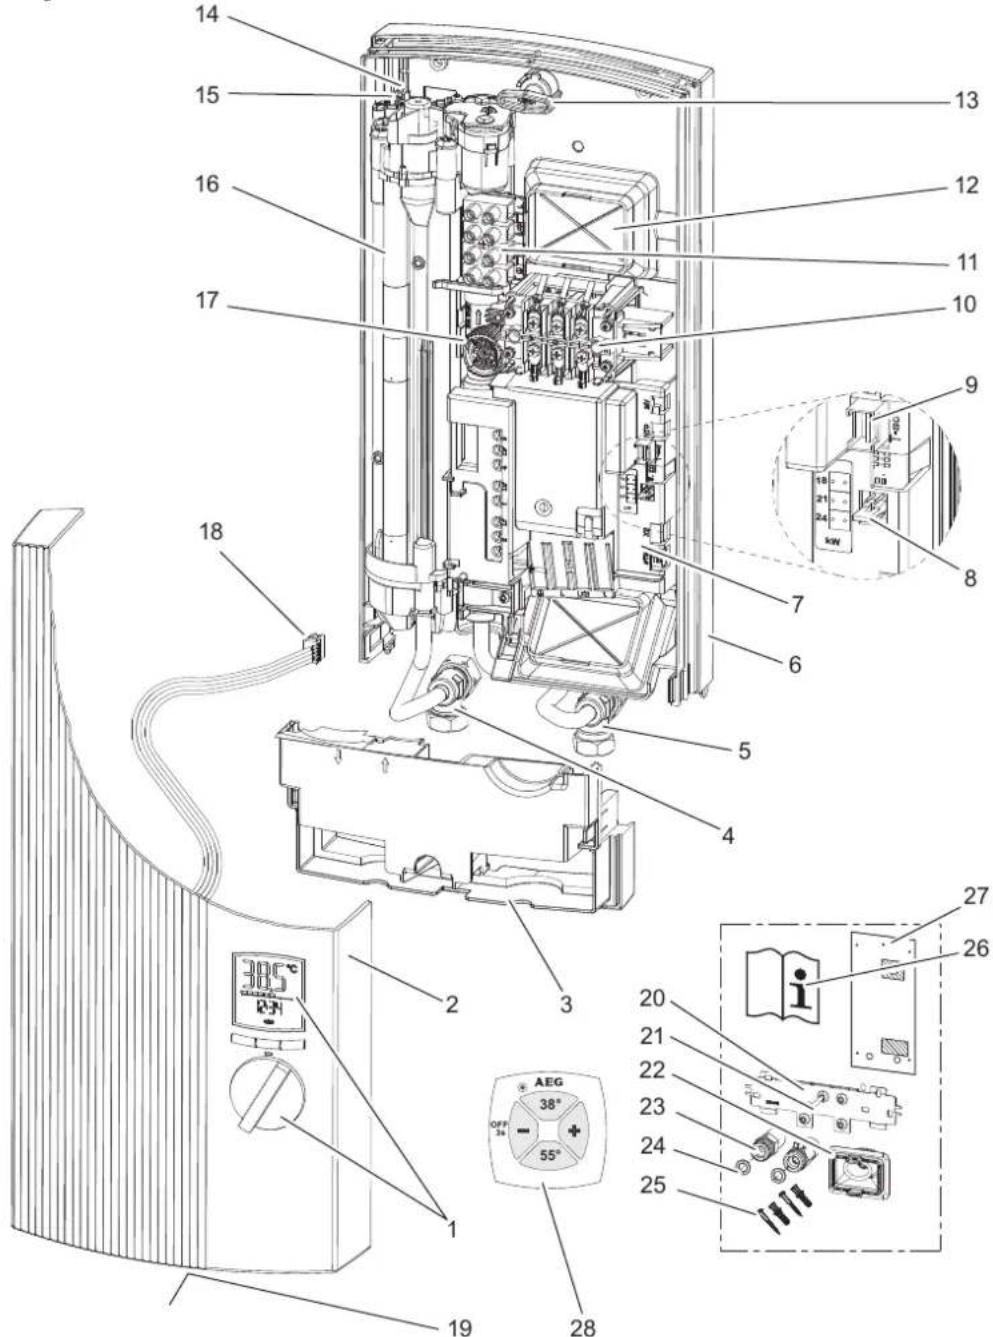
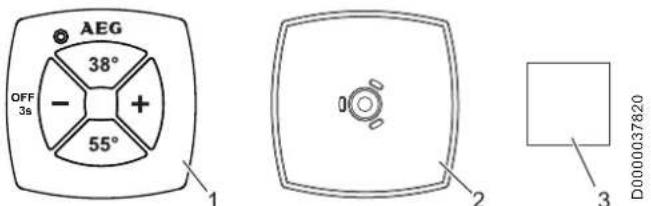
| 1 | Rotary selector with keys and display |
| 2 | Appliance cap |
| 3 Lower section, back panel 17 Flow sensor | |
| 4 | DHW compression fitting |
| 5 | Cold water compression fitting |
| 6 Top, back panel 20 Mounting bracket | |
| 7 | Electronics |
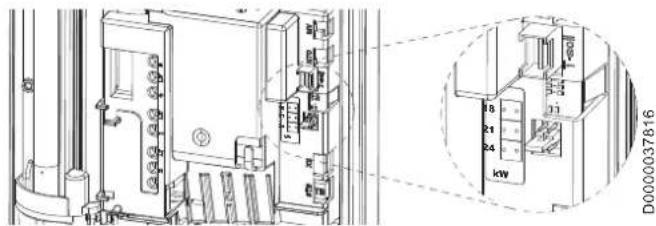
| 8 Coding card for output changeover to 18, 21 or 24 kW (on appliances with output selection) | |
| 9 | Plug-in position for the temperature selector cable |
| 10 | Safety pressure limiter (AP 3) with reset button |
| 11 | Mains terminal |
| 12 | Knock-out for power supply from above |
| 13 | Fixing toggle |
| 14 | Outlet sensor |
| 15 | High limit safety cut-out (STB) with reset button |
| 16 | Heating system |
| 18 | Temperature selector plug "set T" |
| 19 | Type plate |
| 21 | Stud for mounting bracket |
| 22 Cable grommet (power cable from above/below) | |
| 23 | Twin nipple 2 x (cold water with shut-off valve) |
| 24 | Flat packing |
| 25 | Screws, rawl plugs for securing the lower back panel |
| 26 | Operating and installation instructions |
| 27 | Installation template |
| 28 | Wireless remote control FBM Comfort |
D0000037816
8.2 Standard delivery
See Fig. "Appliance layout".
8.3 Customer service mode
You can enable/disable the customer service mode by pressing the SERVICE key (1) at the back of the user interface (connection to "set T" must be available). Pressing the ECO key (info key, see chapter "User interface") switches the display to the next menu point.
You scroll through the respective submenu by pressing the rotary temperature selector.
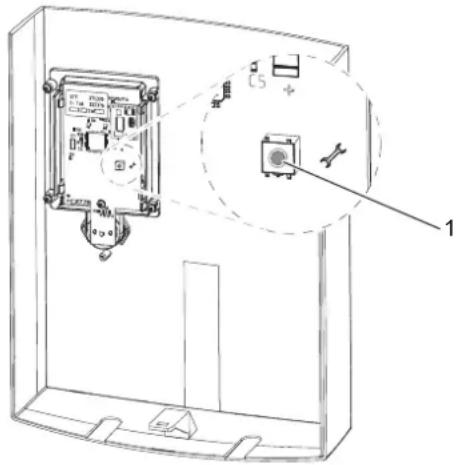
26_02_02_0920
8.3.1 Fault menu
This menu will only be shown if there is a fault.
| Code Description | |
| E1, ELEC The PCB is faulty.»Replace it. | |
| E 3, ntc | »Check the electrical connection to the outlet sensor. Replace it, if required. |
| E 4, mot | »Check the electrical connection to the motorised valve. Replace it, if required. |
8.3.2 Control menu
| Code Description | |
| C 1, 36.5 °C | Display of the current inlet temperature. A temperature of 1.0 °C is displayed if the cold water sensor is faulty. |
| C 2, 47.5 °C | Display of the current outlet temperature. If the outlet sensor is faulty, a temperature of 65 °C is displayed. |
| C 3, 6,8 l/min | Display of the current throughput. |
| C 4, 21.5 kW | Display of the current power consumption. |
8.3.3 Data menu
| Code Description | |
| d 1, 8042 Service - Code for customer service. | |
| d 2, 2341 Time in number of days the appliance was connected to the mains power. | |
| d 3, 172 h Heating time in hours. | |
| d 4, 24 kW | Maximum output in kW. This output may differ from the rated output. For example if the mains voltage is not 400 V. |
8.3.4 Anti-scalding protection menu
| Code Description | |
| OFF | Anti-scalding protection switched OFF. |
| ON | Anti-scalding protection switched ON. |
| 31 ... 60 °C | For ON setting - maximum value can be selected at the appliance. |
Factory settings (see chapter "Specification"). After leaving the customer service mode you will no longer be able to select the maximum temperature via the user interface..

CAUTION Burns
If operating with preheated water, the set temperature limit and anti-scalding protection may be ineffective. In this case, restrict the temperature at the upstream central thermostatic valve; see chapter "Accessories".
8.4 Assembly
The following conditions have been prepared for the appliance at the factory:
- Power supply from above; installation on unfinished walls
- Water connection, installation on unfinished walls.
The appliance must be fitted vertically, over or undersink, to a solid wall.
8.5 Installation versions
The following installation versions are possible/permissible:
• Power supply for unfinished walls - from below
• Power supply for finished walls
• Water installation for finished walls
• Installation of a load shedding relay.
8.6 Special accessories
Special accessories are available from your local supplier.
Direct tap instantaneous water heaters
ADEo 70 WD - Mono-lever mixer tap with changeover bath / hand shower.
Wireless remote control
FBM Comfort
Installation accessories
Finished walls, G 3/8", top. Water connections with 12 mm compression fittings.
Universal mounting frame
Mounting frame with electrical wiring. This assembly creates a gap of 30 mm between the appliance back panel and the installation wall. This enables the power supply to be freely routed over unfinished walls behind the appliance. This increases the appliance depth by 30 mm. This set reduces the protection level to IP 24 (splashproof).
Offset installation pipe assembly
Universal mounting frame (for technical description, see "Universal mounting frame") and pipe bends for the vertical offset of the appliance against the water connection by 90mm downwards.
Gas boiler replacement pipework set
Universal mounting frame (for technical description, see "Universal mounting frame") and pipe bends for installation using existing gas fired water heater connections (cold water connection on the left; DHW connection on the right).
Load shedding relay LR 1-A
The load shedding relay enables operation with, for example, electric storage heaters. The instantaneous water heater is operated via the load shedding relay prior to any other appliance.
ZTA 3/4 - Central thermostatic valve for operating a DDLE ÖKO TD with preheated water
The central thermostatic valve fitted immediately above the cylinder ensures that the outlet temperature never exceeds 60 °C, by admixing cold water via a bypass line.
9. Assembly
9.1 Installation location
The appliance is exclusively designed for installation on a solid wall. Ensure the wall offers adequate load bearing capacity. Always install the appliance vertically in a room free from the risk of frost.
9.1.1 Appliance installation over
26_02_02_1344
9.1.2 Appliance installation undersink
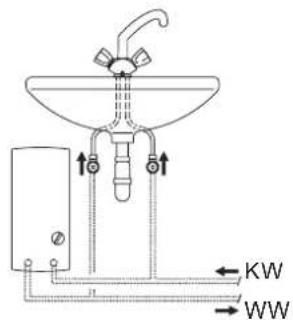
26_02_02_1345
9.2 Preparing the appliance installation
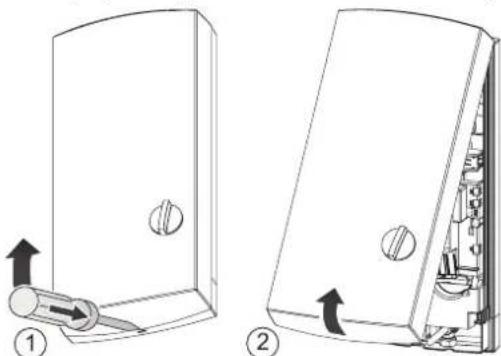
9.2.1 Opening the appliance
» Unhook the snap-in closure using a screwdriver (1).
» Flip up the appliance cover and remove it (2).
natural_image
Two technical diagrams showing a device with a handle and a close-up view of its internal components (no text or symbols present)26_02_02_0766
9.2.2 Information regarding the appliance with changeover connected load
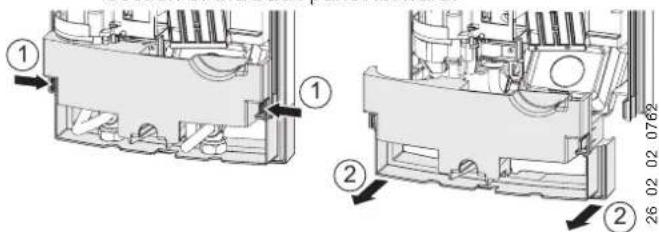
In its delivered condition the appliance is set to 21 kW. When changing to a different load, carry out the following steps:
» Replug the coding card in accordance with the selected output. Observe the corresponding fuse protection required. For this, see chapter "Specification".
» Mark the selected output on the type plate using a permanent marker.
9.2.3 Anti-scalding protection
You can select the required temperature limit in the customer service mode between 31 ... 60 °C.
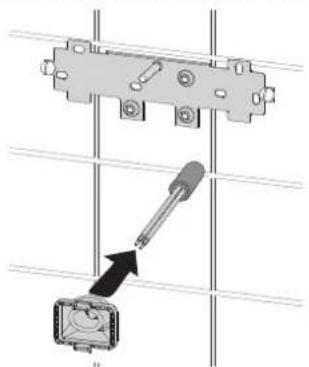
9.2.4 Removing the lower section of the back panel
» Press both locking hooks inwards and pull the lower section of the back panel forward.
9.2.5 Securing the mounting rail
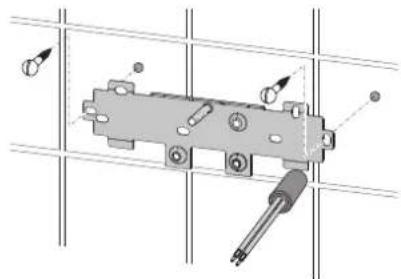
» Mark out the mounting bracket fixing holes using the installation template. You can also use any suitable mounting bracket that is already installed.
» Secure the mounting bracket with two suitable screws and rawl plugs. The screws and rawl plugs are not part of the standard delivery.
» Insert the threaded stud supplied into the mounting bracket.
natural_image
Mechanical assembly diagram showing a bracket with screws and a tool, mounted on a grid background (no text or symbols)26_02_02_0972
You can secure the appliance at the bottom with 2 additional screws. This is required if the appliance is installed with water connections on finished walls (installation on finished walls).
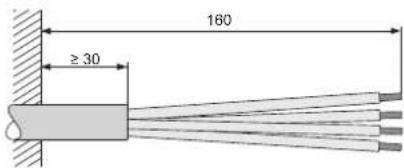
9.2.6 Fitting the power cable
26_02_02_0887
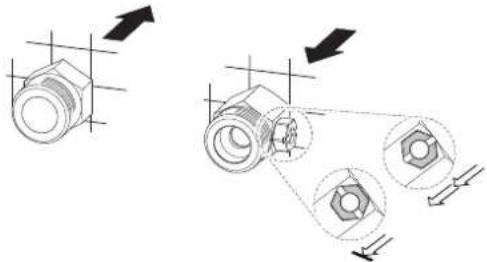
9.2.7 Inserting the twin nipples
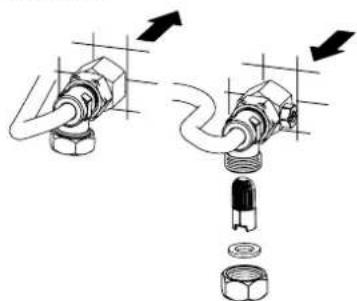
» Seal in both twin nipples before fully inserting them. Insert both twin nipples into the wall plates.
» Thoroughly flush the cold water supply line.
natural_image
Mechanical assembly diagram showing two stages of a bolted joint with directional arrows indicating motion (no text or labels)26_02_02_0948

Note
Shut-off valve in the cold water supply. Never use the shut-off valve in the cold water supply line to reduce the flow rate.
9.2.8 Fitting the cable grommet
» Push the cable grommet over the power cable.
natural_image
Technical diagram showing a mechanical assembly with a screwdriver inserted into a component, no text or symbols present.26_02_02_0950
9.2.9 Preparing the back panel
» Break out the cable grommet knock-out in the back panel.
natural_image
Technical line drawing of an industrial equipment cabinet with internal components and a highlighted component (no text or labels)26_02_02_0884
If the wrong knock-out has been opened by mistake, a new back panel must be used.
9.2.10 Equipment installation
» Remove the transport plugs from the water connections.
» Push the back panel over the threaded stud and the cable grommet. Pull the cable grommet at the locking hooks into the back panel using pliers, until both locking hooks audibly click into place.
» Push the back panel firmly and flush against the wall. Lock the back panel in place using the fixing toggle.
natural_image
Technical line drawing of an electrical enclosure with internal components and a close-up inset showing a speaker (no text or symbols present)26_02_02_0885
9.2.11 Water connection
» Fit the threaded connections with flat packing onto the twin nipples. Ensure that the bayonet closures inside the appliance are not twisted.
natural_image
Diagram showing two mechanical components connected by a spring, with arrows indicating motion direction (no text or symbols)D0000041925
9.2.12 Connecting the power supply
» Connect the power cable to the mains terminal (see chapter "Wiring diagram").

WARNING Electrocution Ensure that the appliance is connected to earth.
9.2.13 Fitting lower section of back panel
» Push the lower section of the back panel onto the upper section of the back panel and ensure that it clicks into place.
9.2.14 Completing the installation process
» Align the mounted appliance by loosening the fixing toggle, aligning the power supply and back panel, and then retightening the fixing toggle. If the back panel of the appliance is not flush against the wall, secure the appliance with a screw in the lower section.
9.2.15 Wireless remote control installation
The transmitter can be fitted to the wall with the wall retainer. The wall retainer can be secured to the wall with the adhesive tape supplied or with a suitable countersunk screw ∅ 3 mm or smaller.
9.3 Installation versions
9.3.1 Power supply - unfinished walls - from below
26_02_02_0890
» Push the cable grommet over the power cable (1).
» Break out the cable grommet knock-out in the back panel (2).
» Reposition the mains terminal from the top to the bottom. For this, undo the screw and refit the mains terminal to the bottom; then retighten the mains terminal (3).
» Push the back panel over the threaded stud and the cable grommet. Pull the cable grommet at the taps into the back panel using pliers, until both locking hooks audibly click into place (4).
» Push the back panel firmly and flush against the wall and lock with the fixing toggle (5).
9.3.2 Power supply - finished walls
Cut a cable entry point into the back panel for the power cable or break out the appropriate knock-out.
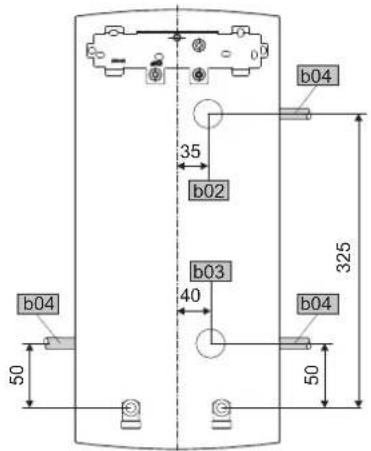
D0000019778
| b02 | Entry electrical cables 1 |
| b03 | Entry electrical cables 2 |
| b04 | Entry electrical cables 3 |

Note
With power supply on finished walls, the protection rating is reduced to IP 24 (splashproof).
Mark the type plate with a permanent marker: Cross out „IP 25“ and mark the box „IP 24“.
9.3.3 Priority control
When used in conjunction with other electrical appliances, e.g. electric storage heaters, the load shedding relay can be used. The load shedding relay LR 1-A must be installed on a top-hat rail inside the distribution area.
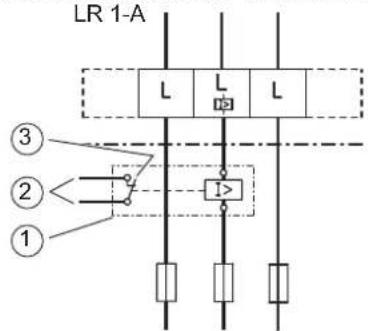
85_02_02_0003
1 Load shedding relay (see "Special accessories").
2 Control cable to the contactor of the second appliance (e.g. electric storage heater).
3 Control contact, opens when switching the instantaneous water heater ON.
The relay trips as soon as the instantaneous water heater starts.
Only connect the load shedding relay to the central phase of the mains terminal.
9.3.4 Undersink installation, water connections from the top
Undersink installation with water connections from the top can be achieved with the additional pipe assembly for undersink appliances. For this, cleanly break out the apertures for the water pipes in the back panel and fit the pipe assembly.
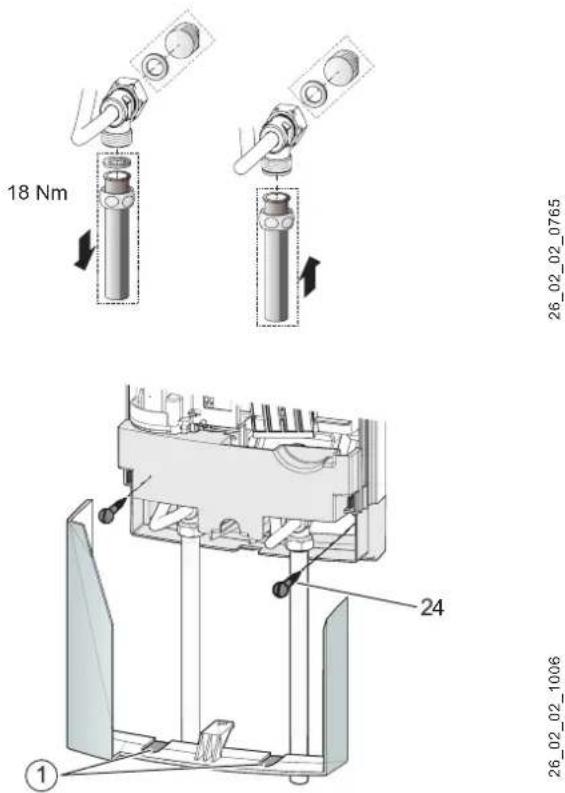
9.3.5 Tap for finished walls
The pressure tap for finished walls is offered as special accessory; see chapter "Special accessories". For installation, carry out the following steps:
» Fit the water plugs G ½" with gaskets to the appliance water connections. The plugs are part of the standard delivery of the tap.
» Install the tap.
» Push the free ends of the pipes into the valve.
» Click the lower part of back panel.
» Secure the connection pipes to the appliance.
» Cleanly break out the entries in the appliance cap (1). If necessary, use a file.
» Secure the back panel at the bottom with two additional screws (24).
26_02_02_0765
26_02_02_1006
9.4 Wireless remote control installation
The transmitter can be fitted to the wall with the wall retainer. The wall retainer can be secured to the wall with the adhesive tape supplied or with a suitable countersunk screw ∅ 3 mm (or smaller).
Standard delivery - wireless remote control
D0000037820
1 Transmitter incl. battery
2 Wall retainer
3 Adhesive pad
10. Commissioning
10.1 Appliance
Commissioning must only be carried out by a contractor.
natural_image
Diagram of a door handle with a black arrow pointing to the side panel (no text or symbols present)⑤ on
26 02 02 0888
» Fill and vent the appliance. Please note - boil-dry risk (1).
Open and close all connected taps several times, until all air has been vented from the pipework and the appliance.
» Activate the safety pressure switch (2) at flow pressure by pressing the reset button. The appliance is supplied with the safety pressure limiter in the triggered state.
» Push the temperature selector cable plug onto the PCB (3).
» Fit the appliance cover.
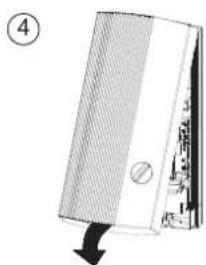
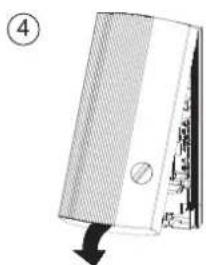
For this, hook the appliance cover into the top and pivot it onto the back panel. The cover must click audibly into place (4).
Check the firm seat of the appliance cover.
» Switch the mains power ON (5).
» Check the appliance function.
10.2 Wireless remote control FBM Comfort
The wireless remote control is registered at the appliance in the factory. If there is no data communication during commissioning, carry out a self-learning process as follows: Use the ECO key to select the comfort function "Wireless remote control (rc)", press memory key 1 on the appliance (this enables the self-learning phase; the bar graph indication on the display runs), then press any key on the wireless remote control.
11. Handover
Explain the functions to the user. Draw special attention to the safety information. Hand these instructions to the user.
12. Troubleshooting
| Fault Cause » Remedy | ||
| Flow rate too low. Sieve, perlator contaminated. | Clean the sieve, perlator. | |
13. Specification
13.1 Wiring diagram
3/PE \~ 380 - 415 V
1 Heaters
2 High limit safety cut-out
3 Safety pressure limiter
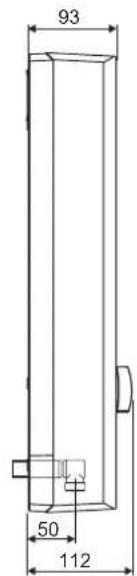
13.2 Dimensions
D0000017757
| b02 Entry electrical cables 1 | ||
| c01 Cold water inlet | Male thread | G 1/2 A |
| c06 DHW outlet | Male thread | G 1/2 A |
13.3 Details on energy consumption
Product data complies with EU regulations relating to the Directive on the ecodesign of energy related products (ErP).
| DDLE ÖKO TD 18 DDLE ÖKO TD 18/21/24 DDLE ÖKO TD 27 | ||||
| 222396 222398 222399 | ||||
| Manufacturer AEG Haustechnik AEG Haustechnik AEG Haustechnik | ||||
| Load profile S S S | ||||
| Energy efficiency class A A A | ||||
| Annual power consumption | kWh | 477 | 477 | 481 |
| Energy conversion efficiency | % | 39 | 39 | 39 |
| Default temperature setting | °C | 60 | 60 | 60 |
| Sound power level | dB(A) | 15 | 15 | 15 |
| Special information on measuring efficiency | None | Data at Pmax. | Measured with flow restriction on 9 Ltr/min | |
13.4 Wireless remote control
| Model | FBM Comfort |
| Dimensions (H/W/D)excl. wall retainer | 50/50/17 mm |
| Weight excluding wall retainer | 30 g |
| Radio frequency | 868.3 MHz |
| Range inside buildingincl. one separating ceiling | 25 m approx. |
| Temperature setting range | 30°C - 60°C |
| Protection level to EN 60529 | Shower = IP X5Bath = IP X7 |
| Battery type | CR 2032 |
13.5 Appliance
| DDLE ÖKO TD 18 | DDLE ÖKO TD 18/21/24 | DDLE ÖKO TD 27 | |||||||
| 222396 | 222398 | 222399 | |||||||
| Electrical details | |||||||||
| Rated voltage | V | 380 | 400 | 415 | 380 | 400 | 415 | 380 | 400 |
| Rated output | kW | 16.2 | 18 | 19.4 | 16.2/19/21.7 | 18/21/24 | 19.4/22.6/25.8 | 24 | 27 |
| Rated current | A | 24.7 | 26 | 27 | 27.6/29.5/33.3 | 29/31/35 | 30.1/32.2/36.3 | 37.1 | 39 |
| Fuse | A | 25 | 25 | 32 | 32/32/35 | 32/32/35 | 32/32/40 | 40 | 40 |
| Phases | 3/PE | 3/PE | 3/PE | ||||||
| Frequency | Hz | 50/60 | 50/60 | 50/- | 50/60 | 50/60 | 50/- | 50/60 | 50/60 |
| Max. mains impedance at 50Hz | Ω | 0.379 | 0.360 | 0.347 | 0.284 | 0.270 | 0.260 | 0.254 | 0.241 |
| Specific resistance ρ15≥ (at θcold ≤25 °C) | Ω cm | 900 | 900 | 1000 | 900 | 900 | 1000 | 900 | 900 |
| Specific conductivity σ15≤ (at θcold ≤25 °C) | μS/cm | 1111 | 1111 | 1000 | 1111 | 1111 | 1000 | 1111 | 1111 |
| Specific resistance ρ15≥ (at θcold ≤45 °C) | Ω cm | 1200 | 1200 | 1300 | 1200 | 1200 | 1300 | 1200 | 1200 |
| Specific conductivity σ15≤ (at θcold ≤45 °C) | μS/cm | 830 | 830 | 770 | 830 | 830 | 770 | 830 | 830 |
| Connections | |||||||||
| Water connection | G 1/2 A | G 1/2 A | G 1/2 A | ||||||
| Application limits | |||||||||
| Max. permissible pressure | MPa | 1 | 1 | 1 | |||||
| Max. inlet temperature for reheating | °C | 45 | 45 | 45 | |||||
| Values | |||||||||
| Max. permissible inlet temperature | °C | 65 | 65 | 65 | |||||
| ON | l/min | >2.5 | >2.5 | >2.5 | |||||
| Flow rate for pressure drop | l/min | 5.2 | 5.2/6.0/6.9 | 7.7 | |||||
| Pressure drop at flow rate | MPa | 0.08 | 0.08/0.1/0.13 | 0.16 | |||||
| DHW delivery | l/min | 9.9 | 9.9/11.6/13.2 | 14.9 | |||||
| Δθ at DHW delivery | K | 26 | 26 | 26 | |||||
| Hydraulic data | |||||||||
| Rated capacity | I | 0.4 | 0.4 | 0.4 | |||||
| Versions | |||||||||
| Connected load options | - | X | - | ||||||
| Temperature adjustment | °C | 30-60 | 30-60 | 30-60 | |||||
| Insulation block | Plastic | Plastic | Plastic | ||||||
| Heating system heat generator | Bare wire | Bare wire | Bare wire | ||||||
| Cap and back panel | Plastic | Plastic | Plastic | ||||||
| Colour | white | white | white | ||||||
| IP-Rating | IP25 | IP25 | IP25 | ||||||
| DDLE ÖKO TD 18 DDLE ÖKO TD 18/21/24 DDLE ÖKO TD 27 | ||||
| Dimensions | ||||
| Height mm 485 485 485 | ||||
| Width mm 226 226 226 | ||||
| Depth mm 93 93 93 | ||||
| Weights | ||||
| Weight | kg | 3.8 | 3.8 | 3.8 |
| Factory settings | ||
| ECO | ECO | 38 °C / 8 l/min |
| Backlighting | blue / red | 100 % |
| Orientation light | OFF | |
| Child-proof system | °C max | OFF / 43.0 °C |
| Wellness | OFF | |
| Automatic water volume control | OFF / 80 l | |
| Second line of display | l/min |
13.6 DHW output
Subject to season, the following maximum mixed water or outlet capacities can result from varying cold water temperatures:
_1 = cold water inlet temperature
_2 = mixed water temperature
93 = outlet temperature
| _2 = 38^ for: a shower, at a hand wash basin, to fill a bath, etc. | ||||
| kW | 18 | 21 | 24 | 27 |
| _1 | l/min * | |||
| 6 °C | 8.0 | 9.4 | 10.7 | 12.1 |
| 10 °C | 9.2 | 10.7 | 12.3 | 13.8 |
| 14 °C | 10.7 | 12.5 | 14.5 | 16.1 |
| _3 = 60°C : kitchen sink, and when using thermostatic valves | ||||
| kW | 18 | 21 | 24 | 27 |
| _1 | l/min * | |||
| 6 °C | 4.8 | 5,6 | 6.4 | 7.2 |
| 10 °C | 5,2 | 6,0 | 6.9 | 7.7 |
| 14 °C | 5.6 | 6.5 | 7.5 | 8.4 |
* Table values relative to a rated voltage of 400 V.
The outlet volume is subject to the available supply pressure and the mains voltage actually supplied.
13.7 Applications / Conversion table
Specific electrical resistance and specific electrical conductivity, see "Specification".
| Standard specification at 15 °C | 20 °C | 25 °C | ||||||
| Spec. Resistance ρ ≥ | Spec. Conductivity σ ≤ | Spec. Resistance ρ ≥ | Spec. Conductivity σ ≤ | Spec. Resistance ρ ≥ | Spec. Conductivity σ ≤ | |||
| Ωcm | mS/m | μS/cm | Ωcm | mS/m | μS/cm | Ωcm | mS/m | μS/cm |
| 900 | 111 | 1111 | 800 | 125 | 1250 | 735 | 136 | 1361 |
| 1000 | 100 | 1000 | 890 | 112 | 1124 | 815 | 123 | 1227 |
| 1100 | 91 | 909 | 970 | 103 | 1031 | 895 | 112 | 1117 |
| 1200 | 83 | 833 | 1070 | 93 | 935 | 985 | 102 | 1015 |
| 1300 | 77 | 769 | 1175 | 85 | 851 | 1072 | 93 | 933 |
13.8 Noise emissions
A general test certificate [Germany] as verification of suitability regarding noise emissions has been issued for this series of instantaneous water heater, based on the State Building Regulations [Germany].
14. Maintenance
14.1 Clean sieve
26_02_02_0949
A sieve has been fitted into the threaded cold water connection. In case of contamination, you can remove this sieve, clean it and then refit it.
Guarantee
The guarantee conditions of our German companies do not apply to appliances acquired outside of Germany. In countries where our subsidiaries sell our products a guarantee can only be issued by those subsidiaries. Such guarantee is only granted if the subsidiary has issued its own terms of guarantee. No other guarantee will be granted.
We shall not provide any guarantee for appliances acquired in countries where we have no subsidiary to sell our products. This will not affect warranties issued by any importers.
Environment and recycling
We would ask you to help protect the environment. After use, dispose of the various materials in accordance with national regulations.
Battery disposal
Dispose of correctly.
Never dispose of batteries with domestic waste. Bring the batteries to your local merchant or a central recycling point for special waste.
WSKAZÓWKI SPECJALNE
OBSŁUGA
D0000037816
8.3.1 Menu Error
26_02_02_1345
natural_image
Diagram of a door with a knife inserted, showing an upward arrow and numbered label (1), no text or symbols present.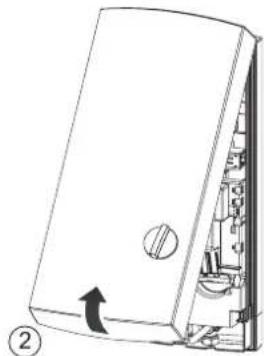
natural_image
Diagram of a device with internal components and directional arrow, no visible text or symbols26_02_02_0766
natural_image
Mechanical assembly diagram showing a component with numbered callouts (no readable text or symbols)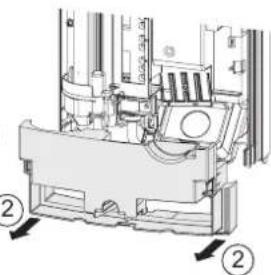
natural_image
Technical diagram of a mechanical assembly with numbered components (no visible text or symbols)26_02_02_0762
natural_image
Mechanical assembly diagram showing a bracket with mounting holes and a tool inserted, no text or symbols present26_02_02_0972
natural_image
Technical diagram showing mechanical assembly with arrows indicating direction (no text or symbols)26 02 02 0948

Wskazówka
26_02_02_0950
natural_image
Technical line drawing of an electrical enclosure with internal components and a central control panel (no text or symbols)26_02_02_0884
natural_image
Technical line drawing of an electrical enclosure with internal components and a close-up inset showing a speaker (no text or symbols present)26_02_02_0885
natural_image
Diagram showing two mechanical components connected by a spring, with arrows indicating motion direction (no text or symbols)D0000041925
26_02_02_0890
85 02 02 0003
natural_image
Diagram of a door switch with a label and arrow indicating direction (no text or symbols present)⑤ on
26_02_02_0888
26_02_02_0949
D0000037816
26_02_02_0920
8.3.1 Mени Error
natural_image
Diagram of a door with a handle and a tool, showing directional arrows (no text or symbols)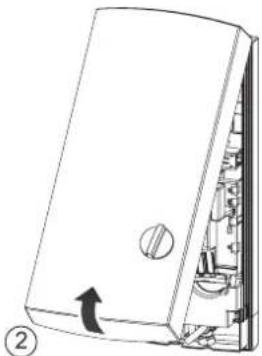
natural_image
Diagram of a door with internal components and directional arrow, no text or symbols present26_02_02_0766
26_02_02_0762
natural_image
Mechanical assembly diagram showing a bracket with screws and a tool, no text or symbols present26_02_02_0972
natural_image
Mechanical assembly diagram showing a pulley system with two bolts and directional arrows (no text or labels)26_02_02_0948

COBET
natural_image
Technical diagram showing a mechanical assembly with a screwdriver inserted into a component, no text or symbols present.26_02_02_0950
natural_image
Technical line drawing of an internal mechanical or electrical enclosure with no visible text or symbols26 02 02 0884
natural_image
Technical line drawing of an electrical enclosure with internal components and a magnified inset showing a component detail (no text or symbols present)26 02 02 0885
natural_image
Diagram showing two mechanical components connected by a spring, with arrows indicating motion direction (no text or symbols)D0000041925
26_02_02_0890
85_02_02_0003
85_02_02_0005
26 02 02 0949
natural_image
Line drawing of a refrigerator with a digital display and control knob (no text or symbols)
26 02 02 0883
УСТАНОВКА
D0000037816
26_02_02_0920
26_02_02_1345
natural_image
Technical line drawings of two mechanical components with directional arrows indicating movement (no text or symbols)26 02 02 0766
26 02 02 0762
natural_image
Mechanical assembly diagram showing a lever mechanism with mounting holes and a tool, mounted on a grid-like structure (no text or symbols visible)26_02_02_0972
natural_image
Technical diagram showing two mechanical assembly configurations with arrows indicating motion (no text or labels)26_02_02_0948

Указания
natural_image
Technical diagram showing a mechanical assembly with a screwdriver inserted into a component, no text or symbols present.26_02_02_0950
natural_image
Technical line drawing of an electrical enclosure with internal components and a central control panel (no text or labels)26_02_02_0884
natural_image
Technical line drawing of an electrical enclosure with internal components and a magnified inset showing a speaker (no text or symbols present)26_02_02_0885
natural_image
Diagram showing two mechanical components connected by a spring, with arrows indicating motion direction (no text or symbols)D0000041925
85 02 02 0003
26_02_02_1006
natural_image
Diagram of a door handle with a black arrow indicating direction (no text or symbols)⑤ on
26_02_02_0888
26_02_02_0949
Urzhumskaya street 4,
building 2
129343 Moscow
Tel. 0495 7753889
Fax 0495 7753887
Switzerland
STIEBEL ELTRON AG
Industrie West
Gass 8
5242 Lupfig
Tel. 056 4640-500
Fax 056 4640-501

- Instantaneous water heater with full electronic control with FBM Comfort wireless remote control
- Error Menü
- Hinweis
- Montage Temperaturfunktaster
- INSTALLATION
- GUARANTEE
- SPECIAL INFORMATION
- OPERATION
- General information
- Note
- Safety instructions
- Structure of safety instructions
- KEYWORD Type of risk
- Symbols, type of risk
- Keywords
- Other symbols in this documentation
- Units of measurement
- Safety
- Correct use
- Safety instructions
- Risk of scalding!
- WARNING Injury
- CAUTION Risk of burns!
- Equipment description
- Temperature selector
- Memory keys 1 and 2
- ECO key
- INFO menu
- Remote control via wireless remote control
- Dynamic anti-scalding protection
- Child-proof system
- Wellness comfort function
- Automatic water volume control
- Display backlighting
- Orientation light
- Second line of display
- Anti-scalding protection
- Air detection
- Operation
- Operation and displays on the appliance
- Temperature setting
- Allocating memory keys
- Scanning memory keys
- Selecting / deselecting ECO
- INFO menu settings
- ECO temperature setting
- Setting the ECO flow rate
- Setting the brightness of blue and red backlighting
- Switching orientation light on/off
- Switching childproofing on/off; setting
- Switching Wellness comfort function on/off
- Switching automatic water volume control on/off; setting
- Selecting second line of display
- Setting the time
- Wireless remote control - scan / - log on / - log off
- Resetting to factory settings
- Wireless remote control operation
- Recommended settings
- Energy saving
- Thermostatic valve
- Maintenance and care
- What to do if ...
- ... the water supply is interrupted
- ... the wireless remote control batteries are spent
- ... faults occur on the appliance?
- Safety
- Instructions and regulations
- Water installation
- Electrical installation
- Equipment description
- Standard delivery
- Customer service mode
- Fault menu
- Control menu
- Data menu
- Anti-scalding protection menu
- CAUTION Burns
- Assembly
- Installation versions
- Special accessories
- Direct tap instantaneous water heaters
- Wireless remote control
- Installation accessories
- Universal mounting frame
- Offset installation pipe assembly
- Gas boiler replacement pipework set
- Load shedding relay LR 1-A
- ZTA 3/4 - Central thermostatic valve for operating a DDLE ÖKO TD with preheated water
- Assembly
- Installation location
- Appliance installation over
- Appliance installation undersink
- Preparing the appliance installation
- Opening the appliance
- Information regarding the appliance with changeover connected load
- Anti-scalding protection
- Removing the lower section of the back panel
- Securing the mounting rail
- Fitting the power cable
- Inserting the twin nipples
- Fitting the cable grommet
- Preparing the back panel
- Equipment installation
- Water connection
- Connecting the power supply
- Fitting lower section of back panel
- Completing the installation process
- Wireless remote control installation
- Installation versions
- Power supply - unfinished walls - from below
- Power supply - finished walls
- Priority control
- Undersink installation, water connections from the top
- Tap for finished walls
- Wireless remote control installation
- Commissioning
- Appliance
- Wireless remote control FBM Comfort
- Handover
- Troubleshooting
- Specification
- Wiring diagram
- Dimensions
- Details on energy consumption
- Wireless remote control
- Appliance
- DHW output
- Applications / Conversion table
- Noise emissions
- Maintenance
- Clean sieve
- Environment and recycling
- Battery disposal
- WSKAZÓWKI SPECJALNE
- OBSŁUGA
- Menu Error
- Wskazówka
- Mени Error
- COBET
- УСТАНОВКА
- Указания
- Switzerland
Brand : AEG
Model : DDLE OKO TD 18
Category : Heating