Pipe - Power bank HAMA - Free user manual and instructions
Find the device manual for free Pipe HAMA in PDF.
| Product type | Portable battery |
| Brand | Hama |
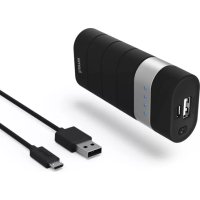
| Model | Pipe |
| Battery capacity | 2600 mAh |
| Battery type | Lithium-ion |
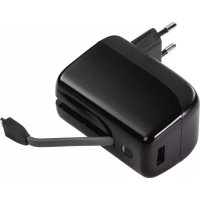
| Charge input | Micro-USB, 5 V / 500 mA |
| Charge output | USB, 5 V / 1 A (1000 mA) |
| Maximum output current | 1000 mA |
| Operating temperature range | 0 °C to 45 °C |
| Main functions | Recharging mobile devices, LED flashlight |
| LED flashlight | Yes, activation via double press |
| Care and cleaning | Clean with a slightly damp, lint-free cloth, without harsh detergent |
| Safety | Protect from moisture, overheating, shocks. Do not open. Use only within specified limits. |
| Spare parts and repairability | No detachable parts, device not user-serviceable |
| Recycling | Do not dispose of with household waste. Deposit at a collection point for electrical devices and batteries. |
| Package contents | Power bank, Micro-USB cable, instruction manual |
| Weight (estimated) | Approximately 120 g |
Frequently Asked Questions - Pipe HAMA
User questions about Pipe HAMA
0 question about this device. Answer the ones you know or ask your own.
Ask a new question about this device
Download the instructions for your Power bank in PDF format for free! Find your manual Pipe - HAMA and take your electronic device back in hand. On this page are published all the documents necessary for the use of your device. Pipe by HAMA.
USER MANUAL Pipe HAMA
Operating Instructions
Bedienungsanleitung
Mode d'emploi
Thank you for choosing a Hama product. 4 Take your time and read the following instructions and information completely. Please keep these instructions in a safe place for future reference. If you sell the device, please pass these operating instructions on to the new owner.
1. Explanation of Warning Symbols and Notes

Warning
This symbol is used to indicate safety instructions or to draw your attention to specific hazards and risks.

Note
This symbol is used to indicate additional information or important notes.
2. Package Contents
- Power Pack, 2600 mAh
- Micro-USB charging/connecting cable
- T hese operating instructions
3. Safety Notes
- The product is intended for private, non-commercial use only.
- P protect the product from dirt, moisture and overheating, and only use it in a dry environment.
- Keep this product, as all electrical products, out of the reach of children!
- D o not drop the product and do not expose it to any major shocks.
- D o not operate the product outside the power limits given in the specifications.
- D o not open the device or continue to operate it if it becomes damaged.
- D ispose of packaging material immediately according to locally applicable regulations.
- Since the battery is integrated and cannot be removed, you will need to dispose of the product as a whole. Do this in compliance with the legal requirements.
- Do not modify the product in any way. Doing so voids the warranty.
4. Operation
4.1 Charging the Power Pack
C onnect the microUSB charging/connecting cable included to the one of the two USB ports on the Power Pack (IN 5V/500mA) and to the microUSB port on your terminal device (mobile phone, smartphone, etc.).
- A Iternatively, you can charge the Power Pack using a suitable USB charger. Please refer to the operating instructions for the USB charger used.
C hargingsbegins and ends automatically. - C charge the Power Pack fully before using it for the first time.
- The LED capacity indicator is red during the charging process. As soon as the charging process is completed, the LED capacity indicator turns blue.

Warning - Battery
- O nly use suitable charging devices or USB connections for charging.
- A s a rule, do not charge devices or USB connections that are defective and do not try to repair them yourself.
- D o not overcharge the product or allow the battery to completely discharge.
- A void storing, charging or using batteries in extreme temperatures.
- W hen stored over a long period of time, batteries should be charged regularly (at least every three months).
4.2 Charging terminal devices
- C onnect the included Micro-USB charging/connecting cable to the USB port on the power pack (OUT 5V/1A) and to the Micro-USB port on your terminal device (mobile phone, smartphone, etc.).
- The Micro-USB charging/connecting cable included may not be suitable for the USB connection on your terminal device. In this case, use the USB cable that was included with your terminal device.
- The current battery status of your terminal device will appear on this device.
- The Power Pack will automatically switch off after 10 seconds if it is not connected to a terminal device.

Warning - Connecting terminal devices
- Before connecting a terminal device, check whether the power output of the charger can supply sufficient power for the device.
- E nsure that the total power consumption of all connected terminal devices does not exceed 1000mA .
- P lease refer to the instructions in the operating manual of your terminal device.
- I t is essential that you observe these specifications and the safety instructions regarding the power supply of your devices.

Note - Optimised charging
- O optimised charging means that the Power Pack recognises the connected terminal device and supplies it with the optimal current to minimise charging time. Please note that the maximum power output of the power pack is 1000mA .

Warning
- N ever connect the charging cable of the Power Pack to both the input and the output of the Power Pack at the same time. This could damage the battery.
- D o not connect any terminal devices while the Power Pack is charging. This could damage the Power Pack and the connected device.
4.3.Torch function
- P press the button twice to switch the integrated LED torch on/off.

Note
- We recommend that you only use the torch for brief periods.
- L onger periods of use negatively affect the Power Pack capacity.
- T his product is only intended for use as a torch. This product is not suitable for lighting rooms in domestic households. Due to the brightness of its LED lamp, this product is a special lamp.
5. Care and Maintenance
Only clean this product with a slightly damp, lint-free cloth and do not use aggressive cleaning agents.
6. Warranty Disclaimer
Hama GmbH & Co. KG assumes no liability and provides no warranty for damage resulting from improper installation/mounting, improper use of the product or from failure to observe the operating instructions and/or safety notes.
7. Service and Support
Please contact Hama Product Consulting if you have any questions about this product.
Hotline: +49 9091 502-115 (German/English)
Further support information can be found here:
www.hama.com
- Technical Data
| Power consumption max. | 500 mA |
| Power Pack voltage 5 V DC | |
| Typ. capacity: 2600 mAh | |
| Min. capacity: 2500 mAh | |
| Power output max. 1000 mA | |
| Temperature range 0°C – 45°C | |
| Battery type Lithium Ion |
9. Recycling Information
Note on environmental protection:
After the implementation of the European Directive 2002/96/EU and 2006/66/EU in the national legal system, the following applies: Electric and electronic devices as well as batteries must not be disposed of with
household waste. Consumers are obliged by law to return electrical and electronic devices as well as batteries at the end of their service lives to the public collecting points set up for this purpose or point of sale. Details to this are defined by the national law of the respective country. This symbol on the product, the instruction manual or the package indicates that a product is subject to these regulations. By recycling, reusing the materials or other forms of utilising old devices/Batteries, you are making an important contribution to protecting our environment.
Bedienungsanleitung
Remarque - Optimised charging
BHHMaHHe - AkKymyIaTOp
- П рименят b Tолько COOTBeTCTByHоиe 3apЯнные устpoиCTba.
- 3 anpeaetcnaKcnnyaTnpoBaTb npemOnTpopoBaTb HeNCnpaBhbIe yCTpoiCTBa.
- He noiBepraTb aKKymyIaTOpbl rIy60Ko pa3pIaKe n nepe3apIaKe.
- B epeb ot BBicoknx TemnepaTypr npxpaHeHH, 3apJe N EKcnJyatauH.
- П ри длnteьном xpaHeHn 3apЯKaTb He pexKe OndHoro pa3aВТрn Mecya.
4.2 3apnka oKOHeuHbIX yCTpOInTB
- Π ōdklouhnte ka6eIb n3 kOMnJIeKta K USB-pa3bemy aKKyMylTOpHoro 6Ioka (OUT 5V/1A). Mnkpopa3bEm USB ka6eI NaKlIOuHTe K 3apJxHaemomy yCTpOiCTBy (MO6nIbHOMy TelefoHy, CMapTfoHy n T.d.).
U SB-ka6eJb c MmKpopa3beMOM n3 KOMnJIeKTa aKKymJyTopHOrO 6Ioka MoXeT He NIOJTu K OKoHeuHOMy yCTpoiCTBy. B 3tOM Clyuae BOCNoJb3yIteCb USB-ka6eJem yCTpoiCTBa.
X OJ 3apIKN CMOTpIte Ha IINcPJIee OKOHeUHOrO yCTPOIcTBA.
E cn 3apjxaemoe yctpoiCTBO He nOdkIIOUeHO, aKKymyIaTOPbI 6JOK aBtOMaTnueCKN BbIKJIIOuAeTCn np6bn3ntelbHo uepe3 10 cekyHd.

IpeynpexKeHne! POnKIOUeHne OKOHeuHbIX yCTPOINCTB
- Ipeen noKJUeHnEM 3apXaEMOro yCTpoiCTBa y6eIntecb, yTO erO xapaKTePncTnKu COOTBeTCTByHT aKKymJIaTOPHomy 6JOKy nITAHn.
- O 6üe noTpe6JЯEmbI TOK BCex NOKJIoueHHbIX yCTpOiCTB He DoJxeh npeBbIwaTb 1000 mA.
CobnOdaIte HNCTpyKuIN NO 3KcNlyatauynyctpoiCTB.
C 06IIOJaTe npaBnla TexHnKn 6e3ONaCHocTn NO nHTaHnO yCTpOInCTB.

PpmeHne. ONTMaJIbHaJ 3apJaKa
PexMM ONTImaJIbHOJ 3apJIKN o6ecneuBaet ONo3HaBaHHe yCTpOInCTBa, BbIbOp TOKa ONTImaJIbHOJ BeINuHNbI N o6ecneueHne MInHMaJIbHOrO BpeMeHn 3apJIKN. MakcImaJIbHbI BbIXoHOb TOK aKKyMylrTopHO6loka nITaHnI COCTabJIeT 1000 mA.

PpeynpeKdHne
3 anpeaetc coeHHaTb Ka6JIaM BXoN BbIXoAkkymyIaTOPHO 6noka. 3To MoKet CtaTb npuHNoB bixOJa AKKymyIaTOPa n3 CTPOJ.
- He nodklouaite okohehhe yctpoiCTBa BO BpeM 3apAkn aKKymyIaTOPHO 6loka nHTAHN. B npOTNBOM clyae 3TO MOKeT npVBecTN K BbIXOdy n3 CTPOA 6loka nHTAHN i OKoHeHoro yctpoiCTBa.
4.3. KapMaHHbI ΦoHapNK
- 4 To6bl BKNIOHTb BCTpoEHbI KapMaHHbI ΦOHaPnK,ДBa pa3a HaxMnte KHOKNy Ha NaHEn

PpmeaHne
- Φ ункциен KapmaHHOrO φонариka peKOMeHdyeTcR NOJIb3OBaTbCЯ Лшь КраТКOBpeMeHHO.
- I сплььзоваиме Фонариka в теймендпелбого Времен прива得不到 Кпраздевременюу разду akкymлгорог6лoka.
- I 3dènne npedHa3NaYeHO dIЯ ᵋKcπLyatauIN ToJIbKO B KaueCTBe KapMaHHOrO foHApR. N3dènne He npedHa3NaYeHO dIЯ OCBeUeHnRA XInbIX KOMHaT. BcJeIcTBHe xapaKTePncTnK apKocTn (CBeToIDNoD) n3dènne OTHOCNTcR K CpeuaJIbHbIM OCBetIteJIbHbIM npi6opam.
5. yxoid texhneckoe 6cbnykubahne
UncTy u3eJnI npOn3BODntb TOnbKO 6e3BOPcBOO cnEka BnaXHO nCaJIΦeTKo. 3aNpeuaetc npImeHrTa arpeccNBhIe UnCTaUne cpeDCTBa.
6. OTKa3 OT rapaHTnHbIX 063aTeNbCTB
Kompania Hama GmbH & Co. KG He HeceT OTBETCTBeHHocTh 3a yuepe6, Bo3HKnKwIn BcneDCTBne He npabNbHoro MOtaxa, NOKJIoueHn I NcNoIb3OBaHn I3JeINr He No Ha3NaueHnIO, a TaKxE BCJeDCTBne HecO6JIoDeHn INHCTpyKuIN PO 3KcNlYatauIN n TexHKn Be3OnaChOCTN.
7. OTdien texo6cnyxnbHnA
IIO BOpocam pemOnTa IIN 3aMeHbI HeNCpPaBbIX I3JeInn ObaaTecb K npOaBuy IIN B cepBncHyIO cnYk6y KomnaHn Hama.
TopyajnHnOToJenaTexo6cnyxnbHa:
+49 9091 502-115 (HemeKni, aHrlnckn)
Poiop6Hee cmOTpnte 3decb: www.hama.com
8. TexHnueckne xapaKTePncTnKn
Avertizare - Accumulator
86652 Monheim/Germany
www.hama.com