USER MANUAL HB 9 IX Ariston Thermo
natural_image
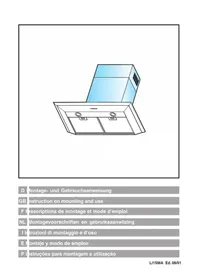
Line drawing of a kitchen air conditioner unit with two doors and a top panel (no text or symbols)
D Montage- und Gebrauchsanweisung
GB Instruction on mounting and use
F Prescriptions de montage et mode d'emploi
NL Montagevoorschriften en gebruiksaanwiizing
I Istruzioni di montaggio e d'uso
E Montaje y modo de empleo
P Instruções para montagem e utilização
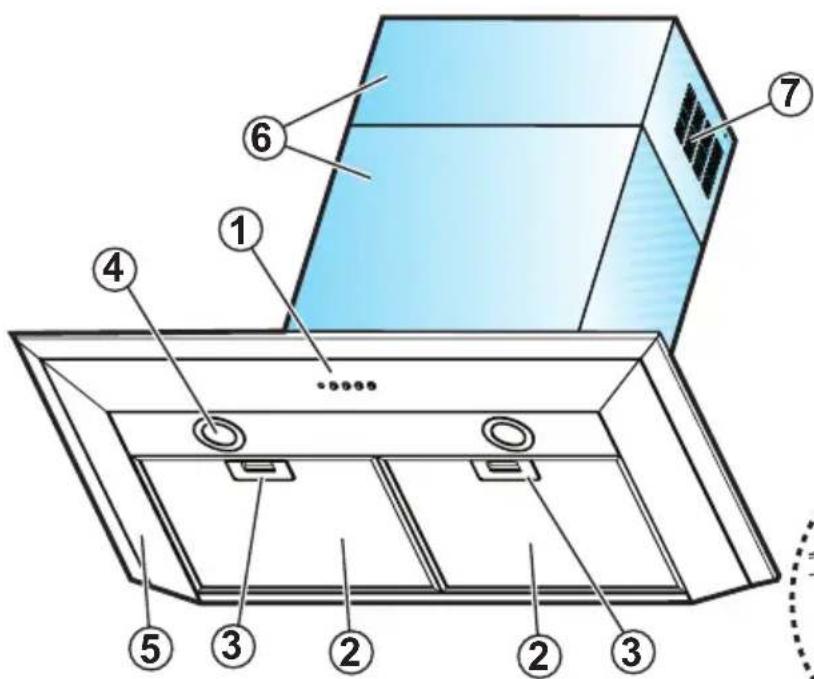
Fig. 1 - Abb. 1 - Afb. 1
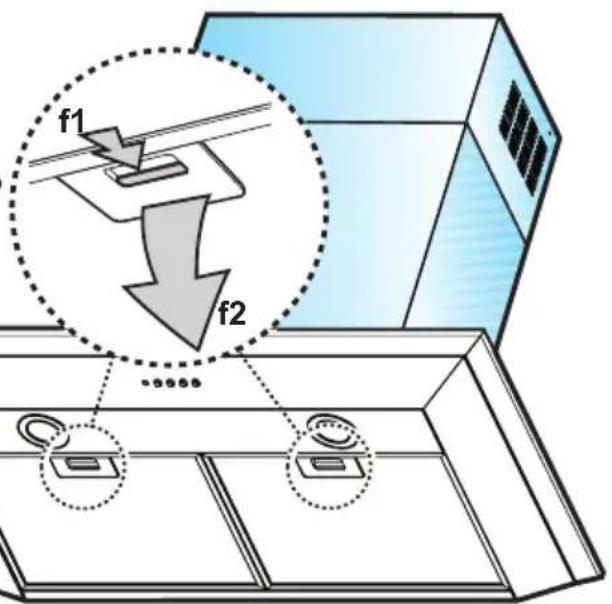
Fig. 2 - Abb. 2 - Afb. 2
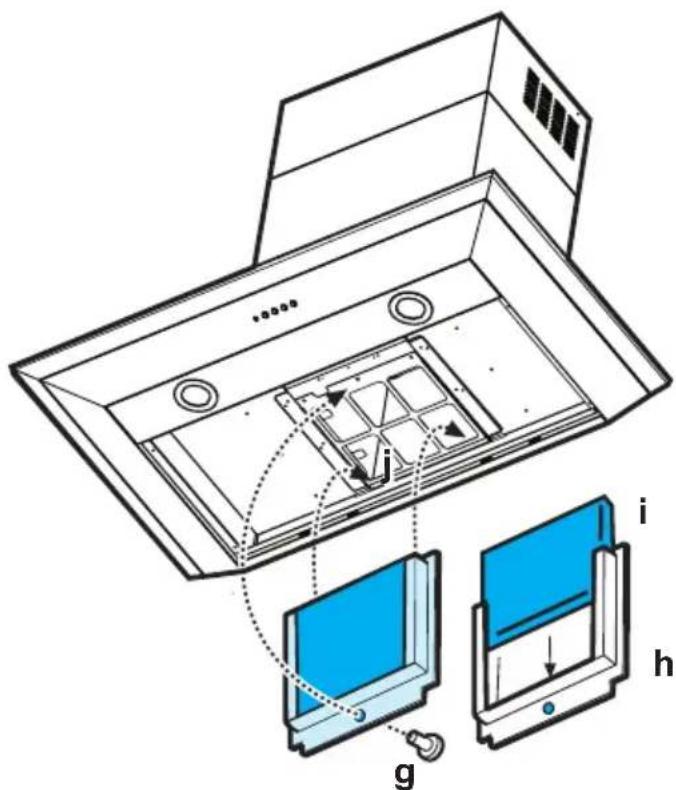
Fig. 3 - Abb. 3 - Afb. 3
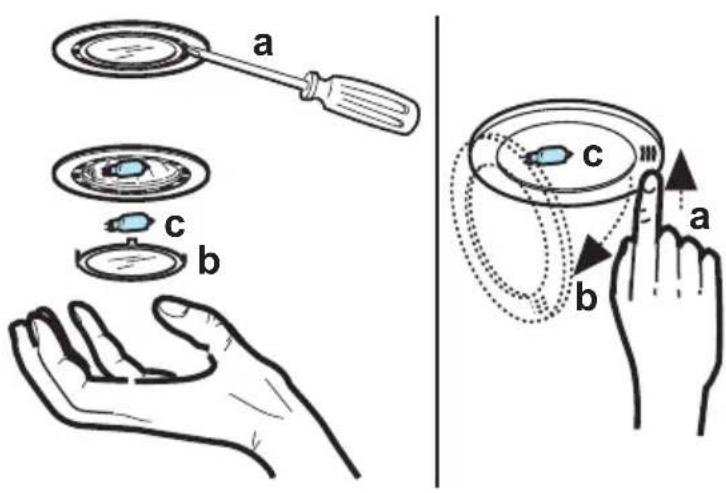
Fig. 4 - Abb. 4 - Afb. 4
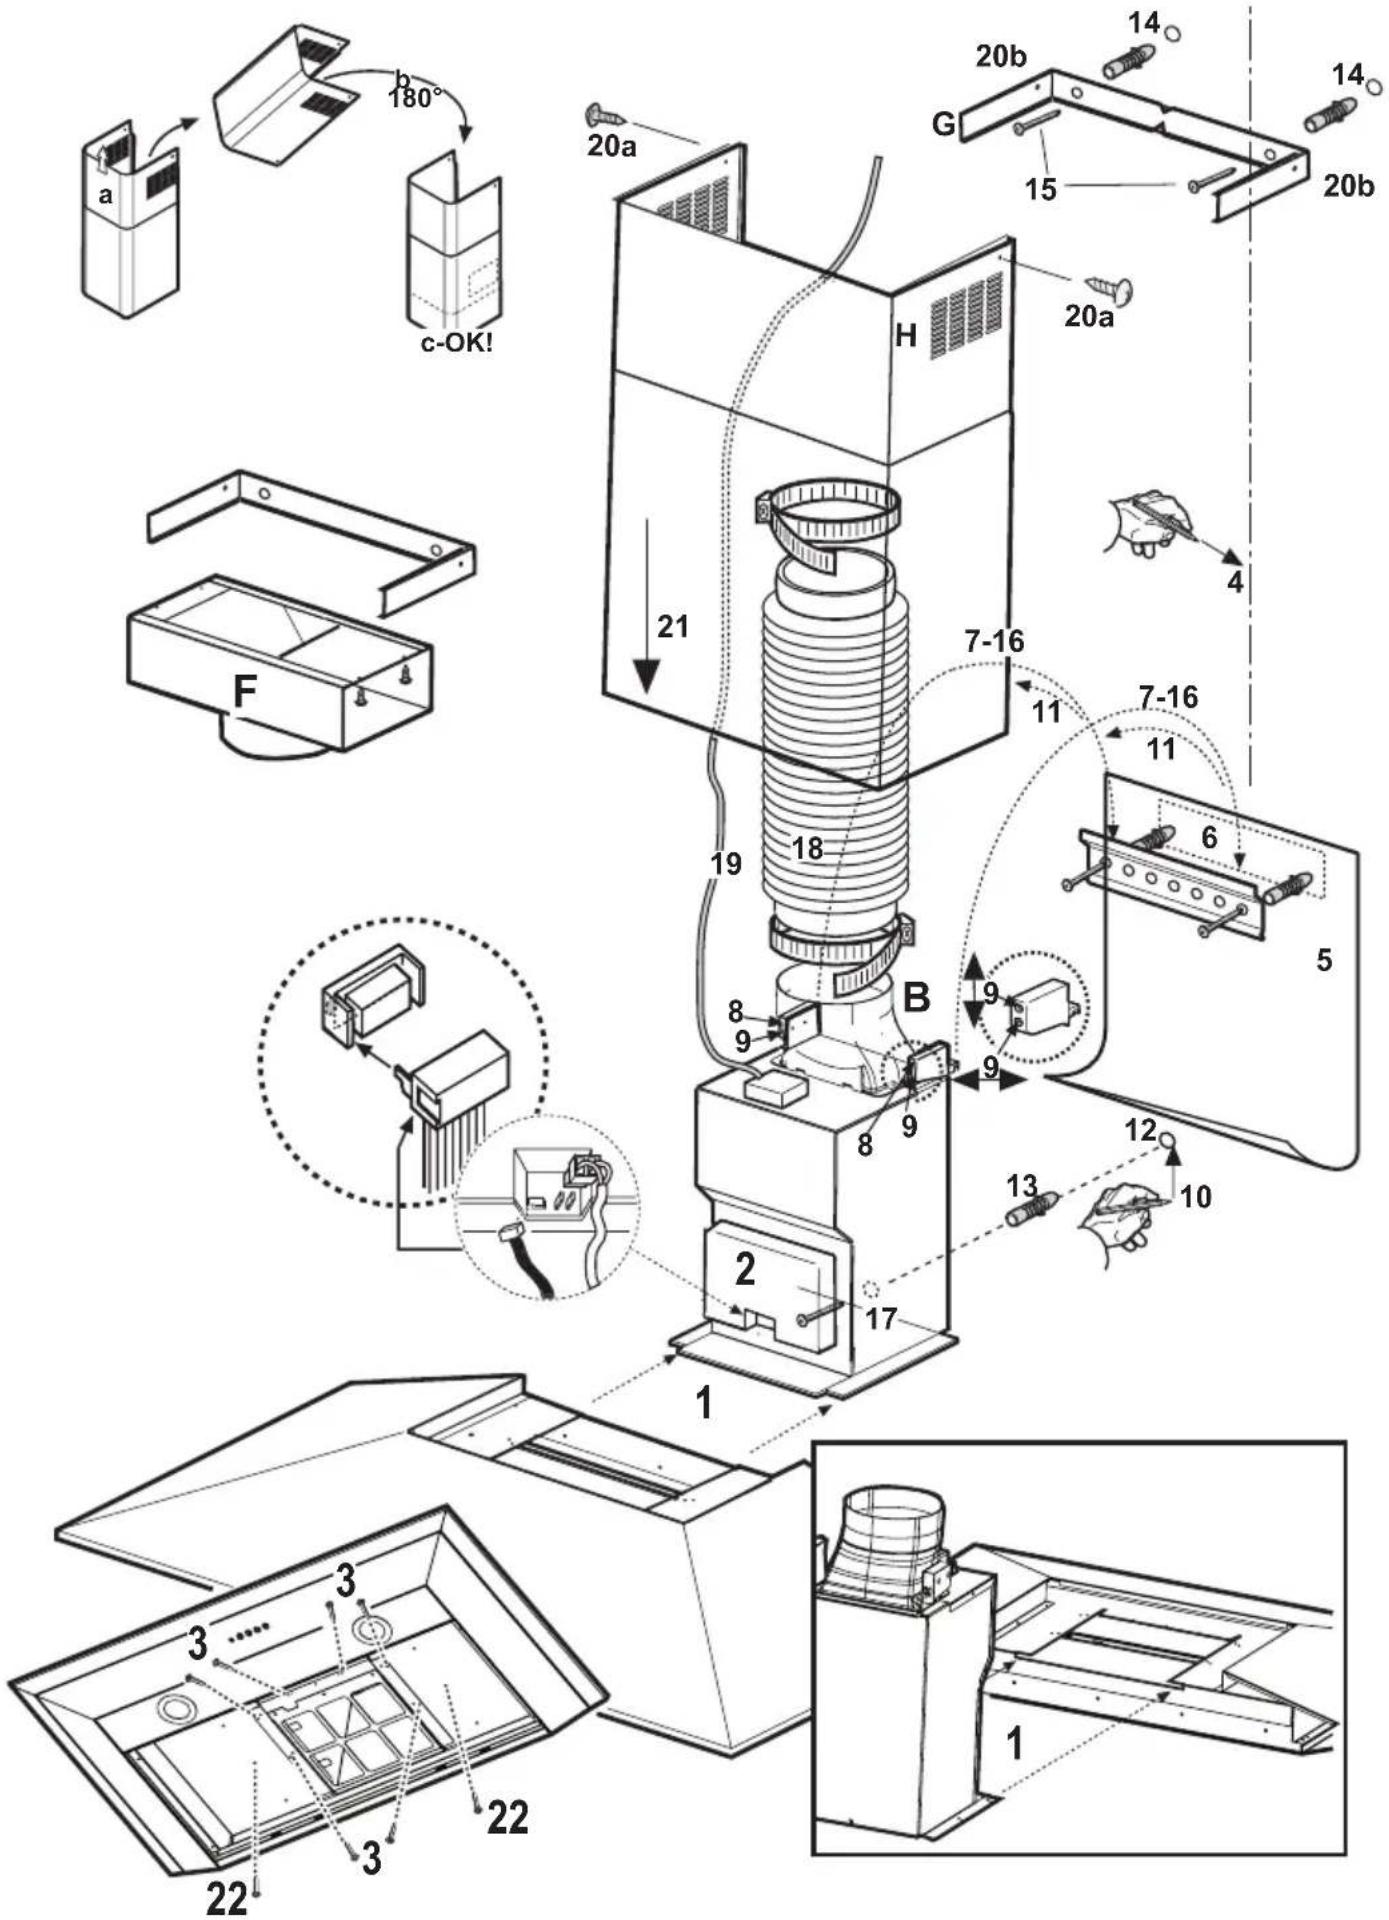
Fig. 5 - Abb. 5 - Afb. 5
The cooker hood must be placed at a minimum distance of 60 cm from the cooking plane for electric cookers and 75cm for gas or mixed cookers.
The hood is equipped with a top air outlet B for discharge of fumes to the outside (Ducting version – exhaust pipe and pipe fixing clamps not provided).
Should it not be possible to discharge cooking fumes and vapour to the outside, the hood can be used in the filter version, fitting an activated carbon filter and the deflector F on the support (bracket) G, fumes and vapours are recycled through the top grille H by means of an exhaust pipe connected to the top air outlet B and the connection ring mounted on the deflector F (exhaust pipe and pipe fixing clamps not provided).
The models with no suction motor only operate in ducting mode, and must be connected to an external suction device (not supplied).
Preliminary information for installation of the hood: Disconnect the hood during electrical connection, by turning the home mains switch off.
First decide which functioning version is better for you. If you decide to use the hood in ducting version we suggest to position the upper section of the chimney so that the outlet slots are not visible once installation has ended, on the contrary if is decided to use the hood in filter version BE SURE that the side with slots is up (see also A-B-C sequence on on Fig. 5).
-
Rest the suction unit on a flat surface and thread the lower part of the hood onto it (remove the grease filter/s).
-
Make all the electrical connections between the two parts.
-
Fasten the hood to the suction unit using 4 screws.
-
Using a pencil, draw a line on the wall, extending up to the ceiling, to mark the centre. This will facilitate installation.
-
Rest the drilling template against the wall: the vertical centre line printed on the drilling template must correspond to the centre line drawn on the wall, and the bottom edge of the drilling template must correspond to the bottom edge of the hood: bear in mind that, when installation is complete, the underside of the hood must be at least 60 cm above the cooker top in the case of electric cookers, and at least 75 cm above the cooker top in the case of gas or mixed cookers.
-
Rest the support bracket on the drilling template so that it coincides with the dotted rectangle, mark the two outer holes and drill them, remove the drilling template, insert 2 wall plugs and fix the hood support bracket into place using two 5x45mm screws.
-
Hang the hood on the bracket.
-
Adjust the distance of the hood from the wall.
-
Adjust the horizontal position of the hood.
-
From inside the suction unit, use a pencil to mark the hole to be used for final fixing of the hood.
-
Remove the hood from the bracket.
- Drill at the point marked (∅8mm - see operation 10).
- Insert 1 wall plug
- Rest the chimney support bracket G against the wall, touching the ceiling. Use the support bracket as a drilling template (the small slot formed on the support must coincide with the line drawn on the wall as above - operation 4) and mark 2 holes with a pencil, drill the holes (∅8mm), insert 2 wall plugs.
- Fix the chimney support bracket to the wall using two 5x45mm screws.
16.Hook the hood onto the bottom bracket.
- Fix the hood into its final position on the wall using one 5x45mm screw (ABSOLUTELY ESSENTIAL).
- Connect a pipe (pipe and pipe clamps not provided, to be purchased separately) for discharge of fumes to the If the hood is to be used in ducting version, the other end of the pipe must be connected to a device expelling the fumes to the outside. If the hood is to be used in filter version, fix deflector F to the chimney support bracket G using 4 screws, and connect the other end of the pipe to the connection ring on deflector F (if dismantled, the connection ring must be bayonet-fastened on the deflector and locked in position using 1 screw).
- Make the electrical connections.
- Apply the chimney stacks and fasten them at the top to the chimney support G (20b) using 2 screws (20a).
- Slide the bottom section of the chimney down until it completely covers the suction unit and slots into the housing provided on top of the hood.
- Fasten the bottom section of the chimney with 2 screws. Refit the grease filter/s and check that the hood is operating correctly.
Electrical connection
The electrical tension must correspond to the tension noted on the label placed inside the cooker hood. Connect the electrical plug, where provided, to the an easily accessible outlet in conformity with local standards in force.
Where an electrical plug is not provided (for direct connection to electrical network) place a standards approved bipolar switch with an aperture distance of not less than 3mm (accessible) from the contacts.
Description of the hood - Fig. 1
1 Control panel
2 Grease filter
3 Grease filter release handle
4 Halogen lamp
5 Vapour screen
6 Telescopic chimney
7 Air outlet (used for filter version only)
Operation – Model with electronic controls
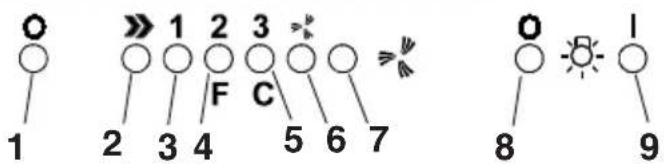
1- Motor OFF button
2- ON button and motor speed selection button 1 - 2 - 3 - 1 - 2 - . . .
3- Speed 1 LED
4- Speed 2 LED and metal grease filter saturation LED (in this latter case, the LED will flash - See instructions on grease filter cleaning).
5- Speed 3 LED and active carbon filter saturation LED _ (in this latter case, the LED will flash - See instructions on active carbon filter replacement).
Warning!
The active carbon filter saturation LED is not activated. In order to activate the active carbon filter saturation indicator, press buttons 2 and 7 simultaneously for 3 seconds. Initially, only LED 4 will flash, then after the 3 seconds have passed, LED 5 will also start flashing, indicating that the active carbon filter saturation control system is active.
To switch off the system, re-press the same two buttons: after 3 seconds LED 5 will stop flashing and the device will be switched off.
6 - Intensive speed LED
7 - Intensive speed ON switch
This speed should be used when the concentration of cooking fumes or odours is particularly strong (for example when frying, cooking fish etc.). The fast speed will run for about 5 minutes and then return to the speed previously set automatically (1, 2 or 3), or switch off if no speed was selected.
To turn off the fast speed, before the end of the 5 minutes, press button 1 or button 2 (see page 13).
8 - OFF lamp button
9 - ON lamp button
If the hood fails to operate correctly, briefly disconnect it from the mains power supply for almost 5 sec. by pulling out the plug. Then plug it in again and try once more before contacting the Technical Assistance Service.
Description of control panel and hood operation
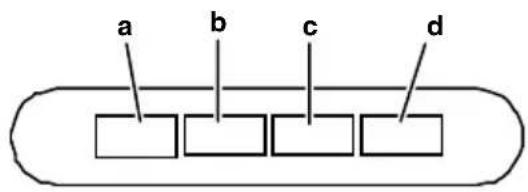

a. on/off light switch
b. on/off aspiration switch and minimum power selection
c. medium power selection aspiration switch
d. maximum power selection aspiration switch
e. operating gauge (foreseen in the model with round buttons)
Use the high suction speed in cases of concentrated kitchen vapours. It is recommended that the cooker hood suction is switched on for 5 minutes prior to cooking and to leave in operation during cooking and for another 15 minutes approximately after terminating cooking.
Cleaning
The cooker hood should be cleaned regularly internally and externally.
For cleaning use a cloth moistened with denatured alcohol or neutral liquid detergents. Avoid abrasive detergents.
Failure to carry out the basic standards of the cleaning of the cooker hood and replacement of the filters may cause fire risks.
Maintenance
Prior to any maintenance operation ensure that the cooker hood is disconnected from the power supply.
Grease filter
This must be cleaned once a month (and, for the model with electronic control panel, every time LED 4 starts to flash – see preceding page) using non aggressive detergents, either by hand or in the dish-washer, which must be set to a low temperature and a short cycle.
To remove the grease filter, pull the spring release handle (f) - (Fig. 2).
Only for model with electronic control panel:
Once the grease filters have been cleaned, press button 1 (see preceding page) for about 3 seconds until you hear the acoustic signal (beep): the LED 4 will now stop flashing.
Charcoal filter (filter version only)
It absorbs unpleasant odours caused by cooking.
The charcoal filter can be washed once every two months (and, for the model with electronic control panel, every time LED 5 starts to flash – see preceding page) using hot water and a suitable detergent, or in a dish-washer at 65°C (if the dish-washer is used, select the full cycle function and leave dishes out).
Eliminate excess water without damaging the filter, then remove the mattress located inside the plastic frame and put it in the oven for 10 minutes at 100^ C to dry completely. Replace the mattress every 3 years and when the cloth is damaged.
Remove the filter holder frame by removing the screw (g) fastening it to the hood (Fig. 3).
Insert the pad (i) of activated carbon into the frame (h) and fit the whole back into its housing (j).
Only for model with electronic control panel:
Once you have replaced the charcoal filter, press button 1 (see preceding page) for about 3 seconds until you hear the acoustic signal (beep).
LED 5 will now stop flashing.
Replacing lamps - Fig. 4
Access the light compartment - according to the model in your possession, proceed as follows:
extract the guard by levering it off with a small screwdriver or similar tool (fig. 4.1)
or
press on the lamp cover and release to open (fig. 4.2).
Replace the damaged light bulb.
Only use halogen bulbs of 20W max (G4), making sure you do not touch them with your hands.
Close the lamp cover (it will snap shut).
If the lights do not work, make sure that the lamps are fitted properly into their housings before you call for technical assistance.
Caution
This appliance is designed to be operated by adults. Children should not be allowed to tamper with the controls or play with the appliance.
Do not use the cooker hood where the grill is not correctly fixed! The suctioned air must not be conveyed in the same channel used for fumes discharged by appliances powered by other than electricity. The environment must always be adequately aerated when the cooker hood and other appliances powered by other than electricity are used at the same time. Flambé cooking with a cooker hood is prohibited. The use of a free flame is damaging to the filters and may cause fire accidents, therefore free flame cooking must be avoided. Frying of foods must be kept under close control in order to avoid overheated oil catching fire. Carry out fumes discharging in accordance with the regulations in force by local laws for safety and technical restrictions.
Installation - Fig. 5