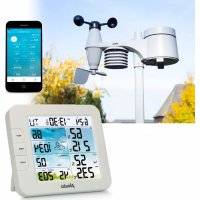
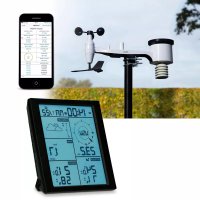
WS1150 - Weather Station ALECTO - Free user manual and instructions
Find the device manual for free WS1150 ALECTO in PDF.
User questions about WS1150 ALECTO
0 question about this device. Answer the ones you know or ask your own.
Ask a new question about this device
Download the instructions for your Weather Station in PDF format for free! Find your manual WS1150 - ALECTO and take your electronic device back in hand. On this page are published all the documents necessary for the use of your device. WS1150 by ALECTO.
USER MANUAL WS1150 ALECTO
text_image
WIRELESS SENSOR CH: 12.9V + -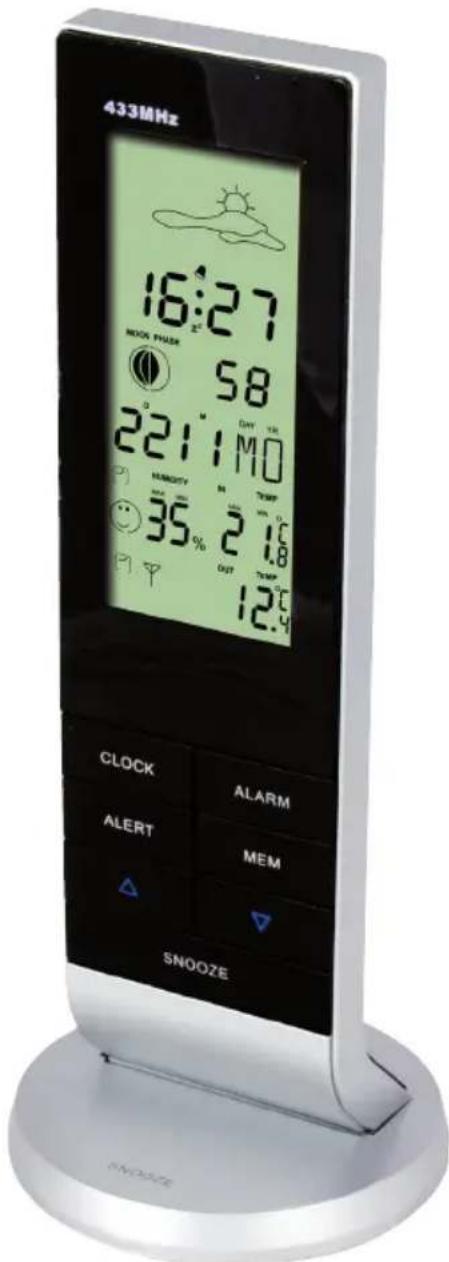
text_image
433MHz 16:27 NEON PHUSK 58 221:10 HUBIDITY 35% OUT 12.9 CLOCK ALARM ALERT MEM SNOOZE• van 0-10 seconden 1 beep/sec.
• van 10-20 seconden 2 beeps/sec.
• van 20-30 seconden 3 beeps/sec.
• van 30-120 seconden 4 beeps/sec.
Piles rechargeables:
natural_image
Simple line drawing of a sun above a cloud-like shape (no text or symbols)Légèrement nuageux

Nuageux

natural_image
Simple line drawing of a cloud partially submerged in rain with falling raindrops (no text or symbols)Pluie
Alarme (réveil) :
ATTENTION: THE ILLUSTRATIONS THIS USER'S MANUAL REFERS TO CAN BE FOUND ON THE LAST PAGE OF THIS MANUAL. SO PLEASE KEEP THAT PAGE OPENED WHILE READING THIS USER MANUAL
INSTALLATION
Power supply:
- Slide down the battery cover at the rear of the indoor unit and remove it.
- Place 2 batteries, type AAA, 1.5Volt, according to the markings inside the battery compartment (see A). Batteries are not included.
After you've installed the batteries, the indoor unit will start scan of 3 minutes for any nearby outdoor unit. That's why you should follow the instructions 3 and 4 within those 3 minutes.
-
Press the half moon on the battery cover at the bottom of the outdoor unit (see I). Simultaneously, pull the two parts of the cabinet off each other (see J). Now remove the battery cover from the indoor unit.
-
Place 2 batteries, type AAA, 1.5Volt, according to the markings inside the battery compartment (see B).
To make the outdoor unit transmit again.
-
Press the "TX" button (see C) to have the outdoor unit transmit again when the registration has failed.
-
Press the "C/F" button (see D) to switch the display on the outdoor unit between °C and °F.
As soon as both the indoor and outdoor unit have been found, the outdoor temperature will appear on de display of the indoor unit (see E).
-
Now replace the battery covers on the indoor and outdoor unit.
-
You can now suspend the outdoor unit from a screw or put it down somewhere.
Time format setup:
The time can be displayed in 12-hours or 24-hours format. When selecting the 12-hours notification, “AM” will appear in the display before noon and “PM” will appear in the display after noon. When selecting the 24-hours notification, the clock runs from 00 to 24 hours.
Press the “▲” button to switch between the 12-hours and 24-hours format.
Time and date setup:
As soon as you've placed the batteries into the indoor unit, the clock and date will show 00:00. You can set the time, date and language (for the name of the day) as follows:
-
press and hold the "CLOCK" button for 2 seconds. The clock digits in the display will start flashing.
-
press the “▲” or “▼” button to set the correct year.
-
press the "CLOCK" button to continue to the month setting.
-
press the “▲” or “▼” button to set the correct month.
-
press the "CLOCK" button to continue to the day setting.
-
press the “▲” or “▼” button to set the correct day.
-
press the "CLOCK" button to continue to the language setting.
-
press the "CLOCK" button to continue to the language setting.
You can choose from the following language settings for indicating the day.
NE - Dutch
ES - Spanish
DA - Denmark
GE - German
EN - English
IT - Italian
FR - French
-
press the “▲” or “▼” button to set the desired language.
-
press the "CLOCK" button to continue to the hours setting.
-
press the “▲” or “▼” button to set the correct hours.
-
press the "CLOCK" button to continue to the minutes setting.
-
press the “▲” or “▼” button to set the correct minutes.
-
press the "CLOCK" button to continue to the time zone setting.
-
the time zone has no function and doesn't require setup.
-
press the "CLOCK" button or wait for 8 seconds to leave the programming mode.
The display will stop flashing and show the correct time and date.
- The display will also stop flashing when you don't press any button for 8 seconds.
- You can press and hold the “▲” or “▼” button for at least 2 seconds to adjust any flashing value with 8 steps.
Alarm setup:
You can use the alarm function to set up a wake-up time.
- press and hold the "ALARM" button for 2 seconds, the alarm time in the display will start flashing.
- press the “▲” or “▼” button to set the correct hours.
- press the "ALARM" button to continue to the minutes setting.
- press the "▲" or "▼" button to set the correct minutes.
- press the "ALARM" button or wait for 8 seconds to leave the programming mode.
- briefly press the "ALARM" button to activate (icon appears) or deactivate (disappears) the alarm.
The alarm buzzer works as follows:
• from 0-10 seconds 1 beep/sec.
• from10-20 seconds 2 beeps/sec.
• from 20-30 seconds 3 beeps/sec.
• from 30-120 seconds 4 beeps/sec.
Temperature notation setup:
The temperature can be displayed in °C or °F. Press the “▼” button to switch between °C and °F.
Temperature alert setup:
You can only set a high and low temperate alert for the outdoor temperature. As soon as the outdoor temperature changes to over or below that limit, an alarm will be emitted. This alert needs to be set per channel.
- press and hold the "ALERT" button for 2 seconds. The alert maximum display will start flashing.
- press the "▲" or "▼" button to set the correct maximum temperature.
- press the "ALERT" button to continue to the minimum temperature setting.
- press the "▲" or "▼" button to set the correct minimum temperature.
- press the "ALERT" button or wait for 8 seconds to leave the programming mode.
- briefly press the "ALERT" button to activate (icon appears) or deactivate (icon disappears) the alarm.
Positioning tips:
- Never place the indoor unit in direct sunlight and keep it away from heat radiating objects (lights, heaters, etc.)
- For a strong reception of the radio controlled time signals, never place the indoor unit next to large metal surfaces or devices with strong electromagnetic fields.
- Even though the outdoor unit is suitable for placement outside, the unit isn't waterproof. Please place this unit on a spot protected against rain and wind.
- The distance between the indoor and outdoor unit should be no more than 50 meters.
Rechargeable batteries:
You can choose to use normal (alkaline) or rechargeable batteries in both the indoor and outdoor unit. However, rechargeable batteries supply a lower voltage, decreasing the lifespan and accuracy of the WS-1150. Rechargeable batteries must be charged using an external charger.
Batteries outdoor unit:
Because regular Alkaline batteries perform poorly or not at all at temperatures around or below 0°C, we don't recommend using standard Alkaline batteries for the outdoor unit. This is why we recommend inserting Lithium batteries into the outdoor unit, because these are developed for functioning within a temperature range of -20°C to 60°C. These batteries can be ordered from the customer service department of Alecto via telephone number 073 6411 355 (Netherlands) or 03 238 5666 (Belgium) or via internet www.alecto.nl. Lithium batteries with a capacity of 2900mAh have a life span of at least one year.
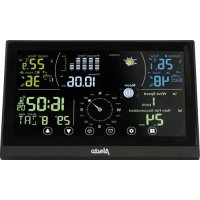
DISPLAY
General:
The actual temperature, humidity and air pressure will only be shown correctly after both the indoor and outdoor unit have been switched on for several hours and have not been moved.
The weather forecast and air pressure will be correctly shown after at least 24 hours.
Outdoor unit
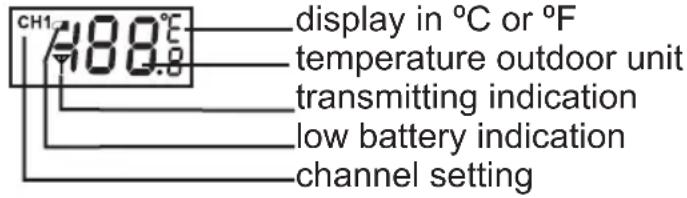
text_image
CH1 488.0 display in °C or °F temperature outdoor unit transmitting indication low battery indication channel setting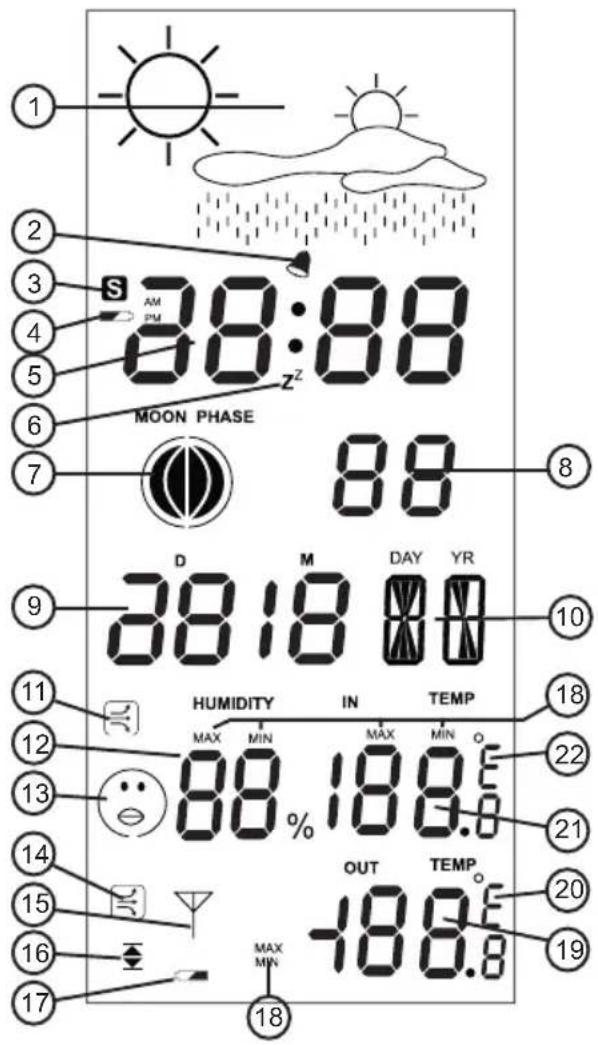
text_image
1 2 3 4 5 6 7 8 9 D M DAY YR 10 11 12 13 14 15 16 17 18 S AM PM 88:88 MOON PHASE 88 38:18 00 HUMIDITY IN TEMP MAX MIN MAX MIN 88% 18.0 OUT TEMP. -18.0 20 19Display overview:
- weather forecast using different icons.
- alarm clock function on/off.
- no function
- indoor unit low battery indication
- time display
- snooze function activated
- moon status indication
- seconds display
- date display
- name of the day display
- temperature curve icon indoors
- humidity indoors
- comfort icon
- temperature curve outdoors
- reception icon
- high and low temperature alert
- outdoor unit low battery indication
- minimum or maximum display history
-
outdoor unit temperature
-
display in °C or °F
- temperature indoors
- display in °C or °F
OPERATION
Weather forecast:
The weather forecast is displayed using different icons. This weather forecast is calculated based on changes in air pressure and this allows for a forecast reliability of 70 to 75%. The use of air conditionings or adjustments of the indoor climate can affect the weather forecast.
The weather forecast is indicated using 4 icon combinations:


natural_image
Simple line drawing of a sun rising over hills (no text or symbols)Sunny Partly cloudy

Cloudy

natural_image
Simple line drawing of a cloud partially submerged in rain with falling raindrops (no text or symbols)Rainy
Alarm (wake-up):
See Installation for setting up the alarm clock. Press the "ALARM" button to activate the alarm. As soon as the alarm sounds, you can turn it off by pressing a random button. The alarm function remains activated and will sound again after 24 hours.
Snooze function:
When the alarm sounds and you use the snooze function by pressing the foot or the "SNOOZE" button, the alarm will stop and the zicon appears in the display, and flashes along with the alarm icon. The alarm will sound again after 5 minutes. Press the "SNOOZE" button or the foot of the WS-1150 to activate the snooze function again of press any other random button to switch off the alarm.
Moon status:
The moon status indicates how much of the moon is visible (when not cloudy). This display depends on the date setting.
Indoor temperature:
The indoor temperature is measured every 12 seconds. The temperature curve icon shows whether the temperature is increasing, decreasing or remains stable as follows.
If the change in temperature is smaller than 1^ C within an hour, will appear.
If the change in temperature is higher than 1^ C within an hour, will appear.
If the change in temperature is lower than 1^ C within an hour, will appear.
This measurement has a range of 0^ C to +50^ C ±1^ C
Indoor humidity:
The humidity is measured every 12 seconds. The display indicates the percentage of the humidity. The comfort icon indicates how pleasant the indoor climate is.
When the humidity is lower than 40%:

When the indoor temperature is between 20^ C\~ 28^ C and the humidity is between 40%\~70%: ☺
No icon is shown when the humidity is between 40%\~70% is, but the indoor temperature is outside of the range 20°C\~28°C.
When the humidity is higher than 70%:

Memory:
You can press the "MEM" button to display the measured minimum and maximum value of the following items.
- indoor temperature
- Humidity
-
outdoor temperature
-
press the "MEM" button.
-
when displaying the indoor temperature, humidity and outdoor temperature, the word "MAX" will appear. The indicated value shows the measured maximum value.
-
press the "MEM" button.
-
when displaying the indoor temperature, humidity and outdoor temperature, the word "MIN" will appear. The indicated value shows the measured minimum value.
-
press the "MEM" button or wait for 8 seconds to leave this mode.
Memory reset:
It's possible to delete the maximum and minimum values.
- press and hold the "MEM" button for 2 seconds until you hear a beep tone. The maximum and minimum registrations are now deleted.
Outdoor temperature alert:
See Temperature Alert Setup in chapter Installation to set the alert limit. activating/deactivating the alarm:
- press the "ALERT" button to activate the alarm (appears in the display).
- press the "ALERT" button again to deactivate the alarm (the icon disappears).
When the alarm is activated and the upper or lower temperature limit is exceeded, an alert signal will be emitted every 5 seconds while the outdoor temperature display starts flashing. This alarm signal is repeated each minute until the temperature is within the limits again.
It's also possible to deactivate this alert.
BATTERY REPLACEMENT
Indoor unit:
After replacing the batteries of the indoor unit, all memories and settings will be deleted.
Outdoor unit:
After replacing the batteries of the outdoor unit, you'll need to re-register it to the indoor unit.
To do this, follow the instructions of chapter 'Installation'.
RESET/SYSTEM ERROR
If you've lost the overview of the settings or the WS-1150 appears to be malfunctioning, we recommend you to reset the indoor and outdoor units.
- Remove the batteries from the indoor and outdoor unit.
- Wait for at least 10 seconds and then replace the batteries.
- Follow the registration procedure (see paragraph 'Installation').
After several seconds the indoor and outdoor unit will have recognised each other and you can start using the WS-1150 again.
If you still have no connection or sound, please contact the customer service of Alecto: www.alecto.nl
ENVIRONMENT
At the end of its lifespan, this product should not be discarded as normal domestic waste, but is must be taken to a collection point for the recycling of electric and electronic equipment.

Don't throw away exhausted batteries, take them to your local depot for small chemical waste.
SPECIFICATIES
Indoor unit:
indoor temperature measurement range: 0^ +50^ ( 32^ +122^ ) resolution: 1^ ( 1.8^ )
Humidity range:
20% \~ 95% relative humidity resolution: 1% accuracy: 10%
Power supply:
2x 1.5V battery, size AAA, alkaline
Outdoor unit:
outdoor temperature measurement range: -50°C \~ +70°C(-58°F \~ 158°F) resolution: 1°C (1.8°F)
Power supply:
2x 1.5V battery, size AAA, alkaline
Transmission frequency:
433,88MHz
Power:
-13,6 dBm
Range:
up to 50 meters
DECLARATION OF CONFORMITY
Hereby, Hesdo declares that the radio equipment type Alecto WS-1150 is in compliance with directive 2014/53/EU. The full text of the EU declaration of conformity is available at the following internet address: http://DOC.hesdo.com/WS-1150-DOC.pdf
WARRANTY
For the Alecto WS-1150 you have a warranty of 24 months from the date of purchase. During this period, we guarantee the free repair of defects caused by material and workmanship errors. All this subjected to the final assessment of the importer.
HOW TO HANDLE:
If you notice any defect, first refer to the user's manual or Alecto website. If you can't find a decisive answer here, please contact your dealer with a clear complaint description. The dealer will then accept the product with this proof of warranty and the dated proof of purchase and ensure a speedy repair or otherwise send it post paid to the importer.
THE WARRANTY BECOMES NULL AND VOID:
In case of improper use, incorrect connections, leaking and/or incorrectly installed batteries, use of unoriginal parts or accessories, negligence and in case of defects caused by moisture, fire, flooding, lightning and natural disasters. In case of unauthorised modifications and/or repairs performed by third parties. In case of incorrect transportation of the device without adequate packaging and when the device is not accompanied by this warranty card and proof of purchase.
All further liability, especially concerning any consequential damages, is excluded.
NO
VÄEROPPMERKSOM: ILLUSTRASJONENE DET HENVISES TIL I DENNE BRUKERHÅNDBOKEN FINNES PÅ DEN SISTE SIDEN. HOLD DERFOR DEN SIDEN ÅPEN NÅR DU LESER DENNE BRUKSANVISNINGEN
INSTALLASJON
Strømforsyning:
natural_image
Simple line drawing of a sun above a cloud with rays (no text or symbols)Sol Delvis skyet


natural_image
Simple line drawing of a cloud with raindrops falling below (no text or symbols)Skyet
Regn
Alarm (vekking):
natural_image
Simple line drawing of a sun above a cloud-like shape (no text or symbols)Halvklart

Molnigt

natural_image
Simple line drawing of a cloud partially submerged in rain with falling raindrops (no text or symbols)Regn
Alarm (väckning):
natural_image
Simple line drawing of a sun rising over hills (no text or symbols)Puolipilvinen

Pilvinen

natural_image
Simple line drawing of a cloud with raindrops falling below (no text or symbols)Sateinen
Hälytys (herätys):
natural_image
Simple line drawing of a sun rising over hills (no text or symbols)natural_image
Simple line drawing of a cloud with raindrops below (no text or symbols)Regnfuldt
Alarm (opvågning):
natural_image
Blank rectangular frame with rounded corners and a small central hole (no text or symbols)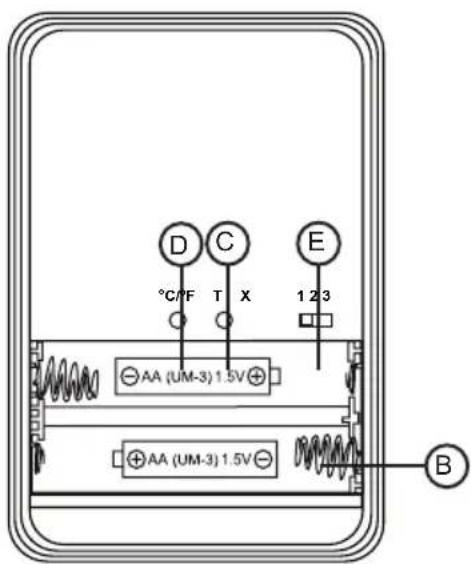
text_image
D C E °C/F T X 1 2 3 AA (UM-3) 1.5V AA (UM-3) 1.5V B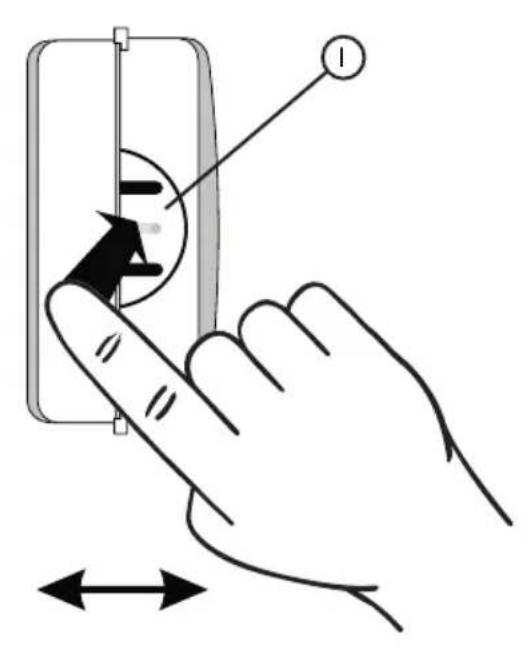
text_image
Diagram showing hand pressing a button on an electrical socket, with directional arrows indicating movement or force.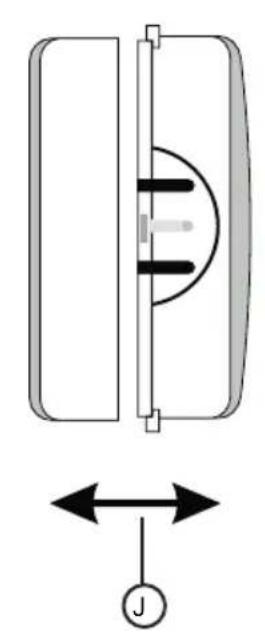
natural_image
Diagram of a mechanical or electrical component with bidirectional arrows and a labeled symbol (no text or labels present)