ISO - Car seat BabyGO - Free user manual and instructions
Find the device manual for free ISO BabyGO in PDF.
| Product type | Child car seat (group 1/2/3) |
| Brand | BabyGO |
| Model | ISO (LB-523) |
| Dimensions (L x D x H) | 480 × 480 × 710 mm |
| Weight | 7.8 kg |
| Weight groups | Group 1: 9-18 kg (≈9 months-4 years) Group 2: 15-25 kg (≈3-7 years) Group 3: 22-36 kg (≈6-11 years) |
| Safety standard | ECE R44/04 - Certificate No. 044422 |
| Installation | ISOFIX anchors (group 1) + 3-point seat belt (groups 2/3) + top tether |
| Main functions | Forward-facing use; 5-position headrest adjustment; adjustable harness height; integrated ISOFIX system; buckle with red button; green locking indicators |
| Use with harness | Up to 18 kg (group 1) |
| Use without harness | From 15 kg (groups 2/3) with vehicle 3-point seat belt |
| Power supply | None (mechanical product) |
| Care and cleaning | Hand wash at max 30°C; do not bleach; dry clean possible (trichloroethylene); do not tumble dry; do not iron; do not use solvents |
| Covers and upholstery | Removable and washable; replace only with original BabyGO parts |
| Safety | Never install on a seat with active airbag; replace after an accident; do not use second-hand product; always secure child |
| Spare parts / repairability | Contact the manufacturer (BabyGO Baby Products GmbH) for any parts; do not modify product without approval |
| General information | Manual included; warranty and quality certificate provided; car sticker included |
Frequently Asked Questions - ISO BabyGO
User questions about ISO BabyGO
0 question about this device. Answer the ones you know or ask your own.
Ask a new question about this device
Download the instructions for your Car seat in PDF format for free! Find your manual ISO - BabyGO and take your electronic device back in hand. On this page are published all the documents necessary for the use of your device. ISO by BabyGO.
USER MANUAL ISO BabyGO
ASSEMBLY INSTRUCTIONS
LB-523 (group: 1,2,3) Certified according to ECE R44-04 with Certificate No.: 044 422 Body weight: 9 - 36kg
Thank you for buying this car child seat. Read this manual carefully before using the child seat. If you have questions regarding the use of this child seat, please contact us.
WARNING: DO NOT use a child safety seat in which the child facing backwards, sitting on a passenger seat with an airbag. This may result in SERIOUS INJURY TO DEATH.
NOTE
TO GROUP 1
- This is an „Universal“-ISOFIX-Child restraint system. It is approved by the regulation No. 44-04 including all attachments for general use in vehicles fitted with ISOFIX anchorage system. (See vehicle type list)
- This seat fits the vehicle with as ISOFIX positions approved positions (detailed in the vehicle handbook).
- This product is intended for the following weight classes and ISOFIX size classes: Group 1 (9-18kg); B
TO GROUP 2 + 3
- This is an „Universal“-Child restraint system. It is approved to Regulation No. 44-04 series of amendments, for general use in vehicles and it will fit most, but not all car seats.
- A correct fit is likely if the vehicle manufacturer has declared in the vehicle handbook that the vehicle is capable of accepting a „Universal“ child restraint for this age group.
- This child restraint has been classified as „Universal“ under more stringent conditions than those which applied to earlier designs which do not carry this notice.
- If in doubt, consult either child restraint manufacturer or the retailers.
IMPORTANT -
The child seat must be installed using ISOFIX anchorage and 3-point belt, approved to UN/ECE NO.16 Regulation or other equivalent standards.
EXTREME HAZARD
Do not use in passenger seats equipped with airbags (SRS).
1. Aufbau


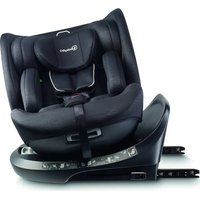
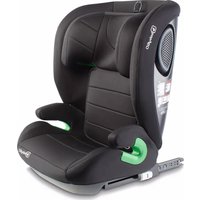
Car Seat + Isofix
2. Feature
- This product is called Restraining devices for child occupants of power-driven vehicles, commonly known as the child seat. Product appearance streamlined bionic design, elegant appearance.
- This product equips with advanced ISOFIX system, installed on the car seat using ISOFIX anchorage which is more convenience, more steady and safer.
This product also equips with the top tether which intended to limit the rotation of the restraint during a frontal impact.
- The headrest can be adjusted according to the children's height.
- This child seat can be used for children of 9-18kg in weight (approx. 9 months to 4 years), can only be installed with ISOFIX system.
- This child seat can be used without harness for children of 15 - 25kg in weight (approx. 3 years to 7 years), can be installed with 3-point belts.
3. Safety Warning
For your child's safety, please read these instructions carefully before use and keep them for future reference. Failure to follow the instructions contained in this manual could result in serious injury to your child.
- This child seat can only be used with the harness for children less than 18kg in weight ( group 1, 9-18kg).
- This child seat can be installed forward-facing using ISOFIX anchorage.
- For ISOFIX installation: Make sure you read the car manufacturer's handbook.
- This instruction manual can be retained in the special space of the child seat for its life period.
- Do not use this child seat in the home. It has not been designed for home use and should only be used in your car.
- Do not leave your child unattended in the seat at any time.
- It shall be recommended that the device should be replaced when it has been subject to violent stresses in an accident.
- For the reason of safety, the child seat must be fixed inside the vehicle using ISOFIX anchorage for group 1 and using 3-point belts for group 2, 3 even if you do not put your child inside the child seat.
- Any straps restraining the child should be adjusted to the child's body, and check that the straps shall not be twisted.
-
Ensuring that any straps is worn low down, so that the pelvis is firmly engaged, shall be stressed.
-
Any luggage or other objects liable to cause injuries in the event of a collision shall be properly secured.
- The rigid items and plastic parts of a child restraint must be so located and installed that they are not liable, as everyday use of the vehicle to become trapped by a moveable seat or in a door of the vehicle.
- To prevent from the risk of fall, your child should always be fastened.
- It is dangerous to make any alteration or additions to the device without the approval of the competent authority, and a danger of not following closely the installation instructions provided by the child restraint manufacturer.
- This child seat is designed for children from 9kg to 36kg. Never overload the child seat more than one child or with other loads.
- The child restraint must not be used without the cover.
- The seat cover should not be replaced with any other than the one recommended by the manufacturer, because the cover constitutes an integral part of the restraint performance.
- Before you adjust any movable or adjustable parts of your child seat, you must remove your baby from the child seat.
- The child seat should be kept away from sunlight if the seat is not provided with a textile, otherwise it may be too hot for the child's skin.
- Never use a second-hand product, as you can never be certain what was happened to it.
4. Usage
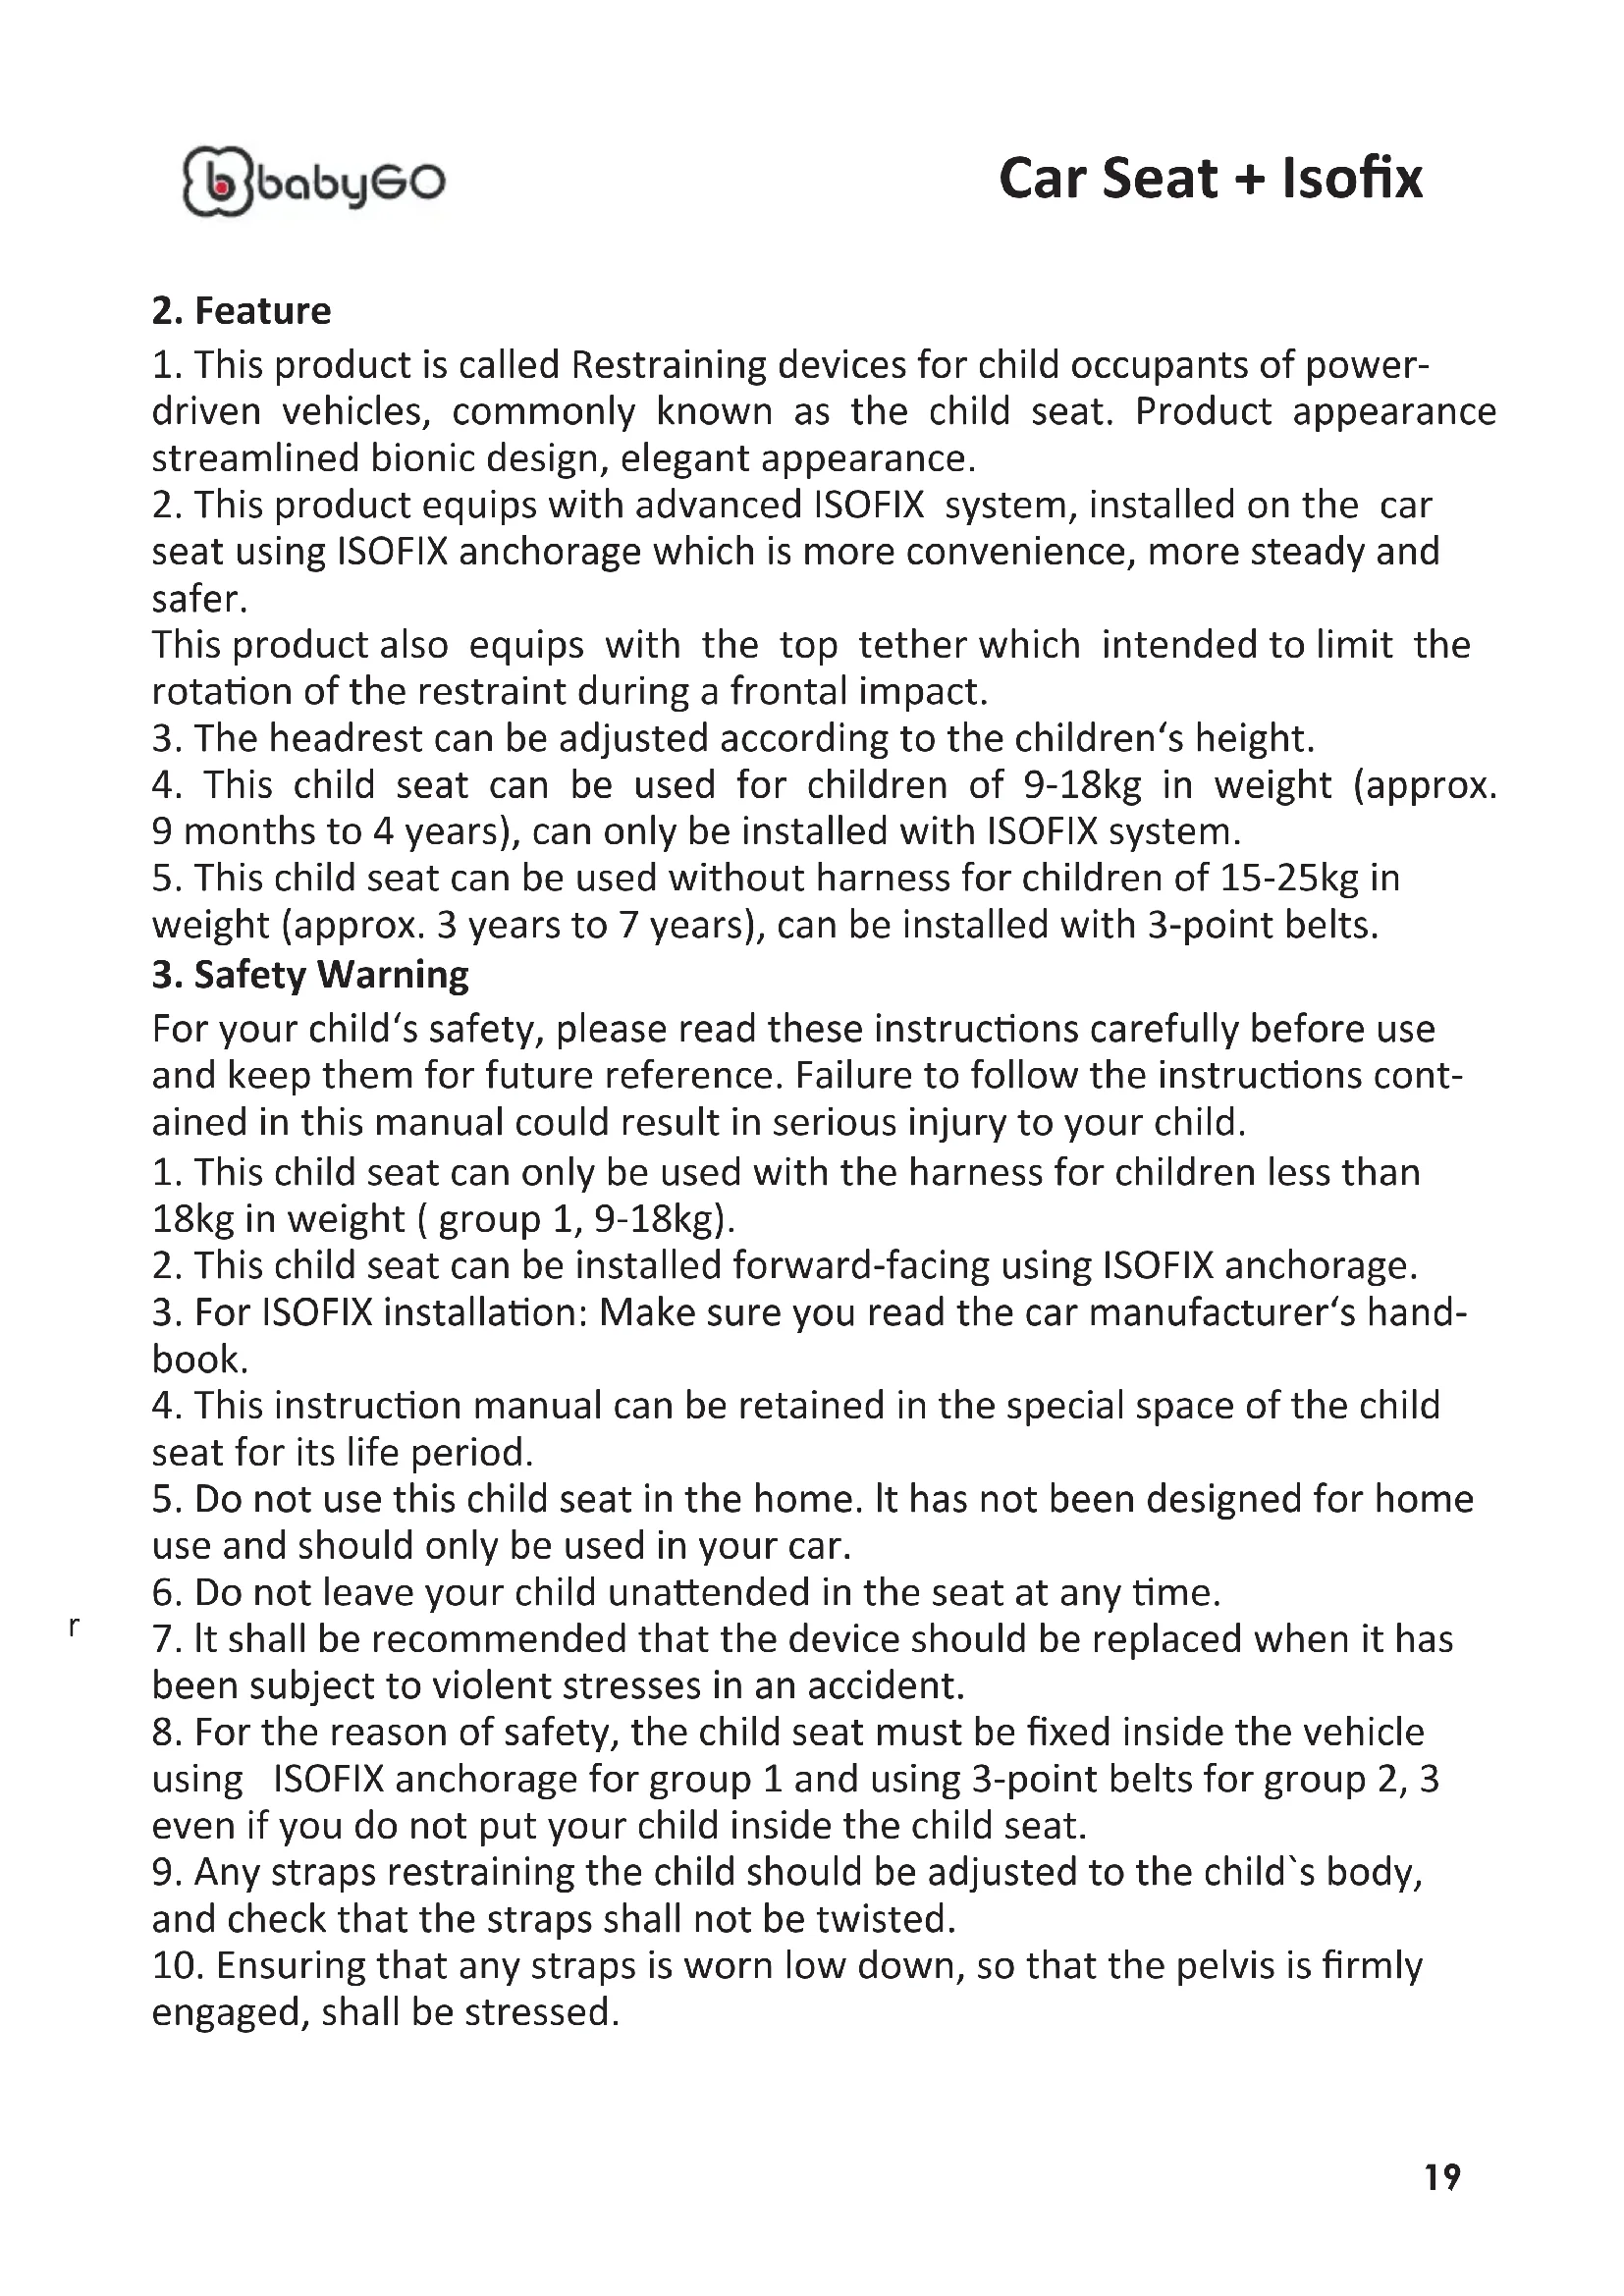
4.1 Install position of the child seat in vehicle

Correct fitting/suitable

This child seat is suitable for fixing into the seat positions of the cars equipped ISOFIX anchorage that are fitted in accordance with European standard (ECE R44 or equivalent-standard).
Important:
The child seat must be installed using ISOFIX anchorage for group 1 and using 3-point belts for group 2, 3.

use on this seat if ISOFIX anchorage is equipped.
4.2 Checking the shoulder strap height

Always check that the shoulder straps are at the correct height for your child. The child's shoulders should always be thread through the slots in the cover and seat shell that are closest to the top of your child's shoulders.
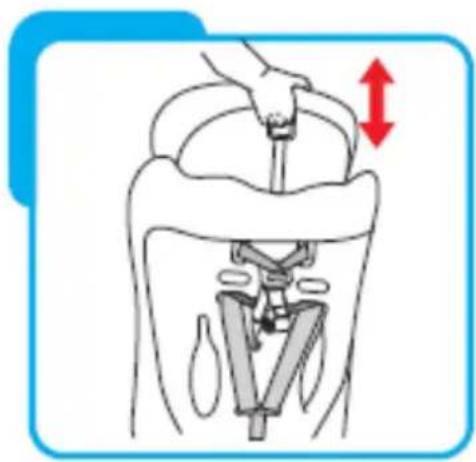
4.3 Wright usage of buckle

To use the buckle accurately, please proceed as follows:
Step 1: Put the two metal sections of the buckle connector together.
Step 2: Slot the two buckle connectors into the slot in the buckle until they "click" place.
Step 3: Check the harness is correctly locked by pulling the shoulder straps upwards.
To release the connectors, you can press the red button of the buckle downwards, the two metal sections will be pop up.
4.4 Adjust and use the harness

Loosen the harness

Tighten the harness
The harness is slackened by pressing the adjuster (under the seat cover) on the front of the seat.
Press down the adjuster as you grip the two shoulder straps with your another hand. Pull the shoulder straps towards you to loosen the harness.
Pull the shoulder straps upwards to remove the slack from the lap sections of the harness then pull the adjuster strap until the harness is fully tightened.
The harness should be adjusted as tightly as possible without being uncomfortable to your child.
A loose harness can be dangerous.
Check the harness adjuster and tighten each time the child is placed in the seat.
4.5 Adjust the headrest height
The headrest can be adjusted for 5 positions to fit for different height of children. As the picture shows, lift the red handle up, meanwhile adjust the headrest up and down to change the height.
Important: Check to make sure the headrest is securely locked in the desired position by pulling or pressing it.
4.6 Changing the shoulder strap height
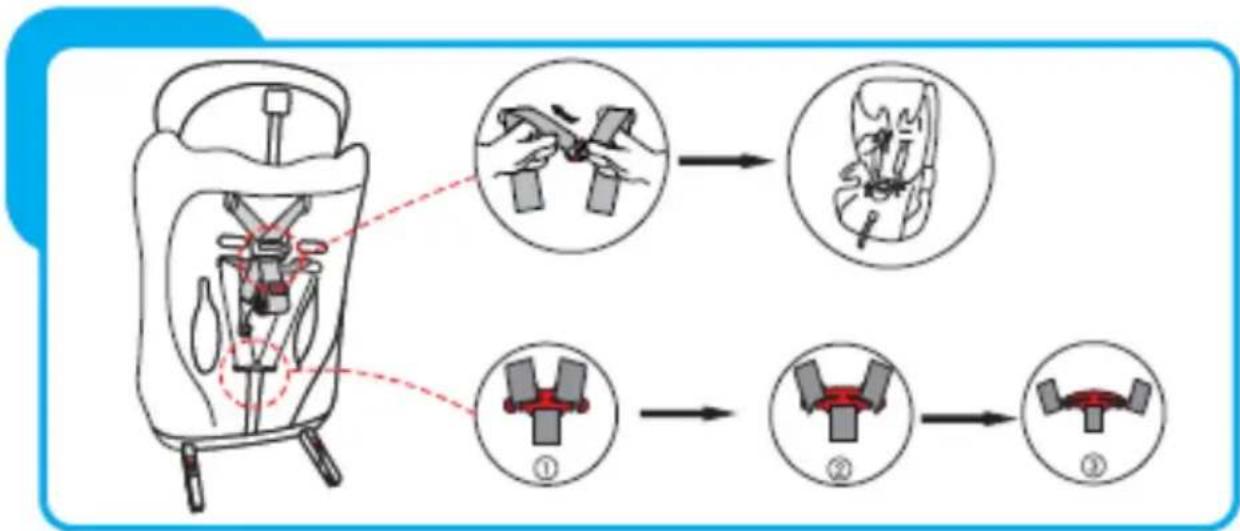
Step 1: Remove the shoulder straps from the harness connector according the picture(1), (2), (3) above and remove the shoulder strap cap, then you can adjust the shoulder straps.
Step 2: From the front of the seat, pull it through the slot in the seat's backrest and fabric cover. Thread the harness strap back through the next hole up or down on the seat's backrest.
Step 3: Re-thread the harness strap back onto the harness connector at the back of the seat.
Step 4: Repeat the same process for the other harness strap. Make sure both of the straps go through slots at the same height.
4.7 Adjust the ISOFIX attachments

Firstly, pull the red handle of the child seat outside while another hand drag the attachments of the ISOFIX. Then ISOFIX attachments will be pulled out. If you want to retract the ISOFIX attachments, just pull the red handle meanwhile another hand push the ISOFIX attachments inside.
4.8 Installation of the ISOFIX attachments

Step 1: Pull the ISOFIX attachments outside, then latch both of the ISOFIX attachments with the corresponding ISOFIX lower anchorages. When you hear a „click“ it means that the ISOFIX attachments and the ISOFIX lower anchorages are all latched completely. Meanwhile the ISOFIX latching indication shows GREEN (see picture).
Step 2: You can lift the ISOFIX adjuster handle up again and push the child seat towards the car seat backrest until it is firmly pressed against the car seat backrest. Now the installation of the ISOFIX base is finished.
Step 3: If you want to release the ISOFIX attachments, just need to pull out the ISOFIX adjuster handle meanwhile pull the child seat outside, then push the ISOFIX release button (see picture).
4.9 Installation of the Top Tether

Guide the Top Tether through the middle of the headrest
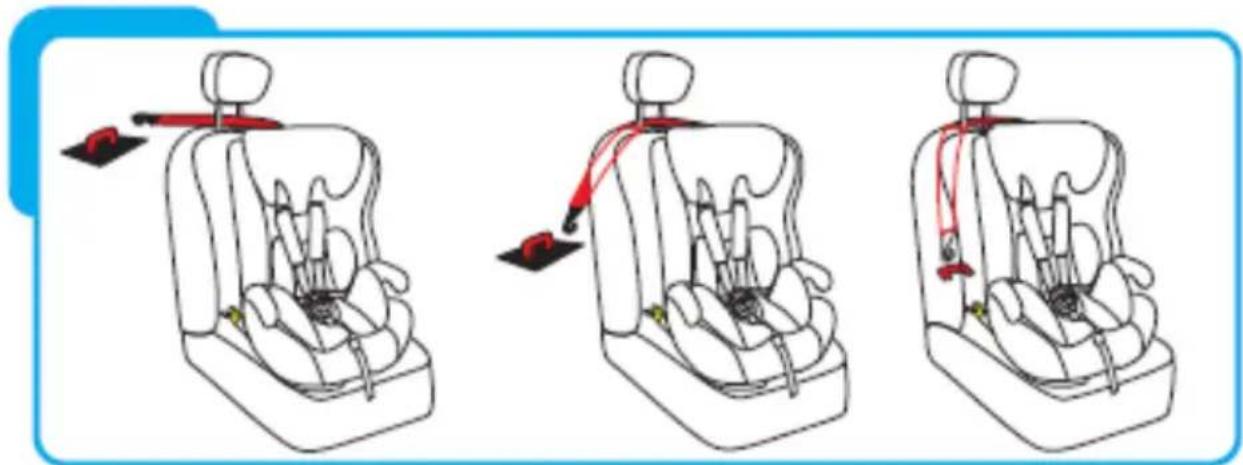
Hook the snap hook into the Top Tether anchoring point recommended in your vehicle owner's guide.

Tension the strap of the Top Tether until the tension indicator turns green and the Top Tether is tightly tensioned.
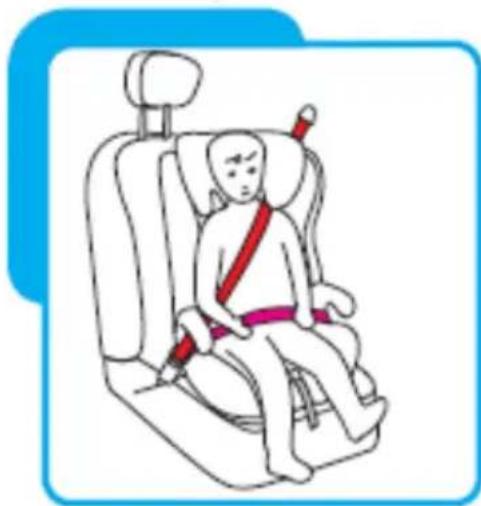
5. Installation of the child seat for children Group 1 (9-18kg)

This child seat can be installed forward-facing using ISOFIX anchorage for children with 9-18kg weight (group 1).
Step 1: Install the ISOFIX of the child seat into the car seat. Please refer to the details in 4.7 / 4.8 / 4.9 . Make sure the ISOFIX latching indication shows GREEN. Then push the ISOFIX base towards the car seat backrest until it is firmly pressed against the car seat backrest.
Schritt 2: Place your child into the child seat. Check the height of the shoulder straps on the correct position and fasten the buckle.
Check that the harness has not become twisted and also check that the cover is not impeding the movement or fit of the harness in any way. To disassemble the child seat, repeat the above prescribed procedures in reverse order.
5.1 Installation of the child seat for group 2/3 (15 - 36 kg).
This child seat used without harnesses is provided for children weighing 15 - 36 kg (about 3 years to 11 years old). It must be attached with a 3-point belt.
5.1.1 Conceal the harness and buckle

Step 1: Loosen the buckle, remove the comfortable cushion and crotch pad, then place the buckle through the slots of the base cover in the corresponding position. Step 2: Please refer to the details in 4.6, hide the harness into the cover inside. Meanwhile place the metal sections of the buckle in the corresponding position of backrest.
5.1.2 Fitting the child seat with the 3-point belts
Step 1: Place the child seat on the car seat. Make sure that the backrest of the child seat is firmly pressed against the car seat backrest.
Step 2: Clip the diagonal belt into the belt guide hook of the backrest. Thread the lap belt through the two belt guides of the child seat base. Make sure the tip of the belt guide hooks point to the red label.
Step 3: Insert diagonal belt and lap belt into car seat belt buckle, until you hear a „click“. Check
the car seat belt buckle is correctly locked by pulling the seat belt upwards.
6. Maintenance and cleaning
6.1 Daily maintenance
- In daily use, check periodically the child seat. The child seat should be replaced after an accident.
- Please keep this child seat in dry and ventilated place to avoid damp moldy.
3.If the child seat becomes dusty, clean the seat belt and the plastic pieces by swiping them with a damp sponge and let it dry under dry ambiance. - If food or drink drop accidentally on the buckle, disassemble the seat belt from the child seat and rinse it gently by warm water. Leave it dry under dry ambiance.
- For cleaning the entire child seat fabric cover, please refer to the 6.2 Washing instructions
6.2 Washing instructions
Never use any solvent, chemical detergent or lubricant on any part of your child seat.

Hand wash, water temperature below 30^

Do not bleach

Dryclean, any solvent except Trichloroethylen

Do not tumble dry
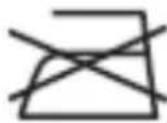
Do not iron
6.3 Remove and assemble the fabric cover
- Firstly, conceal the harness and buckle of the child seat (see page 10, 5.1.1).
- Open the zip on the headrest and remove the headrest cover. Tear the velcros of the backrest cover open and then remove the backrest cover. To assemble the fabric cover of the child seat, repeat the above prescribed procedures in reverse order.
7. The main technical parameters
Distance from front to back of the seat: 480mm
Distance from left to right of the seat: 480mm
Height of the seat: 710 mm
Weight of the seat: 7,8kg


8. Packing list
| Name Child seat Assembly Instructions | Warranty card | Certificate of Quality | Car sticker | |
| Quantity 1 1 1 1 1 | ||||