
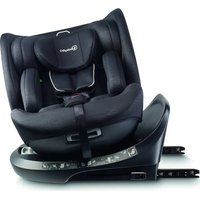
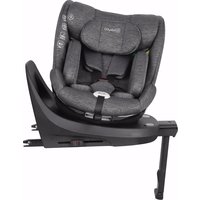
Nova2 - Car seat BabyGO - Free user manual and instructions
Find the device manual for free Nova2 BabyGO in PDF.

| Brand | BabyGO |
| Model | Nova2 |
| Category | Car seat |
| Product type | i-Size convertible car seat |
| Approval | UN Regulation No. 129 (i-Size) |
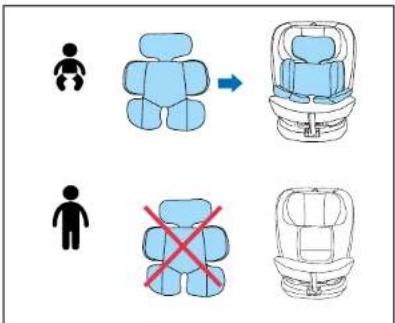
| Use | Rear-facing (40-105 cm), Forward-facing (76-105 cm) and booster (100-150 cm) |
| Installation | ISOFIX + Top Tether + harness (rear/forward); ISOFIX + 3-point belt or belt alone (booster) |
| Child height | From 40 cm to 150 cm (from birth to approx. 12 years) |
| Orientation | Reversible (rear/forward facing) |
| Rotation | 360° (with rotation handle) |
| Recline | Multiple positions (recline lever) |
| Harness | 5-point height adjustable |
| Headrest | Height adjustable (adjustment button) |
| Reduced cushion insert | Yes, for newborn (40-75 cm) |
| Top Tether system | Yes, with hook |
| ISOFIX connectors | Yes, with release buttons |
| Cover material | Machine washable at 30°C |
| Cleaning | Neutral detergent and warm water; do not bleach |
| Safety | Front airbag must be deactivated for rear-facing |
| Replacement after accident | Mandatory |
| Seat weight | Approximately 10 kg |
| Dimensions (L x W x H) | Approximately 45 x 55 x 65 cm |
| Included accessories | Reduced cushion insert, belt guide, shoulder strap covers |
Frequently Asked Questions - Nova2 BabyGO
User questions about Nova2 BabyGO
0 question about this device. Answer the ones you know or ask your own.
Ask a new question about this device
Download the instructions for your Car seat in PDF format for free! Find your manual Nova2 - BabyGO and take your electronic device back in hand. On this page are published all the documents necessary for the use of your device. Nova2 by BabyGO.
USER MANUAL Nova2 BabyGO
ASSEMBLY INSTRUCTIONS
Siège auto
INSTRUCTIONS DE MONTAGE
Autosedadlo
NÁVOD K MONTÁŽI
WICHTIG:
natural_image
Line drawing of a car comfort seat assembly (no text or symbols)natural_image
Diagram of a car seatbelt with two blue dots indicating specific points (no text or symbols present)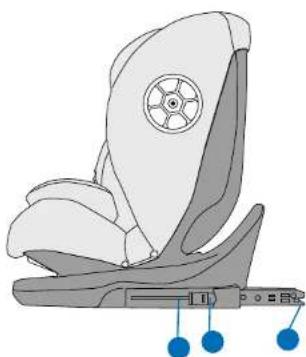
natural_image
Illustration of a car seat with blue buttons and a circular emblem on the seat (no text or symbols)M. Oberer Haltegurt
N. Oberer Haken
O. ISOFIX-Befestigung
P. ISOFIX Freigabetaste 1
Q. ISOFIX Freigabetaste 2
NOVA 2

babyGO

Schultergurt

Beckengurt
natural_image
Illustration of hands holding keys with arrows indicating movement (no text or symbols)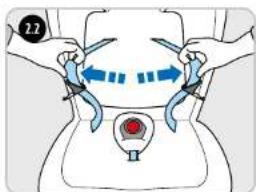
natural_image
Illustration of a child seated in a car seat with a red belt and blue arrows indicating motion or pressure (no text or symbols)
natural_image
Illustration of a baby wearing a seatbelt with a hand adjusting the seatbelt (no text or symbols present)

babyGO
NOVA 2
NOVA 2
NACH VORN GERICHTETE INSTALLATION 76-105CM

babyGO
OBEREN HALTEGURT UND GURTSYSTEM
INSTALLIEREN

NOVA 2
NACH VORN GERICHTETE INSTALLATION
100-150 CM
natural_image
Simple line drawing showing a car icon moving right and a red car seat with a red logo (no text or symbols)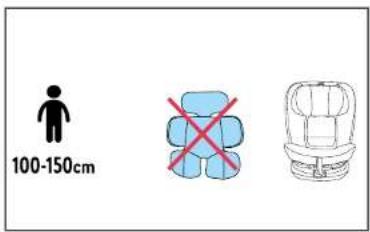

babyGO
3-PUNKT-SICHERHEITSGURT INSTALLIEREN

NOVA 2
NACH VORN GERICHTETE INSTALLATION MIT 3-PUNKT-SICHERHEITSGURT 100-150 CM

babyGO
3-PUNKT-SICHERHEITSGURT INSTALLIEREN

NOVA 2
WARTUNG
natural_image
Line drawing of a car comfort seat assembly (no text or symbols)EN INSTRUCTION MANUAL
Dear Parents:
Thank you for purchasing the Car Seat.
Please read and follow all instructions before using the Car Seat.
WARNING! Read the Instruction carefully before use and keep them for future reference.
NOVA 2
IMPORTANT
READ CAREFULLY AND KEEP THESE INSTRUCTIONS FOR FUTURE REFERENCE
As part of the continuous improvement process for our service, we regularly review all the instruction manuals for our child car seats.
If you have any question on the use or installation of the seat while reading the manual, please consult our website, in the pertinent section for the seat, where you will find its most-recently updated version. If you need further clarification on this or any other matter, please contact our customer service by giving us a call or via our website.

babyGO
SAFETY INSTRUCTIONS
READ CAREFULLY AND KEEP THESE INSTRUCTIONS FOR FUTURE REFERENCE
- Used as I-Size category ECRS: This Is an I-Size Enhanced Child Restraint System. It is approved according to UN Regulation No.129, for use in, i-Size compatible vehicle seating positions as indicated by vehicle manufacturers in the vehicle users' manual. If in doubt, consult either the Enhanced Child Restraint System manufacturer or the retailer.
- Used as I-Size booster cushion category ECRS: This is an I-Size booster seat Enhanced Child Restraint System. It is approved according to UN Regulation No. 129, for use primarily in "I-Size seating positions" as indicated by vehicle manufacturers in the vehicle user's manual. If in doubt, consult either the Enhanced Child Restraint System manufacturer or the retailer.
- "IMPORTANT - DO NOT USE FORWARD FACING BEFORE THE CHILD'S AGE EXCEEDS 15MONTHS (Refer to Instruction)".
- Do not use the ECRS in seating positions where there is an active frontal airbag installed.
- The rigid items and plastic parts of an ECRS shall be located and installed so that they are not liable to become trapped by a movable seat or in a door of the vehicle during everyday use of the vehicle.
- Any straps holding the restraint to the vehicle should be tight, any support-leg should be in contact with the vehicle floor, any straps or impact shields restraining the child should be adjusted to the child's body, and straps should not be twisted.
- It is important to ensure that any lap strap is worn low down.
- The ECRS should be replaced when it has been subject to violent stresses in an accident.
- It is danger to make any alterations or additions to the device without the approval of the Type Approval Authority, and it is also danger of not following closely the installation instructions provided by the child restraint manufacturer.
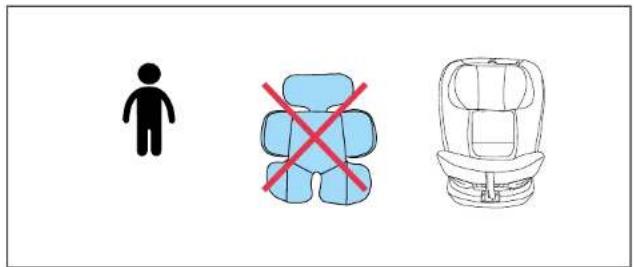
- Be sure that children are not left in their ECRS unattended.
- Be sure that any luggage or other objects liable to cause injuries in the event of a collision shall be properly secured.
- Be sure that the Enhanced Child Restraint System shall not be used without the cover.
NOVA 2
- Be sure that the ECRS cover should not be replaced with any other than the one recommended by the manufacturer, because the cover constitutes an integral part of the restraint performance.
- Be referred to the vehicle manufacturer's handbook for the use of an "i-Size ECRS".
- The child restraint may not fit in all approved vehicles when used in stature range above 135 cm.
- The child restraint may not fit in all approved vehicles when used in one of all angles of inclination positions.
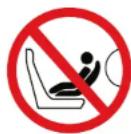
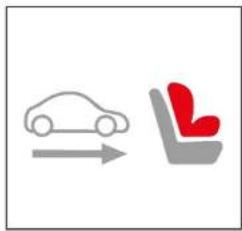
IF THE CAR IS EQUIPPED WITH AN ACTIVE PASSENGER FRONT SEAT AIRBAG, THE CHILD MUST NEVER BE PLACED IN A REAR-FACING SEAT IN THE FRONT OF THE CAR.

babyGO
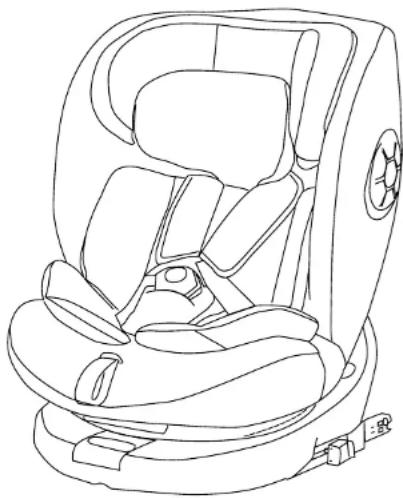
EACH COMPONENT
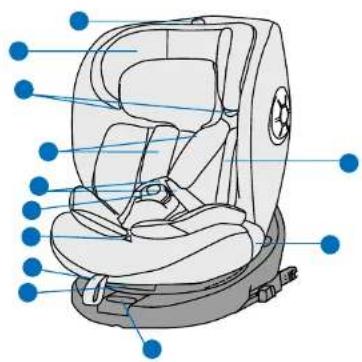
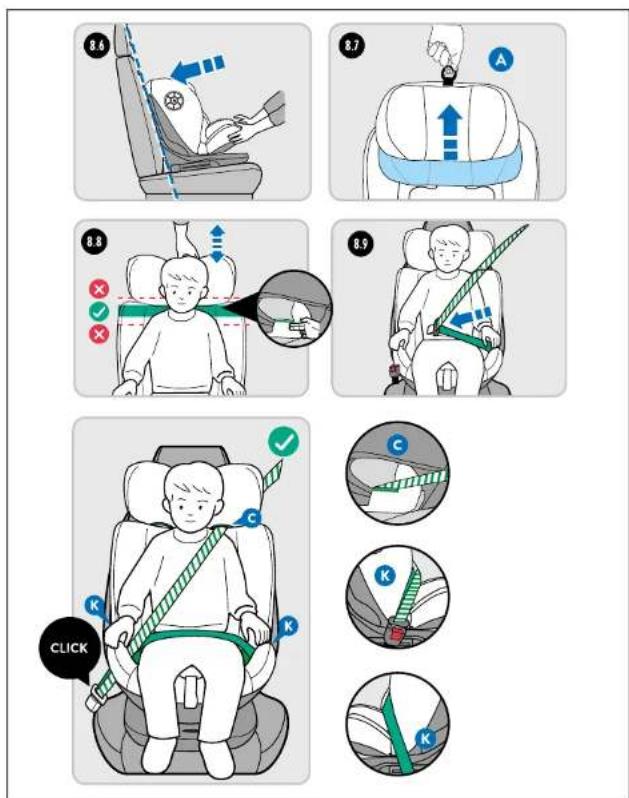
A. Headrest height adjuster
B. Headrest
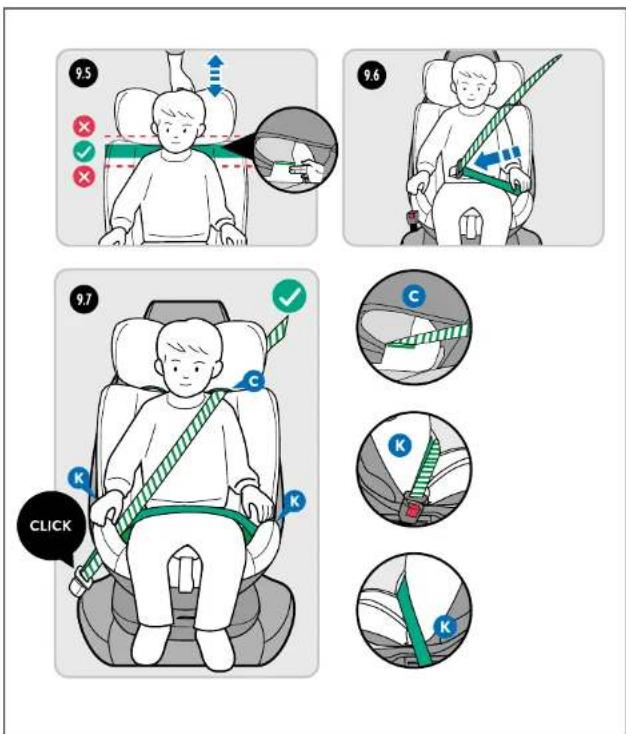
C. Shoulder belt guide (100-150 cm)
D. Shoulder belt pad
E. Harness straps
F. Harness buckle
G. Recline lever
H. Harness adjustment button
1. Harness adjustment strap
1. Rotation handle
K. Lab belt guide
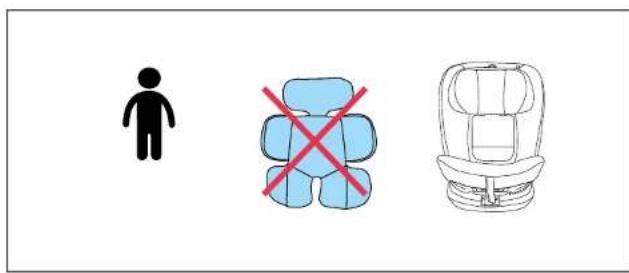
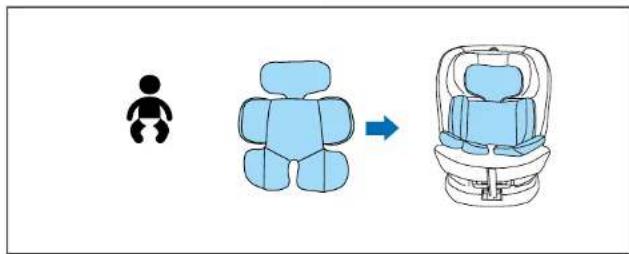
L. Small baby insert cushion

natural_image
Diagram of a car seatbelt with two blue dots indicating specific points (no text or symbols present)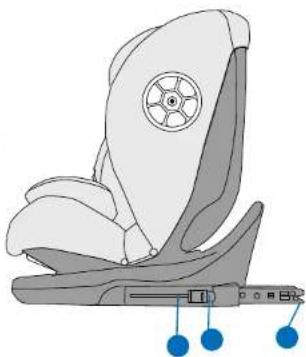
natural_image
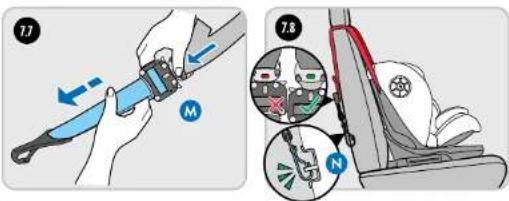
Illustration of a car seat with blue buttons and a circular emblem on the seat (no text or symbols)M. Top Tether system
N. Top tether hook
O. ISOFIX connector
P. ISOFIX system unlock button 1
Q. ISOFIX system unlock button 2
NOVA 2

babyGO
NOVA 2
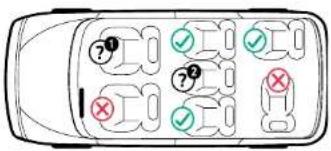
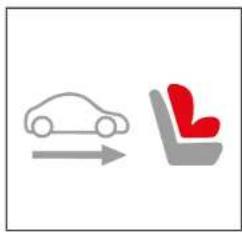
Notice for the vehicle use

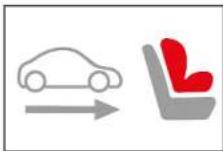
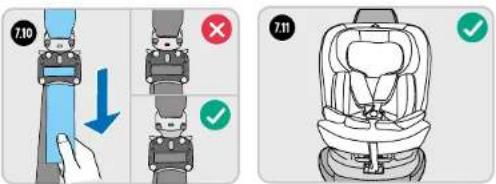
Correct installation /Suitable

Wrong installation /Unsuitable
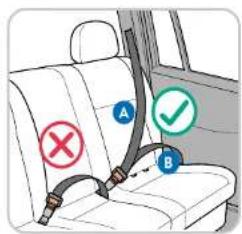


Shoulder Belt

Lab Belt
In seats with: ISOFIX anchorages and Top Tether anchor points and 3-point belt (car's seat belt).
Only suitable for seats with a 3 point safety belt. shoulder belt (A) and lab belt (B).

Baby car seat ISOFIX attachment
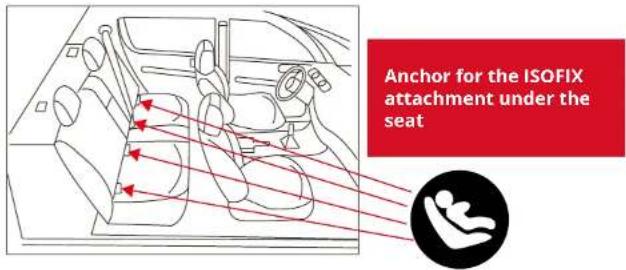
NOTICE: Read the car manual first and check whether the car seat is equipped with ISOFIX attachment fixed anchor points, and check the size of recommended ISOFIX attachment constraints on the system if it is matched our ISOFIX attachment size.
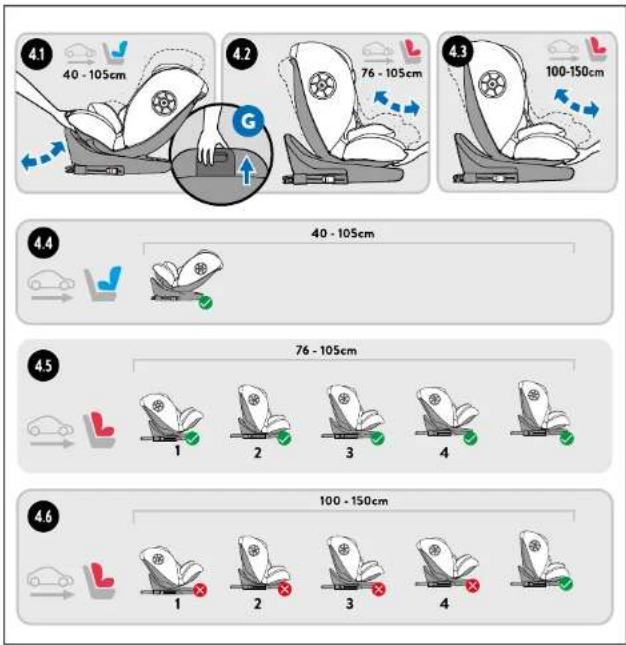
| facing direction | Height | Installation method | Category |
| rearward facing | 40-105cm | ISOFIX+top-tether+harness system | i-Size |
| forward facing | 76-105cm | ISOFIX+top-tether +harness system | i-Size |
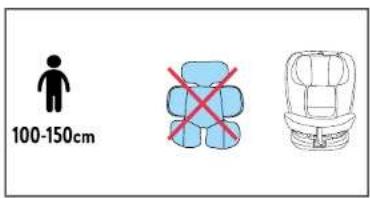
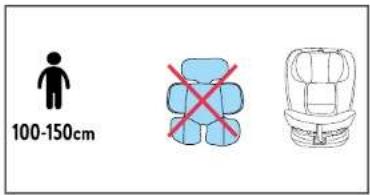
| forward facing | 100-150cm | Method 1: ISOFIX+3- point safety beltMethod 2: 3-point safety belt | i-Size booster seat |

babyGO
NOVA 2
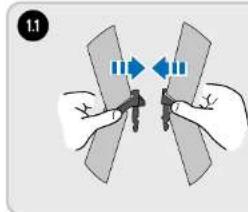
ASSEMBLY STEP
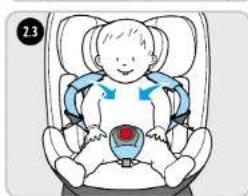
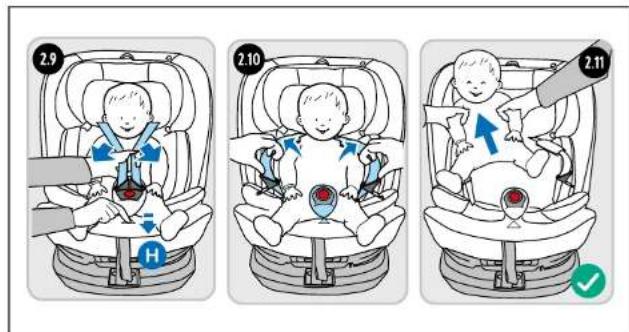
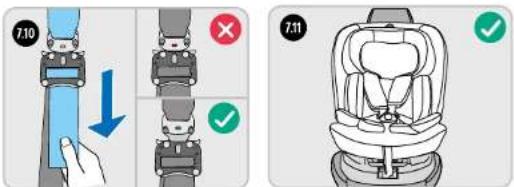
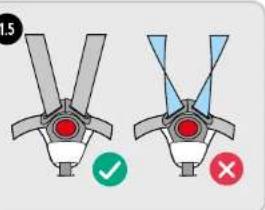
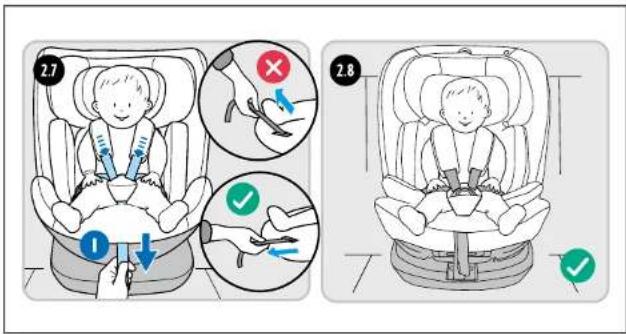
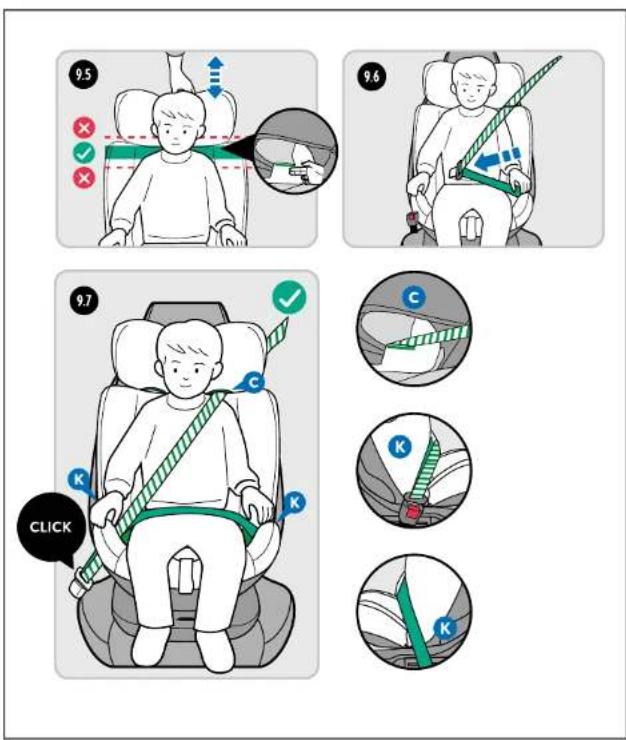
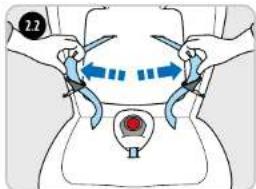
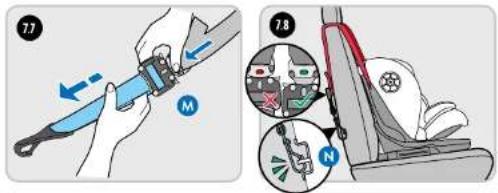
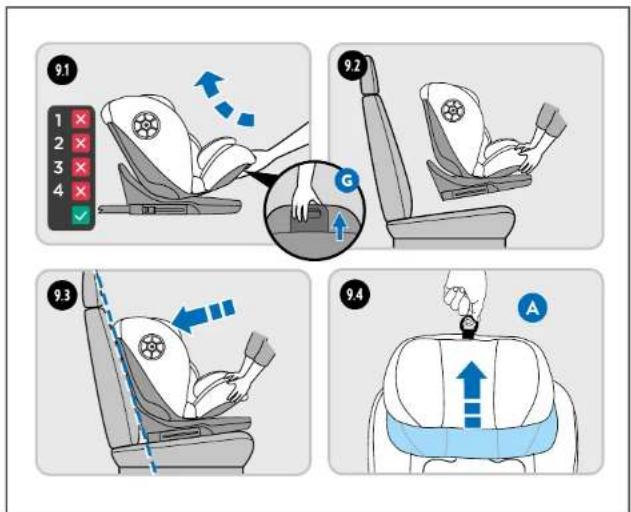
THE USAGE OF BUCKLE ADJUST THE SAFETY BELT
natural_image
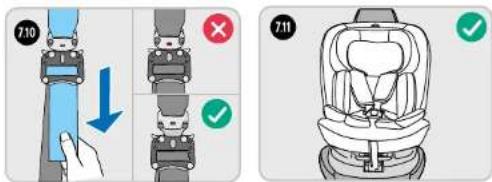
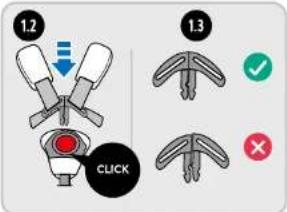
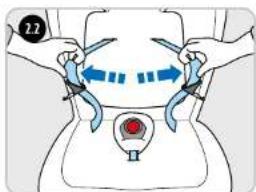
Illustration of two hands holding a tool with arrows indicating movement or force (no text or symbols)- Close the left and right latches of the buckle (as shown in Figure 1.1) and ensure that the concave and convex structures of the left and right latches are closed
-
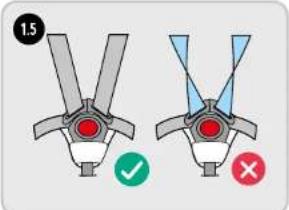
Close the left and right latches without leaving a gap. Keep the latches facing up. (figure 1.3)
-
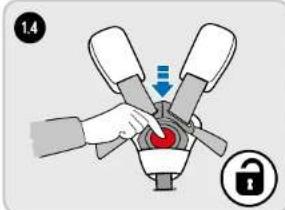
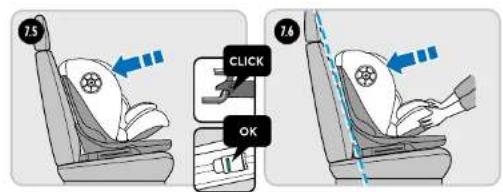
Insert the closed latches into the slot of the buckle. (figure 1.2) If you hear "click" sound, it means that the buckle has been fastened.
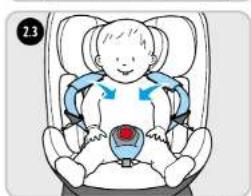
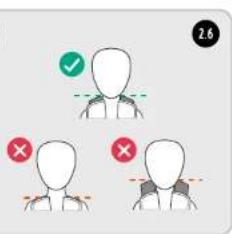
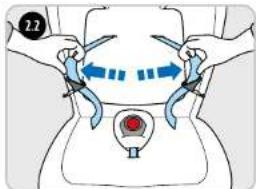
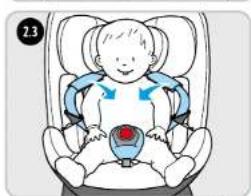
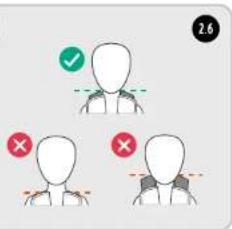
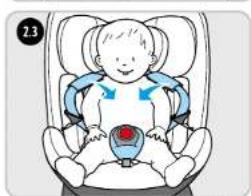
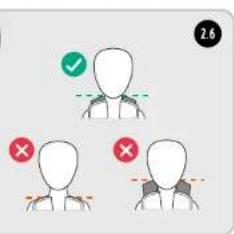
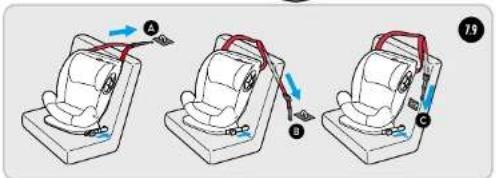
Adjust the length of the harness. The straps should be level with the child's shoulders.

natural_image
Illustration of a baby seated in a car seat with a red belt and blue buttons, no text or symbols present.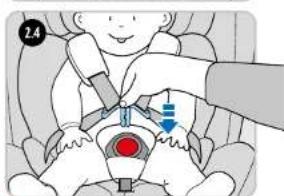
natural_image
Illustration of a baby in a car seatbelt with a hand adjusting the seatbelt (no text or symbols)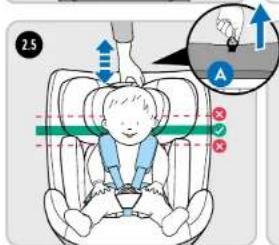


babyGO
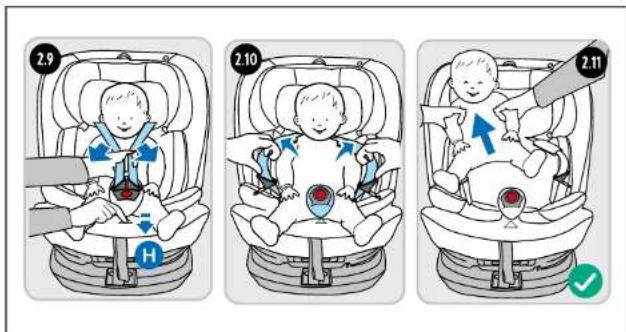
ADJUST THE SAFETY BELT
REMOVE THE SAFETY BELT
NOVA 2
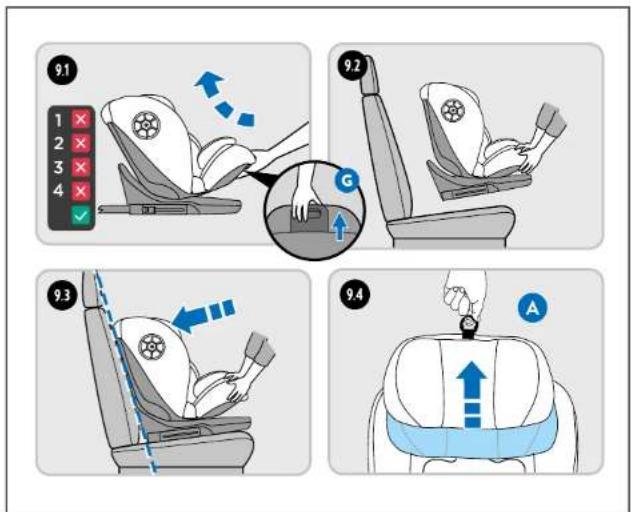
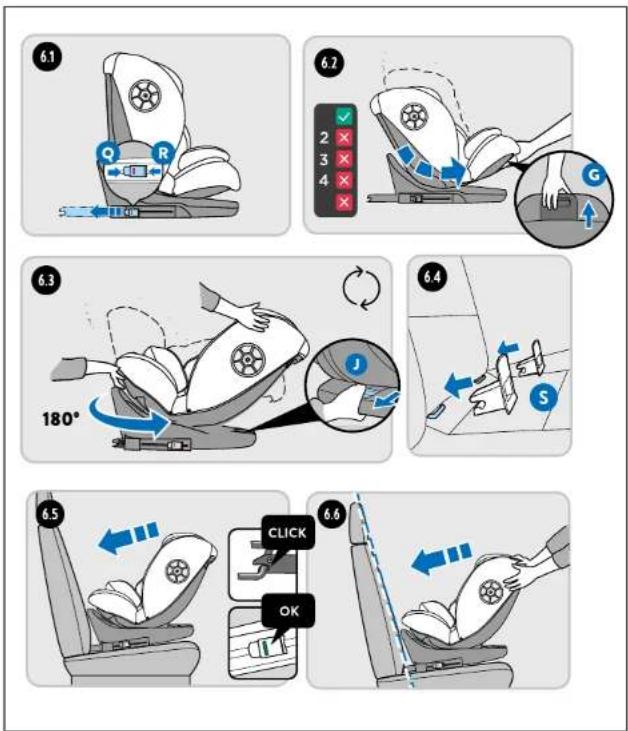
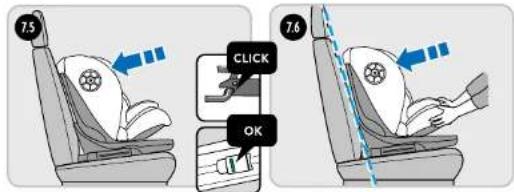
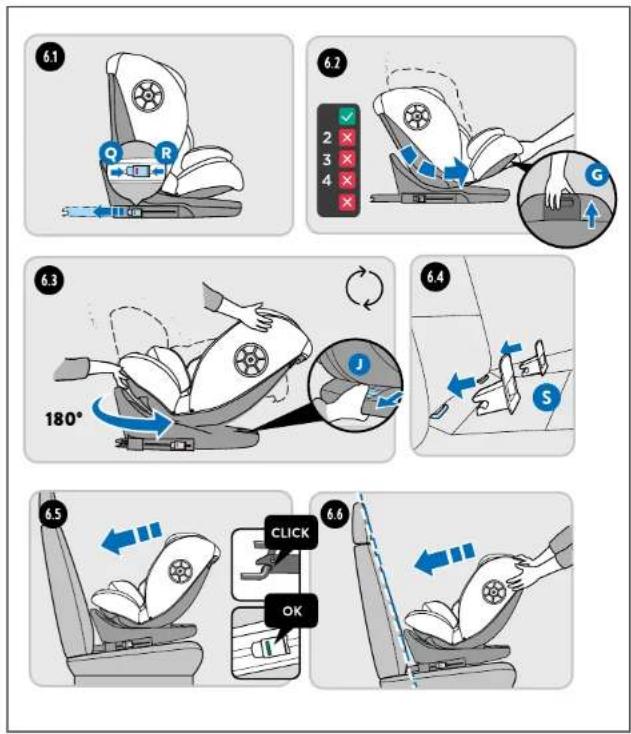
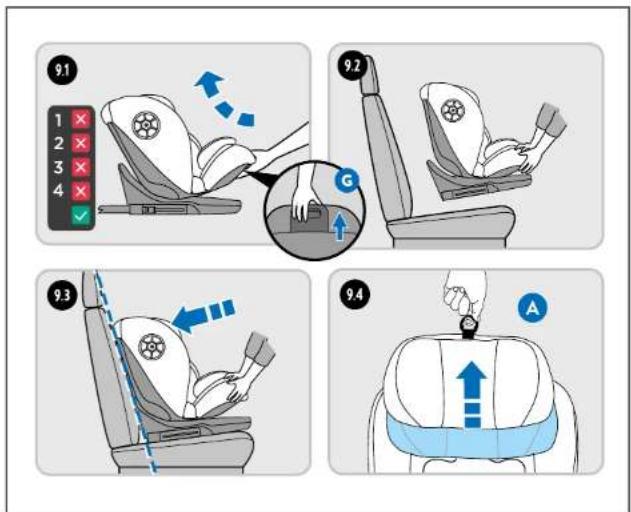
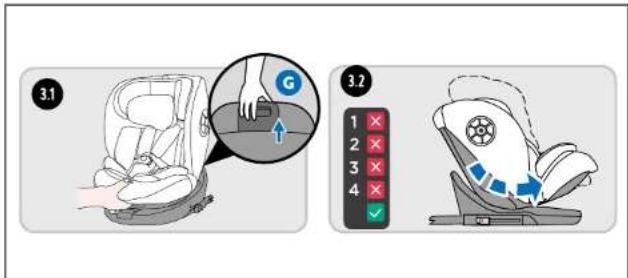
ROTATE THE SEAT

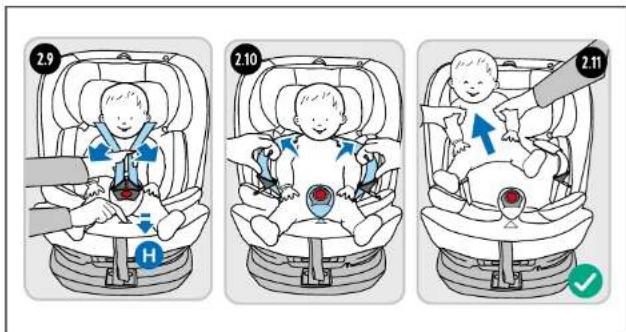
- Pull the recline lever(G) located at the base of the seat, and fully recline the seat (position 5).
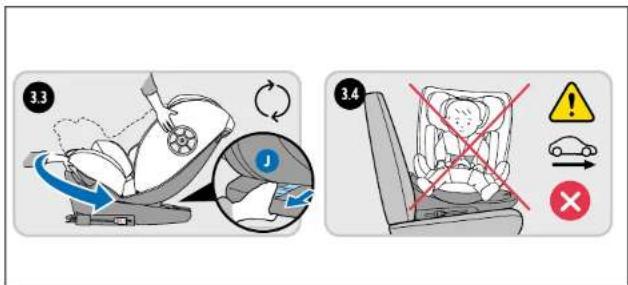
- Press the rotation handle (J) while turning the seat to face rearward or forward.

babyGO
ADJUST THE ANGLE RECLINING OF CAR SEAT
- Pull the lever (G) and move the seat to select one of the recline positions available for your child's group/weight.
NOVA 2
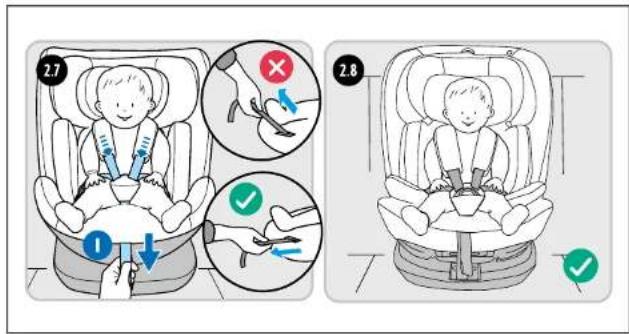
HIDE THE 5-POINT HARNESS AND BUCKLE
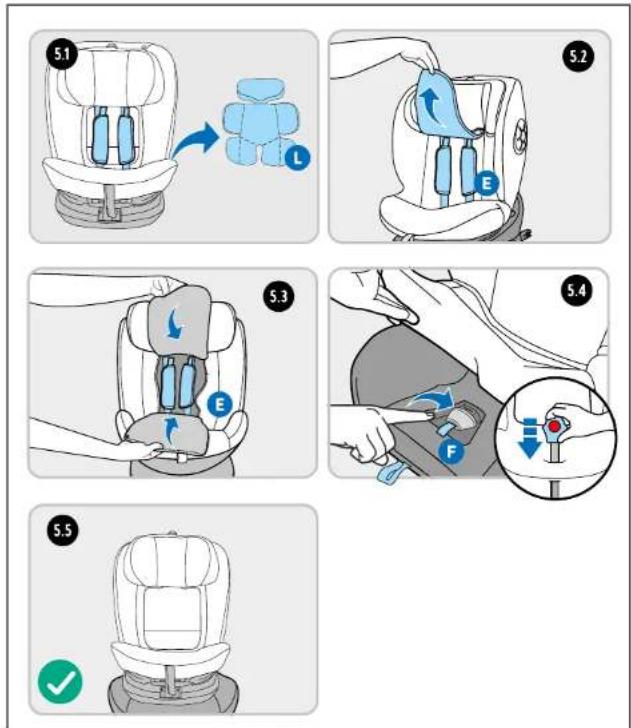
- Remove small baby insert cushion (L) Hide the harness straps (E) in the backrest, and the buckle (F) in the base of the seat preparing it for 100-150 cm in height.


babyGO
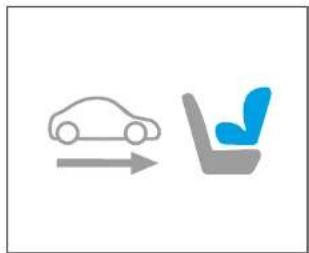
40-105 CM REARWARD-FACING INSTALLATION
natural_image
Simple line icons showing a car and a blue car seat, with no text or symbols present.Note: When the height of baby is 40-75cm, please use the newborn baby's cushion.

NOVA 2
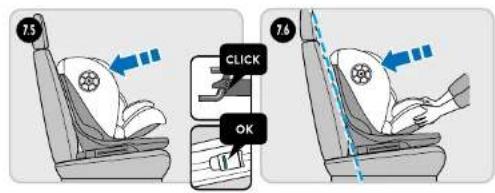
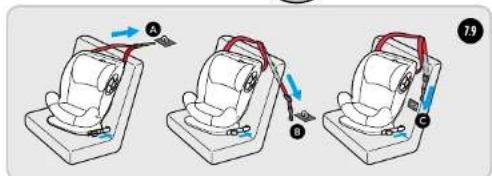
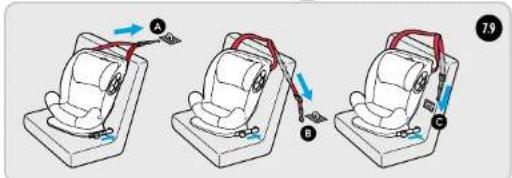
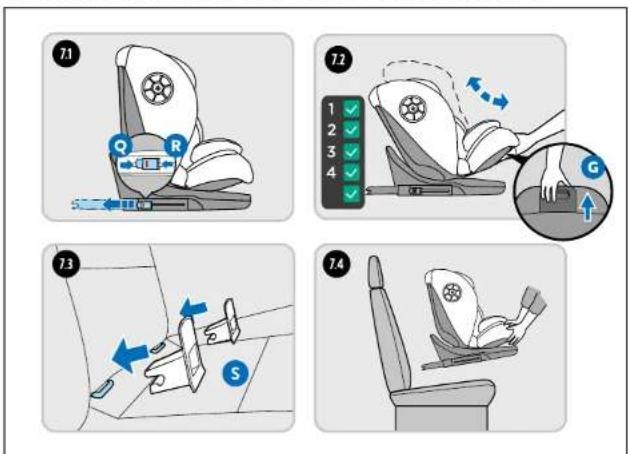
INSTALL ISOFIX ATTACHMENT
- ECRS will turn to gear R for rear facing used.

babyGO
INSTALL TOP TETHER AND HARNESS SYSTEM

NOVA 2
76-105 CM FORWARD-FACING INSTALLATION
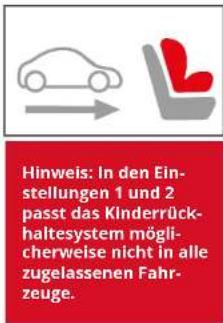
Remark: the child restraint may not fit in all approved vehicles when used in gear 1 and 2.
INSTALLING ISOFIX ATTACHMENT


babyGO
INSTALL TOP TETHER AND HARNESS SYSTEM
NOVA 2
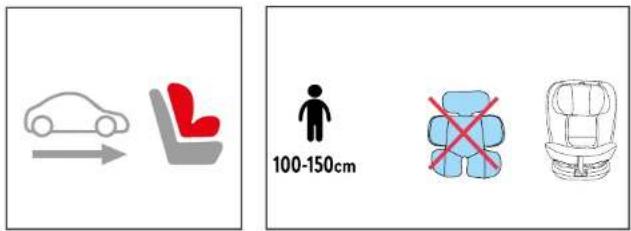
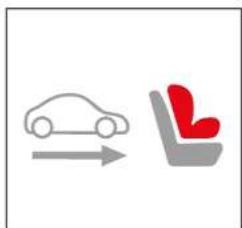
100-150 CM FORWARD-FACING INSTALLATION
natural_image
Simple line drawing showing a car icon moving right and sitting on a chair, with no text or symbols present.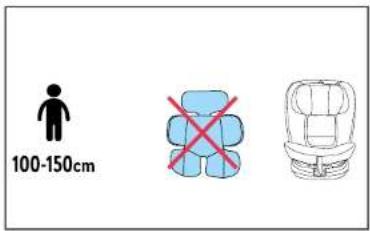
INSTALLING ISOFIX ATTACHMENT


babyGO
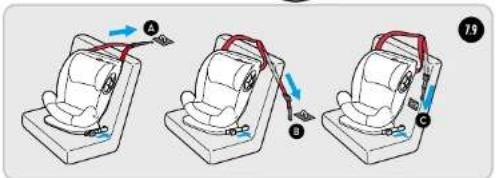
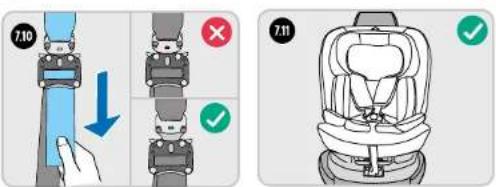
INSTALL 3 POINT SAFETY BELT
NOVA 2
100-150 CM FORWARD-FACING 3 POINT SAFETY BELT INSTALLATION


babyGO
INSTALL 3 POINT SAFETY BELT

NOVA 2
MAINTENANCE
- Clean straps and plastic parts with a neutral detergent and warm water.
- Make sure soap does not enter the buckle or other metal parts.
- Do not use chemical products or bleach on any part of the seat.
- The reducer cushion can be washed, just like the cover, but first remove the foam pieces inside before washing. The inside foam pieces should never be washed for any reason.
WASHING INSTRUCTIONS:

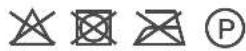
• The cover is removable and can be washed at 30°. Air dry.
- For dry cleaning use any solvent except trichloroethylene.
• Machine wash on cold cycle.
- Do not use a drier.
- Do not bleach.
- Do not iron.

babyGO
natural_image
Line drawing of a car comfort seat assembly (no text or symbols)FR
MANUEL D'INSTRUCTIONS
Chers parents :
natural_image
Interior view of a car seat with visible seatbelt and seatbelt bands (no text or symbols)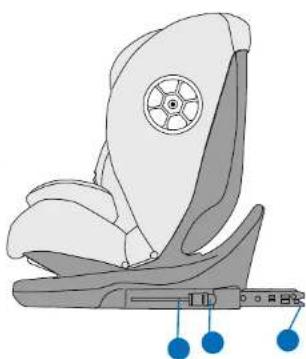
natural_image
Illustration of a car seat with blue buttons and a circular headrest (no text or symbols)
Ceinture diagonale

1.5
natural_image
Illustration of a child seated in a car seat with a red belt and blue arrows indicating motion (no text or symbols)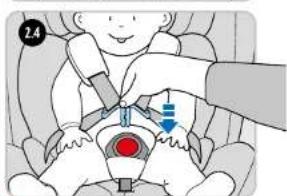
natural_image
Illustration of a baby wearing a seatbelt with a hand adjusting the seatbelt (no text or symbols present)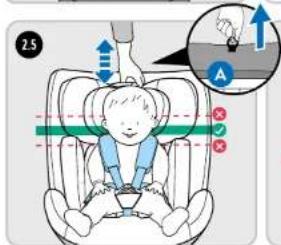

babyGO
RÉGLAGE DE LA CEINTURE DE SÉCURITÉ
RETRAIT DE LA CEINTURE DE SÉCURITÉ
NOVA 2
ROTATION DU SIÈGE


NOVA 2
INSTALLATION DU SYSTÈME D'ANCRAGE ISOFIX
INSTALLATION DU SYSTÈME D'ANCRAGE ISOFIX


babyGO
INSTALLATION DU SYSTÈME TOP TETHER ET DU HARNAIS


NOVA 2
INSTALLATION FACE À LA ROUTE POUR LES CATÉGORIES DE TAILLE DE 100-150 CM

INSTALLATION DU SYSTÈME D'ANCRAGE ISOFIX


babyGO
INSTALLATION DE LA CEINTURE DE SÉCURITÉ À 3 POINTS

NOVA 2
INSTALLATION DE LA CEINTURE DE SÉCURITÉ À 3 POINTS FACE À LA ROUTE POUR LES CATÉGORIES DE TAILLE DE 100-150 CM

natural_image
Simple diagram showing a car icon pointing right to a red car seat (no text or symbols)

babyGO
INSTALLATION DE LA CEINTURE DE SÉCURITÉ À 3 POINTS
NOVA 2
ENTRETIEN
natural_image
Line drawing of a car comfort seat assembly (no text or symbols)SZE
NÁVOD K POUŽITÍ
Drazí rodiče:
natural_image
Illustration of two car seatbelt covers with blue connectors and labels (no text or symbols present)
Šikmý pás

Podbřišní pás
V sedačkách s:
1.5
natural_image
Illustration of a child seated in a car seat with a red belt and blue arrows indicating motion or pressure (no text or symbols)
natural_image
Illustration of a baby wearing a seatbelt with a hand adjusting the seatbelt (no text or symbols present)

babyGO
NASTAVENÍ BEZPEČNOSTNÍHO PÁSU

ODEBRÁNÍ BEZPEČNOSTNÍHO PÁSU
NOVA 2
OTÁČENÍ SEDADLA
NOVA 2
INSTALACE SYSTÉMU KOTVENÍ ISOFIX
INSTALACE SYSTÉMU UCHYCENÍ ISOFIX.

babyGO
INSTALACE SYSTÉMU TOP TETHER A BEZPEČNOSTNÍHO PÁSU.
NOVA 2
INSTALACE SMĚREM VPŘED PRO VELIKOSTNÍ KATEGORIE 100-150 CM.

INSTALACE SYSTÉMU KOTVENÍ ISOFIX.


babyGO
INSTALACE BEZPEČNOSTNÍHO PÁSU SE 3 BODKOVÝMI UPEVŇOVACÍMI BODY.

NOVA 2
INSTALACE TRÍBODOVÉHO BEZPEČNOSTNÍHO PÁSU SMĚREM VZAD PRO VELIKOSTNÍ KATEGORIE 100-150 CM.
natural_image
Simple diagram showing a car icon pointing right to a red car seat (no text or symbols)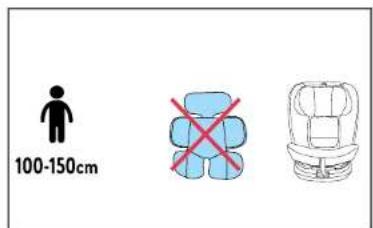

babyGO
INSTALACE BEZPEČNOSTNÍHO PÁSU SE 3 BODKY.
NOVA 2
ÚDRŽBA
natural_image
Abstract logo design with a stylized lowercase 'b' inside a cloud-like frame, featuring a red dot at the center (no text or symbols)
babyGO
BabyGo Baby Products GmbH
Am Bahndamm 1-3
- ASSEMBLY INSTRUCTIONS
- INSTRUCTIONS DE MONTAGE
- NÁVOD K MONTÁŽI
- babyGO
- NOVA 2
- NACH VORN GERICHTETE INSTALLATION 76-105CM
- 3-PUNKT-SICHERHEITSGURT INSTALLIEREN
- WARTUNG
- EN INSTRUCTION MANUAL
- IMPORTANT
- READ CAREFULLY AND KEEP THESE INSTRUCTIONS FOR FUTURE REFERENCE
- SAFETY INSTRUCTIONS
- EACH COMPONENT
- Notice for the vehicle use
- Baby car seat ISOFIX attachment
- ASSEMBLY STEP
- THE USAGE OF BUCKLE ADJUST THE SAFETY BELT
- INSTALL 3 POINT SAFETY BELT
- MAINTENANCE
- FR
- MANUEL D'INSTRUCTIONS
- INSTALLATION DU SYSTÈME D'ANCRAGE ISOFIX
- INSTALLATION DE LA CEINTURE DE SÉCURITÉ À 3 POINTS
- ENTRETIEN
- SZE
- NÁVOD K POUŽITÍ
- INSTALACE SYSTÉMU KOTVENÍ ISOFIX
- INSTALACE BEZPEČNOSTNÍHO PÁSU SE 3 BODKY.
- ÚDRŽBA
Brand : BabyGO
Model : Nova2
Category : Car seat