
Protection360 - Car seat BabyGO - Free user manual and instructions
Find the device manual for free Protection360 BabyGO in PDF.

| Product Type | Convertible car seat with 360° rotation |
| Brand and Model | BabyGO Protection360 |
| Safety Standard | ECE R129/03 (i-Size) |
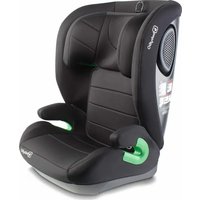
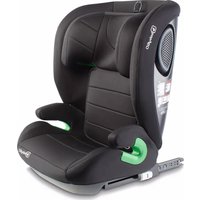
| Size Groups (R129) | 40-105 cm (rear-facing with ISOFIX + Top Tether); 76-105 cm (forward-facing with ISOFIX + Top Tether); 100-150 cm (forward-facing with 3-point seat belt, with or without ISOFIX) |
| Maximum Weight | 18 kg for ISOFIX modes; up to approximately 36 kg for belt mode (not specified) |
| Orientation | Rear-facing and forward-facing (360° rotation) |
| Vehicle Attachment | ISOFIX + Top Tether; 3-point seat belt alone; ISOFIX + 3-point belt |
| Child Harness | 5-point harness adjustable in height with headrest |
| Recline Positions | 5 positions, adjustable both in rear-facing and forward-facing |
| Adjustable Headrest | Yes, height-adjustable with shoulder straps |
| Seat Rotation | Yes, 360° with lock button for travel |
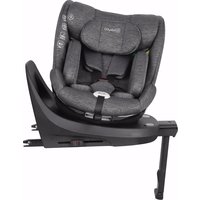
| Support Leg | Yes, retractable under the base |
| Newborn Insert | Yes, newborn insert cushion (40-75 cm) |
| Seat Weight | Approximately 12-15 kg (estimate, not specified) |
| Dimensions (Approx) | L 65 x W 45 x H 60 cm (estimate, not specified) |
| Cover Material | Not specified (machine washable per instructions) |
| Care and Cleaning | Wipe surface with a damp sponge; removable cover washable; rinse straps with warm water |
| Spare Parts Available | Covers, straps, buckles, inserts (must be original) |
| Warranty | 12 months from date of purchase, non-transferable |
| Included Accessories | Newborn insert cushion, shoulder pads, buckle protector, belt guide |
Frequently Asked Questions - Protection360 BabyGO
- Rear-facing with ISOFIX: 40-105 cm (max 18 kg)
- Forward-facing with ISOFIX: 76-105 cm (max 18 kg)
- Forward-facing with 3-point belt: 100-150 cm (no explicit weight limit, generally up to 36 kg).
Never use forward-facing mode before 15 months.
User questions about Protection360 BabyGO
0 question about this device. Answer the ones you know or ask your own.
Ask a new question about this device
Download the instructions for your Car seat in PDF format for free! Find your manual Protection360 - BabyGO and take your electronic device back in hand. On this page are published all the documents necessary for the use of your device. Protection360 by BabyGO.
USER MANUAL Protection360 BabyGO
natural_image
Abstract logo design with a stylized lowercase 'b' inside a cloud-like shape, no text or symbols present.PROTECTION 360
Autositz
BEDIENUNGSANLEITUNG
Child seat
ASSEMBLY INSTRUCTIONS
Siège enfant
ASSEMBLY INSTRUCTIONS
Kinderzitje
ASSEMBLY INSTRUCTIONS

babyGO
BabyGo Baby Products GmbH
Am Bahndamm 1-3
natural_image
Line drawing of a car seat assembly (no text or symbols)PROTECTION 360
Seite 04 - 29
DEUTSCH
Page 30 - 55
ENGLISH
Page 56 - 81
FRANCE
Page 82 - 107
NEDERLANDS
babyGO

babyGO
natural_image
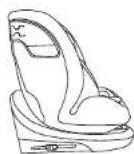
Line drawing of a car seat with neck, frontrest, and seatbelt (no text or symbols)DE
BEDIENUNGSANLEITUNG
Liebe Eltern:
natural_image
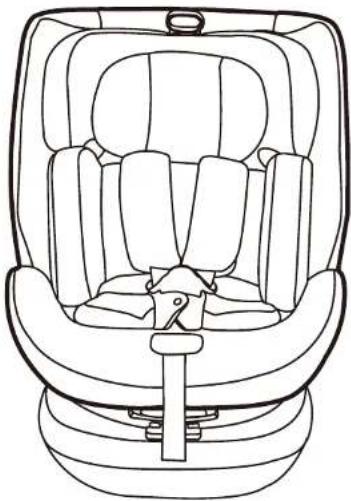
Line drawing of a car seat with blue dots indicating specific seat positions (no text or symbols)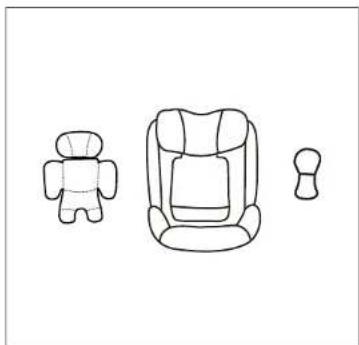
natural_image
Line drawing of three car seat components: a small robot, a full seat with seats, and a small fork (no text or symbols)natural_image
Technical line drawing of a mechanical component with no visible text or symbolsnatural_image
Illustration of a hairdryer and a hand holding a brush, both without any text or symbolsnatural_image
Line drawing of a car seat with a hand strap and seatbelt (no text or symbols)natural_image
Illustration of a person using a resistance band on a seat, with a magnified inset showing the lower front view (no text or symbols)natural_image
Illustration of a child wearing a full-body seatbelt, with a hand adjusting the seat (no text or symbols)natural_image
Illustration of a child wearing a seatbelt with hands adjusting the seatbelt (no text or symbols)natural_image
Line drawing of a car seat assembly (no text or symbols)natural_image
Illustration of a car seatbelt device (no text or symbols)natural_image
Line drawing of a car comfort seat with seatbelt and seatbelt (no text or symbols)EN INSTRUCTION MANUAL
Dear Parents:
Thank you for purchasing the child seat.
Please read and follow all instructions before using the child seat.
WARNING! Read the Instruction carefully before use and keep them for future reference.
PROTECTION 360
WARNING
READ CAREFULLY AND READ CAREFULLY AND KEEP THESE INSTRUCTIONS FOR FUTURE REFERENCE
THIS PRODUCT COMPLIES WITH STANDARD R129/03
Never leave the child unattended.
- Read this user manual carefully.
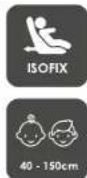
- The correct installation of the ISOFIX attachment system and the support leg anchoring of the 3-point seat belt system is crucial for the safety of your child.
- It's important to store the user manual carefully for future use of the seat.
- Never leave your child unattended in the car.
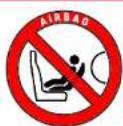
- Do not use a child safety seat if the vehicle seat is equipped with a front airbag, as this can be dangerous. However, this does not apply to so-called side airbags.
- Before using our product, please read the user manual carefully.
- The product is a safety product and is only safe when used according to the user manual.
- The product should only be used on a forward-facing seat equipped with ISOFIX attachment and the support leg.
- The product can be used on both the front and rear seats, but it's recommended to install it on the rear seat.
- The product has been approved according to the strictest European safety standards (ECE R129/03) and is suitable for:
- 40-105 cm (weight limit 18 kg) with ISOFIX attachment and Top Tether;
- 76-105 cm (weight limit 18 kg) with ISOFIX attachment and Top Tether;

babyGO
PROTECTION 360
• 100-150 cm with 3-point seat belt;
• 100-150 cm with 3-point seat belt and ISOFIX attachment.
• After an accident, the seat may become unsafe due to damages that are not immediately apparent. It should be replaced.
- The safety of the seat can only be guaranteed by the manufacturer if it was issued by the original owner.
- We strongly advise against using a used product, as you are unsure of its history.
- The harness pads are important for your child's safety, so always use them.
- Ensure that all luggage and items that could cause injuries in an accident are properly secured.
- The movable parts of the child seat should not be lubricated in any way.
- The infant seat must not be used without a cover. Please use an original cover, as it contributes to the safety of the seat.
- The seat must also be secured with ISOFIX attachment when not in use. An unsecured seat can injure other occupants in the car during sudden braking.
- The rigid parts and plastic parts of a child restraint system must be arranged and installed so that they cannot be caught by a moving seat or a vehicle door during daily use of the vehicle.
- Ensure that the seat is not damaged by the straps between or under heavy luggage, adjustable seats, or slamming of the car door.
- No alterations should be made to the product, as this could affect parts or the overall safety of the seat.
- In hot weather, the plastic and metal parts of the product can become hot. Cover the seat when the car is parked in the sun.
- To avoid damaging the cover, please do not remove the product's logo.
- Use the seat even for short trips, as this is when most accidents occur.
- Check before purchasing whether the seat is properly installed in your car.
• Take a short break during long trips to allow your child some relaxation time.
- Set a good example for your child and always wear your seatbelt.
- Tell your child never to play with the buckle.
- Ensure that all belts are properly fastened (worn low) and not twisted.
• Each lap belt should be worn low to hold the pelvis firmly.

babyGO
CERTIFICATION
Read the car manual rst and check whether the car seat is equipped with ISOFIX attachment fixed anchor points, and check the size of recommended ISOFIX attachment constraints on the system if it is matched our ISOFIX attachment size.
WARNING! Only suitable if the approved vehicles are fitted with 3 point safety belts, approved to UN/ECE Regulation No.16 or other equivalent standards.
Height Size facing direction
40-105cm ISO/R2 rearward facing
76-105cm ISO/F2X forward facing
100-150cm ISO/B2 forward facing
WARRANTY
The warranty period starts from the date of purchase and is valid for a period of 12 months. The warranty is only applicable to the original owner and is not transferable. The warranty is only applicable to products that have not been adapted by the user. In the case of any defects, the owner is required to return the product to the retailer. If the retailer can not solve the problem, he must return the product, complete with a clear description of the complaint and a validated purchase receipt to the manufacturer. Exchanger or return can not be demanded. Repairs do not constitute an extension to the warranty term. The manufacturer is not liable for any damages other than those on products supplied.
No warranty is given if:
• The product is not supplied complete with the validated purchase receipt to the manufacturer.
- Defects are caused by misuse or maintenance which differ from that indicated in the instruction manual.
• Repairs are carried out by third parties.
• Defects are caused by neglect.
• Damage or removal of any serial number is found.
• If there is normal wear and tear which may be expected from everyday use.
• The stated warranty terms and conditions have not been satisfied.
PROTECTION 360
Here is the positions of installation for your reference

Forward facing
Rear facing
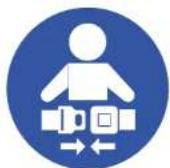
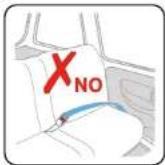
× Two points seat belts
√ Three points seats belts
× Front passenger seat
√ The rear vehicle seats
WARNING! If your child is secured in the vehicle seat with only a 2 point belts, he or she could sustain serious injuries possibly resulting in death. Never use in connection with a 2 point belts.
- Do not fasten the child seat on the front passenger seat with validated airbag as it will casue death or serious injury if airbag exploded. Please always secure the child seat on the rear seats.
- Do not fasten the child seat on the rear facing or lateral vehicle seats. Please refer to the following graphic when you install your child seat:
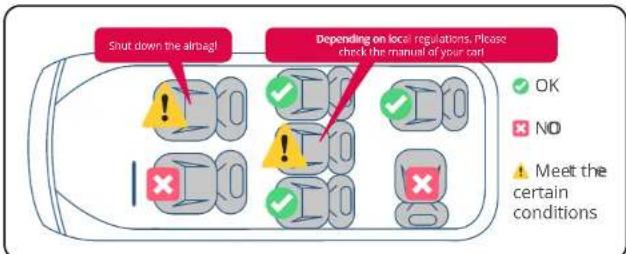
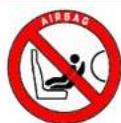
DO NOT place rear-facing child seat on front seat with airbag. IMPORTANT-DO NOT use forward facing before the child's age exceeds 15 months. DEATH OR SERIOUS INJURY can occur.

babyGO
PROTECTION 360
MAINTENANCE & CLEANING
- During daily use, it is necessary to regularly inspect the child seat. In case of an accident, the child seat must be replaced.
- When the car seat is not in use, the child seat should be stored in a dry and ventilated place to avoid moisture and mold formation.
- If dust accumulates on the surface of the child seat, a damp sponge can be used to wipe it off, followed by ventilation to dry.
- If food or drink accidentally drips onto the safety belt, please remove the safety belt and rinse it thoroughly with warm water, then ventilate it to dry.
- For cleaning the entire seat cover, please follow the washing instructions. Minor fading may occur during the first wash, which is a normal occurrence.

FABRIC COVER INSTALLATION
natural_image
Line drawing of a car seat with blue indicator lights indicating seat positions (no text or symbols)
natural_image
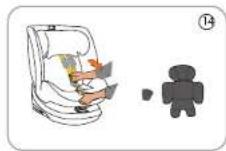
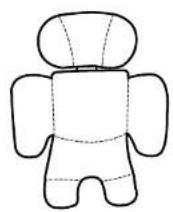
Line drawing of three car seat components: a small robot, a midsize seat, and a small fork (no text or symbols)A. Headrest Handle
B. Headrest
C. Harness Guide
D. Infant Insert
E. Buckle Pad
F. Angle Adjustment Handle
G. Adjustment Strap
H. Shoulder Pad
I. Buckle
J. Five-point Harness Adjuster
K. Rotational Adjustment Handle
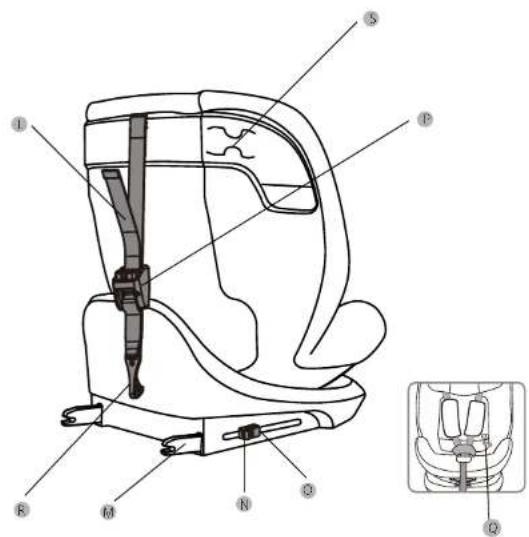
L. Top Tether
M. ISOFIX Attachment
N. ISOFIX Attachment Release Button
O. Second Locking Mechanism of ISOFIX Attachment
P. Safety Adjuster for Top Tether
Q. Storage Bag for Instruction Manual
R. Hooks for Top Tether
S. Hooks for Rear Seatbelt

babyGO
INSTALLATION OF ISOFIX, TOP TETHER AND HARNESS SYSTEMS
INSTALLATION METHOD FOR ISOFIX ATTACHMENT

Note: Child seats can also be used with the ISOFIX attachment rail.
Note: If your car seat can adjust the inclination, please adjust the car seat to the appropriate position to facilitate the ISOFIX attachment.
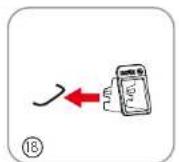
Installation is facilitated by attaching the ISOFIX attachment guide to the ISOFIX anchorage point of the vehicle, ensuring the notch is facing upwards.
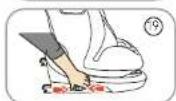
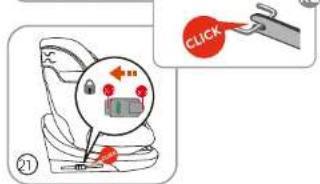
- Simultaneously press the release button of the ISOFIX attachment lock and the second release button of the ISOFIX attachment lock (as shown in Figure 19) to extend the ISOFIX attachment lock.
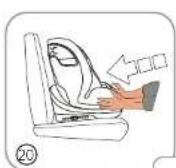
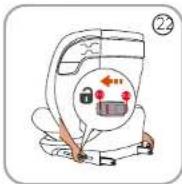
- Take the child seat with both hands and insert the two ISOFIX arms into the ISOFIX guide frame until the ISOFIX arms on both sides click into place and a clicking sound is heard. Once the ISOFIX is locked, press the child seat firmly towards the direction of the arrow to ensure it is snug against the back of the car seat (Figure 21).
- Take the child seat with both hands and insert the two ISOFIX arms into the ISOFIX guide frame until the ISOFIX arms on both sides click into place and a clicking sound is heard. Once the ISOFIX is locked, press the child seat firmly towards the direction of the arrow to ensure it is snug against the back of the car seat (Figure 21).
PROTECTION 360

REMOVING THE ISOFIX ATTACHMENT
- Removal of the ISOFIX Attachment: Press the "ISOFIX Attachment Release Button" and listen for a "click" sound to ensure that both sides of the ISOFIX attachment are unlocked. Then, remove the seat.
Note: The ISOFIX attachment is only properly unlocked when the left and right ISOFIX indicators show red.

babyGO
PROTECTION 360
INSTALLATION METHOD FOR THE TOP TETHER FIVE-POINT HARNESS HIDDEN
natural_image
Technical line drawing of a mechanical component with no visible text or symbols
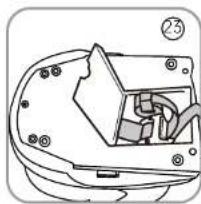
- Open the lower storage flap for the tensioning strap, remove the tensioning strap, and close the upper storage flap for the tensioning strap.
-
Release the top tether strap by pressing the release button and pulling the strap to extend it.
-
Thread the top tether under the headrest of the car seat.
natural_image
Illustration of a car seat and its side view showing mechanical components (no text or symbols)
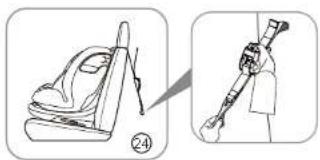
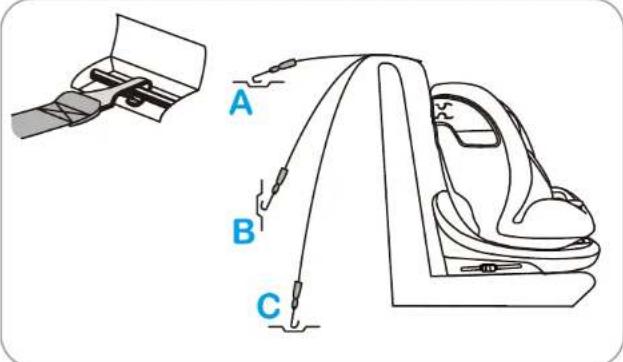
- Attach the top tether. There are three fixed anchorage points behind the car seat. Please select the appropriate point according to the position of the anchor in your car.
Note: This is the indicator for the top tether point. Reminder: Thread the top tether strap under the car seat cushion (if the cushion is not adjustable, thread it over the cushion).

- Secure the strap by pulling it backward until the indicator shows green.
-
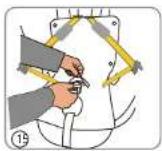
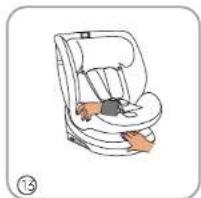
Remove the shoulder pads, buckle cover, and infant insert cushion from the seat.
-
Thread the buckle through the hole in the fabric cover, as shown in Figure 15.
-
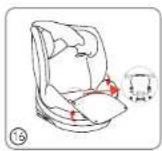
Open the buttons of the seat cover, as shown. Insert the buckle inserts into the buckle. Open the buckle cover at the bottom of the seat, place the buckle inside, and finally close the cover.
-
Align the fabric cover neatly, as shown in Figure 17.

babyGO
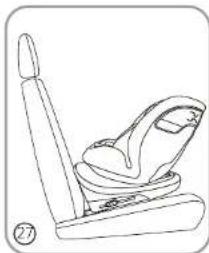
INSTALLATION IN THE CAR REAR-FACING INSTALLATION WITH ISOFIX, TOP TETHER, AND 5-POINT HARNESS


Use the ISOFIX attachment and the Top Tether to install the child seat in the rear-facing position (suitable for children from 40 to 105 cm in height / up to 18 kg).
natural_image
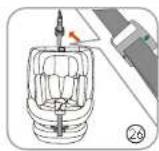
Line drawing of a car seat assembly (no text or symbols)- When installing the child seat in the rear-facing position, please follow the 4-6 method. Rotate the seat into the rear-facing position (as shown in Figure 27); then follow the ISOFIX installation (from Figure 18) to install the ISOFIX in the car seat.
natural_image
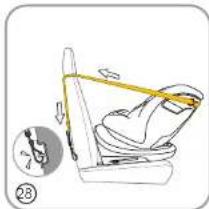
Illustration of a person using a resistance band on a seatbelt, with a magnified inset showing the seatbelt (no text or symbols)- Pull the tensioning strap from top to bottom through the back of the seat to the seatbelt hook (as shown in Figure 28), and then attach the tensioning strap to your vehicle's anchor point according to the Top Tether installation (from Figure 23).
DO NOT PLACE a rear-facing child seat on the front passenger seat with an airbag. IMPORTANT - DO NOT use forward-facing until the child reaches 15 months of age. There is a risk of DEATH or SERIOUS INJURY.
PROTECTION 360
FORWARD-FACING INSTALLATION WITH ISOFIX, TOP TETHER, AND 5-POINT HARNESS


Use the ISOFIX attachment and the Top Tether to install the child seat in the forward-facing position (suitable for children from 76 to 105 cm in height / up to 18 kg).
Caution! If the child's weight is below 9 kg, the child seat must be installed in the rear-facing position.
- Adjust the child seat according to the 4-4 method.
- Follow the ISOFIX installation (from Figure 18) to secure the child seat with ISOFIX and the ISOFIX anchorage on the car seat.
- Follow the Top Tether installation (from Figure 23) to secure the child seat with the tensioning strap and the tensioning strap anchor point on the car seat.
- Finally, check the child seat to ensure it is securely attached to the car seat.
- Follow the steps for "Securing Child - 5-Point Harness" to secure the child.

babyGO
FORWARD-FACING INSTALLATION WITH ISOFIX + 3-POINT VEHICLE SEATBELT

Use the ISOFIX attachment and the 3-point seatbelt to install the child seat in the forward-facing position (suitable for children from 100 to 150 cm in height).
- To secure the child in this way, the 5-point harness must first be hidden (see "Five-point harness hidden").
- Follow the ISOFIX installation (from Figure 18) to secure the child seat with ISOFIX and the ISOFIX anchorage on the car seat.
- Place the child seat on the car seat and adjust it to the appropriate recline/seat position.
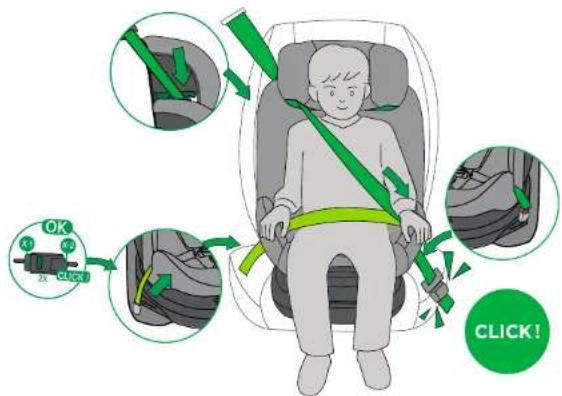
- Thread the vehicle's seatbelt through the shoulder belt guide and around the child's shoulder.
- Thread the vehicle's seatbelt through the crotch strap guide and around the child's pelvis.
- Fasten the vehicle's seatbelt.
PROTECTION 360
FORWARD-FACING 3-POINT VEHICLE SEATBELT
Use the 3-point seatbelt to install the child seat in the forward-facing position (suitable for children from 100 to 150 cm in height).

- First, remove the 5-point harness (see "Five-point harness hidden").
- Place the child seat on the car seat and adjust it to the appropriate recline/seat position.
- The car seat belt passes through the belt guide and goes around the child's shoulder.
- The car seat belt's lap belt passes through the lap belt guide and goes around the child's pelvis.
- Fasten the car seat belt.

babyGO
PROTECTION 360
FUNKTIONS
THE USAGE OF BUCKLE
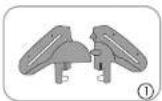
- Close the left and right latches of the buckle (as shown in Figure 1) and ensure that the concave and convex structures of the left and right latches are closed.
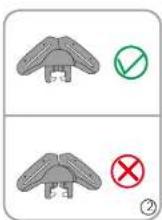
- Close the left and right latches without leaving a gap. Keep the latches facing up. (Figure 2)
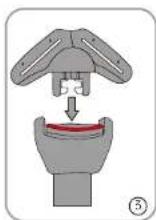
- Insert the closed latches into the slot of the buckle. (Figure 3)
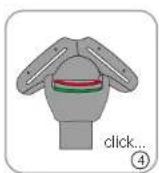
- If you hear "click" sound, it means that the buckle has been fastened. (Figure 4)
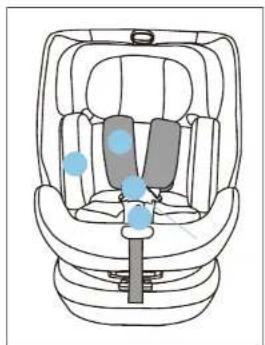
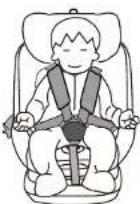
ADJUST THE SAFETY BELT
natural_image
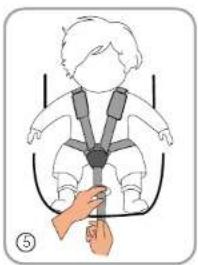
Illustration of a baby wearing a full-body seatbelt, with a hand adjusting the seat (no text or symbols)- Tighten your baby car seat belt Pull the shoulder strap up to tighten the loose part of the leg belt. Then pull the adjustable belt to tighten the belt. Keep your seat belt as tight as possible without causing discomfort. The leg belt should be as low as possible and should be near the crotch, not the belly. A finger space should fit between the seat belt and the child.
A loose seat belt is dangerous. Check that the seat belt adjuster is working properly each time when you place a child in a car seat before tightening the seat belt.
natural_image
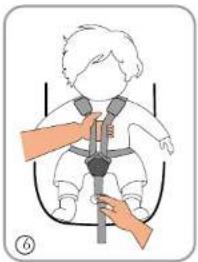
Illustration of a baby wearing a seatbelt with hands adjusting the seat (no text or symbols)- loose the seat belt The seat belt can be loosened by pressing the 5-point seat belt adjustment button in front of the seat. While pressing down the 5-point seat belt adjustment button, hold the two straps under the shoulder guard with the other hand and pull them in front of the child to release the seat belt

babyGO
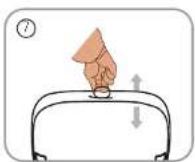
- Use the ve-point seat belt adjustment button under the front of the seat to loosen the seat belt, unlock the buckle, pull the headrest adjustment handle up, move the headrest to the correct shoulder belt height, and then gently slide the headrest down to check that the headrest is properly hinged.
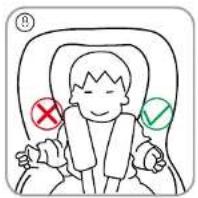
- Correctly adjusting the headrest can ensure the best protection for your child in the car seat; The headrest must be adjusted to the position that the shoulder strap is compatible with the height of a child's shoulders or slightly higher. The straps must be located at shoulder height or slightly above the child's shoulder height. The shoulder strap should not be behind the child or at or above the ear.
Note: It is important to keep the headrest appropriate to the height of the child's head.
PROTECTION 360
ADJUST THE ANGLE RECLINING OF CAR SEATADJUST THE HEIGHT OF HEADREST
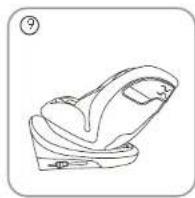
The child safety seat can be adjusted to different reclining positions. You can adjust the reclining angle of the seat even when your child is in it
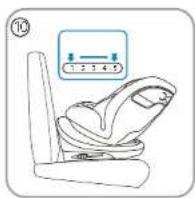
REARWARD :
Press the base part of the seat with one hand and pull the angle adjusting handle on the back of the seat with the other hand to adjust the seat to the appropriate position, 5 positions in total.
When the baby car seat is rearward facing: please use 1,2,3,4,5 position;
FORWARD FACING: :
Press the base of the seat with one hand and pull the angle adjusting handle on the back of the seat with the other hand to adjust the seat to the appropriate position, a total of 5 positions.
When the baby car seat is forward facing: please use 1,2,3,4,5 position;

babyGO

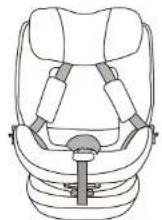
Notice: When the height of baby is 40-75cm, please use the newborn baby's cushion.
Place the new born cushion in the car seat, place the two shoulder pads on the new born cushion, and finally cover the buckle cushion on.
PROTECTION 360
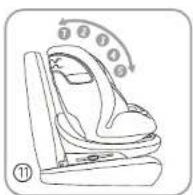
ROTATION FUNCTIONNEW BORN CUSHION
natural_image
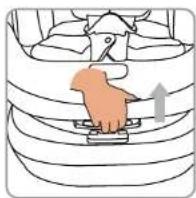
Illustration of a car seatbelt with hands placed on the seat (no text or symbols)- Take the supporting leg out of the storage at the bottom of the base;
- Press the supporting leg expansion button and pull out the leg;
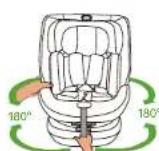
- Press the rotation button and rotate the seat.
Attention! Before each trip, pls make sure that the seat rotation is locked by turning the seat in both directions.
IMPORTANT-DO NOT USE FORWARD FACING BEFORE THE CHILD'S AGE EXCEEDS 15 MONTHS(Refer to instruction)
Attention! Before each trip, pls make sure the child seat is in the correct group and configuration.

babyGO
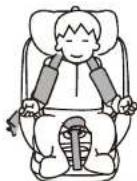
5-POINT HARNESS SYSTEM TO INSTALL THE CHILD
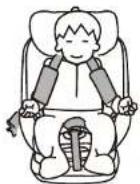
- Release the safety belt to the most loosely, then unlock the buckle and place it on both sides of the seat, as shown in the picture
- Insert the left and right latches into the buckle and hear a "click" sound, indicating that the buckle is fastened. Press the adjustable belt button to adjust and tighten the shoulder strap, while ensuring that the child's shoulders are comfortable (a finger space should fit between the seat belt and the child).
PROTECTION 360

babyGO

natural_image
Line drawing of a car seat with neck, frontrest, and seatbelt (no text or symbols)FR MODE D'EMPLOI
Chers parents
natural_image
Line drawing of a car seat with blue indicator lights indicating seat positions (no text or symbols)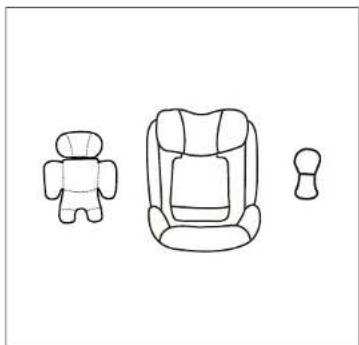
natural_image
Line drawing of a car seat, a small robot figure, and a small gear (no text or symbols)natural_image
Technical line drawing of a mechanical component with no visible text or symbols
natural_image
Illustration of a seatbelt device and its side view showing mechanical components (no text or symbols)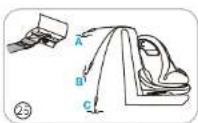
natural_image
Line drawing of a car seat assembly (no text or symbols)natural_image
Illustration of a person using a resistance band on a seatbelt, with a magnified inset showing the lower side view (no text or symbols)natural_image
Illustration of a child wearing a seatbelt with a hand adjusting the seat (no text or symbols)natural_image
Illustration of a baby wearing a seatbelt with hands adjusting the seat (no text or symbols)natural_image
Line drawing of a car seat assembly (no text or symbols)natural_image
Illustration of a car seat with orange bandages and black straps (no text or symbols)natural_image
Three line drawings of a car seat assembly showing 180-degree angle changes (no text or symbols)
babyGO
MOTION
UTILISATION DU SYSTÈME DE HARNAIS À 5 POINTS POUR ATTACHER L'ENFANT EN TOUTE SÉCURITÉ.
natural_image
Line drawing of a car seat with neck, frontrest, and seatbelt (no text or symbols)natural_image
Line drawing of a car seat with blue circular markers indicating specific seat positions (no text or symbols present)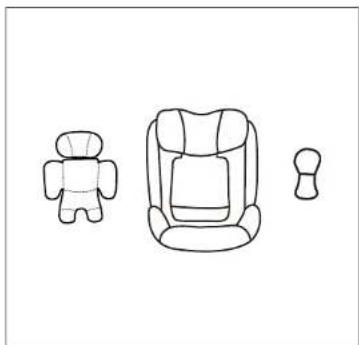
natural_image
Line drawing of three car seat components: a small robot, a full seat with a lid, and a small car (no text or symbols)L. Top-Tether
M. ISOFIX-bevestiging
N. ISOFIX-bevestigingsontgrendelingsknop
O. Tweede vergrendelingsmechanisme van de ISOFIX-bevestiging
natural_image
Technical line drawing of a mechanical component with no visible text or symbols
natural_image
Illustration of a car seat and its side view showing the same seat and body (no text or symbols)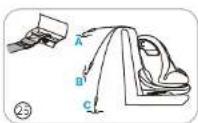
natural_image
Line drawing of a car seat assembly (no text or symbols)natural_image
Illustration of a person using a resistance band on a seat, with a magnified inset showing the lower front view (no text or symbols)natural_image
Illustration of a child wearing a full-body seatbelt, with a hand adjusting the seat (no text or symbols)natural_image
Illustration of a child wearing a seatbelt with hands adjusting the seatbelt (no text or symbols present)natural_image
Illustration of a baby car seat with hand buttons and seatbelt (no text or symbols)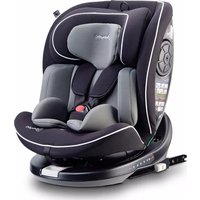
- PROTECTION 360
- DEUTSCH
- ENGLISH
- FRANCE
- NEDERLANDS
- DE
- BEDIENUNGSANLEITUNG
- EN INSTRUCTION MANUAL
- WARNING
- READ CAREFULLY AND READ CAREFULLY AND KEEP THESE INSTRUCTIONS FOR FUTURE REFERENCE
- babyGO
- CERTIFICATION
- Height Size facing direction
- WARRANTY
- No warranty is given if:
- Here is the positions of installation for your reference
- MAINTENANCE & CLEANING
- FABRIC COVER INSTALLATION
- INSTALLATION OF ISOFIX, TOP TETHER AND HARNESS SYSTEMS
- INSTALLATION METHOD FOR ISOFIX ATTACHMENT
- REMOVING THE ISOFIX ATTACHMENT
- INSTALLATION METHOD FOR THE TOP TETHER FIVE-POINT HARNESS HIDDEN
- INSTALLATION IN THE CAR REAR-FACING INSTALLATION WITH ISOFIX, TOP TETHER, AND 5-POINT HARNESS
- FORWARD-FACING INSTALLATION WITH ISOFIX, TOP TETHER, AND 5-POINT HARNESS
- FORWARD-FACING INSTALLATION WITH ISOFIX + 3-POINT VEHICLE SEATBELT
- FORWARD-FACING 3-POINT VEHICLE SEATBELT
- FUNKTIONS
- THE USAGE OF BUCKLE
- ADJUST THE SAFETY BELT
- ADJUST THE ANGLE RECLINING OF CAR SEATADJUST THE HEIGHT OF HEADREST
- REARWARD :
- FORWARD FACING: :
- ROTATION FUNCTIONNEW BORN CUSHION
- 5-POINT HARNESS SYSTEM TO INSTALL THE CHILD
- FR MODE D'EMPLOI
- MOTION
- UTILISATION DU SYSTÈME DE HARNAIS À 5 POINTS POUR ATTACHER L'ENFANT EN TOUTE SÉCURITÉ.
Brand : BabyGO
Model : Protection360
Category : Car seat