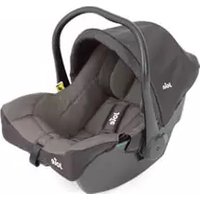
Spin 360 - Car seat Joie - Free user manual and instructions
Find the device manual for free Spin 360 Joie in PDF.
| Product Type | Child car seat |
| Brand | Joie |
| Model | Spin 360 |
| Weight group | 0+ (up to 13 kg) and 1 (9 to 18 kg) |
| Maximum child weight | 18 kg (approx. 4 years) |
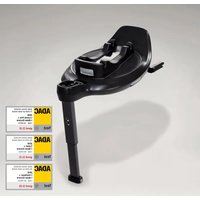
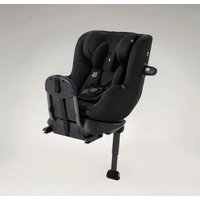
| Installation | ISOFIX + load leg |
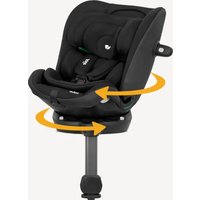
| Rotation | 360° for installation and lateral exit |
| Orientation | Rear-facing (birth - 18 kg) and forward-facing (9 - 18 kg) |
| Recline positions | 5 positions in rear-facing mode, 5 in forward-facing mode |
| Headrest adjustment | 6 positions |
| Materials | Plastic, metal, fabric |
| Safety standard | ECE R44.04 |
| ISOFIX connector type | Retractable, 10 adjustable positions |
| Load leg | 12 positions with green/red indicator |
| Fabric care | Wash in cold water (<30°C), no bleach, no dry cleaning, dry in shade |
| Manual storage | Compartment under the base |
| Repairability | Spare parts available through dealer or manufacturer (joiebaby.com) |
Frequently Asked Questions - Spin 360 Joie
User questions about Spin 360 Joie
0 question about this device. Answer the ones you know or ask your own.
Ask a new question about this device
Download the instructions for your Car seat in PDF format for free! Find your manual Spin 360 - Joie and take your electronic device back in hand. On this page are published all the documents necessary for the use of your device. Spin 360 by Joie.
USER MANUAL Spin 360 Joie
spin 360^TM
child restraint
GB Instruction Manual
FR Manuel d'utilisateur
NL Handleiding
SE Bruksanvisningen
Manuale di Istruzioni
Hu Hasznalatiutasitas

ECE R44.04: A,C,D
ECE R44.04: ISOFIX
Welcome to Joie
Congratulations on becoming part of the Joie family! We are so excited to be part of your journey with your little one. While traveling with the Joie spin 360^TM child restraint you are using a high quality, fully certified safety Group 0 + / 1 child restraint. Please carefully read this manual and follow each step to ensure a comfortable ride and best protection for your child.
If vehicle is equipped with ISOFIX, the vehicle lower anchor points may be visible at the vehicle seat crease. See your vehicle owner's manual for exact locations, anchor identification, and requirements for use.
To use this child restraint with the ISOFIX connections according to the UN ECE R44.04 Regulation, the child should weigh under 18kg (approximately 4 years old or under).
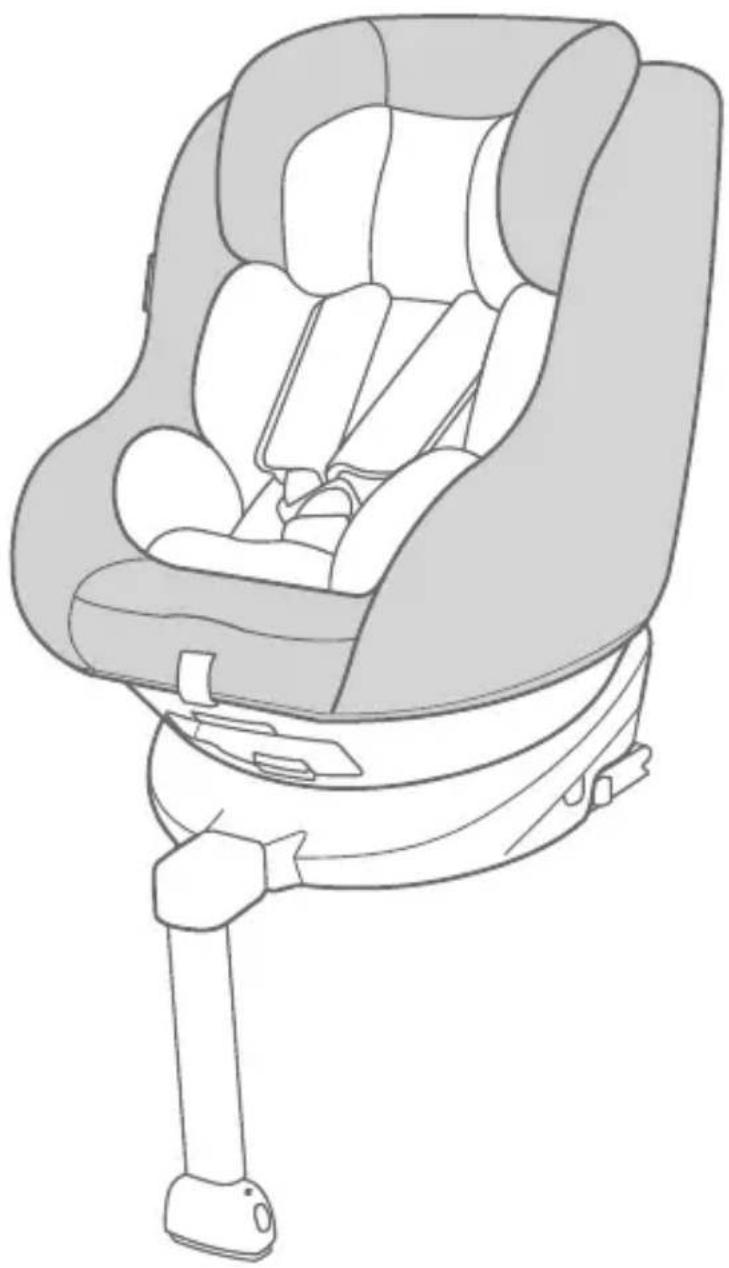
Base
Please read all the instructions in this manual before installing and using the product.
IMPORTANT: KEEP FOR FUTURE REFERENCE.
PLEASE READ CAREFULLY.
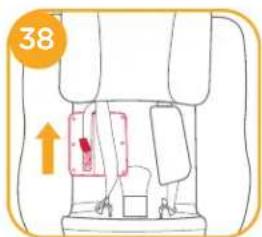
Please keep the instruction manual in the storage compartment at the bottom of the base as right figure.
For warranty information, please visit our website at joiebaby.com
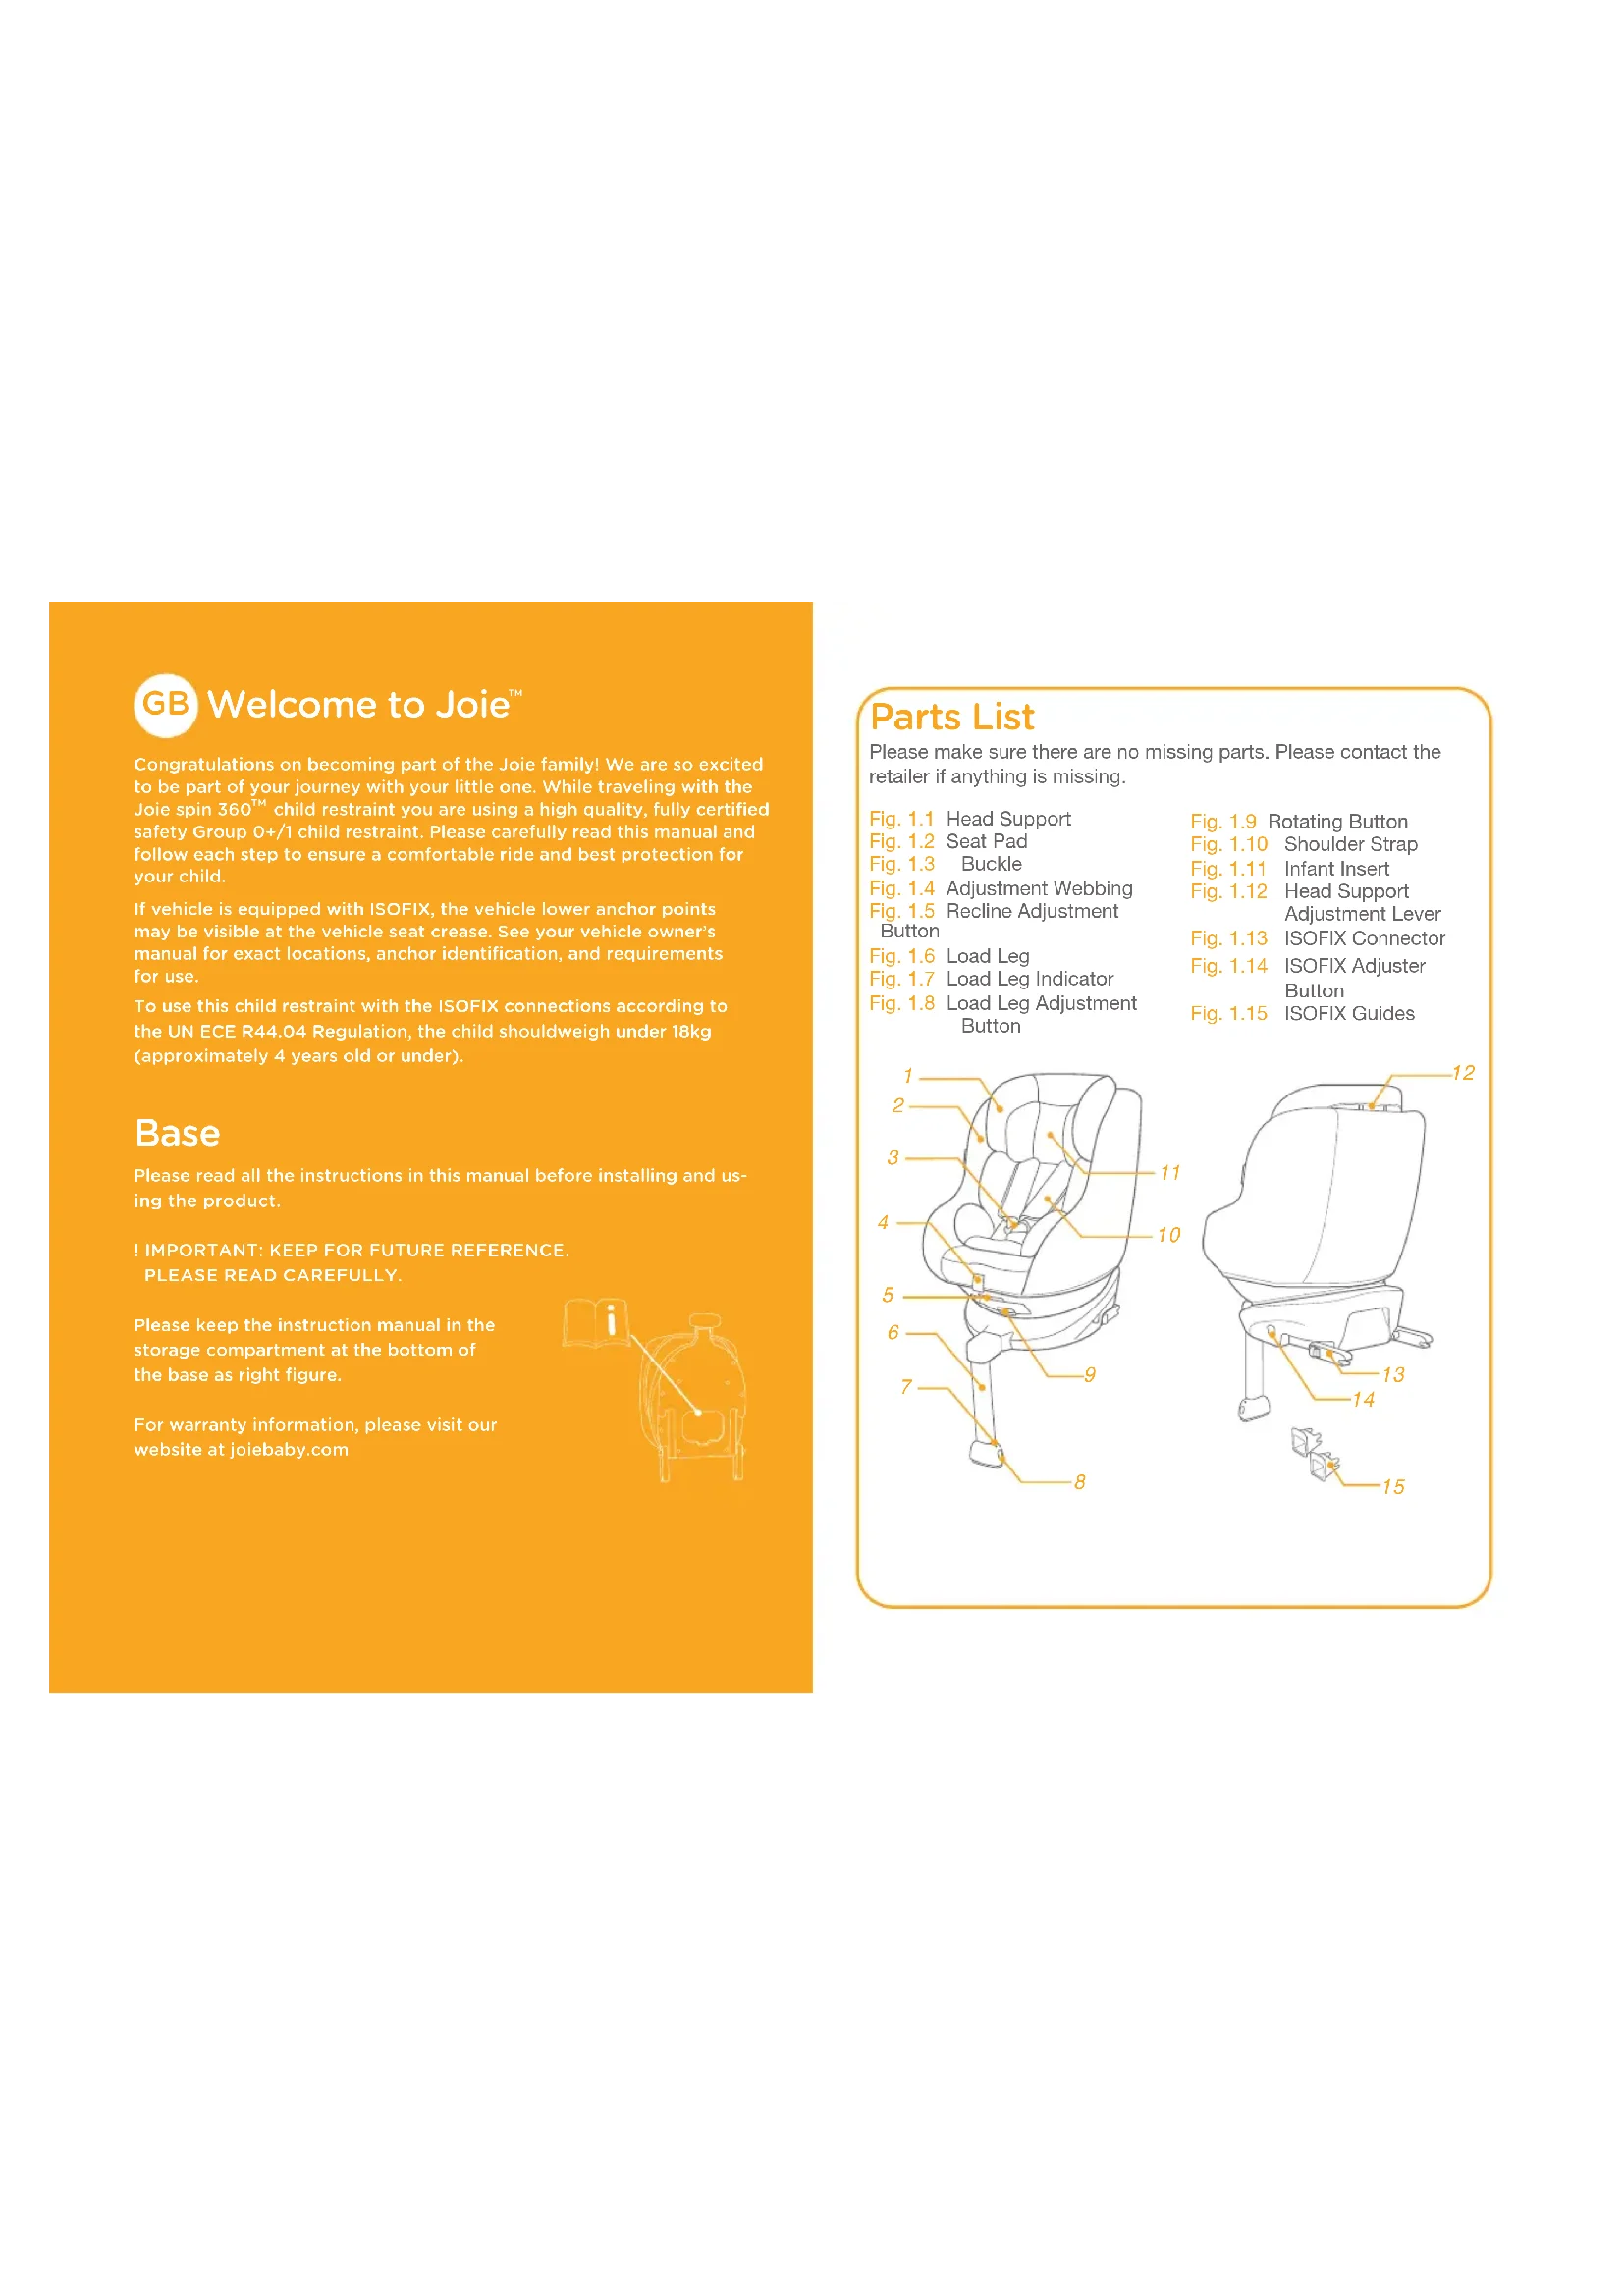
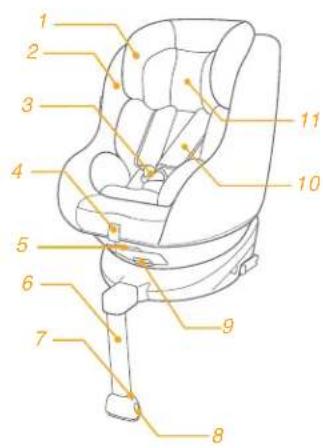
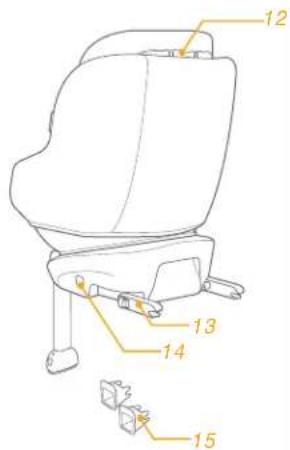
Parts List
Please make sure there are no missing parts. Please contact the retailer if anything is missing.
Fig.1.1 Head Support
Fig.1.2 Seat Pad
Fig.1.3 Buckle
Fig.1.4 Adjustment Webbing
Fig. 1.5 Recline Adjustment
Button
Fig.1.6 Load Leg
Fig. 1.7 Load Leg Indicator
Fig.1.8 Load Leg Adjustment Button
Fig.1.9 Rotating Button
Fig.1.10 Shoulder Strap
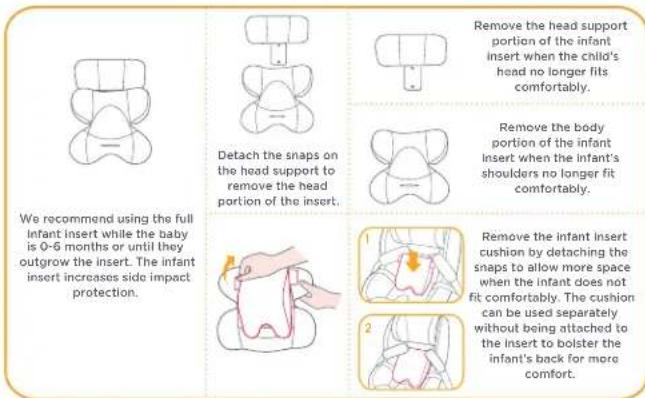
Fig.1.11 Infant Insert
Fig.1.12 Head Support Adjustment Lever
Fig.1.13 ISOFIX Connector
Fig.1.14 ISOFIX Adjuster
Button
Fig.1.15 ISOFIX Guides
WARNING
NO child restraint can guarantee full protection from injury in an accident. However, proper use of this child restraint will reduce the risk of serious injury or death to your child.
The child should weight under 18kg (approximately 4 years old or under).
Any support-leg should be in contact with the vehicle floor and any straps restraining the child should be adjusted to the child's body. The straps should not be twisted.
DO NOT use forward facing mode before the child's weight exceeds 9kg. Keep your child rearward facing as long as possible as rearward facing is the safest position.
! DO NOT install or use this child restraint without following the instructions and warnings in this manual or you may put your child at serious risk of injury or death.
DO NOT make any modifications to this child restraint or use it along with component parts from other manufacturers.
! DO NOT use this child restraint if it is damaged or has missing parts.
WARNING
DO NOT have your child in large/oversized clothes when using this enhanced child restraint in baby or toddler mode, because this may prevent your child from being properly and securely fastened by the shoulder harness straps and the crotch strap between the thighs.
When using this child restraint in rear facing or forward facing mode, the harness must be used correctly, and make sure the lap belt is not above the child's pelvis portion.
DO NOT leave this child restraint unsecured in your vehicle because an unsecured child restraint can be thrown around and may injure occupants in a sharp turn, sudden stop, or collision. Remove it if not in regular use.
NEVER leave your child unattended with this child restraint.
Please do not use this child restraint if the child restraint has dropped from a significant height, hit the ground at a considerable speed, or has visible signs of damage. We are not responsible to replace if the child restraint has been damaged under these abnormal conditions. A new child restraint will need to be purchased when any of the aforementioned conditions occurs.
WARNING
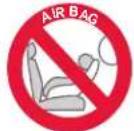
NEVER install this child restraint on any vehicle seat equipped with safety airbags when used in rear facing mode.
NEVER use a second-hand child restraint or a child restraint whose history you do not know because they may have structural damage that endangers your child's safety.
Please keep this child restraint away from sunlight, otherwise it may be too hot for the child's skin.
DO NOT use this child restraint as a regular chair as it tends to fall down and could injure the child.
DO NOT use this child restraint without the soft goods.
! The soft goods should not be replaced with any besides the ones recommended by the manufacturer, because the soft goods constitute an integral part of the child restraint performance.
! DO NOT put anything other than the recommended soft goods in this child restraint.
WARNING
DO NOT put unsecured items in the vehicle because they can be thrown around and may injure occupants in a sharp turn, sudden stop, or collision.
! Do not place other items on top of the child restraint if it is in the car boot to prevent damage.
Do not allow the child restraint harness or buckles to become trapped or caught in the vehicle seat or door.
DO NOT continue to use this child restraint after it has suffered any violent crash. Replace immediately as there may be invisible structural damage from the crash.
! Remove this child restraint from the vehicle seat when it is not in use for a long period of time.
To avoid suffocation, remove plastic bag and packaging materials before using this product. The plastic bag and packaging materials should then be kept away from babies and children.
Consult the retailer for issues concerning maintenance, repair and part replacement.
WARNING
! Do not place any objects in the load leg area in front of your base.
DO NOT carry this child restraint with a child in it.
! Frequently check the ISOFIX guides for dirt and clean them if necessary. Reliability can be effected by ingress of dirt, dust, food particles etc.
! DO NOT use any load bearing contact points other than those described in the instructions and marked on the child restraint.
! Correct Installation is only permitted by use of the ISOFIX connectors.
! DO NOT install this child restraint under the following conditions:
- Vehicle seats with lap belt or 3-point-belt.
- Vehicle seats facing sideways or rearward with respect to the running direction of the vehicle.
- Vehicle seats movable during installation.
Emergency
In case of emergency or accidents, it is most important to have your child taken care of with first aid and medical treatment immediately.
Product Information
- According to the UN ECE R44.04 Regulation, the child restraint with Base is a Semi-Universal ISOFIX Class A,C,D Child Restraint.
- If in doubt, please consult the child restraint manufacturer or the retailer.
For Installation with ISOFIX System
This is an ISOFIX CHILD RESTRAINT SYSTEM. It is approved to UN ECE regulation 44, 04 series of amendments for general use in vehicles fitted with ISOFIX anchorages systems.
It will fit vehicles with positions approved as ISOFIX positions (as detailed in the vehicle handbook), depending on the category of the child restraint and of the fixture. If in doubt, consult either the infant child restraint manufacturer or vehicle manufacturer.
The ISOFIX size class for which this device is intended is A,C,D.
Suitable for Child weighing under 18kg
Mass Group Group 0+/1
Materials Plastics, metal, fabrics
Patent No. Patents pending
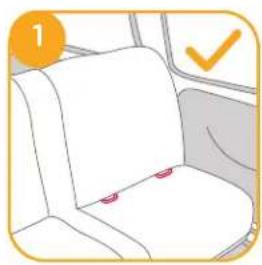
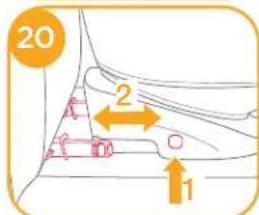
Concerns on Installation
see images 1-2
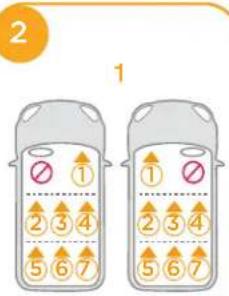
3
2
Choose the Installation Mode
| ECE R44.04 | Child's Weight | Installation Mode | Installation | Reference Age | Recline Position |
| <18kg | Rear facing mode | Approx birth to 4 years | Position 1-5 | ||
| 9-18kg | Forward facing mode | Approx 1 year to 4 years | Position 1-5 |
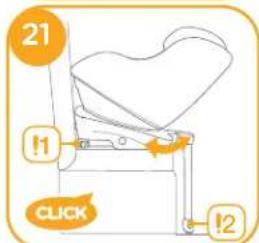
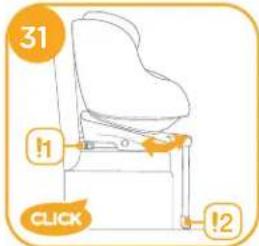
Installing the Base
see images 6-12
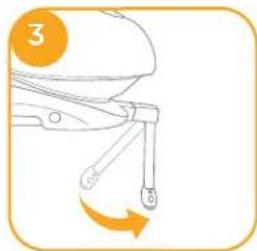
! After placing the base on the vehicle seat, pull the load leg downward to floor.
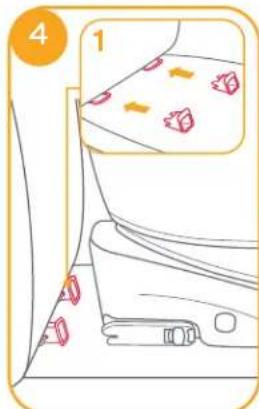
! Insert ISOFIX guides to assist with installation.
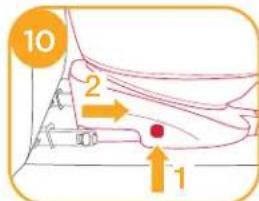
There are 10 adjustable positions for ISOFIX. Press the ISOFIX adjuster button to extend the ISOFIX.
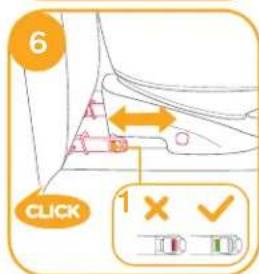
Make sure that both ISOFIX connectors are securely attached to their ISOFIX anchor points. The colors of the indicators on both ISOFIX connectors should be completely green.
If a tighter install or increased cabin space is required, then press the ISOFIX adjuster button 5-1 and push to adjust.
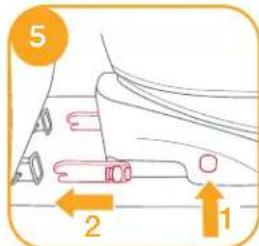
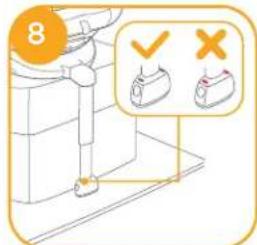
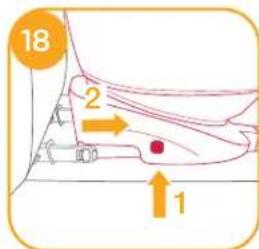
After attaching the ISOFIX, pull the load leg downward to floor. When the load leg indicator shows green, the load leg is installed correctly.
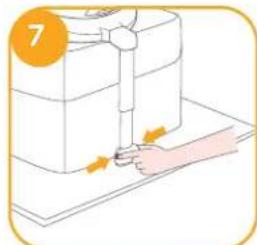
! Squeeze the load leg releasing button, then adjust the load leg length.
The load leg has 12 positions. When the load leg indicator shows red this means the load leg is in the wrong position.
Make sure the load leg is in full contact with the vehicle floor pan. Red means it is installed incorrectly.
! Check to make sure the base is securely installed by pulling on both ISOFIX connectors.
! The ISOFIX connectors must be attached and locked onto the ISOFIX anchor points.
The load leg must be installed correctly with green indicator.
Please refer to rear facing mode and recline positions mode in section to use the child restraint.

Removing the base
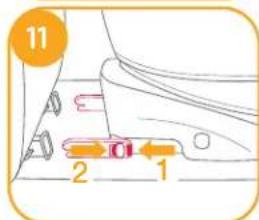
To remove from the vehicle press the ISOFIX adjuster button 1-1 and pull the base back from the seat.
Then press and release the connectors from the vehicle's ISOFIX.
To prevent damage during transit, press the ISOFIX adjuster button 12-1 and fold the connector completely. 12-2

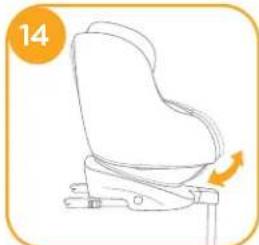
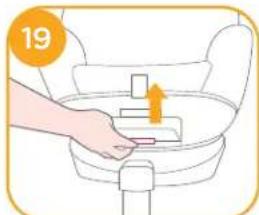
Recline Adjustment
see images 18-19
Squeeze the recline adjustment button, to adjust the child restraint to the proper position. The recline angles are shown as
Please recheck the load leg position after reclining. There are 5 recline positions for rear facing mode and 5 recline positions for forward facing mode.
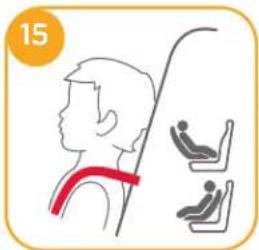
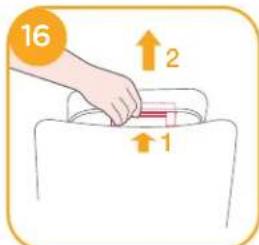
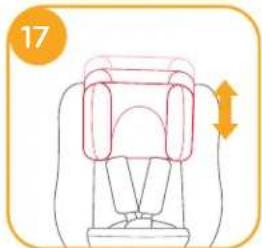
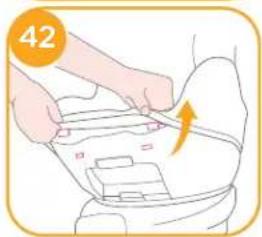
Height Adjustment for Head Support and Shoulder Harnesses
see images 15-17
- Please adjust the head support and check if the shoulder harnesses are at the correct height according to 15
When used rear facing, the shoulder harness height must be even with child's shoulders.
When used forward facing, the shoulder harness height must be even with child's shoulders. 15
- Squeeze the head support adjustment lever, meanwhile pull up or push down on the head support until it snaps into one of the 6 positions. The head support positions are shown as
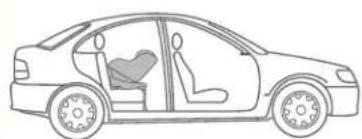
Using in the Rear Facing Mode (Rearward Facing Mode/for Child under 18kg /infant - 4 years old)
see images 3 - 8
Please install the child restraint on the rear vehicle seat, and then put the child in the child restraint.
see images 16-27
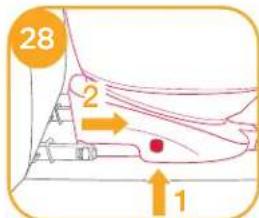
- Press the ISOFIX adjuster button 15-1 and pull the base back from the vehicle seat.
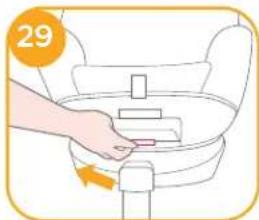
- Press the rotating button to rotate for easier side loading/unloading of the child, then rotate back to desired direction.
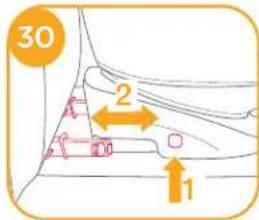
3.If a tighter install or increased cabin space is required, then press the ISOFIX adjuster button -1 and push to adjust. -2
The ISOFIX connectors must be attached and locked onto the ISOFIX anchor points.
The load leg must be installed correctly with green indicator.
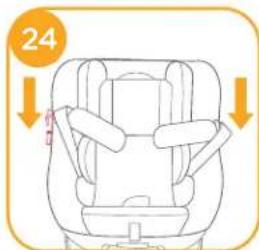
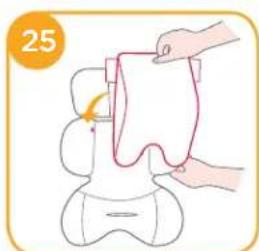
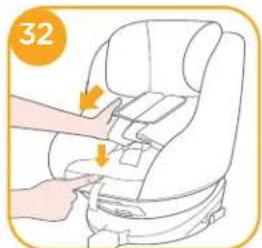
Securing Child
After the child is placed into the seat, check whether the Shoulder Harness Straps are at proper height.
- Press the webbing adjustment button, while pulling out the shoulder harnesses to the proper length.
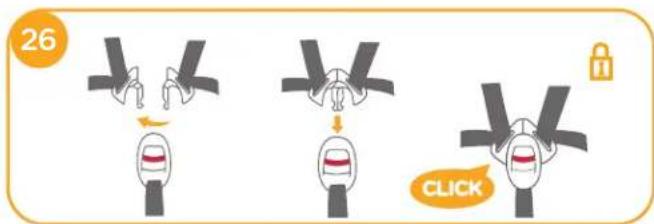
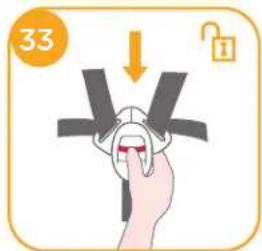
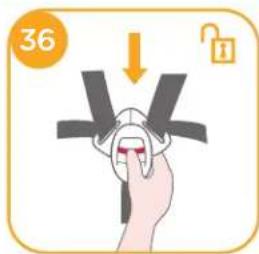
- Unlock the buckle of the harnesses by pressing the red button.
- Fix the buckles on the both sides of seat to make placing the child in rear facing mode more convenient.
- Use Infant insert is for children's protection.

-
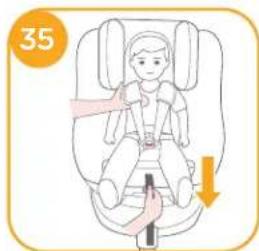
Place the child into the child restraint and pass both arms through the harnesses.
! After the child is seated, recheck whether the shoulder harnesses are at the proper height. -
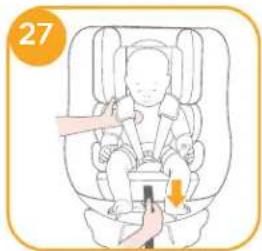
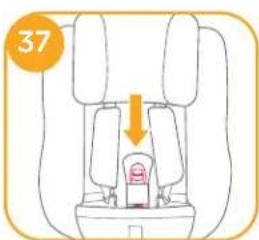
Engage the buckle. Please refer to 29
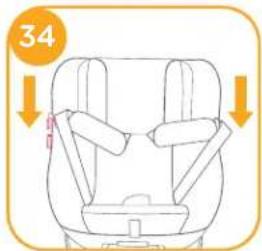
7.Pull down the adjustment webbing and adjust it to the proper length to make sure your child is properly secured.
Make sure the space between the child and the Shoulder Harness Straps is about the thickness of one hand.
8. If steps 2&3 are taken when arriving at your destination whilst removing the child, then the harness will be positioned so that it is out of the way and ready for loading upon your return to the vehicle.
Using in the Forward Facing Mode (Forward Facing Mode/for Child between 9-18kg / 1-4 years old)
see images

Please install the child restraint on the vehicle seat, and then put the child in the child restraint.
see images


- Press the ISOFIX adjuster button -1 and pull the base back from the vehicle seat. 25-2
- Press the rotating button to rotate for easier side loading/unloading of the child, then rotate forwards to desired direction.
- If a tighter install or increased cabin space is required, then press the ISOFIX adjuster button and push to adjust. -2
The ISOFIX connectors must be attached and locked onto the ISOFIX anchor points.
The load leg must be installed correctly with green indicator.
Securing Child
After the child is placed into the seat, check whether the Shoulder Harness Straps are at proper height.
- Press the webbing adjustment button, while pulling out the shoulder harnesses to the proper length.
- Unlock the buckle of the harnesses by pressing the red button.
- Fix the buckles on the both sides of seat to make placing the child in forward facing mode more convenient.
- When installing the child restraint in the forward facing mode, do not use the infant insert.
- Place the child into the child restraint and pass both arms through the harnesses. Engage the buckle.
After the child is seated, recheck whether the shoulder harnesses are at the proper height.
6. Pull down the adjustment webbing and adjust it to the proper length to make sure your child is properly secured.
Make sure the space between the child and the Shoulder Harness Straps is about the thickness of one hand.
7. If steps are taken when arriving at your destination whilst removing the child, then the harness will be positioned so that it is out of the way and ready for loading upon your return to the vehicle.
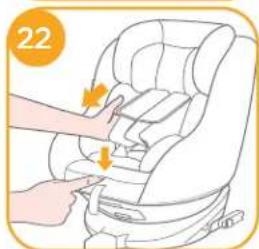
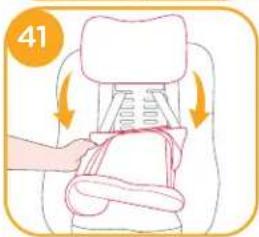
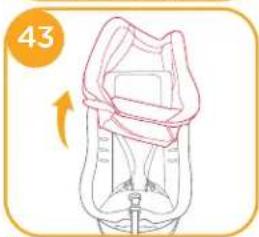
Detach Soft Goods
see images 65-8
Press the red button to disengage the buckle.
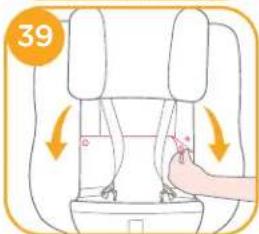
Follow steps 7-3 to detach soft goods.
To re-attach the soft goods please repeat the above steps in the reverse step.

Care and Maintenance
! After removing the wedge from the insert, please store it somewhere that the child cannot access it.
Please wash the seat cover and inner padding with cold water under 30^ .
Do not iron the soft goods.
Do not bleach or dry clean the soft goods.
! Do not use undiluted detergents, gasoline or other organic solvent to wash the child restraint or base. It may cause damage to the child restraint.
Do not wring out the seat cover and inner padding to dry. It may leave the seat cover and inner padding with wrinkles.
Please hang dry the seat cover and inner padding in the shade.
Please remove the child restraint and base from the vehicle seat if not in use for a long period of time. Put the child restraint in a cool, dry place where your child cannot access it.
Do not tamper with the harness connectors during cleaning.


Lamplig for Barn vager under 18 kg
Allison Baby UK Ltd,
Venture Point, Towers Business Park
Rugeley, Staffordshire, WS15 1UZ