SDR 900 A1 - Steam cleaner SILVERCREST - Free user manual and instructions
Find the device manual for free SDR 900 A1 SILVERCREST in PDF.
| Product type | Steam cleaner |
| Brand | SilverCrest |
| Model | SDR 900 A1 |
| Power supply | 220-240 V ~, 50 Hz |
| Rated power | 900-1050 W |
| Protection type | IPX4 |
| Water tank capacity | 350 ml (max. 250 ml of water for approx. 5 minutes of steam) |
| Included accessories | Flexible extension, lance, curved nozzle, furniture nozzle, round brush, squeegee, cotton cover, funnel, measuring cup, safety lock |
| Main functions | Steam cleaning for smooth surfaces, textiles, joints, windows, etc. |
| Child safety | Yes, child safety switch |
| Overheat protection | Yes |
| Maintenance and cleaning | Clean with a damp cloth; use distilled water if water is hard; cotton cover machine washable at 60 °C |
| Warranty period | 3 years |
| Dimensions (approx.) | 30 x 20 x 25 cm |
| Weight (approx.) | 1.3 kg |
| Housing material | Plastic |
Frequently Asked Questions - SDR 900 A1 SILVERCREST
User questions about SDR 900 A1 SILVERCREST
0 question about this device. Answer the ones you know or ask your own.
Ask a new question about this device
Download the instructions for your Steam cleaner in PDF format for free! Find your manual SDR 900 A1 - SILVERCREST and take your electronic device back in hand. On this page are published all the documents necessary for the use of your device. SDR 900 A1 by SILVERCREST.
USER MANUAL SDR 900 A1 SILVERCREST
Operating instructions
SE
ANGTVATT
Bruksanvisning
FR BE
NETTOYEUR VAPEUR À MAIN
Mode d'emploi
DE AT CH
HANDDDAMPFREINIGER
Bedienungsanleitung
F
KÄSIKÄYTTOINEN HÖYRYPESURI
Käytöohje
DK
HÄNDHOLDT DAMPRENSER
Before reading, unfold the page containing the illustrations and familiarise yourself with all functions of the device.
H
GB/IE Operating instructions Page 1
| FI | Käytöohje | Sivu | 17 | |
| SE | Bruksanvisning | Sidan | 33 | |
| DK | Betjeningsvejledning | Side | 49 | |
| FR/BE Mode d'emploi Page 65 | ||||
| NL/BE Gebruiksaanwijzing Pgina 81 | ||||
| DE/AT/CH | Bedienungsanleitung | Seite 97 | ||
Contents
Introduction 2
Copyright 2
Warning notes. 2
Intended use 3
Package contents 4
Description of appliance/accessories 5
Technical data 5
Safety guidelines 6
Operating the appliance 8
Filling/refilling with water 8
Operating the appliance. 10
Areas of application 11
Fitting/removing attachments. 11
Child safety lock 13
Cleaning 13
Storage 14
Troubleshooting 14
Disposal of the appliance 15
Disposal of packaging materials 15
Notes on the Declaration of Conformity 15
Warranty 16
Service 16
Importer 16

Introduction
Congratulations on the purchase of your new appliance.
You have selected a high quality product. The operating instructions are part of this product. They contain important information on safety, usage and disposal. Before using the product, familiarise yourself with all handling and safety instructions. Use the product only as described and for the range of applications specified. Keep these operating instructions in a safe place. Please also pass these operating instructions on to any future owner(s).
Copyright
This documentation is protected by copyright.
Any copying or reproduction, including in the form of extracts, or any reproduction of images (even in a modified state), is permitted only with the written authorisation of the manufacturer.
Warning notes
The following warnings are used in these operating instructions:

WARNING
A warning at this hazard level indicates a potentially hazardous situation.
Failure to avoid this hazardous situation could result in physical injury.
Follow the instructions in this warning to prevent physical injury.
CAUTION
A warning at this hazard level indicates potential property damage.
Failure to avoid this situation could result in property damage.
Follow the instructions in this warning to prevent property damage.
NOTE
A note provides additional information that will assist you in using the appliance.
Intended use
This appliance is a steam cleaner designed for the removal of dirt and stains in domestic households, for example ...
- smooth surfaces: work surfaces, tiles, glazed tiles, windows, mirrors
- hard-to-reach areas: corners, joints, blinds, WC, bathroom fittings, etc.
- textiles: curtains, cushions, clothing, car seats.
This appliance is not intended:
- for outdoor use,
- for use with liquids other than water,
- for use in commercial or industrial applications.
WARNING
Danger if not used for the intended purpose!
The appliance may pose a hazard if it is not used for its intended purpose and/or if it is used for any other purpose.
Use the appliance only for its intended purpose.
Observe the procedures described in these operating instructions.
NOTE
Incorrect use of the appliance and/or using it for an alternative purpose can be dangerous. Use the appliance only for its intended purpose. Observe the procedures described in these operating instructions.
Claims of any kind for damage resulting from misuse, incompetent repairs, unauthorised modification or the use of unauthorised spare parts will not be accepted. The risk shall be borne solely by the user.
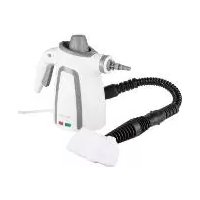
Package contents
The appliance is supplied with the following components as standard:
- Steam cleaner
- Extension hose
- Extension nozzle
Angle nozzle - Upholstery nozzle
- Round brush
Safety valve
Pulling attachment
Cotton cover
Funnel - Measuring cup
- Operating instructions
Remove all parts of the appliance from the packaging and remove all packaging materials.
WARNING
Risk of suffocation!
- Packaging material must not be used as a plaything. Risk of suffocation.
NOTE
- Check the package for completeness and for signs of visible damage.
- If the consignment is incomplete or damaged due to defective packaging or carriage, contact the Service hotline (see the section Service).
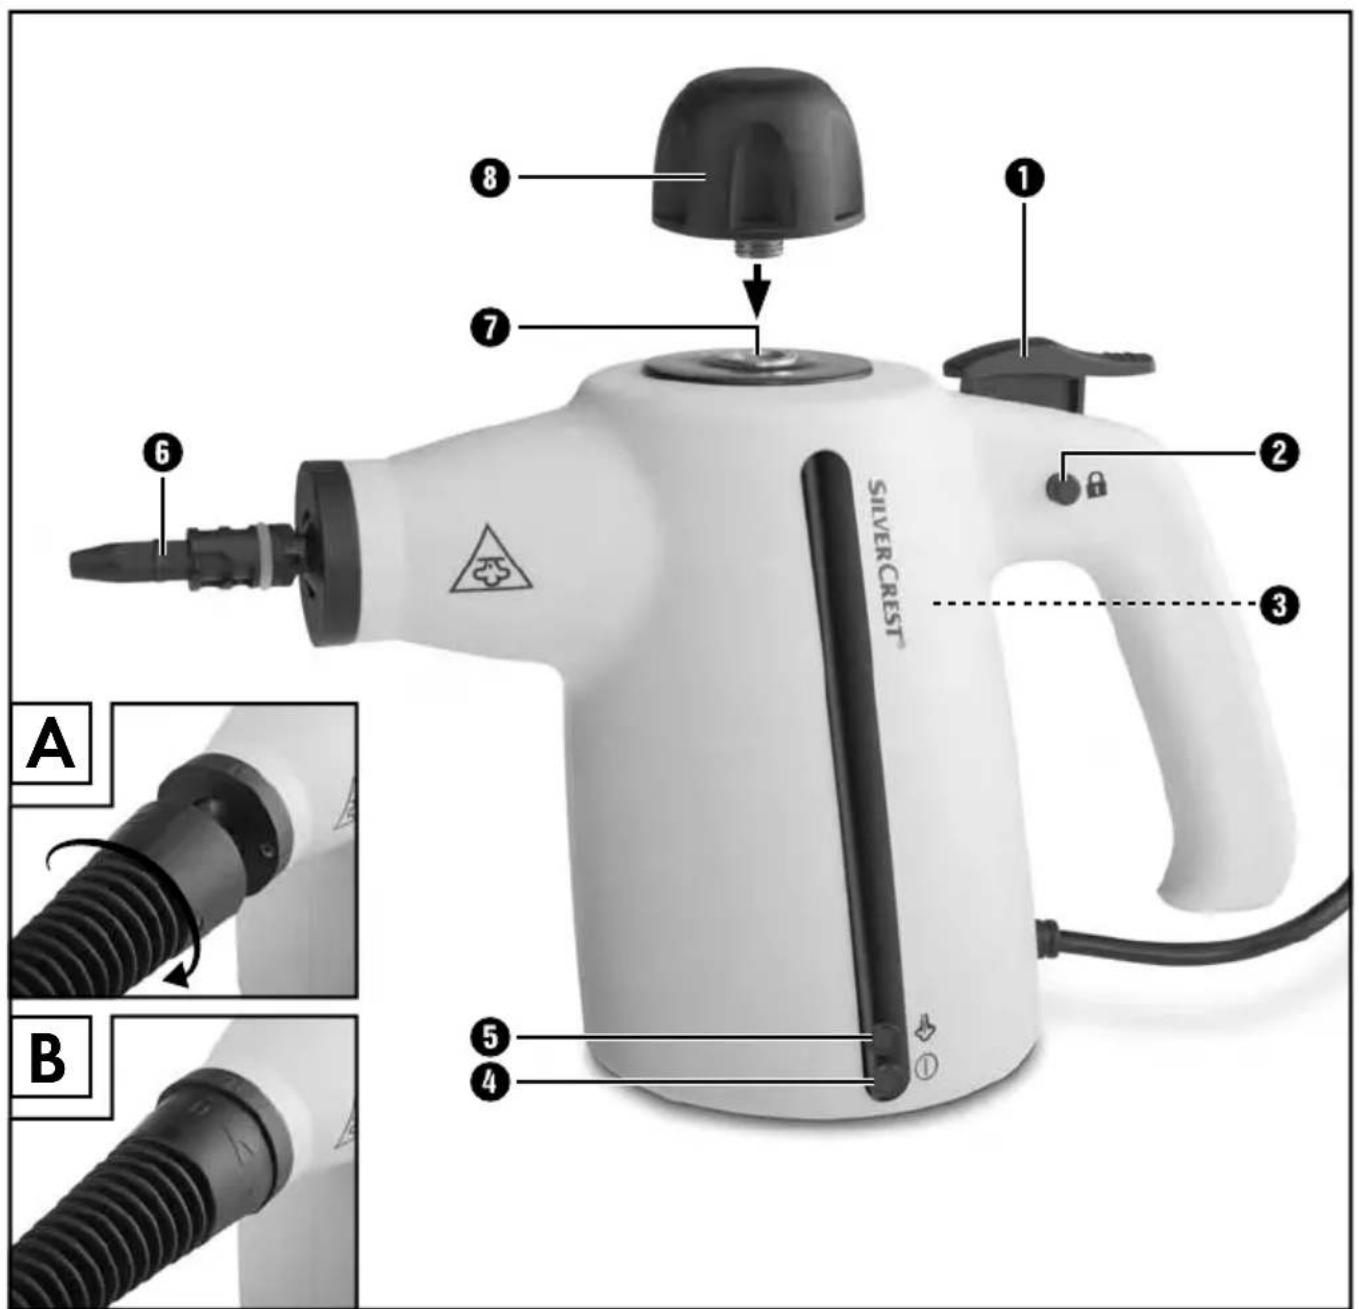
Description of appliance/accessories
Steam lever
"Child safety lock" button
Water tank
Red control lamp
Green control lamp
6 Steam nozzle
Water tank filler opening
Safety valve
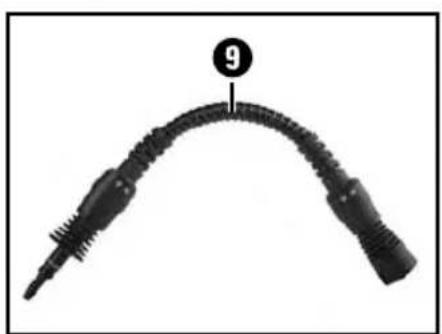
9 Extension hose
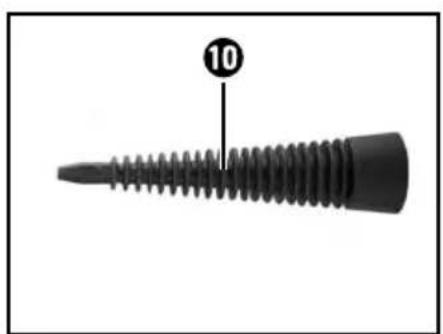
10 Extension nozzle
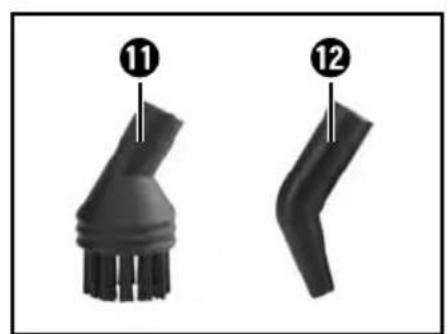
Round brush
12 Angle nozzle
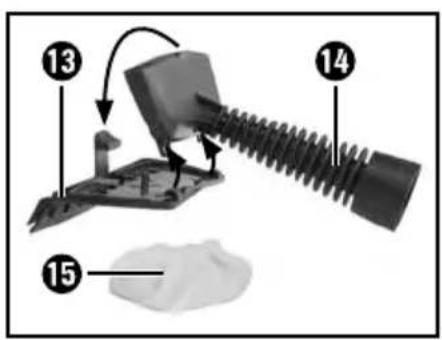
Squeegee attachment
14Upholstery nozzle
15 Cotton cover
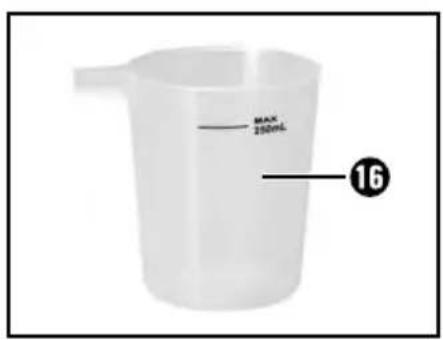
16 Measuring cup
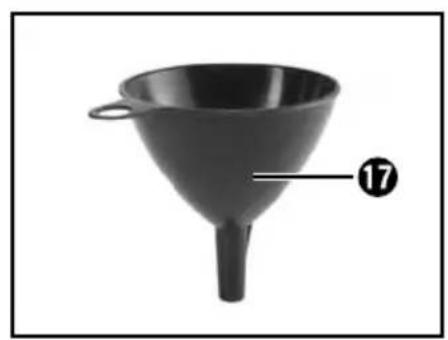
Funnel
Technical data
| Mains voltage 220–240 V | ~, 50 Hz |
| Rated power 900–1050 W | |
| Appliance protection rating IPX4 | |
| Water tank capacity | 350 ml With a water fi lling of 250 ml (MAX), steam can be generated for about 5 minutes. |
Safety guidelines

RISK OF ELECTRIC SHOCK
- Connect the appliance only to mains power sockets supplying a mains power voltage of 220 - 240V /50Hz
In the event of operating malfunctions, and before cleaning the appliance, disconnect the plug from the mains power socket.
-
To disconnect the power cable, always pull the plug from the socket, do not pull the power cable itself.
-
Do not kink or crush the power cable, and route the cable so that it cannot be stepped on or tripped over.
-
To avoid risks, arrange for defective plugs and/or power cables to be replaced at once by qualified technicians or our Customer Service Department.
-
Ensure that the power cable does not become wet or moist during use. Route the cable in such a way that it cannot be crushed or damaged.
-
Should the appliance, the power cable or the plug become damaged, arrange for them to be repaired by Customer Services to avoid hazardous situations.
-
Disconnect the appliance from the mains power socket before fi lling it with water, changing accessories or cleaning it.
Use the appliance only in dry indoor areas, not outdoors.
Never submerse the appliance in water or other liquids!
-
Never aim the steam jet directly at electrical appliances or equipment which contains electrical components, such as the interior of ovens.
-
Never leave a heat-generating device unattended! After use or during work pauses, always remove the plug from the mains power socket. The appliance heats up and generates steam pressure continuously when the plug is connected to a mains power socket!
-
Use the appliance only with dry hands and never without shoes (i.e. not barefoot). This will help reduce the effect of an electric shock in the event of a malfunction.
-
Never aim the appliance at moisture-sensitive objects.
This appliance may be used by persons with limited physical, sensory or mental capabilities or lack of experience and knowledge, provided that they are under supervision or have been told how to use the appliance safely and are aware of the potential risks. The appliance must not be used as a plaything by children.
WARNING! RISK OF INJURY!
Never remove the safety valve if steam is still exiting the steam nozzle!
- Do not operate the appliance with an empty water tank. When the water reserve is used up, remove the power cable to prevent the appliance from overheating.
The accessories will get hot during use! There is a risk of scalding!
- Allow the accessories used to cool down before dismantling them.
- Use only the original accessory parts for this appliance. Other accessories may not meet the safety requirements.
The appliance may not be used if it has been dropped, if there are any obvious signs of physical damage or if it is leaking.
The appliance must be kept out of the reach of children if it is switched on or is cooling down.
- Wear gloves, protective glasses and breathing protection equipment when attempting to remove substances that could be hazardous to health.
- Never direct the steam toward people or animals. Hot steam can cause serious injuries!
WARNING! RISK OF SCALDING!

This symbol warns you about escaping steam. Please follow the safety instructions!
CAUTION - PROPERTY DAMAGE!
-
Start by carrying out a test on an unobtrusive area to be certain that the material is suitable for cleaning with a steam cleaner, for instance:
-
Painted/varnished wood or leather can be bleached by steam.
- Unprotected wood can swell up.
- Protective wax coatings can be dissolved by steam.
Plastics can become tarnished from the effcts of steam. - Soft plastics can deform when exposed to steam.
- Cold glass or mirror surfaces can crack when sprayed with hot steam.
If you wish to clean windows, you must first preheat them, for instance by applying the steam over large areas from a greater distance, then moving in progressively closer.
Acrylics, velvet and silk react sensitively to hot steam, as do plastic fi bres.
Operating the appliance
WARNING! RISK OF INJURY!
To ensure fault-free operation and a long service life for the appliance, pay heed to the following instructions:
- Do not press the steam level until the green control lamp lights up. If you press too early, it may cause an accumulation of hot water in the steam nozzle which will drip or spray from the nozzle. There is a risk of scalding.
Before switching off, allow all of the steam to escape from the appliance. Press the steam lever until no more steam comes out of the steam nozzle.
If the appliance is to be used in continuous operation, the "Child safety lock" button 2 with the symbol 1 must be pressed before switching off.
Filling/refi lling with water
RISK OF ELECTRIC SHOCK
Always disconnect the plug from the mains power socket before you add water to the water tank 3!
Open the safety vo8e
CAUTION - PROPERTY DAMAGE!
Do not put any additives or cleaning agents in the water tan 3!
NOTE
Ensure that you fill the appliance's water tag with around 250~ml of water.
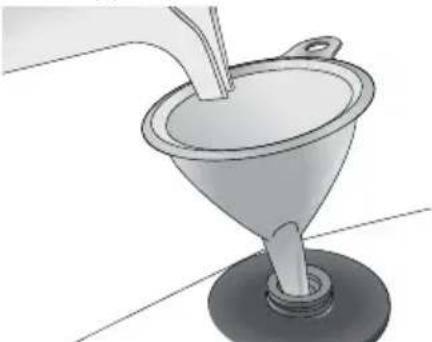
Fill the water with water through the fi Iller opening.
To do this, use the supplied measuring 16 and the funnel 17 for assistance (see figure). Fill the measuring cup with water up to the marking line (approx. 250 ml).
Reclose the safety vc8e
If there is no more water in the water tan, no steam will come out when the steam lever is pressed The water tank must be filled as follows:
Remove the plug from the mains power socket.
Wait about 10 seconds.
Slowly open the safety valve before fully opening up the valve, wait a few seconds until the hissing of the water vapour stops.
Fill the water t3 kwith water.
Reclose the safety v8e
If the mains water at your locality is rated as hard, it is recommended that you mix the mains water with distilled water. Otherwise, the appliance could calcify prematurely and clog the steam nozzle ⑥.
To extend the optimal functioning of the appliance, mix the mains water with distilled water as per the following table.
| Water hardness | Ratio of distilled water to mains water |
| very soft/soft 0 | |
| medium 1:1 | |
| hard 2:1 | |
| very hard 3:1 |
The water hardness level of your tap water can be queried at your local water works.
Operating the appliance
1) Insert the plug into a mains power socket.
The red control lamp 4 lights up to indicate that there is a connection to the mains electricity.
2) As soon as the appliance is ready to use, the green control lamp lights up. The red control lamp stays lit.
NOTE
While heating up, steam may occasionally escape from the steam nozzle.
3) Press the steam lever ① downwards. Steam comes out of the steam nozzle ⑥ . If the steam pressure drops, the green control lamp ⑤ will go out.
Release the steam lever 1 until the green control lamp 5 comes back on.
4) If you want to work with the appliance in continuous operation, press the steam lever 1 down and at the same time press the "Child safety lock" button 2 with the 3 on.
5) To end continuous operation, press the "Child safety lock" button with the icon.
NOTE
If water drips out of the steam nozzle during operation or the steam pressure falls, release the steam lever The appliance needs to heat up again. Wait until the green control lamp lights up again.
The steam cleaner has a thermal cut-out. It switches itself off automatically in case of overheating (e.g. due to an empty water tank). If this happens, pull out the mains plug and refill the water tank.
WARNING! RISK OF INJURY!
If you stop working for an extended period of time and leave the appliance switched on, steam may occasionally escape even though the steam lever is not pressed.
Areas of application
You can clean either by using steam directly from the steam nozzle or you can fit an accessory.
- Do not use an accessory if you want to clean items such as toilets and sinks, taps and drains, windows, furniture, fabrics, shutters or mirrors.
You can easily remove water and dissolved dirt from smooth surfaces after cleaning using the squeezegee attachment 13.
NOTE
The closer you hold the steam nozzle to the surface to be cleaned, the better the effect. The steam pressure and temperature are at their highest directly after leaving to the steam nozzle.
Stubborn stains and dirt must be soaked with water beforehand.
Use the angle nozzl12 for tight corners or joints, or hard-to-reach places.
Use the round brus for stubborn soiling, for example, on wheel rims.
Fitting/removing attachments
WARNING! RISK OF INJURY!
Always remove the plug from the mains power socket before you fit/remove an attachment.
Wait until the appliance has cooled down before you fit/t/remove an attachment.
Wait until all of the steam has dissipated before you fit/remove an attachment.
Extension hose
Push the extension h9eon to the steam nozzle 6 as far as the stop. The marking line on the extension hose 9 and the marking line on the appliance must be aligned with each other (see fold-out page Figure A).
Turn anticlockwise until both marking lines on the extension hose 9 are aligned with both marking lines on the appliance. The extension hose 9 remains locked in this position (see fold-out page Figure B).
NOTE
The fixture on the appliance has a joint so that the attachment can be aligned to the best usage position. This is, however, not possible with the extension hose.
The extension has 9 is removed in the reverse order.
Extension nozzle
Push the extension no10con to the steam nozzle 6 as far as the stop. The marking line on the extension nozzle 10 and the marking line on the appliance must be aligned with each other (see fold-out page Figure A).
Turn anticlockwise until both marking lines on the extension nozzle 10 are aligned with both marking lines on the appliance. The extension nozzle 10 remains locked in this position (see fold-out page Figure B).
NOTE
The fixture on the appliance has a joint so that the attachment can be aligned to the best usage position. This is, however, not possible with the extension nozzle 10.
The extension nozzle is removed in the reverse order.
Assembling the squeezegee
Remove the upholstery no14and place this together with the two brackets onto the squeezegee attachment 13.
Then press the upholstery noz4under the mount of the squeezegee attachment 13 (see fold-out page).
Upholstery nozzle
Push the upholstery noz14con to the steam nozzle 6 as far as the stop. The marking line on the upholstery nozzle 14 and the marking line on the appliance must be aligned with each other (see fold-out page Figure A).
Turn anticlockwise until both marking lines on the upholstery nozzle 14 are aligned with both marking lines on the appliance. The upholstery nozzle 14 remains locked in this position (see fold-out page Figure B).
A cotton covel is supplied for use with the upholstery nozzle 14. This can be used for the cleaning of sensitive surfaces, such as sofas and armchairs.
NOTE
The fixture on the appliance has a joint so that the attachment can be aligned to the best usage position. This is, however, not possible with the upholstery nozzle 14.
The upholstery nozzle is removed in the reverse order.
Angle nozzle and round brush
Both of these attachments can be used either on the extension hos or on the extension nozzle or directly onto the steam nozzle 6.
Push the respective attachment on the hexagonal mount.
NOTE
- The fixture on the appliance has a joint so that the attachment can be aligned to the best usage position.
The respective attachment can now be turned to the desired position.
Child safety lock
This appliance is equipped with a child safety lock 2.
To activate the child safety lock, press the "Child safety lock" button with the icon. The steam lever 1 an now no longer be pressed down.
To deactivate the child safety lock, press the "Child safety lock" button with the icon. The steam lever can now be activated again.
Cleaning

RISK OF ELECTRIC SHOCK
Always remove the plug from the mains power socket before cleaning the appliance.

You must never immerse the appliance in water when cleaning it or it under running water.

WARNING - RISK OF INJURY!
Allow the appliance to cool sufficiently before cleaning it.

UTION - PROPERTY DAMAGE!
- Do not use aggressive, chemical or abrasive cleaning agents! They could irreparably damage the surface!
Remove the power plug from the socket.
Allow the appliance to cool down.
Empty the water t3k
Clean the appliance and the accessories with a moist cloth. For stubborn dirt, wipe, adding mild detergent to the cloth.
If it is dirty, the removable cotton cover can be cleaned in accordance with the symbols on the label:
| The cotton cover 15 is machine washable at 60°C. |
| The cotton cover 15 can be dried at a low temperature in a tumble drier. |
| Do not iron the cotton cover 15. |
Storage
Store the cleaned and dried appliance in a clean and dust-free location.
Troubleshooting
| PROBLEM | POSSIBLE CAUSE | POSSIBLE SOLUTIONS |
| The appliance is not working. | The plug is not con- nected. | Connect the appliance to a mains power socket. |
| The appliance is damaged. | Contact the Customer Service department. | |
| No steam is produced. | The water tank 3 is empty. | Fill the water tank 3 with water. |
| The appliance is not yet heated up. | Wait until the green control lamp 5 lights up. | |
| The green control lamp 5 lights up and then goes out again. | This is not a fault: the temperature dropped for a short time and the appliance started heating up again. | |
| The steam volume is low. | The temperature is too low. | Wait until the appliance has heated up again. |
| Water drips from the steam nozzle 6. | The temperature is too low. | Wait until the appliance has heated up again. |
Disposal of the appliance
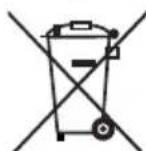
Under no circumstances should you dispose of the appliance with the normal household waste. This product is subject to the provisions of European Directive 2012/19/EU.
Dispose of the appliance via an approved waste disposal company or your municipal waste disposal facility. Please observe applicable regulations. Please contact your waste disposal facility if you are in any doubt.
Disposal of packaging materials

The packaging protects the appliance from damage during carriage.
The packaging materials have been selected for their environmental friendliness and ease of disposal, and are therefore recyclable.
Returning the packaging to the materials cycle conserves raw materials and reduces the amount of waste that is generated. Dispose of packaging materials that are no longer needed in accordance with applicable local regulations.
NOTE
If possible, keep the original packaging of the appliance during the warranty period so that the device can be packed properly for returning in the event of a warranty claim.
Notes on the Declaration of Conformity
This appliance complies with the essential requirements and other relevant provisions of the European Electromagnetic Compatibility Directive 2004/108/EC, the Low Voltage Directive 2006/95/EC and the RoHS Directive 2011/65/EU. The complete Declaration of Conformity, in its original form, is available from the importer.

Warranty
You are provided a 3-year warranty on this appliance, valid from the date of purchase. This appliance has been manufactured with care and inspected meticulously prior to delivery.
Please retain your receipt as proof of purchase. In the event of a warranty claim, please contact your Customer Service unit by telephone. This is the only way to guarantee free return of your merchandise.
NOTE
The warranty is valid only for material or manufacturing faults, not for transport damage, parts subject to wear or damage to fragile parts, e.g. switches.
This appliance is intended solely for private use and not for commercial purposes. The warranty shall be deemed void in the case of misuse or improper handling, use of force or interventions which were not carried out by one of our authorised Service centres.
Your statutory rights are not restricted by this warranty.
The warranty period is not prolonged by repairs made under the warranty. This also applies to replaced and repaired components.
Any damage or defects present at the time of purchase must be reported immediately after unpacking, but no later than two days after the date of purchase. Repairs carried out after expiry of the warranty period shall be subject to charge.
Service
GB Service Great Britain
Tel.: 0871 5000 720 (£ 0.10/Min.)
E-Mail: kompernass@lidl.co.uk
IAN 103808
IE Service Ireland
Tel.: 1890 930 034
(0,08 EUR/Min., (peak))
(0,06 EUR/Min., (off peak))
E-Mail: kompernass@lidl.ie
IAN 103808
Hotline availability: Monday to Friday 08:00 - 20:00 (CET)
Importer
KOMPERNASS HANDELS GMBH
BURGSTRASSE 21
44867 BOCHUM
GERMANY
www.kompernass.com
Sisällysluettelo
KOMPERNASS HANDELS GMBH
BURGSTRASSE 21
44867 BOCHUM
GERMANY
www.kompernass.com
KOMPERNASS HANDELS GMBH
BURGSTRASSE 21
44867 BOCHUM
GERMANY
www.kompernass.com
Indholdsfortegnelse
Indledning 50
Ophavsret 50
Advarsler 50
KOMPERNASS HANDELS GMBH
BURGSTRASSE 21
44867 BOCHUM
GERMANY
www.kompernass.com
Table des matieres
Introduction 66
Droits d'auteur 66
Avertissements 66
KOMPERNASS HANDELS GMBH
BURGSTRASSE 21
44867 BOCHUM
GERMANY
www.kompernass.com
Inhoud
Inleiding 82
Auteursrecht. 82
Waarschuwingen. 82
WAARSCHUWING! LETSELGEVAAR!
WAARSCHUWING! LETSELGEVAAR!
WAARSCHUWING! LETSELGEVAAR!
WAARSCHUWING! LETSELGEVAAR!
WAARSCHUWING-LETSELGEVAAR!
KOMPERNASS HANDELS GMBH
BURGSTRASSE 21
44867 BOCHUM
GERMANY
www.kompernass.com
Inhaltsverzeichnis
Einleitung 98
KOMPERNASS HANDELS GMBH
BURGSTRASSE 21
44867 BOCHUM
GERMANY
www.kompernass.com
KOMPERNASS HANDELS GMBH
BURGSTRASSE 21
44867 BOCHUM
DEUTSCHLAND/GERMANY
www.kompernass.com
Last Information Update · Tietojen tila · Informationsstatus
Tilstand of information · Version des informations
Stand van de informatie · Stand der Informationen:
09/2014·Ident.No.:SDR900A1-092014-3