BAR916HG - Weather Station OREGON SCIENTIFIC - Free user manual and instructions
Find the device manual for free BAR916HG OREGON SCIENTIFIC in PDF.


User questions about BAR916HG OREGON SCIENTIFIC
0 question about this device. Answer the ones you know or ask your own.
Ask a new question about this device
Download the instructions for your Weather Station in PDF format for free! Find your manual BAR916HG - OREGON SCIENTIFIC and take your electronic device back in hand. On this page are published all the documents necessary for the use of your device. BAR916HG by OREGON SCIENTIFIC.
USER MANUAL BAR916HG OREGON SCIENTIFIC
Wireless Weather Station with World Time Clock
Model: BAR916HG
USER MANUAL
CONTENTS
Introduction 3
Product Overview 4
Front View 4
Back View 5
Table Stand and Wall Mount.... 5
LCD Display 6
Remote Sensor (RTGR328N) 9
Getting Started....9
Batteries 9
Change Settings.... 10
Remote Sensor 10
Set Up Thermo / Hygro Sensor (RTGR328N)..... 11
Sensor Data Transmission 12
Search for Sensor 12
Clock and Calendar 12
Radio-Controlled Clock 12
Turn Radio-Controlled Clock ON / OFF 13
Set Clock.... 14
Switch Clock Display 14
World Time Clock 14
Alarms 19
Set Daily Alarm.... 19
Set Pre-Alarm.... 19
Activate Alarm 20
Snooze 20
Barometer....20
View Barometer Area 20
Select Measurement Unit.... 20
View Barometer History 20
Bar Chart Display 21
Set Altitude 21
Weather Forecast 21
Weather Forecast Icons 21
UV Measurement 22
New Additional UV Features 22
Temperature and Humidity 23
View Temperature and Humidity Area 24
Select Measurement Unit.... 24
Select Sensor Channel 24
Minimum / Maximum Records.... 24
Temperature and Humidity Trend.... 24
Comfort Zone 25
Heat Index 25
Backlight 25
Reset System 25
Safety and Care 26
Warnings 26
Troubleshooting 26
Specifications 27
About Oregon Scientific 28
EU-Declaration of Conformity 29
INTRODUCTION
Thank you for selecting the Oregon Scientific ^™ Wireless Weather Station with World Time Clock (BAR916HG). This powerful device bundles time keeping, weather monitoring, indoor and outdoor temperature and humidity readings, barometric trends and altitude adjustment, into a single tool you can use from the convenience of your home.
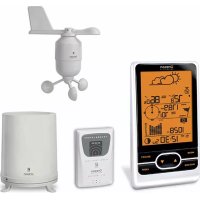
In this box, you will find:
- Main unit
• Remote sensor (RTGR328N)
• Optional UV sensor (UVR128) - Batteries
BAR916HG --- BAR916HG Main Unit + RTGR328N Remote Sensor
NOTE The main unit is compatible with the following sensors: THGR228N, THGR328N, THR228N, THR328N, THWR288. Additional sensors are sold separately. Please contact your local retailer for more information. Keep this manual handy as you use your new product. It contains practical step-by-step instructions, as well as technical specifications and warnings you should know.
PRODUCT OVERVIEW
FRONT VIEW
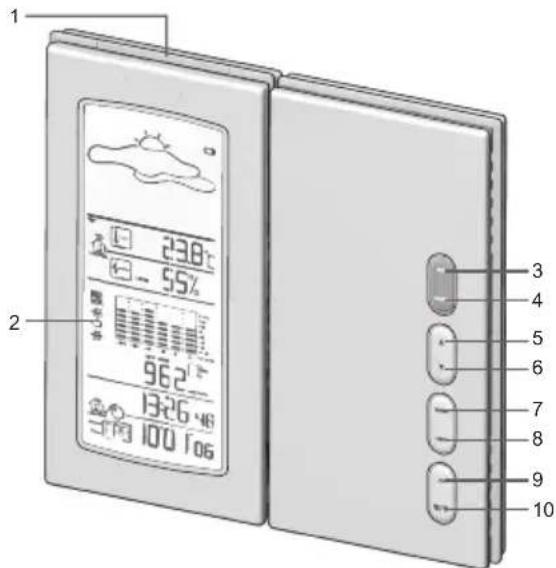
text_image
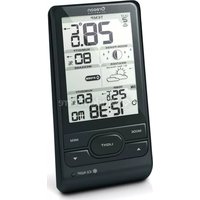
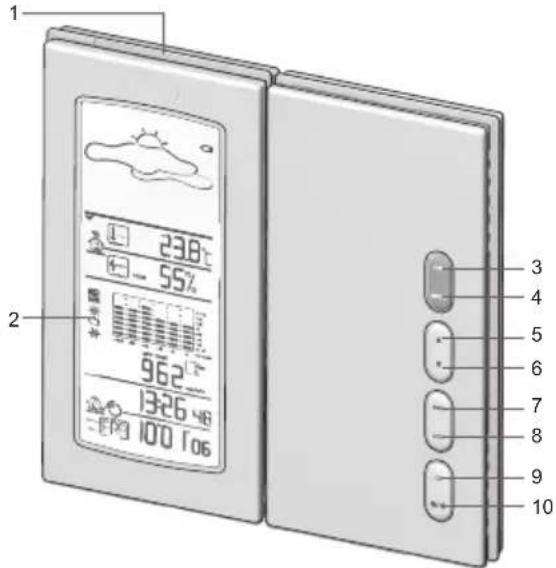
1 2 3 4 5 6 7 8 9 10 23.8°C - 55% 96.2 13:26:46 100 106- SNOOZE / LIGHT: Activate 8-minute snooze or backlight
- LCD display
- SEL: Switch areas
- MODE: Change settings / display
- Increase setting / activate radio-controlled clock
- Decrease setting / deactivate radio-controlled clock
- MEM: View current, maximum and minimum temperature / humidity / UV readings
- HIST: View historical barometer and UV readings
- CH: Switch remote sensor display
- ▼/ *View alarm status; set alarm radio-controlled clock
BACK VIEW
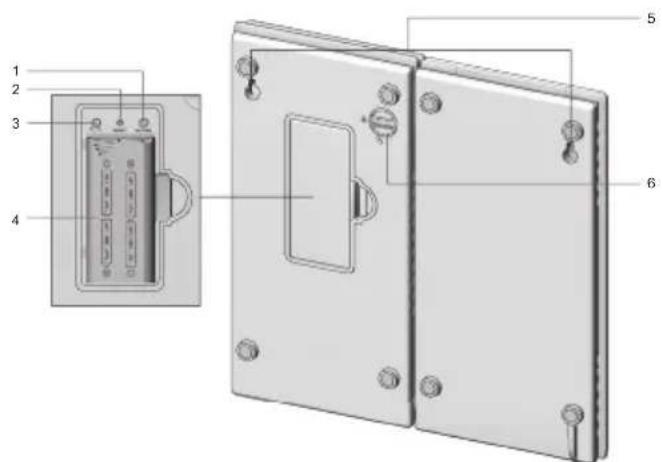
text_image
Technical diagram of a door panel with labeled components including front panel, side panel, and internal components- mb / inHg switch (in battery compartment)
- RESET button (in battery compartment)
- °C / °F switch (in battery compartment)
- Battery compartment (cover open)
- Wall mount holes
- Lock button -place the 2 parts of the unit next to each other, as shown opposite. Twist the lock button to secure the 2 unit parts together. Twist it anti-clockwise to release the lock and separate the two segments.
TABLE STAND AND WALL MOUNT
To stand the unit on a table, twist the lock button (on the back of the unit) so that the two main unit segments are unlocked from each other. Then position the unit as shown below.
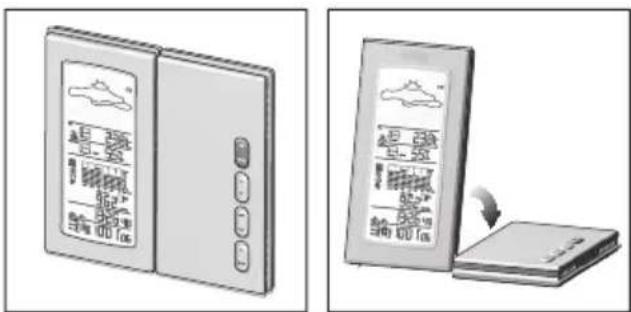
text_image
Diagram showing two views of a device with labeled buttons and a magnified view of its internal components.To mount the unit on a wall, twist the lock button (on the back of the unit) so that it locks the two segments together. Then mount as shown below.
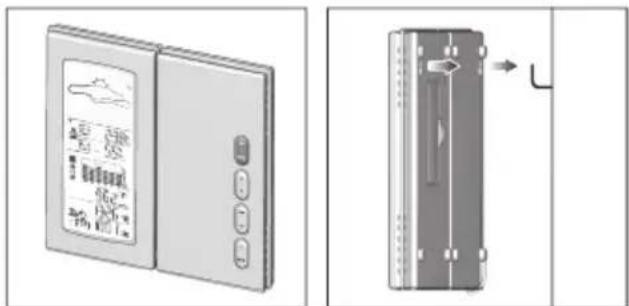
natural_image
Illustration of a refrigerator with front panel and side view showing internal components (no text or symbols)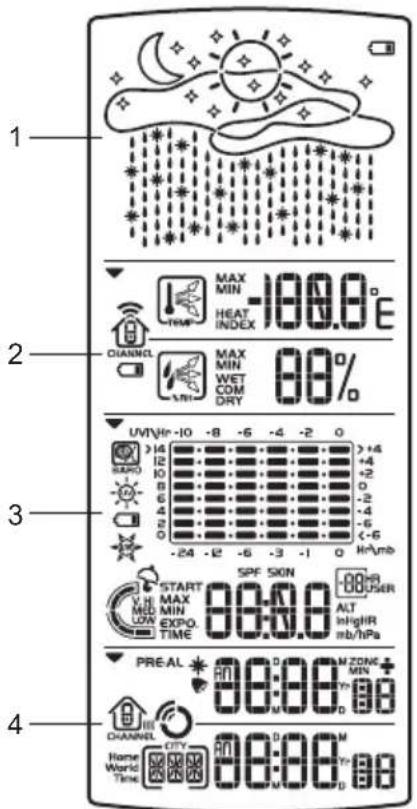
text_image
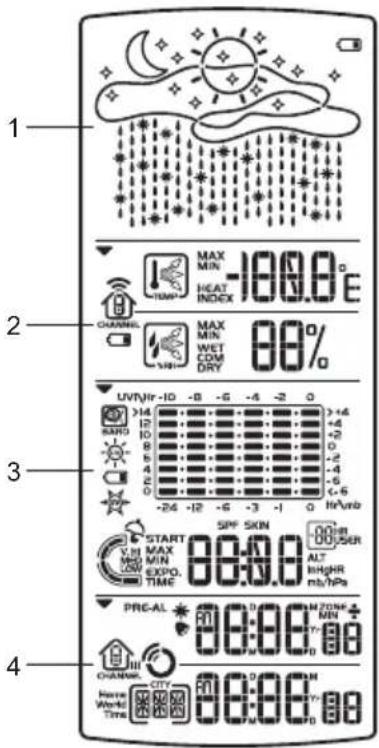
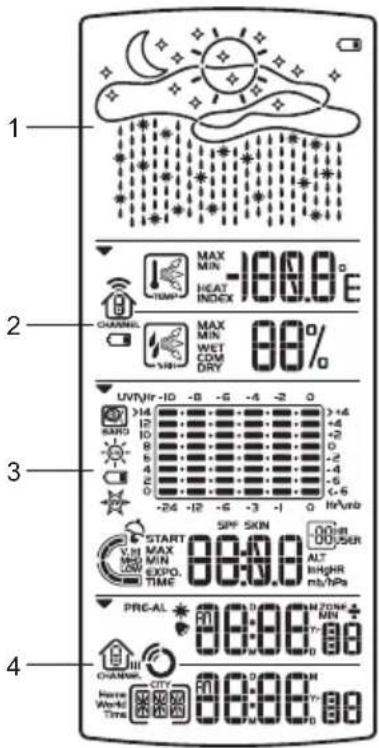
1 2 3 4 MAX MIN -100.0 E MAX MIN WET COM DRY 00% UVINV-10 -8 -6 -4 -2 0 +4 +4 +2 0 -2 -4 -6 <-6 HV/mb START SPF SIGN -00HR USER MAX MIN ALT InHighR MED LOW EXPO TIME mb/HPa PRE-AL 00:00 M ZONE M 00:00 Yr- CHANNEL CITY 00:00 Yr- Home World Time 00:00 Yr- Time 00:00 Yr-- Weather Forecast Area: Animated weather forecast.
- Temperature / Humidity / Comfort Zone Area: Readings and trend lines; comfort zone; sensor channel number.
- UVI / Barometer Area: UV level and barometric pressure bar chart; UV Index and barometric readings.
- Clock / Alarm / Calendar Area: Radio-controlled clock with World time; alarms; calendar.
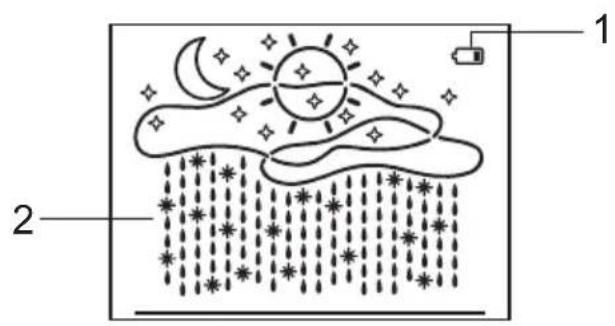
Weather Forecast Area
text_image
Diagram illustrating the rain system with labeled components and weather patterns- Low battery icon for main unit
- Weather display
Temperature / Humidity / Comfort Zone Area
text_image
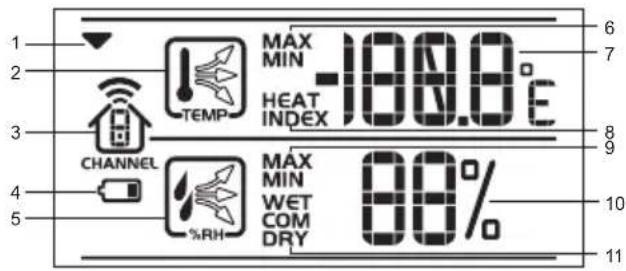
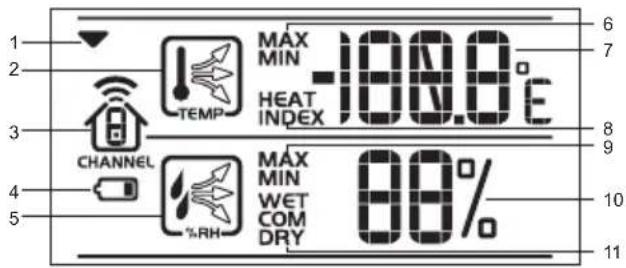
1 2 3 4 5 CHANNEL TEMP MAX MIN HEAT INDEX -100.0°E %RH MAX MIN WET COM DRY 88% 6 7 8 9 10 11- Selected Area icon
- Temperature trend
- Channel number (1-5) / reception status
- Low battery icon for remote sensor
- Humidity trend
- MAX / MIN temperature
- Temperature - °C / °F
- Heat Index
- MAX / MIN humidity
- Humidity
- Comfort levels
UVI / Barometer Area
text_image
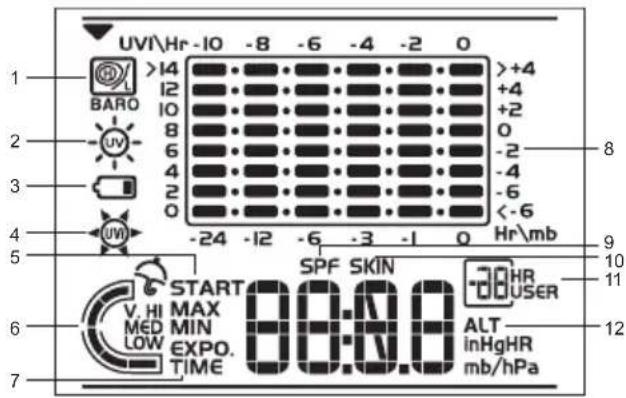
UVI\Hr -10 -8 -6 -4 -2 0 1 >14 12 10 8 6 4 2 0 -24 -12 -6 -3 -1 0 Hr\mb BARO UV 3 4 5 START SPF SKIN HR V. HI MAX ALT MED MIN ALT 10 LOW EXPO. inHgHR TIME mb/hPa 7- Barometric pressure is showing
- UV is showing
- Low battery icon for UV sensor
- UVI value is showing
- UV exposure time countdown has started
- UV index level
- UV exposure time for user
- Barometer / UV chart
- SPF applied to user for UV exposure
- User skin type for UV exposure
- User no. (for UV Mode) or hour history for UV / Barometric pressure reading
- Altitude / barometric pressure / UVI reading
Clock / Alarm / Calendar Area
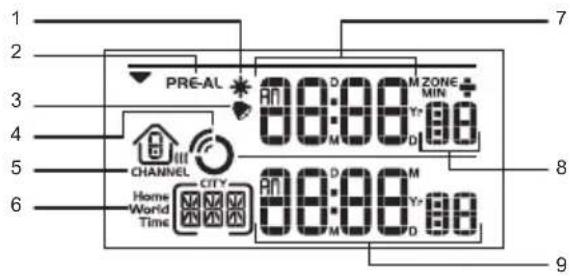
text_image
PRE-AL CHANNEL Home World Time 8:08 M ZONE MIN D M D CITY 8:08 M D M D 9 7 8- Pre-Alarm is set
- Pre-Alarm display / Pre-Alarm setting
- Channel with RF clock reception is locked
- RF clock reception icon
- Daily Alarm is set
- Home or World time city
- RF clock time (i.e. home clock time) / calendar
- Offset time-zone
- World clock time / calendar
REMOTE SENSOR (RTGR328N)
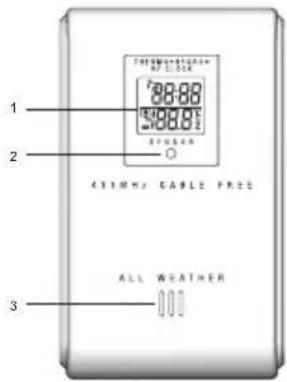
text_image
1 2 3 431 MHz CABLE FREE ALL WEATHER- LCD display
- LED status indicator
- Ventilation duct
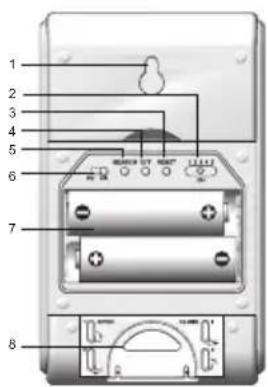
text_image
Diagram of an electronic device rear panel with numbered labels pointing to components like buttons, dials, and a dial.- Wall mount
- CHANNEL switch (1-5)
- RESET
- °C / °F
- SEARCH
- EU / UK radio signal format switch
- Battery compartment
- Fold-out stand
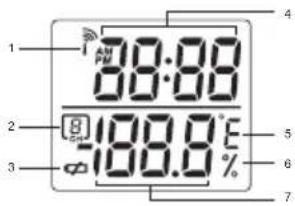
text_image
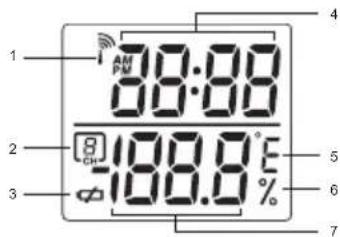
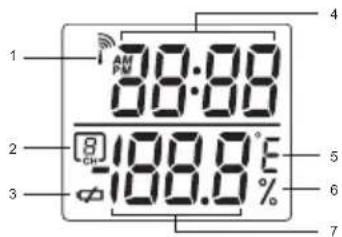
1 88:88 - 188.0° 2 3 4 5 6 7- Signal reception
- Channel number
- Low battery icon
- Time
- Temp (°C or °F)
- Humidity %
- Temp / Humidity
GETTING STARTED
BATTERIES
Batteries are supplied with this product:
• Main unit 4 x UM-3 (AA) 1.5V
- Remote unit 2 x UM-3 (AA) 1.5V
Insert batteries before first use, matching the polarity as shown in the battery compartment. For best results, install batteries in the remote sensor before the main unit. Press RESET after each battery change.
To install the main unit batteries:
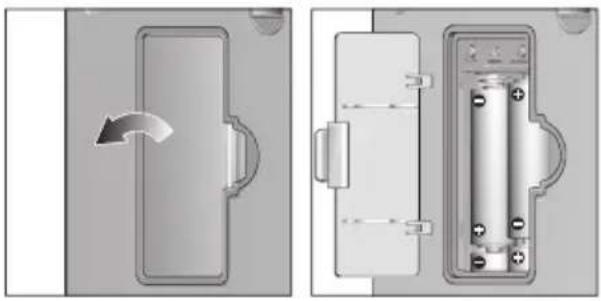
natural_image
Diagram showing two views of a door panel with a rotating arrow and internal components (no text or symbols)NOTE Do not use rechargeable batteries.
shows when batteries are low.
NOTE It is recommended that you use alkaline batteries with this product for longer performance.
| UNIT | LOCATION |
| Main Weather Forecast Area | |
| Remote Temperature / Humidity Area | |
| UV Sensor | UVI / Barometric Pressure Area |
CHANGE SETTINGS
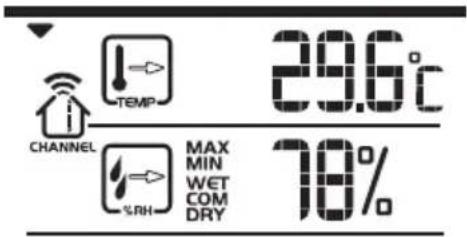
- Press SEL to switch between Areas. ▼ indicates the selected Area.
text_image
CHANNEL TEMP 29.6°C MAX MIN WET COM DRY 78%- Most Areas have alternate display options (for example, Clock / Alarm or Barometer / UVI). Press MODE to switch options, or / 🚪 * to switch between clock and alarm.
- Press and hold MODE for 2 seconds to enter setting mode.
- Press ▲ to ▼nange settings.
- Press MODE to confirm.
REMOTE SENSOR
This product is shipped with the RTGR328N Thermo / Hygro Sensor. The main unit can collect data from up to 6 sensors (5 Thermo / Hygro Sensors and 1 UV Sensor).
The main unit is compatible with the following sensors: THGR228N, THGR328N, THR228N, THR328N and THWR288. (Additional sensors are sold separately. Contact your local retailer for more information.)
The RTGR328N Sensor collects temperature and humidity readings, and signals from official time-keeping organizations for the radio-controlled clock.
SET UP THERMO / HYGRO SENSOR (RTGR328N)
- Open the battery compartment with a small Phillips screwdriver.
- Insert the batteries.
- Set the channel and radio signal format. The switches are located in the battery compartment.
| SWITCH OPTION | |
| Channel If you are using more than onesensor, select a different channelfor each sensor | |
| Radio SignalFormat | EU (DCF) / UK (MSF) |
- Press RESET. Then set the temperature unit.
| SWITCH OPTION | |
| Temp °C / °F | |
- Close the battery compartment.
To fold out the stand:
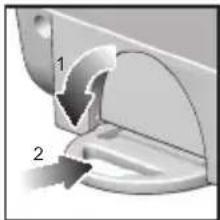
natural_image
Mechanical component diagram showing a curved bracket with two labeled parts (1 and 2), no text or symbols present.For best results:
- Insert the batteries and select the unit, channel, and radio signal format before you mount the sensor.
- Place the sensor out of direct sunlight and moisture.
- Do not place the sensor more than 70 metres (230 feet) from the main (indoor) unit.
- Position the sensor so that it faces the main (indoor) unit, minimizing obstructions such as doors, walls, and furniture.
- Place the sensor in a location with a clear view to the sky, away from metallic or electronic objects.
- Position the sensor close to the main unit during cold winter months as below-freezing temperatures may affect battery performance and signal transmission.
NOTE The transmission range may vary and is subject to the receiving range of the main unit.
You may need to experiment with various locations to get the best results.
SENSOR DATA TRANSMISSION
Data is sent from the sensor(s) every 60 seconds. The reception icon shown in the Temperature / Humidity Area indicates the status.
| ICON DESCRIPTION | |
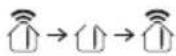 | Main unit is searching for sensors. |
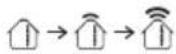 | At least 1 channel has been found. |
 | Sensor 1 is sending data. (The number shows which sensor is selected.) |
| --- shows in Temp / Humidity Area | The selected sensor cannot be found. Search for the sensor or check batteries. |
SEARCH FOR SENSOR
To search for a Thermo / Hygro sensor, press SEL to navigate to the Temperature / Humidity Area. will show next to the Area. Then, simultaneously press and hold MEM and CH for 2 seconds.
To search for the UV sensor, press SEL to navigate to the UVI / Barometer Area. ▼ will show next to the Area.
Then, press and hold MEM and CH for 2 seconds.
NOTE If the sensor is still not found, check the batteries.
CLOCK AND CALENDAR
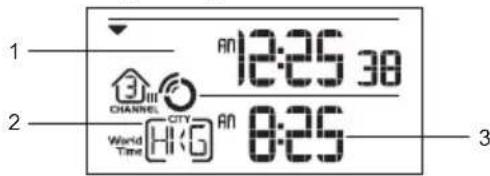
This product tracks the time and date based on radio-controlled signals from the RTGR328N remote sensor, or manual settings that you enter.
text_image
1 2 CHANNEL Wired Time CITY H:G AN 12:25 30 AN 8:25 3- RF Clock time
- World Time city
- World Time clock
RADIO-CONTROLLED CLOCK
The time and date are automatically updated by radio-controlled clock signals from official time-keeping organizations in Frankfurt (Germany) and Rugby (England) unless you disable this feature. The signals are collected by the remote sensor (RTGR328N) whenever it is within 1500 km (932 miles) of a signal. Initial reception takes 2-10 minutes, and is initiated when
you first set up the unit, and whenever you press RESET. Once complete, the reception icon will stop blinking.
In addition to the local time and calendar display, you can also select to display the corresponding time of 130 major world cities.

The icon shown in the Clock Area indicates 2 factors:
- Connection between the main unit and the sensor that collects RF signals ( III )
• RF signal reception (○)
How these signals work together:
| ICON | MEANING |
 | The unit has contact with the sensor and has synchronized the time. |
 | The unit has contact with the sensor but the time has not been synchronized. |
 | The unit has lost contact with the remote sensor but the time is synchronized. |
 | The unit has lost contact with the remote sensor and the time is not synchronized. |
| The unit cannot reach the remote sensor. |
NOTE To force a manual search for RF clock reception, press and hold SEARCH on the sensor (RTGR328N) for 2 seconds.
TURN RADIO-CONTROLLED CLOCK ON / OF
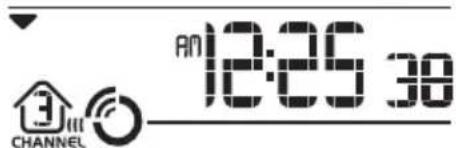
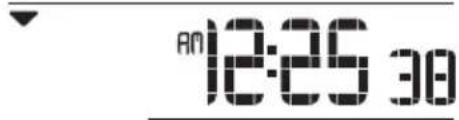
If you wish to manually set the clock, you must first disable the radio-controlled feature. To do this, navigate to the Clock / Alarm Area. Then, press and hold on the main unit for 2 seconds. To enable it, navigate to the Clock / Alarm Area, then press and hold 2 seconds.
RF clock enabled:
text_image
AM 12:25 30 CHANNELRF clock disabled:
text_image
AM 12:25 30SET CLOCK
You only need to do this if you have disabled the radio-controlled clock, or if you are too far from a RF signal.
- Press SEL to navigate to the Clock Area will show next to the Area.
- Press and hold MODE for 2 seconds.
- Select the Home Time city, World Time city, 12 / 24 hour format, hour, minute, year, date / month format, month, date and display language.
- Press ▲ to change the setting.
- Press MODE to confirm.
NOTE The language options are (E) English, (F) French, (D) German, (I) Italian, and (S) Spanish. The language you select determines the weekday display.
SWITCH CLOCK DISPLAY
Press SEL to navigate to the Clock Area. ▼ will show next to the Area.
Press MODE to toggle between different displays.
When the World Time city is not set, you can toggle between:
• Clock with seconds and date
- Clock with day and date
When the World Time city is set, you can toggle between:
• RF clock with seconds and World Time clock
• RF and World Time clock with day
• RF and World Time date
WORLD TIME CLOCK
This clock features a World-time display function so that you check the corresponding time of different places in the world instantly with Daylight Saving Time (DST) automatically adjusted. The names of the world cities are in the abbreviated 3-letter format e.g., FRA for Frankfurt, Germany.
CITY, COUNTRY CITY CODE TIME OFFSET SUMMER TIME START DATE SUMMER TIME END DATE
| Addis Ababa, Ethiopia ADD 3 No DST | ||||
| Adelaide, Australia ADL 9.5 Last Sunday in October Last Sunday in March | ||||
| Auckland, New Zealand AKL 12 1st Sunday in October 3rd Sunday in March | ||||
| Ankara, Turkey AKR 2 | Last Sunday in March | Last Sunday in October | ||
| Algiers, Algeria | ALG | 1 No DST | ||
| Amsterdam, Netherlands | AMS | 1 | Last Sunday in March | Last Sunday in October |
| Anchorage AK, USA | ANC | -9 | 1st Sunday in April | Last Sunday in October |
| Antananarivo, Madagascar | ANT 3 No DST | |||
| Asuncion, Paraguay | ASU | -4 | 1st Sunday in September | 1st Sunday in April |
| Athens, Greece ATH | 2 | Last Sunday in March Last Sunday in October | ||
| Atlanta GA, USA | ATL | -5 | 1st Sunday in April | Last Sunday in October |
| Abu Dhabi, U.A.E AUH 4 No DST | ||||
| Bucharest, Romania | BBU | 2 | Last Sunday in March | Last Sunday in October |
| Barcelona, Spain | BCN 1 | Last Sunday in March Last Sunday in October | ||
| Baghdad, Iraq | BDD 3 1st April | 1st October | ||
| Belgrade, Yugoslavia | BEG | 1 | Last Sunday in March | Last Sunday in October |
| Beijing, China | BEJ | 8 No DST | ||
| Berlin, Germany | BER | 1 | Last Sunday in March | Last Sunday in October |
| Beirut, Lebanon BEY 2 | Last Sunday in March Last Sunday in October | |||
| Bangkok, Thailand | BKK | 7 No DST | ||
| Brisbane, Australia | BNE 10 | No DST | ||
| Bogota, Colombia BOG -5 | No DST | |||
| Boston MA, USA | BOS | -5 | 1st Sunday in April | Last Sunday in October |
| Bern, Switzerland BRN 1 | Last Sunday in March Last Sunday in October | |||
| Brussels, Belgium BRU 1 | Last Sunday in March Last Sunday in October | |||
| Brasilia, Brazil | BSB | -3 | 2nd Sunday in October | 3rd Sunday in February |
| Buenos Aires, Argentina | BUA | -3 | No DST | |
| Budapest, Hungary | BUD | 1 | Last Sunday in March | Last Sunday in October |
| Cairo, Egypt | CAI 2 last Friday in April Last Friday in September | |||
| Casablanca, Morocco CAS 0 No DST | ||||
| Canberra, Australia | CBR 10 Last Sunday in October Last Sunday in March | |||
| Caracas, Venezuela | CCS | -4 | No DST | |
| Calcutta, India | CCU | 5.5 | No DST | |
| Chicago IL, USA | CGX | -6 | 1st Sunday in April | Last Sunday in October |
| Colombo, Sri Lanka | CMB 6 No DST | |||
| Copenhagen, Denmark | CPH | 1 | Last Sunday in March | Last Sunday in October |
| Cape Town, South Africa CPT 2 | No DST | |||
| Dhaka, Bangladesh DAC 6 No DST | ||||
| Damascus, Syria DAM 2 1st | April 1st October | |||
| New Delhi, India DEL 5.5 No | DST | |||
| Detroit MI, USA DTW -5 1st | Sunday in April Last Sunday in October | |||
| Dublin, Ireland DUB 0 Last | Sunday in March | Last Sunday in October | ||
| Frankfurt, Germany FRA 1 Last | Sunday in March | Last Sunday in October | ||
| Guatemala City, Guatemala | GUA | -6 | No DST | |
| Geneva, Switzerland | GVA | 1 | Last Sunday in March | Last Sunday in October |
| Hamburg, Germany | HAM 1 Last | Sunday in March | Last Sunday in October | |
| Hanoi, Vietnam | HAN 7 No DST | |||
| Havana, Cuba | HAV | -5 1st Sunday in April Last Sunday in October | ||
| Ho Chi Minh City, Vietnam | HCM | 7 No DST | ||
| Helsinki, Finland HEL 2 Last | Sunday in March | Last Sunday in October | ||
| Hong Kong, China | HKG 8 No DST | |||
| Honolulu HI, USA | HNL -10 No DST | |||
| Houston TX, USA | HOU | -6 1st Sunday in April Last Sunday in October | ||
| Indianapolis, IN, USA | IND -5 | No DST | ||
| Istanbul, Turkey IST | 2 Last Sunday in March | Last Sunday in October | ||
| Jakarta, Indonesia | JKT | 7 No DST | ||
| Johannesburg, South Africa | JNB | 2 No DST | ||
| Kabul, Afghanistan | KBL 4.5 No DST | |||
| Khartoum, Sudan KHA 3 No DST | ||||
| Kiev, Ukraine | KIE | 2 | Last Sunday in March | Last Sunday in October |
| Kingston, Jamaica KIN -5 | No DST | |||
| Kathmandu, Nepal | KTM | 5.75 | No DST | |
| Kuala Lumpur, Malaysia | KUL 8 No DST | |||
| Kuwait City, Kuwait | KWI | 3 No DST | ||
| Las Vegas NV, USA | LAS -8 1st Sunday in April Last Sunday in October | |||
| Los Angeles CA, USA LAX | -8 1st Sunday in April Last Sunday in October | |||
| Lima, Peru | LIM -5 | No DST | ||
| Lisbon, Portugal | LIS | 0 | Last Sunday in March | Last Sunday in October |
| London, UK | LON 0 Last Sunday in March | Last Sunday in October | ||
| Lagos, Nigeria | LOS 1 No DST | |||
| La Paz, Bolivia LPB -4 | No DST | |||
| Luxembourg, Luxembourg | LUX | 1 | Last Sunday in March | Last Sunday in October |
| Madrid, Spain | MAD 1 Last Sunday in March | Last Sunday in October | ||
| Melbourne, Australia MEL 10 | Last Sunday in October | Last Sunday in March | ||
| Mexico City, Mexico MEX -6 1st Sunday in April Last Sunday in October | ||||
| Managua, Nicaragua MGA -6 No DST | ||||
| Miami FL, USA MIA -5 1st Sunday in April Last Sunday in October | ||||
| Milan, Italy MIL 1 Last Sunday in March Last Sunday in October | ||||
| Manama, Bahrain MNA 3 | No DST | |||
| Manila, Philippines | MNL 8 | No DST | ||
| Montreal, Canada | MON -5 1st Sunday in April Last Sunday in October | |||
| Moscow, Russia | MOW 3 Last Sunday in March Last Sunday in October | |||
| Montevideo, Uruguay MVD -3 No DST | ||||
| Nassau, Bahamas | NAS -5 1st Sunday in April Last Sunday in October | |||
| Nairobi, Kenya | NRB 3 | No DST | ||
| New York NY, USA | NYC | -5 | 1st Sunday in April | Last Sunday in October |
| Oslo, Norway | OSL 1 Last Sunday in March Last Sunday in October | |||
| Ottawa, Canada OTW -5 1st Sunday in April Last Sunday in October | ||||
| Port-au-Prince, Haiti | PAP -5 No DST | |||
| Paris, France | PAR 1 Last Sunday in March Last Sunday in October | |||
| Perth, Australia | PER 8 | No DST | ||
| Phoenix, AZ, USA | PHE -7 No DST | |||
| Phnom Penh, Cambodia | PNH 7 | No DST | ||
| Port-Of-Spain, Trinidad & Tobago | POS -4 No DST | |||
| Papeete, French Polynesia | PPT | -10 | No DST | |
| Prague, Czech Republic | PRG 1 Last Sunday in March Last Sunday in October | |||
| Portland OR, USA PTL -8 1st Sunday in April Last Sunday in October | ||||
| Pretoria, South Africa PTR 2 | No DST | |||
| Panama City, Panama PTY -5 No DST | ||||
| Rangoon, Myanmar RGN | 6.5 | No DST | ||
| Rio de Janeiro, Brazil RIO -3 2nd Sunday in October | 3rd Sunday in February | |||
| Reykjavik, Iceland RKV 0 | No DST | |||
| Rome, Italy | ROM 1 Last Sunday in March Last Sunday in October | |||
| Riyadh, Saudi Arabia RUH 3 | No DST | |||
| San Salvador, El Salvador | SAL -6 No DST | |||
| Santiago, Chile | SCL | -4 | 1st Sunday after 8th October | 1st Sunday after 8th March |
| Seattle WA, USA | SEA | -8 1st Sunday in April Last Sunday in October | ||
| Seoul, South Korea SEL 9 | No DST | |||
| San Francisco CA, USA | SFO | -8 | 1st Sunday in April | Last Sunday in October |
| Shanghai, China SHA 8 | No DST | |||
| Singapore, Singapore SIN 8 No DST | |||
| San Jose, Costa Rica SJO -6 No DST | |||
| San Juan, Puerto Rico SJU -4 No DST | |||
| Salt Lake City UT, USA SLC -7 1st Sunday in April Last Sunday in October | |||
| Sofia, Bulgaria SOF 2 Last Sunday in March Last Sunday in October | |||
| Sao Paulo, Brazil SPL -3 2nd Sunday in October 3rd Sunday in February | |||
| Stockholm, Sweden STH 1 Last Sunday in March Last Sunday in October | |||
| Sydney, Australia SYD 10 Last Sunday in October Last Sunday in March | |||
| Tashkent, Uzbekistan TAS 5 No DST | |||
| Tokyo, Japan | TKY 9 No DST | ||
| Taipei, Taiwan | TPE 8 No DST | ||
| Tripoli, Libya | TRP 2 | No DST | |
| Toronto, Canada | TRT -5 1st Sunday in April Last Sunday in October | ||
| Quito, Ecuador | UIO | -5 No DST | |
| Vancouver, Canada VAC -8 1st Sunday in April Last Sunday in October | |||
| Vienna, Austria | VIE | 1 Last Sunday in March Last Sunday in October | |
| Warsaw, Poland | WAW | 1 Last Sunday in March Last Sunday in October | |
| Washington DC, USA | WDC | -5 | 1st Sunday in April |
| Wellington, New Zealand | WLG | 12 | 1st Sunday in October |
| Zurich, Switzerland ZRH 1 Last Sunday in March Last Sunday in October | |||
ALARMS
This product has 2 alarms: The Daily Alarm and a Pre-Alarm for snowy weather. The Daily Alarm can be set to go off at the same time every day. The Pre-Alarm sounds only when the Daily Alarm is activated and the recorded temperature from Channel 1 Sensor falls to 2°C (35.6°F) or below.
SET DAILY ALARM
1 Press SEL to navigate to the Clock Area. will show next to the Area.
2. Press ▶ to view the alarm. (AL will show at the top.)
3. Press and hold ▶ for 2 seconds.
4. Select the hour and minute. Presse or to change settings.
5. Press 🔔 to confirm.
6. The Daily Alarm icon will appear when the alarm is set.
SET PRE-ALARM
The Pre-Alarm can be set to sound 15, 30, 45, or 60 minutes before the Daily Alarm. It will sound whenever the recorded temperature from Channel 1 Sensor falls to 2°C (35.6°F) or below.
For example, if you set the alarm to 7:00 AM, and the Pre-Alarm to 45 minutes, the Pre-Alarm will sound at 6:15 AM provided the outdoor temperature at Channel 1 Sensor is 2°C or below.
- Set up and activate the Daily Alarm.
- Press 🤔 to switch to Pre-Alarm view. (PRE-AL will show at the top.)
- Press and hold ♦ for 2 seconds.
- Press ▲ to select 15, 30, 45 or 60 minutes. This is the amount of time the Pre-Alarm will sound BEFORE the Daily Alarm. The Pre-Alarm is automatically activated when you select a time.
- Press 🔔 to confirm.
* shows when the Pre-Alarm is set.
NOTE The Daily Alarm will NOT function until the next day if the Pre-Alarm has been triggered. Also, if you deactivate the Daily Alarm, the Pre-Alarm is automatically deactivated.
ACTIVATE ALARM
Navigate to the Clock Area, then press ▶ to switch to Daily Alarm or Pre-Alarm view. To activate or deactivate the alarm, press ▶ or ▼
When the alarm time is reached, the backlight will be on for 8 seconds and crescendo alarm will sound for 2 minutes. Press any key (except snooze) to silence the alarm. It will sound at the same time the next day.
SNOOZE
Press SNOOZE / LIGHT to temporarily disable the alarm for 8 minutes. For will blink while snooze is on.
BARÓMETER
This product tracks fluctuations in barometric pressure to provide the weather forecast, and the current and past 24 hours barometric pressure history measurements are recorded by the main (indoor) unit.
VIEW BAROMETER AREA
Press SEL to navigate to the Barometer Area.

NOT shown, press MODE.
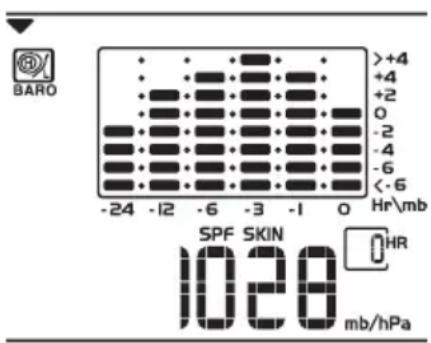
Barometric data is shown in 2 areas at the bottom of the display. The upper area shows a 24-hour bar chart. The lower area shows current and historical readings.
text_image
BARO -24 -12 -6 -3 -1 0 Hr\mb SPF SKIN 1028 mb/hPa >+4 +4 +2 0 -2 -4 -6 <-6 HR\mbSELECT MEASUREMENT UNIT
Slide the mb / inHg switch (in the clock battery compartment), to change the display unit.
VIEW BAROMETER HISTORY
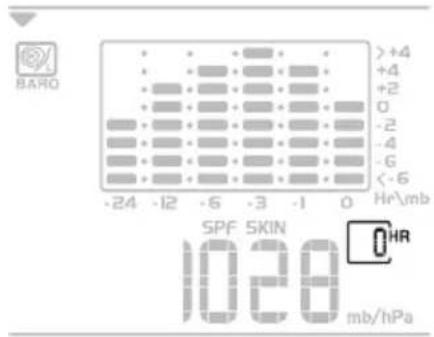
Navigate to the Barometer Area. Then press HIST repeatedly to scroll through the measurements. The number shown in the HR box indicates how long ago each measurement was taken (e.g. 2 hours ago, 3 hours ago, etc.).
text_image
BARO >+4 +4 +2 0 -2 -4 -6 <-6 -24 -12 -6 -3 -1 0 Hr\mb SPF SKIN HR 1028 mb/hPaBAR CHART DISPLAY
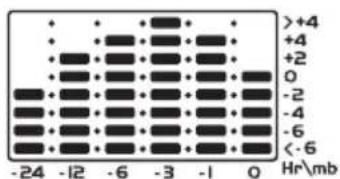
The bar chart visually shows atmospheric changes from the current hour (0) to 24 hours prior (-24).
heatmap
| | -24 | -12 | -6 | -3 | -1 | 0 | |---|---|---|---|---|---|---| | >+4 | + | + | + | + | + | + | | +4 | + | + | + | + | + | + | | +2 | + | + | + | + | + | + | | 0 | -2 | -2 | -2 | -2 | -2 | -2 | | -2 | -4 | -4 | -4 | -4 | -4 | -4 | | -6 | -6 | -6 | -6 | -6 | -6 | -6 | | <-6 | -6 | -6 | -6 | -6 | -6 | -6 | Hr\mbSET ALTITUDE
Set the altitude to match how far above or below sea level you are living. This ensures that the barometric pressure readings are accurate.
- Navigate to the Barometer Area.
- Press and hold HIST for 2 seconds.
- Press ▲ to set the altitude in 10-metre increments (-100m to 2500m).
- Press HIST to confirm.
WEATHER FORECAST
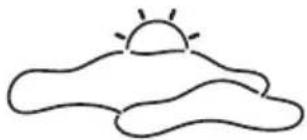
This product forecasts the next 12 to 24 hours of weather within a 30-50 km (19-31 mile) radius. The forecast is based on barometric pressure trend readings.
natural_image
Simple line drawing of a sun partially behind clouds (no text or symbols)The top area shows an animated icon indicating the forecasted weather.
WEATHER FORECAST ICONS
| DESCRIPTION ICON | |
| Clear (Day) |  |
| Partly Cloudy (Day) | 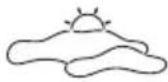 |
| Cloudy | 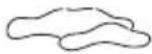 |
| Clear (Night) | 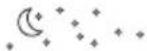 |
| Partly Cloudy (Night) | 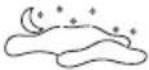 |
| Snowy | 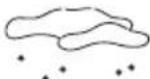 |
| Rainy |  |
NOTE The night time icon displays from 6 PM to 6 AM. When the Channel 1 sensor records a temperature of 2°C (35.6°F) or lower, the RAINY icon becomes SNOWY.
UV MEASUREMENT
The UVR128 Ultra-Violet Radiation Sensor is included with the BAR966HG and is available as an optional item for the BAR916HG. The UV sensor gives you the following information at your fingertips:
• 10-hour Ultra-Violet Index (UVI) record.
- Automatic calculation of acceptable UV exposure times based on pre-set user profiles (4 users maximum).
- UVI Danger Alert when UV Index reaches unsafe levels.
UV data is shown in the same area as the Barometer. Press SEL to navigate to the Barometer Area, then press MODE to display the UV icon and data.
NOTE Refer to the UVR128 User Manual for more information and see below to learn about the new additional UV features.
NEW ADDITIONAL UV FEATURES
UV EXPOSURE TIME COUNTDOWN
To set the exposure time countdown you need to set the Skin Type and Sun Protection Factor (SPF) as follows:
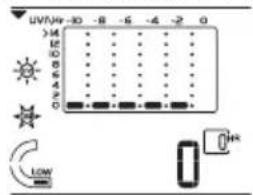
- Press SEL to navigate to the Barometer Area, then press MODE to select the UV display.
text_image
UV/VR -30 -8 -5 -4 -2 0 14 10 8 6 4 2 0 LOW High- Press CH to select user 1-4.
- Press and hold MODE for 2 seconds to enter the Skin Type Setting Mode of the selected user.
| SKIN TYPE | TAN BURN | HAIR COLOUR | EYE COLOUR | |
| 1 | Never Always Red Blue | |||
| 2 | Sometimes Always Blonde | Blue / Green | ||
| 3 | Always Rarely Brown | Grey / Brown | ||
| 4 | Always Never Black Brown | |||
- Press ▲ to choose 1 of the 4 skin type settings. Then press MODE to confirm and enter the SPF Set Up Mode.
| SPF LEVEL OF PROTECTION | |
| 1 - 11 | Low |
| 12 - 29 | Medium |
| 30 - 50 | High |
- Press ▲ or ▼ to increase or decrease the SPF value. Then press MODE to confirm and enter the UV Exposure Time Countdown Setting Mode.
- Press ▲ or ▼ to enable or disable countdown. Press MODE to exit the UV Exposure Time Countdown Mode and start the exposure time
countdown. The remaining user UV exposure time will display and the START will flash.
- When the countdown has reached "0", an alarm will sound for 2 minutes. Press any button to turn the alarmoff. The EXPO TIME icon will flash for 2 minutes even if you have stopped the alarm sound.
MAXIMUM / MINIMUM MEMORY FOR UVI
To view the maximum and minimum memory for UVI:
- Press SEL to navigate to the Barometer Area.
- Press MODE to select the UV display.
- Press MEM to show maximum, minimum and current UVI readings.
- Press and hold MEM for 2 seconds to clear the UVI memory.
NOTE The UV sensor must be activated before you try and set the additional features. Please refer to the UVR128 User Manual for more information.
TEMPERATURE AND HUMIDITY
The weather station can display the following information from any of the 5 remote sensors:
- Current, minimum, and maximum temperatures and relative humidity percentages.
- Comfort level indicator and trend line (rising, falling, or steady).
Data is collected and displayed approximately every 60 seconds.
VIEW TEMPERATURE AND HUMIDITY AREA
Press SEL to navigate to the Temperature and Humidity Areas.
Temperature data is given at the top; Humidity is below.
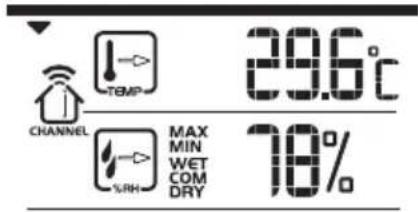
text_image
CHANNEL TEMP 29.6°C MAX MIN WET COM DRY 78%SELECT MEASUREMENT UNIT
Slide the °C / °F switch (inside the clock battery compartment), to the setting you want.
SELECT SENSOR CHANNEL
Press CH to switch between sensors 1-5.

The house icon shows the selected remote sensor.
- To auto-scan between sensors, press and hold CH for 2 seconds. Each sensor's data will be displayed for 3 seconds.
- To end auto-scan, press CH or MEM with the Temperature / Humidity Area selected.
NOTE If you select a sensor that collects only temperature data, the humidity will not be shown.
- Press MEM repeatedly to view current, maximum and minimum records for the selected sensor.
• To clear the records, press and hold MEM for 2 seconds. A beep will sound to confirm that the memory has been cleared.
TEMPERATURE AND HUMIDITY TREND
The trend lines are shown next to the temperature and humidity readings.
The Comfort Zone indicates how comfortable the climate is, based on current temperature and humidity measurements.
| ZONE TEMPERATURE HUMIDITY | ||
| WET | Any >70% | |
| COM | 20-25°C(68-77°F) | 40-70% |
| DRY | Any | <40% |
NOTE This information is shown in the Humidity Area when the current measurement is displayed.
HEAT INDEX
The Heat Index advises 4 levels of warning if the temperature is high.
| DANGER CATEGORY | TEMPERATURE | |
| °C °F | ||
| Extreme Danger | >54.5 | >130 |
| Danger 40.5-54.4 | 105-130 | |
| Extreme Caution | 32.2-40.5 | 90-105 |
| Caution 26.6-32.2 | 80-90 | |
- Press SEL to navigate to the Temperature Area.
will show next to the Area.
- Press MODE to reach the Heat Index display.
- Press CH to select the desired channel.
NOTE If the temperature is below 26^ C / 80^ F, or the desired channel is not working, the Heat Index will display "NA".
BACKLIGHT
Press SNOOZE / LIGHT to illuminate the backlight for 8 seconds.
RESET SYSTEM
The RESET button is located in the main unit battery compartment. Press RESET when you change the batteries and whenever performance is not behaving as expected (for example, unable to establish radio frequency link with remote unit or radio-controlled clock).
NOTE When you press RESET, all settings will return to default value, and you will lose all stored information.
SAFETY AND CARE
Clean the product with a slightly damp cloth and alcohol free, mild detergent. Avoid dropping the product or placing it in a high-traffic location.
WARNINGS
This product is designed to give you years of service if handled properly. Oregon Scientific will not be responsible for any deviations in the usage of the device from those specified in the user instructions or any unapproved alterations or repairs of the product. Observe the following guidelines:
- Never immerse the product in water. This can cause electrical shock and damage the product.
- Do not subject the main unit to extreme force, shock, or fluctuations in temperature or humidity.
- Do not tamper with the internal components.
- Do not mix new and old batteries or batteries of different types.
- Do not use rechargeable batteries with this product.
- Remove the batteries if storing this product for a long period of time.
- Do not scratch the LCD display.
NOTE The technical specification of this product and contents of this user guide are subject to change without notice. Images not drawn to scale.
TROUBLESHOOTING
| PROBLEM SYMPTOM REMEDY | ||
| Barometer Strange readings | Set altitude / unit | |
| Calendar Strangedate /month | Change language | |
| Clock Cannot | adjustclock | Disable radio-controlled clock |
| Cannotauto-synch | 1. Adjustbatteries2. Press RESET3. Manuallyactivate radio-controlled clock | |
| Temp Shows | "LLL" or"HHH" | Temperature is out-of-range |
| Remotesensor | Cannotlocateremotesensor | Check batteries |
SPECIFICATIONS
Main Unit Dimensions
L x W x H 195 x 26 x 192 mm
(7.6 x 0.8 x 7.5 inches)
Weight 578 grams (20.4 ounces)
without battery
Remote Unit Dimensions
L x W x H 70 x 24.5 x 116 mm
(2.76 x 0.96 x 4.57 inches)
Weight 108 grams (0.24 lbs)
without battery
Temperature
Unit °C or °F
Indoor Range -5 °C to 50 °C
(23 °F to 122 °F)
Outdoor Range -20 °C to 60 °C
(-4 °F to 140 °F)
Resolution 0.1 °C (0.2° F)
Comfort 20 °C to 25 °C
(68 °F to 77 °F)
Memory Min / Max
Relative Humidity
Range 25% to 95%
Resolution 1%
Comfort 40% to 70%
Memory Min / max
Barometer
Unit mb / hPa or inHg
Resolution 1 mb (0.03 inHg)
Altitude -100 to 2500 metres
(-328 to 8202 feet)
Display Sunny (day / night), partly cloudy (day / night), cloudy,
rainy, snowy
Remote Unit (RTGR328N)
RF frequency 433 MHz
Range Up to 70 metres (230 feet)
with no obstructions
Transmission Approx. every 1 minute
Channel No. 1, 2, 3, 4 or 5
Unit °C or °F
Radio-Controlled Clock
Synchronization Auto or disabled
Clock display HH:MM:SS
Hour format 12hr AM/PM (MSF format) 24hr (DCF format)
Calendar DD / MM or MM / DD; Day of the week in 1 of 5 languages (E, G, F, I, S)
Alarm Daily & Pre-Alarm; 2-minute crescendo
Snooze 8-minute snooze
Power
Main Unit
Batteries 4 x UM-3 (AA) 1.5V
Thermo / Hygro Remote Unit
Batteries 2 x UM-3 (AA) 1.5V
NOTE It is recommended that you use alkaline batteries with this product for longer performance.
ABOUT OREGON SCIENTIFIC
Visit our website (www.oregonscientific.com) to learn more about Oregon Scientific products such as digital cameras; MP3 players; children's electronic learning products and games; projection clocks; health and fitness gear; weather stations; and digital and conference phones. The website also includes contact information for our Customer Care department in case you need to reach us, as well as frequently asked questions and customer downloads.
We hope you will find all the information you need on our website, however if you're in the US and would like to contact the Oregon Scientific Customer Care department directly, please visit:
www2.oregonscientific.com/service/default.asp
OR
Call 1-800-853-8883.
For international inquiries, please visit:
www2.oregonscientific.com/about/international.asp
EU-DECLARATION OF CONFORMITY
Hereby, Oregon Scientific, declares that this Wireless Weather Station with World Time Clock model BAR916HG is in compliance with the essential requirements and other relevant provisions of Directive 1999/5/EC.
A copy of the signed and dated Declaration of Conformity is available on request via our Oregon Scientific Customer Service.

COUNTRIES RTTE APPROVAL COMPLIED
All EU countries, Switzerland

and Norway

text_image
Technical diagram of a door panel with labeled components including an analog meter and adjustment knobstext_image
Illustration of a device with labeled buttons and display screen showing Chinese text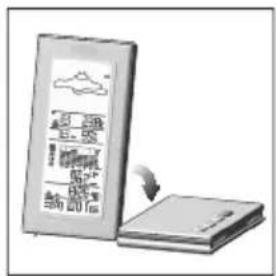
text_image
Illustration showing a weather monitoring device with Chinese text labels and an arrow indicating process or transformation.natural_image
Illustration of a digital device with a screen displaying weather icons and a battery, no text or symbols present.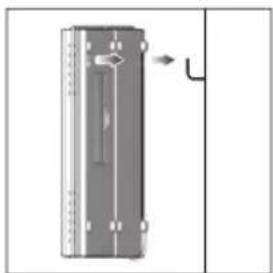
natural_image
Diagram of a vertical panel with a right-angle arrow pointing to the side (no text or symbols present)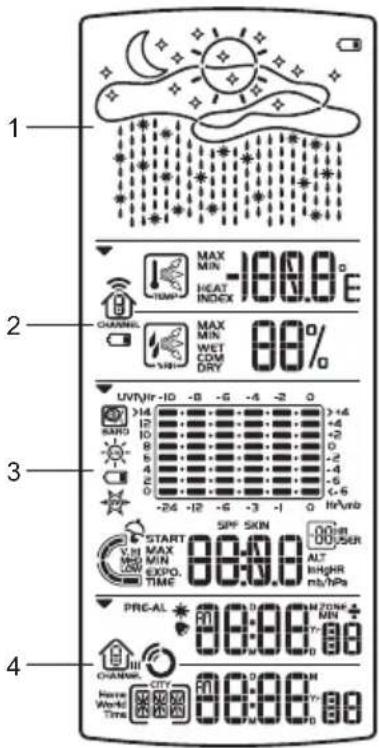
text_image
1 2 3 4text_image
Weather diagram showing sun, moon, cloud, and rain patterns with labeled parts 1 and 2text_image
1 2 3 4 5 CHANNEL TEMP MAX MIN -180.8°E HEAT INDEX MAX MIN 88% WET COM DRY %RHtext_image
Diagram of a device rear panel with numbered labels pointing to ports and indicatorsnatural_image
Technical diagram showing two views of a door handle mechanism with directional arrow (no text or symbols)text_image
29.6°C CHANNEL MAX MIN WET COM DRY 78%natural_image
Mechanical component diagram showing a curved bracket with two labeled parts (1 and 2), no text or symbols present.text_image
29.6°C CHANNEL MAX MIN WET COM DRY 78%BAR916HG --- BAR916HG Main Unit + RTGR328N Sensor Remoto
text_image
1 2 3 4 5 6 7 8 9 10 23.8°C - 55% 96.2 13:26:48 100 106text_image
Technical diagram of a door panel with labeled components including an analog meter and internal componentstext_image
Illustration of a refrigerator with Chinese text labels and icons on the front panel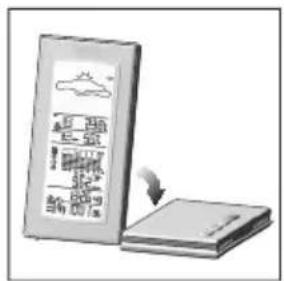
text_image
Illustration showing a document with Chinese characters and an arrow pointing to a stack of documents, likely illustrating a document or interface.text_image
Illustration of a mobile phone with Chinese text and app icons on the screen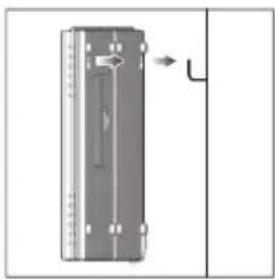
natural_image
Diagram of a device with a vertical panel and directional arrow, no visible text or symbols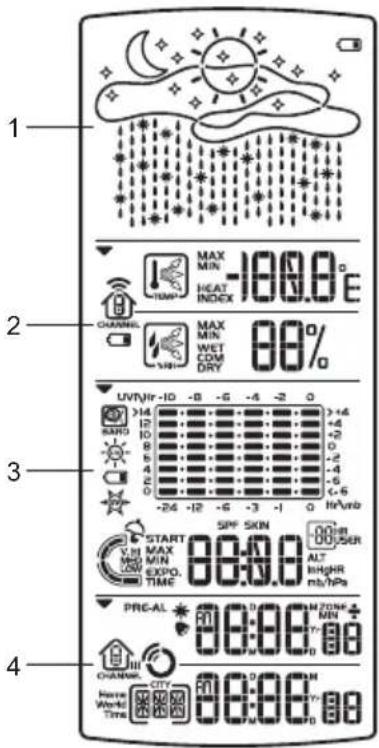
text_image
1 2 3 4text_image
Weather diagram showing sun, moon, raindrops, and stars with labels 1 and 2text_image
UV\Hr -10 -8 -6 -4 -2 0 >14 +4 +2 0 -2 -4 -6 <-6 Hr\mb 1 BARGO 2 3 4 5 START SPF SKIN 00:0.0 ALT 12 V.HI MAX 00:0.0 User MED MIN LOW EXPO. TIME mb/hPatext_image
Diagram of a device rear panel with numbered labels pointing to internal componentstext_image
1 2 3 4 5 6 7 8:00:00 100.0% 188.0%natural_image
Technical diagram showing two views of a door handle mechanism with directional arrows indicating rotation (no text or symbols present)text_image
CHANNEL TEMP 29.6°C MAX MIN WET COM DRY 78%natural_image
Mechanical component diagram showing a curved part with two arrows indicating direction (no text or symbols)text_image
UV/VR -30 -8 -6 -4 -2 0 >14 ON/OFF LOW OKtext_image
29.6°C CHANNEL MAX MIN WET COM DRY 78%Remote Unit Dimensions
L x A x A 70 x 24.5 x 116 mm
(2,76 × 0,96 × 4,57
pulgadas)
Peso 108 gramos (0.24 libras)
sin pilas
Temperatura
Unidad °C o °F
Rango Exterior -5 °C a 50 °C
(23 °F a 122 °F)
Rango Interior -20 °C a 60 °C
(-4 °F a 140 °F)
Resolución 0.1 °C (0.2° F)
Confort 20 °C a 25 °C
(68 °F a 77 °F)
Memoria Min / Max
Humedad Relativa
Rango 25% a 95%
Resolución 1%
Confort 40% a 70%
Memoria Min / max
Barómetro
BAR916HG --- Appareil Principal BAR916HG + Sonde Sans Fil RTGR328N
VUE D'ENSEMBLE DU PRODUIT
FACE AVANT
text_image
1 2 3 4 5 6 7 8 9 10 238 - 55% 962 13:26 48 100 106text_image
Technical diagram of a door panel with labeled components including front panel, side panel, and internal componentstext_image
Illustration of a refrigerator with Chinese text labels and front panel indicators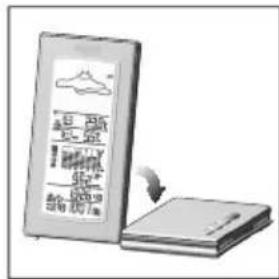
text_image
Illustration showing a device with Chinese text labels and an arrow indicating a process or transformation.natural_image
Illustration of a rectangular electronic device with a screen and control buttons (no visible text or symbols)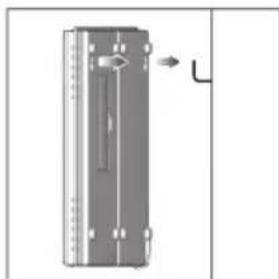
natural_image
Diagram of a mechanical device with a lever and adjustment knob (no text or symbols)AFFICHAGE À CRISTAUX LIQUIDES
text_image
1 2 3 4text_image
Weather diagram showing sun, moon, cloud, and rain patterns with labeled parts 1 and 2text_image
Diagram of a device rear panel with numbered labels pointing to components like buttons, dials, and meters.- Fixation murale
- Bouton CH (1-5)
- RESET
- Bouton ^ C / ^
- SEARCH
- Bouton du format du signal radio EU / UK
- Logement des piles
- Pied pliable
text_image
1 38:00 00:00 - 188.0° 2 4 5 6 7natural_image
Technical diagram showing two views of a door handle mechanism with directional arrows indicating rotation (no text or symbols present)text_image
29.6°C CHANNEL MAX MIN WET COM DRY 78%natural_image
Mechanical component diagram showing a curved arrow and two numbered arrows (1 and 2), no text or symbols present.NOUVELLES FONCTIONS UV
COMPTE À REBOURS DU TEMPS D'EXPOSITION AUX UV
text_image
29.6°C CHANNEL MAX MIN WET COM DRY 78%SELECTION D'UNE UNITÉ DE MESURE
text_image
Technical diagram of a door panel with labeled components including front panel, side panel, and internal componentstext_image
Illustration of a refrigerator with Chinese text labels and icons on the front panel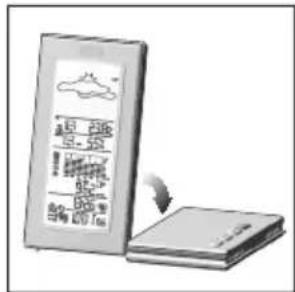
text_image
Illustration showing a digital tablet with Chinese text and icons, next to a stack of books or documents.text_image
Illustration of a refrigerator with Chinese text labels on the front panel and side panels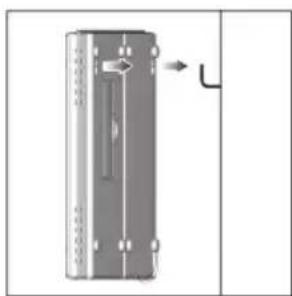
natural_image
Diagram of a cylindrical device with a side panel and a right-angle arrow indicating direction (no text or symbols)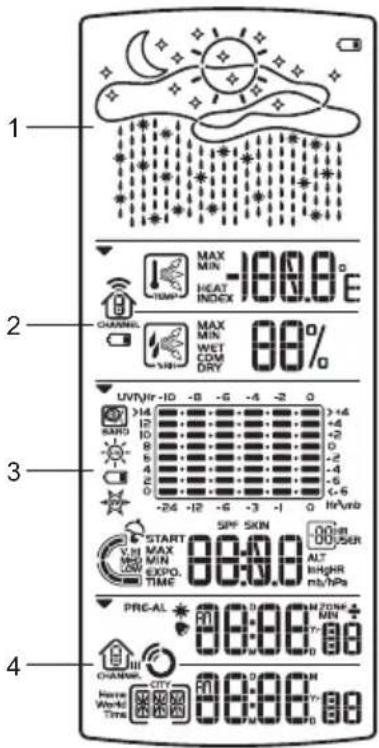
text_image
1 2 3 4text_image
Weather diagram showing sun, moon, raindrops, and stars with labels 1 and 2text_image
Diagram of a device rear panel with numbered labels pointing to components like buttons, dials, and meters.natural_image
Two technical diagrams showing a door mechanism and internal components, with no visible text or symbols.text_image
29.6°C CHANNEL MAX MIN WET COM DRY 78%natural_image
Mechanical component diagram showing a curved part with two arrows indicating direction (no text or symbols)text_image
29.6°C CHANNEL MAX MIN WET COM DRY 78%text_image
1 2 3 4 5 6 7 8 9 10 23.8°C - 55% 96.2° 13:26:48 100 106text_image
Technical diagram of a door panel with labeled components including control panel, indicator, and buttonsnatural_image
Illustration of a two-panel electronic device with front panel and side buttons (no visible text or symbols)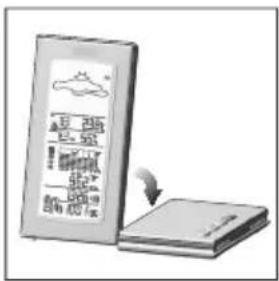
text_image
Illustration showing a document with Chinese characters and an arrow pointing to a blank document, likely indicating a revision or cancellation.natural_image
Illustration of a front panel with a digital display and control buttons (no text or symbols visible)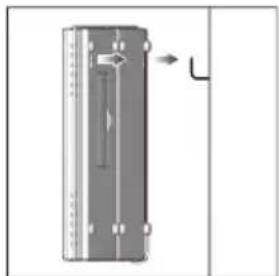
natural_image
Pure diagram of a vertical rectangular object with internal lines and arrows, no text or symbols present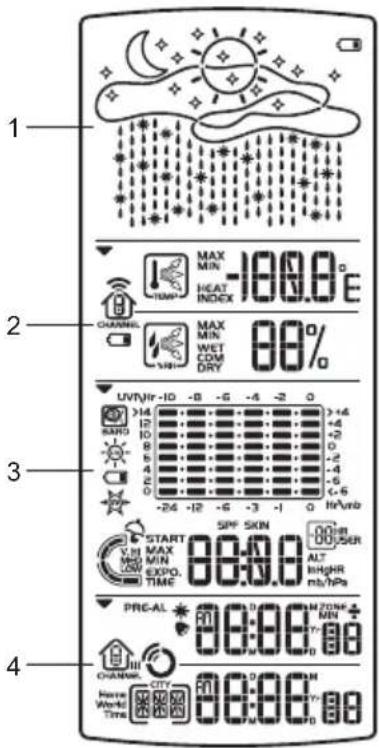
text_image
1 2 3 4text_image
Weather diagram showing sun, moon, raindrops, and stars with labels 1 and 2text_image
1 2 3 4 5 CHANNEL TEMP MAX MIN -100.0 °E HEAT INDEX MAX MIN 80% WET COM DRY %RHtext_image
Diagram of a device rear panel with numbered labels pointing to internal components- Muurbevestiging
- CH schakelaar (1-5)
- RESET
- °C / °F schakelaar
- SEARCH
- EU / UK radiosignaal formaat schakelaar
- Batterij compartiment
- Uitklapbare Standaard

text_image
1 2 3 4 5 6 7 8 9:00 100.0%natural_image
Diagram showing two views of a door handle mechanism with directional arrow and internal components (no text or symbols)NB It is recommended that you use alkaline batteries with this product for longer performance.
text_image
29.6°C CHANNEL MAX MIN WET COM DRY 78%natural_image
Mechanical component diagram showing a curved arrow and labeled parts (no text or symbols present)DE SENSOR DETECTEREN
KLOK WEERGAVE WISSELEN
WEERGAVE STAAFDIAGRAM
text_image
29.6°C CHANNEL MAX MIN WET COM DRY 70%MEETEENHEID SELECTEREN
text_image
Technical diagram of a door panel with labeled components including control panel, indicator lights, and buttonstext_image
Illustration of a refrigerator with Chinese text labels and icons on the front panel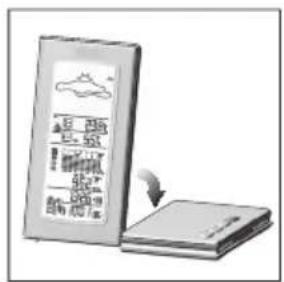
text_image
Illustration showing a document with Chinese text and a downward arrow, likely indicating a decline or reduction in a document.text_image
Illustration of a refrigerator with visible price tags and control buttons, showing price ranges and icons.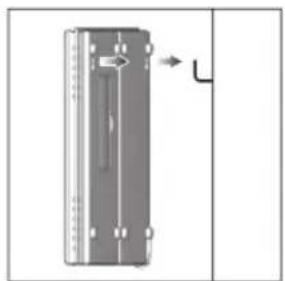
natural_image
Diagram of a device with a rectangular panel and directional arrow, no visible text or symbols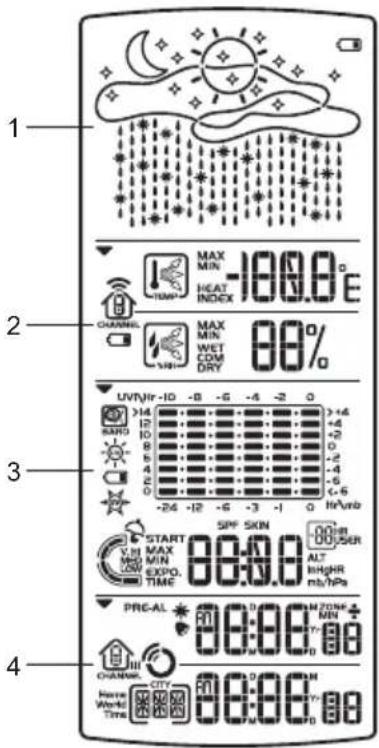
text_image
1 2 3 4text_image
Weather diagram showing sun, moon, raindrops, and stars with labels 1 and 2- Indicador de pilha fraca da unidade principal
- Indicador meteorológico
Área de Temperatura / Umidade / Zona de Conforto
text_image
1 2 3 4 5 CHANNEL TEMP MAX MIN -100.0 °E HEAT INDEX MAX MIN 00% WET COM DRY %RHtext_image
1 2 423 MHI CADIT FREE ALL WEATHER 3text_image
Diagram of a device rear panel with numbered labels pointing to internal componentsnatural_image
Technical diagram showing two views of a door mechanism with directional arrow and internal components (no text or symbols)text_image
CHANNEL TEMP 29.6°C MAX MIN WET COM DRY 78%natural_image
Mechanical component diagram showing a curved part with two arrows indicating direction (no text or symbols)text_image
AM 12:25 30AJUSTE DO RELÓGIO
text_image
UVTN+ -10 -8 -6 -4 -2 0 14 10 8 6 4 2 0 LOW Rtext_image
29.6°C CHANNEL MAX MIN WET COM DRY 70%Altitude -100 a 2500 metres
(-328 a 2734 pés)
Tela Ensolarado (dia / noite), parcialmente nublado
text_image
Technical diagram of a door lock with labeled components including front panel, side panel, and internal componentsnatural_image
Illustration of a two-panel electronic device with display screen and control buttons (no text or symbols)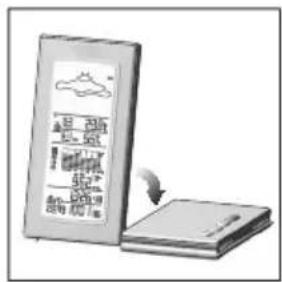
text_image
Illustration showing a device with Chinese text labels and an arrow indicating transformation or change.text_image
Illustration of a refrigerator with Chinese text labels and icons on the front panel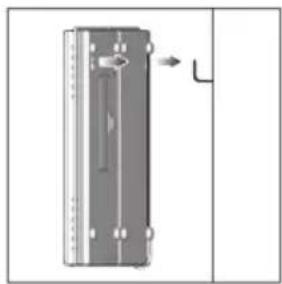
natural_image
Diagram of a device with a vertical panel and directional arrow, no visible text or symbolsLCD DISPLAY
text_image
1 2 3 4 MAX MIN -100.0 °E MAX MIN WET COM DRY 80% UVV/HR-10 -8 -6 -4 -2 0 +4 +4 +2 0 -2 -4 -6 +- -6 -6 -24 -12 -6 -3 -1 0 Hi/Vmb SIPF SKIN 80000000000000000000000000000000000000000000000000000000000000000000000000000000000 PRE-AL 88:88 MN CHANNEL CITY 88:88 MN Home World Time 88:88 MNtext_image
Weather diagram showing sun, moon, cloud, and rain patterns with labeled parts 1 and 2text_image
Diagram of a device rear panel with numbered labels pointing to internal components- Väggmontering
- Kanalomkopplare (1-5)
- RESET
- °C / °F omkopplare
- SEARCH
- EU / UK radioformatsomkopplare
- Batterifack
- Utfällbart stativ