Ingenio - Boiler ATLANTIC - Free user manual and instructions
Find the device manual for free Ingenio ATLANTIC in PDF.

| Product type | Wall-mounted electric water heater |
| Brand | Atlantic |
| Model | Ingenio |
| Capacity | 50 L, 80 L or 100 L (depending on version) |
| Power supply | 230 V ~ 50 Hz, connection with rigid cable 2.5 mm² |
| Electrical protection | 30 mA residual current circuit breaker, all-pole disconnection |
| Nominal pressure | 7 or 9 bar (0.7 or 0.9 MPa) depending on model |
| Safety group | Mandatory, new, compliant with EN 1487 (1/2" or 3/4") |
| Hydraulic connection | Cold water inlet, hot water outlet with dielectric sleeve |
| Pressure reducer | Required if pressure > 5 bar (0.5 MPa) |
| Maximum temperature | 75 °C (Max mode) |
| Display | Digital screen with temperature and modes |
| Operating modes | Frost protection, Smart, Mini (45-50°C), Comfort (50-65°C), Max (65-75°C) |
| Thermostat | Adjustable, thermal cut-out with manual reset |
| Frost protection safety | Frost protection mode maintains 7°C |
| Routine maintenance | Monthly drain of safety group; descaling and magnesium anode replacement every 2 years |
| Legal warranty | 2 years |
| Additional commercial warranty | +3 years on tank and heating element |
| Weight (approx.) | Approximately 25 to 35 kg depending on capacity |
Frequently Asked Questions - Ingenio ATLANTIC
User questions about Ingenio ATLANTIC
0 question about this device. Answer the ones you know or ask your own.
Ask a new question about this device
Download the instructions for your Boiler in PDF format for free! Find your manual Ingenio - ATLANTIC and take your electronic device back in hand. On this page are published all the documents necessary for the use of your device. Ingenio by ATLANTIC.
USER MANUAL Ingenio ATLANTIC
natural_image
White cylindrical water heater with a digital display at the bottom (no visible text or symbols)| EN | ELECTRIC WATER HEATEREnamelled steel tank | p.5 |
| FR | CHAUFFE-EAU ELECTRIQUECuve émaillée | p.9 |
| PL | ELEKTRYCZNY OGRZEWACZ WODYZasobnik emąliowany | p.13 |
| LT | ELEKTRINIS VANDENS ŠILDYTUVASEmaliuota talpa | p.18 |
| BG | ЕЛЕКРИЧЕСКИ ВОДОНАГРЕВАТЕЛЕмайлирао покритие | p.22 |
| HR | ELEKTRIĆNE GRIJALICE VODEEmajlirani spremnik vode | p.26 |
| ET | ELEKTRIKUUMUTIEnamel tank | p.30 |
| AR | السخان المغمور في المالتنك المعزول بالمينا الزجاجية | p.34 |
| RU | ЭЛЕКТРИЧЕСКИЙ ВОДОНАГРЕВАТЕЛЬЪак,покрытый стеклокерамикой | p.39 |
natural_image
Empty white rectangle with a thin black border (no text or symbols)| Model | Power output (W) (BT) | Voltage (V~) (B) | Water Connexions | |||
| VM 050 D400-3-E | 2000 | 230 | 12" | p. 2 | p. 3 | p. 4 |
| VM 080 D400-3-E | 2000 | 230 | 12" | p. 2 | p. 3 | p. 4 |
| VM 100 D400-3-E | 2000 | 230 | 12" | p. 2 | p. 3 | p. 4 |
text_image
dielectric union safety valve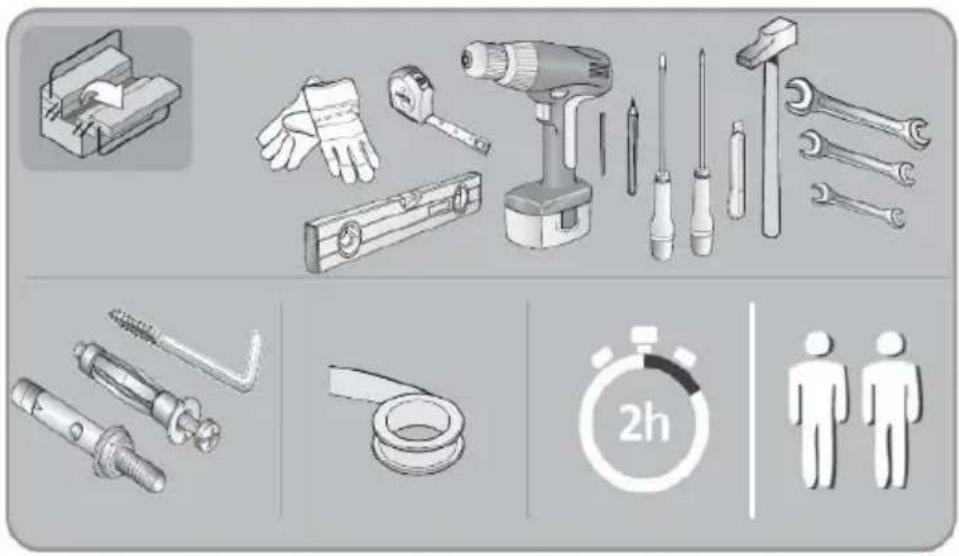
natural_image
Illustration of various hand tools including screwdriver, wrench, and washer, alongside a stopwatch with 2 hours symbol (no text or labels present)1
text_image
2,4 m 3 2 0,6m 2,25m 1 0 0,6m 0,6m
natural_image
Isometric line drawing of a box with two handles and a base, no text or symbols present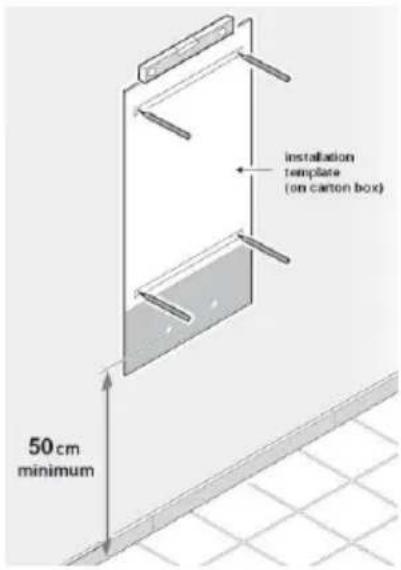
text_image
installation template (on carton box) 50 cm minimum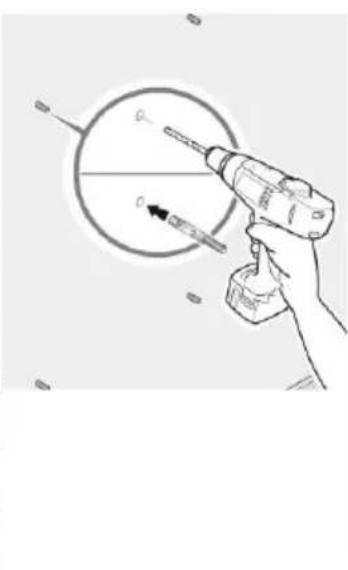
natural_image
Illustration of a hand using a screwdriver to measure a circular target with pointer (no text or symbols)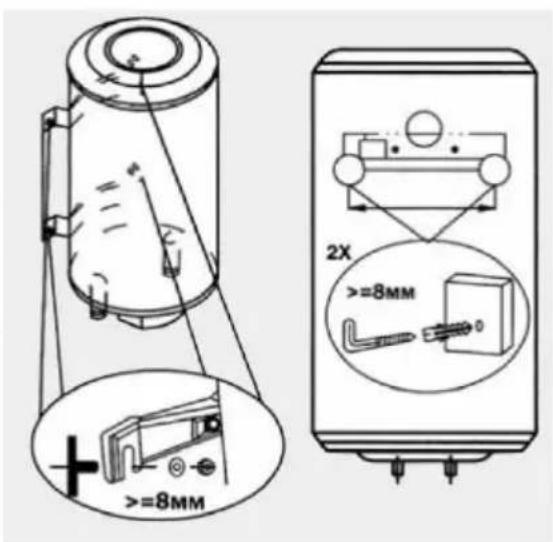
text_image
Technical diagram showing a cylindrical device with internal components and an 2X magnified view of a mechanical component with dimensional annotations.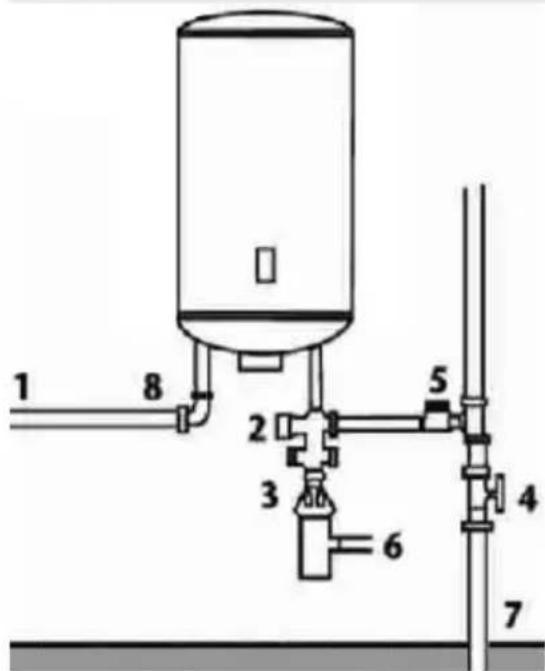
text_image
1 8 2 3 6 5 4 7
text_image
Diagram showing a cylindrical device with labeled parts and directional arrows indicating assembly or operation.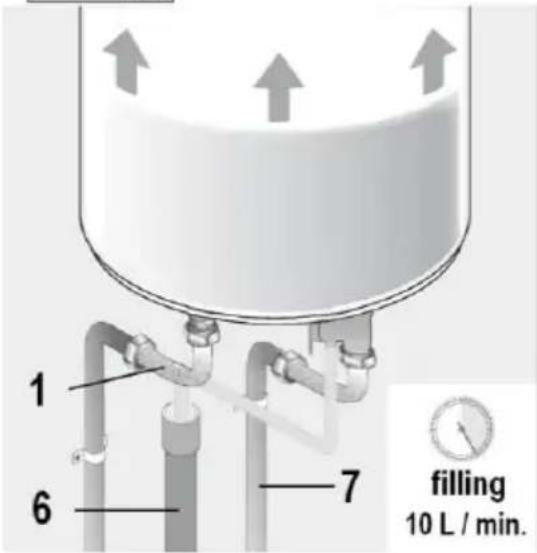
text_image
filling 10 L / min. 6 7EN
- Hot water tube
- Safety relief valve
- Funnel
- Pressure reducer recommended if pressure > 5 bar (0,5 MPa)
- Stop valve
- Drain to sewage
- Cold water pipe
- Dielectric union
HR
- Cijev za toplu vodu
- Sigurnosni ventil
- Sifon
- Reducir ventil (preporučljivco ako je pritisak iznad Bara (0,5MPa)
- Ventil
- Odvod u kanalizaciju
- Cijev za hladnu vodu
- Dielektrični navoj
BG
natural_image
Illustration of a hand inserting a plug into a wall socket (no text or symbols)4
flowchart
graph TD
    A["MODE"] --> B["A"]
    A --> C["D"]
    A --> D["C"]
    A --> E["E"]
    A --> F["F"]
    A --> G["G"]
    A --> H["B"]
    style A fill:#f9f,stroke:#333
    style B fill:#ccf,stroke:#333
    style C fill:#cfc,stroke:#333
    style D fill:#fcc,stroke:#333
    style E fill:#cff,stroke:#333
    style F fill:#ffc,stroke:#333
    style G fill:#cfc,stroke:#333
    style H fill:#fcc,stroke:#333
5
text_image
Technical diagram of an electrical connector with labeled terminals and wiring, showing internal components and connection points.Safety OFF
natural_image
Close-up of a control panel with green indicator lights and a dashed circular outline (no readable text or symbols)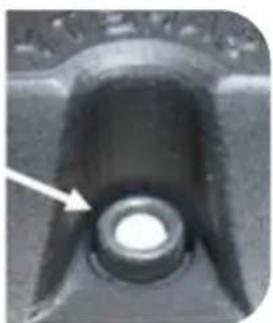
natural_image
Close-up of a mechanical component with a central circular feature and an arrow pointing to it (no visible text or symbols)Safety ON
natural_image
Close-up of a mechanical component with multiple pins and a highlighted circular feature (no visible text or symbols)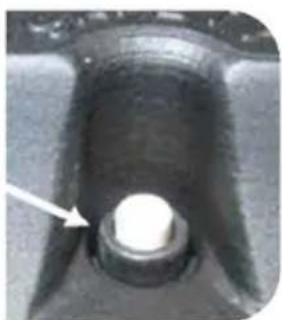
natural_image
Close-up of a mechanical component with a central hole and an arrow pointing to it (no visible text or symbols)EN
GENERAL WARNINGS
This device is not intended for use by persons (including children) with physical, sensory or mental disability, or by persons lacking experience or knowledge, unless they have received from a person in charge of their safety adequate supervision or preliminary instructions on how to use the device. Children should be supervised to ensure that they do not play with the appliance.
This unit can be used by children of not less than 8 years and people with reduced physical, sensory or mental capabilities or without experience or knowledge if they are properly supervised or if the instructions for using the device safely have been given and if the risks are taking into account. Children must not play with the device. Cleaning and maintenance must not be done by children without supervision.
CAUTION! Heavy item, handle with care:
-
Install the appliance in a room which is protected from frost. If the appliance is damaged because the safety device has been blocked, it is not covered by guarantee,
-
Make sure that the wall on which the appliance is mounted can support the weight of the appliance when filled with water,
-
If the appliance is to be fitted in a room or location where the ambient temperature is higher than 35^ C, provide sufficient ventilation,
-
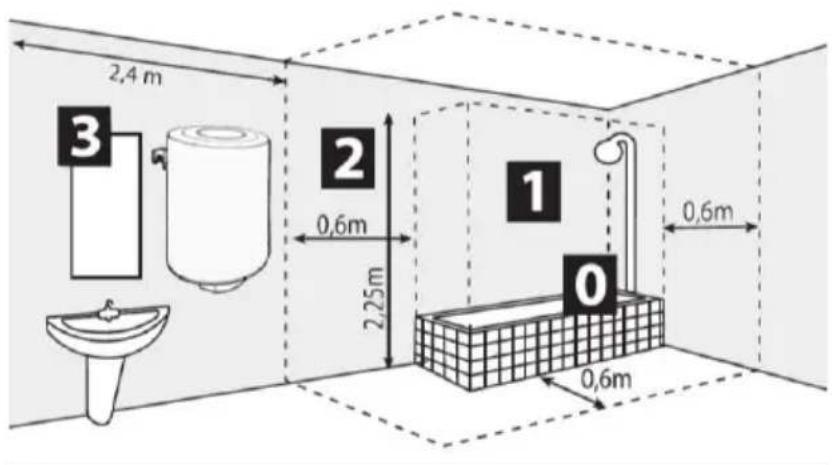
When installed in a bathroom, do not install the appliance in volumes V0 and V1 (See fig. 1, p.2). If the water heater is to install above living space, fit a retaining tank with drain to the sewer system. Place the water heater in a place with easy access,
-
If PER pipes are used, the installation of a thermostatic regulator on the output pipe of the device is strongly recommended. It will be set according to the performance of the material used.
-
Installation of a vertical or horizontal wall mounted device: To allow the replacement of the heating element leave a free space of 300mm between the tube ends and the wall or fixed furniture.
-
Switch off the power before removing the cover, to avoid any risk of injury or electric shock.
-
The installation must be equipped, upstream of the appliance, with a bipolar cut-out device (fuse, breaker switch) respecting local regulations (30 mA earth-leakage breaker).
-
If the supply cord is damaged, it must be replaced by a special cord or assembly available from the manufacturer or the after sales service.
-
Mandatory installation of a safety device in a frost free location (or any other new device which limits the tank pressure) to 7 or 9 bar (0.7 or 0.9 MPa) according to the nominal pressure, with a size of 1/2" in the input of the water heater, respecting the local regulations
-
Operate regularly the discharge of safety device to prevent scaling and check that it is not blocked.
-
Hydraulic accessories should not be located between the safety valve and the cold water inlet. A pressure reducer (not supplied) is required when the water supply pressure exceeds 5 bar (0,5 MPa) and will be fitted on the main supply.
-
Connect the safety device to an unpressurised outlet pipe in a frost free location, with a continuous slope to evacuate water during heating up or draining the water heater.
-
The pipes used must support 10 bars (1 MPa) and 100 °C.
-
To drain the device: Switch off the power and the supply of cold water, open the hot water faucets and manipulate the safety valve. To drain under sink water heater disconnect the hydraulic connections and return the device.
-
The products described in this manual are subject to changes at any time to be in accordance with technology and standards. The devices comply with electromagnetic directives 2004/108/EC and Low Voltage 2006/95/EC.
-
Do not dispose your water heater in the garbage, but hand it to a place assigned for this purpose (collection point) where it can be recycled.
EN
INSTALLATION
1. PRODUCT MOUNTING See "General Warnings" N°.1 to N°.6
For product installation, refer to drawings section 1 page.2
2. HYDRAULIC CONNECTION See "General Warnings" N°.10 to N°.14
For hydraulic connection, refer to drawings section 2 page 3.
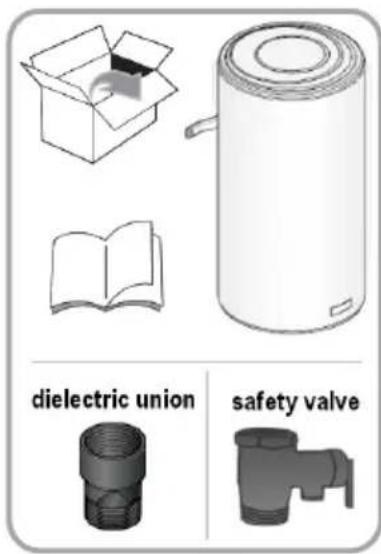
- It is necessary to clean the supply piping prior to the hydraulic connection. The connection to the hot water outlet is to be carried out with a cast iron or steel sleeve or a dielectric connector, to avoid corrosion of the pipe (direct contact iron / copper). The use of brass fittings is prohibited.
- Always install a new safety device on the cold water pipe of the water heater, which comply with the standards (EN 1487 in Europe), with a pressure of 7 or 9 bars (0.7 or 0.9 MPa) according to the nominal pressure, with diameter 1/2".
- CAUTION: Do not use the safety valve included in this packaging in France (home country and French overseas)
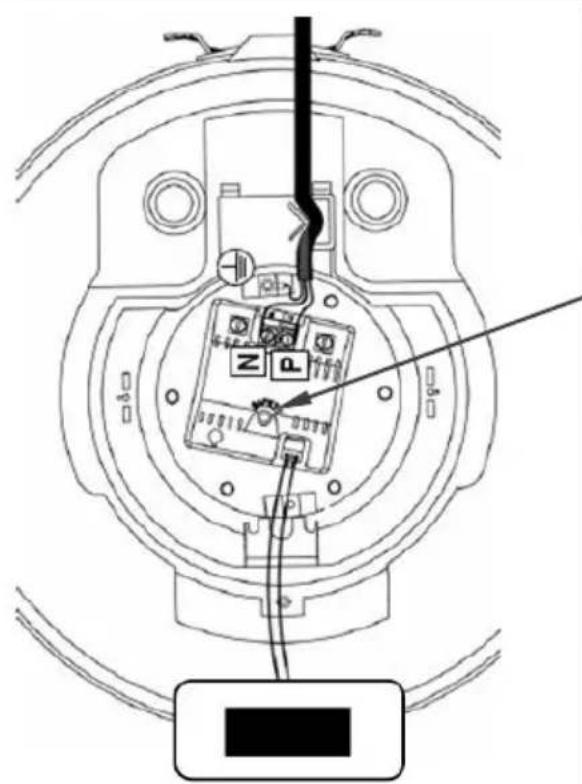
3. ELECTRICAL CONNECTION
For electrical connection, refer to drawings section 3 page 4.
- The water heater can be connected and operated only on AC 230V. Connect the heater with a rigid cable with conductors 2,5mm^2 . Use a standardised channeling (rigid or flexible conduit) until the calibrated housing cover.
- Directly connect devices with a cable or plug. In France, a product with plug is strictly prohibited and cannot be sold and installed.
- Always connect the earth conductor of the cable to the earth ground wire or connect the earth conductor to the appropriate terminal identified by the symbol ⏻. This connection is compulsory for safety reasons. The earth wire green - yellow must be longer than those of phases. The installation must be equipped, upstream of the appliance, with a bipolar cut-out device (minimum contact distance of 3 mm fuse, breaker switch). In the case where hydraulic connexions are in insulated material, electrical circuits shall be protected by a differential circuit breaker 30 mA adapted to local standards.
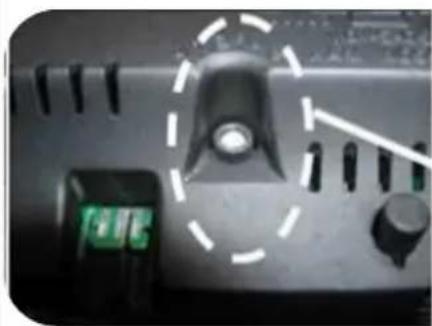
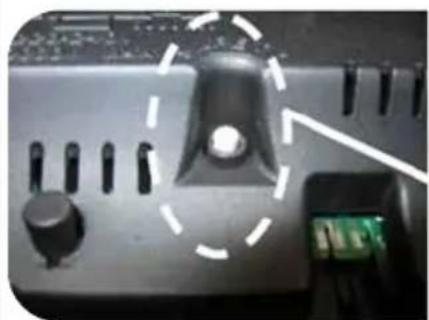
Thermal circuit breaker (see drawings section 5 page 4): All our products are equipped with a thermostat with thermal circuit breaker and manual resetting which cuts off the power supply to the water heater in case of overheating. If the safety trips:
→ switch off the power before taking any further action,
→ remove the cover.
→ check the electrical connections,
→ reset the thermal circuit breaker
If the circuit breaker keeps tripping, replace the thermostat. Never short circuit the safety cut out or the thermostat. Connect the power supply only via the terminal.
EN
SETUP & OPERATION
- CAUTION: NEVER POWER THE WATER HEATER WITHOUT WATER: Models with an electric heating element will be certainly damaged.
- Fill the tank completely. Before powering up, open the hot water taps, drain the pipes in order to empty the air.
- Check the tightness of the tubes and of the flange seal under the plastic cover. In case of leaking tighten moderately. Check the operating of the hydraulic components and of the safety valve.
- Turn the power on. After 15 to 30 minutes, depending of the capacity of the device, the water should drip from the drain. This is normal and due to the expansion of water. Check connection leaks and seal. During heating and according to the water quality, hot water tanks can make a bubbling noise. This noise is normal and does not indicate any defect of the unit.
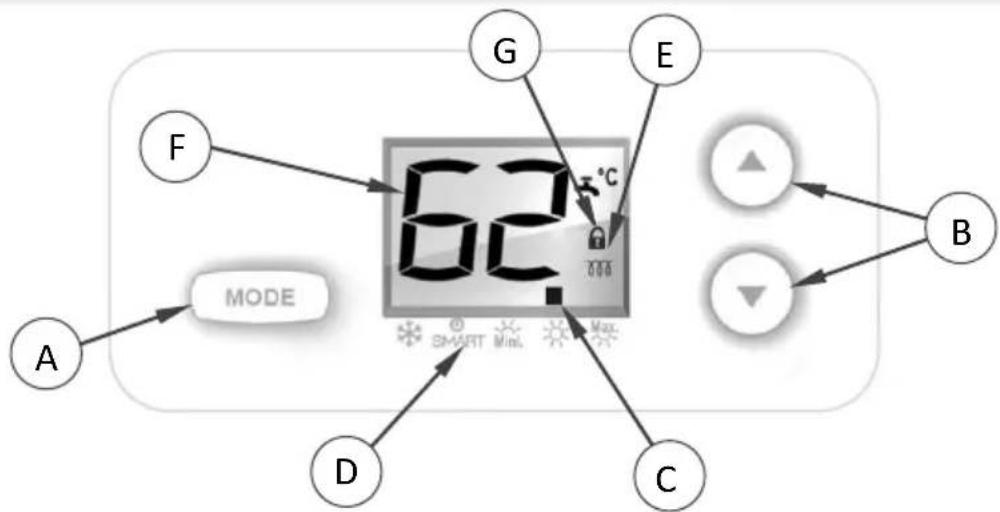
The water heater features a digital screen that allows to choose the running mode (see. drawing section 4 page 4).
1/ Mode selection key (Ref. A): Enables to choose the running mode. Press twice to change the mode.
2/ Setting arrows keys (Ref. B): In the selected modes, these keys allow to increase or decrease the setpoint temperature (steps of 1°C).
3/ Indicator of operating mode (Ref. C): Shows the current running mode of the product.
4/ Operating modes (Ref. D):
FROST FREE Mode * : Automatic regulation at frost-free temperature (7°C), in order to reduce the electric consumption during the periods of absence of the user.
SMART Mode SMART : Fully automatic operation of the water heater: after a learning period, the product will adjust automatically the hot water temperature adapted to the user consumption. This allows lowering of the electrical consumption.
MINI Mode Mini. : User selects a hot water temperature between 45°C and 50°C (default value of 50°C).
COMFORT Mode : User selects a hot water temperature between 50°C and 65°C (default value of 65°C). Warning: this operating mode might increase the electrical consumption of the product.
MAX Mode : User selects a hot water temperature between 65°C and 75°C (default value of 70°C). Warning: this operating mode increases the electrical consumption and scaling. Using hot water with high temperature may cause burns. It is strongly recommended to take all the necessary precaution to use this operating mode.
5/ Temperature display (Ref. F):
In FROST FREE Mode ^* , it indicates the temperature setpoint of 7^ C automatically fixed by the product.
In SMART Mode SMART, the displayed value is the temperature setpoint automatically analysed and fixed by the product. When a large quantity of hot water is used, the displayed temperature is the one measured close to the bottom side of the product (30cm for a 50L product, 40cm for 80L and 100L). That means the remaining quantity of hot water is limited (10L of hot water remaining for a 50L product, 30L remaining for a 80L product and 50L remaining for a 100L product).
In MINI Mini., COMFORT and MAX modes, it shows the temperature of water inside the tank. When pushing the setting keys (Ref. B), the screen displays during a few seconds the setpoint temperature chosen by the user before displaying again the water temperature inside the product.
6/ Heating indicator (Ref. E): Shows when the water is under heating. NOTA: if the indicator is on continuously, that means the product is under heating. It doesn't reveal a bad running of the product.
7/ Control panel locking (Ref. G): To lock or unlock the control panel, press simultaneously the UP and DOWN buttons
EN TROUBLESHOOTING
When a malfunction occurs, the user interface of the appliance will display an error code.
| Code | Fault | Concerned element | Actions |
| E1 | Probe fault | Thermostat | Unplug and plug the power supplyIf the problem is not resolved, contact your installer or dealer |
| E2 | No heating | ThermostatHot water circuitHeating element | 1/ Check that there are no problems on the hot water circuit (open tap, burst pipe...)If a leak is found, solve the problem, disconnect and reconnect the power supply to the unit and check that the default does not reappear during the first heating.2/ Check that the circuit breaker is not tripped thermal→ Disconnect power supply→ Open the cover of the device→ Check the thermostatIf the circuit breaker has tripped→ reset it by pressing the button SAFETY on the thermostat→ close the cover of the device→ reconnect the power supply and check that the default does not reappear in the first heating.If the default reappears, contact your installer or dealer (service code: ERR9).3/ None of the previous two casesContact your installer or dealer (service code: ERR0) |
| E3 | Over heating | Thermostat | Check that the circuit breaker is not tripped thermal→ Disconnect power supply→ open the cover of the device→ check the thermostatIf the circuit breaker has tripped→ reset it by pressing the button SAFETY on the thermostat→ close the cover of the device→ reconnect the power supply and check that the default does not reappear in the first heating.If the default reappears, contact your installer or dealer (service code: ERR9).If the circuit breaker is not tripped, contact your installer or dealer (service code: ERR9) |
| E4 | Dry heating | Cold water circuit | 1/ Check that the cold water supply is operational2/ Open hot water taps and see the water flow. If the flow is not immediate, wait lines are purged of air→If the flow of the hot water circuit is sufficient→Disconnect and reconnect the power supply to the unit and check that the default does not reappear.If the default reappears, contact your installer or dealer (service code: Err7).→If the flow of hot water is absent, contact a qualified professional to intervene in the cold water supply of the unit. |
EN
MAINTENANCE
CAUTION: Before removing the plastic cover, make sure the power is turned off to avoid any risk of injury or electric shock.
1. USER MAINTENANCE
Operates once a month the discharge of the safety valve to prevent scaling deposit and verify that the safety device is not blocked. If this is not done, damage may be caused and the guarantee invalidated. For an installation with a booster pump; before starting up, after a long period of disuse, turn the rotor following the advice in the manufacturer's instructions.
2. MAINTENANCE BY A QUALIFIED PERSON
- Scaling: Remove the scale sludge. Do not scrape or hammer the lime scale deposited on the casing, as this may damage the lining.
- Magnesium anode: change the magnesium anode every 2 years or when its diameter is lower than 10 mm.
- Heating element: the replacement of a sheathed heating element involves draining of the water heater and replacement of the flange gasket. Reassemble the heating element, reasonably tight nuts (cross tightening), check that there is no leakage after the first heating-up, tighten again if necessary
- Drain: Turn off power and cold water supply. Open hot water taps and drain valve of the safety device.
Spare parts list: thermostat, flange gasket, heating element, heating light indicator, magnesium anode, connection wires, electric switch. The guarantee requires genuine manufacturer's parts to be used.
Advice to the user
→ When the water has a TH > 20°f, it is recommended that this be treated. When a softener is used, the water hardness must remain above 15°f.
→ In case of prolonged absence, especially in winter, drain your appliance following the procedure above.
EN
SCOPE OF THE GUARANTEE
The water heater must be installed, used and maintained according to best practice and conform to the standards in force in the country in which it is installed and to the instructions contained in this document. In the European Union this appliance is covered by the statutory guarantee accorded to consumers in accordance with directive 1999/44/CE. This guarantee comes into force when the appliance is delivered to the consumer. In addition to the legal guarantee, certain items are covered by an extra guarantee relating only to the free exchange of the tank and of components accepted as defective. It does not include the cost of replacement or carriage. Refer to the table below. This commercial guarantee does not affect your statutory rights. It applies within the country where the product was acquired, provided it is also installed in the same country. The dealer must be informed of any damage before the product is exchanged under guarantee and the appliance will remain available for inspection by experts from the insurance company and the manufacturer.
| Statutory guarantee | 2 years |
| Extra commercial guarantee on enamel tank and heating element | +3 years |
Exclusions: Wear parts: magnesium anodes. Equipment which cannot be assessed (access difficult for repair, maintenance or assessment). Equipment exposed to abnormal environmental conditions: frost, bad weather, water which is abnormally aggressive or outside drinking standards, electrical supply with large spikes. Equipment installed without observing current standards in the country of installation: the absence or incorrect fitting of safety devices, abnormal corrosion due to incorrect water fitments (iron/copper contact), incorrect earthing, inadequate cable thickness, non-observance of the connection drawings shown in these instructions. Equipment not maintained in accordance with these instructions. Repairs or replacement of parts or components in the equipment not carried out or authorised by the company responsible for the guarantee. Changing a component does not extend the life of the guarantee.
The products illustrated in these instructions may be modified at any time to reflect changes in manufacture and current norms.
To claim under guarantee, contact your installer or dealer. If necessary, contact:
SPAIN and PORTUGAL: Pol.Industrial Cami Ral, Calle Molinot 59-62 - 08860 - Castelldefels (Barcelona) Tél : 902 45 45 66 /
ITALIA : 848 800 929 (al solo costo di uno chiamata a tariffa urbana) / POLSKA : ul. Plochocińska 115 , 03-044 Warszawa tel (0800)-548-098 / OTHER COUNTRIES: +33 23 87 13 846
who will inform you of what you should do. The guarantee applies only to examine products which are accepted as faulty by the company underwriting the guarantee. It is essential that products should be retained for inspection by them.
| Type / Reference: | STAMP DEALER | |
| Serial number: | ||
| Name and address of customer: |