
WKL 1502 - Heating AEG - Free user manual and instructions
Find the device manual for free WKL 1502 AEG in PDF.
User questions about WKL 1502 AEG
0 question about this device. Answer the ones you know or ask your own.
Ask a new question about this device
Download the instructions for your Heating in PDF format for free! Find your manual WKL 1502 - AEG and take your electronic device back in hand. On this page are published all the documents necessary for the use of your device. WKL 1502 by AEG.
USER MANUAL WKL 1502 AEG
WKL 502, WKL 752, WKL 1002, WKL 1502, WKL 2002, WKL 2502, WKL 3002
Wandkonvektor
Operating and Installation instructions
English
Convecteur
- Operating instructions 6
1.1 Switching on the Unit 6
1.2 Heater 6
1.2.1 Anti-frost setting 6
1.2.2 Limiting the temperature range ____ 6
1.3 Safety notes 6
1.4 Servicing 6
- Installation instructions 7
2.1 Attaching the wall mounting bracket 7
2.2 Wall mounting the convector 7
2.2 Electrical connection 8
- Guarantee 8
3.1 Environment and recycling 8
Inhoudsoverzicht
Nederlands
natural_image
Technical line drawing of a structural support frame with no text or symbolsnatural_image
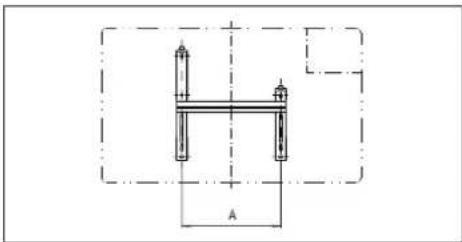
Pure technical line drawing of a mechanical assembly with no text, numbers, or symbols| Typ WKL WKL WKL WKL WKL WKL WKL | |||||||
| 502 752 1002 1502 2002 2502 3002 | |||||||
| Anschlußleistung W 500 750 1000 1500 2000 2500 3000 | |||||||
| Breite mm 370 370 445 590 740 890 1036 | |||||||
| Höhe mm 450 450 450 450 450 450 450 450 | |||||||
| Tiefe mm 78 78 78 78 78 78 78mit Wandhalterung 100 100 100 100 100 100 | |||||||
| Maß A 121 121 195 343 491 639 790 | |||||||
| Gewicht kg | 4,1 4,1 | 4,7 6,1 7,4 | 8,1 10,0 | ||||
natural_image
Technical line drawing of a vertical wall-mounted device with curved arrows indicating force or connection (no text or symbols)1. Operating instructions
1.1 Switching on the Unit
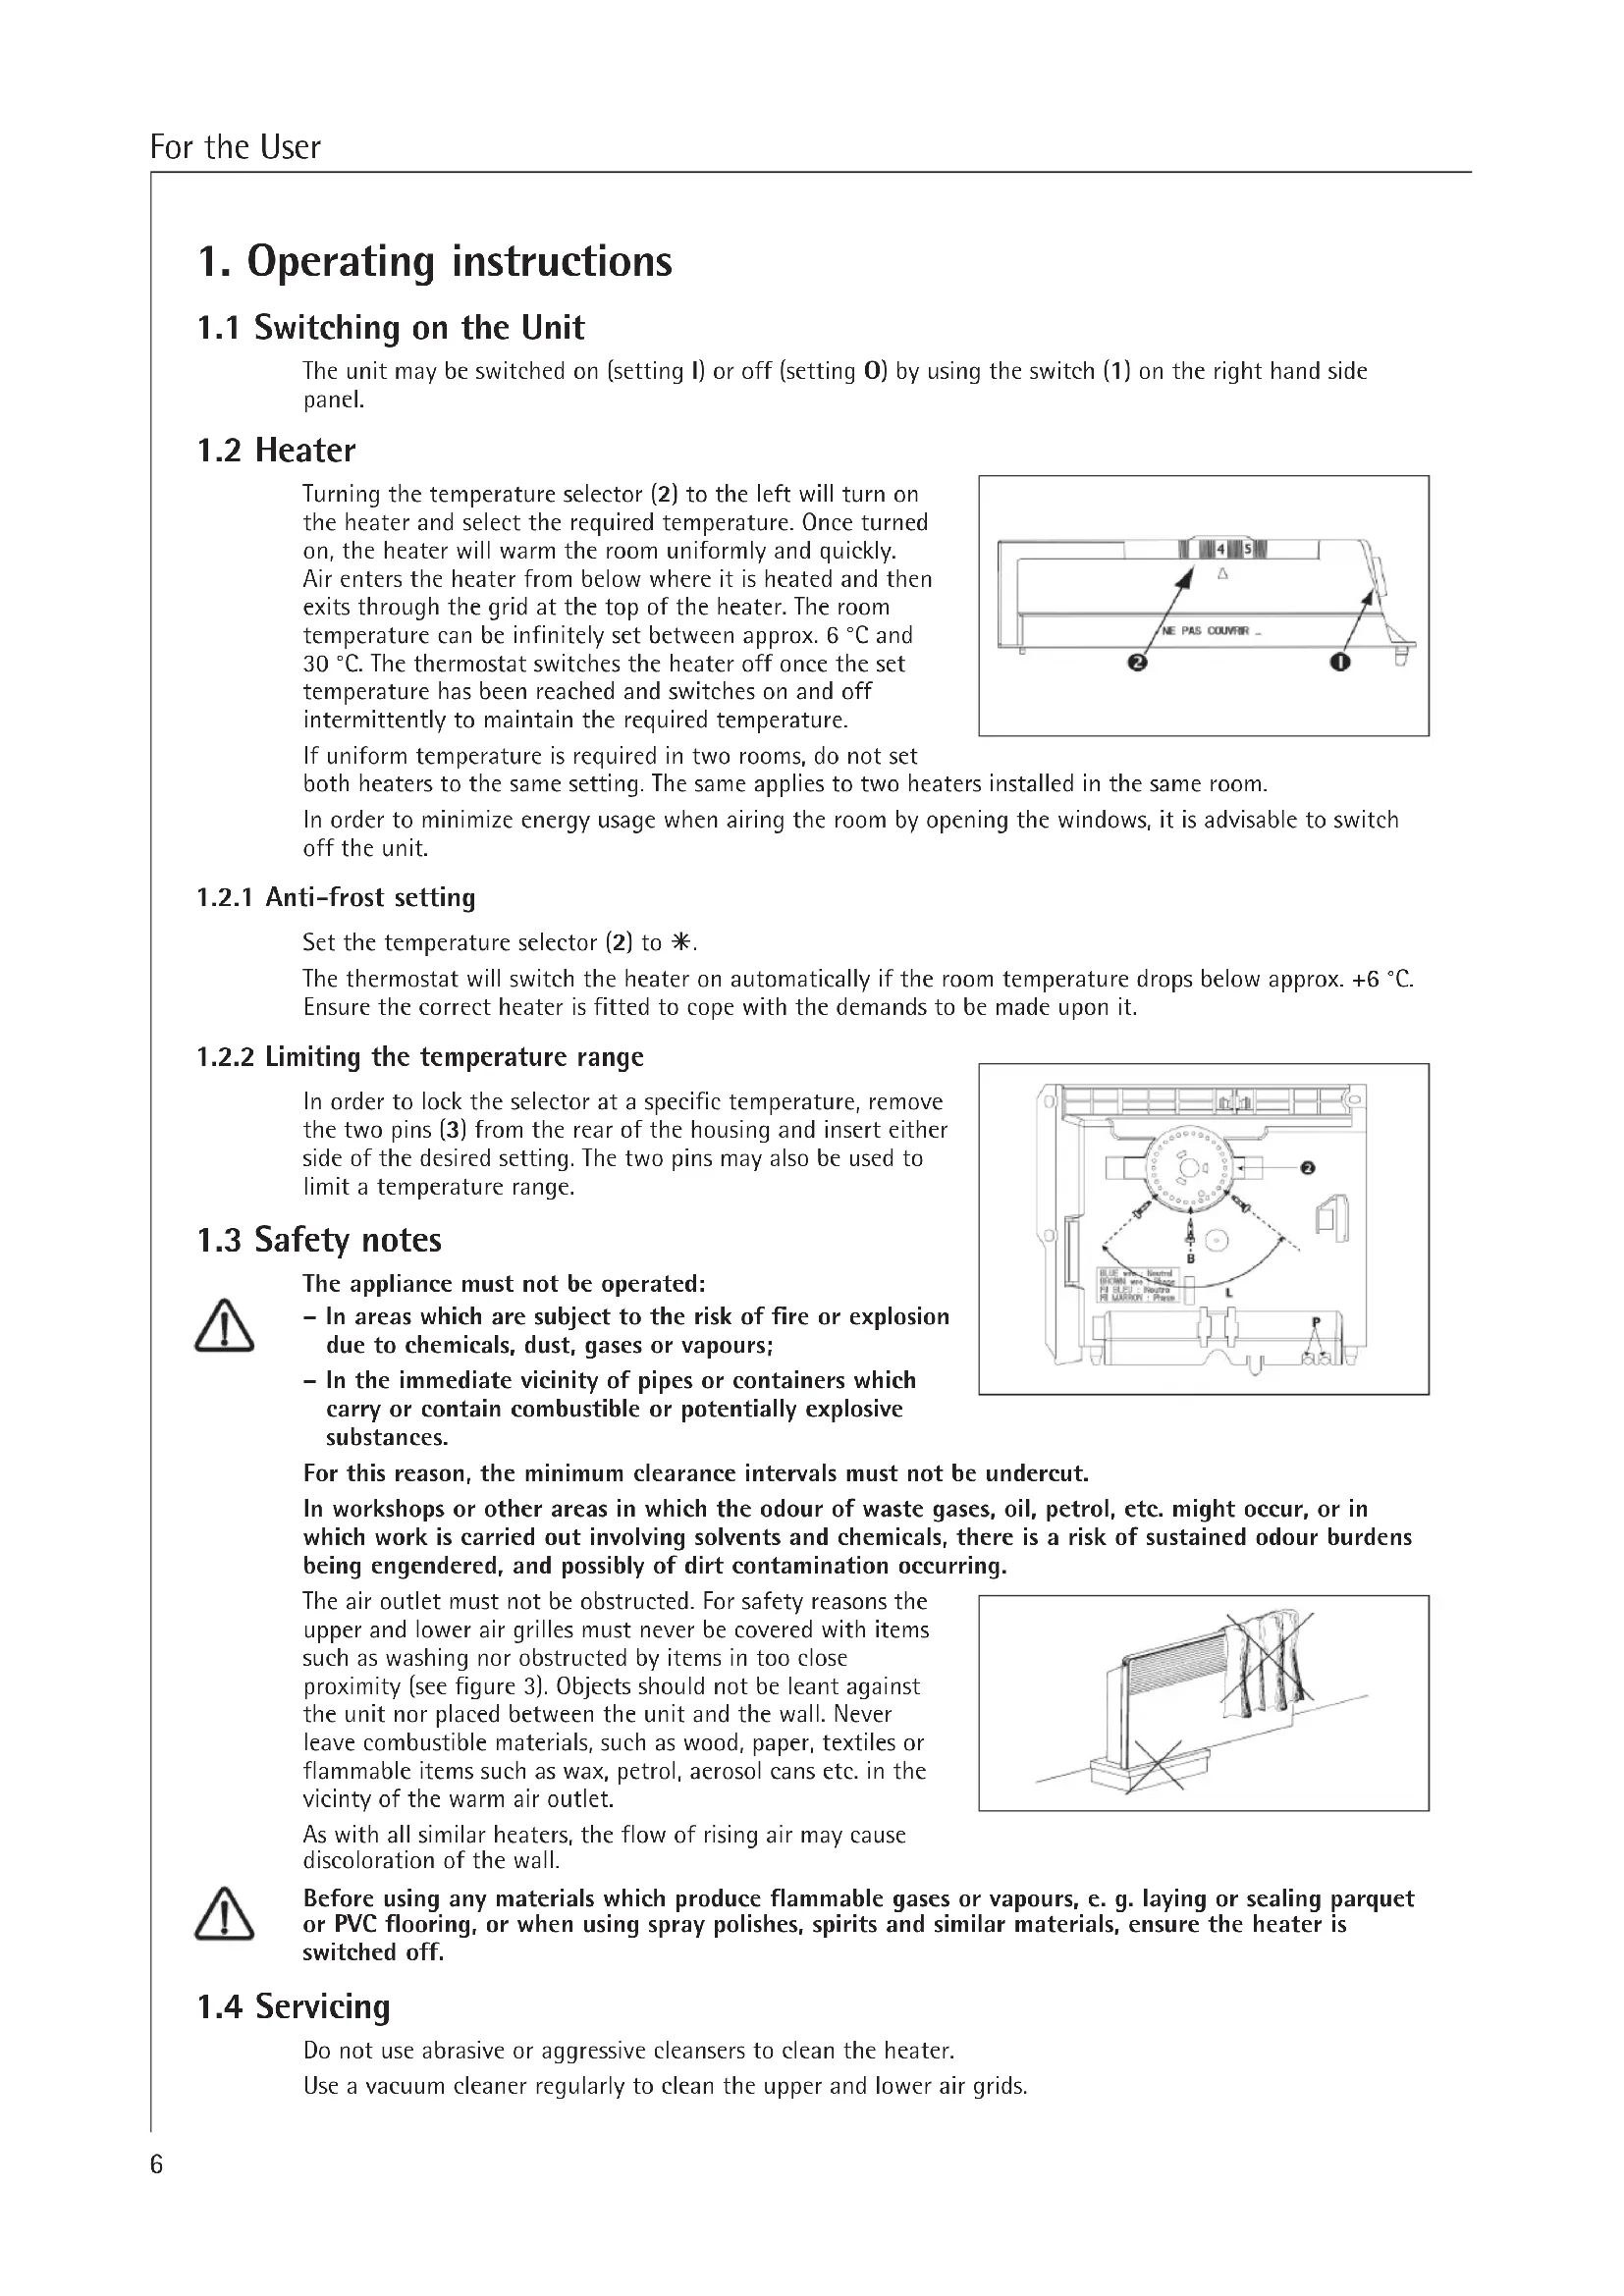
The unit may be switched on (setting I) or off (setting O) by using the switch (1) on the right hand side panel.
1.2 Heater
Turning the temperature selector (2) to the left will turn on the heater and select the required temperature. Once turned on, the heater will warm the room uniformly and quickly. Air enters the heater from below where it is heated and then exits through the grid at the top of the heater. The room temperature can be infinitely set between approx. 6 °C and 30 °C. The thermostat switches the heater off once the set temperature has been reached and switches on and off intermittently to maintain the required temperature.
text_image
4 5 Δ NE PAS COUVRIR ... ② ①If uniform temperature is required in two rooms, do not set
both heaters to the same setting. The same applies to two heaters installed in the same room.
In order to minimize energy usage when airing the room by opening the windows, it is advisable to switch off the unit.
1.2.1 Anti-frost setting
Set the temperature selector (2) to *.
The thermostat will switch the heater on automatically if the room temperature drops below approx. +6 °C. Ensure the correct heater is fitted to cope with the demands to be made upon it.
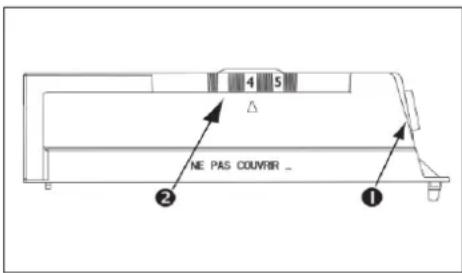
1.2.2 Limiting the temperature range
In order to lock the selector at a specific temperature, remove the two pins (3) from the rear of the housing and insert either side of the desired setting. The two pins may also be used to limit a temperature range.
text_image
BLUE VIEW: Board RETURN ON: -50mm F1 F2 F3 Return F4 MARGIN : Power L P A B D E F G H I J K L ②1.3 Safety notes

The appliance must not be operated:
- In areas which are subject to the risk of fire or explosion due to chemicals, dust, gases or vapours;
- In the immediate vicinity of pipes or containers which carry or contain combustible or potentially explosive substances.
For this reason, the minimum clearance intervals must not be undercut.
In workshops or other areas in which the odour of waste gases, oil, petrol, etc. might occur, or in which work is carried out involving solvents and chemicals, there is a risk of sustained odour burdens being engendered, and possibly of dirt contamination occurring.
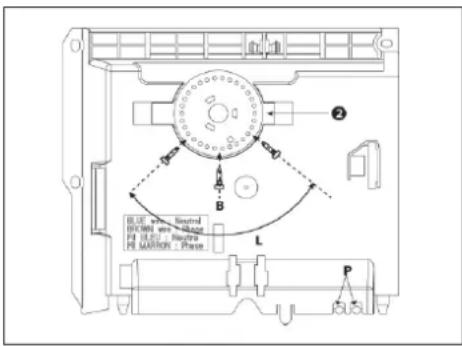
The air outlet must not be obstructed. For safety reasons the upper and lower air grilles must never be covered with items such as washing nor obstructed by items in too close proximity (see figure 3). Objects should not be leant against the unit nor placed between the unit and the wall. Never leave combustible materials, such as wood, paper, textiles or flammable items such as wax, petrol, aerosol cans etc. in the vicinity of the warm air outlet.
natural_image
Simple line drawing of a fence with a horizontal beam and a hanging sheet, marked with X marks (no text or symbols)As with all similar heaters, the flow of rising air may cause discoloration of the wall.

Before using any materials which produce flammable gases or vapours, e. g. laying or sealing parquet or PVC flooring, or when using spray polishes, spirits and similar materials, ensure the heater is switched off.
1.4 Servicing
Do not use abrasive or aggressive cleansers to clean the heater.
Use a vacuum cleaner regularly to clean the upper and lower air grids.
2. Installation instructions

ATTENTION!
The installation, electrical connection and first operation of this appliance should be carried out by a qualified installer.
The company does not accept liability for failure of any goods supplied which have not been installed and operated in accordance with the manufacturer's instructions.
This convector heater must be installed by an authorised serviceman in conjunction with these instructions.
These installation instructions belong to the heater and must be handed on to the successor if the heater is sold.
AEG convector heaters are direct electric heaters designed to be mounted on the wall and are particularly suitable for heating smaller rooms such as utility rooms, kitchen, bath- and washrooms etc.
The convector heater is supplied with a lead.
(Exception: WKL502 C to WKL3002 C)
The convector heater must not be mounted immediately below a wall socket.

During the just operation, the heater may give off a smell. Ensure that the room is ventilated (for example, open a window).
natural_image
Pure mechanical diagram showing a lever and pivot with no text, numbers, or symbols2.1 Attaching the wall mounting bracket
The wall mounting bracket is oriented centrally
(see figure and the following table).
Use the wall-mounting bracket as a template for positioning the heater correctly and providing the correct distance from the floor.
Place the bracket on the floor. Mark the screw-holes through the drill holes (①).
| Type WKL WKL WKL WKL WKL WKL WKL | |||||||
| 502 752 1002 1502 2002 2502 3002 | |||||||
| Connecting power W 500 750 | 1000 1500 | 2000 2500 | 3000 | ||||
| Breadth mm 370 370 445 590 7 | 40 890 1036 | ||||||
| Heigth mm 450 450 450 450 450 450 450 450 450 450 450 450 450 450 450 450 450 450 450 450 450 450 450 450 450 45 | 100 100 100 100 100 100 100 100 100 100 100 100 100 100 100 100 100 100 100 100 100 100 100 100 100 100 | ||||||
| Depth mm 78 78 78 78 78 78 78 with wall mounting 100 100 100 100 100 100 100 100 100 100 100 100 100 100 100 100 100 100 100 100 100 100 100 100 10 | |||||||
| Measure A | 121 121 195 343 | 491 639 790 | |||||
| Weight kg | 4.1 4.1 | 4.7 6.1 7.4 | 8.1 10.0 | ||||
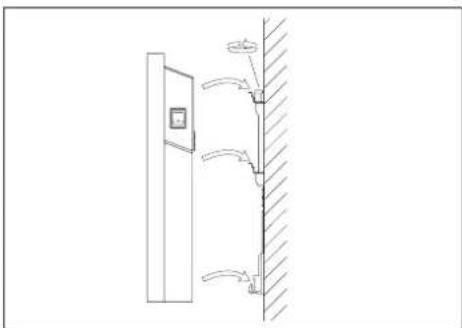
Raise the bracket and position it in such a way that holes B are aligned with the marks on the wall you have just made. Now mark the upper holes through holes C and D in the wall mounting (II).
Drill the four holes, insert plugs and screw the wall mounting securely to the wall using four screws.

text_image
① C A D B I ② C A D B Ⅱ2.2 Wall mounting the convector
On the backside of the convector there are 4 slots, these should be hooked onto the wall bracket and pushed down. The spring clips should be turned clockwise to secure. To remove the convector reverse the above operation.
natural_image
Technical line drawing of a wall-mounted electrical cabinet with curved arrows indicating direction (no text or symbols)2.2 Electrical connection

This heater is for 230 V AC.
Please observe national standards, the regulations of your local electricity supply company as well as data the rating label.
Electrical safety!
The convector heaters have protective system II (☐) and are spray protected (△P24).
Note the details on the rating plate!
The voltage supply must match the requirements on the rating plate. The supply cable must be correctly sized. The heater must be connected to a socket outlet or permanent terminal box at least 10 cm to one side of the heater.
In compliance with installation regulations the permanently wired electrical installation must be provided with an omnidirectional terminal switching device that has a contact opening gap of at least 3 mm.
To avoid hazards, if the power cord of the appliance exhibits visible damage it must be replaced by the manufacturer or his service department or a qualified electrician.
Please note in general:
Where the convector heater is fitted in a room with a bath or shower, ensure the safety zone defined in IEE Regulations is applied in accordance with the details on the rating plate.
Safety measures
This convector heater is equipped with a safety cut-out (STB) that switches the heater off if it overheats. Once the heater has switched off due to overheating, remove the cause of the fault, e.g. blocked air grids. When the heater has cooled down for several minutes it will restart automatically. If the heater then cuts off again, switch off the heater and call an authorised serviceman.

Caution!
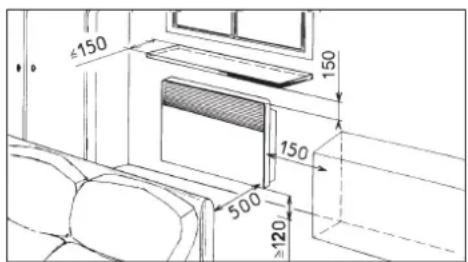
Ensure the safety zones (mm) in following figure are kept free.
text_image
≤150 150 150 500 ≥203. Guarantee
For guarantee please refer to the respective terms and conditions of supply for your country.

The installation, electrical connection and first operation of this appliance should be carried out by a qualified installer.
The company does not accept liability for failure of any goods supplied which are not installed in accordance with the manufacturer's instructions.
3.1 Environment and recycling
Please help us to protect the environment by disposing of the packaging in accordance with the national regulations for waste processing.
text_image
4 5 Δ NE PAS COUVRIR _ ① ②text_image
B. L. 10 B. 10.1 - B. Control B. 10.1 - B. Control B. MATOR - P. Press Pnatural_image
Simple line drawing of a stand with a horizontal bar and a hanging cloth, marked with 'X' symbols (no text or labels)natural_image
Pure technical line drawing of a mechanical assembly with no text, numbers, or symbols| Type WKL WKL WKL WKL WKL WKL WKL | |||||||
| 502 752 1002 1502 2002 2502 3002 | |||||||
| Puissance nominale W 500 750 | 1000 1500 2000 2500 3000 | ||||||
| Largeur mm 370 370 445 590 740 890 1036 | |||||||
| Hauteur mm 450 450 450 450 450 450 450 450 450 450 450 450 450 450 450 450 450 450 450 450 450 450 450 450 450 45 | 450 450 450 | ||||||
| Profondeur mm 78 78 78 78 78avec support mural 100 100 100 100 100 100 100 100 100 100 100 100 100 100 100 100 100 100 100 100 100 100 100 100 100 10 | 78 78100 100 100 100 100 100 100 100 100 100 100 100 100 100 100 100 100 100 100 100 100 100 100 100 100 | ||||||
| Dimension A 121 121 195 343 491 639 790 | |||||||
| Poids kg | 4,1 4,1 | 4,7 6,1 7,4 | 8,1 10,0 | ||||
natural_image
Technical line drawing of a wall-mounted electrical cabinet with mounting brackets and grounding (no text or symbols)text_image
4 5 Δ NE PAS COUVRIR _ ① ②natural_image
Technical line drawing of a mechanical assembly with no visible text or symbols1.4 Onderhoud
natural_image
Pure technical line drawing of a mechanical assembly with no text, numbers, or symbols| Type WKL WKL WKL WKL WKL WKL WKL | ||||||||||||||
| 502 752 | 1002 150 | 2 2002 25 | 02 3002 | |||||||||||
| Aansluitvermogen W 500 750 1 | 000 1500 | 2000 2500 | 3000 | |||||||||||
| Breedte mm 370 370 445 590 7 | 40 890 | 1036 | ||||||||||||
| Hoogte mm 450 450 450 450 450 450 450 450 450 450 450 450 450 450 450 450 450 450 450 450 450 450 450 450 450 45 | 450 450 450 450 450 450 450 450 450 450 450 450 450 450 450 450 450 450 450 450 450 450 450 450 450 | 450 450 450 450 450 450 450 450 450 450 450 450 450 450 450 450 450 450 450 450 450 450 450 450 45 | 100 100 100 100 100 100 100 100 100 100 100 100 100 100 100 100 100 100 100 100 100 100 100 100 100 100 | 100 100 100 100 100 100 100 100 100 100 100 100 100 100 100 100 100 100 100 100 100 100 100 100 10 | 100 100 100 100 100 100 100 100 100 100 100 100 100 100 100 100 100 100 100 100 100 100 100 100 1 | 100 100 100 100 100 100 100 100 100 100 100 100 100 100 100 100 100 100 100 100 100 100 100 100 101 | 100 100 100 100 100 100 100 100 100 100 100 100 100 100 100 100 100 100 100 100 100 100 100 100 1 | Gewicht kg | 4,1 4,1 | 4,7 6,1 7,4 | 8,1 10,0 | |||
natural_image
Technical line drawing of a door or cabinet mounted on a wall, with no visible text or symbols.natural_image
Simple line drawing of a window with a horizontal bar and a hanging sheet, marked with 'X' symbols (no text or labels)natural_image
Pure technical line drawing of a mechanical assembly with no text, numbers, or symbols| Tipo WKL WKL WKL WKL WKL WKL WKL | |||||||
| 502 752 1002 1502 2002 2502 3002 | |||||||
| Potencia de conexión W 500 750 1000 1500 2000 2500 3000 | |||||||
| Anchura mm 370 370 445 590 740 890 1036 | |||||||
| Altura mm 450 450 450 450 450 450 450 | |||||||
| Profundidad mm 78 78 78 78 78 78 con soporte mural | 78 78100 100 100 100 100 100 | ||||||
| Medida A | 121 121 195 343 491 639 790 | ||||||
| Peso kg | 4,1 4,1 4,7 6,1 7,4 8,1 10,0 | ||||||
natural_image
Technical line drawing of a wall-mounted electrical cabinet with attached wiring and mounting bracket (no text or symbols)text_image
4 5 Δ NE PAS COUVRIR _ ① ②natural_image
Diagram of a window frame with a cloth hanging on top, marked with X marks (no text or symbols)natural_image
Pure technical line drawing of a mechanical assembly with no text or symbols| Typ WKL WKL WKL WKL WKL WKL WKL | |||||||
| 502 752 1002 1502 2002 | 2502 3002 | ||||||
| Příkon W 500 750 1000 1500 | 2000 2500 3000 | ||||||
| Šiřka mm 370 370 445 590 740 890 1036 | |||||||
| Výška mm 450 450 450 450 450 450 450 | |||||||
| Hloubka mm | 78 | 78 | 78 | 78 | 78 | 78 | 78 |
| s držákem na stěnu | 100 | 100 | 100 | 100 | 100 | 100 | 100 |
| Rozměr A | 121 121 195 | 343 491 639 790 | |||||
| Hmotnost kg | 4,1 | 4,1 | 4,7 | 6,1 | 7,4 | 8,1 | 10,0 |
natural_image
Technical line drawing of a door mounted on a wall, showing structural details and angle indicators (no text or symbols)text_image
NE PAS COUVRIR ① ② ④ ⑤natural_image
Technical line drawing of a structural support frame with no text or symbolsnatural_image
Pure technical line drawing of a mechanical assembly with no text, numbers, or symbols| Typ WKL WKL WKL WKL WKL WKL WKL | |||||||
| 502 752 1002 1502 2002 2502 3002 | |||||||
| Moc przyłącyeniowa W 500 | 750 1000 1500 2000 2500 | ||||||
| Szerokość mm 370 370 445 | 590 740 890 1036 | ||||||
| Wysokość mm 450 450 450 | 450 450 450 450 | ||||||
| Głębokość mmz uchwytem | 78100 100 100 100 100 100 | 78 | 78 | ||||
| Wymiar A | 121 121 195 343 491 639 790 | ||||||
| Masa kg | 4,1 | 4,1 | 4,7 | 6,1 | 7,4 | 8,1 | |
natural_image
Technical line drawing of a wall-mounted device with mounting bracket and side panel (no text or symbols)Tel. 0 73 / 6 23 00 00
Fax 0 73 / 6 23 11 41
Belgium
AEG Home Comfort
Havenlaan - Av. du port, 104
B-1000 Brussel - Bruxelles
Tel. 02 / 4 22 25 22
Fax 02 / 4 22 25 24
Czech Republic
Stiebel Eltron Czech
K Hájum 946
CZ-Prague 5 - Stodulky
Tel. 0 04 20 / 251 11 61 11
Fax 0 04 20 / 235 51 21 22
Polska
Stiebel Eltron Polska Sp. z o.o.
UI. Instalatorów 9
02-237 Warszawa
Tel. 0 22 / 8 46 48 20
Fax 0 22 / 8 46 67 03
