
WKL 1003 - Heating AEG - Free user manual and instructions
Find the device manual for free WKL 1003 AEG in PDF.
| Product type | Electric wall convector |
| Brand | AEG |
| Model | WKL 1003 |
| Dimensions (H x W x D) | 450 x 445 x 78 mm |
| Weight | 4.6 kg |
| Power supply | 230 V ~, 1/N, 50 Hz |
| Power | 1.0 kW |
| Temperature range | 6 °C to 30 °C |
| Frost protection | ~6 °C |
| Protection class | II |
| Protection rating | IP24 (protection against water splashes) |
| Connection type | Plug (S) or fixed connection (U) |
| Heating principle | Natural convection |
| Thermostat | Continuously adjustable, with limit stops |
| Safety | Protective temperature limiter (STR) against overheating |
| Minimum safety distances | Air outlet: 500 mm, sides: 100 mm, top: 150 mm, bottom: 100 mm, rear: 26 mm |
| Maintenance | Clean when cold with a damp cloth and clean water; do not use abrasive products |
| Warranty | Valid in country of purchase, contact AEG subsidiary |
| General information | Use in bathroom or as supplementary heating; wall mounting by qualified installer |
Frequently Asked Questions - WKL 1003 AEG
User questions about WKL 1003 AEG
0 question about this device. Answer the ones you know or ask your own.
Ask a new question about this device
Download the instructions for your Heating in PDF format for free! Find your manual WKL 1003 - AEG and take your electronic device back in hand. On this page are published all the documents necessary for the use of your device. WKL 1003 by AEG.
USER MANUAL WKL 1003 AEG
Wall mounted convector heater
Operating and Installation instructions
Convectiveur mural
English page 11 - 15
-
Operating instructions 10-12
1.1 Description
1.2 Operation
1.3 Safety notes
1.4 Care and maintenance What to do if... 12 -
Installation instructions 13-14
2.1 Structure of unit Technical data 13
2.2 Provisions and specifications
2.3 Installation
2.4 Electrical connection
2.5 Handover Guarantee 15 Environment and recycling 15
Indices
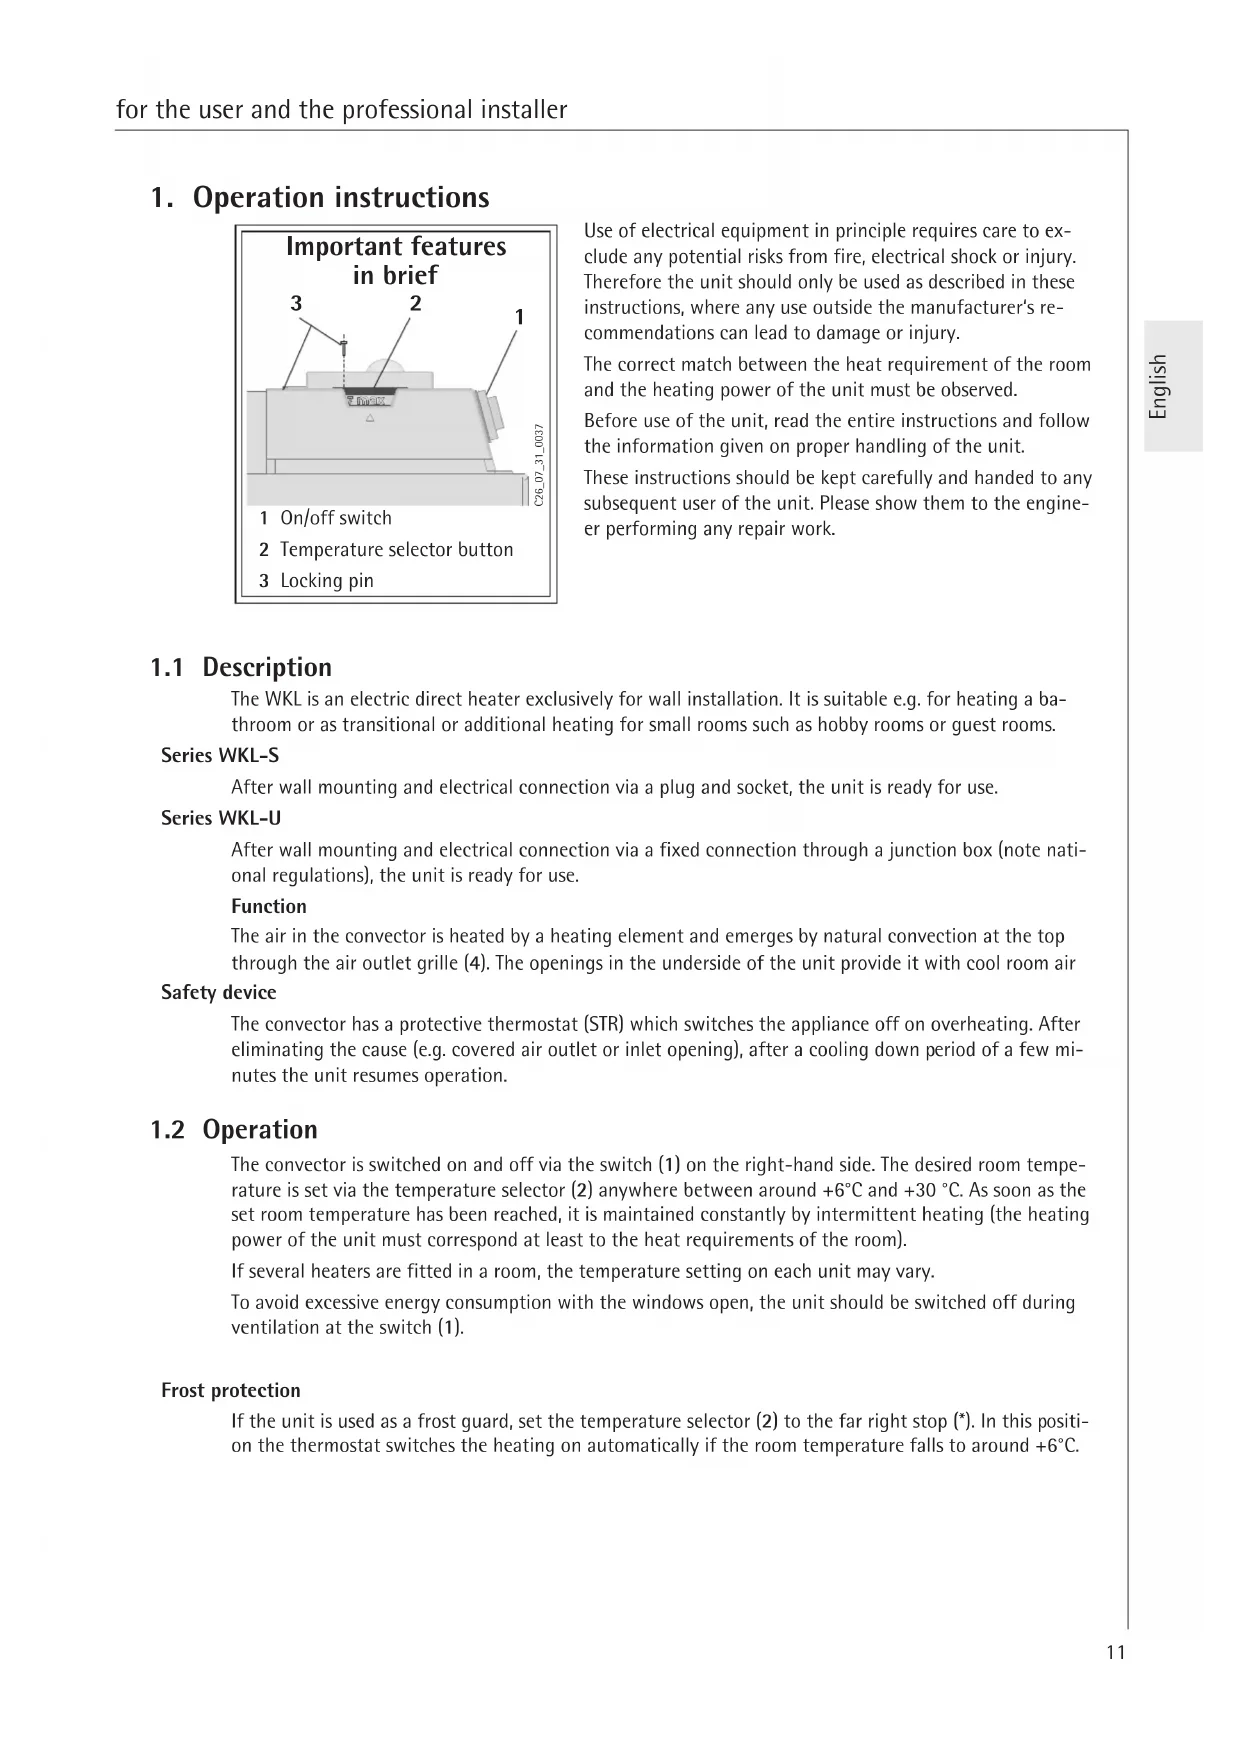
1. Operation instructions
Use of electrical equipment in principle requires care to exclude any potential risks from fire, electrical shock or injury. Therefore the unit should only be used as described in these instructions, where any use outside the manufacturer's recommendations can lead to damage or injury.
The correct match between the heat requirement of the room and the heating power of the unit must be observed.
Before use of the unit, read the entire instructions and follow the information given on proper handling of the unit.
These instructions should be kept carefully and handed to any subsequent user of the unit. Please show them to the engineer performing any repair work.
1.1 Description
The WKL is an electric direct heater exclusively for wall installation. It is suitable e.g. for heating a bathroom or as transitional or additional heating for small rooms such as hobby rooms or guest rooms.
Series WKL-S
After wall mounting and electrical connection via a plug and socket, the unit is ready for use.
Series WKL-U
After wall mounting and electrical connection via a fixed connection through a junction box (note national regulations), the unit is ready for use.
Function
The air in the convector is heated by a heating element and emerges by natural convection at the top through the air outlet grille (4). The openings in the underside of the unit provide it with cool room air
Safety device
The convector has a protective thermostat (STR) which switches the appliance off on overheating. After eliminating the cause (e.g. covered air outlet or inlet opening), after a cooling down period of a few minutes the unit resumes operation.
1.2 Operation
The convector is switched on and off via the switch (1) on the right-hand side. The desired room temperature is set via the temperature selector (2) anywhere between around +6^ and +30^ . As soon as the set room temperature has been reached, it is maintained constantly by intermittent heating (the heating power of the unit must correspond at least to the heat requirements of the room).
If several heaters are fitted in a room, the temperature setting on each unit may vary.
To avoid excessive energy consumption with the windows open, the unit should be switched off during ventilation at the switch (1).
Frost protection
If the unit is used as a frost guard, set the temperature selector (2) to the far right stop (^*) . In this position the thermostat switches the heating on automatically if the room temperature falls to around +6^ .
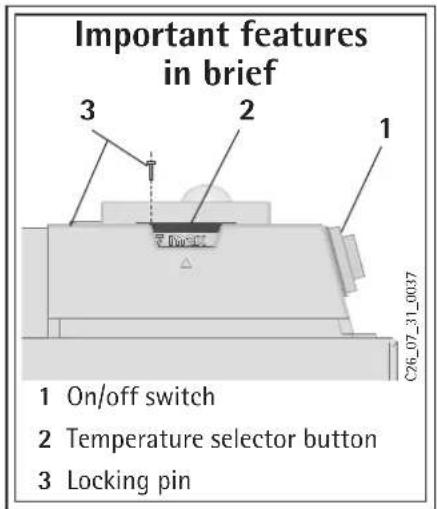
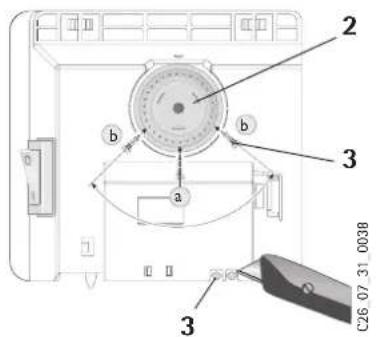
Limiting the thermostat
Using the two pins on the back of the switch housing (3), the thermostat can be fixed in a particular setting. To fix a desired temperature, push pin a into the hole opposite.
To limit the temperature adjustment range, set the minimum and maximum values on the selector knob and mark these by inserting pin b into the opposite, slightly offset hole each time.
1.2.1 External room thermostat
If necessary the unit can be operated with a commercial external room thermostat. The temperature selector (2) must be turned to the right stop (MAX). The room thermostat should be located as far as possible from the unit and at least 1.5m high.
1.2.2 Shutting Down
To shut down the unit, move the switch to the OFF position and remove the mains plug from the wall socket (do not pull out the plug using the lead).
1.3 Safety notes

The unit should not be operated
- in rooms at risk of explosion or fire from chemicals, dust, gas or vapour,
- in the immediate vicinity of pipes or containers which transport or contain flammable or explosive substances,
-
if the minimum distances from adjacent object surfaces are not observed.
-
Installation (electrical installation), first operation and maintenance of this unit may only be performed by an accredited expert according to these instructions.
The unit must not be operated if in the same room work is performed such as floor laying, grinding, sealing, cleaning with petrol and care (spray, beeswax) and similar.
The housing surfaces of the unit and the emerging air are hot during operation (over 80^ ). Risk of burns!
Keep small children away from the unit.
- Do not place objects on the unit, lean objects against it or store anything between the heater and the wall (e.g. drying washing).
Also do not place in the immediate vicinity of the unit any flammable, combustible or heat-insulating objects or substances such as laundry, blankets, newspapers, containers of beeswax or petrol, spray cans or similar. Risk of explosion!

To prevent overheating of the unit, it must not be covered.
- A For objects of all types e.g. furniture, curtains, hangings or textiles or other flammable or non-flammable materials, the following minimum distances from the unit must be observed:
To the air outlet grille 500mm
To the sides 100mm
To the top 150mm
To the underside 100mm
To the back wall 26mm
Hot air must be able to escape unobstructed.
- The unit may not be used as a freestanding unit.
- Do not stand on the unit.
No changes may be made to the unit. - The unit should never be left in operation accidentally.
Special care is required if the unit is used in the presence of children, the infirm or animals. Risk of injury!
If part of the unit is damaged, if the unit has fallen off or is malfunctioning, do not operate.
In case the power mains supply is damaged, it must be replaced by the manufacturer, the customer service of the manufacturer or an authorized and qualified person. Mandatory for hazard prevention.
1.4 Care and maintenance
If the unit housing shows a slight brown discolouration it should be cleaned as soon as possible with a damp warm cloth:
When the appliance is cold it can be cleaned with normal cleaning agents.
Avoid scouring or aggressive cleaning agents.
Moisture must not penetrate the unit.
Do not spray cleaning spray into the air slots.
For regular maintenance we recommend checking the control and adjustment elements. At the latest 10 years after first use, the safety, control and adjustment elements should be checked by an expert.
What to do if ...?
the unit does not get hot?
Check that ...
... the ON/OFF switch is turned on.
... in your fuse box, the corresponding fuse is intact or whether the breaker has tripped.
Eliminate cause!
If the heater still does not warm up, call customer service!
the unit switches itself off?
Check whether it is covered, so it could have overheated (e.g. covered air outlet or inlet opening).
Eliminate cause!
If it does not warm up again after a few minutes' cooling down period, call customer service!
- customer service is called?
Read the type (Typ) and number (Nr.) from the rating plate (8)
on the unit and tell customer service!
AEG
Typ:WKL....
E-Nr: F-Nr:
2. Installation instructions
This unit may only be erected and electrically connected by a specialist following the installation instructions.
First remove the packaging and check accessories and any enclosures, ensure that no accessories remain in the packaging material.
2.1 Structure of unit
4 Air outlet grid
5 Wall bracket
6 Closing bolt
7 Mains connection cable
8 Rating plate
Technical data
| Type WKL 503 S | WKL 503 U | WKL 753 S WKL 753 U | WKL 1003 S WKL 1003 U | WKL 1503 S WKL 1503 U | WKL 2003 S WKL 2003 U | WKL 2503 S WKL 2503 U | WKL 3003 S WKL 3003 U | |
| Height mm 450 | ||||||||
| Width mm 370 445 | 5 445 | 590 740 890 | 1040 | |||||
| Depth with wall bracket | mm | 78 100 | ||||||
| Dimension A mm | 21 195 195 343 49 | 1 639 787 | ||||||
| Weight kg 4,0 4,6 | 4,6 6,0 7,2 8,4 9,9 | |||||||
| Connection 1/N ~ | 230 V | |||||||
| Power | kW | 0,5 | 0,75 | 1,0 | 1,5 | 2,0 | 2,5 | 3,0 |
| Temperature adjustment range | °C | approx. 6 to 30 | ||||||
| Frost protection | °C | approx. 6 | ||||||
| Protection class | II | |||||||
| Protection mode | IP 24, splash water protected | |||||||
| Approval | see unit rating palte | |||||||
2.2 Provisions and specification
The unit should not be operated
in rooms at risk of explosion or fire from chemicals, dust, gas or vapour,
- in the immediate vicinity of pipes or containers which transport or contain flammable or explosive substances,
if the minimum distances from adjacent object surfaces are not observed.
In workshops or other rooms in which exhaust gases, oil or petrol vapours etc. occur or where solvents and chemicals are used, persistent odour problems and where applicable contamination can occur.
The unit may only be fitted to a vertical wall, temperature-resistant up to at least 80^
Minimum distances from adjacent object surfaces must be observed.
All electrical connection and installation work must be performed to VDE regulations (0100), the regulations of a competent utility company and the corresponding national and regional regulations.
The unit must not be mounted directly below a wall socket.
- If the unit is permanently connected to an AC network (junction box) an isolation distance of at least 3mm is required on all poles for isolation from the network. For this, circuit breakers, LS switches, fuses etc. can be used.
Installation with permanent connection cables is not permitted.
The rating plate must be observed. The rated voltage must correspond to the nominal voltage.
- On installation of the heater in rooms with a bath and/or shower, the protection area to VDE 0100 part 701 as specified on the unit rating plate must be observed.
The unit must be mounted such that the switch and control units are out of reach of a person in the bath or shower. - The mains connection cable may only be replaced with original spare parts by experts.
2.3 Installation
2.3.1 Installation of wall bracket B
The wall bracket should be used as a template for fixing the appliance to the wall. It also helps to keep the necessary ground clearance. To attach the unit proceed as follows:
- Place the wall bracket (5) holding the centre point horizontally on the ground and mark the holes a and d on the assembly wall;
- Raise the wall bracket so that the holes b in the wall bracket coincide with the marks just made on the assembly wall;
Mark holes c and d on the wall bracket on the assembly wall; - At all four markings drill holes and attach the wall bracket to the wall using suitable fixing materials (wall plugs and screws) depending on the type of wall. The vertical slots allow adjustment for an offset in the fixing holes.
2.3.2 Unit installation C
The convector is mounted by attaching the slots on the rear simultaneously to the four tabs of the wall bracket pressing down to lock. The closing bolt (6) of the wall bracket is then turned clockwise to the stop, locking the fixing. To remove the convector, unscrew the locking bolt and lift the unit slightly, pulling it forwards and out of the bracket.
2.4 Electrical connection
The required electrical connection is AC 230V.
For fixed connection, an earth socket or junction box should be installed at a distance of at least 100mm to the side of the heater.
2.5 Handover
Explain to the user how the unit functions. Draw his attention in particular to the safety instructions. Give the user these operating and usage instructions.
3. Guarantee
For guarantees please refer to the respective terms and conditions of supply for your country.

The installation, electrical connection and first operation of this appliance should be carried out by a qualified installer.
The company does not accept liability for failure of any goods supplied which accord-dance with the manufacturer's instructions.
3.1 Environment and recycling
Recycling of obsolete appliances

Appliances with this label must not be disposed off with the general waste. They must be collected separately and disposed off according to local regulations.
Bo n36eKaHne pNcKa, CBa3aHHoro C BOCnAmEHeHem, Ydapom ToKa nn Dpyrnx BO3MOxHbIX TpaBM, NOb3OBaTbC8 3NeKtpueckmN np6opamn CneJyET C PpeJeBHOO OCTOpoxHoCTbIO. NToMcy NcNoB3OBaTb np6op Heo6xOIMO TOIbKO CORNaCHO INCHpyKcIMN. JIO6oe dpyroE npImeHHe np6opapa MoXeT PpNBecT K NOBpeXDeHnM m TpaBMam.
MoHOCb KOHBeKTopa DonxHa COOTBeTCTBOBaTb TENIOIOTeprAm NOME-
Ipeep3Kcnpyaataue np6opda nraero npabHoro npmeHn H06xOIMO NONHOCTbIO pOoHTaTB INHCTpyKUNO BCE yKa3AHN K Hei.
Hnctpykcuio cneyuET coxpaHTb n nepeaTb BCnyae CMeHbBnaedlbca e HOBOMy co6CTBEHNky Nn CneuaJIHCTy, npoBOJaIeMyTexnueckoe 06cnyKmbAHne.
1.1 Onncanne npu6opa
WKL - 3neKtpnueckn np6op npamoro HarpeBa, nna HacteHHoro MOnTaXa. NcNoIb3yeTcra nna noHoro OTOpHeHn BaHHo KOMHaTb IIN DOONHHTeBHorO OTOpHeHn roCTuHO n dpyrnx He6OJIbux NomeeHn.
Tunoboi pWKL-S
Iocne hacteHHoro MOHTaKa n NOkNIOueHnnoCoeHNHTeHOro npOBopa K 3NeKtpopO3eTKe, np6Op roTOB K 3KcNpyatauun.
Tunobov pyd WKL-U
Iocne HacteHHoro MONTaHa NIOKJIuOHeHn NOCoEHNHTeBHOr npoBoa K pacnpedeHnTeBHOk Kopo6Ke, np6Op rotOB K kCnnyataun.
Функци np6opa
Bo3dyx noctynaet K harpebaTeBHomy 3nemEny cH3y,HarpeBaetc Ta m n 6naOapra eCTeCTBeHHo KoHBekunnoHNMaetc HabePx Chepe3 Bo3duWHyIO peWeTky (4).
PpeoxpaHnteIbHoe yctpoNCTBO
KoHBeKTop nMeet 3aunTHoe TemnepaTyphoe pene (STR), KOtOpoe OTKnIOuayeT OToIeHne npN BO3HnKHOBeHn OnaChocn nepepeBa. Nocne yctpaHEny npuHbI neperpeBa (HaNPmEp, 3akpbTO OTBepCTne BbIXOda BO3dyxa) np60p uepe3 HeckOBko MInHy T OxJaXdEHN CHOBa HaUNHaET YHKUOHNPOBaTb.
1.2 06cnyxmbHne
KoHBekTOp BkIIOUaETcB/BykIKIOUaETcC NOMOuB KHOHKn (1), paNIOJOKeHHo Ha npaBOt CTOPOHe np6bopa. XeNaemar TemnepaTypa NOMEuHn MoKeT 6bITb BbCTabNeHa 6ecctyneHato B Dnana3OHe OT 6°C npimepHo Do 30°C C NOMOuBpyKn Bbl6opa TemnepaTypb (2). PeryJrTop TemnepaTypb OTKIOUaET HarpeB pN DOCTNKeHHn 3aAHHo TemnepaTypb, KOtOpaa 3aTeM NOdEpxNBaeTcK OHCTAHTHO 3a CHT nepNOduueckoro BkIOUeHn np6bopa. (CneNyET yuHTbBaT npABINbHoe COOTHOse TEPNONOTpe6JIeHn B NOMEuHn I OTONTEbHO MOnHOCTbIO np6bopa!).
EcnB nomeeHn Hmeetc HeckoKo HargpeBaTehblx np6opOB, To yctaHObKa pyKn peryIaTopa TempePaTpyb KaJdoRo np6opa MoKeT 6bIb pa3nHOn.
Bo n36exhaHne noBbIeHHoro nOtpe6JIeHHa 3JIeKtpo3Heprn npn OTKpbIbIX OKhax cIeMyET OTKnIOHTb npn6Op c nOMoubIO KhoNk BNJI/BblKI (1).
Pekim 3aunTbI OT 3amep3AHN

EcnB np6ope nCnoB3yeTc DaTtuk 3aunTbI OT 3aMep3aHn, pyka Bbi6opa TempepaTypb (2) yctahabnBaetcHa *TePmoCTa ABTomatNueckn BKIOUaET HarpeB Cnyae, eCN TEmpepaTpa B nomeeHNOnyckaTcdo+6°C n Hxke.
OrpaHnueHne peryIaTopa TempepaTypbI
IITTO, TTO6b3aФИKcnpOBaTb pykY Bb6opa TemnepaTypbHa OnpedeneHHo NaCTPOKe, Ha 3aHHe CTeHKe np6opa OTkpUBAOTc IBa WtNΦTa (3) n yCTaHabNBAOTcNo o6e CToPOhJI KeNaemoro 3HaueHn.
IyikcaunnKeenaemoy TemnepaTypbU WntuT a CneNyET BCTABNTb TOHOB HAnpotNBpacnoNoXeHHoe OTBepCTne.
PnOrpaHueHn yCTaHaBnBaemoro Dnana3oHa Tempeatypb CneDyeT yCTaHOBnTB MNHMmaNbHoe N MaKcMmaNbHoe 3HaueHne Ha pyKe Bbl6opa n COOTBeTCTBeHHO TaKke 3aΦNKCuPobAtb UTnΦ T b BdpYROM HeCKoJIbKO CMeUeHHOM, paCNoIooXeHHOM HAnpOTNB OTBepCTnn.
1.2.1 BheuHn peryJrTop tempeatpybI
B clyuae Hado6hOCTn np6op moKet npBOJtbc8 B DeiCTBne 0bHuHbIM BHeuHmpeyIaTOpom TemnepaTpybl. Pn n3Tom pyka Bb6opa TeMnepaTpybl (2) nobopaunBaetc Bnpabo Do ynopa (MAX). PeryIaTOp TemnepaTpybl CneJeYt ycTaHaBnBaTb NO BO3MOXHOCTn Ha 60JIbWOM paCCToHnn OT np6opa n Ha bICote MInHMym 1,5 m.
1.2.2 OTKIOUeHne KOHBeKTopa
YTo6bI OTKIIOuHTb Pn6Op, HxKHO NOCTaBtB erO B No3uNIO AUS (BbIK). I BblepHytb BnKy n3 pO3ETKn, HO He TAYHtB 3a 3JIeKTpUneckn Ka6eB.
1.3 Yka3aHnno 6e3OnaCHOCTn

3anpeucaetcnaonb3oBaTb np6op:
B NOMEUHIXKOTOpbIeMOry6bITbB3PbIBO- IN NOXapOONaCHbIMN BCJeDCTBNE HaJIuYHXUMKATOB, PbJINr, rA3OB nII napOB;
B HENOCpeDCTBeHHo6IIN3OCTNOT Tpy6OpOBoOB INI pe3epByapOB,coepKaux INI PPOBOaIXN Tropoune IN B3pbIOONaCHbe BeuecTBA.
- HeIb3a IpeBbIaTb MmHmMaJIbHbIe 6e3OnaChIbe pacCToHnO T O6BeKToB npu yctaHOBKe npu6opa.
- YCTAHOBKa, TaKKe KaK N BBOd B EKcNlyaTaUHIO, IN TexHnueCKoe O6CnyXnBaHne npOBoJrTOIbKO CneuAnlntOM CORNaCHO IHCTpyKUn.
HnBkoem cnyae HeIb3a noIb3oBaTc np6opom,ecnB nOmeueHnn npOBoJrTaKa pa60tbl, KaYknaJaKu nn 3aJeNka WBOB napKeTa, YnCTKa C nCnoJIb3OBAHHem BOCKa-Cnpera Iy nOIIPOBKn napKeTa,BeHNHa nn NOIO6HbIX BeueCTB.
OrHeonacHo! Ppu pa60Te np60pa noBepxHocTb Kopnyca n BbIXoJn BO3dyx MoryT HArpeBaTbCra Do 80 C n Bblwe.
YcTaHaBnBaTb B HeIOCTyHOM Dn MaJIeHbKx DeTei MeCTe!
3anpeaetc npncnoHb K np60py npedMeTb, n6o cTabntb nx Mekdy np60pom n CTehoH.
B6n3n OToHnTeJbHoro np6opa He DoJXhbl HaxOHTbcra NERKOBocnnaMeHraUneec npedMeTbI n3 DepeBa, 6ymar, TeKCTnJIa n T.D., a TaKke NOxapooNaChbIe MaTePnaJIbI, Hanpumep, BeTOuB, 6eH3nH, paCnbInTeJbHbIe 6aIIOnHbI n T.D.
Onachoctb Bo3ropaHn!

Bo n36eKahne neperpeBa KOHBeKTopa Hn B Koem cnyuae HnueM He HaKpbIbA Tb np6Op.
Pnc.AInpedMeTOBIO6OToTnTaKHXKaM6eB,rapHbI,3aHaBeCKN INTeKCTnblnnDpyrueBOCnIaMeHraUoIeCnHEBOcNlaMeHraUoIeCMAtepnaJIb,IOLXHbICo6IpaTbcCneDuOuNe MUNMaNbHbIpepacCTOHHN:
IO BO3yHOn peWetKn 500 MM
do60KOBbIXCTeHOK npu6opa 100 MM
DOBepxHei cTeHKn npu6opa 150 MM
do HnHexHcTeHNKn np6opa 100 MM
do3aHHei CTeHKn np6opa 26 MM
TennbBIO3dyx DonKeH BbIXoNDb 6ecnpenrTcBeHHO!
- Pn6op dIy HacteHHoro MOHTaKa, He npedHa3HaueH dIy HanoIbHoro MOHTaKa
He donyckaetc BheceHne KaKx-Jn6o n3MeHn
He hactynatb Ha np6op!
He octabTb pa6oTaUos np6op 6e3 npncMoTpa - Oco6eHHO OCTOPOXHIO NcNoB3OBaTb B nPnCyTCTBmI DeTei, NOXINbIX IIOJe I XNBOTbIX. OnaCHOCTb TpaBMnPOBaHnia!
B cnyuae noBpeKeHn nn o6hApXKeHn c6oEB pa6ote Hn B Koem cnyuae He 3KcnnyaTnpOBaT np6Op
1.4 YxOД n TextHnueckoe o6cnyKuBaHne
3arp3HeHn Ha Kopnyce np60pa Heo6xOIMO NO BO3MOXHOCTn Cp3y 6pa6oTaB BlaXHOI caIeTKo I ropaye MblbHO BdoN. B hepa6oTaIOeM COCTOHN pnp6Op MOKHO IpOTnpaTb 0bIHyIM CpeDCTBOM IIN yXOA. N36eratb abp3NBbIX INI paCTBOPAUHX UcTAAUX CpeCTB.
I36erai Te nonaHaHn BlanB np6op, a TaKke MOUxN CpeCTB BeHTnAIOHHyO peWETky. Ipr perynapHom Texnueckom 6cnykuaHmMb pekomHdyem npOBepTb MexaHn3Mbl KOHTpOJ n perynpoBaHn. IIO nCTeueHn 10 let kCnpyatauHOHorO cPoka CneuaJInc TdoJKeH npOBepTb yctpoCTBO 6eONaCHOCTN, KOHTPOJn perynpoBaHn.
B cnuyae, ecn noocenHeHne 3eKtponuHaHn NOBpeXdeHo, OHO DOnxho 6bTb 3aMeHcno3BODInTeJEM, cepBnCHbIM ueHTpom npOn3BOUteJI nIa ABTOHbIM I KBaIINΦuPObaHHbIMnnOc.063aTeJbHO dI npedOTBpaueHn ONaCHOCTn.
YTo DeIaTb,ecnn...?
-Пибор HeHarpeBaetc
Поверпс, Влоча.. . . .Kнога EIN=BkN./AUS=BbIkn. ..Pоверпс ЗЕКТРИСЕ ВblкLOЧATEЛИ ПpeDoxpaHNTeJI BHTKe.
Pnp60pOTKIOUaETcABTOMATNueCKn
YctpaHnTe npuHny! Ecn nocne 3toro np6op He harpeBaetc, no3BOHnTe cneuaJInty!
PpOBepbTe, He HApBtIIN npmbop Yem-Jn6o, Yo MoKeT npNBeCTN K erO nepepeBy (HapnpMep, 3akpbToe OTBepctne DoCTyna Bo3dyxa).
YctpaHnTe npuHny! Ecn nocJe HeckoJIbKx MmHyT OxnaJdeHnAp6Op HnHarpeBaetc, no3BOHnTe cneuaJIncTy!
3BOHOKB cepBnchyo cnyx6y
Coo6uTb B cepBnCHyIO Cnyk6y TIN HOMep KOHBeKTopa(8), NOCMTpeB Ha 3TKeTKpy Ipon3BOIDTeIra!
AEG
Typ:WKL...
E-Nr: F-Nr:
AEG Home Comfort Czech
K Hajum 946
