
DBS 5564 - Iron AEG - Free user manual and instructions
Find the device manual for free DBS 5564 AEG in PDF.
| Product Type | Steam iron with steam station |
| Brand | AEG |
| Model | DBS 5564 |
| Power supply | 230 V, 50/60 Hz |
| Maximum power | 2200 W |
| Water tank capacity | 1.7 liters |
| Net weight | 3.30 kg |
| Temperature setting | Electronic, 5 positions (Nylon, Polyester, Rayon, Cotton, Linen) |
| Steam function | Yes, with vertical steam shot |
| Auto shut-off | Yes, after 60 minutes of inactivity |
| Soleplate type | Not specified in the manual |
| Anti-scale filter | Yes, replaceable filter cartridge |
| Safety | Auto shut-off, overheat protection |
| Maintenance | Clean the soleplate with a damp cloth; replace the anti-scale filter when the granules turn black |
| Dry ironing | Possible |
| Minimum temperature | Lowest for Nylon |
| Maximum temperature | Highest for Linen |
Frequently Asked Questions - DBS 5564 AEG
User questions about DBS 5564 AEG
0 question about this device. Answer the ones you know or ask your own.
Ask a new question about this device
Download the instructions for your Iron in PDF format for free! Find your manual DBS 5564 - AEG and take your electronic device back in hand. On this page are published all the documents necessary for the use of your device. DBS 5564 by AEG.
USER MANUAL DBS 5564 AEG
Overview of the Components
Attention: Surcharge!
Consommation: 2200 W
Classe de protection:
Vapor vertical (Vertical Steam)
Steam na vertical (Vertical Steam)
Vapore verticale (Vertical Steam)
General Safety Instructions
Read the operating instructions carefully before putting the appliance into operation and keep the instructions including the warranty, the receipt and, if possible, the box with the internal packing. If you give this device to other people, please also pass on the operating instructions.
- The appliance is designed exclusively for private use and for the envisaged purpose. This appliance is not fit for commercial use.
Do not use it outdoors. Keep it away from sources of heat, direct sunlight, humidity (never dip it into any liquid) and sharp edges. Do not use the appliance with wet hands. If the appliance is humid or wet, unplug it immediately. - When cleaning or putting it away, switch off the appliance and always pull out the plug from the socket (pull the plug itself, not the lead) if the appliance is not being used and remove the attached accessories.
- Do not operate the machine without supervision. If you leave the room you should always turn the device off. Remove the plug from the socket.
- The device and the mains lead have to be checked regularly for signs of damage. If damage is found the device must not be used.
- Do not try to repair the appliance on your own. Always contact an authorized technician. To avoid the exposure to danger, always have a faulty cable be replaced only by the manufacturer, by our customer service or by a qualified person and with a cable of the same type.
- Use only original spare parts.
- Pay careful attention to the following "Special Safety Instructions".
Children and Frail Individuals
- In order to ensure your children's safety, please keep all packaging (plastic bags, boxes, polystyrene etc.) out of their reach.
Warning!
Caution! Do not allow small children to play with the foil as there is a danger of suffocation!
- This device is not intended to be used by individuals (including children) who have restricted physical, sensory or mental abilities and/or insufficient knowledge and/or experience, unless they are supervised by an individual who is responsible for their safety or have received instructions on how to use the device.
- Children should be supervised at all times in order to ensure that they do not play with the device.
Symbols in these Instructions for Use
Important information for your safety is specially marked. It is essential to comply with these instructions in order to avoid accidents and prevent damage to the machine:
Warning:
This warns you of dangers to your health and indicates possible injury risks.
Caution:
This refers to possible hazards to the machine or other objects.
Note:
This highlights tips and information.
Special Safety Instructions
WARNING: Danger of burns!
During operation the temperature of the exposed surface may be very hot.
Warning:
The soleplate of the iron quickly becomes hot and need time to cool down. Please do not touch it!
When not in use the iron should be stored in the storage space!
- Select a safe work surface for the base! The surface must be level and stable.
Place and use the iron on a stable and heat-resistant surface.
Before filling the water tank remove the mains lead.
- The tank should only be filled up to the maximum mark. Do not overfill! Maximum water filling quantity: 1.7 litres.
- Do not bend the connecting hose (4)!
- This devise should only be used for ironing garments and textiles!
- The iron must not be left unsupervised while it is connected to the mains.
- Do not use the iron if it was dropped, has visible damages or leaks.
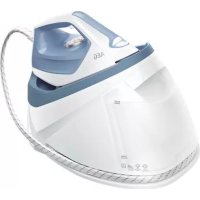
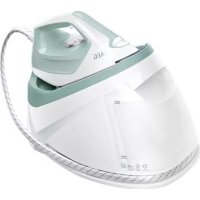
Overview of the Components
1 Display for fabric setting (Fig. A)
2 "SETTING" selector (electronic temperature setting)
3 Steam button
4 Connecting tube
5 Base
6 Iron rest
7 Releasing device for handle "UNLOCK"
8 Water tank with lime filter
9 Handle
10 Lime filter cartridge
Not shown
"RELEASE" button below the water tank. Releasing device of the water tank
Instructions
Unpacking
- Remove any protective foils and stickers from the soleplate.
- Please unwind the lead completely.
Electrical connection
- Make sure that the iron voltage (see name plate) and the line voltage match.
- The mains plug should only be inserted into a correctly installed 230V 50Hz socket with earthing contact.
Connected Wattage
The station has a total maximum wattage of 2200W. With this connected load a separate supply line protected by a 16A household circuit breaker is recommended.

Caution: Overload!
If you use extension leads, these should have a cable cross-section of at least 1.5mm^2
Do not use any multiple sockets, as this device is too powerful.
Handle Function (9)
The handle connected to the base serves to
- carry the device when disconnected from mains power supply and
-
switch the device on and off when connected to mains power supply. Moving the handle down will switch the device on, while moving the handle up will switch the device off.
-
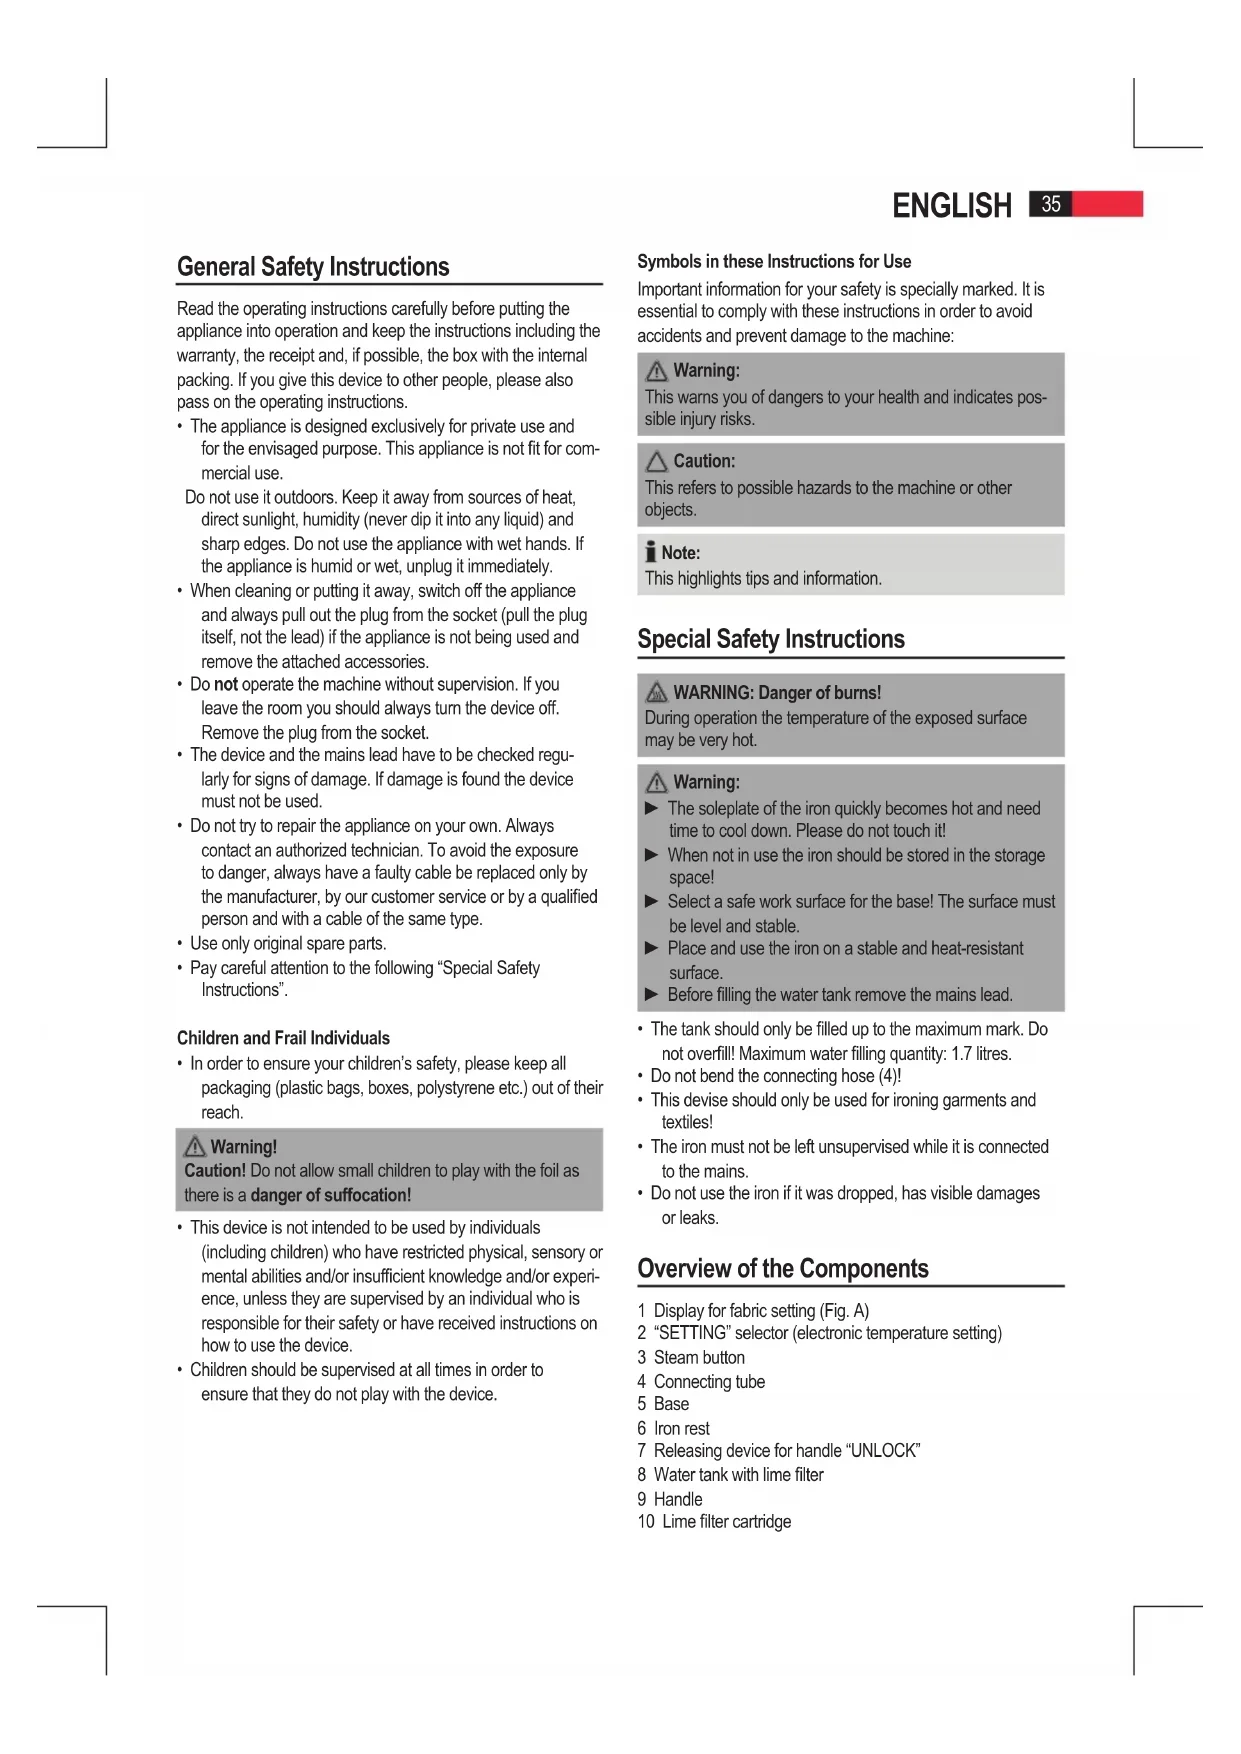
Move the handle up until it locks into place to carry the device (Fig. D). A "click" sound indicates that the handle is locked. You can carry the device at the handle.
- Simultaneously press both "UNLOCK" buttons (7) to unlock the handle and move it down (Fig. E).
Electronic Temperature SETTING Button (2)
- Observe the ironing instructions on the clothes label.
-
Select the temperature setting according to the following table.
-
Tum woolen clothes inside out to avoid shiny spots on the fabric due to steam ironing.
- The instructions in the table only refer to fabrics with no additional surface treatment (gloss, impregnation, wrinkles, etc.). Select a low temperature setting for fabrics with additional surface treatment and iron them inside out.
| Display1. | NYLON 2. | POLY-ESTER | 3. RAYON | 4. COTTON | 5. LINEN |
| FabricSynt | HeticsSilkNylonAcrylicsAcetate | WoolPolyester | SyntheticsWoolPolyester | CottonWool | CottonLinen |
| Tempera-ture | Lowest Low | Medium | High Highest | ||
| Symbol on clothes label | • | • to •• | •• | ••• | ••• |
| Ironing instruc-tion | Iron without steam | Iron with-out steam inside out | Iron with steam inside out | Iron with steam inside out | Iron with steam |
| Steam selection | — | ○ | ○ | ○ | ○ |

Note:
The iron heats up faster than it cools down. Start ironing with the lowest temperature setting.

Caution:
When changing from a higher to a lower temperature the blue indicator starts flashing fast. This means that the temperature is too high for the setting. Do not singe your laundry! Only continue ironing after the blue indicator stops flashing and an acoustic signal is emitted.
Auto Off Function
The appliance features an automatic cut-off function.
- The steam ironing unit automatically turns off when idling for approx. 60 minutes.
- The device switches off automatically after using the same temperature setting for 60 minutes.
- 5 acoustic signals sound and the red POWER icon starts flashing on the display.
- Reset the desired temperature with the "SETTING" button (2) to continue ironing.
Water tank (8)
- The water tank has a recessed grip on the bottom so that it can be removed.
- The lock of the water tank is also the lime filter cartridge. Take out the lime filter cartridge to fill with water. Proceed as described under "How can I replenish the water during operation?"
- The tank volume is 1.7 litres.
Water
Use only tap water or distilled water.
Do not fill battery water, water from the clothes dryer and water containing additives (such as starch, perfume, softener or other chemicals) into the water reservoir.
This could damage the iron due to residues forming in the steam chamber. These residues may cause impurities to the fabric when dropping out of the holes in the soleplate.
Operation
Before Initial Use
- Clean the ironing base with a slightly damp cloth.
- In order to remove all residues before initial use, please pass the iron a few times over an old clean cloth.
Ironing without steam
i Note:
Sort out the garments according to their ironing temperatures.
- Place the iron on the rest (6).
- Unlock the handle if still in carry position as described under "Handle Function". The device can only be switched on with the handle in a downward position.
- Only connect the machine to a properly installed safety socket, 230V / 50Hz . The red POWER icon lights up on the display.
- Set the temperature with the SETTING button (2). Observe the previous table. If you have sensitive items to iron, please begin with the lowest temperature.
Note:
The selected fabric type lights up blue and starts flashing slowly. The iron heats up. The operating temperature is reached as soon as the blue indicator stops flashing and an acoustic signal is emitted. Now you can start ironing.
The ironing temperature is electronically controlled during use. The device heats up if the blue indicator on the display starts flashing slowly.
- Always switch the device off and disconnect it from mains power supply after use.
Steam Ironing
#
Warning:
The iron expels a large quantity of hot steam. Danger of bums.

Caution:
When using the steam iron please ensure that the water tank is always filled to the required level.
The lime filter cartridge always has to be positioned in the water tank, even if you use distilled water.

Caution: Initial Use:
Please proceed as follows:
The tank should only be filled up to the maximum mark. Do not overfill!
Close the water tank and place it back in the base.
Connect the base station to a 230V / 50Hz socket with earthing contact.
Unlock the handle if still in carry position as described under "Handle Function". The device can only be switched on with the handle in a downward position.
Set the temperature with the SETTING button (2). Observe the previous table.
Wait until the soleplate has heated up. The operating temperature is reached as soon as the blue indicator stops flashing and an acoustic signal is emitted.
Now press the steam jet button (3) for at least 1 minute or until steam comes out of the soleplate of the iron. This time is needed for the steam to reach the iron. A somewhat louder noise from the pump is normal.

Note On Steam Ironing:
Setting "1. NYLON" is not intended for steam ironing (see table).
The amount of steam is electronically controlled. It is based on the ironing temperature (fabric type setting).
The ironing temperature is electronically controlled during use. The device heats up if the blue indicator on the display starts flashing slowly.
Always switch the device off and disconnect it from mains power supply after use.
Vertical Steam
This can be used to produce a jet of steam in a vertical direction.

Warning:
Never point the steam jet at other people. Danger of burns.
Hang your laundry on a clothes hanger and move the iron to approximately 2-3cm away.
How can I replenish the water during operation?
- Refill with water before the tank is completely empty.
-
The water level is too low if the pump is noisy during operation.
-
Place the iron on the rest (6).
- Press the SETTING button to select the POWER icon.
- Move the handle up until it audibly locks into place.
- Remove the mains plug from the socket.
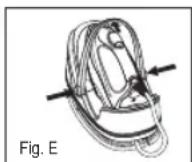
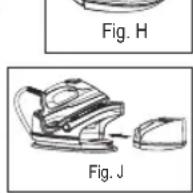
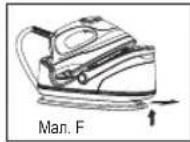
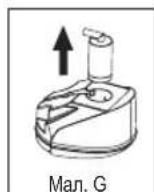
In order to remove the tank, press the RELEASE button below the water tank (Fig. F). - Remove the lime filter cartridge (Fig. G).
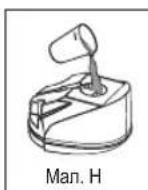
- Fill the tank up to the maximum mark (Fig. H). Do not overfill!
- Reinsert the lime filter
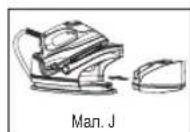
cartridge and push the tank back into the base (Fig. I + J).
- You can now continue ironing.
When you have finished
- Place the iron on the rest (6).
- Press the SETTING button to select the POWER icon
- Move the handle up until it audibly locks into place.
- Remove the mains plug from the socket.
- Empty the water tank if the ironing station is not in use for a longer period of time.
- Allow the device to cool down before you put it away.
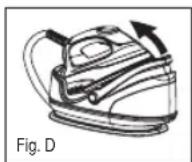
Cable Storage
Wind connecting tube and power cable around the cable holder of the base. Fix connecting tube and power cable with the supplied cable clip. Place the plug between the connecting tubes.
Lime Filter
Your steam iron station comes with a lime filter. The granules of the lime filter cartridge are light brown to orange when new. Depending on your water hardness the lime filter cartridge is used up after approx. 25 full tanks. The lime filter cartridge must be exchanged if the granules are completely black.
- Switch the device off.
- Remove the mains plug from the socket.
- Remove the water tank.
- Remove the lime filter cartridge.
- Fill the tank up to the maximum mark. Do not overfill!
- Replace the lime filter cartridge.
- Wait a few minutes before switching the device on again for the lime filter cartridge to absorb water.

lote:
Continue ironing with distilled water if you have no lime filter cartridge at hand.

Caution:
Leave the lime filter cartridge always attached!
Cleaning

Warning:
Always remove the mains lead before cleaning!
Wait until the machine has cooled down completely!
Under no circumstances should you immerse the device in water for cleaning purposes. Otherwise this might result in an electric shock or fire.

Caution:
Do not use a wire brush or any abrasive items.
Do not use any acidic or abrasive detergents.
- Clean the casing with a slightly damp cloth.
- Clean the sole plate and the rest with a slightly damp cloth.
- Any residual water can remain in the water tank, but should be poured out if it has been in the tank for a prolonged period.
Troubleshooting
| Fault Possible Cause | Remedy | |
| Device does not work | Fault mains socket | Try another socket. |
| The handle is not moved down. | Move the handle down. | |
| The electronic temperature setting is in position. | Select the desired ironing temperature. | |
| The device suddenly stops working during operation | Is the electric circuit overloaded? | Check the house fuse. |
| The blue indicator on the display is flashing fast | The temperature is too high for the selected position. | Wait until the iron has cooled down (the blue indicator stops flashing). |
| Loud noises during steam operation | The tank is empty. | Check the tank. Refill water. |
Technical Data
Model: DBS 5564
Power supply: 230 V, 50/60 Hz
Power consumption: 2200 W
Protection class:
Maximum filling quantity of the water tank: 1.7 Liter
Net weight: 3.30 kg
This device has been tested according to all relevant current CE guidelines, such as electromagnetic compatibility and low voltage directives, and has been constructed in accordance with the latest safety regulations.
Meaning of the "Dustbin" Symbol
Protect our environment: do not dispose of electrical equipment in the domestic waste.
Please return any electrical equipment that you will no longer use to the collection points provided for their disposal.
This helps avoid the potential effects of incorrect disposal on the environment and human health.
This will contribute to the recycling and other forms of reutilisation of electrical and electronic equipment.
Information concerning where the equipment can be disposed of can be obtained from your local authority.
IpoOdBxuyTe npacyBaTu TINbKn ToDi, KOni CnHi iHnKaTOp nepeCTaHe 6nMaTu I npOlyNaE 3ByKOBu CnHaI.
Функлг ABTomaTHHOrO BIMKHeHH
Pnictpii 05naHaHO fHKJcIeABTOMaTHHOro BIMKHeHHA.
- Ppacka aBTOMaTNUHO BUMNkAcTbcra NiCna 60 XBUNH 6e3diNbHoCTi.
-Ппсгд ВIMKHTбС АВТOMATИН,Яко BIN ВИКОПСТОВЕТСЗ 3a OДHAKOBOI TempepatурnpOTЯROM 60 xBUNIH.
-Прolyнайе 5Звкови сгнань iHa дсплій поч
Блимати черва niktortpama POWER
- IIO6 npOIOBKMn npacyBaHH, ue pa3 BCTaHOtB noTpi6Hy Tempepaty 3a donomoro kHONK "SETTING" (2).
EMHicTh DnB OBDn (8)
Pe3epByapIINBODNMaBHN3yBIMKyIpyHOrO BIMaHHraTkoBMOKeTe 3Hrtn Horo 3Micu.
Kpnu Ka peepByapa nra BOnn Ondohacno e taKoK pfIb-TPom npotn Bannha. Bmmit natpon fipnbpy dna 3axncty npotn Bannha, o6 doatn BOnn Bpeepbyap. BnkOhyte iiBIDNOBIDHO do 3aHaehoro B po3di "Ka DOnatn BOnn B EMHicTb nD qac npacyBaHH?
€Mnictb BMiuye 1,7 itpa.
Boda
3aTocobyTe TInbKn BDOy i3 BOOnpOBOy a6o dNCTINbOBaHy BOy.
Body 3 6atapei, i3 cywapkn a6o B0y 3doaHnM ximikatib (Taknx kpoxmanb,napdymn,doabkn DnI 3m'kUeHHB B0n a6o iHui) 3a6opohraetcbaanBaTN B EMHictb npackn.
Ppnilad Moke 6ytn Nn OoKoJKeHn, OckIbKn B napoi Kamepi MOkyTb CTBOPUBaTNC OcaDi. Li ocAdn MOkyTb 3aIIuWATN CiiDn Ha TkaHHi, KOJI BHXOHTMBy Tpee3 OTBOp Dn npn.
06cnyrobybaHHa
06cnyroByBaHHa
IpeedepipuHm3acToCyBaHHM
OuHCTITbHnIe npackn BOIoroIO TKAHINHO.
- Lio6 BnndnTnepeepnepm3actocybaHHM Bc3a6pydHeHH, cIi npacybAtn Cnoatky CTapy NCTyTKaHnHy.
PpacyBaHH86e3 npu
Ipnmitka.
BicopTyIe 6IIIN3Hy 3a TINAMN TKAHHN dIpy pi3Hx Tempepatyp npacybaHH.
- Bičtabte npackу ha njčtabky (6).
- P036nokyIte pyky, kIIO BOHa 3haxoDITbcra B nIOXeHHI dIra nepHeceHHRA ONIcAHO B po3di "PyHKuipyKn". IpiCTpiM oKHa yBIMkHyTn TiIbKn Todi, KOIN pyKa 3HaXoDITBCBHN3y.
BknHcy Bnky B po3eKy, 0iNkHcHHe HaneKHM CHHOM i BiNobiae TexHiHMM BmOram 230 B, 50 Tc. Ha DnCnne3acBiTbCyaepBOHa nIKtorpama POWER
3a donomoro hONIKN SETTING (2) BCTaHOBITb TEMnepatpy. NIBITcra Tabmio BVne. RaIO Bu npacyBaTMte 6iIM3Hy, uOyTINBA do BNCOKoI TEMnepatypn, noHHaTe 3MiHImaJIbHOI TEMnepatypn.

IpMItka.
Bn6paHm TnTkAHnH 6yde CbITNTcB cHIM i noUHe nobInbHO 6NImaTN. IpaK aNoH eHarpBaTnc. KOnn 6yde DocarHyTo nOtpiHoI dI npacyBaHH Taemepa- Typu, CnHi IHdKaTop nepeCTane 6NImaTu npOpyHae 3BykoBm CnHAn. Bn MoKeTe NoCHATn IpacyBaTn.
PiJ ac BnKOpncTaHn TempeaTpy npacyBaHH KOHTpOIOeTbC eEKeTPOHO CXEMo. KkuO CnHi IINkaTop Ha DcNneI NOBILbHO 6lmae, pnpctpi HarpBaTebCra.
PicnBnKOpNCTaHHaBxKnBmMkaIte npncpti i BID'EDHyTe NOro BiMepexi.
IpacyBaHHa3 npao

PonepeKeHHa.
Ipaacka Bnpo6nE BeNkY KInbKic7b rapraoi nap. IChye He6e3neka onikB.

yBara.
KoINBn npaioeTe BpeXmI npaOBoro npacyBaHHa 3BeptaTte yBary Ha Te, Uo6 EMHICTb 3 BOIO 3abXn 6Bya 3anOBHeHOIO DocTaTHBOHO KJbKICTO BOIN.
PnTPOH pInbtpy dIa 3axnCTpy npOTn BAHa Mae 3aBKn3haxoDHTNCBpeepByapi,TAOKY TOMy BUNaKy,KOIN Bu 3actocobyTe Ductnbobany BoN.

Ybara: noayok npaui:
PouHnaiTe npaObaTn B TaKOMy nopAky:
3anOBHtB cHcTB do no3HaKmakcmMy.He nepe6inbuyte KInbkCTb BOn!
3akpntpeepbyap nBn i noCTaTe HOro Ha niCTaBky.
PiKIOHcyCTAHIO DO p03eTKI 3axnCHIMN KOHTaMn 230B/50T.
Poz6nokyIte pyky, kyo BOHa 3hAxoDntBcB nIoKHeHHI dny nepenecHnR, kOnncAHO B pozdi "FyHKiiIpyKn". PincptiM oKHa yBIMkHyTn TiNbKn ToDi, KOnn pyka 3haxoDntBcra Bn3y.
3a donomoro khoikn SETTING (2) BCTaHObitb Tempe-patpy. DnBtbcra Ta6nucu Bnue.
PouekaiTe, nokn iiooBa npackn po3irpieTcBc. KOnn 6ynde oocryHyto notpi6hoi dna npacyBaHHa Temnpa- Typn, cnHn IHdkaTop nepectane 6bnmatn i nponyha 3BykoBn CnHan.
Utpmyte knabiuy imnybchoi noaapi napi (3) npotrrom 1 xBNHn a6o TaK doBro, nOKn npa He 3'ABNTCBi 3OTbopB iNDWBu. Leyac E Heo6xIDHM, uOb npa notpapanla do npackn. He3naHm wum niJ vac noaip npn ce HopmaIbHO.
Bka3ibKa do npacyBaHHa 3 3actocyBaHHa nap:
HanaWtuBaHHa "1.NYLON" He npu3HaueHo dI npacyBaHHa 3 npoIO (INB. Ta6NIIO).
KInbKicTbpn KoHTpOIOeTbcra eNEKTPOHIKOIO.BoHa B3HaacTcRa TemnpaTypoI npn (HanaWtYBaHHr TnnyTKaHHN).
PiJuc BnKOpNCTaHH TaepaTpya npacyBaHH KOnTpOJIIOCTbC eNEKTPoHHO CXeMOI. KaQc CNHI iHNIkaTOp HA DnCIIe IOBilHo 6IIMae, pNCTpi HarpBaCTbCra.
IicnBnKOpNCtAHH3aBKnBmNkAte npncpti BIDcHyTe NOro BiD Mepeki.
BepTikalbHa nodaHa napn (Vertical Steam)
Ley pekIM dae MOKINBicTb noDaBaTN napy B BeptnKaIbHomy Haprmi.

PonepeJxehn.
HikonHe cnpmOByTe ctpymInb napHa nIOeI. IChye He6e3neKa onikB.
Iicra toro k Bn noicnn OJg H niiuKa, npoeiB npacko H bIDCTahi 2-3 cm BjD nobepxhi.
RkdoataBODIN BEMHICTb nIac npacybaHHa?
IOnaBaiTe BOy B EMHicThb 3aBxN DTO TOROMOHTy, NOKI BOa He 3akHnnacn NOBHCTHO.
Kaio nIacpobotnuytnyMn3 npCTPO NOaui napu,piBeHb BoN 3HaADTO Hm3bKn.
- BidaCTaBTe npacky Ha nidaTbky (6).
Hattchitb KhoNky SETTING, u6Bn6paTn nikTorpamy POWER
IocyHbTe pyKByBropy,doNOKBOHA3i 3BYKOM He 3a6nOKyETbca Ha Micui. - BuitarHItB BuIky 3 po3eTkn.
- Lio6 BnHnTn pe3epByap, HATNCHtB kIaBiw RELEASE, 0o 3haxOuNTbcra nID pe3epByapom. (Man.F).
BnMItb natoPOn fipIbtpy npOTn BAnHa. (MaI.G).
3aONOBHnTe EMHcTb TINbKn DO N03HaKmAKCMMy. (Man.H).
He nepenOBHnIe emHICTb BDOIO!
IocTaBTe natoH pInbtpy npOTn BAnHa Ha Micue B KpUu, pe3epByap DnBa Bodn NoCTaBTe 3HOB Ha 6a3y-niDcT
BIMoKTe npOIOBKKTN npacyBaTn.

3aikHueHH npaui
- Bicntabte npacky ha nictabky (6).
HaTnCHITb KhoNky SETTING, uO6 Bv6paTu niktorpamy POWER - NocyhBTe pyKy Bropy, JONOK BOHa 3i 3ByKOM He 3a6nokcybca Ha Micci.
- BintarHnHb BnKky 3 po3eTKn.
- 3πnTe 3aπnK BODi i3 pe3epByapy dπra BODi, kUo nIDCTABKa dπr npacyBaHH He BUKOPNCOTByetybCnPOTAROM TpBANORO Yacy.
- PepeT Mm k CTaBn T npacky Ha Micu, De BOHa 36epiraETbca, CnID OCTUYNTI NOBHICTO.
36epirahanka6enlo
3MotaIte Tpy6ky I ka6eJIb KINBneHnHa HABKIOI TpIMaHa Ka6eIIO Ha OCHOBi. 3AkpinIb Tpy6ky I ka6eJIb KINBneHnHa 3a DonOMorOo fikcatopA dna Ka6eIIO, 10doJaetbcr. BCTahOBiT bItekep Mk Tpy6kAmn.
ΦinbTp BiD Hakiny
Ipaoba npacka 6nndha Hcipbpm Bid hakny. rpaynk Kaptpdxka pibtpa BiHakny Temho-opahkeBi, KOHNBOi.3anexHo BiJ KOpctKoCTi BoN KAptpdx KipbTa BiHAKNY MOxHA BnKOpNCTOBvBaTn Pp6bn3HO DnA 25 NOBHXpe3epByapIB dna BoN. KaptpdxK pibtpa BiHakny NOTpi6HO 3amHHTN, RkOg rpaHyN cTahytb NobHicTHO OPHMM.
BIMMKHeHHH pIcStpoH.
BunrHtB BunKy 3 po3eKn.
Bid'eHaHte pe3epByap dna BOnu.
BIMITb natpoh pfjntpy npotn Banha.
3anOBHnTe cHmHCTb TlBKn Do nO3HaKn MaKcMymy.He nepenOBHnTe cHmHCTb BOHO!
3amHItb KapTpndk i3 pfJbTpom Bid Hakuiny.
3aekaiTe KInbKa cekyH, nepu Hix yBIMkHytn npnctpi 3HOBy, uo6 Kaptpndg pifnbpa BiHaKny yBipab BDOy.

IpMmItka.
KIO KAPTnka 3 fInbTpOM BiHakNpy HEmae, npoOBKyIte npacyBaHH 3 nCTINJIBOBAHO BOHO.

yBara.
Kaptpnix 3i pInbTpom BID HAKINy MAE 6ytN 3aBXn INpH eHaHO!
OuHJeHH

PonepeXeHn.
Pepd TmK NOaTNOuHn npackn, cnid o6oB'3KOBO BNTaHTN BuNKy 3 po3eKn!
PooekaiTe, nOKn npuaad He doocrHe HopMaIbHoi TeMnepatyp!
KateropnHNo 3abOpOHcTbCn onyckatn npuaB B Ody, o6 ouHCTnN noRo. Lc moKe np3BecTN do ydApyeNEkTPuHm CTpyMOM a6o do noXeki.

yBara.
Дяоуншн He 3actocobyte itkn 3 npoty a6o iuimatepiann,po MOKytb noKOJNTN NOBepxHIO.
He 3actocobyte 3acobn dIry ouHn Hn, kIMCTb iKia6o a6pa3nBHI cKnadObi YactHHN.
- OuHsauIte Kopnyc 3a donomoroo cyxoi TkaHHI.
OuHauTe dHnue npacki nictabkn 3JeKa BOnorHO TKAHHHO.
OCTaTOUHa BOda MoKe 3aJIiWuaTnCBA EMHOCtI, aIe ii Kpaue BvIaIHTN, kIzO Bn He INaHyTe KOpNCTyBaTnC npackoIO B Hai6JIuKChY qac.
Texhiy hi napameTpni
Modèle: DBS 5564
IopdHnXMBHeHHa: 230B,50/60T
CnoxmbaHnnotyKHOCTi: 2200BT
Ipyna eJektpo6e3neuHocti
MaKcImaJIbHa KInbKicTb BOuN B cMHOCTi: 1,7 nIITpa
Bara HeTTo: 3,30
Ley npnad 6yno nepebipeho 3riDNo Bcix BiNobiHnx, akTyalbHnx DnpekTNB CE, Hanpknad zuoDo eNeKtpomarHHTHO cyMICHOCTa Hn3bKOBoTbTHOi DnpeKTNBt, Ta 36ydoBaHO 3 a HOBITIM NOJNOKeHHMm TexHki 6e3neKn.
UcyhenHn HenoJaoK
| Helenopada Можлбы i ndabu Ucunehnna | ||
| Прилад не пацюс | Деб feкт роз-етки се lektpruchнохи Влеленя | Влелочь влку в iншу розетку. |
| Ручу не bctанов-пени дониу. | Посунtle ручу дониу. | |
| Викоано се lektpro-нне налашуваньч Temnéратури U. | Виберitenotipi6ну Temnéратуру npacувань. | |
| Прилад не-гайно пессанпддпогати пд ча npacуванья | Чи спесанру-жению мерека? | Песевирот залобіжники в Будунку. |
| Сини i ndimakotр на диспейшигд-ko блимати | Длая Вибразною положения Tem-песа typа заhandTo Bincoka. | Заухаши, do-nokи паска не охалоное (сини i ndimakotр пес一侧псимати). |
| Гунниш ум пд ча паціз з парою | В с Memberschті Немаьд. | Песевирот emhість. Дддіteьд. |
GARANTIE-KARTE
Garantiebewijs · Carte de garantie

- Attention: Surcharge!
- Vapor vertical (Vertical Steam)
- Steam na vertical (Vertical Steam)
- Vapore verticale (Vertical Steam)
- General Safety Instructions
- Children and Frail Individuals
- Warning!
- Symbols in these Instructions for Use
- Warning:
- Caution:
- Note:
- Special Safety Instructions
- WARNING: Danger of burns!
- Overview of the Components
- Not shown
- Instructions
- Unpacking
- Electrical connection
- Connected Wattage
- Caution: Overload!
- Handle Function (9)
- Electronic Temperature SETTING Button (2)
- Auto Off Function
- Water tank (8)
- Water
- Operation
- Before Initial Use
- Ironing without steam
- i Note:
- Steam Ironing
- #
- Caution: Initial Use:
- Note On Steam Ironing:
- Vertical Steam
- How can I replenish the water during operation?
- When you have finished
- Cable Storage
- Lime Filter
- lote:
- Cleaning
- Technical Data
- Meaning of the "Dustbin" Symbol
- Функлг ABTomaTHHOrO BIMKHeHH
- EMHicTh DnB OBDn (8)
- Boda
- 06cnyroByBaHHa
- IpeedepipuHm3acToCyBaHHM
- PpacyBaHH86e3 npu
- Ipnmitka.
- IpMItka.
- IpacyBaHHa3 npao
- PonepeKeHHa.
- yBara.
- Ybara: noayok npaui:
- Bka3ibKa do npacyBaHHa 3 3actocyBaHHa nap:
- BepTikalbHa nodaHa napn (Vertical Steam)
- PonepeJxehn.
- RkdoataBODIN BEMHICTb nIac npacybaHHa?
- 3aikHueHH npaui
- 36epirahanka6enlo
- ΦinbTp BiD Hakiny
- IpMmItka.
- OuHJeHH
- PonepeXeHn.
- Texhiy hi napameTpni
- UcyhenHn HenoJaoK
- GARANTIE-KARTE
Brand : AEG
Model : DBS 5564
Category : Iron