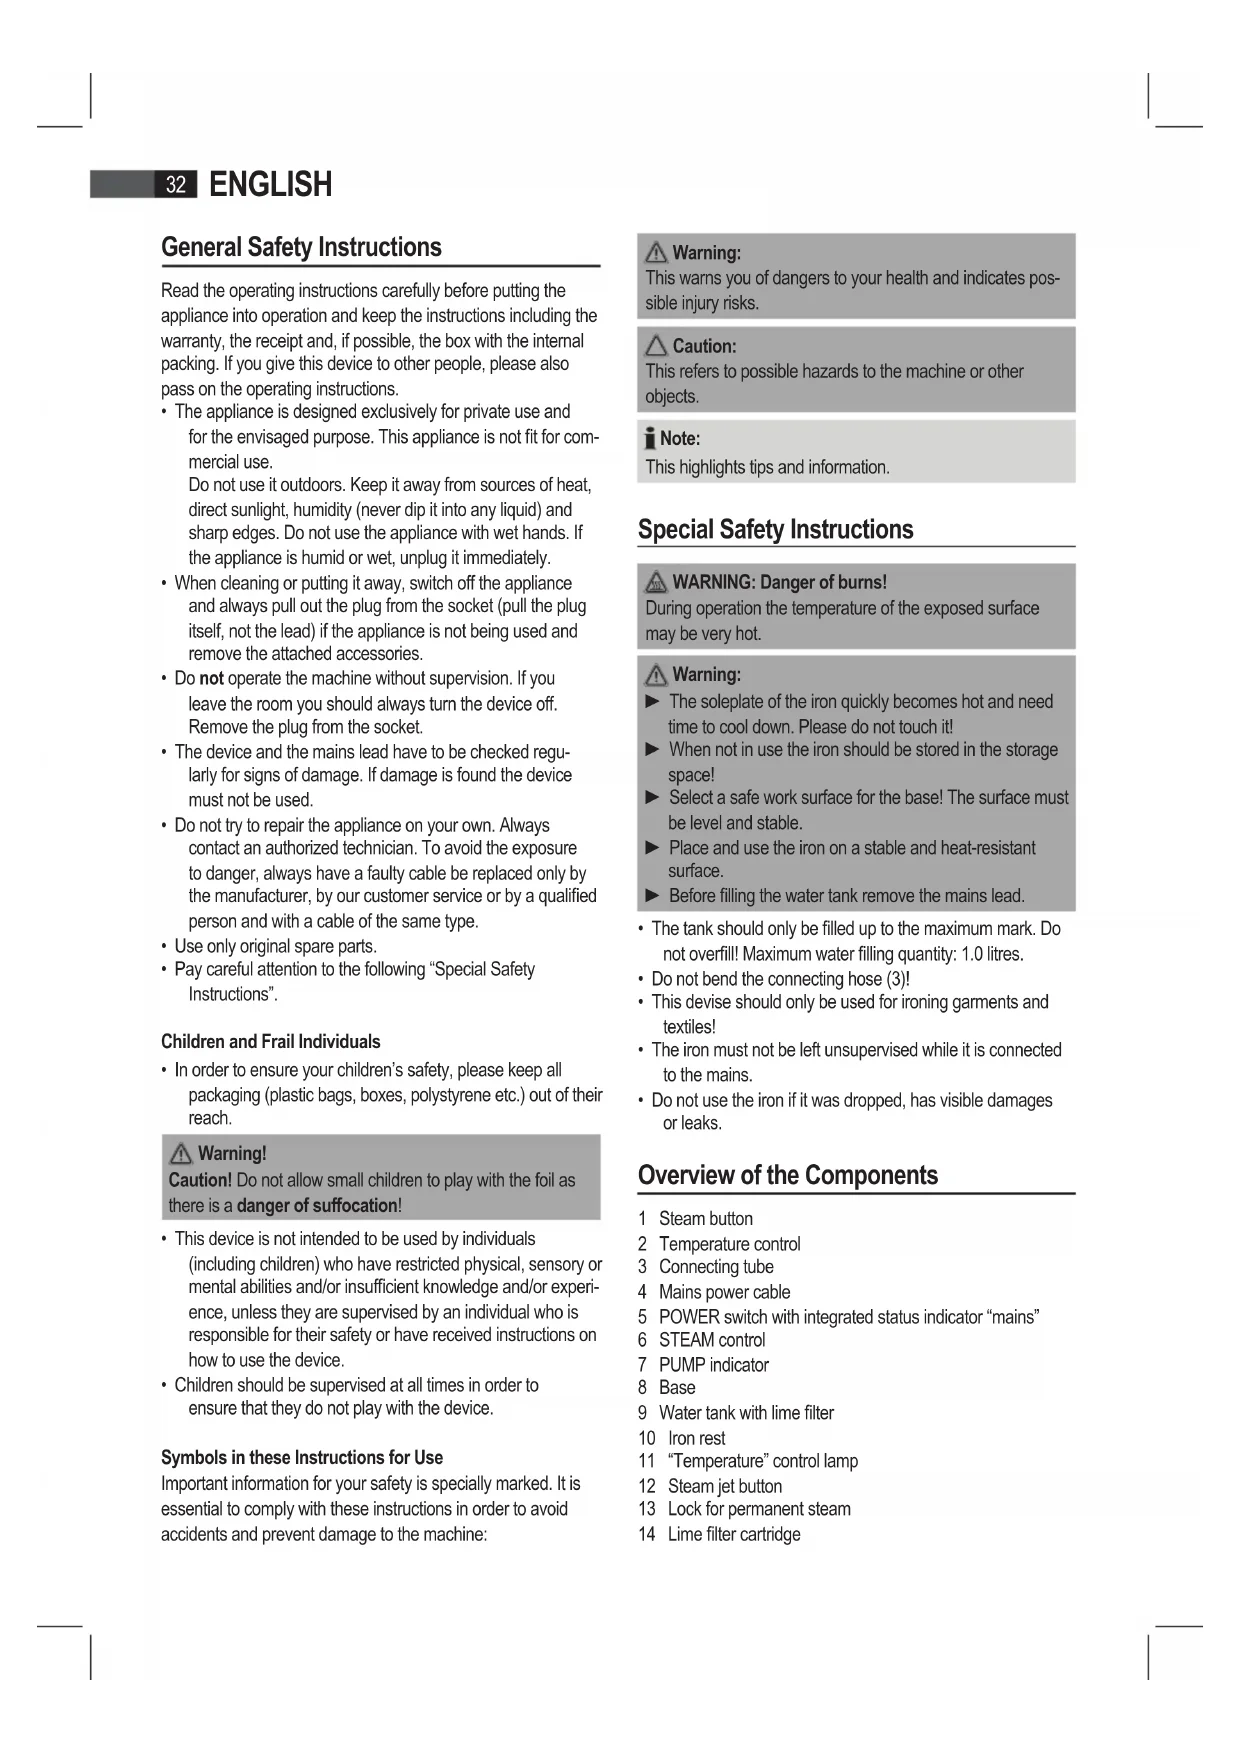
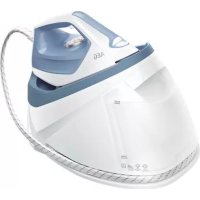
USER MANUAL DBS 5565 AEG
Overview of the Components.. 3
Setup Instructions.. page 4
Instruction Manual.. page 32
Technical Data.. 35
JEZYK POLSKI
Spis tresci
Attention: Surcharge!
Consommation: 2000-2200 W
Vapor vertical (Vertical Steam)
Steam na vertical (Vertical Steam)
Vapore veticale (Vertical Steam)
General Safety Instructions
Read the operating instructions carefully before putting the appliance into operation and keep the instructions including the warranty, the receipt and, if possible, the box with the internal packing. If you give this device to other people, please also pass on the operating instructions.
- The appliance is designed exclusively for private use and for the envisaged purpose. This appliance is not fit for commercial use.
Do not use it outdoors. Keep it away from sources of heat, direct sunlight, humidity (never dip it into any liquid) and sharp edges. Do not use the appliance with wet hands. If the appliance is humid or wet, unplug it immediately.
- When cleaning or putting it away, switch off the appliance and always pull out the plug from the socket (pull the plug itself, not the lead) if the appliance is not being used and remove the attached accessories.
- Do not operate the machine without supervision. If you leave the room you should always turn the device off. Remove the plug from the socket.
- The device and the mains lead have to be checked regularly for signs of damage. If damage is found the device must not be used.
- Do not try to repair the appliance on your own. Always contact an authorized technician. To avoid the exposure to danger, always have a faulty cable be replaced only by the manufacturer, by our customer service or by a qualified person and with a cable of the same type.
- Use only original spare parts.
- Pay careful attention to the following "Special Safety Instructions".
Children and Frail Individuals
- In order to ensure your children's safety, please keep all packaging (plastic bags, boxes, polystyrene etc.) out of their reach.

Warning!
Caution! Do not allow small children to play with the foil as there is a danger of suffocation!
- This device is not intended to be used by individuals (including children) who have restricted physical, sensory or mental abilities and/or insufficient knowledge and/or experience, unless they are supervised by an individual who is responsible for their safety or have received instructions on how to use the device.
- Children should be supervised at all times in order to ensure that they do not play with the device.
Symbols in these Instructions for Use
Important information for your safety is specially marked. It is essential to comply with these instructions in order to avoid accidents and prevent damage to the machine:

Warning:
This warns you of dangers to your health and indicates possible injury risks.

Caution:
This refers to possible hazards to the machine or other objects.

ote:
This highlights tips and information.
Special Safety Instructions

WARNING: Danger of burns!
During operation the temperature of the exposed surface may be very hot.

Warning:
The soleplate of the iron quickly becomes hot and need time to cool down. Please do not touch it!
- When not in use the iron should be stored in the storage space!
Select a safe work surface for the base! The surface must be level and stable.
Place and use the iron on a stable and heat-resistant surface.
Before filling the water tank remove the mains lead.
- The tank should only be filled up to the maximum mark. Do not overfill! Maximum water filling quantity: 1.0 litres.
- Do not bend the connecting hose (3)!
- This devise should only be used for ironing garments and textiles!
- The iron must not be left unsupervised while it is connected to the mains.
- Do not use the iron if it was dropped, has visible damages or leaks.
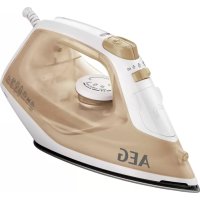
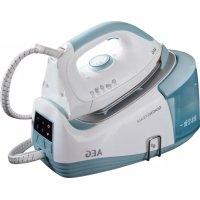
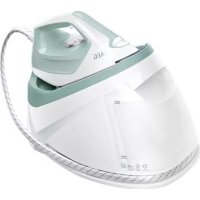
Overview of the Components
1 Steam button
2 Temperature control
3 Connecting tube
4 Mains power cable
5 POWER switch with integrated status indicator "mains"
6 STEAM control
7 PUMP indicator
8 Base
9 Water tank with lime filter
10 Iron rest
11 "Temperature" control lamp
12 Steam jet button
13 Lock for permanent steam
14 Lime filter cartridge
Not shown
RELEASE button below the water tank. Releasing device of the water tank
Instructions
Unpacking
- Remove any protective foils and stickers from the soleplate.
- Please unwind the lead completely.
Installation
- Select a safe work surface for the base! The surface must be level and stable.
- Place the iron properly on the iron rest (10), as shown in Fig. C.
- The soleplate must not come into contact with the back edge of the iron rest (10), otherwise the iron will not stand securely on it. (Fig. D)
Electrical connection
- Make sure that the iron voltage (see name plate) and the line voltage match.
- The mains plug should only be inserted into a correctly installed 230V 50Hz socket with earthing contact.
Connecte Wattage
The station has a total maximum wattage of 2000-2200 W. With this connected load a separate supply line protected by a 16A household circuit breaker is recommended.

Caution: Overload!
If you use extension leads, these should have a cable cross-section of at least 1.5mm^2
Do not use any multiple sockets, as this device is too powerful.
Temperature Control on the Iron (2)
The symbols on the control correspond to the following settings:
(Synthetics) low temperature
Wool, silk) medium temperature
Cotton, linen) highest temperature
Steam Control (6)
Set the amount of steam with the steam control depending on the iron temperature:
| Fabric | Synthetics, silk, nylon, acrylics, acetate | Wool, silk polyester | Cotton, linen |
| Temperature setting | ● ● ● | | ● ● ● to MAX |
| Steam control setting | MINMINM N to | |
Note:
Do not use the steam function if the temperature control is set lower than "● ●". Water may leak from the soleplate.
Water tank (9)
- The water tank has a recessed grip on the bottom so that it can be removed.
- The lock of the water tank is also the lime filter cartridge. Take out the lime filter cartridge to fill with water.
- The tank volume is 1.0 litres.
Water
Use only tap water or distilled water.
Do not fill battery water, water from the clothes dryer and water containing additives (such as starch, perfume, softener or other chemicals) into the water reservoir.
This could damage the iron due to residues forming in the steam chamber. These residues may cause impurities to the fabric when dropping out of the holes in the soleplate.
Operation
Before Initial Use
- Clean the ironing base with a slightly damp cloth.
- In order to remove all residues before initial use, please pass the iron a few times over an old clean cloth.
Ironing without steam
i Note:
Note:
The control lamp (11) on the iron shows that it is heating up. As soon as the control lamp goes off the operating temperature has been reached. Now you can start ironing.
After use, always set the temperature control to "MIN".
- Press the POWER button to switch the device off and disconnect it from the mains.
Steam Ironing
Warning:
The iron expels a large quantity of hot steam. Danger of burns.
Caution:
When using the steam iron please ensure that the water tank is always filled to the required level.
The lime filter cartridge always has to be positioned in the water tank, even if you use distilled water.
Caution: Initial Use:
Please proceed as follows:
The tank should only be filled up to the maximum mark. Do not overfill!
Close the water tank and place it back in the base.
Connect the base station to a 230V / 50Hz socket with earthing contact.
Press the POWER button (5) to switch the device on.
Set the desired temperature in the range " " to " " The indicator on the iron lights up.
Turn the steam control (6) to the highest position.
Press and hold the steam button (1) for at least 1 minute. Alternatively pull the steam lock (13) back to lock the steam jet button (12). This time is needed for the steam to reach the iron.
Wait until the soleplate has heated up. Once the temperature has been reached the control lamp goes off.
Note On Steam Ironing:
Do not use the steam function if the temperature control is set lower than . Water may leak from the soleplate.
Start ironing after starting up the appliance and filling the water tank.
- Wait for the iron to heat up.
- Steam jet: Press button (12) on the iron.
- Continuous steam: Slide the locking lever (13) to lock button (12) in place. Press and hold the steam button (1).
- Select amount of steam: Turn the steam control (6) to select the amount of steam. Follow the abovementioned settings.
Vertical Steam
This can be used to produce a jet of steam in a vertical direction.
Warning:
Never point the steam jet at other people. Danger of burns.
Hang your laundry on a clothes hanger and move the iron to approximately 5 -10 cm away.
How can I replenish the water during operation?
Refill with water before the tank is completely empty. The water level is too low if the pump is noisy during operation.
- If you have been working with continuous steam, unlock the continuous steam lock (13).
- Place the iron on the rest (10).
- Set the temperature control to "MIN".
- Press the POWER button to switch the device off and disconnect it from the mains.
- In order to remove the tank, press the RELEASE button below the water tank.
- Remove the lime filter cartridge.
- Fill the tank up to the maximum mark. Do not overfill!
- Close the water tank.
- Reinsert the lime filter cartridge and push the tank back into the base.
- You can now continue ironing.
When you have finished
- If you have been working with continuous steam, unlock the continuous steam lock (13).
- Place the iron on the rest (10).
- Set the temperature control to "MIN".
- Press the POWER button to switch the device off and disconnect from mains power supply.
- Empty the water tank if the ironing station is not in use for a longer period of time.
- Allow the device to cool down before you put it away.
Anti-scale filter
Your steam iron station is fitted with an anti-scale filter. The anti-scale filter cartridge becomes spent after filtering approximately 18 litres of water, depending on the hardness of your water. It then loses its effectiveness and must be replaced.
- Switch the device off as described under "When you have finished".
- Remove the water tank.
- Remove the lime filter cartridge.
- Fill the tank up to the maximum mark. Do not overfill!
- Replace the lime filter cartridge.
- Wait a few minutes before switching the device on again for the lime filter cartridge to absorb water.
Note:
Continue ironing with distilled water if you have no lime filter cartridge at hand.
Caution:
Leave the lime filter cartridge always attached!
Cleaning

Warning:
Always remove the mains lead before cleaning!
Wait until the machine has cooled down completely!
Under no circumstances should you immerse the device in water for cleaning purposes. Otherwise this might result in an electric shock or fire.

Caution:
Do not use a wire brush or any abrasive items.
Do not use any acidic or abrasive detergents.
- Clean the casing with a slightly damp cloth.
- Clean the sole plate and the rest with a slightly damp cloth.
- Any residual water can remain in the water tank, but should be poured out if it has been in the tank for a prolonged period.
Troubleshooting
| FaultPossible Cause | Use Remedy | |
| Device does not work | Fault mains socket Try another socket. | |
| The device is not switched on. | Press the POWER button to switch the device on. |
| The electronic temperature setting is in position MIN. | Select the desired ironing tempera-ture. |
| The device suddenly stops working during operation. | Is the electric circuit overloaded? | Check the house fuse. |
| During steam iron-ing, water leaks from the soleplate. | The temperature control on the iron is set too low. | Select a higher temperature. |
| Loud noises during steam operation | The tank is empty. Check the tank. Refill water. |
Technical Data
Model: DBS 5565
Power supply: 220-230 V, 50/60 Hz
Power consumption: 2000-2200 W
Protection class:
Maximum filling quantity of the water tank: 1.0 litre
Net weight: 2.85 kg
This device has been tested according to all relevant current CE guidelines, such as electromagnetic compatibility and low voltage directives, and has been constructed in accordance with the latest safety regulations.

Meaning of the "Dustbin" Symbol
Protect our environment: do not dispose of electrical equipment in the domestic waste.
Please return any electrical equipment that you will no longer use to the collection points provided for their disposal.
This helps avoid the potential effects of incorrect disposal on the environment and human health.
This will contribute to the recycling and other forms of reutilisation of electrical and electronic equipment.
Information concerning where the equipment can be disposed of can be obtained from your local authority.
He BnKOpNCTOByTe FyHKtio nap, RaIIO peryIaTOp TempeIaTpN BCTaHOBNeH O HIXKne NOnOKeHHaIX K
3NiDOWBIMOKeKanatNBOda.
EMHicTh DnB OBDn (9)
- PeερByap dπr Bɔn Mae BnH3y BmMky dπr 3pyHOro BmMaHHa, TAK lIc BmOKeTe 3HrTn IOrO 3MiCμ.
KpnupeepByapa dna BOn OndHocHO taKoX pIb-TPOM npOTn BAHa. BnIMtB natpon pInbtpy dna 3axncty npOTn BAHa, uOdoATN BOIN B pe3epByap.
€MhICTbBMilueyE1,0nita
Boda
3actocobyte tIbKn BOy i3 BOonpoBOdy a6o nctnboaHy BOy.
Boy 3 6atapei, i3 cyuapkn a6o BoY 3 doaHnM ximikatib (Taknx kpoxmaIb,napfym,doabkIn I73 m'KwHeHH BOIN a60 IHui) 3abopohReTcb 3aImBatN B EMHiCTb npackn.
Ppunad moke 6ytn noUKoJKeHn, ockIbKn B napoiB kamepi MOKyTB CTBOPHOATNCr OcaHn. Lj ocAaN MoKyTb 3aJIuWATn CnIDn Ha TkaHHi, KOIN BHXODITMMyTb Yepe3 OTBOPN Dn Napn.
06cnyrobyBaHHa
Ipeep nepuim 3actocyBaHHaM
OuHCTIb DnHlue Ippackn BONOrIO TkAHNHOIO.
- ⅢbBnAaHInTnepeepnepuHm3actocyBaHHrM Bc3abpydHeHH, cnipacyBatn CnoaATky CTapy HCTy TkAHHy.
IpaCyBaHnHa 6e3 napi

IpMMITka.
BicopTyIe 6iIN3Hy 3a TINAMN TKaHHN dIpy pi3HIX TEMpepaT npacyBaHH.
Perpu Hix BMnKaTu npucTpiBCTaHOBnHTope peryIaTOp TEMpepaTyPi iperyIaTOp napu y noNoKeHHA MIN
BepTKaJIbHa noDaHa napn (Vertical Steam)
Lei peKIM dae MOJIINBICb IoJaBaTn napy B BeptNKaIbHomy Hanpmi.

PonepeJxehn.
Hikon He cnpmyTe ctpymnb napn Ha nOed. Icye He6e3neka onikB.
Iicra toro kBn nobicnil OJg Ha nnHka, npoeiib npackoh Hb iDctahi 5-10 cm BiD nobepxhi.
JIKdoataNBOINBEMHICTbnidacnpacybaHHa?
IodabaiTe BDOBEMHicTb 3aBxN Do TOROMoMeHTy, NOKI BOa He 3akIHnnaCra NobHCTIO. JkUO nIac poBoTn yTuN UyMN 3 npICPTPO NOaHi npi, pBeHb BoN 3HaADTO Hn3bkM
-Якuto BnKOpNtOByeTcpeJxHmNoCTiHoi napi,po36noKyIteBaxJIb6NoKyBaHnBnXoHynapi(13).
- BiDCTaBTe npacky Ha niDCTaBky (10).
- Perjatop TemnepaTpy nocTaBHe Na "MIN".
HaTnCHiB KHOHky POWER, 0o6 BmKHyTN npCTpi, i Bi'edHaTe NOro Bi Mepeki.
- 06 BnHnTn pe3epByap, HATNCiB KlaBI RELEE, 3n3naOHTbcra n pe3epByapom
BnIMtbnatpohphiIbtpny npOtnBaHa.
3aONBHJTE EMHCt b TINbKn Do N03HaKN MaKcMMy. He nepenOBHJTe EMHCt b BOHO!
3akpiTepeepByapIINBODN.
- NocTabTe NaTPOH pIbTpY npOTn BAnHa Ha MicCe B KpNusu, pe3epByap dny BODn NOCTaBte 3HOB Ha 6a3y-niDcTabKy.
- Bn mojete npoIOBxHITn npacyBaTn.
3aikHcHn npaui
- KIIO BIKOPICTOBYeTcpeXIM NoCTHIOI napi,po36noKyIte BaJIb 6NoKyBaHHB BNXOy napi (13).
- Bičtabte Čpáčky ha ničtabky (10).
- PerynlaTop TemnepaTpyn nocTaBte Ha "MIN".
HaTnCHiB KhoNkY POWER, 0o6 BmKHyTu npucTpI, i BiD'cHaiTe NOro BiMpeKei.
yKPAIHcbsKA
3JnTe 3aIiWok BODi i3 pe3epByapy IraB OND, kIIO nIcTABKa dIe npacyBaHH He BIKOPNCOTOBYETbCpOTAROM TpIBaNOrO Yacy.
- PpeI TmK CTaBnT nPacKy Ha Micue, De BOHa 36epira-ETbca, cIiOCTyDnT II NOBHcTIO.
Φinbtp BiD hakiny
IiDCTABKy dny napoO npackn 6bnaHaHO fInbTpom BiH KaNpy. Upe3 pfIbTp BiH HAKINy MoXHa nPOnyCTHTn pnp6bn3Ho 18 JITPB BDO N3aENxHO BiD JxOpCTKOci T BoN. Picnra cboR opecypc fInbTpa BHeepnyetbcra i Noro cnid 3amHNTn.
BIMMKHb npncptpi, k onncaHO B po3di "3aKiHHeHH npaui".
Bidi'ednaHae pe3epByap nIa BODn.
BnIMtbnatpohphiIbtpny npOtnBaHa.
3aONBHaTe EMHCTb TINbKn Do no03NaKmAKCMMy. He nepenOBHnTE EMHCTb BOIO!
3aMihItb Kaptnjx i3 cijltbTpor BiJnHaKnIpy.
3aekaiTe KInbKa cekyHn, nepu HIX yBIMKHTn npctpi 3HOBy, uO6 KaptpnDk fInbTpa BID hAKINy yBipab BDOy.

PpIMITka.
KapTnDka 3 fInbTpom BiHakiny Hema, npoobKyTe npacyBaHHa 3 INCTINJbOBAHO BOHO.

ybara.
Kaptpnix 3 iinbTpom Bid Hakiny Mae 6ytn 3abxnn npi- eHaHO!
OuHnueHH

PonepeJxehn.
PepenTMMAKNOATN OUYUENHnIpaACKn,cniO6OB'3KOBOBHTYnBUNky 3po3eTK!
PouekaiTe,poK npuaH He DoocrHe HOpMaIbHoI TeMepaTpy!
KateropnHHO 3a6oPnoHReTbCOnyckTaN npnAaB B Ody, 06 ouHCTnNoRo. Ce moKe npnsBeCTn Do yapy eektpnHm CTpyMOM a6o Do noXkexi.

yBara.
IIN OUNHHe H3actocobyte 3n3 npOy a6o iHui MaTePianu,IO MOKyTb NIOKODNTN NOBepxHIO.
He 3actocobyte 3acobn nny ouuueHHraKi MicTb iDki a6o abpa3nBhi cknadobi yactnnH.
OuHuaTe KOpNc 3a donomoroIO cyxoi TKAHHI.
OuHuaTe DnHue npacki nDctabKn 3nerKa BONorHO TKAHHIOI.
OCTaToHbBoaMoKe 3aHuaTcBEMHOcti,ane II kpaue BuaNTn,kao Bu He PnaHyTe KopNCyBaTncn npackoB Hn6nKvHac.
YcyHeHH HeNoJaOK
| Helenajka Moxli | Ви п ductави усуня. | |
| Пробд не пацов | Дебе́т розетки
еожимчесу
ЖИВLEнг. | Влочь Вишикь в
ишу розетку. |
| Прackу не вимк....
п. | Шоб увимк....
пrackу, нашич...
Кноку POWER. |
| Вико....
н....
н....
н....
н....
temп....
р....
MIN. | Виберіь по....
temп....
р....
п...
р...
п...
п...
п...
п...
п...
п...
п...
п...
п...
п...
п...
п...
п...
п...
п...
п...
п...
п...
п...
п...
п...
п...
п...
п...
п...
п...
п...
п...
п...
п...
п...
п...
п...
п...
п...
п...
п...
п...
п...
п...
п...
п...
п...
п...
п...
п...
п...
п...
п...
п...
н...
п...
п...
п...
п...
п...
п...
п...
п...
п...
п...
п...
п...
п...
п...
п...
п...
п...
п...
п...
п...
п...
п...
п...
п...
п...
п...
п...
п...
п...
п...
п...
п...
п...
п...
п...
п...
п...
п...
п...
п...
п...
п...
п...
п...
п...
п...
п...
п...
п...
?
п...
п...
п...
п...
п...
п...
п...
п...
п...
п...
п...
п...
п...
п...
п...
п...
п...
п...
п...
п...
п...
п...
п...
п...
п...
п...
п...
п...
п...
п...
п...
п...
п...
п...
п...
п...
п...
п...
п...
п...
п...
п...
п...
п...
п...
п...
п...
п...
п...
п ...
п...
п...
п...
п...
п...
п...
п...
п...
п...
п...
п...
п...
п...
п...
п...
п...
п...
п...
п...
п...
п...
п...
п...
п...
п...
п...
п...
п...
п...
п...
п...
п...
п...
п...
п...
п...
п...
п...
п...
п...
п...
п...
п...
п...
п...
п...
п...
п...
п...
п....
п...
п...
п...
п...
п...
п...
п...
п...
п...
п...
п...
п...
п...
п...
п...
п...
п...
п...
п...
п...
п...
п...
п...
п...
п...
п...
п...
п...
п...
п...
п...
п...
п...
п...
п...
п...
п...
п...
п...
п...
п...
п...
п...
п...
п...
п...
п...
п...
п...
п
...
п...
п...
п...
п...
п...
п...
п...
п...
п...
п...
п...
п...
п...
п...
п...
п...
п...
п...
п...
п...
п...
п...
п...
п...
п...
п...
п...
п...
п...
п...
п...
п...
п...
п...
п...
п...
п...
п...
п...
п...
п...
п...
п...
п...
п...
п...
п...
п...
п...
.
п...
п...
п...
п...
п...
п...
п...
п...
п...
п...
п...
п...
п...
п...
п...
п...
п...
п...
п...
п...
п...
п...
п...
п...
п...
п...
п...
п...
п...
п...
п...
п...
п...
п...
п...
п...
п...
п...
п...
п...
п...
п...
п...
п...
п...
п...
п...
п...
п...
п..
.
п...
п...
п...
п...
п...
п...
п...
п...
п...
п...
п...
п...
п...
п...
п...
п...
п...
п...
п...
п...
п...
п...
п...
п...
п...
п...
п...
п...
п...
п...
п...
п...
п...
п...
п...
п...
п...
п...
п...
п...
п...
п...
п...
п...
п...
п...
п...
п...
п...
.
.
.
.
.
.
.
.
.
.
.
.
.
.
.
.
.
.
.
.
.
.
.
.
.
.
.
.
.
.
.
.
.
.
.
.
.
.
.
.
.
.
.
.
.
.
.
.
.
.
.
.
.
.
.
.
.
.
.
.
.
.
.
.
.
.
.
.
.
.
.
.
.
.
.
.
.
.
.
.
.
.
.
.
.
.
.
.
.
.
.
.
.
.
.
.
.
.
.
.
;
.
.
.
.
.
.
.
.
.
.
.
.
.
.
.
.
.
.
.
.
.
.
.
.
.
.
.
.
.
.
.
.
.
.
.
.
.
.
.
.
.
.
.
.
.
.
.
.
.
.
.
.
.
.
.
.
.
.
.
.
.
.
.
.
.
.
.
.
.
.
.
.
.
.
.
.
.
.
.
.
.
.
.
.
.
.
.
.
.
.
.
.
.
.
.
.
.
.
.
-
.
.
.
.
.
.
.
.
.
.
.
.
.
.
.
.
.
.
.
.
.
.
.
.
.
.
.
.
.
.
.
.
.
.
.
.
.
.
.
.
.
.
.
.
.
.
.
.
.
.
.
.
.
.
.
.
.
.
.
.
.
.
.
.
.
.
.
.
.
.
.
.
.
.
.
.
.
.
.
.
.
.
.
.
.
.
.
.
.
.
.
.
.
.
.
.
.
.
.
?
.
.
.
.
.
.
.
.
.
.
.
.
.
.
.
.
.
.
.
.
.
.
.
.
.
.
.
.
.
.
.
.
.
.
.
.
.
.
.
.
.
.
.
.
.
.
.
.
.
.
.
.
.
.
.
.
.
.
.
.
.
.
.
.
.
.
.
.
.
.
.
.
.
.
.
.
.
.
.
.
.
.
.
.
.
.
.
.
.
.
.
.
.
.
.
.
.
.
.
>
.
.
.
.
.
.
.
.
.
.
.
.
.
.
.
.
.
.
.
.
.
.
.
.
.
.
.
.
.
.
.
.
.
.
.
.
.
.
.
.
.
.
.
.
.
.
.
.
.
.
.
.
.
.
.
.
.
.
.
.
.
.
.
.
.
.
.
.
.
.
.
.
.
.
.
.
.
.
.
.
.
.
.
.
.
.
.
.
.
.
.
.
.
.
.
.
.
.
.
-...
- - - -
- - - - - - - - - - - - - - - - - - - - - - - - - - - - - - - - - - - - - - - - - - - - - - - - - - - - - - - - - - - - - - - - - - - - - - - - - - - - - - - - - - - - - - - - - - - - - - - - - - - - - -
- - - - - - - - - - - - - - - - - - - - - - - - - - - - - - - - - - - - - - - - - - - - - - - - - - - - - - - - - - - - - - - - - - - - - - - - - - - - - - - - - - - - - - - - - - - - - - - - -
- - - -
- - - - - - - - - - - - - - - - - - - - - - - - - - - - - - - - - - - - - - - - - - - - - - - - - - - - - - - - - - - - - - - - - - - - - - - - - - - - - - - - - - - - - - - - - - - - - - - -
- - - - -
- - - - - - - - - - - - - - - - - - - - - - - - - - - - - - - - - - - - - - - - - - - - - - - - - - - - - - - - - - - - - - - - - - - - - - - - - - - - - - - - - - - - - - - - - - - - - - - -
-
- - - - - - - - - - - - - - - - - - - - - - - - - - - - - - - - - - - - - - - - - - - - - - - - - - - - - - - - - - - - - - - - - - - - - - - - - - - - - - - - - - - - - - - - - - - - - - - - - - - -
-
- - - -
- - -
- - -
- -
- -
- -
- -
- -
- -
- -
- -
- -
- -
- -
- -
- -
- -
- -
- -
- -
- -
- -
- -
- -
- -
- -
- -
- -
- -
- -
- -
- -
- -
- -
- -
- -
- -
- -
- -
- -
- -
- -
- -
- -
- -
- -
- -
- -
- -
- -
- -
- -
- -
-
- -
- -
- -
- -
- -
- -
- -
- -
- -
- -
- -
- -
- -
- -
- -
- -
- -
- -
- -
- -
- -
- -
- -
- -
- -
- -
- -
- -
- -
- -
- -
- -
- -
- -
- -
- -
- -
- -
- -
- -
- -
- -
- -
- -
- -
- -
- -
- -
- -
- ...
- -
- -
- -
- -
- -
- -
- -
- -
- -
- -
- -
- -
- -
- -
- -
- -
- -
- -
- -
- -
- -
- -
- -
- -
- -
- -
- -
- -
- -
- -
- -
- -
- -
- -
- -
- -
- -
- -
- -
- -
- -
- -
- -
- -
- -
- -
- -
- -
- -
- - -
- -
- -
- -
- -
- -
- -
- -
- -
- -
- -
- -
- -
- -
- -
- -
- -
- -
- -
- -
- -
- -
- -
- -
- -
- -
- -
- -
- -
- -
- -
- -
- -
- -
- -
- -
- -
- -
- -
- -
- -
- -
- -
- -
- -
- -
- -
- -
- ...
- -
-
- -
- -
- -
- -
- -
- -
- -
- -
- -
- -
- -
- -
- -
- -
- -
- -
- -
- -
- -
- -
- -
- -
- -
- -
- -
- -
- -
- -
- -
- -
- -
- -
- -
- -
- -
- -
- -
- -
- -
- -
- -
- -
- -
- -
- -
- -
- -
- -
-
- -
-
- -
- -
- -
- -
- -
- -
- -
- -
- -
- -
- -
- -
- -
- -
- -
- -
- -
- -
- -
- -
- -
- -
- -
- -
- -
- -
- -
- -
- -
- -
- -
- -
- -
- -
- -
- -
- -
- -
- -
- -
- -
- -
- -
- -
- -
- -
- -
- -
.
- -
- -
- -
- -
- -
- -
- -
- -
- -
- -
- -
- -
- -
- -
- -
- -
- -
- -
- -
- -
- -
- -
- -
- -
- -
- -
- -
- -
- -
- -
- -
- -
- -
- -
- -
- -
- -
- -
- -
- -
- -
- -
- -
- -
- -
- -
- -
- -
- -
- .
- -
- -
- -
- -
- -
- -
- -
- -
- -
- -
- -
- -
- -
- -
- -
- -
- -
- -
- -
- -
- -
- -
- -
- -
- -
- -
- -
- -
- -
- -
- -
- -
- -
- -
- -
- -
- -
- -
- -
- -
- -
- -
- -
- -
- -
- -
- -
- -
- -
- #
- #
- #
- #
- #
- #
- #
- #
- #
- #
- #
- #
- #
- #
- #
- #
- #
- #
- #
- #
- #
- #
- #
- #
- #
- #
- #
- #
- #
- #
- #
- #
- #
- #
- #
- #
- #
- #
- #
- #
- #
- #
- #
- #
- #
- #
- #
- #
- #
- #
- -
- #
- #
- #
- #
- #
- #
- #
- #
- #
- #
- #
- #
- #
- #
- #
- #
- #
- #
- #
- #
- #
- #
- #
- #
- #
- #
- #
- #
- #
- #
- #
- #
- #
- #
- #
- #
- #
- #
- #
- #
- #
- #
- #
- #
- #
- #
- #
- #
- -
- -
- -
- -
- -
- -
- -
- -
- -
- -
- -
- -
- -
- -
- -
- -
- -
- -
- -
- -
- -
- -
- -
- -
- -
- -
- -
- -
- -
- -
- -
- -
- -
- -
- -
- -
- -
- -
- -
- -
- -
- -
- -
- -
- -
- -
- -
- -
- -
- +
- -
- -
- -
- -
- -
- -
- -
- -
- -
- -
- -
- -
- -
- -
- -
- -
- -
- -
- -
- -
- -
- -
- -
- -
- -
- -
- -
- -
- -
- -
- -
- -
- -
- -
- -
- -
- -
- -
- -
- -
- -
- -
- -
- -
- -
- -
- -
- -
- -
--
-
- -
- -
- -
- -
- -
- -
- -
- -
- -
- -
- -
- -
- -
- -
- -
- -
- -
- -
- -
- -
- -
- -
- -
- -
- -
- -
- -
- -
- -
- -
- -
- -
- -
- -
- -
- -
- -
- -
- -
- -
- -
- -
- -
- -
- -
- -
- -
- -
- -
-
-
-
-
-
-
-
-
-
-
-
-
-
-
-
-
-
-
-
-
-
-
-
-
-
-
-
-
-
-
-
-
-
-
-
-
-
-
-
-
-
-
-
-
-
-
-
-
-
-
-
-
-
-
-
-
-
-
-
-
-
-
-
-
-
-
-
-
-
-
-
-
-
-
-
-
-
-
-
-
-
-
-
-
-
-
-
-
-
-
-
-
-
-
-
-
-
-
-
-
- -
-
-
-
-
-
-
-
-
-
-
-
-
-
-
-
-
-
-
-
-
-
-
-
-
-
-
-
-
-
-
-
-
-
-
-
-
-
-
-
-
-
-
-
-
-
-
-
-
-
-
-
-
-
-
-
-
-
-
-
-
-
-
-
-
-
-
-
-
-
-
-
-
-
-
-
-
-
-
-
-
-
-
-
-
-
-
-
-
-
-
-
-
-
-
-
-
-
- -
- -
-
-
-
-
-
-
-
-
-
-
-
-
-
-
-
-
-
-
-
-
-
-
-
-
-
-
-
-
-
-
-
-
-
-
-
-
-
-
-
-
-
-
-
-
-
-
-
-
-
-
-
-
-
-
-
-
-
-
-
-
-
-
-
-
-
-
-
-
-
-
-
-
-
-
-
-
-
-
-
-
-
-
-
-
-
-
-
-
-
-
-
-
-
-
-
- 100%
200%
300%
400%
500%
600%
700%
800%
900%
1000%
1100%
1200%
1300%
1400%
1500%
1600%
1700%
1800%
1900%
2000%
2100%
2200%
2300%
2400%
2500%
2600%
2700%
2800%
2900%
3000%
3100%
3200%
3300%
3400%
3500%
3600%
3700%
3800%
3900%
4000%
4100%
4200%
4300%
4400%
4500%
4600%
4700%
4800%
4900%
5000%
5100%
5200%
5300%
5400%
5500%
5600%
5700%
5800%
5900%
6000%
6100%
6200%
6300%
6400%
6500%
6600%
6700%
6800%
6900%
7000%
7100%
7200%
7300%
7400%
7500%
7600%
7700%
7800%
7900%
8000%
8100%
8200%
8300%
8400%
8500%
8600%
8700%
8800%
8900%
9000%
9100%
9200%
9300%
9400%
9500%
9600%
9700%
9800%
9900%
9990%
10000%
10100%
10200%
10300%
10400%
10500%
10600%
10700%
10800%
10900%
11000%
11100%
11200%
11300%
11400%
11500%
11600%
11700%
11800%
11900%
12000%
12100%
12200%
12300%
12400%
12500%
12600%
12700%
12800%
12900%
13000%
13100%
13200%
13300%
13400%
13500%
13600%
13700%
13800%
13900%
14000%
14100%
14200%
14300%
14400%
14500%
14600%
14700%
14800%
14900%
15000%
15100%
15200%
15300%
15400%
15500%
15600%
15700%
15800%
15900%
16000%
16100%
16200%
16300%
16400%
16500%
16600%
16700%
16800%
16900%
17000%
17100%
17200%
17300%
17400%
17500%
17600%
17700%
17800%
17900%
18000%
18100%
18200%
18300%
18400%
18500%
18600%
18700%
18800%
18900%
19000%
19100%
19200%
19300%
19400%
19500%
19600%
19700%
19800%
19900%
20000%
20100%
20200%
20300%
20400%
20500%
20600%
20700%
20800%
20900%
21000%
21100%
21200%
21300%
21400%
21500%
21600%
21700%
21800%
21900%
22000%
22100%
22200%
22300%
22400%
22500%
22600%
22700%
22800%
22900%
23000%
23100%
23200%
23300%
23400%
23500%
23600%
23700%
23800%
23900%
24000%
24100%
24200%
24300%
24400%
24500%
24600%
24700%
24800%
24900%
25000%
25100%
25200%
25300%
25400%
25500%
25600%
25700%
25800%
25900%
26000%
26100%
26200%
26300%
26400%
26500%
26600%
26700%
26800%
26900%
27000%
27100%
27200%
27300%
27400%
27500%
27600%
27700%
27800%
27900%
28000%
28100%
28200%
28300%
28400%
28500%
28600%
28700%
28800%
28900%
29000%
29100%
29200%
29300%
29400%
29500%
29600%
29700%
29800%
29900%
20000%
20100%
20200%
20300%
20400%
20500%
20600%
20700%
20800%
20900%
21000%
21100%
21200%
21300%
21400%
2150
...
21600%
21700%
21800%
21900%
22000%
22100%
22200%
22300%
22400%
22500%
22600%
22700%
22800%
22900%
23000%
23100%
23210%
23300%
23400%
23500%
23600%
23700%
23800%
23900%
24000%
24100%
24200%
24300%
24400%
24500%
24600%
24700%
24800%
25000%
25100%
25200%
25300%
25400%
25500%
25600%
25700%
25800%
25900%
26000%
26100%
26200%
26300%
26400%
26500%
> 1
> 2
> 3
> 4
> 5
> 6
> 7
> 8
> 9
> 10
> 11
> 12
> 13
> 14
> 15
> 16
> 17
> 18
> 19
> 20
> 21
> 22
> 23
> 24
> 25
> 26
> 27
> 28
> 29
> 30
> 31
> 32
> 33
> 34
> 35
> 36
> 37
> 38
> 39
> 40
> 41
> 42
> 43
> 44
> 45
> 46
> 47
> 48
> 49
> 50
> 51
> 52
> 53
> 54
> 55
> 56
> 57
> 58
> 59
> 60
> 61
> 62
> 63
> 64
> 65
> 66
> 67
> 68
> 69
> 70
> 71
> 72
> 73
> 74
> 75
> 76
> 77
> 78
> 79
> 80
> 81
> 82
> 83
> 84
> 85
> 86
> 87
> 88
> 89
> 90
> 91
> 92
> 93
> 94
> 95
> 96
> 97
> 98
> 99
> 100
> 101
> 102
> 103
> 104
> 105
> 106
> 107
> 108
> 109
> 110
> 111
> 112
> 113
> 114
> 115
> 116
> 117
> 118
> 119
> 120
> 121
> 122
> 123
> 124
> 125
> 126
> 127
> 128
> 129
> 130
> 131
> 132
> 133
> 134
> 135
> 136
> 137
> 138
> 139
> 140
> 141
> 142
> 143
> 144
> 145
> 146
> 147
> 148
> 149
> 150
> 151
> 152
> 153
> 154
> 155
> 156
> 157
> 158
> 159
> 160
> 161
> 162
> 163
> 164
> 165
> 166
> 167
> 168
> 169
> 170
> 171
> 172
> 173
> 174
> 175
> 176
> 177
> 178
> 179
> 180
> 181
> 182
> 183
> 184
> 185
> 186
> 187
> 188
> 189
> 190
> 191
> 192
> 193
> 194
> 195
> 196
> 197
> 198
> 199
> 200
> 201
> 202
> 203
> 204
> 205
> 206
> 207
> 208
> 209
> 210
> 211
> 212
> 213
> 214
> 215
> 216
> 217
> 218
> 219
> 220
> 221
> 222
> 223
> 224
> 225
> 226
> 227
> 228
> 229
> 230
> 231
> 232
> 233
> 234
> 235
> 236
> 237
> 238
> 239
> 240
> 241
> 242
> 243
> 244
> 245
> 246
> 247
> 248
> 249
> 250
> 251
> 252
> 253
> 254
> 255
> 256
> 257
> 258
> 259
> 260
> 261
> 262
> 263
> 264
> 265
> 266
> 267
> 268
> 269
> 270
> 271
> 272
> 273
> 274
> 275
> 276
> 277
> 278
> 279
> 280
> 281
> 282
> 283
> 284
> 285
> 286
> 287
> 288
> 289
> 290
> 291
> 292
> 293
> 294
> 295
> 296
> 297
> 298
> 299
> 300
> 301
> 302
> 303
> 304
> 305
> 306
> 307
> 308
> 309
> 310
> 311
> 312
> 313
> 314
> 315
> 316
> 317
> 318
> 319
> 320
> 321
> 322
> 323
> 324
> 325
> 326
> 327
> 328
> 329
> 330
> 331
> 332
> 333
> 334
> 335
> 336
> 337
> 338
> 339
> 340
> 341
> 342
> 343
> 344
> 345
> 346
> 347
> 348
> 349
> 350
> 351
> 352
> 353
> 354
> 355
> 356
> 357
> 358
> 359
> 360
> 361
> 362
> 363
> 364
> 365
> 366
> 367
> 368
> 369
> 370
> 371
> 372
> 373
> 374
> 375
> 376
> 377
> 378
> 379
> 380
> 381
> 382
> 383
> 384
> 385
> 386
> 387
> 388
> 389
> 390
> 391
> 392
> 393
> 394
> 395
> 396
> 397
> 398
> 399
> 400
> 401
> 402
> 403
> 404
> 405
> 406
> 407
> 408
> 409
> 410
> 411
> 412
> 413
> 414
> 415
> 416
> 417
> 418
> 419
> 420
> 421
> 422
> 423
> 424
> 425
> 426
> 427
> 428
> 429
> 430
> 431
> 432
> 433
> 434
> 435
> 436
> 437
> 438
> 439
> 440
> 441
> 442
> 443
> 444
> 445
> 446
> 447
> 448
> 449
> 450
> 451
> 452
> 453
> 454
> 455
> 456
> 457
> 458
> 459
> 460
> 461
> 462
> 463
> 464
> 465
> 466
> 467
> 468
> 469
> 470
> 471
> 472
> 473
> 474
> 475
> 476
> 477
> 478
> 479
> 480
> 481
> 482
> 483
> 484
> 485
> 486
> 487
> 488
> 489
> 490
> 491
> 492
> 493
> 494
> 495
> 496
> 497
> 498
> 499
> 500
> 501
> 502
> 503
> 504
> 505
> 506
> 507
> 508
> 509
> 510
> 511
> 512
> 513
> 514
> 515
> 516
> 517
> 518
> 519
> 520
> 521
> 522
> 523
> 524
> 525
> 526
> 527
> 528
> 529
> 530
> 531
> 532
> 533
> 534
> 535
> 536
> 537
> 538
> 539
> 540
> 541
> 542
> 543
> 544
> 545
> 546
> 547
> 548
> 549
> 550
> 551
> 552
> 553
> 554
> 555
> 556
> 557
> 558
> 559
> 560
> 561
> 562
> 563
> 564
> 565
> 566
> 567
> 568
> 569
> 570
> 571
> 572
> 573
> 574
> 575
> 576
> 577
> 578
> 579
> 580
> 581
> 582
> 583
> 584
> 585
> 586
> 587
> 588
> 589
> 590
> 591
> 592
> 593
> 594
> 595
> 596
> 597
> 598
> 599
> 600
> 601
> 602
> 603
> 604
> 605
> 606
> 607
> 608
> 609
> 610
> 611
> 612
> 613
> 614
> 615
> 616
> 617
> 618
> 619
> 620
> 621
> 622
> 623
> 624
> 625
> 626
> 627
> 628
> 629
> 630
> 631
> 632
> 633
> 634
> 635
> 636
> 637
> 638
> 639
> 640
> 641
> 642
> 643
> 644
> 645
> 646
> 647
> 648
> 649
> 650
> 651
> 652
> 653
> 654
> 655
> 656
> 657
> 658
> 659
> 660
> 661
> 662
> 663
> 664
> 665
> 666
> 667
> 668
> 669
> 670
> 671
> 672
> 673
> 674
> 675
> 676
> 677
> 678
> 679
> 680
> 681
> 682
> 683
> 684
> 685
> 686
> 687
> 688
> 689
> 690
> 691
> 692
> 693
> 694
> 695
> 696
> 697
> 698
> 699
> 700
> 701
> 702
> 703
> 704
> 705
> 706
> 707
> 708
> 709
> 710
> 711
> 712
> 713
> 714
> 715
> 716
> 717
> 718
> 719
> 720
> 721
> 722
> 723
> 724
> 725
> 726
> 727
> 728
> 729
> 730
> 731
> 732
> 733
> 734
> 735
> 736
> 737
> 738
> 739
> 740
> 741
> 742
> 743
> 744
> 745
> 746
> 747
> 748
> 749
> 750
> 751
> 752
> 753
> 754
> 755
> 756
> 757
> 758
> 759
> 760
> 761
> 762
> 763
> 764
> 765
> 766
> 767
> 768
> 769
> 770
> 771
> 772
> 773
> 774
> 775
> 776
> 777
> 778
> 779
> 780
> 781
> 782
> 783
> 784
> 785
> 786
> 787
> 788
> 789
> 790
> 791
> 792
> 793
> 794
> 795
> 796
> 797
> 798
> 799
> 800
> 801
> 802
> 803
> 804
> 805
> 806
> 807
> 808
> 809
> 810
> 811
> 812
> 813
> 814
> 815
> 816
> 817
> 818
> 819
> 820
> 821
> 822
> 823
> 824
> 825
> 826
> 827
> 828
> 829
> 830
> 831
> 832
> 833
> 834
> 835
> 836
> 837
> 838
> 839
> 840
> 841
> 842
> 843
> 844
> 845
> 846
> 847
> 848
> 849
> 850
> 851
> 852
> 853
> 854
> 855
> 856
> 857
> 858
> 859
> 860
> 861
> 862
> 863
> 864
> 865
> 866
> 867
> 868
> 869
> 870
> 871
> 872
> 873
> 874
> 875
> 876
> 877
> 878
> 879
> 880
> 881
> 882
> 883
> 884
> 885
> 886
> 887
> 888
> 889
> 890
> 891
> 892
> 893
> 894
> 895
> 896
> 897
> 898
> 899
> 899 |
Texhihi napametpn
Modenb: DBS 5565
PoaHnJXnBHeHH 220-230 B,50/60 T
CnoKnBaHH noTyXHocti: 2000-2200 Bt
Ipyna eNeKtpo6e3neuHocTi:
MaKcImaJIbHa KInbKicTb BOIN B EMHOCti: 1,0 nItp
Bara HETTO: 2,85 kr
Ley npnad 6yNo nepeBipeno 3riDNo Bcix BiNobiHnx,
akTyalbHnx DnpeKTNB CE, HapnKnad 0do eNeKTpOMarHIOI
CymHOCTa Hn3bKObIbTHOI DnpeKTNB, Ta 36yDoBaHO 3 a
HOBITIM NIOJXeHHMm TexHki 6e3neKn.
-
1
GARANTIE-KARTE
Garantiebewijs · Carte de garantie