
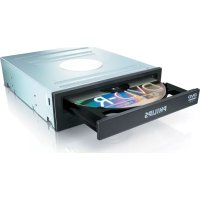
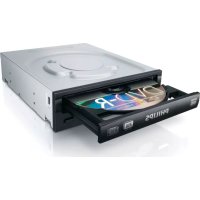
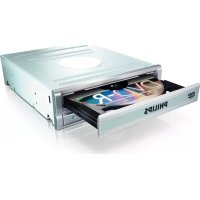
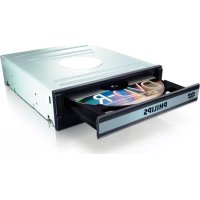
SPD3200CC - DVD Recorder PHILIPS - Free user manual and instructions
Find the device manual for free SPD3200CC PHILIPS in PDF.
| Product type | External DVD recorder |
| Brand | Philips |
| Model | SPD3200CC |
| Interface | USB 2.0 High Speed |
| Disc formats read | CD, CD-R, CD-RW, DVD-ROM, DVD-Video, DVD+R, DVD+R double layer, DVD+RW, DVD-R, DVD-R Dual layer, DVD-RW |
| Maximum write speed (CD-R) | 48x |
| Maximum write speed (CD-RW) | 24x |
| Maximum write speed (DVD+R) | 16x |
| Maximum write speed (DVD+R double layer) | 8x |
| Maximum write speed (DVD+RW) | 8x |
| Maximum write speed (DVD-R) | 16x |
| Maximum write speed (DVD-R Dual layer) | 4x |
| Maximum write speed (DVD-RW) | 6x |
| Maximum read speed (CD) | 48x |
| Maximum read speed (DVD) | 16x |
| Average access time | 160 ms |
| Buffer size | 2 MB |
| Power supply | External AC adapter |
| Operating temperature | 5 to 40 °C |
| Storage temperature | -20 to 60 °C |
| MTBF | 75,000 hours |
| Software included | Nero |
| Maintenance | Clean discs from the center outward with a soft cloth. Do not use solvents. |
| Safety | Avoid humidity, heat, dust. Do not block ventilation openings. |
Frequently Asked Questions - SPD3200CC PHILIPS
User questions about SPD3200CC PHILIPS
0 question about this device. Answer the ones you know or ask your own.
Ask a new question about this device
Download the instructions for your DVD Recorder in PDF format for free! Find your manual SPD3200CC - PHILIPS and take your electronic device back in hand. On this page are published all the documents necessary for the use of your device. SPD3200CC by PHILIPS.
USER MANUAL SPD3200CC PHILIPS
UK
Contents
How to connect the SPD3200CC to my computer? 5
How to disconnect the SPD3200CC without shutting down the computer? 15
How to print a label on a disc? 17
How to capture video from a digital DV-camcorder? 25
How to make a video disc from video
files which are on the hard disk or a disc? 29
How to copy a disc? 35
How to make a Data disc? 39
How to make an Audio disc? 45
Warranty, Environment, Safety,
Frequently Asked Questions (FAQ) and Specifications 51
D
Inhalt
How to connect the SPD3200CC to my computer?
The next pages show how to connect your new SPD3200CC to a computer. Since there are many brands and types of computers available, the next photographs show only examples on how your SPD3200CC could be installed. For specific information on your computer, please refer to your computer manual or contact your local dealer.
1
The image is too blurry to recognize any text content.
The image is too blurry to recognize any text content.
natural_image
Three electronic devices labeled A, B, and C: a black device with ports, a black charger, and two white cables (no visible text or symbols on the devices themselves)UK You will find a SPD3200CC device and following cables in the retail box:
A: SPD3200CC device.
B: Power supply (2 parts).
C: HiSpeed USB Cable.
UK At the back side, you will find the plugs you need for connecting your SPD3200CC to your computer.
A: Power.
B: HiSpeed USB.
C: Audio connector.
UK Connect the power cables together and connect them to the SPD3200CC and a power outlet.
natural_image
Hand holding a black USB port connected to a Philips 11H device (no visible text or symbols on the device body)4
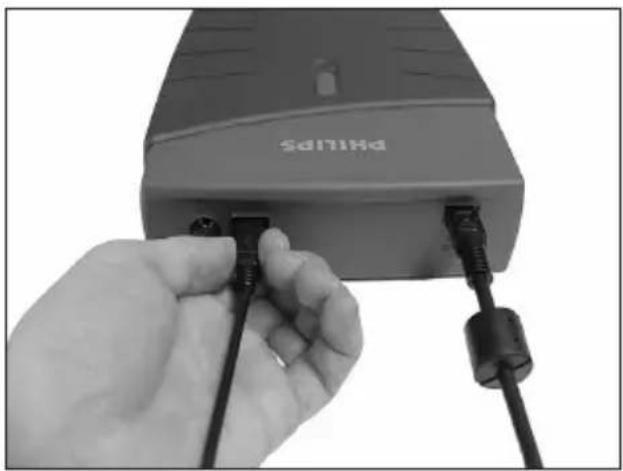
UK Plug the USB cable in the SPD3200CC. Do not connect the cable to the computer at this moment.
natural_image
Hand inserting a USB cable into a device labeled 'SALMA' (no additional text or symbols visible)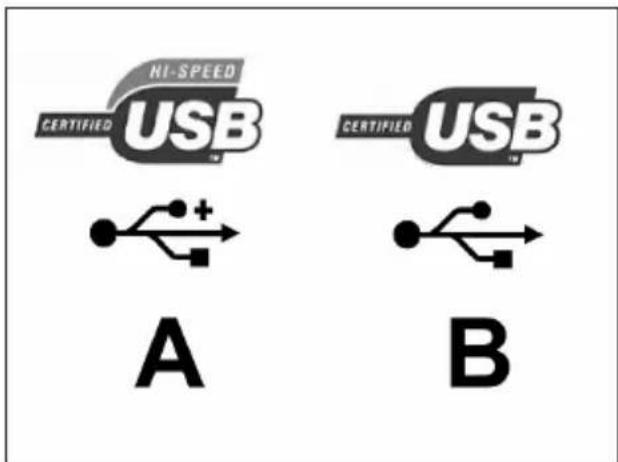
UK Search for the HiSpeed USB connector on your PC.
A: Logo for the preferred HiSpeed USB or connector. B: Logo for the alternative LowSpeed USB connector. When connected to LowSpeed USB (or USB 1.x), speeds are limited (4x writing and 6x reading on CD, 0,7x reading on DVD) and it is not possible to write on DVD or to watch video.
UK Windows XP will warn you when you connect the SPD3200CC to a slow USB 1 connection. Check step 5 again. This is valid for Windows XP only.
natural_image
Hand holding a CD into a Philips flash drive (no visible text or symbols on the CD or background)11
UK Windows 98 Second Edition only! Insert the Nero disc in the CD-ROM device of your computer, not in the SPD3200CC. If you do not have a CD-ROM device on your computer, please refer to the Frequently Asked Questions.
UK Windows 98 Second Edition only!
The "Add New Hardware Wizard" will pop up. Follow these steps:
A. Click "Next" in "The wizard searches for new drivers...".
B. Choose "Search for the best drivers...".
C. Choose "Specify a location".
D. Browse to the directory "Philips drivers" on the Nero disc and click Next.
E. The drivers will be installed.
F. Continue with step 15.
D Nur Windows 98 Second Edition!
UK Click on "Install Suite" to install the main software. The software will ask to reboot the PC at the end of the installation process.
UK After installing the software, you should reboot your computer.
Congratulations. Your Philips device is now ready for use.
How to use it and what software applications you need to perform your tasks, is described in the next chapters of this How To Manual.
Find more info on www.philips.com/storage
Find updates on on www.philips.com/storageupdates
How to disconnect the SPD3200CC without shutting down the computer?
The next pages show how to disconnect your new SPD3200CC to a computer. The screenshots are representing the Microsoft Windows XP™ operating system. Other operating systems may show different popups.
-
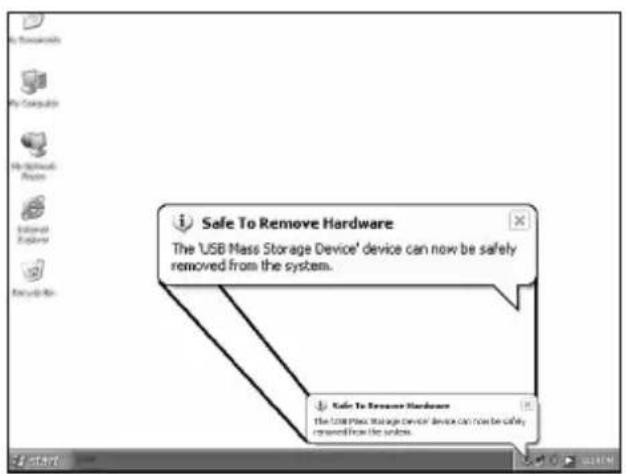
UK Click on "Safely remove USB...".
D Klicken Sie auf "USB auf sichere Weise entfemen...".
F Cliquez sur "Safely remove USB" (Retirer un périphérique USB en toute sécurité...).
Fate clic su "Rimozione sicura USB...".
NL Klik op "USB veilig verwijderen...".
2
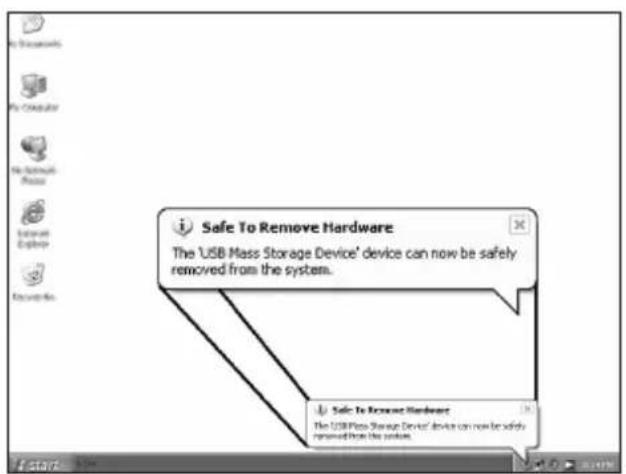
UK When this popup appears, you may disconnect the SPD3200CC.
D Wenn diese Anzeige erscheint, können Sie die Verbindung zum SPD3200CC trennen.
F Lorsque ce message apparaît, vous pouvez déconnecter l'SPD3200CC.
1 Quando compare questo messaggio potete scollegare l'SPD3200CC.
NL Als dit venster verschijnt, kunt u de SPD3200CC ontkoppelen.
3

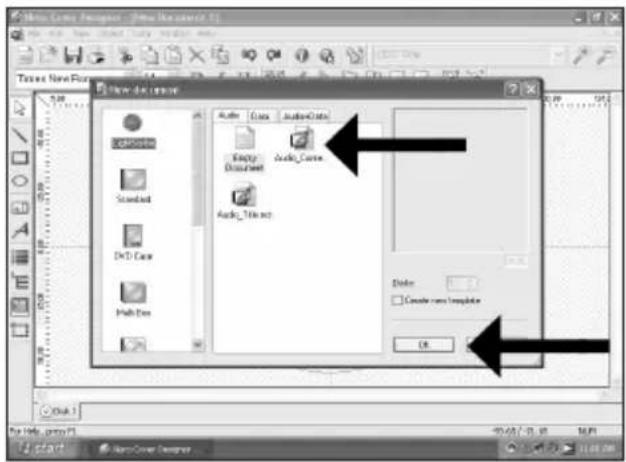
How to print a label on a disc?
This manual will show you how to print a label on a disc using the LightScribe™ functionality.
This can only be done on discs, which have the LightScribe™ label, not on "printable" discs. Below is an example of this logo.
-
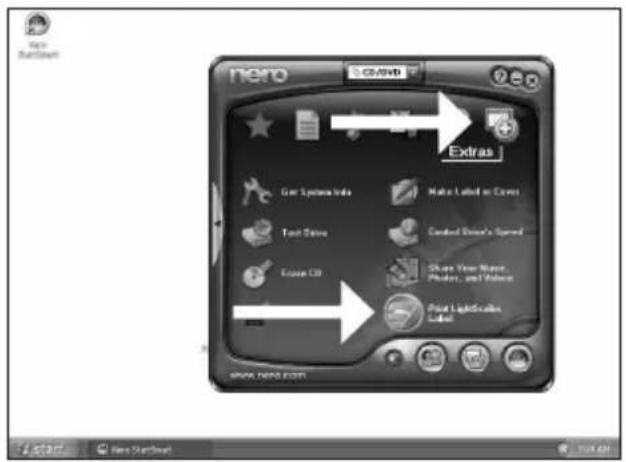
UK Choose "Extra" and "Print LightScribe Label".
D Wählen Sie "Extras" und "LightScribe Label drucken".
F Choisissez "Extras" puis "Imprimer l'étiquette LightScribe".
1 Selezionate "Extra" e "Stamp. Etichetta LightScribe".
NL Selecteer "Extra" en "LightScribe afdrukken".
![New Cover Designer - [Drive Dev abper] File Edit View Object Data Window Open Ctrl+0 Close Save Close Save As... Save As Template... TWAB Font... Ctrl+0 Print Print... Font Sets... Paper Stocks... Font Light Colors label... Light shades Print Preview Preferences... 1 Text_Filk.txt Cut View up documents 82.451.00:05 Next Cover Designer Next Cover Designer](/content/2026/02/384218/images/7cc14a5fbe3535b9fa218afd981b07c2892394de39d4c67a912f7c4f78097382.jpg)
5
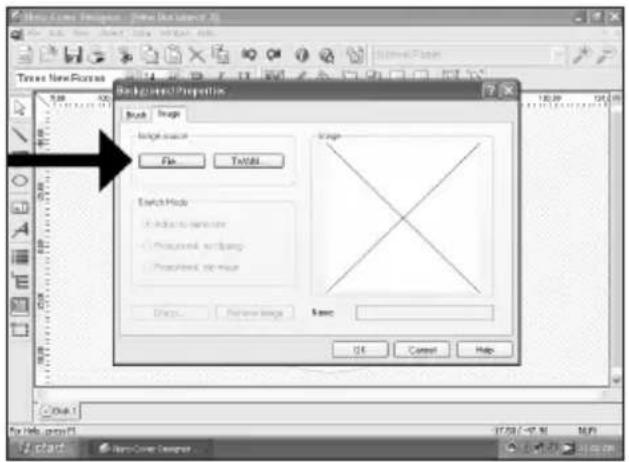
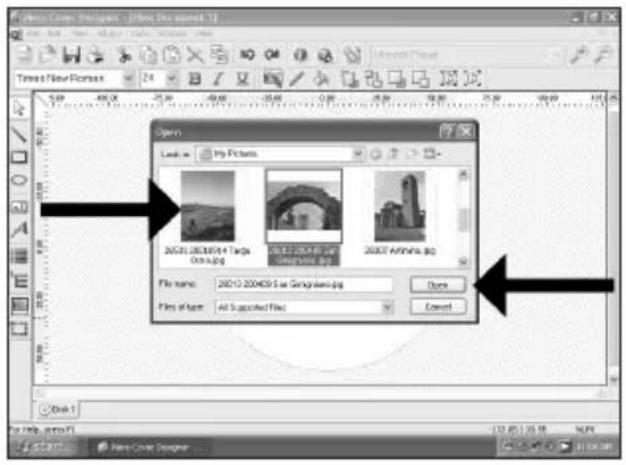
UK You can import a picture to fill the complete surface of the disc by double clicking on the working area. Click on "File".
D Sie können ein Bild importieren, um die komplette Oberfläche der Disc auszufüllen, indem Sie den Arbeitsbereich doppelt anklicken. Klicken Sie auf "Datei".
F Vous pouvez importer une image pour remplir la surface du disque en double-cliquant sur la zone de travail. Cliquez sur "Fichier".
1 Facendo doppio clic sull'area di lavoro è possibile importare un'immagine per coprire completamente la superficie del disco. Fate clic su "File".
NL U kunt een afbeelding importeren om het volledige oppervlak van de disc mee te vullen door te dubbelklikken op het werkgebied. Klik op "Bestand".
6
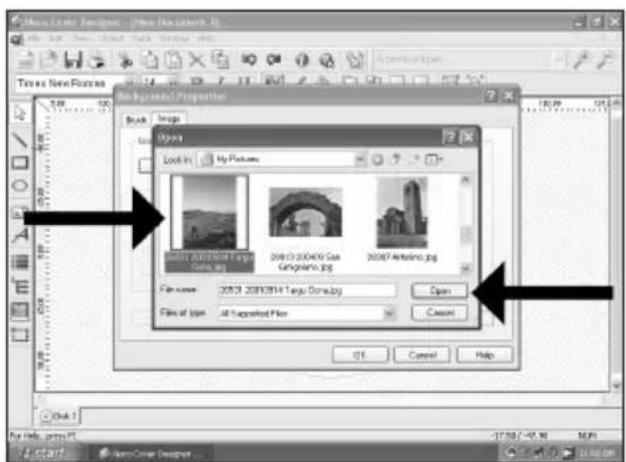
UK Choose your background image and click "Open".
D Wählen Sie Ihr Hintergrundbild und klicken Sie auf "Öffnen".
F Choisissez l'image d'arrière-plan puis cliquez sur "Ouvrir".
1 Selezionate l'immagine di sfondo e fate clic su "Apri".
NL Selecteer het achtergrondbeeld en klik op "Openen".
![My Store Designer - [Movie (Access)] New York Times Times New Forms File Approval Properties Book Image Lock In My Pictures 2017 2018/2019 Page Gingiano.jpg 2018 201906 Gas Gingiano.jpg 20187 Antenna.jpg File name: 2017 2018/2019 Page Gingiano.jpg Open File of type: All Suppressed Files Cancel OK Cancel Help File Edit View Help View History... Start New Store Designer](/content/2026/02/384218/images/eeff7112a9311f460a82e34776f1ca79c353670005da30cf5589b691fa607a95.jpg)
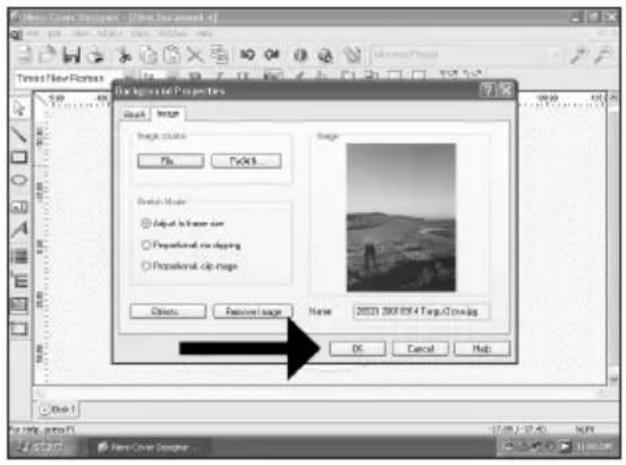
UK Click "OK".
D Klicken Sie auf "OK".
F Cliquez sur "OK".
Fate clic su "OK".
NL Klik op "OK".
![Photo Cook Designer - [Time Dev ment 4.1*] File Edit View Object Data Window Help View: New Document 0 1 2 3 4 5 6 7 8 9 10 11 12 13 14 15 16 17 18 19 20 21 22 23 24 25 26 27 28 29 30 31 32 33 34 35 36 37 38 39 40 41 42 43 44 45 46 47 48 49 50 51 52 53 54 55 56 57 58 59 60 61 62 63 64 65 66 67 68 69 70 71 72 73 74 75 76 77 78 79 80 View: New Document 0 1 2 3 4 5 6 7 8 9 10 11 21 31 41 51 61 71 81 91 101 111 121 131 141 151 161 171 181 191 201 211 221 231 241 251 261 271 281 291 301 311 321 331 341 351 361 371 381 391 401 411 421 431 441 451 461 471 481 491 501 511 521 531 541 551 561 571 581 591 601 611 621 631 641 651 661 671 681 691 701 711 721 731 741 751 761 771 781 791 801 811 821 831 841 851 861 871 881 891 901 911 921 931 941 951 961 971 981 991](/content/2026/02/384218/images/cae371f36595bed392abc8228d029bde084b97527aba4ba89c71b4c222ffc028.jpg)
UK Click on the "Text Box Tool" to enter text. If you only print text, the disc will be printed faster.
D Um Text einzugeben, klicken Sie auf "TextBox-Werkzeug". Wenn Sie nur Text drucken, wird die Disc schneller gedruckt.
F Cliquez sur l'outil "Boîte de Texte" pour saisir le texte. Si vous imprimez seulement du texte, l'impression du disque sera plus rapide.
Fate clic su "Strumento riquadro testo" per inserire del testo. Se il contenuto è solo testo, la stampa avverrà con maggiore rapidità.
NL Klik op "Tekstvak" om tekst in te voeren. Als u alleen tekst afdrukt, wordt de disc sneller bedrukt.
natural_image
Screenshot of Photo Cook Designer interface showing a circular landscape photo with measurement rulers and a camera rig (no readable text or symbols)11
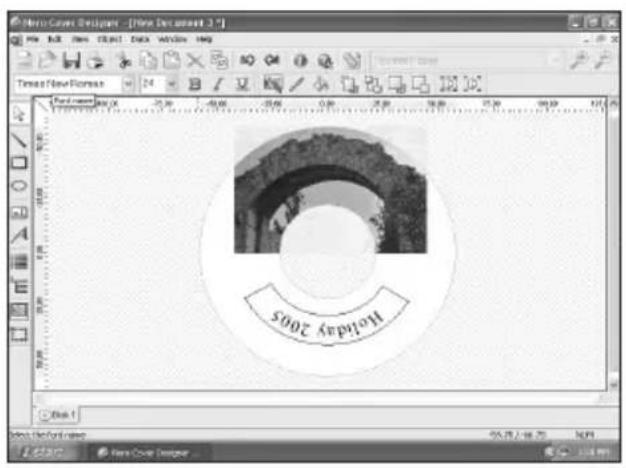
UK This is how the background and the text will look.
D Hintergrund und Text werden folgendermaßen aussehen.
F Voici l'aspect de l'arrière-plan et du texte.
Ecco un'anteprima del testo e dello sfondo specificati.
NL Hier ziet u hoe de achtergrond en de tekst eruit zullen zien.
![New Cover Designer - [New Document 4.7] New Cover Designer Texas New Romanas Holiday 2005](/content/2026/02/384218/images/4f3ac47ec144b0fdac1726080f5ea5c8f0e8c8a8053a68156909f4073f1bc97e.jpg)
12
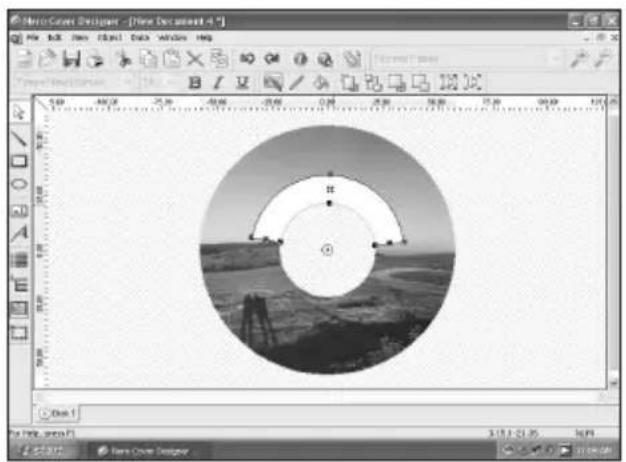
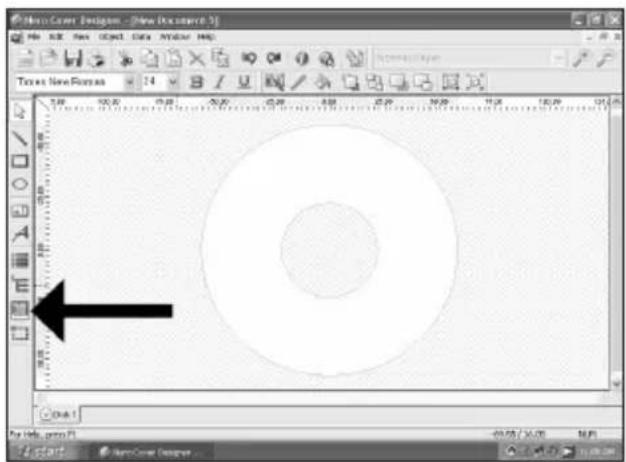
UK Alternatively, you can also position a picture where you like on the disc area. Click on the "Image Tool".
D Alternativ können Sie auch ein Bild an beliebiger Stelle auf der Disc-Fläche anordnen. Klicken Sie auf das "Bild-Werkzeug".
F Sinon, vous pouvez également placer une image à l'endroit de votre choix sur le disque. Cliquez sur "l'Outil image".
In alternativa, è anche possibile posizionare un'immagine sull'area del disco. Fate clic su "Strumento immagine".
NL U kunt een afbeelding ook op een willekeurige plek op het discoppervlak plaatsen. Klik op "Afbeelding".
![New Cover Designer - [New Document 5] File Edit View Object Data Window Help Times New Roman 24 100.00 100.00 100.00 100.00 100.00 100.00 100.00 100.00 100.00 100.00 100.00 100.00 100.00 100.00 100.00 [ ] [ ] [ ] [ ] [ ] [ ] [ ] [ ] [ ] [ ] [ ] [ ] [ ] [ ] [ ] [ ] [ ] [ ] [ ] [ ] [ ] [ ] [ ] [ ] [ ] [ ] [ ] [ ] [ ] [ ] [ ] [ ] [ ] [ ] [ ] [ ] [ ] [ ] [ ] [ ] [ ] [ ] [ ] [ ] [ ] [ ] [ ] [ ] [ ] [ ] [ ]](/content/2026/02/384218/images/369abe05549578e2b6c17d8235762de0a9b9f38774ec1bd98f8d526541271144.jpg)
natural_image
Screenshot of a graphic design software interface showing a circular frame with an arch and a central circular feature, displayed within a blank canvas.UK Position the image so that it looks nice.
D Positionieren Sie das Bild so, dass das Ganze gut aussieht.
F Placez l'image telle que vous souhaitez la voir apparaître sur le disque.
1 Posizionate l'immagine sul disco.
NL Plaats de afbeelding zodanig, dat u een fraai ogende disc krijgt.
17
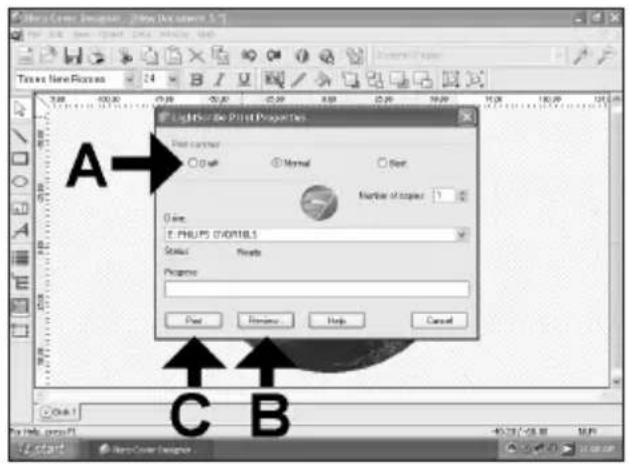
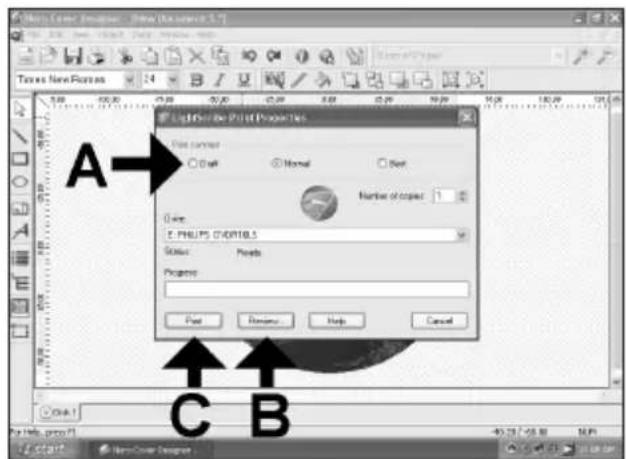
UK Choose the print quality (A). You can see a preview (B) and start printing (C).
D Wählen Sie den Druckkontrast (A).
Sie können sich eine Vorschau (B) ansehen und dann den Druckvorgang starten (C).
F Choisissez la qualité d'impression (A). Vous pouvez afficher un perçu avant impression (B) puis lancer l'impression (C).
I Selezionate il contrasto stampa (A). E' possibile vedere un'anteprima (B) ed avviare la stampa (C).
NL Selecteer de afdrukkwaliteit (A). U kunt een voorproof (B) bekijken en beginnen met afdrukken (C)
18
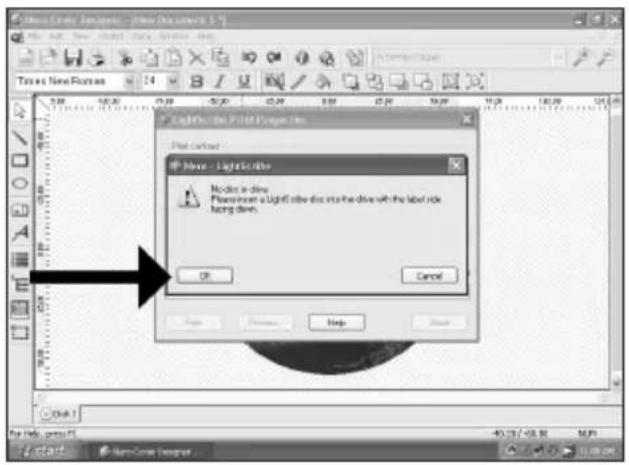
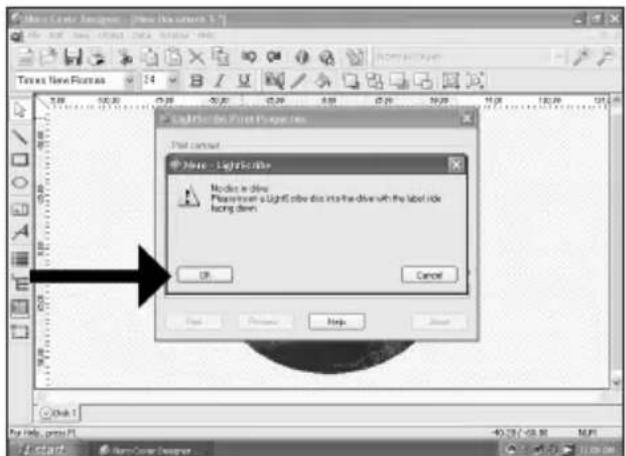
UK Insert a Lightscribe disc, the label facing down and click "OK".
D Legen Sie eine Lightscribe Disc mit dem Logo nach unten ein und klicken Sie auf "OK".
F Insérez un disque Lightscribe l'étiquette vers le bas, puis cliquez sur "OK".
Inserite un disco Lightscribe con l'etichetta rivolta verso il basso e fate clic su "OK".
NL Plaats een Lightscribe-disc met de bedrukte zijde naar beneden en klik op "OK".

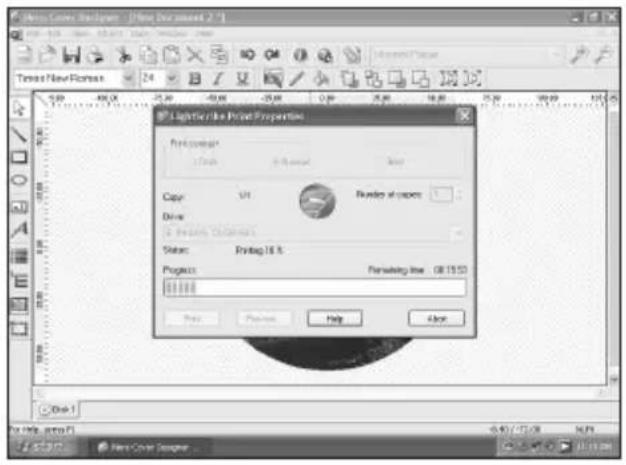
UK The disc is now printed.
D Jetzt wird die Disc bedruckt.
F L'impression du disque commence.
Il disco viene quindi stampato.
NL De disc-label wordt nu afgedrukt.
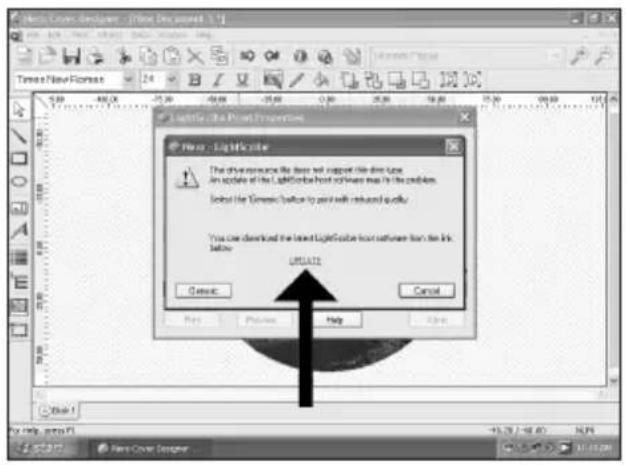
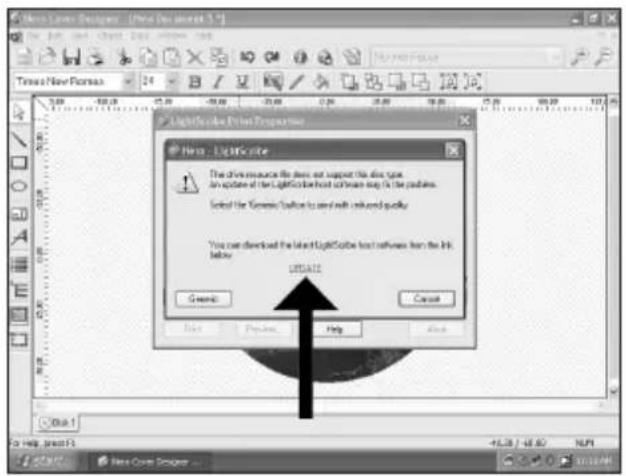
UK You may be asked to update your LightScribe application when this is required to ensure good printing quality. Click "To download the latest LightScribe Host software click here".
D Eventuell werden Sie aufgefordert, Ihre LightScribe Anwendung zu aktualisieren, wenn dies erforderlich ist, um eine gute Druckqualität zu gewährleisten. Klicken Sie auf "To download the latest LightScribe Host software click here".
F Vous pouvez également être amené à mettre à jour votre application LightScribe si nécessaire pour bénéficier d'une bonne qualité d'impression. Cliquez sur "To download the latest LightScribe Host software click here" (mettre à jour).
Per garantire sempre una buona qualità di stampa può venire richiesto di effettuare l'aggiornamento dell'applicazione LightScribe. Fate clic su "To download the latest LightScribe Host software click here".
NL Er kan u worden gevraagd of u uw LightScribe-toepassing wilt bijwerken als dit nodig is om een goede afdrukkwaliteit te garanderen. Klik op "To download the latest LightScribe Host software click here".
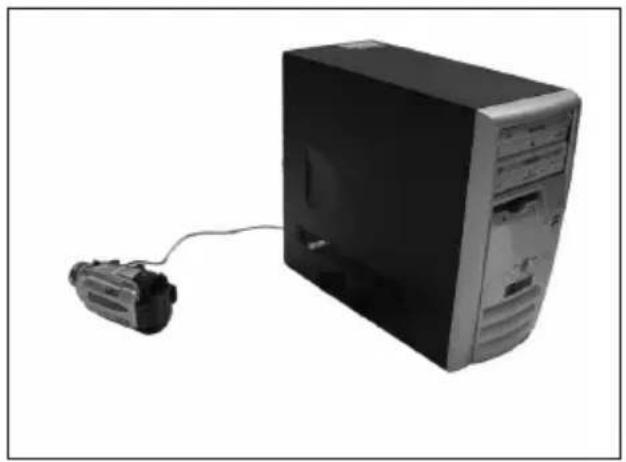
How to capture video from a digital DV-camcorder?
This manual shows an example on how to capture video from a digital DV-camcorder which is connected via FireWire (IEEE1394) to the computer.
The image is too blurry to recognize any text content.
The image is too blurry to recognize any text content.
The application software used here is: Nero Vision Express from Nero AG

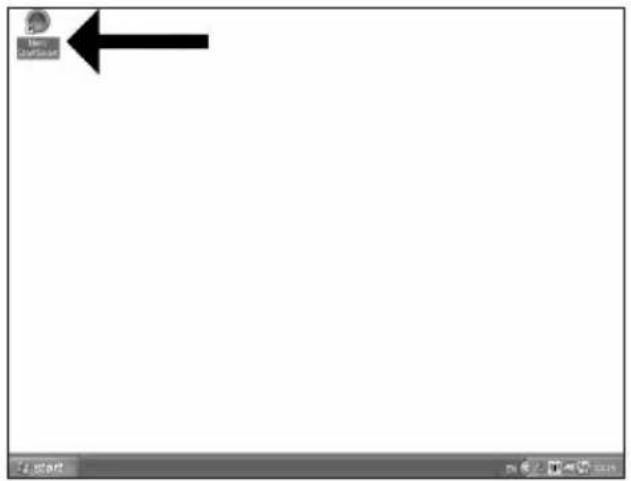
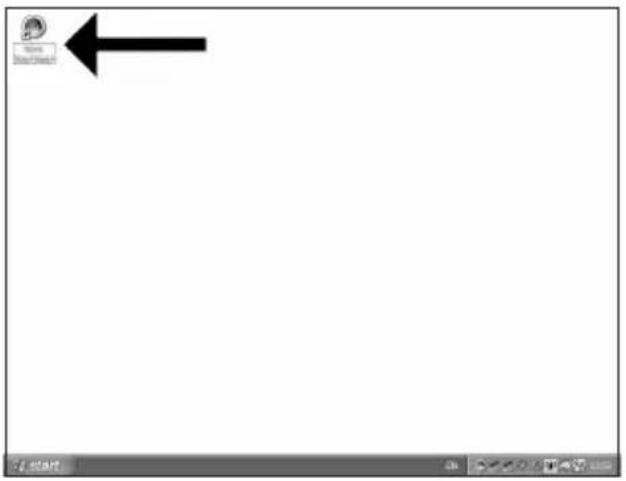
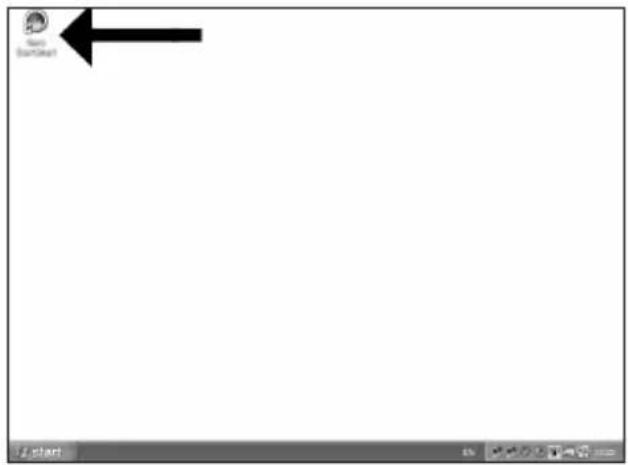
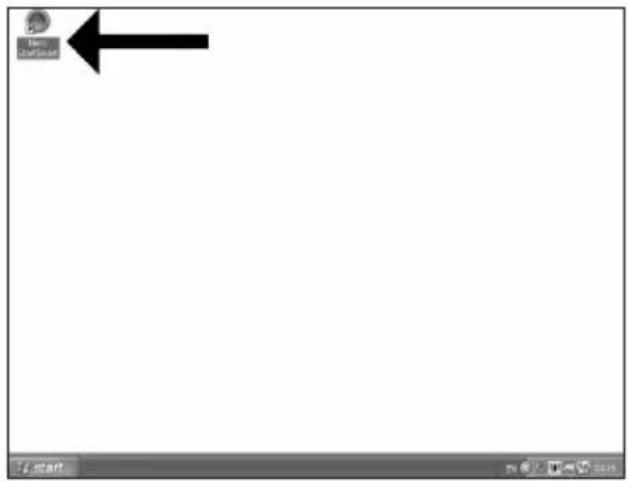
UK Start "Nero StartSmart" from the desktop.
D Starten Sie "Nero StartSmart" von Ihrer Oberfläche aus.
F Lancez "Nero StartSmart" depuis le bureau.
1 Aprire "Nero StartSmart" dal desktop.
NL Start "Nero StartSmart" vanaf het bureaublad.
natural_image
Black-and-white photo of a desktop computer tower connected to a cable via a cable (no visible text or labels)UK Connect your camera to the computer and switch it on.
D Verbinden Sie Ihre Kamera mit dem Computer und schalten Sie sie ein.
F Connectez votre caméra à l'ordinateur et allumez-la.
1 Collegare la camera al computer ed accendere.
NL Sluit uw camera op de computer aan en schakel hem in.

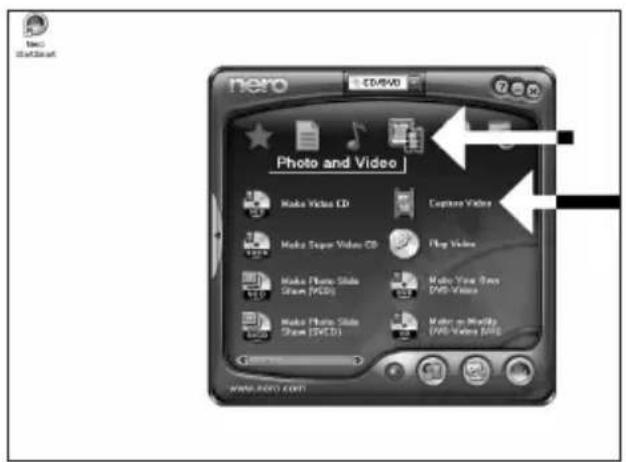
UK Choose "Photo and video" and click "Capture video".
D Wählen Sie "Photo und Video" und klicken Sie auf "Video aufnehmen".
F Choisissez "Photo et vidéo" puis cliquez sur "Capturer une vidéo".
1 Selezionare "Foto e video" e fare clic su "Cattura video".
NL Kies "Foto en video" en klik op "Video vastleggen".
4
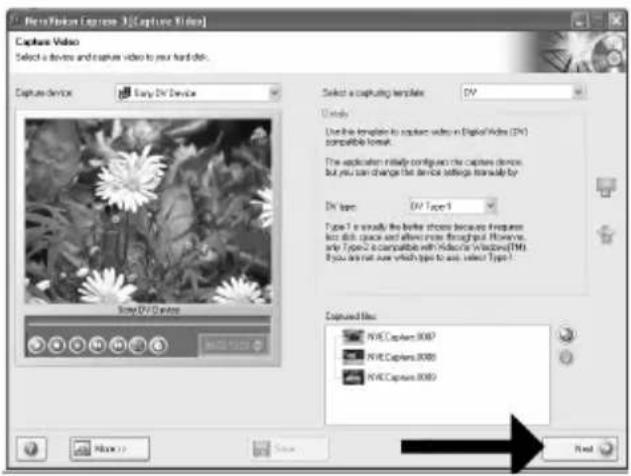
UK Choose your DV-Camcorder and use the buttons to control your DV-camera. Press the "Record" button to record video.
D Wählen Sie Ihren DV-Camcorder und benutzen Sie die Tasten, um Ihre DV-Kamera zu steuem. Drücken Sie die Taste "Aufnehmen", um Videoinformationen aufzunehmen.
F Choisissez votre caméscope DV et utilisez les boutons de commande. Appuyez sur le bouton "Enregistrer" pour enregistrer de la vidéo.
1 Selezionate il Camcorder DV ed utilizzate i tasti per controllare la camera-DV. Premere il tasto "Registra" per registrare il video.
NL Selecteer uw DV-Camcorder en gebruik de knoppen om uw DV-camera te bedienen. Druk op de knop "Opnemen" om videobeelden op te nemen.
![NewVision License 3[Capture Video] Capture Video Select a device and capture video in your hard disk. Capture devices Soap DV Device DV Details Use this description to capture video in Digital Video (DV1) compatible format. The application initially configes the capture device. but you can change the device settings manually by. DV type: DV Type 1 Type 1 is usually the before choose because I computer to a file space and allows have successfully. However, only Type 2 is compatible with Video to Windows [TM]. If you can not care which type to save, select Type 1.](/content/2026/02/384218/images/e7136f043ed36761dfeb538b28e0efb65d072b84512b8f05fdb9b5e0fe90abc4.jpg)
5
UK During capturing, you will see the progress here.
D Während der Aufnahme sehen Sie hier den Fortschritt.
F La progression de l'acquisition est affichée ici.
Durante la cattura qui viene visualizzata la sua progressione.
NL Tijdens het opnemen ziet u hier de voortgang.
![CorelDRAW Legacy 3 [Capture Video] Capture Video Select a device and capture Video to your hard disk. Capture devices Copy PDF Document Capture capturing templates: Default Use the image file or image files (or this file is available in this image file) The image file contains images for the content file (which contains the image file on the image file). PDF type: The Type 1 Type 1 is usually the content class because it requires this file is used and allows users through your website, or write from a web page. If you use a web page with a link to a web page, then use a link to a web page with a link to a web page. Copying information from captured/slapped ISO](/content/2026/02/384218/images/4f5a19059105663bdb3b423da19a06e2deed901667b03c2e47894305513d1c42.jpg)
6
UK When all video sequences are captured, click "Next".
D Wenn alle Videosequenzen aufgenommen sind, klicken Sie auf "Weiter".
F Une fois l'acquisition de toutes les séquences vidéo terminée, cliquez sur "Suivant".
Dopo aver catturato tutte le sequenze video, fare clic su "Avanti".
NL Na het opnemen van alle videofragmenten klikt u op "Verder".
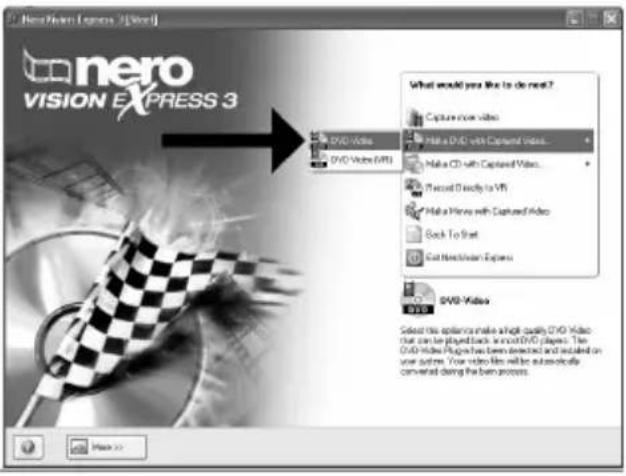
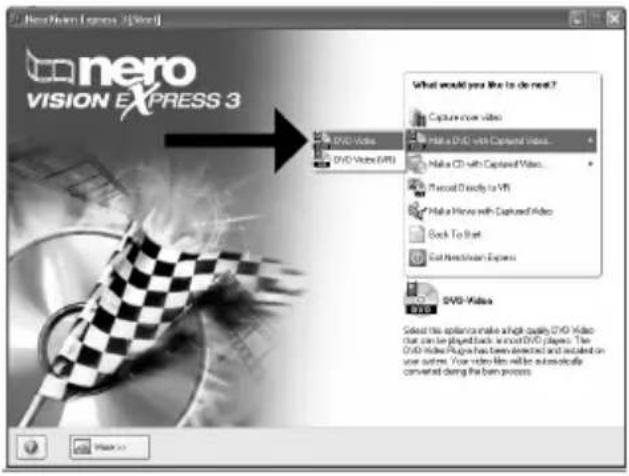
UK Choose "Make DVD with captured video" and "DVD-Video".
D Wählen Sie "DVD mit aufgenommenen Videodaten erstellen" und "DVD-Video".
F Choisissez "Créer un DVD avec la vidéo capturée" et "DVD-Vidéo".
Selezionare "Crea DVD con video acquisito" e "DVD-Video".
NL Kies "DVD met vastgelegde video maken" en dan "DVD-Video".
How to make a video disc from video files which are on the hard disk or a disc?
This manual will show you how to make a DVD-Video from source files which are stored on your hard disc or on one or more discs and that can be played in most DVD-players.
A DVD Video is a DVD disc with video files in a special format, which you can play on a DVD Video Player or on a DVD-ROM.
[NO TEXT]
The application software used here is: Nero Vision Express from Nero AG
UK Start "Nero StartSmart" from the desktop.
D Starten Sie "Nero StartSmart" von Ihrer Oberfläche aus.
F Lancez "Nero StartSmart" depuis le bureau.
1 Aprire "Nero StartSmart" dal desktop.
NL Start "Nero StartSmart" vanaf het bureaublad.

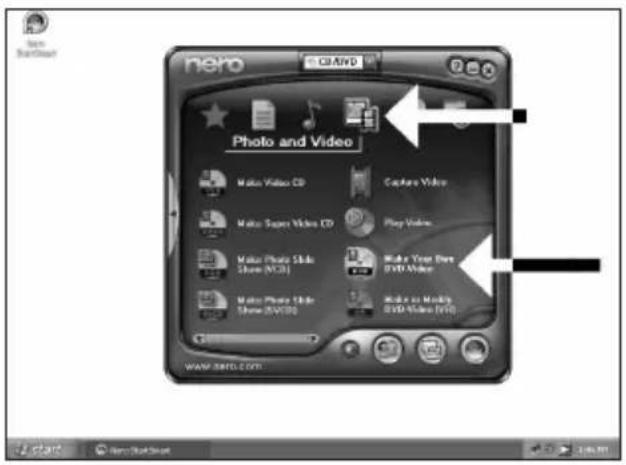
UK Choose "Photo and video" and "Make DVD-Video".
D Wählen Sie "Foto und Video" und "Eigenes DVD-Video erstellen".
F Choisissez "Photo et vidéo" puis cliquez sur "Créer votre propre DVD-vidéo".
Selezionare "Foto e video" e "Creare il proprio DVD-Video".
NL Kies "Foto en video" en dan "Maak uw eigen DVD-Video".
![Untitled Project [SMD Video] - MacroVideo Express 3 Content Create and manage files for your project What would you like to do? Capture Video... Add Video From... Video Move... Video Slide Show... Insert Dot... Play Action... Create Image... Add Video Files... Here, you can select one or more video files less you had drive or click and add them to your project. Used space: 0.00 out of 4.28 GB 0.000 1.00 2.00 3.00 4.00 More > Save Save Back](/content/2026/02/384218/images/ff8c9ad254cf4b068d8effa0370c2b2c809cdcf1b14e793e60f71694638e77ff.jpg)
5
UK The movies you loaded are shown here. You can edit them by choosing "Edit Movie".
D Hier werden die geladenen Filme gezeigt. Sie können sie editieren, indem Sie "Film bearbeiten" wählen.
F Les films que vous venez de charger sont répertoriés ici. Vous pouvez les monter en choisissant "Editer le film".
1 Qui sono visualizzati i filmati caricati.
E' possibile modificarli selezionando "Modifica Filmato".
NL Hier ziet u welke bestanden u hebt toegevoegd. U kunt die bewerken door "Film bewerken" te kiezen.
![UnifinalProject * [DVD Video] - NewFlakes Express 3 Content Create and recognize to your project. 1. VT5_01 8001 Video Title: In 80m X6 Target video option: 708+576 (CDR/601 01) - 4.3 2. VT5_01 8001 Video Title: In 80m X7 Target video option: 708+576 (CDR/601 01) - 4.3 3. VT5_01 8001 Video Title: In 80m X7 Target video option: 708+576 (CDR/601 01) - 4.3 What would you like to do? Capture Video... Add Video Data... Make Movies... Make Slide Stores... Import Data Edit Image... Create Channels... Last you click the highlighted video title User space: $5K out of 4.30 GB 0.000 1.000 2.000 3.000 4.000 More... Next Save Next Such Next](/content/2026/02/384218/images/091f02637a61c319022f56f6591aa7a9c1eb3746e38aff8664b86b339203ca98.jpg)
6
UK In the Edit Movie screen, you can add video effects, text effects and transitions.
D Auf der Anzeige Edit Movie können Sie Video-effekte, Texteffekte und Übergänge hinzufügen.
F L'écran Edit Movie vous permet d'ajouter des effets vidéo et textuels, ainsi que des transitions.
Nello schermo Edit Movie, è possibile aggiungere effetti video, effetti testo e transizioni.
NL In het scherm "Edit Movie" kunt u video- en teksteffecten en overgangen toevoegen.
![File Edit / Project * [2003-Video] - New Vision Express 3 PHILIPS My Media Map VTR-DL0003 Import Export Save Next](/content/2026/02/384218/images/409ab7d7e1e9f5b29713207ebc71993e68751751655fb9a34ee0ec8458a29865.jpg)
![Untitled Project * [DVD-Video] - NewWindow Express 3 PHILIPS My Web1.dwg V70_28.0005 File Edit View Help Import Export Save Next](/content/2026/02/384218/images/46ee2e51d69ed84fda02e7f2995926d86e057c968a2b75783fe92188f1069d4e.jpg)
UK You can also trim the recorded video. When done, choose "Next".
UK After editing all files, choose "Next".
UK Enter the title in the "Header" field and click "Edit menu" to change the layout and background of the disc menu.
UK You can change the layout, the background, add titles, ... here. When done, choose "Next".
11
UK You can preview the finished movie by pressing on the thumbnails. When done, choose "Next".
12
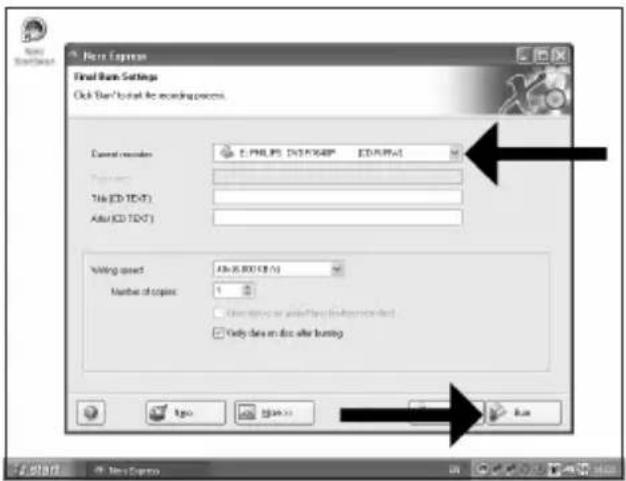
UK Choose "Burn to", choose your recorder and choose "Burn".
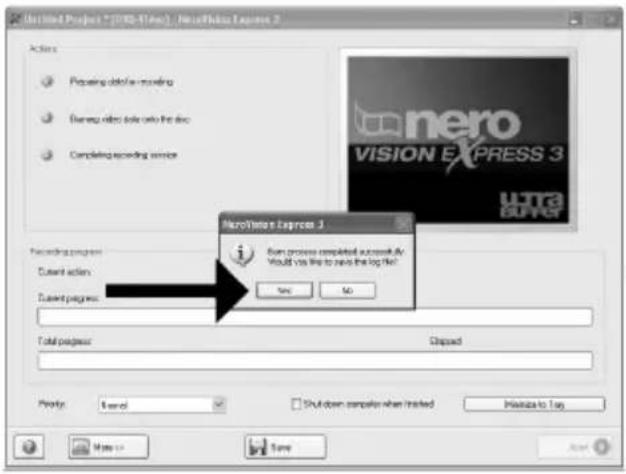
![Untitled Project * [0780-Video] - New Flakes Express 3 Actions Preparing data is recording Warning video data onto the class Completing encoding service PHILIPS Recording progress Current session: Transmitting and writing NT$_01.0004 Download progress: Resetting On 10x 20s Expired On 62x 85x Total progress: Resetting On 10x 20s Expired On 62x 85x Preview: Shut down computer when limited Import to Top Make up Save About](/content/2026/02/384218/images/3a1c8e056f63f403662ca14cb4cba38ab910573a9ee19a8a89c693365526c0bf.jpg)
UK NeroVision Express is transcoding and burning your disc.
D NeroVision Express transcodiert und brennt Ihre Disk.
F NeroVision Express procède au transcodage et à la gravure de votre disque.
NeroVision Express è in fase di trascodifica e scrittura del disco.
NL NeroVision Express zet de informatie om en brandt die op de disc.
This manual shows an example of how to copy a disc.
[NO TEXT]
The application software used here is: Nero - Burning Rom from Nero AG
UK Start "Nero StartSmart" from the desktop.
D Starten Sie "Nero StartSmart" von Ihrer Oberfläche aus.
F Lancez "Nero StartSmart" depuis le bureau.
1 Aprire "Nero StartSmart" dal desktop.
NL Start "Nero StartSmart" vanaf het bureaublad.
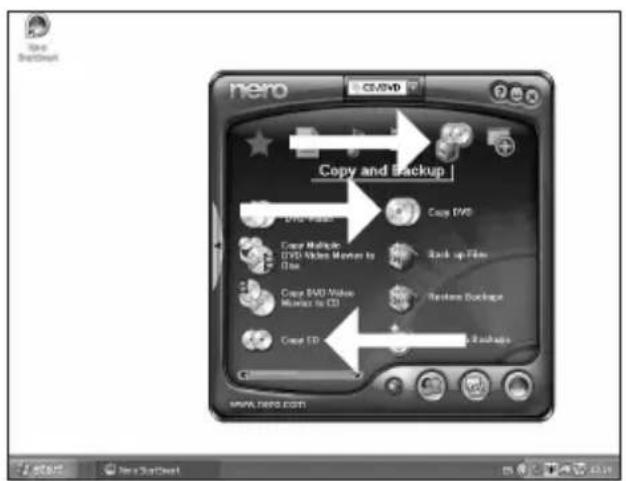
UK Choose "Copy and Backup" and click "Copy CD" or "Copy DVD".
D Wählen Sie "Kopieren und Sichem" und klicken Sie auf "CD kopieren" oder "DVD kopieren".
F Choisissez "Copier et sauvegarder" puis cliquez sur "Copier CD" ou "Copier DVD".
1 Selezionare "Copia e Backup" e fare clic su "Copia CD" ovvero "Copia DVD".
NL Kies "Kopiëren en backup" en klik op "CD kopiëren" of "DVD kopiëren".
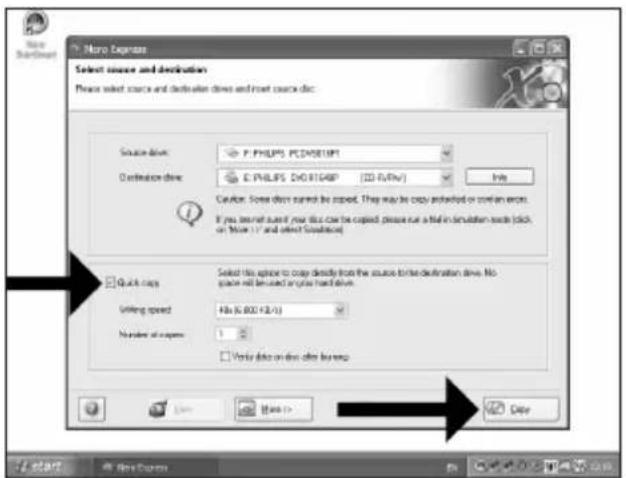
![None Express Select source and destination. Please select source and destination drives and insert source drives. Source drive: E.PHILIPS PC2/5376P1 Destination drive: E.PHILIPS EVCRTG4KP [CD-057A] Custom Time does not be copied. They may be copy protected in certain errors. If you are not sure if your disk can be aspect, please run a train simulation mode (click an Mean 19 and select Simulary) Quick copy Select the option to copy directly from the source to the destination drive. No space will be contained you next drive. Winning speed: Altx (GB) KG/kg Number of copies: 1 ✓ Verify data as close when learning](/content/2026/02/384218/images/b1747249bc11b3166dc461cf4da02b2649f30f5c1f67818a8812a369ae7a95d9.jpg)
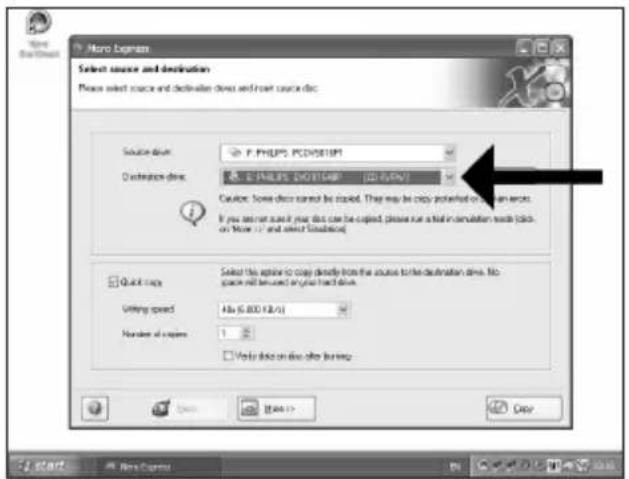
UK Choose the source drive and insert the source disc in this drive.
D Wählen Sie das Quelllaufwerk und legen Sie die Quell-Disk in dieses Laufwerk ein.
F Choisissez le disque source puis insérez-le dans le lecteur source.
1 Selezionare lettore sorgente ed inserire il disco di origini in questa unità.
NL Kies het bronstation en leg de bronschijf in dat station.
4
UK Choose the destination drive.
D Wählen Sie das Ziellaufwerk.
F Choisissez l'unité de destination.
Selezionare drive di destinazione.
NL Kies het doelstation.
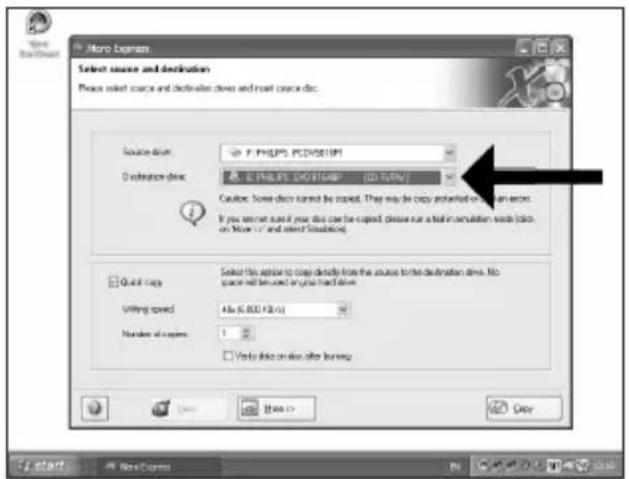
5
UK If possible, you may mark the checkbox "Quick copy" if your source drive is fast enough. Otherwise, unmark the checkbox. Click "Burn".
D Wenn Ihr Quelllaufwerk schnell genug ist, können Sie bei Bedarf das Kästchen "Direktkopie" ankreuzen. Andernfalls löschen Sie das Kreuz oder Häkchen in dem Kästchen. Klicken Sie auf "Kopieren".
F Si votre lecteur source est suffisamment rapide, vous pouvez cocher l'option "Copie rapide". Sinon, décochez cette case. Cliquez sur "Copier".
Se possibile, selezionare la casella "Copia rapida" se l'unità sorgente è sufficientemente veloce. Altrimenti, deselezionare la casella. Fare clic su "Copia".
NL Indien mogelijk kunt u het vakje "Snel kopieren" aanvinken, maar alleen als uw bronstation snel genoeg is. Is dat niet zo, verwijder dan het vinkje. Klik op "Kopieren".
6
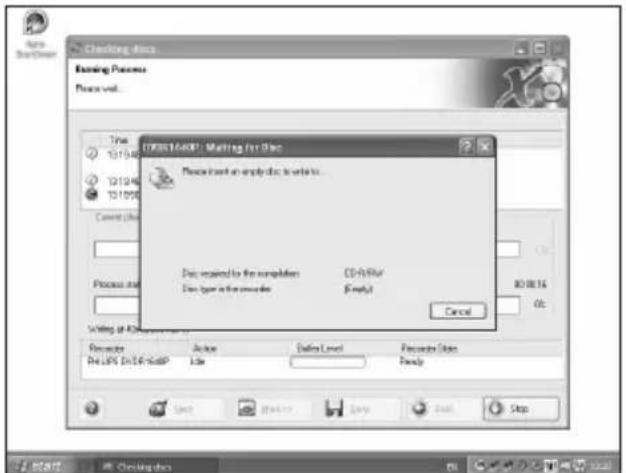
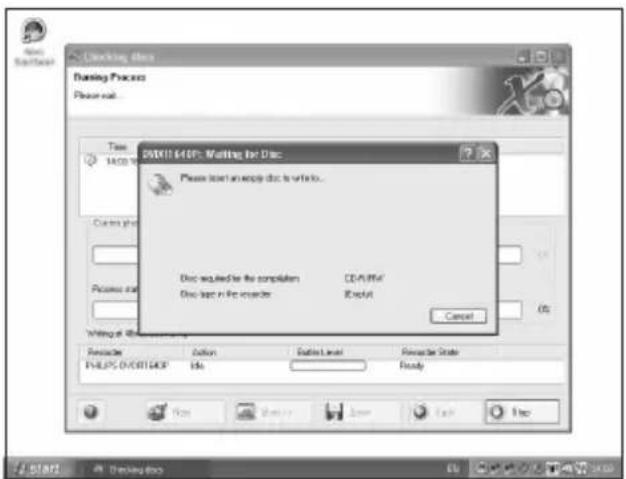
UK Insert an empty disc in your destination drive.
D Legen Sie eine leere Disk in Ihr Ziellaufwerk ein.
F Insérez un disque vierge dans votre lecteur de destination.
Inserire un disco vuoto nell'unità di destinazione.
NL Leg een lege schijf in het doelstation.
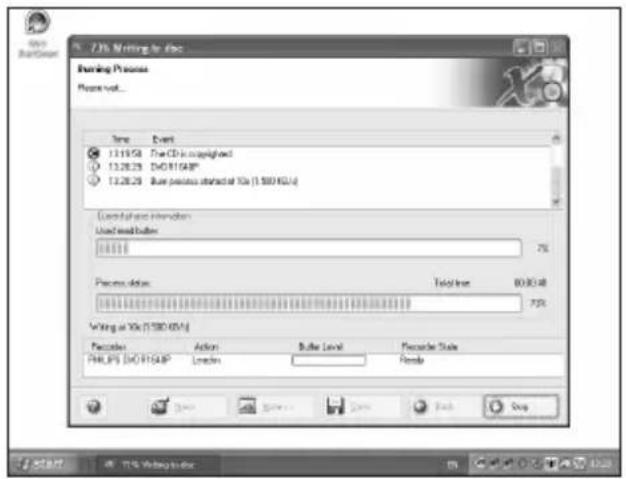
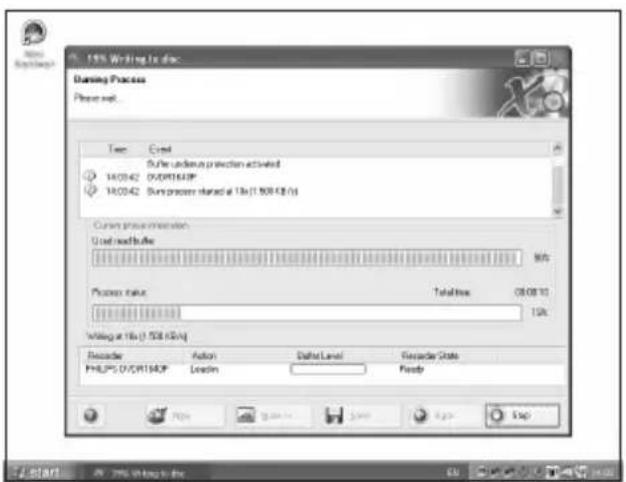
UK "Nero" will now burn your disc.
D "Nero" wird jetzt Ihre Disk brennen.
F "Nero" grave alors votre disque.
"Nero" inizierà a scrivere sul disco.
NL "Nero" zal nu uw CD branden.
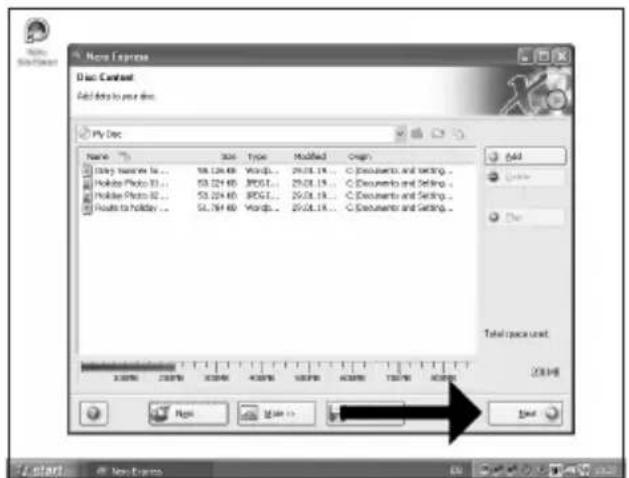
How to make a Data disc?
This manual shows you an example of how to make a Data disc.
-
The application software used here is: Nero - Burning Rom from Nero AG

UK Start "Nero StartSmart" from the desktop.
D Starten Sie "Nero StartSmart" von Ihrer Oberfläche aus.
F Lancez "Nero StartSmart" depuis le bureau.
1 Aprire "Nero StartSmart" dal desktop.
NL Start "Nero StartSmart" vanaf het bureaublad.
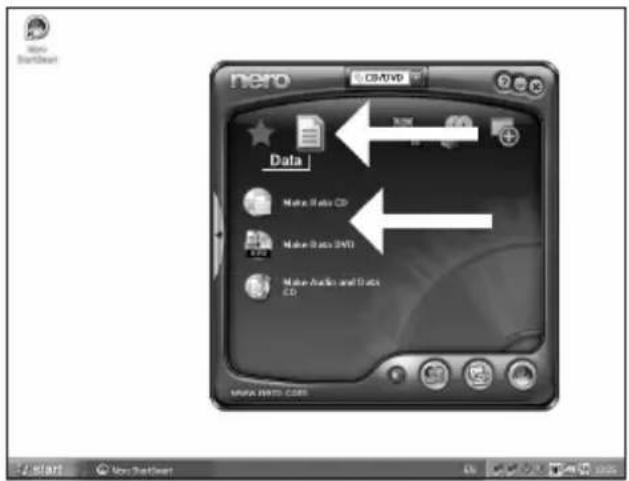
UK Choose "Data" and click "Make a data CD" or "Make a data DVD".
D Wählen Sie "Daten" und klicken Sie auf "Daten CD erstellen" oder "Daten DVD erstellen".
F Choisissez "Données" puis cliquez sur "Créer un CD de données" ou "Créer un DVD de données".
1 Selezionare "Dati" e fare clic su "Creare CD dati" ovvero "Creare DVD dati".
NL Kies "Data" en klik op "Data-cd maken" of "Data-dvd maken".
6
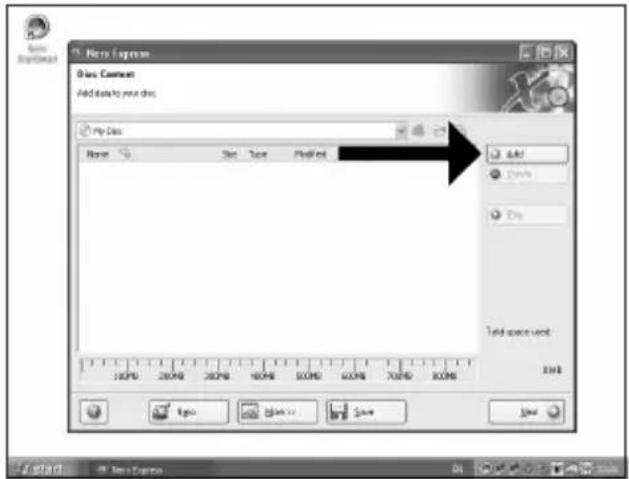
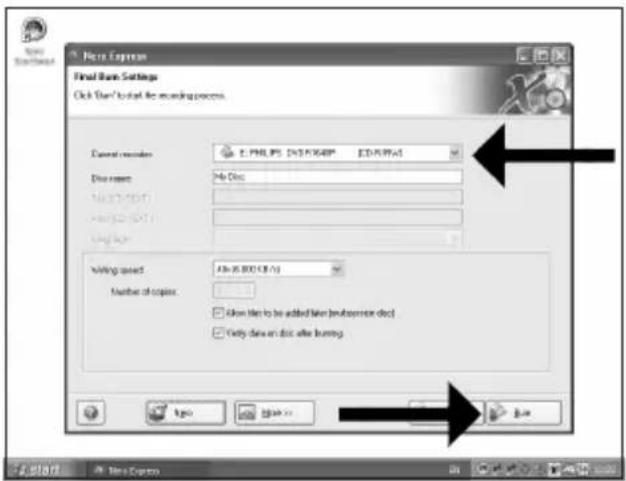
UK Choose the drive you use for burning and click "Bum".
D Wählen Sie das Laufwerk zum Brennen der Disk und klicken Sie auf "Brennen".
F Choisissez le lecteur à utiliser pour la gravure puis cliquez sur "Graver".
1 Selezionare l'unità da utilizzare per la scrittura e fare clic su "Scrivi".
NL Kies de recorder waarmee u de disc wilt branden en klik op "Branden".

UK Insert an empty disc.
D Legen Sie eine leere Disk ein.
F Insérez un disque vierge.
Inserire un disco vuoto.
NL Plaats een lege disc in uw recorder.
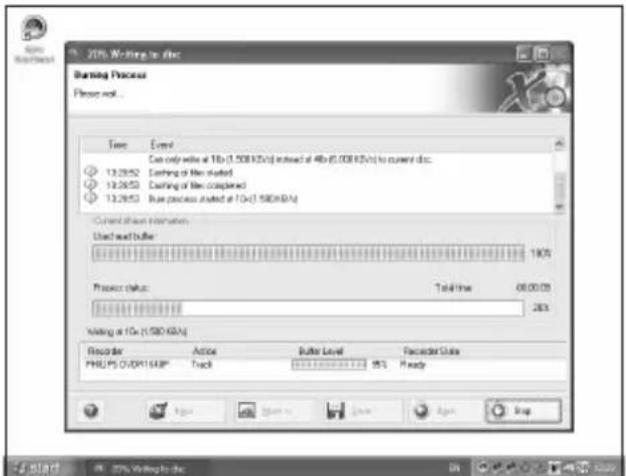
UK "Nero" will now burn your disc.
D "Nero" wird jetzt Ihre Disk brennen.
F "Nero" grave alors votre disque.
"Nero" inizierà a scrivere sul disco.
NL "Nero" zal nu uw disc branden.
10
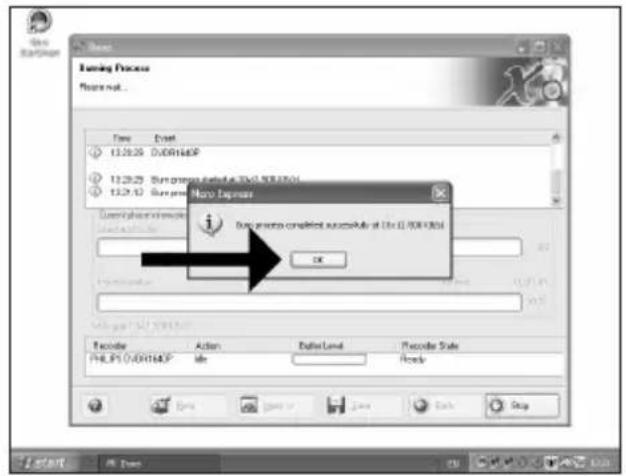
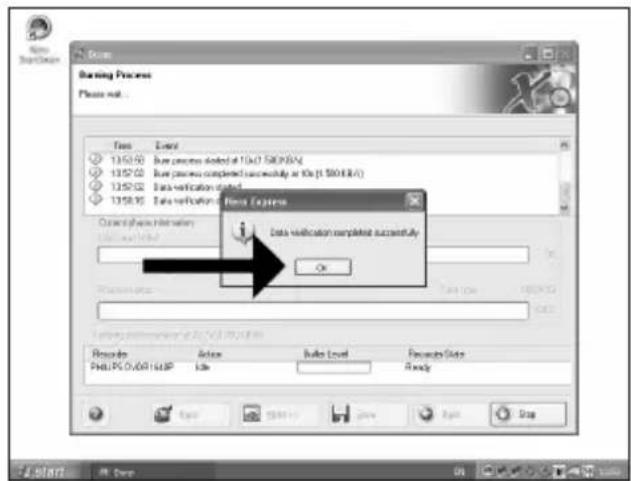
UK Congratulations, your disc has been written successfully. Click "OK". You may exit the application now.
D Herzlichen Glückwunsch – Ihre Disk wurde erfolgreich erstellt. Klicken Sie auf "OK". Sie können jetzt die Anwendung verlassen.
F Félicitations, votre disque est prêt. Cliquez sur "OK". Vous pouvez maintenant fermer l'application.
1 Congratulazioni, il disco è stato scritto correttamente. Fare clic su "OK". Ora è possibile chiudere l'applicazione.
NL Gefeliciteerd! Uw disc is met succes gebrand. Klik op "OK".U kunt het programma nu afsluiten.

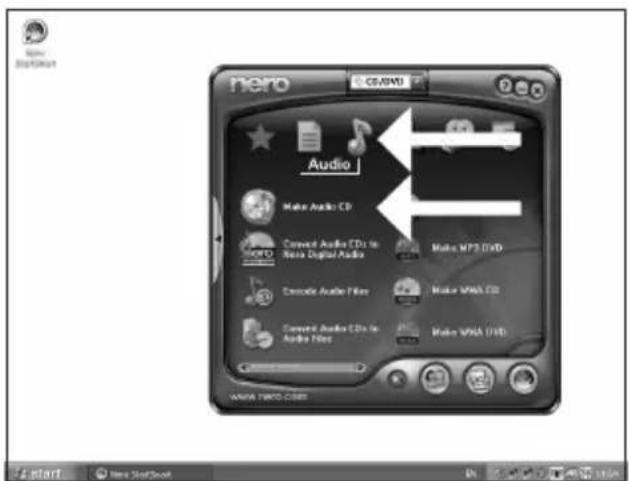
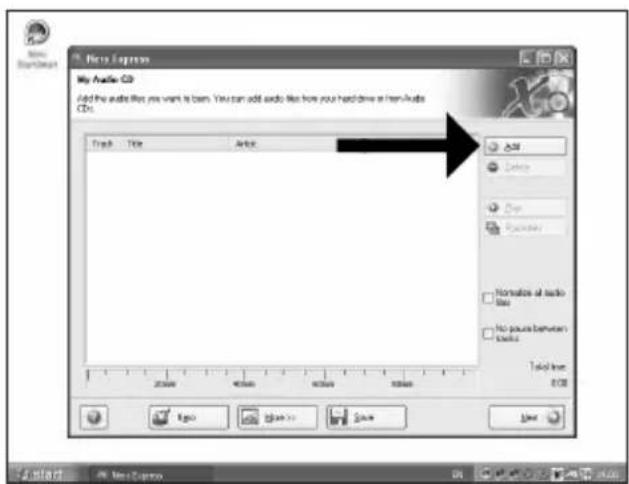
How to make an Audio disc?
This manual shows you an example of how to make an Audio disc which can be played in any CD-Player
-
The application software used here is: Nero - Burning Rom from Nero AG
UK Start "Nero StartSmart" from the desktop.
UK Choose "Audio" and "Make Audio CD".
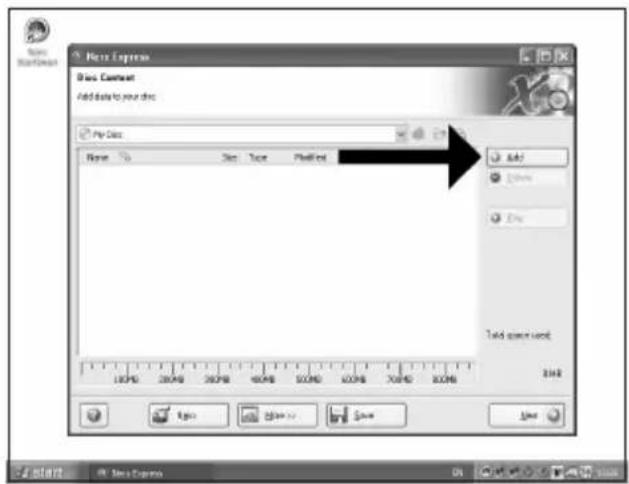
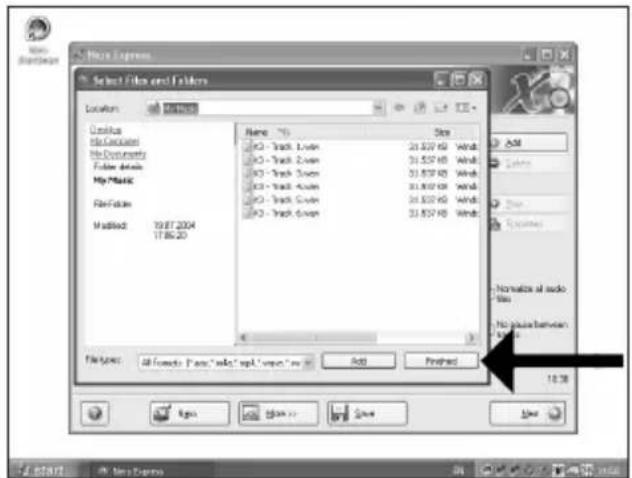
UK Click "Add".
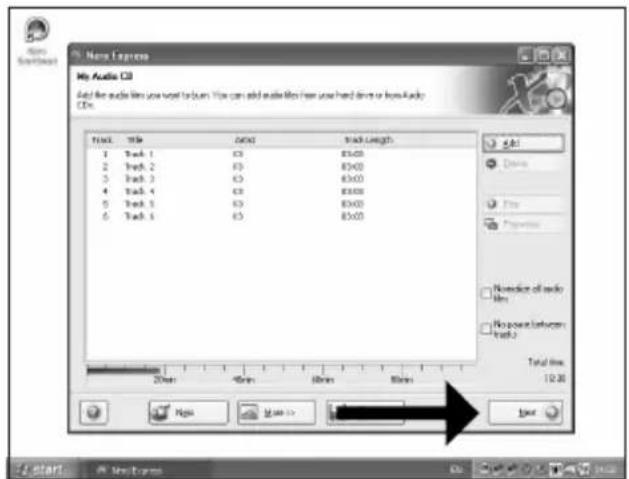
UK Choose your recorder and click "Bum".
D Wählen Sie Ihren Recorder und klicken Sie auf "Brennen".
F Choisissez le périphérique d'enregistrement puis cliquez sur "Graver".
1 Selezionare il recorder e fare clic su "Scrivi".
NL Kies uw recorder en klik op "Branden".
7
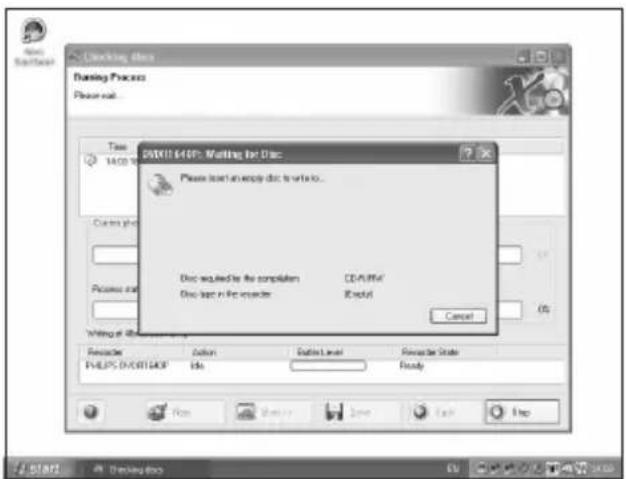
UK Insert an empty disc.
D Legen Sie eine leere Disk ein.
F Insérez un disque vierge.
Inserire un disco vuoto.
NL Plaats een lege disc in uw recorder.
8
UK "Nero" will now burn your disc.
D "Nero" wird jetzt Ihre Disk brennen.
F "Nero" grave alors votre disque.
"Nero" inizierà a scrivere sul disco.
NL "Nero" zal nu uw disc branden.
9
10
UK Congratulations, your disc has been written successfully. Click "OK". You may exit the application now.
D Herzlichen Glückwunsch – Ihre Disk wurde erfolgreich erstellt. Klicken Sie auf "OK". Sie können jetzt die Anwendung verlassen.
F Félicitations, votre disque est prêt. Cliquez sur "OK". Vous pouvez maintenant fermer l'application.
1 Congratulazioni, il disco è stato scritto correttamente. Fare clic su "OK". Ora è possibile chiudere l'applicazione.
NL Gefeliciteerd! Uw disc is met succes gebrand. Klik op "OK". U kunt het programma nu afsluiten.

Warranty, Environment, Safety, Frequently Asked Questions (FAQ) and Specifications
How to find warranty information?
1 Insert the Nero disc again, and click "Exit".
2 Click on the "My Computer" icon on your desktop or click "Start", "My Computer".
3 Click with the right mouse button on the "Nero" icon and choose "Explore".
4 Choose the "Philips Warranty" folder and you will find the warranty documents.
If you do not have Adobe Acrobat Reader, you can find it in the folder "Acrobat Reader" on this disc or find it for free on http://www.adobe.com

"The making of unauthorised copies of copy-protected material, including computer programmes, files, broadcasts and sound recordings, may be an infringement of copyrights and constitute a criminal offence.
This equipment should not be used for such purposes."
WEEE mark: "Information to the Consumer"
Disposal of your old product
Your product is designed and manufactured with high quality materials and components, which can be recycled and reused.
Please inform yourself about the local separate collection system for electrical and electronic products, including those marked by following symbol.
Please act according to your local rules and do not dispose of your old products with your normal household waste.
WARNING
Plastic bags can be dangerous.
To avoid danger of suffocation, keep this bag away from babies and small children.
Frequently Asked Questions (FAQ)
Question 1: I have a Windows 98 Second Edition PC and there is no CDROM device in the computer but I have another PC. How do I install the drivers?
- Start another computer.
- Insert the Nero disc for the SPD3200CC into the CDROM device.
- Click "Exit" when the Nero Installation screen appears.
- Click on "My Computer".
- Click on the "Nero"-logo.
- Click on the right mouse button and choose "Explore".
- Go to the directory "Philips Drivers".
- Copy the contents of this directory on a floppy disc.
- Attach your SPD3200CC to your Windows 98SE computer.
- When Windows asks for the drivers, insert the floppy from step 8 and point windows to this floppy.
- The drivers will be installed. You can now use your SPD3200CC to install the software by inserting the Install disc.
Question 2: I have a windows 98 Second Edition PC and there is no CDROM device in the computer but I have access to the internet. How do I install the drivers?
- Start the computer.
- Start Internet Explorer (or another web browser).
- Go to the Philips website: http://www.philips.com/support
- Choose "Drivers and manuals".
- Search for the SPD3200CC.
- Download the Windows 98SE drivers.
- Unzip the drivers and remember where you saved the unzipped drivers.
- Plug in the SPD3200CC.
- When Windows asks for drivers, refer to the location where you saved the drivers in step 7.
- Your SPD3200CC will work now.
Question 3: How do I keep my SPD3200CC in good shape?
- Do not expose to moisture, rain, sand or heat.
- Place it on a firm, flat surface.
- Keep away from domestic heat and direct sunlight.
- Give the SPD3200CC enough place: approx. 2,5cm (1 inch) to all sides is required.
- Do not place anything on the SPD3200CC.
Question 4: I have connected the SPD3200CC to an USB connector but Windows does not react and the SPD3200CC is not recognized.
- Make sure the SPD3200CC is connected properly to a power outlet.
- Make sure the USB connectors are switched on (also in the PC Bios, consult your PC manual).
- Check if all drivers are installed (run windows update, check your PC manual and download if required drivers for the PC from the manufacturer's website).
Question 5: Burning or reading takes far too long. How does this come?
- You have connected the SPD3200CC to a low speed USB connector, which has a very limited throughput. Connect the drive to a highspeed USB adapter.
- You may have to install drivers for your USB-adapter. Consult the manual and or download drivers from the manufacturer's website.
Question 6: I inserted a disc and it is not played.
- Ensure the disc label is facing up.
- Clean the disc.
- Check whether the disc has the same region code as the player.
- Check if the disc is defective by trying another disc.
- Check to see if the disc is defective, badly scratched or warped (not flat).
Question 7: Player does not respond to some operating commands during playback.
Check whether a PC connection is active. Unplug the USB cable to de-activate the PC connection. The operations may not be permitted by the disc. Refer to the instructions of the disc.
Question 8: I tried to burn a disc and this failed. What happened?
- Check to ensure that there are no scratches or finger marks on the disc.
- Use a new disc and retry the writing sequence.
- Use a different (Philips) branded disc to check that your drive is working correctly.
Question 9: I cannot read from a disc.
- Check to ensure that there are no scratches or finger marks on the disc.
- Use another disc and retry to see if your drive can read a other disc.
Question 10: How can I clean a dirty disc?
Some problems may occur because the disc inside the player is dirty. To avoid these problems clean your discs regularly, in the following way:
When a disc becomes dirty, clean it with a cleaning cloth. Wipe the disc from the center out, in a straight line.
Question 11: May I use chemicals to clean a disc?
No, do not use solvents such as benzene, thinner, commercially available cleaners, or anti-static spray intended for analogue discs.
Question 12: May I use cleaning discs to clean the lens of the SPD3200CC?
No, do not use commercially available cleaning discs to clean the lens, as these discs may damage the optical unit.
Specifications
Maximum write speeds:
48x on CD-Recordable
24x on UltraSpeed CD-ReWritable
16x on DVD+R
8x on DVD+R Double Layer
8x on DVD+RW
16x on DVD-R
4x on DVD-R Dual Layer
6x on DVD-RW
The actual write speed may be lower as this is disc dependent.
Maximum read speeds:
48x on CD
16x on DVD
The SPD3200CC reads following discs:
CD / CD-R / CD-RW formats both 8cm & 12cm discs (up to 99 min).
DVD Disc Format: DVD-ROM, DVD-Video, DVD+R, DVD+R Double layer, DVD+RW, DVD-R,
DVD-R Dual Layer, DVD-RW formats both 8cm & 12cm discs.
Interface: HiSpeed USB (USB 2.0)
Typical access time: 160ms
Buffer Size: 2 MB
Temperature:
Operating temperature should be between +5°C and +40°C (41°F and 104°F)
Storage temperature should be between -20^ and +60^ ( -4^ and 140^ )
MTBF: 75.000 hours at 20% duty cycle.
Be responsible Respect copyrights
The image is too blurry to recognize any text content.
natural_image
Three electronic devices labeled A, B, and C: a black server unit, a connected charger, and a cable with power leads (no visible text or symbols on devices)C: Cabo USB HiSpeed.
natural_image
Hand holding a Philips 3.0 microcontroller device (no visible text or symbols on the device body)4
E Conecte el cable USB a SPD3200CC.
No conecte el cable al ordenador todavía.
PT Ligue o cabo USB ao SPD3200CC.
Não ligue ainda o cabo ao computador.
TR USB kablosunu SPD3200CC'ne takınız. Bu aşamada, kabloyu bilgisayara takmayınız.
PL Podłącz kabel USB do napędu SPD3200CC. Nie podłączaj jeszcze kabla do komputera.
sv Anslut USB-kabeln till SPD3200CC.
Anslut inte kabeln till datorn vid denna tidpunkt.
natural_image
Hand inserting a USB into a device labeled 'Sd11Hd', showing cable routing (no text beyond label)
natural_image
Hand holding a Philips CD with a Lenovo case, no visible text or symbols on the CD or background.11
natural_image
Hand inserting a CD into a Philips tower (no visible text or symbols on the CD or tower)E Haga clic en "Quitar hardware con seguridad...".
PT Clique em "Safely remove USB..." (Remover em segurança USB...).
TR "Safely remove USB..." (Güvenlice USB'yi çıkar...) üzerine tıklatınız.
PL Kliknij "Safely remove USB..." (Bezpieczne odłączanie urządzeń USB...).
SV Klicka på "Safely remove USB..." (Säker borttagning av USB).
2
E Cuando aparezca esta pantalla, puede desconectar SPD3200CC.
PT Quando esta mensagem "pop-up" surgir, pode desligar o SPD3200CC.
TR Bu açılır menü belirdiğinde, SPD3200CC'nin bağlantısını kesebilirsiniz.
PL Kiedy pojawi się to okno, możesz odłączyć napęd SPD3200CC.
SV När det här popupmeddelandet visas kan du koppla bort SPD3200CC.
3

The image is too blurry to recognize any text content.
E Inicie "Nero StartSmart" en el escritorio.
PT Inicie o "Nero StartSmart" a partir da área de trabalho.
TR Masaüstünden "Nero StartSmart"ı başlatınız.
PL Uruchom program "Nero StartSmart" z pulpitu.
sv Starta "Nero StartSmart" från skrivbordet.
1
E Seleccione "Herramientas" y "Imprimir etiqueta LightScribe".
PT Escolha "Extras" e "Imprimir etiqueta do Lightscribe".
TR "Ek Ayarlar" ve "LightScribe Etiketi yazdır" 1 seçiniz.
PL Kliknij "Dodatki" i "Wypal etykietę LightScribe".
sv Välj "Extra" och "Skriv ut Lightscribe etikett".
2
![Corel Cover Designer - [Time Dev assar] File Edit View Object Data Window Open Ctrl+D Close Save Ctrl+S Save As... Save As Template... TWID Print Ctrl+D Print Version... Print Setup... Paper Display... Print Light Color label... Lightshade Print Preview Preferences... 1 Text_title list Cut R: B: P: Disk 1 Start name: Document 32.451.09.05 NPL Next Cover Designer](/content/2026/02/384218/images/142339eacae33bfdcd92e323f763adac0b090f5f2911df7c7044d6765d011688.jpg)
E Se abre CoverDesigner. Seleccione "Archivo" y "Nuevo".
PT O Cover Designer será aberto. Escolha "Arquivo" e "Novo".
TR Cover Designer (Kapak Tasarımcısı) açılır, "Dosya" ve "Yeni" yi seçiniz.
PL Uruchomi się program Cover Designer. Kliknij "Plik" i "Nowy".
SV Cover Designer startar. Välj "Arkiv" och "Nytt".
3
4
E Seleccione "Documento vacío" y haga clic en "OK".
PT Escolha "Documento vazio" e clique em "OK".
TR "Begeyi Bosalt" öğesini seçin. "OK" üzerine tıklatınız.
PL Wybierz opcję "Pusty dokument" i kliknij "OK".
SV Välj "Tomt dokument" och klicka på "OK".
5
E Puede importar una imagen que ocupe toda la superficie del disco haciendo doble clic en el área de trabajo. Haga clic en "Archivo".
PT É possível importar uma figura para preencher toda a superfície do disco clicando duas vezes na área de trabalho. Clique em "Arquivo".
TR Çalışma bölgesi üzerine iki kez tıklatarak diskin tüm yüzeyini dolduracak bir resim alabilirsiniz. "Dosya" üzerine tıklatınız.
PL Możesz importować obraz, aby wypełnić całą przestrzeń płyty, klikając dwukrotnie obszar roboczy. Kliknij "Plik".
SV Du kan importera en bild för att fylla hela ytan på skivan genom att dubbelklicka på arbetsområdet. Klicka på "Fil".

6
E Seleccione su imagen de fondo y haga clic en "Abrir".
PT Escolha a imagem de fundo e clique em "Abrir".
TR Arkaplan görüntüüzü seçip "Aç" üzerine tıklatınız.
PL Wybierz obraz tła i kliknij "Otwórz".
SV Välj din bakgrundsbild och klicka på "Öppna".
![Image Cover: Image - [Movie Document 4] Times New Format Additions to Properties Show: MSP Image creation File... View... Browse Mode Adjust to frame size Propositional view copying Propositional clip maps Objects... Remove Image Name: 2023.2008.05.4 Targ1.0.jpg OK Cancel Help Edit 1 View: admin New Cover Designer...](/content/2026/02/384218/images/29b700a7ec57663615ec7dec9a9c6f67441bba5f60832da320ed5975bfc64cad.jpg)
natural_image
Screenshot of a photo editing software interface showing a circular crop image with an arrow pointing to it, no visible text or symbols on the crop itself.E Haga clic en la "Herramienta Cuadro de texto" para insertar el texto. Si sólo imprime texto, el disco se imprimirá más rápido.
PT Clique na "Ferramenta caixa de texto" para digitar o texto. Se imprimir apenas texto, o disco será impresso mais rapidamente.
TR Metni girmek için "Yazı Kutusu Aleti" üzerine tıklatınız. Eğer sadece metni yazdırırsanız, disk daha hızlı yazdırılacaktır.
PL Kliknij "Narzędzie wstawiania pola tekstowego", aby wpisać tekst. Jeśli drukujesz sam tekst, drukowanie etykiety płyty potrwa krócej.
natural_image
Screenshot of a photo editing software interface showing a circular landscape image with concentric rings and measurement markers (no readable text or symbols)E Trace el área en la que desea añadir el texto. El programa la curvará para permitir una impresión más rápida.
PT Desenhe a área à qual deseja adicionar o texto. O programa irá curvá-la para acelerar a impressão.
TR Metni eklemek istediğiniz bölgeyi çiziniz. Program, daha hızlı yazdırmaya olanak verecek şekilde bunu eğecektir.
PL Narysuj obszar, w którym chcesz umieścić tekst. Program wygnie go, aby przyspieszyć drukowanie.
12
E Si lo prefiere, también puede colocar una imagen en el lugar que desee del área del disco. Haga clic en la "Herramienta Imagen".
PT Como opção, você também poderá posicionar uma figura onde desejar na área de disco. Clique na "Ferramenta imagem".
TR Bir başka seçenek olarak, disk bölgesine de begendiğiniz bir resmi konumlandırabilirsiniz. "Kalıp Aleti" üzerine tıklatınız.
PL Alternatywnie możesz również umieścić obraz w dowolnym miejscu na płycie. Kliknij "Narzędzie wstawiania obrazu".
SV Alternativt kan du placera en bild på skivområdet. Klicka på "Bildverktyg".

E Seleccione su imagen y haga clic en "Abrir".
PT Escolha a sua imagem e clique em "Abrir".
TR Kalıbınızı/Görüntünüzü seçip "Aç" üzerine tıklatınız.
PL Wybierz obraz i kliknij "Otwórz".
sv Välj din bild och klicka på "Öppna".

natural_image
Screenshot of a photo editing software interface showing a circular frame with a scenic arch, displayed within a blank canvas (no text or symbols on the image itself)E Coloque la imagen para que quede bien.
PT Posicione adequadamente a imagem.
TR Kalıbı/Görüntüyü hoş görünecek şekilde konumlandırınız.
PL Umieść obraz w żądanym miejscu.
SV Placera bilden på lämpligt ställe.
![Microsoft Excel Designer - [New Document 2.1] Times New Features Holiday 2005](/content/2026/02/384218/images/cc7566aba1a21a345a3fcdc6efa26f31a5e281463ed6bc5dad38506bfe804859.jpg)
E Puede añadir un texto como en los pasos 8-10.
PT É possível adicionar um texto como nas etapas 8 a 10.
TR 8-10. adımlanında olduğu gibi bir metin ekleyebilirsiniz.
PL Możesz dodać tekst, zgodnie z opisem w punktach 8-10.
sv Du kan lägga till text enligt steg 8-10.
16
E Una vez que haya terminado de diseñar su etiqueta, seleccione "Archivo" y "Imprimir etiqueta LightScribe".
PT Ao concluir a criação de sua etiqueta, escolha "Arquivo" e "Imprimir etiqueta LightScribe".
TR Etiketinizi tasanmlama işlemini tamamladığınızda, "Dosya" ve "Lightscribe Etiketini Bastır"ı seçiniz.
PL Po zakończeniu projektowania etykiety, kliknij "Plik" i "Drukuj etykietę LightScribe".
SV När du är klar med din etikettdesign väljer du "Arkiv" och "Skriv ut LightScribe-etikett".
![New Document - Image - [Image Document 3.1] Name: 234-H Open: 0 Close Save: 100+H Save As... Save As Template... PUMERS Field... Field Presets... Field Setup... Paper Stocks... Field Display Labels LightBox Print Preview Preferences... I Data_Tile list Edit Holiday 2005 Print preview is in a Light Solar package 2005 4/08/06 40 start NewCover Designer](/content/2026/02/384218/images/c35fa72ef48f9738396b28258f0a586df2995b66012f60c7089f455206797e25.jpg)
17
E Seleccione la calidad de impresión (A). Puede ver una vista preliminar (B) e iniciar la impresión (C).
PT Escolha a qualidade de impressão (A).
É possível exibir uma revisualização (B) e Imprimir (C).
TR Basım/Yazdırma kalitesini (A) seçiniz.
Bir önizleme (B) görebilir ve basım/yazdırma işlemini (C) başlatabilirsiniz.
PL Wybierz jakość wydruku (A). Możesz wyświetlić podgląd (B) i rozpocząć drukowanie (C).
SV Välj utskriftskvalitet (A). Du kan se en preview (B) och starta utskrift (C).
18
E Inserte un disco Lightscribe, con la etiqueta hacia abajo, y haga clic en "Aceptar".
PT Insira um disco Lightscribe, com a etiqueta voltada para baixo e clique em "OK".
TR Etiketli yüzü aşağı bakacak şekilde bir Lightscribe diski yerleştirip "OK" (TAMAM) üzerine tıklatınız.
PL Umieść płytę LightScribe etykietą skierowaną w dół i kliknij "OK".
SV Sätt i en Lightscribe-skiva med etiketten nedåt och klicka på "OK".
E El disco ya está impreso.
PT O disco será impresso.
TR Disk şimdi yazdırılmaktadır.
PL Rozpocznie się drukowanie.
sv Skivan skrivs nu ut.
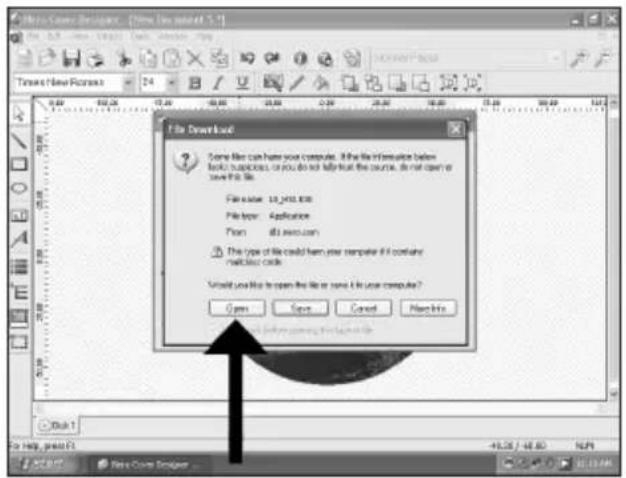
E Seleccione "Abrir" y haga clic en "Siguiente" hasta que se instale la actualización. Tras la instalación, tendrá que cancelar el proceso de impresión (guardar su diseño) y volver a empezar
PT Escolha "Abrir" e clique em "Avançar" até que a atualização tenha sido instalada. Após a instalação, será necessário cancelar o processo de impressão (salve a etiqueta criada) e inicie-o novamente.
TR "Aç"ı seçip güncellemenin kurulumu yapılana kadar "İleri" üzerine tıklatınız. Kurulumdan sonra, yazdırma/basım işlemini iptal etmeniz (tasarımınızı saklayınız) ve yeniden başlatmanız gerekli olacaktır.
The image is too blurry to recognize any text content.
The application software used here is: Nero Vision Express from Nero AG
E Inicie "Nero StartSmart" desde el escritorio.
PT Inicie o "Nero StartSmart" a partir da área de trabalho.
TR Masaüstünden "Nero StartSmart"ı başlatınız.
PL Uruchom program "Nero StartSmart" z pulpitu.
sv Starta "Nero StartSmart" från skrivbordet.
1

natural_image
Black-and-white photo of a desktop computer tower connected to a cable via a cable (no visible text or labels)E Conecte la cámara al ordenador y enciéndala.
PT Conecte a sua câmera ao computador e ligue-a.
TR Kameranızı bilgisayara takıp çalıştırınız.
PL Podłącz kamere do komputera i uruchom.
SV Anslut din kamera till datorn och slå på den.
2
E Seleccione "Foto y vídeo" y haga clic en "Capturar vídeo".
PT Escolha "Foto e Vídeo" e clique em "Capturar vídeo".
TR "Fotograf ve video"yu seçip "Video yakala" üzerine tıklatınız.
PL Kliknij "Foto i wideo" oraz "Przechwyć wideo".
SV Välj "Foto och video" och klicka på "Fånga video".
3
4
E Seleccione su videograbadora digital y utilice los botones para controlar su cámara digital. Pulse el botón "Grabar" para grabar vídeo.
PT Escolha o seu DV Camcorder e use os botões para controlar a sua DV câmera. Pressione o botão "Gravar" para gravar o vídeo.
TR DV-Camcorder'ınızı (DV-kaydedici kamera) seçip DV-kameranıza kumanda etmede düğmeleri kullanız. Videoyu kaydetmek için "Kaydet" düğmesine basınız.
PL Wybierz posiadaną kamerę DV i użyj przycisków, aby nią sterować. Naciśnij przycisk "Nagraj", aby nagrać obraz wideo.
SV Välj din DV-Camcorder och använd kontrollknappama för din DV-kamera. Tryck på "Bränn"-knappen för att spela in video.
![New Vision License 3 [Capture Video] Capture Video Select a device and capture video in your hard disk. Capture devices Soap DV Device DV Details Use this image to capture video in Digital Video (DV1) compatible format. The application initially configes the capture device. but you can change the device settings manually by. DV type: DV Type 1 Type 1 is usually the before choice because I computer to a file space and allows here from Google. However, only Type 2 is compatible with Video to Windows (TM). If you can use which type to save, select Type 1. Save DV Device Save Back](/content/2026/02/384218/images/31ab77b2dd470b5fedc4f07fa8773bc3c3dbb1789fd71c01828b91904dd0bdd1.jpg)
5
6
E Una vez capturadas las secuencias de vídeo, haga clic en "Siguiente".
PT Quando todas as sequências de vídeo estiverem capturadas, clique em "Avançar".
TR Tüm video dizisi yakalandığında, "İleri" üzerine tıklatınız.
PL Po przechwyceniu wszystkich sekwencji wideo, kliknij "Dalej".
SV När alla videosekvenser har fångats klickar du på "Nästa".
![MetaVision Capture 3.0 [Capture Video] Capture Video Select a device and capture video to your hand disk. Capture device: Easy DV Device Select a capturing template: DV Use this template to capture video in DigitalVideo (DV) compatible format. The application is initially configured to capture devices but you can change the device settings available for DV type: DV Type-1 Type 1 is usually the better video because it contains free disk space and allows more throughput. However, and Type 2 is compatible with Video or Wireless (TM) You can not use which type to use, select Type 1. Capture Mode: RVCE Captive 8007 RVCE Captive 8005 RVCE Captive 8003 View >... Save... Next](/content/2026/02/384218/images/8f4d666c8f4aeac1d3f99fd1e98d61d9e1b098d2c2a697a1e7f4c00f10d55997.jpg)
The application software used here is: Nero Vision Express from Nero AG

E Inicie "Nero StartSmart" desde el escritorio.
PT Inicie o "Nero StartSmart" a partir da área de trabalho.
TR Masaüstünden "Nero StartSmart"ı başlatınız.
PL Uruchom program "Nero StartSmartv z pulpitu.
sv Starta "Nero StartSmart" från skrivbordet.
1
E Seleccione "Foto y vídeo" y haga clic en "Crear DVD de vídeo proprio".
PT Escolha "Foto e Vídeo" e "Crie seu próprio DVD de vídeo".
TR "Fotoğraf ve video" ve "Kendi DVD-Video'nu yarat"ı seçiniz.
PL Kliknij "Foto i wideo" oraz "Twórz własne DVD-Video".
SV Välj "Foto och video" och "Gör din egen dvd-video".
2
![Untitled Project [2003-Video] - New/Fiction Express 3 Content Create and manage this for your project. What would you like to do? Express Video... Add Video File... Make Movies... Make Slide Show... Import Disc Edit History Create Chapters Add Video Files... Here you can add some or more video files from your hard drive as disc and add them to your project. Used space: 8.00 out of 4.30 $B 0.000 1.000 2.000 2.800 4.000 Next > Back](/content/2026/02/384218/images/899a52c1a9d43b617633495373f4f0af2ff1fa4784fe75e02b2c965ab5d2bfbd.jpg)
5
Los vídeos que ha cargado se muestran aquí. Puede editarlos seleccionando "Editar película".
PT Os filmes carregados serão exibidos aqui. É possível editá-los escolhendo "Editar filme".
TR Yüklediğiniz filmler, burada gösterilir. "Filmi Düzenle"yi seçerek onlar üzerinde düzenleme yapabilirsiniz.
PL Załadowane filmy są wyświetlane tutaj. Możesz je edytować, klikając "Edytuj film".
SV De filmer som du har laddat visas här.
Du kan redigera dem genom att välja "Redigera film".
![UntitledProject * [DVD-Video] - New/iVision Express 3 Content Create and reagretion by your project. 1. V15_01 8001 Video Title: In 80m X6 Target retro options: 708+576 (CDR/681 31) - 4.3 2. V15_01 8001 Video Title: In 80m X7 Target retro options: 708+576 (CDR/681 31) - 4.3 3. V15_01 8001 Video Title: In 80m X7 Target retro options: 708+576 (CDR/681 31) - 4.3 What would you like to do? Capture Video... Add Video Files... Make Movies... Make Slide Maps... Import Data Edit Movie... Create Channels... Let you add the highlighted video title Used space: $5K out of 4.30 GB 0.000 1.000 2.000 3.000 4.000 More... Export Save Back Next](/content/2026/02/384218/images/7d96c4bbd7e4dbb700d4b997b87080dab449bd15c66a745263b4dfb2c03df4ad.jpg)
6
E En la pantalla Edit Movie puede añadir efectos de vídeo, de texto y transiciones.
PT Na tela Editar filme, você poderá adicionar efeitos de vídeo, efeitos de texto e transições.
TR Filmi Düzenle ekranında, video efektleri, metin efektleri ve geçişler ekleyebilirsiniz.
PL W oknie Edytuj film, możesz dodawać efekty wideo, efekty tekstowe i przejścia.
SV På skämen för filmredigering kan du lägga till videoeffekter, texteffekter och övergångar.
![Untitled Project * [RGB-Video] - NewVideo Express 1 PHILIPS My Media Map VTR_GK.KRMS](/content/2026/02/384218/images/38469cd81157d40ee744d0ca63c50f6bae4fe9c3cc312c4a7a7971a3475ca695.jpg)
![Untitled Project * [DVD-Video] - NewWindow Express 7 PHILIPS My Web1.dwg VTR_01.0008 Home TV Export Sets Host](/content/2026/02/384218/images/da7cdcea2f6a45cdff967e7d72b1d23676aa45bd75695542c594b8f3ef9423c2.jpg)
E También puede recortar el vídeo grabado. Cuando termine, haga clic en "Siguiente".
PT Também é possível fazer adaptações no vídeo gravado. Ao concluir o procedimento, escolha "Avançar".
TR Kaydedilen video üzerinde kırpma da yapabilirsiniz. Tamamlandığında, "İleri"yi seçiniz.
PL Możesz również przycinać nagrane wideo. Po zakończeniu kliknij "Dalej".
SV Du kan också trimma en inspelad video. När du är klar, välj "Nästa".
![Untitled / Project * [RMS-Video] - NewWindow Express 3 Created Create and manage files in your project 1. YTS_01_0001 Video Title=On Data 17s Target video options: 720 x 576 (CCOR/681 31) - 4.3 2. YTS_01_0001 Video Title=On Data 17s Target video options: 720 x 576 (CCOR/681 31) - 4.3 3. YTS_01_0001 Video Title=On Data 27s Target video options: 720 x 576 (CCOR/681 31) - 4.3 What would you like to do? Capture Video... Add Video Film... Make Home... Make Slids Show... Import Disc Edit Movie... Create Chapters... Used space: 0.30 unit of $0.00 GB 0 KB 1 KB 2 KB 3 KB 4 KB Next](/content/2026/02/384218/images/ed46c11ecfb9c97e56e2e4ac8f8682071121da8336e0d28c061f98fdb56ea821.jpg)
E Cuando haya editado todos los archivos, haga clic en "Siguiente".
PT Após editar todos os arquivos, escolha "Avançar".
TR Tüm dosyalar üzerinde düzenleme yaptıktan sonra, "İleri"yi seçiniz.
PL Po zakończeniu edycji wszystkich plików kliknij "Dalej".
sv När du har redigerar alla filer, välj "Nästa".
![HotBox Project * [DVD-Video] - NewWindow Express 3 Select Menu Select menu menu to this menu. Select menu: MainMenu Holiday 2005 1. V75 92.0007 7. V75 81.0001 5. V75 4.0001 Preview: Holiday 2005 Edit Menu... 01:00:00 1:00:00 2:00:00 3:00:00 4:00:00 Add Next](/content/2026/02/384218/images/070053e498feb282fc635b77de539f546e9dd7321c84aee12f3d12d05f8ec789.jpg)
11
12
![Untitled Project * [0780-X-line] - MacRakken Express 3 Actions Preparing data is incoming Drawing video data onto the class Completing recording service PHILIPS Recording progress Current action: Transcoding and editing MTV_01.0004 Download progress: Remaining On 10x 20s Closed On 62x 85s Total progress: Remaining On 10x 20s Closed On 62x 95s Priority: Shut down computer when installed Hide to Top Map 11 Save About](/content/2026/02/384218/images/5ecc4bbe9b5d690bd432b72ca3a232ae67d23fc17a73a57cb7beaf5028987c45.jpg)
E NeroVision Express está transcodificando y grabando el disco.
PT O NeroVision Express irá transcodificar e gravar o seu disco.
TR NeroVision Express; kod çevrimi yapıyor ve diskiniz yazıyor/kaydediyor.
PL Program NeroVision Express transkoduje i nagrywa płytę.
sv NeroVision Express omvandlar kod och bränner din skiva.

E Enhorabuena, su disco se ha grabado correctamente. Haga clic en "Aceptar". Ahora puede cerrar la aplicación.
PT Parabéns, o seu disco foi gravado com êxito. Clique em "Não". Agora, você poderá fechar o aplicativo.
TR Tebrikler, diskinize başarıyla yazdındı. "Hayır" üzerine tıklatınız. Şimdi uygulamadan çıkabilirsiniz.
PL Gratulacje! Zapis płyty zakończył się pomyślnie. Kliknij "Nie". Możesz zakończyć pracę programu.
The application software used here is: Nero - Burning Rom from Nero AG
E Inicie "Nero StartSmart" desde el escritorio.
PT Inicie o "Nero StartSmart" a partir da área de trabalho.
TR Masaüstünden "Nero StartSmart"ı başlatınız.
PL Uruchom program "Nero StartSmart" z pulpitu.
SV Starta "Nero StartSmart" från skrivbordet.

E Seleccione la unidad origen y coloque el disco de origen en esta unidad.
PT Escolha a unidade de origem e insira o disco de origem nesta unidade.
TR Kaynak sürücüyü seçip kaynak diski bu sürücüye yerleştiriniz.
PL Wybierz napęd źródłowy i umieść w nim płytę źródłową.
SV Välj källenhet och sätt i källskivan i enheten.
4
E Seleccione la unidad de destino.
PT Escolha o drive de destino.
TR Hedef sürücüyü seçiniz.
PL Wybierz napęd docelowy.
sv Välj målenheten.
5
E Si la velocidad de la unidad de origen lo permite, marque la casilla "Copia rápida". En caso contrario, deje la casilla sin marcar. Haga clic en "Copiar".
PT Se possível, você poderá marcar a caixa de seleção "Cópia rápida" se a unidade de origem for rápida o suficiente. Caso contrário, desmarque-a. Clique em "Gravar".
TR Olanaklı olduğu durumlarda, eğer kaynak sürücünüz yeterince hızlı ise, "Hızlı kopyala" onay kutusunu işaretleyebilirsiniz. Aksi takdirde, onay kutusundaki işaretlemeyi kaldınnız. "Yazdır" üzerine tıklatınız.
PL Jeśli to możliwe, zaznacz pole wyboru "Szybka kopia", o ile napęd źródłowy jest dostatecznie szybki. W przeciwnym razie wyczyść pole wyboru. Kliknij "Zapis".
SV Markera rutan "Snabbkopia" om din källenhet är tillräckligt snabb. Lämna rutan tom i annat fall. Klicka på "Kopiera".
![Micro Express Select source and destination Please select source and destination drives and host source disc. Source drive: F. PHILIPS: PCDA5016PT Destination drive: E. PHILIPS: DVD 81G46P [CD FUV/V] Click: Some drive named by speed. They may be copy protected or confirm errors. If you select such if your disc can be copied, please run a full in simulation mode (pack, on block 17) and select Simulation? Quick copy Select this option to copy directly from the source to the destination drive. No space will be used on your hard drive. Writing speed: 4Hz (5.800 Hz/1) Number of copies: 1 Only data on the next page Add View >> Next Clear](/content/2026/02/384218/images/a5025bad45713c60731099abfc5db46235873f32aeb0c09dc2c1d37d3b67703e.jpg)
6
E Coloque un disco vacío en la unidad de destino.
PT Insira um disco vazio no drive de destino.
TR Hedef sürücünüze boş bir disk yerleştiriniz
PL Włóż czystą płytę do napędu docelowego.
sv Sätt i en tom skiva i målenheten


E "Nero" grabará ahora el disco.
PT O "Nero" irá gravar o seu disco.
TR "Nero" artık diskinizin üzerine yazacaktır.
PL Program "Nero" rozpocznie nagrywanie płyty.
sv "Nero" kommer nu att bränna din skiva.

E Enhorabuena, su disco se ha grabado correctamente. Haga clic en "Aceptar". Ahora puede cerrar la aplicación.
PT Parabéns, o seu disco foi gravado com êxito. Clique em "OK". Agora, você poderá fechar o aplicativo.
TR Tebrikler, diskinize başarıyla yazdırıldı. "OK" üzerine tıklatınız. Şimdi uygulamadan çıkabilirsiniz.
PL Gratulacje! Zapis płyty zakończył się pomyślnie. Kliknij "OK". Możesz zakończyć pracę programu.
The image is too blurry to recognize any text content.
The image is too blurry to recognize any text content.
The application software used here is: Nero - Burning Rom from Nero AG

E Inicie "Nero StartSmart" desde el escritorio.
PT Inicie o "Nero StartSmart" a partir da área de trabalho.
TR Masaüstünden "Nero StartSmart"ı başlatınız.
PL Uruchom program "Nero StartSmart" z pulpitu.
SV Starta "Nero StartSmart" från skrivbordet.

E Seleccione "Datos" y haga clic en "Crear CD de datos" e "Crear DVD de datos".
PT Escolha "Dados" e clique em "Criar CD de Dados" ou "Criar DVD de Dados".
TR "Veri"yi seçip "Veri CD'si Yarat" ya da "Veri DVD'si Yaratv üzerine tıklatınız.
PL Kliknij "Dane", a następnie "Utwórz dysk CD z danymi" lub "Utwórz dysk DVD z danymi".
SV Välj "Data" och klicka på "Skapa data-cd" eller "Skapa data-dvd".
E Haga clic en "Añadir".
PT Clique em "Adicionar".
TR "Ekle" üzerine tıklatınız.
PL Kliknij "Dodaj".
sv Klicka på "Lägg till".
4
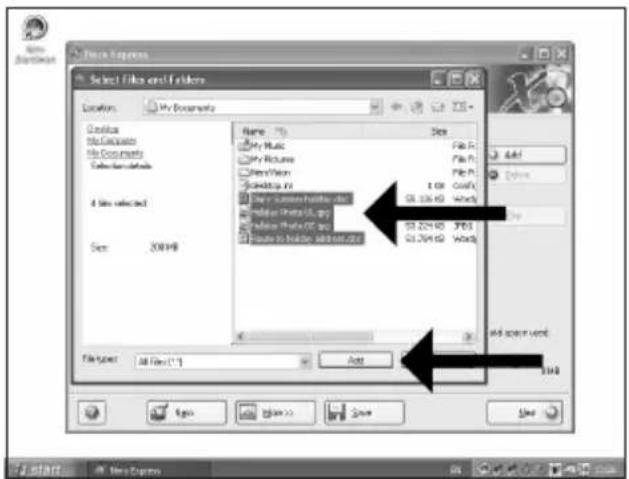
E Seleccione los archivos que desee grabar y haga clic en "Añadir".
PT Escolha os arquivos a serem gravados e clique em "Adicionar".
TR Kaydedilecek/Yazdınlacak dosyaları seçip "Ekle" üzerine tıklatınız.
PL Wybierz pliki do nagrania i kliknij "Dodaj".
SV Välj filema som ska brännas och klicka på "Lägg till".
5
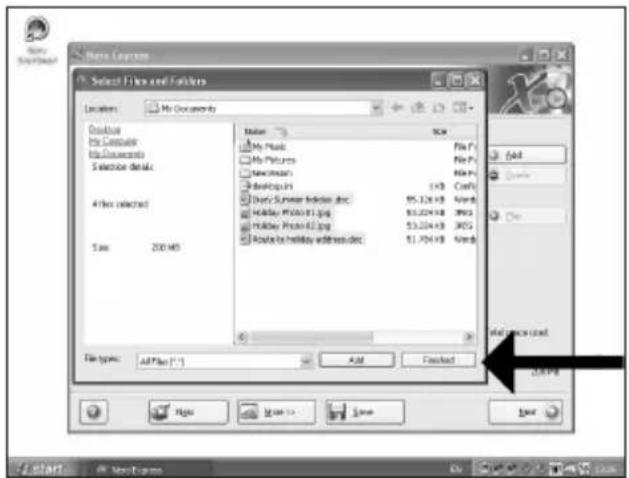
E Una vez añadidos todos los archivos, haga clic en "Finalizado".
PT Ao finalizar a inclusão de todos os arquivos, clique em "Concluído".
TR Tüm dosyalar eklendiğinde, "Bittiv üzerine tıklatınız.
PL Po dodaniu wszystkich plików kliknij "Zakończono".
SV När alla filer har lagts till klickar du på "Avslutat".
6
E Haga clic en "Siguiente".
PT Clique em "Avançar".
TR "İleri" üzerine tıklatınız.
PL Kliknij "Dalej".
sv Klicka på "Nästa".
E Seleccione la unidad para la grabación y haga clic en "Grabar".
PT Escolha a unidade utilizada para gravação e clique em "Gravar".
TR Yazdırma/kaydetme için kullandığınız sürücüyü seçip "Yazdır" üzerine tıklatınız.
PL Wybierz napęd używany do nagrywania i kliknij "Zapis".
SV Välj filema enheten som ska användas för att bränna och klicka på "Bränn".
7

E "Nero" grabará ahora el disco.
PT O "Nero" gravará o seu disco.
TR "Nero" artık diskinizin üzerine yazacaktır.
PL Program "Nero" rozpocznie nagrywanie płyty.
sv "Nero" kommer nu att bränna din skiva.
9
10
E Enhorabuena, su disco se ha grabado correctamente. Haga clic en "Aceptar". Ahora puede cerrar la aplicación.
PT Parabéns, o seu disco foi gravado com êxito. Clique em "OK". Agora, você poderá fechar o aplicativo.
TR Tebrikler, diskinize başarıyla yazdırıldı. "OK" üzerine tıklatınız. Şimdi uygulamadan çıkabilirsiniz.
PL Gratulacje! Zapis płyty zakończył się pomyślnie. Kliknij "OK". Możesz zakończyć pracę programu.
SV Grattis! din skiva har bränts utan fel. Klicka på "OK". Du kan avsluta programmet nu.


The application software used here is: Nero - Burning Rom from Nero AG
E Inicie "Nero StartSmart" desde el escritorio.
PT Inicie o "Nero StartSmart" a partir da área de trabalho.
TR Masaüstünden "Nero StartSmart"ı başlatınız.
PL Uruchom program "Nero StartSmart" z pulpitu.
SV Starta "Nero StartSmart" från skrivbordet.
E Seleccione "Audio" y "Crear CD de audio".
PT Escolha "Áudio" e "Criar CD de Áudio".
TR "Ses" ve "Müzik/Ses CD'si Yarat"ı seçiniz.
PL Kliknij "Audio" i "Utwórz Audio CD".
sv Välj "Audio" och "Skapa Audio-cd".
E Haga clic en "Añadir".
PT Clique em "Adicionar".
TR "Ekle" üzerine tıklatınız.
PL Kliknij "Dodaj".
sv Klicka på "Lägg till".
4
E Seleccione los archivos de audio (*.wav) que desea incluir en su nuevo disco de audio y haga clic en "Añadir".
PT Selecione os arquivos de áudio (*.wav) que deseja gravar em seu novo disco e clique em "Adicionar".
TR Yeni ses diskiniz üzerinde olmasını istediğiniz ses dosyalarını (*.wav) seçip "Ekle" üzerine tıklatınız.
PL Wybierz pliki audio (*.wav), które chcesz umieścić na nowej płycie audio i kliknij "Dodaj".
SV Välj audiofilema (*.wav) som du vill ha på din nya audioskiva och klicka på "Lägg till".

5
E Una vez añadidos todos los archivos, haga clic en "Finalizado".
PT Ao finalizar a inclusão dos arquivos, clique em "Concluído".
TR Tüm dosyalar eklendiğinde, "Bitti" üzerine tıklatınız.
PL Po dodaniu wszystkich plików kliknij "Zakończono".
sv När alla filer har lagts till klickar du på "Avslutat".
6
E Haga clic en "Siguiente".
PT Clique em "Avançar".
TR "İleri" üzerine tıklatınız.
PL Kliknij "Dalej".
sv Klicka på "Nästa".

E Seleccione su grabadora y haga clic en "Grabar".
PT Escolha o seu gravador e clique em "Gravar".
TR Kaydedicinizi seçip "Yazdır" üzerine tıklatınız.
PL Wybierz nagrywarkę i kliknij "Zapis".
sv Välj din spelare klicka på "Bränn".
7
E "Nero" grabará ahora el disco.
PT O "Nero" irá gravar o seu disco.
TR "Nero" artık diskinizin üzerine yazacaktır.
PL Program "Nero" rozpoczęnie nagrywanie płyty.
sv "Nero" kommer nu att bränna din skiva.
9
10
E Enhorabuena, su disco se ha grabado correctamente. Haga clic en "Aceptar". Ahora puede cerrar la aplicación.
PT Parabéns, o seu disco foi gravado com êxito. Clique em "OK". Agora, você poderá fechar o aplicativo.
TR Tebrikler, diskinize başarıyla yazdırıldı. "OK" üzerine tıklatınız. Şimdi uygulamadan çıkabilirsiniz.
PL Gratulacje! Zapis płyty zakończył się pomyślnie. Kliknij "OK". Możesz zakończyć pracę programu.
SV Grattis! din skiva har bränts utan fel. Klicka på "OK". Du kan avsluta programmet nu.

Be responsible Respect copyrights
Be responsible Respect copyrights
Be responsible Respect copyrights
USA/Canada: This player is for use only with IBM compatible UL listed Personal Computers or Macintosh UL listed workstations, weighing less than 18 kg.
LASER SAFETY
This unit employs a laser. Do not remove the cover or attempt to service this device when connected due to the possibility of eye damage.
LASER-SICHERHEIT
USE OF CONTROLS OR ADJUSTMENTS OR PERFORMANCE OF PROCEDURES OTHER THAN THOSE SPECIFIED HEREIN MAY RESULT IN HAZARDOUS LASER RADIATION EXPOSURE.
WARNUNG
Output power......(measured above the objective lens)
Read: 0,2 mW (CD) - 2 mW (DVD)
......Write: 78 mW (CD) – 54 mW (DVD)
Beam divergence....60 degree
KLASS 1 LASERAPPARAT
CLASS 1 LASER PRODUCT
LUOKAN 1 LASERLAITE
KLASSE 1 LASER-PRODUCT
Notes
Notes
Additional information available at our website:
Find more info on www.philips.com/storage
Find updates on www.philips.com/storageupdates
Specifications subject to change without notice.
All dimensions shown are approximate.
All rights reserved.
Reproduction, copying, usage, modifying, hiring, renting,
public performance, transmission and/or broadcasting in whole or part is prohibited without the written consent of Philips Electronics N.V.

- UK
- Contents
- D
- Inhalt
- How to connect the SPD3200CC to my computer?
- 1
- The image is too blurry to recognize any text content.
- 11
- UK Windows 98 Second Edition only!
- D Nur Windows 98 Second Edition!
- How to disconnect the SPD3200CC without shutting down the computer?
- -
- How to print a label on a disc?
- 5
- 6
- 12
- 17
- 18
- How to capture video from a digital DV-camcorder?
- 4
- How to make a video disc from video files which are on the hard disk or a disc?
- [NO TEXT]
- How to make a Data disc?
- 10
- How to make an Audio disc?
- Warranty, Environment, Safety, Frequently Asked Questions (FAQ) and Specifications
- How to find warranty information?
- WEEE mark: "Information to the Consumer"
- Disposal of your old product
- WARNING
- Frequently Asked Questions (FAQ)
- Question 1: I have a Windows 98 Second Edition PC and there is no CDROM device in the computer but I have another PC. How do I install the drivers?
- Question 2: I have a windows 98 Second Edition PC and there is no CDROM device in the computer but I have access to the internet. How do I install the drivers?
- Question 3: How do I keep my SPD3200CC in good shape?
- Question 4: I have connected the SPD3200CC to an USB connector but Windows does not react and the SPD3200CC is not recognized.
- Question 5: Burning or reading takes far too long. How does this come?
- Question 6: I inserted a disc and it is not played.
- Question 7: Player does not respond to some operating commands during playback.
- Question 8: I tried to burn a disc and this failed. What happened?
- Question 9: I cannot read from a disc.
- Question 10: How can I clean a dirty disc?
- Question 11: May I use chemicals to clean a disc?
- Question 12: May I use cleaning discs to clean the lens of the SPD3200CC?
- Specifications
- Be responsible Respect copyrights
- 16
- LASER SAFETY
- LASER-SICHERHEIT
- WARNUNG
- Notes
- Find more info on www.philips.com/storage
- Find updates on www.philips.com/storageupdates
Brand : PHILIPS
Model : SPD3200CC
Category : DVD Recorder