
SPD2415SD - DVD Recorder PHILIPS - Free user manual and instructions
Find the device manual for free SPD2415SD PHILIPS in PDF.
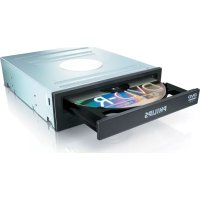
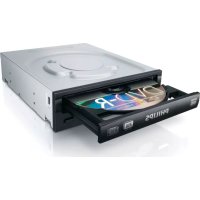
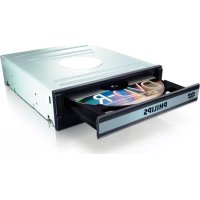
| Product type | Internal DVD writer |
| Brand | Philips |
| Model | SPD2415SD |
| Supported disc formats | DVD±R, DVD±RW, DVD+R DL, CD-R, CD-RW |
| DVD±R write speed | 20x |
| DVD±RW write speed | 8x |
| CD-R write speed | 48x |
| DVD read speed | 16x |
| Interface | IDE (ATAPI) |
| Loading mechanism | Motorized tray |
| Dimensions (W x H x D) | 146 x 41 x 165 mm |
| Weight | 0.75 kg |
| Power supply | Via internal power connector (Molex) |
| Power consumption | 15 W during operation |
| Operating temperature | 5 °C to 45 °C |
| Included software | Nero suite (Nero Burning ROM, Nero Express) |
| Main functions | Burning video, audio and data discs, disc copying |
| Maintenance | Clean the case with a soft, dry cloth, avoid solvents |
| Safety | Electrostatic discharge: touch an unpainted metal surface before handling |
| Spare parts and repairability | Parts not provided, contact a qualified technician |
| General information | Compliant with WEEE directive, do not dispose with household waste |
Frequently Asked Questions - SPD2415SD PHILIPS
User questions about SPD2415SD PHILIPS
0 question about this device. Answer the ones you know or ask your own.
Ask a new question about this device
Download the instructions for your DVD Recorder in PDF format for free! Find your manual SPD2415SD - PHILIPS and take your electronic device back in hand. On this page are published all the documents necessary for the use of your device. SPD2415SD by PHILIPS.
USER MANUAL SPD2415SD PHILIPS
How to... for Internal ReWriters using Nero 7
EN Install Guide
DE Installationsanleitung
FR Guide d'installation
IT Guida d'installazione
NL Installatiegids
ES Guia de instalacion
PT Guia de Instalação
TR Kurulum Kilavuzu
PL Instrukcja montazu
SV Installationsguide
安装指南
RU HnCTpyKUIN NO IHCTaAIAUIN
DK Installationsvejledning
安装指南

Contents
How to install? 5
Up to date? 15
How to make a video disc? 19
How to make a data or audio disc? 27
How to copy a disc? 31
More info or help needed 34

Inhalt
How to install? 73
Up to date? 83
How to make a video disc? 87
How to make a data or audio disc? 95
How to copy a disc? 99
More info or help needed 107
How to install?
Please refer to your PC manual or contact your local dealer for more information.
#
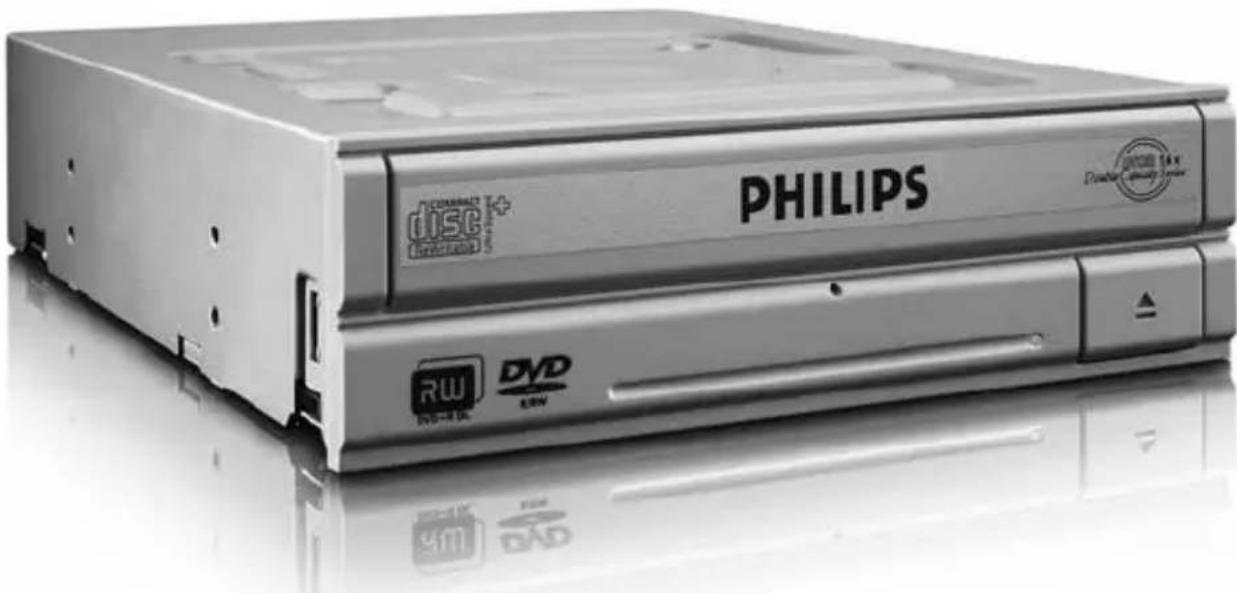
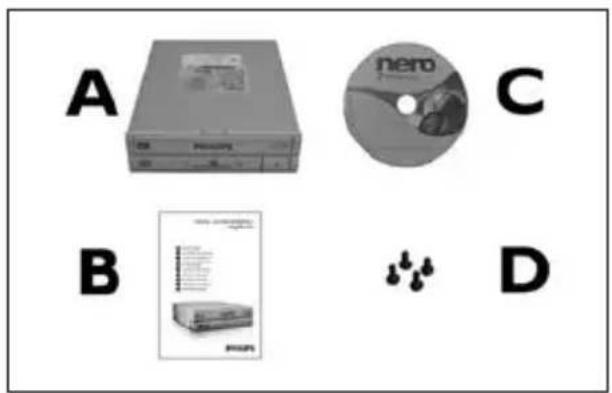
EN This can be found in the box:
A: Your new drive C: The Nero software disc
B: This manual D: 4 screws in a small bag
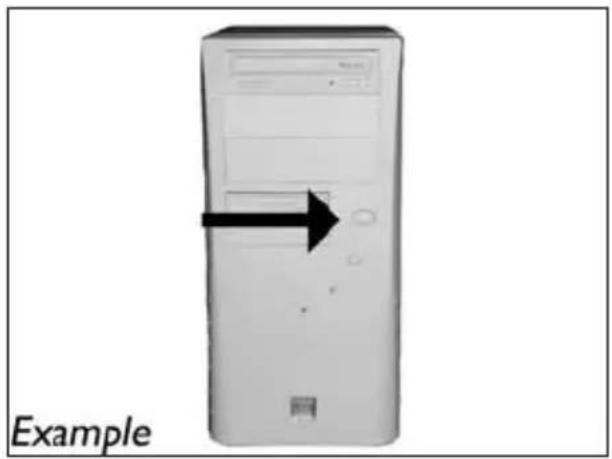
EN Switch your computer off.
EN Touch an unpainted metal part (eg. your heating or an unpainted part of your computer case).
This will avoid any damage to your computer by electrostatic discharge.
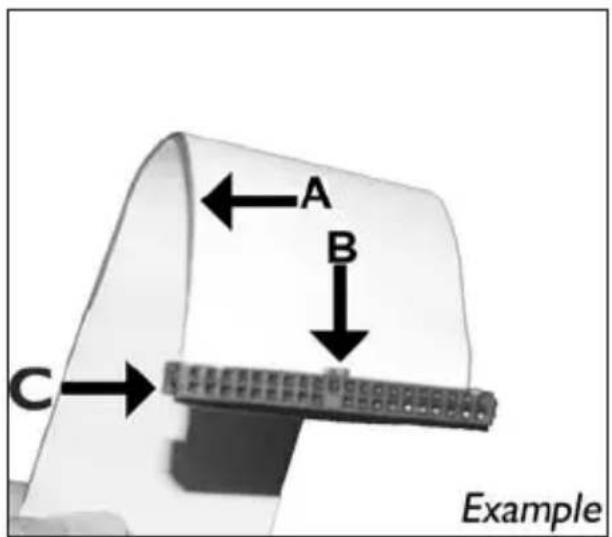
EN Find the IDE-cable which may look like this example:
A: Coloured line.
B: Notch and closed hole.
C:Pin1.
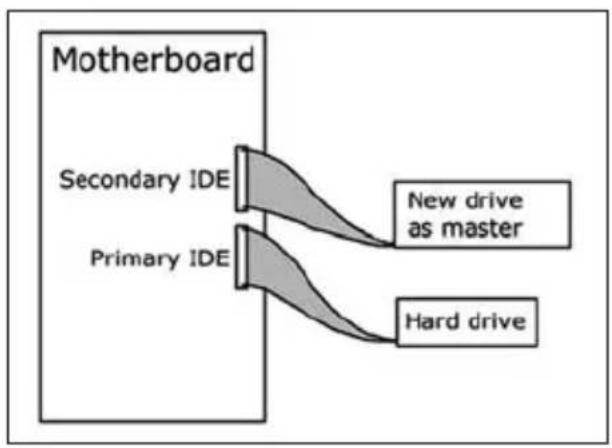
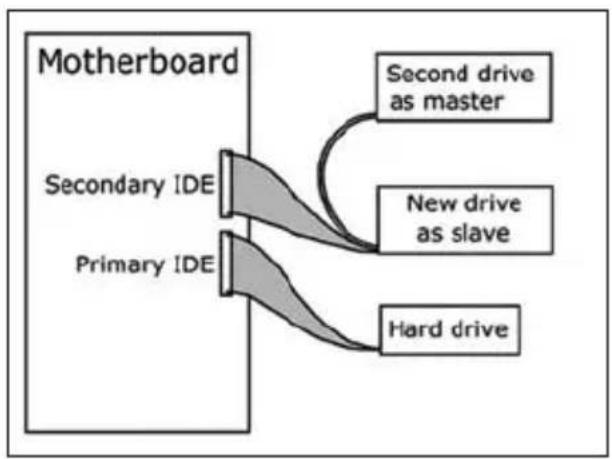
EN Connect the IDE cable like in A (2 devices) or B (only 1 device). Do not choose 2 "Master" or 2 "Slave" devices on 1 cable.
A: Coloured line.
B: Notch and closed hole.
C:Pin1.
EN Secure the drive with the screws (if possible on both sides).
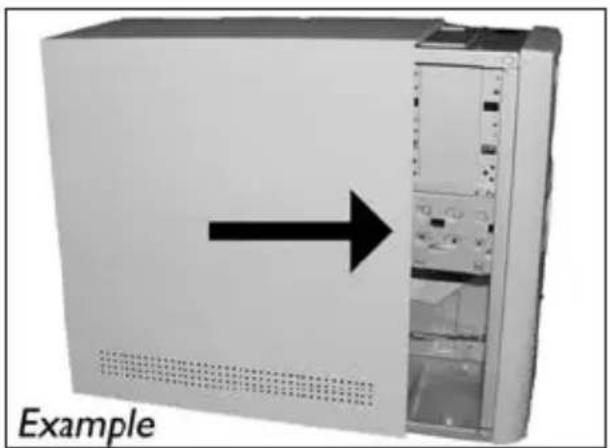
EN Put the cover you took off in step 5 back on.
EN Put the screws (if there were any) back in and reconnect the cables.
How to make a video disc?
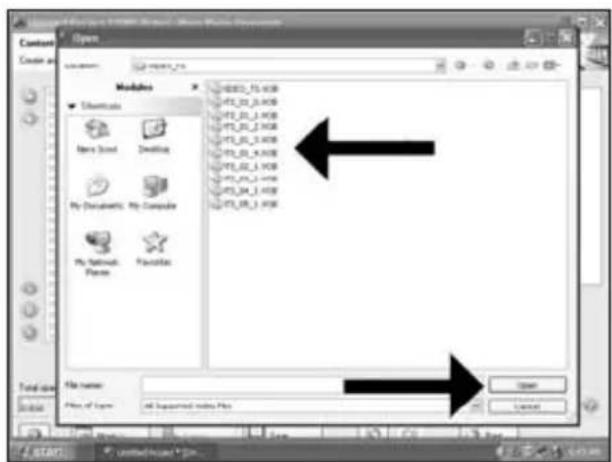
EN If you want to add files from the hard disk, choose "Add Video Files".
How to make a data or audio disc?
EN Choose your recorder and click "Burn".
8
EN Nero is burning your disc.
9
EN Congratulations, your disc has been written successfully. You may exit the application now.
10
Be responsible Respect copyrights
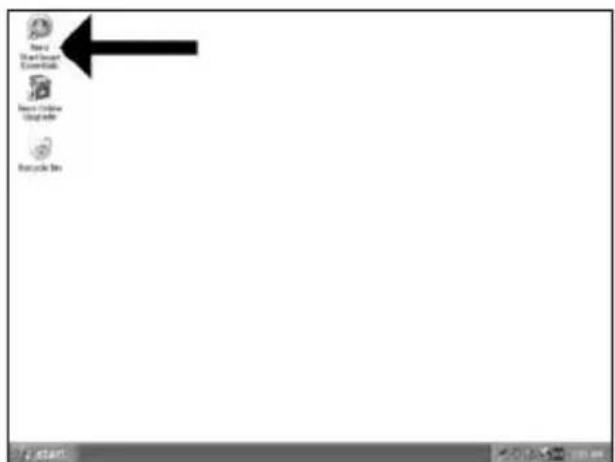
EN Start "Nero StartSmart Essentials".
DE Starten Sie "Nero StartSmart Essentials".
FR Lancez "Nero StartSmart Essentials".
IT Awiare "Nero StartSmart Essentials".
NL Start "Nero StartSmart Essentials".
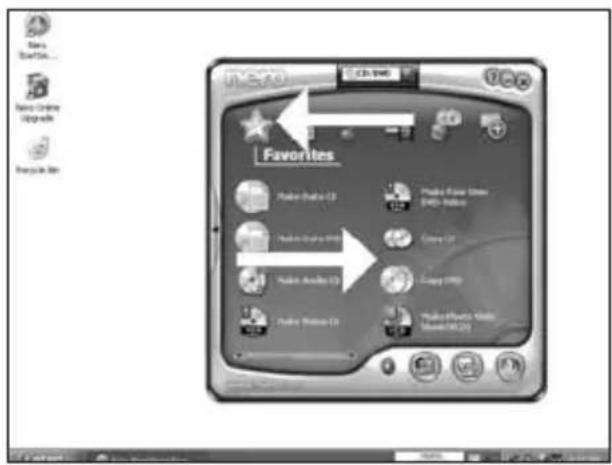
EN Choose "Favorites" and "Copy CD" or "Copy DVD".
2
DE Wahlen Sie "Favoriten" und "CD kopieren" oder "DVD kopieren".
FR Choisissez "Favoris" et "Copier CD" ou "Copier DVD".
IT Selezionare "Preferiti" e "Copia CD" o "Copia DVD".
Kies "Favorieten" en "CD Kopieren" of "DVD Kopieren".
More info or help needed
Visit www.philips.com/storageupdates

Troubleshooting
Philips optical disc drives are manufactured with utmost care. In case of problems, it often appears that the drive itself is not defective. You can simply solve most of these problems by using the support tools offered by Philips.
When you're experiencing problems:
Please check the information in the "How to..." manual.
2 Check the Philips support websites www.philips.com/storageupdates and www.philips.com/support for interactive support, troubleshooting, and the newest software updates.
3 Should you encounter any more difficulties during installation or use, please contact Philips Customer Care via the e-mail address or telephone numbers that can be found at www.philips.com/contact.
Prior to claiming a drive for warranty, you must request a return reference number at www.philips.com/support or contact Philips Customer Care.
Additional warranty information is available in the "Philips Warranty" folder on the Nero software disc.

Be responsible Respect copyrights
"The making of unauthorised copies of copy-protected material, including computer programmes, files, broadcasts and sound recordings, may be an infringement of copyrights and constitute a criminal offence. This equipment should not be used for such purposes."
WEEE mark:Disposal of your old product

Your product is designed and manufactured with high quality materials and components, which can be recycled and reused. Please inform yourself about the local separate collection system for electrical and electronic products, including those marked by following symbol. Please act according to your local rules and do not dispose of your old products with your normal household waste.
WARNING
Plastic bags can be dangerous.
To avoid danger of suffocation, keep this bag away from babies and small children.
Be responsible Respect copyrights
Be responsible Respect copyrights
1 ES Inicie "Nero StartSmart Essentials".
PT Inicie o "Nero StartSmart Essentials".
TR "Nero StartSmart Essentials" baslat.
PL Uruchom program "Nero StartSmart Essentials".
SV Starta "Nero StartSmart Essentials".

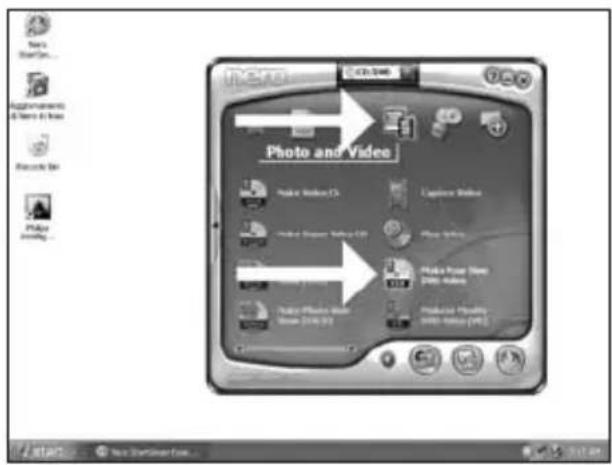
ES Elija "Foto y video" y "Crear DV de video propio".
2
PT Seleccione "Foto e video" e "Crie seu propre DVD de video".
TR "Fotografia ve Video" ve "Keni DVD-Video'nu Yarat"yu sec.
PL Kliknj "Foto i video" i "Tworz wlasne DVD-Video".
SV Valj "Foto och video" och "Gör din egen DVD-video".
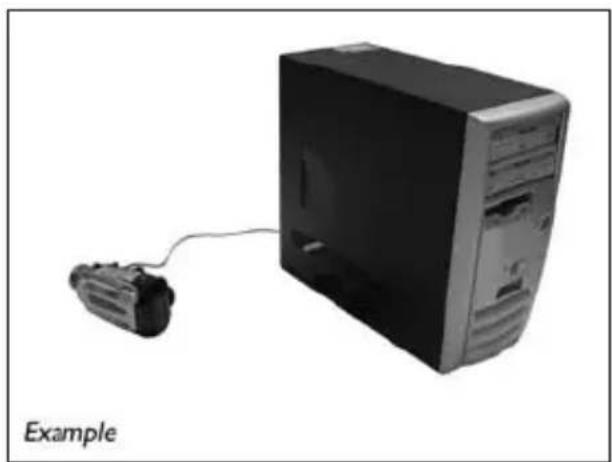
ES Si quiere capturar video desde una CAMERA, conectela a su PC. De lo contrario, vaya al paso 8.
PT Se desejar capturar video de unaamera, conecte-a ao seu PC. Caso contrario, va para a etapa 8.
TR Kameradan video yakalamak istiyorsaniz, bunu PC'ize baglayin. Aksi halde 8. adima gidin.
PL Jesli chcesz przechwycic video z kamery, podlacz ja do komputera. W przyciwnym razie przyjeźdo kroku 8.
SV Om du vill hamta video fran en kamera ansluter du den till datom.l annat fall gár du till steg 8.

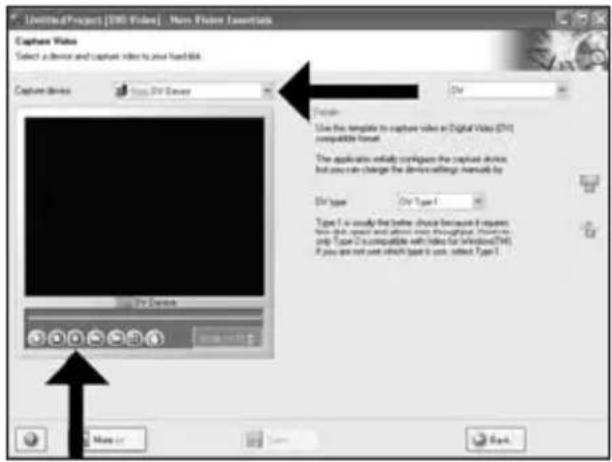
ES Elija "Capture video".
PT Selezione "Capture video".
TR "Capture video"yu sec.
PL Kliknij "Capture video".
SV Välj "Capture video".
3
5
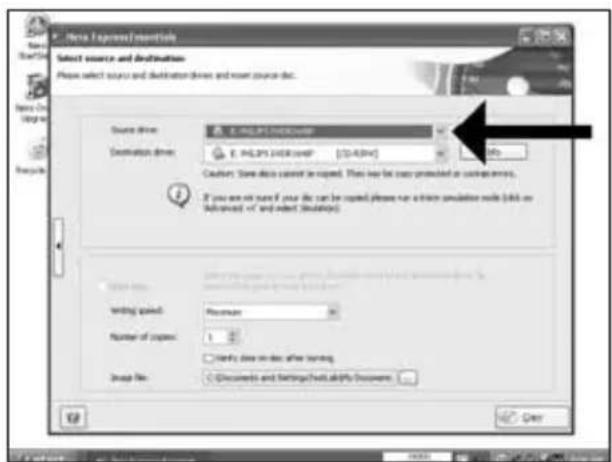
ES Seleccione el dispositorico de captura y pulse el boton Record.
PT Seleciono o dispositoso de captura e aperte o botao de gracaio.
TR Yakalanan aygiti segin ve kayit dugmesine basin.
PL Wybierz urzadzenie do przechwytywania i nacinij przycisk nagrywania.
SV Välj den,enhet som du villhamta video fran ochtryckpaisinpelningsknappen.
6
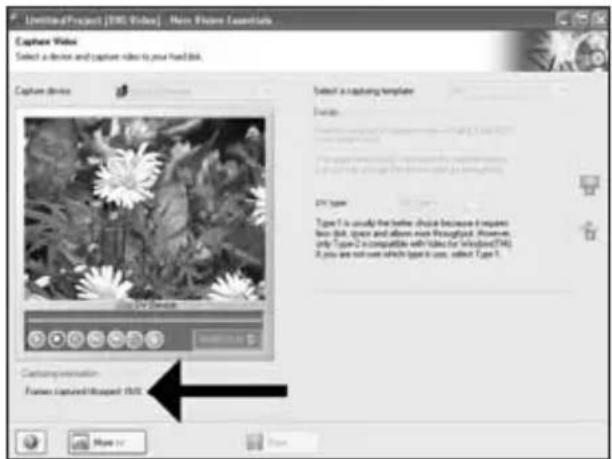
ES Durante la captura, aquí verá el proceso.
PT Durante a captura, você está o progresso muito bem.
TR Yakalama sirasinda, ilerlemede durumunu buradan goreceksiniz.
PL W trakcie przechwymania, tutaj mozesz observwować postep operaci.
SV När hamtningen pagar ser du forloppet hare.
7
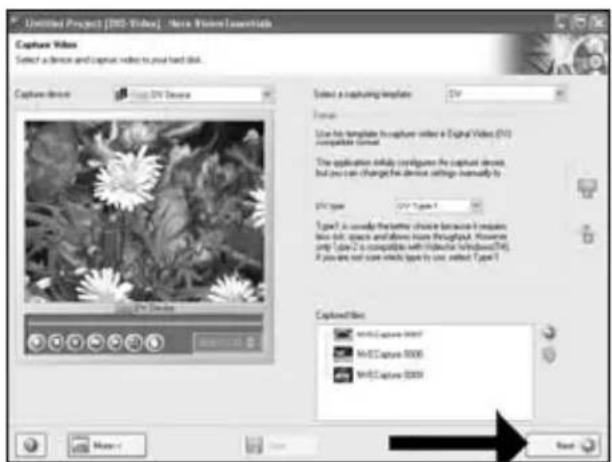
ES Hagablick en "Siguiente" cuando se hayan capturado todas las secuencias de video.
PT Clique em "Avançar" quando todas as sequências de video tiverem sido capturadas.
TR Tum video siralari yakalandiginda "ileri"ye tiklayin.
PL Po przechwyceniu wzystkich sekwenci video, kliknij "Dalej".
SV Klicka på "Nästa" nar alla videosekvenser har hamtats.
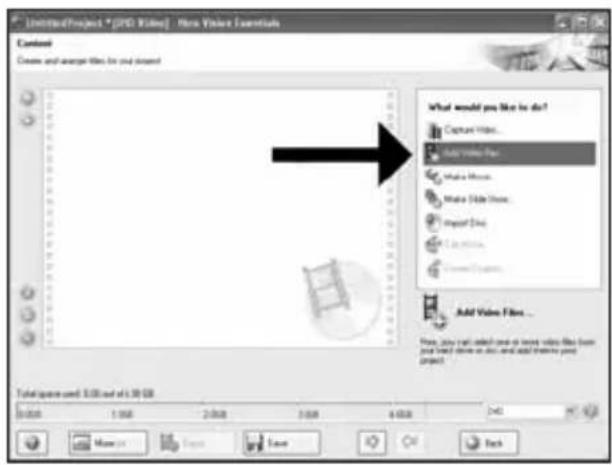
ES Si quiereañadir ARCHIVOS desde el disco duro, elija"Añadir archivos de video".De lo contrario, vaya al paso 10.
PT Se quiser adicionar arquivos do disco rigido, selecione "Adcionar arquivos de video".
Caso contrario, ya para a etapa 10.
TR TSabit diskten dosya eklemek istiyorsaniz, "Vidyo Dosyasi Ekle" seçin. Aksi halde 10. adim gidin.
PL Jesli chcesz dodać pliki z dysku twardego, kliknjij "Dodaj pliki video". W przyciwnym razie przyzejź do kroku 10.
SV
Om du vill lagga till filer fran hardsdisken valjer du "Addera videofiler". Annars gár du till steg 10.

ES
Be responsible Respect copyrights
1 ES Inicie "Nero StartSmart Essentials".
PT Inicie o "Nero StartSmart Essentials".
TR "Nero StartSmart Essentials" baslatin.
PL Uruchom program "Nero StartSmart Essentials".
SV Starta "Nero StartSmart Essentials".


ES Elija "Favoritos" y "Copiar CD" o "Copiar DVD".
2
PT Selezione "Favoritos" e "Copiar CD" ou "Copiar DVD".
TR "Sik Kullanilanlar" ve "CD Kopyala" veya "DVD Kopyala"yi secin.
PL Kliknij "Ulubione" i "Kopiuj CD" lub "Kopiuj DVD".
SV Välj "Favoriter" och "Kopiera CD" aller "Kopiera DVD".

Be responsible Respect copyrights
Be responsible Respect copyrights
Be responsible Respect copyrights
Please refer to your PC manual or contact your local dealer for more information.
1
SC可在包装盒中找到以下物件:
A: 新驱动器。
C: Nero软件光盘。
B: 本手册。
D:小袋装的4颗螺钉。
RU 3TO MOXHO HAIHTB OKHe
A:BaHHOBbIMDNCKOBoA
D:4BnHTaB KOMNaKTHOM NaKeTe
DK Dette findesi kassen:
A: Dit nye drev C: En disc med Nero-software
B: Denne manual D: 4 skruer i en lille pose
在包装盒裹可以找到:
A您的新光碟機。
B: 這本手冊。
C: Nero 軍體光碟。
D: 小袋子中的 4 颗螺絲
EN This can be found in the box:
A: Your new drive C: The Nero software disc
B: This manual D: 4 screws in a small bag
2
SC 关闭计算机。
RU BbikiouHTe BaU KOMNbiOTep.
EN Switch your computer off.
3
EN Touch an unpainted metal part (eg. your heating or an unpainted part of your computer case).
This will avoid any damage to your computer by electrostatic discharge.
4
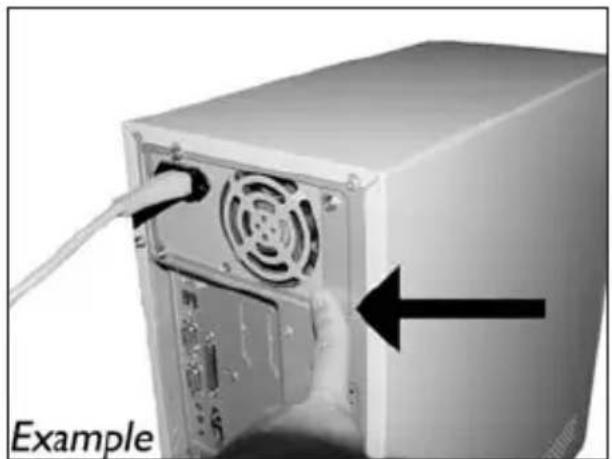
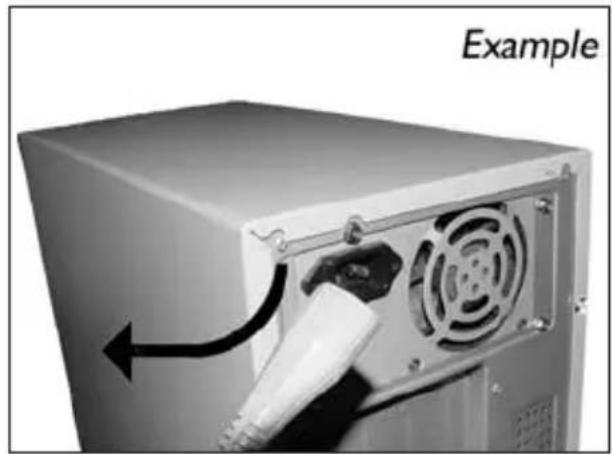
SC 断开计算机电源。
RU OTcoeAHHTe Ka6eAb TnTaHnO T BaIero PC.
DK Tag strömkablet fra computeren ud.
TC 拔掉電腦電源線
EN Disconnect the power cable from the PC.
5
SC 打开计算机。可能需要松开计算机最后面的螺钉。
有关详细信息,请参阅您的计算机手册。
RU OTKPOIte KOMNBIOTep. ABy 3TOFO HxHHO OTNYCTNTB BVINTb, paCIOAOXeHHbIe HaJIe Bcero Ha 3aHHe CTeHKe KOMNBIOTepa.
BoaeePiop6Ho CM. B pyKOBOACTBe IIO KOMIbIOTepy.
DK Abn computeren. Du skal muligvis Iosne nogle skruer, der ofte sidder bag pa computeren.
Find mere information i manualent til din computer.
TC 拆開您的電腦。您可能需要拆下螺絲,通常位於您電腦的背面。
請參閱您的電腦手冊以取得更多資訊
EN Open your computer. You may have to unleash screws which are mostly located at the back of your computer.
See your computer manual for more details.

6
EN If you replace a drive, take it out and check which setting it has ("Master" or "Slave"). Remember this setting and go to step 10.
如未安装任何驱动器,则记住“Master(主驱动器)”并转至步骤10。
RU ECAN BbI He HnHCTaMpyeTe DnCKOBoA, 3aIOMHInTe yCTAHOBky "Master" n IpepeAnTe K wary 10.
Husk blot pa "Master", hvis du/DDhke har noget drev installereret, og g til pkt. 10.
TC 若您未安裝光碟機,請記下“Master”,然後至步驟10。
EN If you have no drive installed, remember "Master" and go to step 10.
EN If you add a drive, check the drive has which remains in the PC ("Master" or "Slave", see step 11), remember the OTHER setting.
10
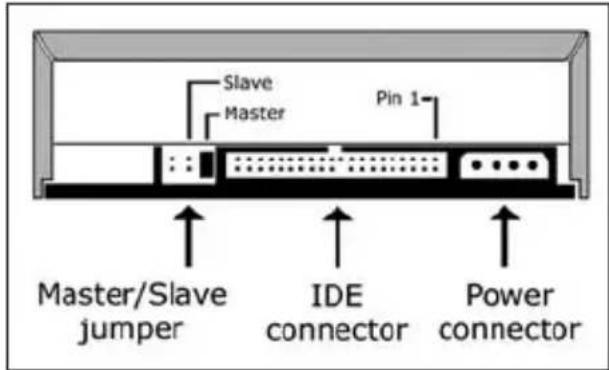
驱动器后面有一些接口,用来将驱动器连接到计算机。
3Aecb HxOaTc CoaHHeHH (Ha 3aHc HCTeHKe BaIero DnCKOBoDa), KOTOpbl EoAKHbINCIOABoBtCBr AINoKAIOHeHH DnCKOBoDa KKOMNbIOTepy.
DK Dette er de forbindelser (bag pa drevet), som du skal bruge, nardrevet skal tilsluttes computeren.
TC 這些是您將用來把光碟機連接到電腦的連接設定(在您的光碟機背面)。
EN These are the connections (on the back of your drive) you will have to use for connecting the drive to the computer.
11
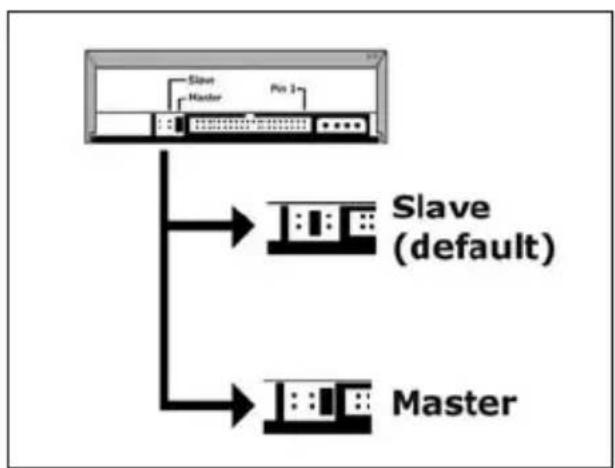
选择“Master(主驱动器)”或“Slave(辅驱动器)”作为跳线,如步骤7、8和步骤9所示。
RU BbI6epITe "Master" nAn "Slave" dAn MInKpOnepeKIOUaTeA, KaK nOKa3aHO B Iwarax 7,8 nn9.
DK Vaelg "Master" eller "Slave" til jumperen som vist i pkt. 7, 8 eller 9.
TC選擇跳線至“Master”或“Slave”,如步驟7、8或9中所述。
EN Choose "Master" or "Slave" for the jumper, as seen in steps 7, 8 or 9.
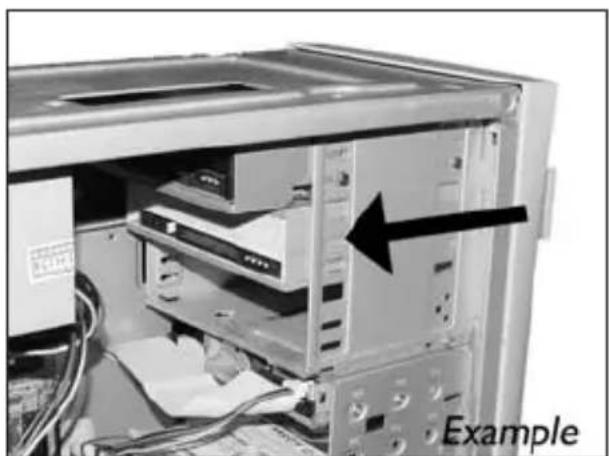
12
SC 将驱动器放入计算机。
RU BCTaBbTe DnCKOBoD B BaU KOMIbIOTep.
DK Sæt drevet ind i computeren.
TC 將光碟機放入您的電腦。
EN Put the drive into your computer.
SC 找到如此例所示的IDE线缆:
EN Find the IDE-cable which may look like this example:
A: Coloured line.
B: Notch and closed hole.
C:Pin1.
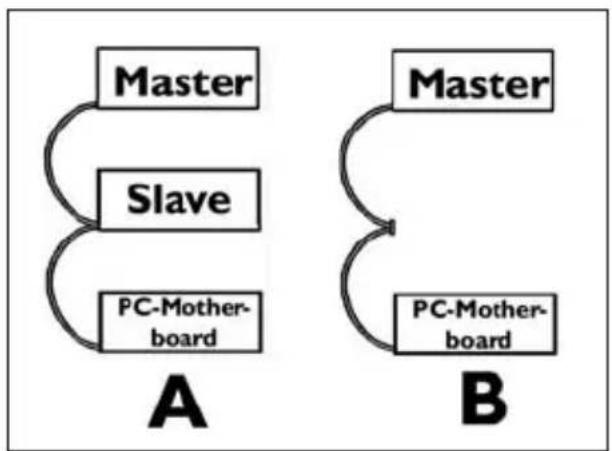
EN Connect the IDE cable like in A (2 devices) or B (only 1 device).
Do not choose 2 "Master" or 2 "Slave" devices on 1 cable.
15
SC 连接IDE线缆
A: Coloured line.
B: Notch and closed hole.
C:Pin1.
16
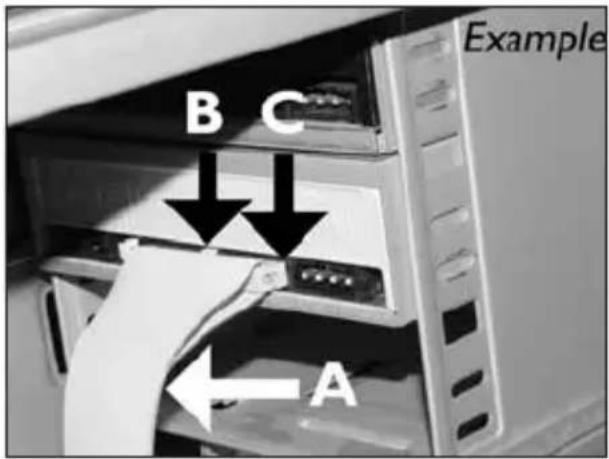
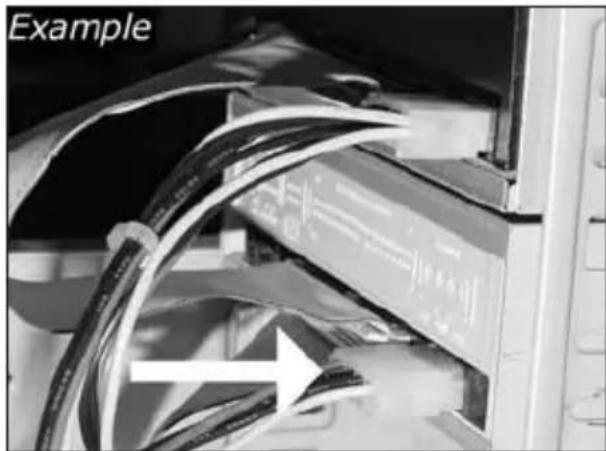
SC 找到此例所示的空闲电源线。
请注意接头的边缘。
RU HaIaNTe CBO6oADbIK Ka6eAb NITaHIN,
KOTOpbI BbIT, KaB bTOM pIMepe: NometbTe Kpa pa3bema.
DK Find et legit stromkabel som i dette
eksempel.
EN Find a free power cable like this example.
Please note the edges of the connector.

17
SC 将电源线连接到驱动器
(从步骤16起边缘将朝上)。
RU BCTBbTe Ka6eAn NITaHn BAaNCKOBOA.
EN Connect the power cable into your drive
(the edges from step 16 will be on top).
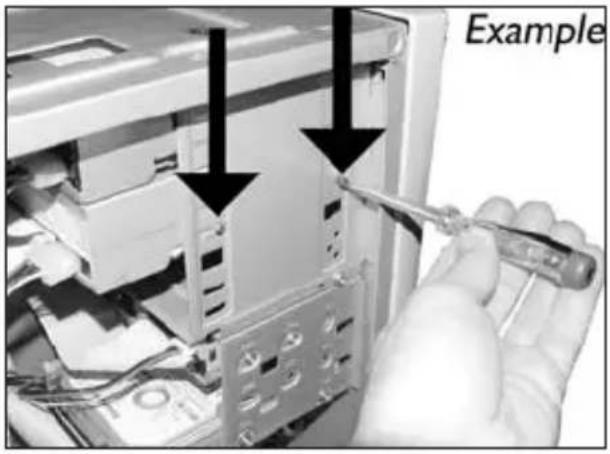
SC 用螺钉固定驱动器(如可能,同时固定两边)。
RU 3aKpeNITe AINCKOBDA BNHTAMN (NO BO3MOXHOCTNC O6eHX CTOPOH).
DK Fastgör drevet med skrueme (om muligt pa begge sider).
TC 使用螺絲固定光碟機(可能的話,請固定兩側)
EN Secure the drive with the screws (if possible on both sides).
Kak co3aTb BnaeOAnck?
Sādan laves en videodisc
如何製作視訊光碟?
How to make a video disc?

EN If you want to add files from the hard disk, choose "Add Video Files".
KaK co3aTb Anck AaHHbIX HAn ayAnoAnck?
Sādan laves en data-ller lyddisc
如何製作資料或音樂光碟?
How to make a data or audio disc?

Be responsible Respect copyrights
Be responsible Respect copyrights
Be responsible Respect copyrights
O: Indicates that this toxic or hazardous substance contained in all of the homogeneous materials for this part is below the limit requirement in SJ/T11363 - 2006.
X: Indicates that this toxic or hazardous substance contained in at least one of the homogeneous materials used for this part is above the limit requirement in SJ/T11363 - 2006.

环使用期限 Environmental Protection Use Period
This logo refers to the period (10 years)
This logo refers to the period ( 10 years ) during which the toxic or hazardous substances or elements contained in electronic information products will not leak or mutate so that the use of these substances or elements will not result in any severe environmental pollution, any bodily injury or damage to any assets.
BbIaHHe HeNCpPaBHOCTe
AACKOBaONTuecknx AACKOB Philips n3rOtaBnBAOTc c Oco6o TuaTeNbHocTBIO. PnB03HNIKHOBEHN np6eM qacto OKa3bIbaeTCyTO AACKOBa cam NO ce6e NcnpaBeH. BoaSyIO acTb 3TNX np6eM Bbl MoKeTe pOCTo peuHTb C NOMOu bIO INCTpyMeHTaBhix CpeACTB NOAdepKKN, PpeAaraembix hPmOi Philips
Ean y Bac BO3HkAN npo6aembl:
IpoHTaTte INHOpMaUIO, COePkaUIOB CootBeTCTByIOUeM pa3DeAe pyKOBOAcTBA "Ka ...
2 O6paTHeTcB K Be6-caTam NOAepKKn Philips www.philips.com/storageupdates n www.philips.com/support: AAR INHTepaKTINBHOI NOAepKKn, BbIABaeHn HEnCnpaBHOCTe N IOCAEHNX AKTyAAN3aU.
3 EcAn BO Bpem HCTaMaun nn EKCIyataun Bbl CTOAKHYNCb C OIOAHTeABHbIMN TpyHOCTaMn, Bam Caeayet o6paTntbcB Philips Customer Care no 3eKTPoHHo nOHTe Nn NO TeAefoHy, KOTOpBie MoXHo HauTN B INHTepHete no aDpecy www.philips.com/contact.
PpeKDe, cem npeAdbnB npTeH3n B paMKax rapaHTn Ha dNCKOBDA,Bbl AOxHbI 3aNPocHTb CcbIAOuHbI HOMep BO3BpaTa no aDpecy www.philips.com/support ancBraTcC Philips Customer Care.
ДононTeьняифорmaци no rapaHTn npeAcTaBaeHa Bnanke "Philips Warranty" kataIora Ha nporpaMMHom Ancke Nero.

Be responsible Respect copyrights
"He3aKOHHOe N3rOToBaeHne KOIN MaTePnaAOB, 3aUuIeHHbIX OT KOnnpoBaHnY, BkIOuaKOMNtEepHbIe npOrpaMMbl, faiMbI, TeAE-, paAnOTpHaCAAUIM IN 3ByKO3aNcM MoKeT paccMaTPNaBaTbCRA KAK HApUeHHe ABTopCKNX PAB IN IpeCAeOBaTbCRA NO YTOAOBHOMy 3aKoHOaTeA bCTBy. HactoJIuee o6OpdyOBaHHe He DOANHOICNOA3OBaTbCBA NODObHix LceAx."
IPEAOCTEPEXKEHNE
IaactIKOBbIE MeuKIMoYr PpeCTaBAYb ONaCHOCTb AAR JIN3Hn. Bo n36eKaHne ONaCHOCTn ydyuHeHr He dOnyckaiTe HaxOxHeHr 3TNX MeUKOB prAOM C MaAdEHaMn N MaEhBkMm DeTbMn.
www.philips.com/storageupdates
Be responsible Respect copyrights
Be responsible Respect copyrights
More info or help needed
Visit www.philips.com/storageupdates

Troubleshooting
Philips optical disc drives are manufactured with utmost care. In case of problems, it often appears that the drive itself is not defective. You can simply solve most of these problems by using the support tools offered by Philips.
When you're experiencing problems:
Please check the information in the "How to..." manual.
2 Check the Philips support websites www.philips.com/storageupdates and www.philips.com/support for interactive support, troubleshooting, and the newest software updates.
3 Should you encounter any more difficulties during installation or use, please contact Philips Customer Care via the e-mail address or telephone numbers that can be found at www.philips.com/contact.
Prior to claiming a drive for warranty, you must request a return reference number at www.philips.com/support or contact Philips Customer Care.
Additional warranty information is available in the "Philips Warranty" folder on the Nero software disc.

Be responsible Respect copyrights
"The making of unauthorised copies of copy-protected material, including computer programmes, files, broadcasts and sound recordings, may be an infringement of copyrights and constitute a criminal offence. This equipment should not be used for such purposes."
WEEE mark:Disposal of your old product
Your product is designed and manufactured with high quality materials and components, which can be recycled and reused. Please inform yourself about the local separate collection system for electrical and electronic products, including those marked by following symbol. Please act according to your local rules and do not dispose of your old products with your normal household waste.
WARNING
Plastic bags can be dangerous.
To avoid danger of suffocation, keep this bag away from babies and small children.
FC
FCC Compliance
FCC 15.105 rule:
This equipment has been tested and found to comply with the limits for a Class B digital device, pursuant to Part 15 of the FCC Rules. These limits are designed to provide reasonable protection against harmful interference in a residential installation. This equipment generates, uses and can radiate radio frequency energy and, if not installed and used in accordance with the instructions, may cause harmful interference to radio communications. However, there is no guarantee that interference will not occur in a particular installation. If this equipment does cause harmful interference to radio or television reception, which can be determined by turning the equipment off and on, the user is encouraged to try to correct the interference by one or more of the following measures:
- Reorient or relocate the receiving antenna.
- Increase the separation between the equipment and receiver.
- Connect the equipment into an outlet on a circuit different from that to which the receiver is connected.
- Consult the dealer or an experienced radio/TV technician for help.
Warning: Changes or modifications made to this equipment not expressly approved by Philips may void the FCC authorization to operate this equipment.
FCC 15.19 rule:
This device complies with Part 15 of the FCC Rules and with RSS-210 of Industry Canada. Operation is subject to the following two conditions:
(1) this device my not cause harmful interference, and
(2) this device must accept any interference received, including interference that may cause undesired operation.
CE
Electric-, Magnetic- and Electromagnetic Fields ("EMF")
- Philips Royal Electronics manufactures and sells many products targeted at consumers, which, like any electronic apparatus, in general have the ability to emit and receive electro magnetic signals.
- One of Philips' leading Business Principles is to take all necessary health and safety measures for our products, to comply with all applicable legal requirements and to stay well within the EMF standards applicable at the time of producing the products.
- Philips is committed to develop, produce and market products that cause no adverse health effects.
- Philips confirms that if its products are handled properly for their intended use, they are safe to use according to scientific evidence available today.
- Philips plays an active role in the development of international EMF and safety standards, enabling Philips to anticipate further developments in standardization for early integration in its products.
Safety Precautions
USA/Canada: This player is for use only with IBM compatible UL listed Personal Computers or Macintosh UL listed workstations, weighing less than 18kg .
LASER SAFETY
This unit employs a laser. Do not remove the cover or attempt to service this device when connected due to the possibility of eye damage.
LASER-SICHERHEIT
USE OF CONTROLS OR ADJUSTMENTS OR PERFORMANCE OF PROCEDURES OTHER THAN THOSE SPECIFIED HEREIN MAY RESULT IN HAZARDOUS LASER RADIATION EXPOSURE.
WARNING
Output power (measured above the objective lens)
Read: 1,4 mW - 2,5 mW
Write: 90 mW (CD) - 27 mW (DVD)
Beam divergence 60 degree
Additional information available at our website: www.philips.com/storageupdates www.philips.com/storage
Specifications subject to change without notice. All dimensions shown are approximate. © 2007 Koninklijke Philips Electronics N.V.
All rights reserved.
Reproduction, copying, usage, modifying, hiring, renting, public performance, transmission and/or broadcasting in whole or part is prohibited without the written consent of Philips Electronics N.V.


- How to... for Internal ReWriters using Nero 7
- Contents
- Inhalt
- How to install?
- #
- How to make a video disc?
- How to make a data or audio disc?
- More info or help needed
- Troubleshooting
- Be responsible Respect copyrights
- WEEE mark:Disposal of your old product
- WARNING
- 环使用期限 Environmental Protection Use Period
- BbIaHHe HeNCpPaBHOCTe
- IPEAOCTEPEXKEHNE
- FC
- FCC Compliance
- FCC 15.105 rule:
- FCC 15.19 rule:
- CE
- Electric-, Magnetic- and Electromagnetic Fields ("EMF")
- Safety Precautions
- LASER SAFETY
- LASER-SICHERHEIT
Brand : PHILIPS
Model : SPD2415SD
Category : DVD Recorder