
SPD6007BD - DVD Recorder PHILIPS - Free user manual and instructions
Find the device manual for free SPD6007BD PHILIPS in PDF.
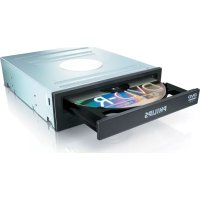
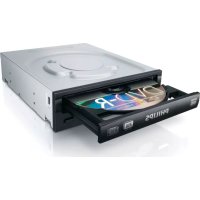
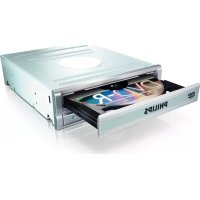
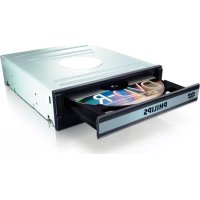
| Product Type | Internal DVD Recorder |
| Brand | Philips |
| Model | SPD6007BD |
| Interface | IDE (Parallel ATA) |
| Form Factor | 5.25-inch Internal |
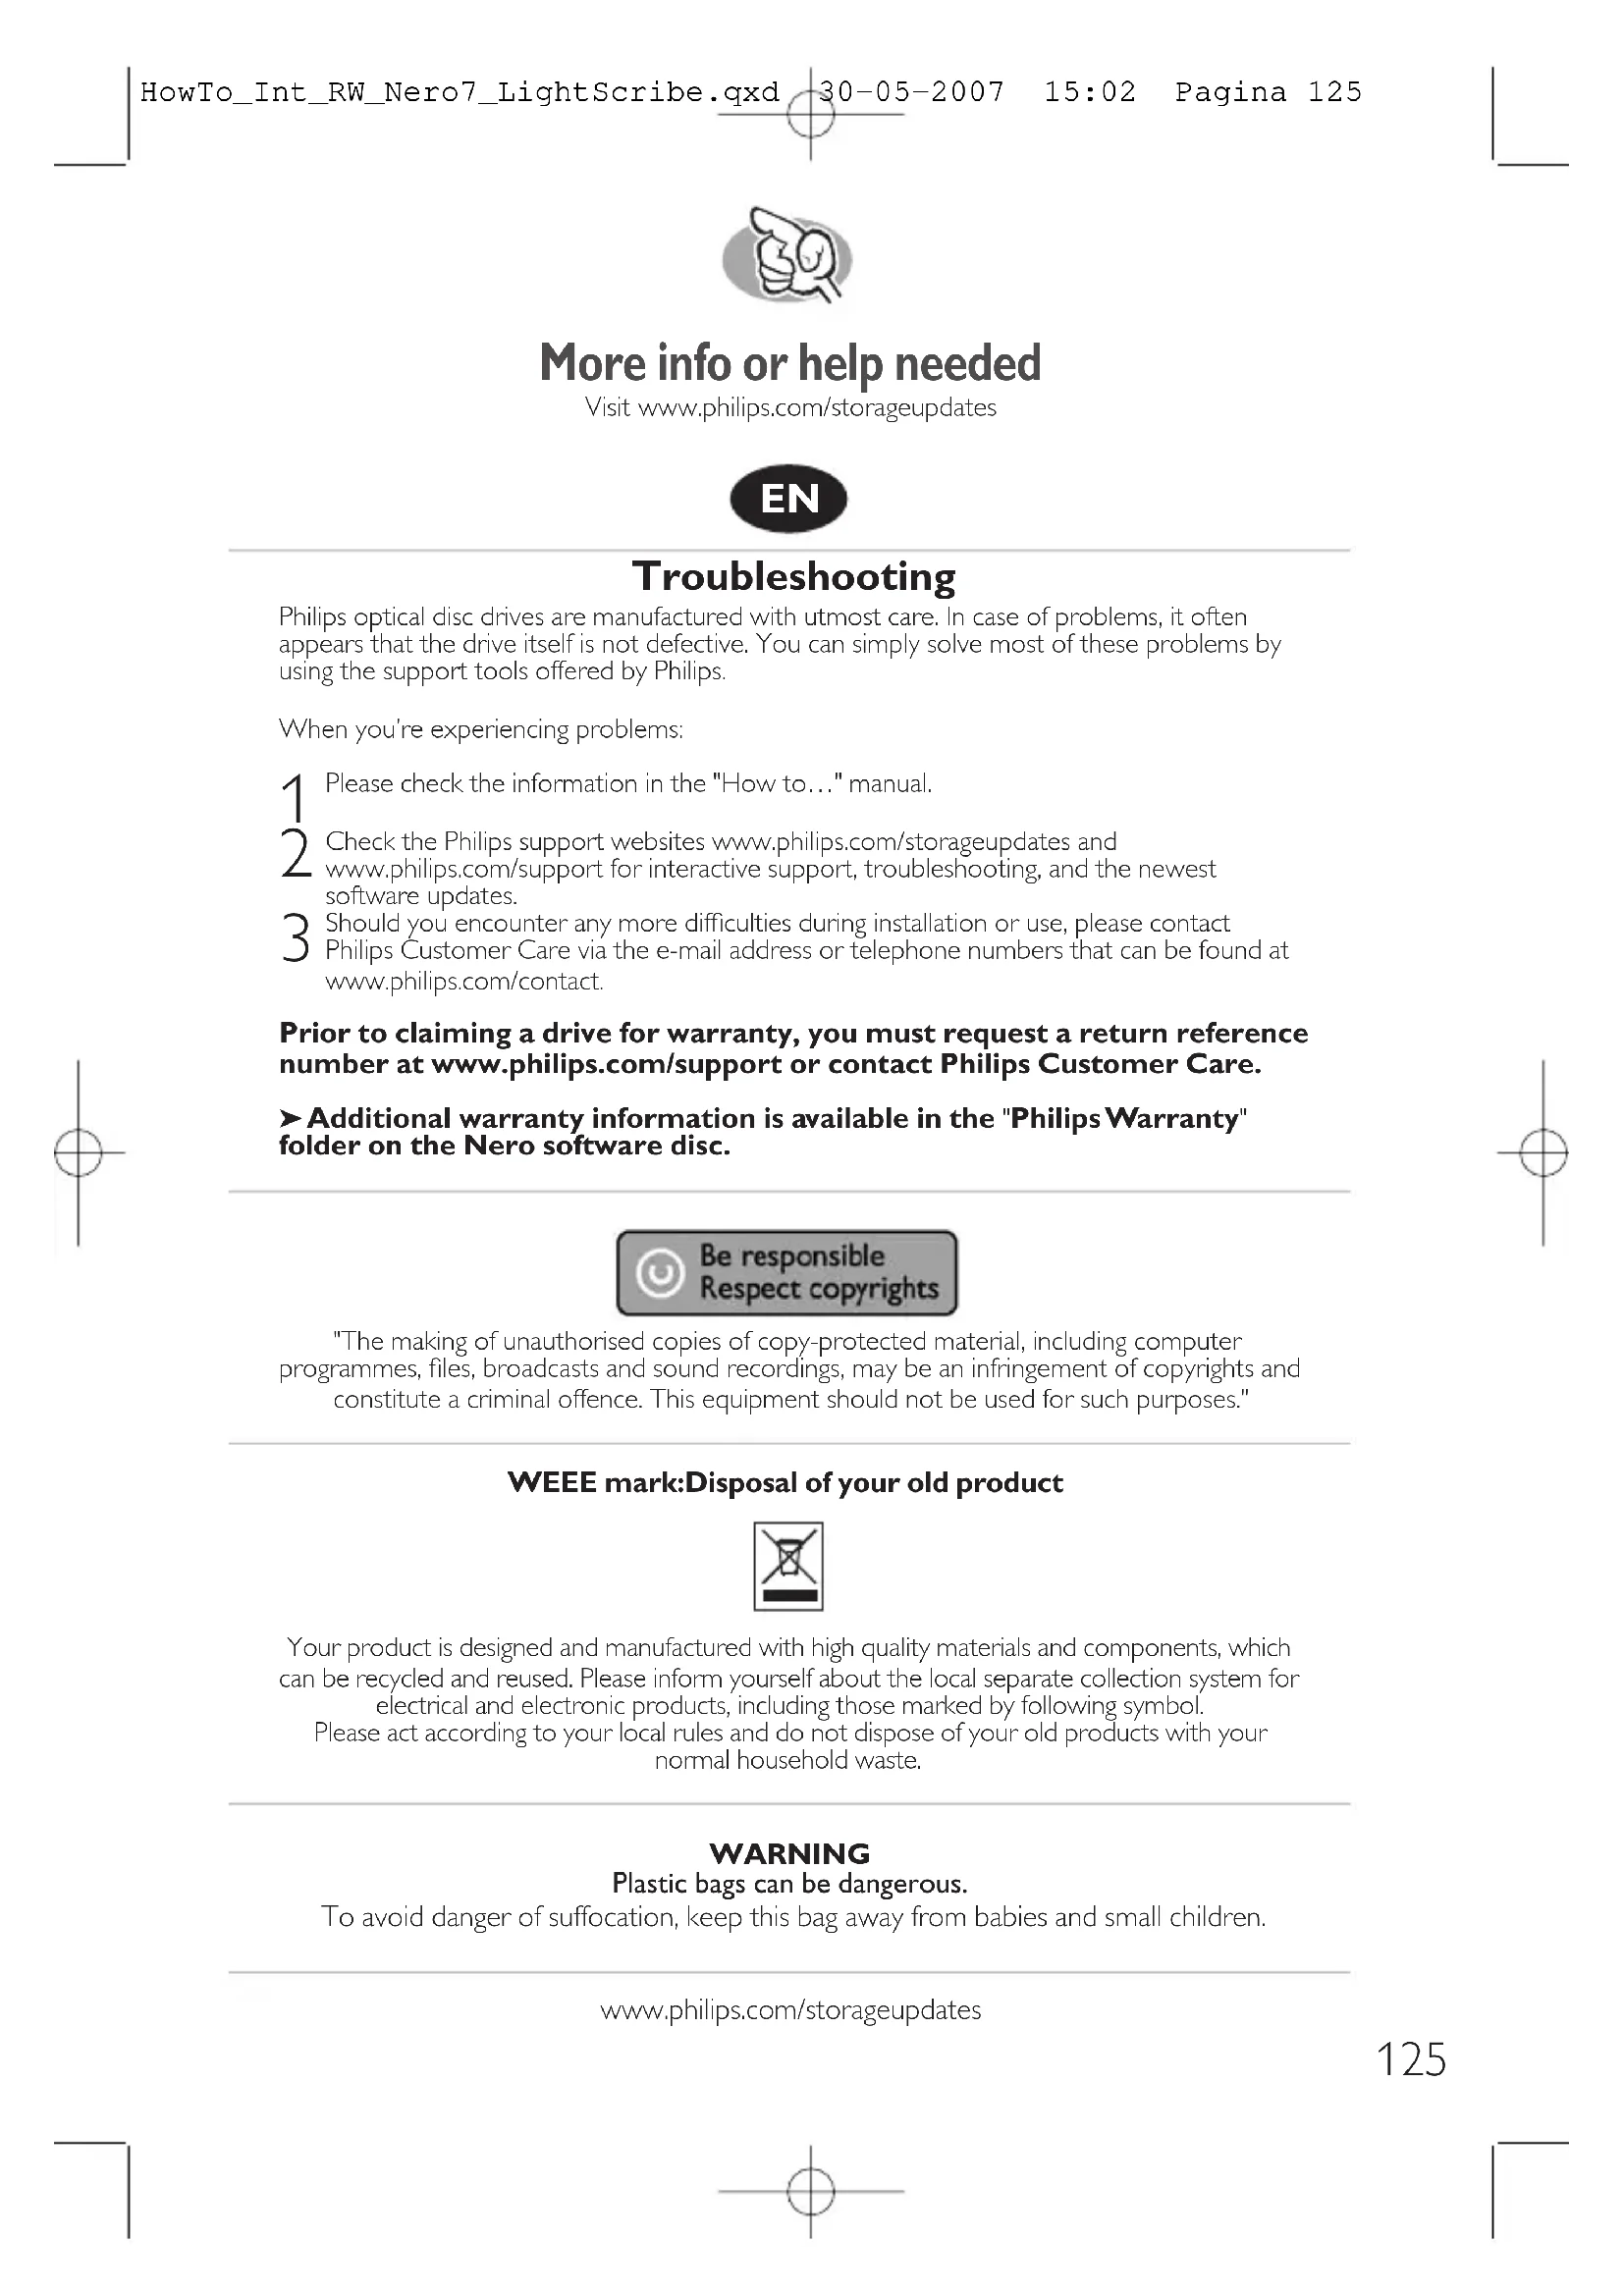
| Main Functions | DVD/CD burning and reading; creation of video, audio, and data discs; disc copying; LightScribe label printing |
| Included Software | Nero (full suite), Philips Intelligent Agent |
| Jumper Configuration | Selectable Master or Slave |
| Power Supply | Standard internal power connector (Molex) |
| Dimensions (approx.) | 170 x 145 x 42 mm |
| Weight (approx.) | 0.8 kg |
| Care and Cleaning | Clean the exterior with a soft dry cloth. Do not use solvents. |
| Safety | Do not expose to moisture. Keep plastic bags away from children. |
| Spare Parts and Repairability | Contact Philips customer support or www.philips.com/support |
| General Information | Warranty: refer to the Philips Warranty booklet. Support: www.philips.com/storageupdates |
Frequently Asked Questions - SPD6007BD PHILIPS
User questions about SPD6007BD PHILIPS
0 question about this device. Answer the ones you know or ask your own.
Ask a new question about this device
Download the instructions for your DVD Recorder in PDF format for free! Find your manual SPD6007BD - PHILIPS and take your electronic device back in hand. On this page are published all the documents necessary for the use of your device. SPD6007BD by PHILIPS.
USER MANUAL SPD6007BD PHILIPS
How to... for Internal ReWriters using Nero 7 and LightScribe
EN Install Guide
DE Installationsanleitung
FR Guide d'installation
IT Guida d'installazione
NL Installatiegids
ES Guia de instalacion
PT Guia de Instalação
TR Kurulum Kilavuzu
PL Instrukcja montazu
SV Installationsguide
SC 安装指南
RU INHCTpyKUINI NO INHCTaAIAUIN
DK Installationsvejledning
TC 安装指南

PHILIPS
EN
Contents
How to install? 5
Up to date? 15
How to print a label using LightScribe? 19
How to make a video disc? 25
How to make a data or audio disc? 33
How to copy a disc? 37
More info or help needed 40
DE
Inhalt
How to install? 85
Up to date? 95
How to print a label using LightScribe? 99
How to make a video disc? 105
How to make a data or audio disc? 113
How to copy a disc? 117
More info or help needed 125

How to install?
Please refer to your PC manual or contact your local dealer for more information.
#
EN This can be found in the box: A:Your new drive C:The Nero software disc B:This manual D:4 screws in a small bag
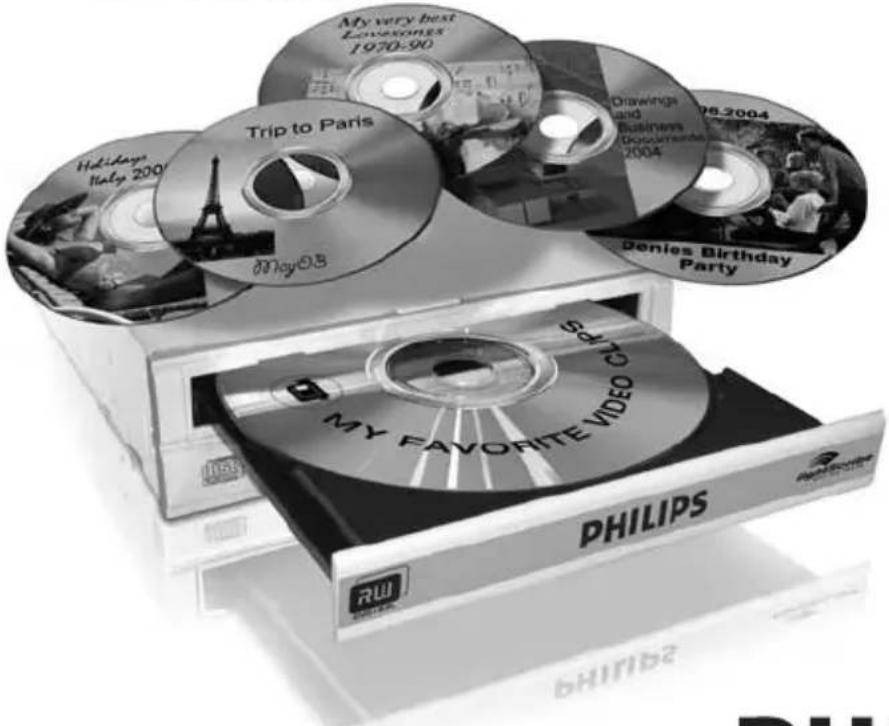
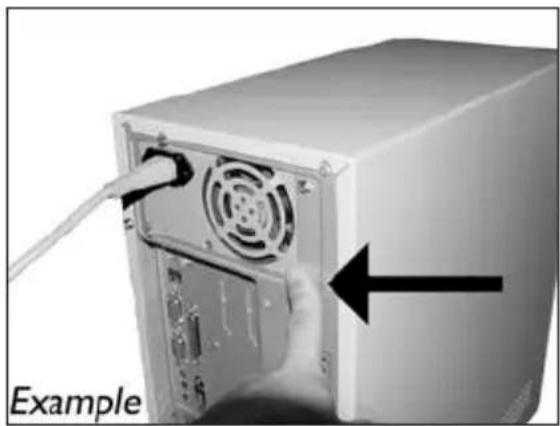
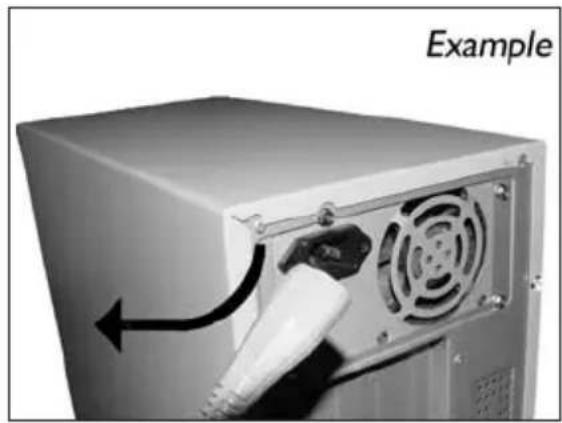
4 EN Disconnect the power cable from the PC.
DE Ziehen Sie das Netzkabel vom Computer ab.
FR Debranche le cable d'alimentation de I'ordinateur.
IT Disconnettere il cavo di alimentazione dal PC.
NL Trek de netstekkeruit de PC.
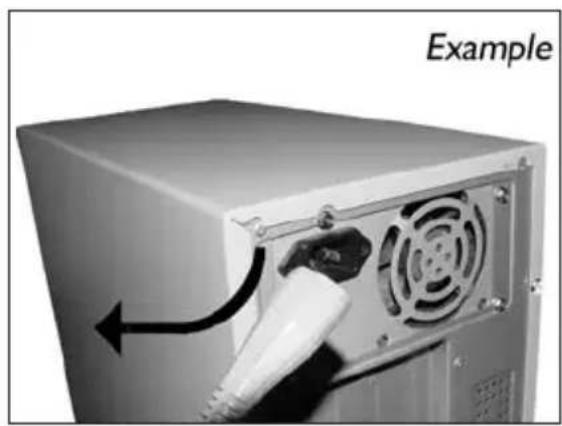
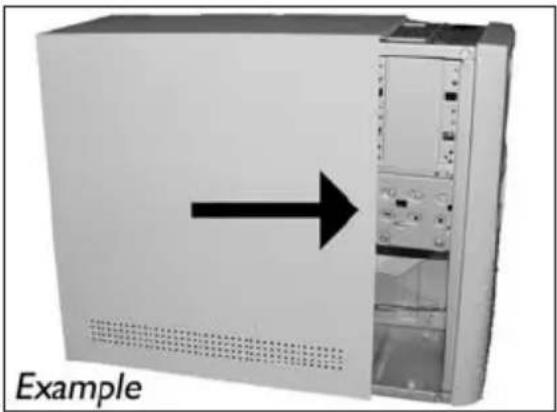
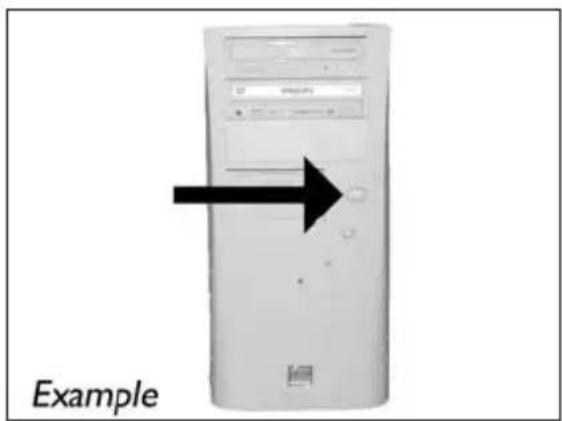
5 EN Open your computer. You may have to unleash screws which are mostly located at the back of your computer.
See your computer manual for more details.
DE Öffnen Sie ihren Computer. Eventuell müssen Sie hierzu Schrauben herausdrehen, die sich meistens an der Rückseite ihren Computers befinden.
Weitere Informationen hierzu finden Sie in Ihr Computerhandbuch.
FR Ouvrez I'ordinateur. Pour cela, il peut etre nécessaire de desserrer une ou plusieurs vis a I'amere de I'ordinateur.
Pour plus de détaill, reportez-vous au mode d'emploi de l'ordinateur.
IT Apriere il computer. E possibile che si dovanno svitare delle viti che in genere si trovano sul pannello posteriore del computer.
Per ulteriori informazioni fare nferimento al manuale del computer.
NL Maak uw computer open. Meestal moet u de schroeven aan de achterkant van uw computer loschroeven.
Raadpleeg de handleiding van uw PC voor details over het openen van de PC.
EN Take off the cover of the computer.
DE Nehmen Sie die Abdeckung des Computers ab.
FR Retirez le capot de I'ordinateur.
IT Togliere il coperchio del computer.
NL Verwijder de kast van de computer.
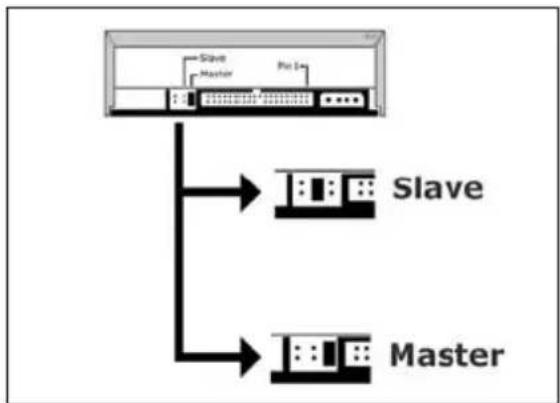
EN If you replace a drive, take it out and check which setting it has ("Master" or "Slave"). Remember this setting and go to step 10.
DE Wenn Sie ein Laufwerk ersetzen, bauen Sie es aus und überprüfen Sie seine Einstellung ("Master" oder "Slave"). Merken Sie sich diese Einstellung und gehen Sie zu Schritt 10.
FR Si vous remplacez un lecteur, sortez-le et vérifie ses réglages ("Maitre" ("Master") ou "Esclave" ("Slave"). Notez ces réglages et passez à l' étape 10.
In caso di sostituzione di un'unità, estrarla e verificare le impostazioni ("Master" o "Slave"). Annotare l'impostazione e andare al punto 10.
EN Find the IDE-cable which may look like this example:
A: Coloured line.
B: Notch and closed hole.
C:Pin1.
EN Connect the IDE cable
A: Coloured line.
B: Notch and closed hole.
C:Pin1.
EN Find a free power cable like this example.
Please note the edges of the connector.
EN Secure the drive with the screws (if possible on both sides).
18
DE Befestigen Sie das Laufwerk mit den Schrauben (wenn möglich an beiden Seiten).
FR Fixez l'appareil à l'aide des vis (si possible des deux côtes).
Fissare l'unita con le viti (se possible su entrambi i lati).
NL Schroef het station vast (zo mogelijk aan beiden zijden).
EN Put the cover you took off in step 5 back on.
19
EN Put the screws (if there were any) back in and reconnect the cables.
20
21 EN Restart your computer.
DE Starten Sie Ihr Computer neu.
FR Allumez I'ordinateur.
Riaviare il computer.
NL Start uw computer opnieuw op.
EN Insert the Nero disc when Windows is loaded.
DE Legen Sie die Nero CD ein, wenn Windows geladen ist.
FR Insérez le disque Nero une fois que Windows a démame.
IT Inserire il disco Nero dopo il caricamento di Windows.
NL Plaats de Nero-disc nadat Windows is gestart.
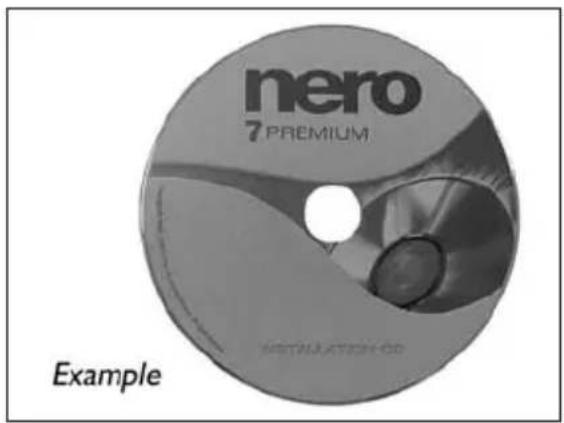
23 Choose "Nero 7 Essentials" and follow the instructions on the screen. When finished, continue with the next chapter.
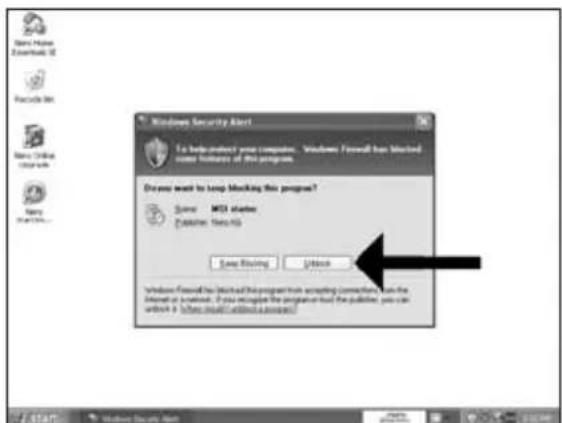
8 EN The Windows Firewall may warn you. Click "Unblock" to allow your Nero to be updated.
DE Sie erhalten evtl. eine Warnung von der Windows Firewall. Klichen Sie auf "Sperre deaktivieren", damit sich Nero aktualisieren kann.
FR Le pare-feu de Windows affichera peut-être un avertissement. Cliquez sur "Débloquer" pour activer la mise à jour de Nero.
IT É possibile Windows Firewall visualizzi un messaggio di averimento. Fare cli "Unblock" (Sblocca) per consentire l'aggiomamento di Nero.
NL De Firewall van Windows kan een waarschuwing geben. Klik op "Uitschakelen", zodate uw Nero kan worden bijgewerkt.
How to print a label using LightScribe?
Be responsible Respect copyrights
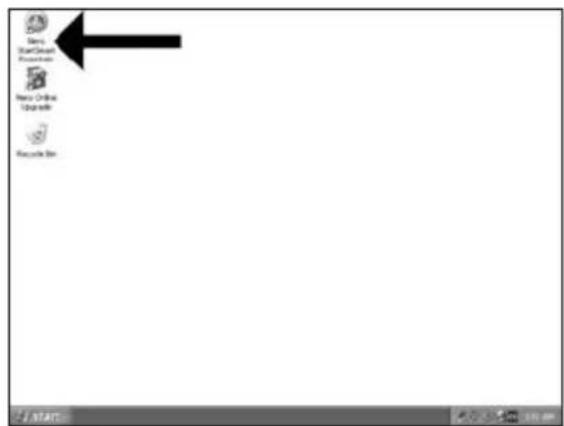
1 EN Start "Nero StartSmart Essentials".
DE Starten Sie "Nero StartSmart Essentials".
Lancez "Nero StartSmart Essentials".
IT Awiare "Nero StartSmart Essentials".
NL Start "Nero StartSmart Essentials".

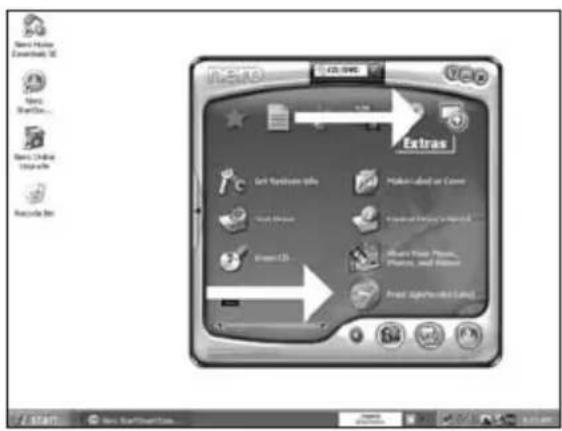
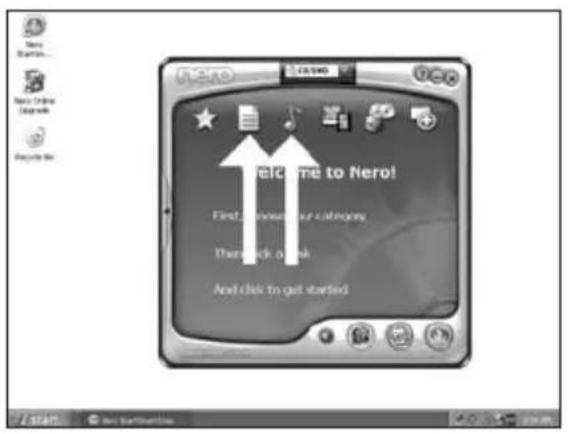
EN Choose "Extra" and "Print LightScribe label".
DE Klichen Sie auf "Extras" und "LightScribe Label drucken".
FR Choisissez "Extras" et "Imprimer une étiquette LightScribe".
IT Selezionare "Extra" e "Stampare etichette LightScribe".
NL Kies "Extra" en "LightScribe-label afdrukken".
2

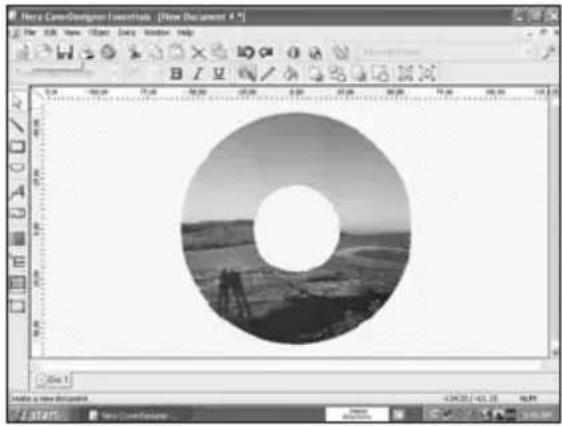
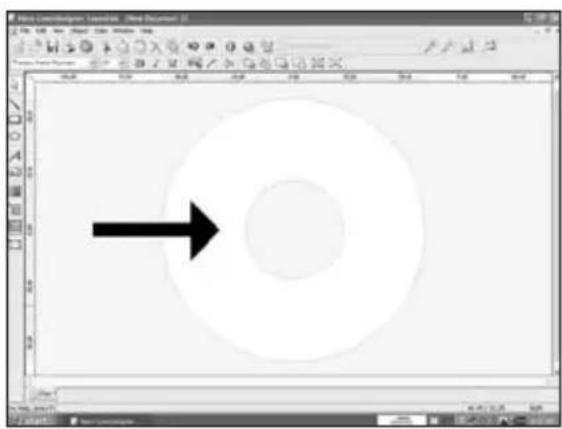
EN To insert a full image, doubleclick on the empty CD area.
DE Doppelklicken Sie auf den leeren CD/DVD-Bereich, um ein komplettes Bild einzufugen.
FR Pour insérer une image complete, double-cliquez sur la zone vide du CD.
IT Per insere un'immagine completa, fare doppio clc sull'area CD vuota.
NL Om een volledige afbeelding in te voegen, moet u op het lege cd-gebied klikken.
5 Your image will be aligned to the printable area.
DE Ihr Bild wird auf den bedruckbaren Bereich ausgerichtet.
FR L'imag sera adaptee a la zone imprimable.
IT L'immagine d'interesse verrà allineata all'area stampabile.
NL Uw afbeelding wordt uitgelijnd in het afdrukgebied.
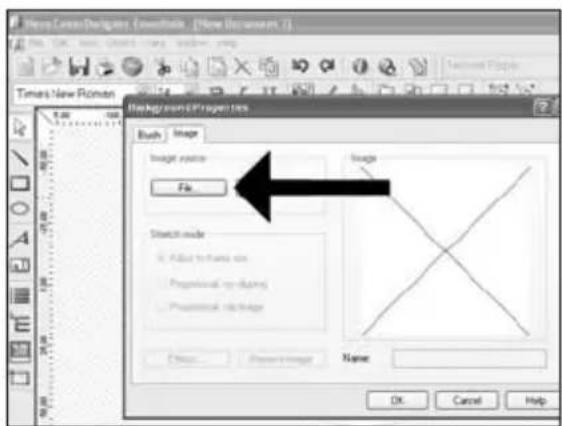
6 EN To insert an image on a part of the disc, start the "image tool".
DE Um nur auf eine Teilfläche der Disc ein Bild zu drucken, führen Sie das "Bild-Werkzeug" aus.
FR Pour insérer une image sur une partie du disque, lancez "Outil Image".
IT Per insere un'immagine in una parte del disco, aviare lo "Strumento imagine".
NL Om een afbeelding op een deel van de cd in te voegen, moet u de tool "Afbeelding" starten.
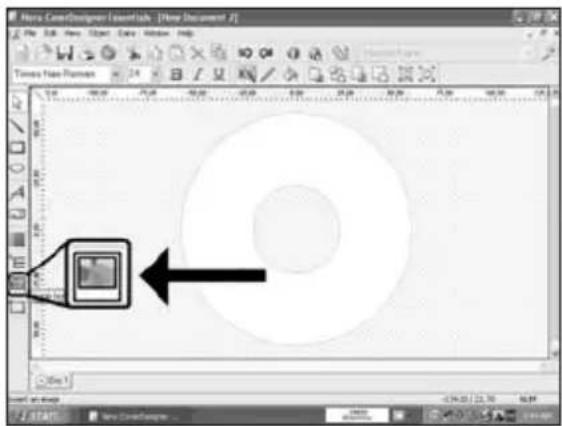
7 Open your image and place it where you want it on the CD surface.
How to make a video disc?
Be responsible Respect copyrights
1 EN Start "Nero StartSmart Essentials".
12 You can also trim the recorded video by sliding the markers. When done, choose "Next".
13 EN After editing all files,choose "Next".
17 Choose "Bum to", choose your recorder and choose "Bum".
18 EN NeroVision Express is transcoding and burning your disc.
DE NeroVision Express fuhrt ein Transcoding durch und brennt ihre Disc.
FR NeroVision Express proceeds au transcodage et grave le disque.
IT NeroVision Express esgue la codifica intermedia e la masterizzazione del disco.
NeroVision Express transcodeert en brandt uw cd.
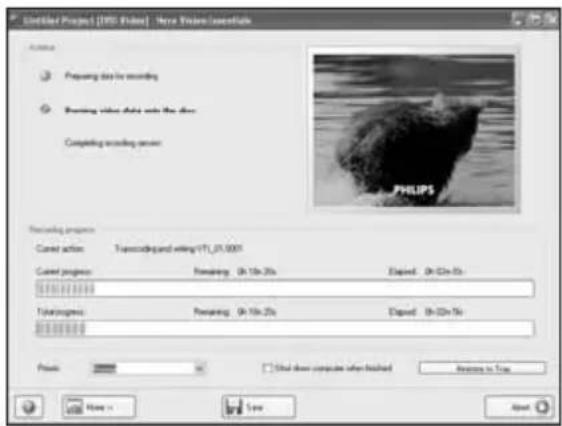
19 EN Congratulations, your disc has been written successfully. You may exit the application now.
How to make a data or audio disc?
Be responsible Respect copyrights
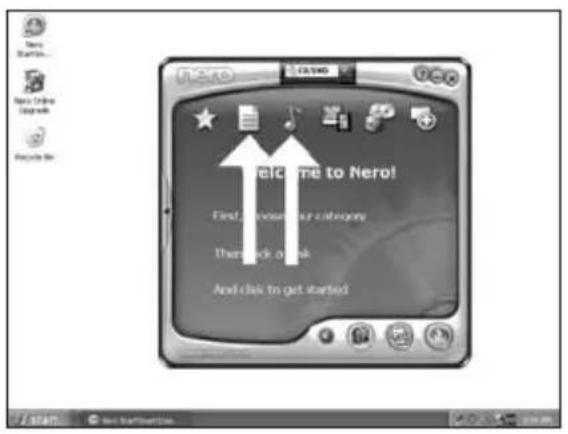
1 EN Start "Nero StartSmart".
DE Starten Sie "Nero StartSmart".
Lancez "Nero StartSmart".
IT Awiare "Nero StartSmart".
NL Start "Nero StartSmart".

EN Choose "Data" or "Audio".
DE Wahlen Sie "Datum" oder "Audio".
FR Choisissez "Données" ou "Audio".
IT Selezionare "Dati" o "Audio".
NL Kies "Data" of "Audio".
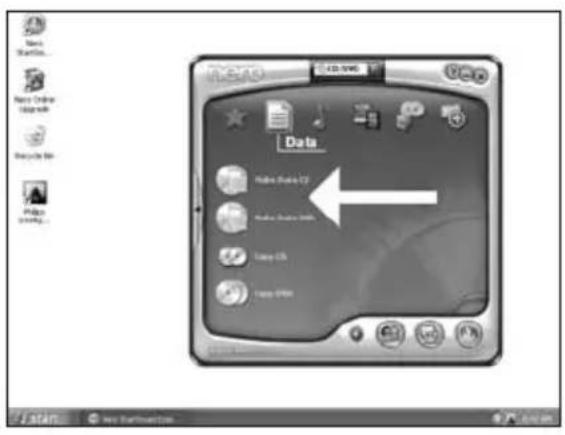
2
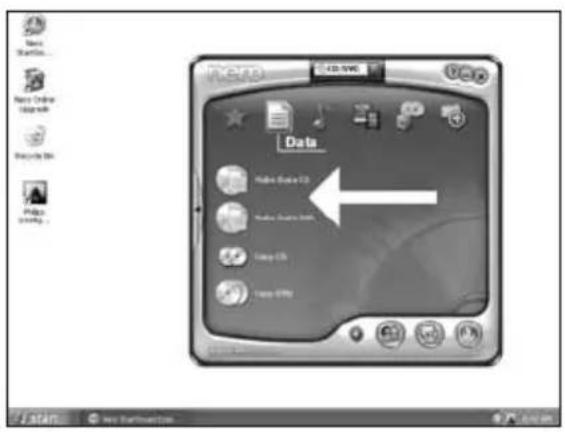
EN For data,choose "Make Data CD" or "Make Data DVD".
DE Für Daten wahlen Sie "Datum CD erstellen" oder "Datum DVD erstellen".
FR Pour creer un disque de données,CHOISSEZ "Creer un CD de données" ou "Creer un DVD de données".
IT Per i dati selezionare "Creare CD dati" o "Creare DVD dati".
NL Voor data, kies "Data-cd make" of "Data-dvd make".

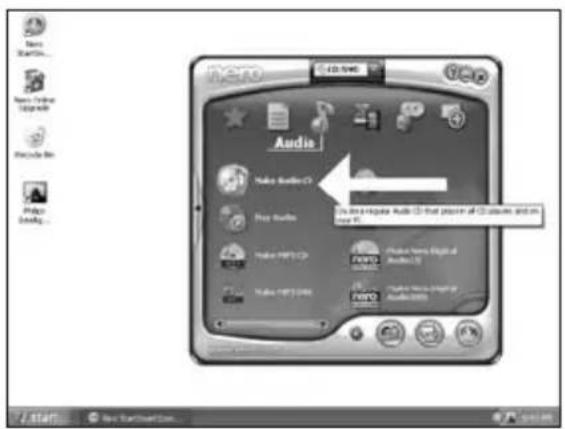
EN For an audio disc, choose "Make Audio CD".
DE Für eine Audio-Disc wahlen Sie "Audio-CD erstellen".
FR Pour creer un disque audio, choisissez "Creer un CD audio".
IT Per un disco audio, selezionare "Crea CD Audio".
NL Voor een audio-cd, kies "Audio-cd maken".
4
EN Click "Add".
EN Select all the files to burn and click "Add". Click "Close" when finished.
7 Check your files and click "Next".
EN Choose your recorder and click "Bum".
8
Be responsible Respect copyrights
1 EN Start "Nero StartSmart Essentials".
DE Starten Sie "Nero StartSmart Essentials".
FR Lancez "Nero StartSmart Essentials",
IT Awiare "Nero StartSmart Essentials".
NL Start "Nero StartSmart Essentials".


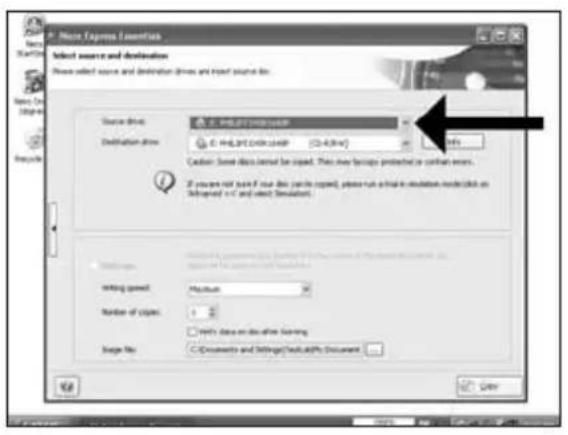
EN Choose "Favorites" and "Copy CD" or "Copy DVD".
DE Wahlen Sie "Favoriten" und "CD kopieren" oder "DVD kopieren".
FR Choisissez "Favoris" et "Copier CD" ou "Copier DVD".
IT Selezionare "Prefenti" e "Copia CD" o "Copia DVD".
NL Kies "Favorieten" en "CD Kopieren" of "DVD Kopieren".
2

More info or help needed
Visit www.philips.com/storageupdates

Troubleshooting
Philips optical disc drives are manufactured with utmost care. In case of problems, it often appears that the drive itself is not defective. You can simply solve most of these problems by using the support tools offered by Philips.
When you're experiencing problems:
1 Please check the information in the "How to..." manual.
2 Check the Philips support websites www.philips.com/storageupdates and www.philips.com/support for interactive support, troubleshooting, and the newest software updates.
3 Should you encounter any more difficulties during installation or use, please contact Philips Customer Care via the e-mail address or telephone numbers that can be found at www.philips.com/contact.
Prior to claiming a drive for warranty, you must request a return reference number at www.philips.com/support or contact Philips Customer Care.
Additional warranty information is available in the "Philips Warranty" folder on the Nero software disc.

"The making of unauthorised copies of copy-protected material, including computer programmes, files, broadcasts and sound recordings, may be an infringement of copyrights and constitute a criminal offence. This equipment should not be used for such purposes."
WEEE mark:Disposal of your old product

Your product is designed and manufactured with high quality materials and components, which can be recycled and reused. Please inform yourself about the local separate collection system for electrical and electronic products, including those marked by following symbol. Please act according to your local rules and do not dispose of your old products with your normal household waste.
WARNING
Plastic bags can be dangerous.
To avoid danger of suffocation, keep this bag away from babies and small children.

Gaaar www.philips.com/storageupdates

Probleemoplossing
Be responsible Respect copyrights
Be responsible Respect copyrights
1 ES Inicie "Nero StartSmart Essentials".
PT Inicie o "Nero StartSmart Essentials".
TR "Nero StartSmart Essentials" i baslat.
PL Uruchom program "Nero StartSmart Essentials".
SV Starta "Nero StartSmart Essentials".


ES Elija "Herramientos" e "Imprimir etiqueta LightScribe".
PT Selecione "Extras" e "Imprimir etiqueta do LightScribe".
TR "Ekstra"yi secin ve "LightScribe etiketini yazdirin".
PL Kliknj "Dodatki" i "Wypal etyktete LightScribe".
SV Valj "Extra" och "Skriv ut LightScribe-etikett".
2
ES Para introducir una imagen completa, haga doble tic en la zona vaca del CD.
PT Para inserir una imagem completa, clique das vezes na area vazia do CD.
TR Tam bir görtündü eklemek icin, boş CD alanina Çift tiklayın.
PL Aby wstawic caly obraz, dwukrotnie kliknij pusty obszar CD.
SV Dubbelklicka pa det tomma CD-omraret for att infoga en fullstandig bild.
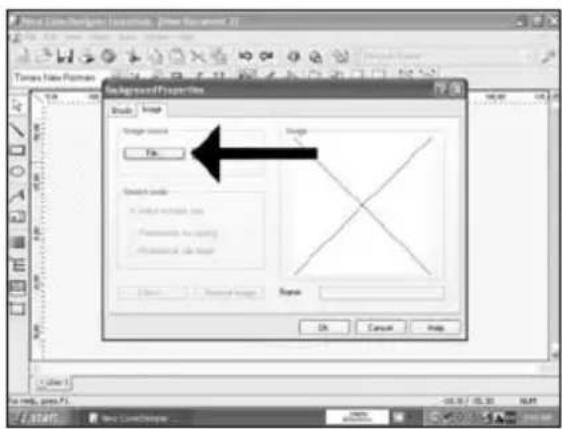
ES Haga cli en "Archivo" y abra la imagen.
PT Clique em "Arquivo" e abra sua imagem.
TR "Dosya"ya tiklayin ve görtünüzünçın.
PL Kliknij "Plik" i otworz obraz.
SV Klicka pa "Fil" och oppna bilden.
4
Be responsible Respect copyrights
1 ES Inicie "Nero StartSmart Essentials".
PT Inicie o "Nero StartSmart Essentials".
TR "Nero StartSmart Essentials"!baslat.
PL Uruchom program "Nero StartSmart Essentials".
SV Starta "Nero StartSmart Essentials".

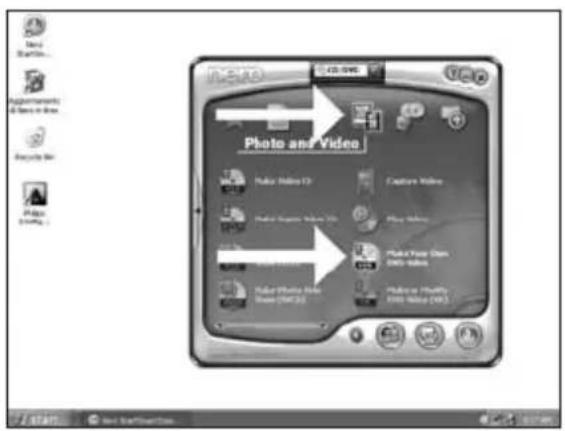
ES Elija "Foto y video" y "Crear DV de video propio".
PT SeLECTIONe "Foto e video" e "Crie seu propre DVD de video".
TR "Fotografia ve Video"ve "Keni DVD-Video'nu Yaratyu sec.
PL Kliknij "Foto i video" i "Twórz wlasne DVD-Video".
SV Val "Foto och video" och "Gör din egen DVD-video".
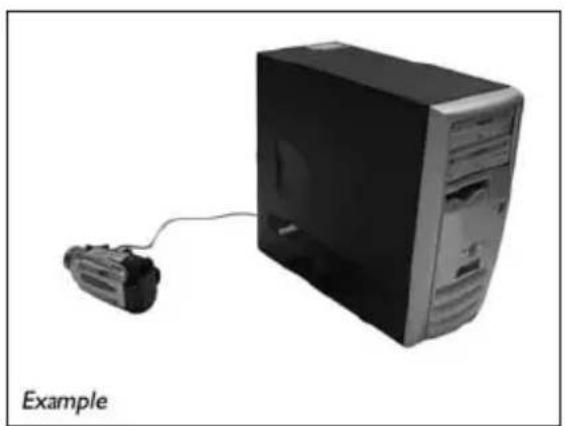
ES Si quiere capturar video desde una camarara, conectela a su PC. De lo contrario, vaya al paso 8.
PT Se desejar capturar video de unaamera, conecte-a ao seu PC. Caso contrario, va para a etapa 8.
TR Kameradan video yakalamak istiyorsaniz, bunu PC'nize baglayin. Aksi halde 8.adima gidin.
PL Jesli chcesz przechwycic video z kamery, podlacz ja do komputera. W przyciwnym razie przyejdlz do kroku 8.
Sv Om du vill hamta video fran en kamera ansluter du den till datom.l annat fall gár du till steg 8.
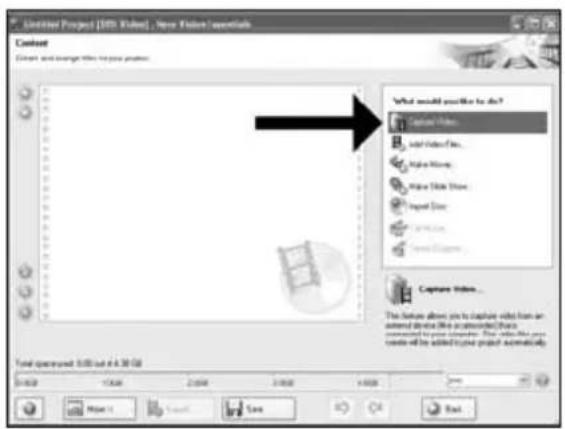
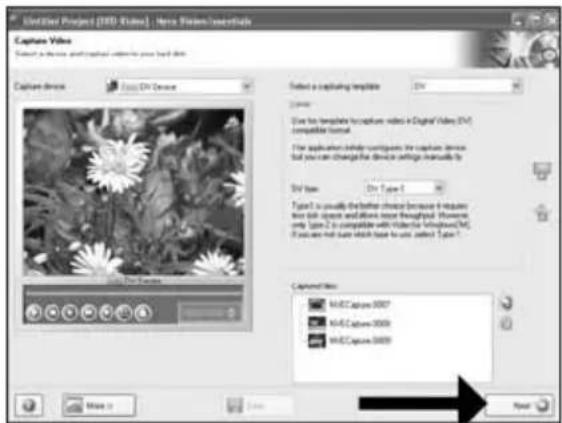
ES Elija "Capture video".
PT Sezione "Capture video".
TR "Capture video"yu se.
PL Kliknj "Capture video".
sv Valj"Capture video".
5
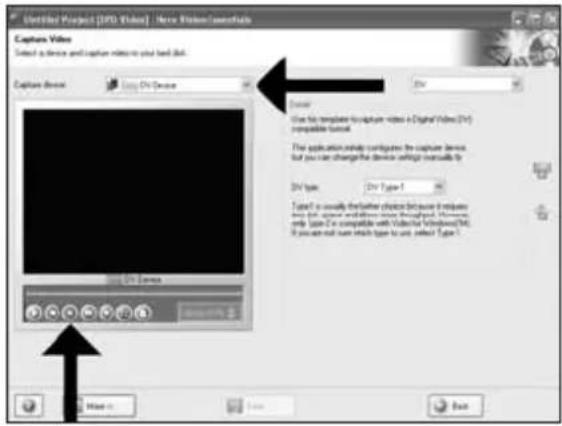
ES Selectione el dispositivo de captura y pulse el botón Record.
PT SeLECTIONO dispositivo de captura e aperte o botao de gravacao.
TR Yakalanan aygit secin ve kayit duğmesine basin.
PL Wybierz urzadzenie do przechwytwnia i nacinij przycisk nagrywnia.
SV Valj den enchet som du vill hamta video fran och tryck pa inspelningsknappen.
6
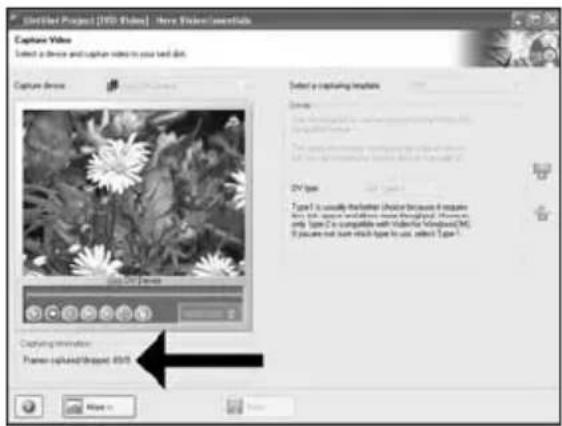
ES Durante la captura,Aquiverelproso.
PT Durante a captura, você está o progresso muito bem.
TR Yakalama sirasinda, ilerlemede durumunu buradan goreceksiniz.
PL W trakcie przechwywnia, tutaj mozesz observwowac postep operaci.
SV När hamtningen pagar ser du forloppet hare.
7
ES Haga click en "Siguiente" cuando se hayan capturado todas las secuencias de video.
PT Clique em "Avançar" quando todas as sequências de video tiverem sido capturadas.
TR Tum video siralariy yakalandiginda "llen"ye tiklayin.
PL Po przechwyceni wszystkich sekwenci video, kliknj "Dalej".
SV Klicka pa "Nasta" när alla videosekvenser har hamtats.
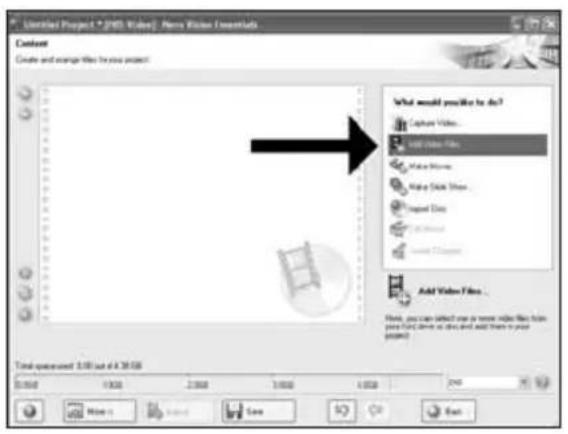
ES Si quiereañadir ARCHivos desde el disco duro, elija"Añadir archivos de video".De lo contrario, vaya al paso 10.
PT Se quiser adiconar arquivos do disco rigido, selecione "Adiconar arquivos de video". Caso contrario, va para a etapa 10.
TR TSabit diskten dosya eklemek istiyorsaniz, "Vidyo Dosyasi Ekle"1 secin. Aksi halde 10. adima gidin.
PL Jesli chcesz dodac pliki z dysku twardego, kliknij "Dodaj pliki video". W przyciwnym razie przyzejdo koiku 10.
Sv Om du vill lagga till filer fran hardsiken valjer du "Addera videofiler". Annars gár du till steg 10.
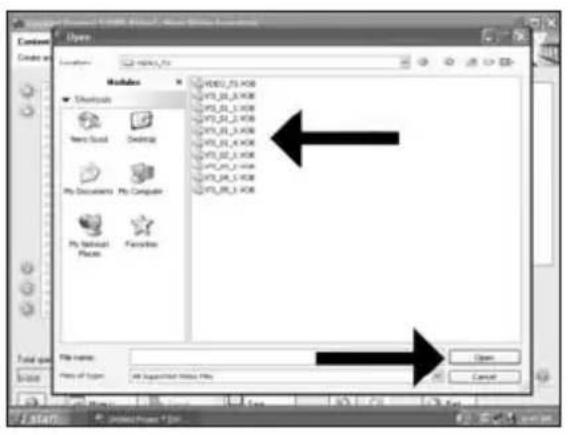
ES Seleccione los ficheros y haga tic en "Abrir". 9
PT Selecione os arquivos e clique em "Abrir".
TR Dosyalari segin ve "Aca tiklayin.
PL Wybierz pliki kliknij "Otworz".
SV Markera filerna och klicka pa "Oppna".
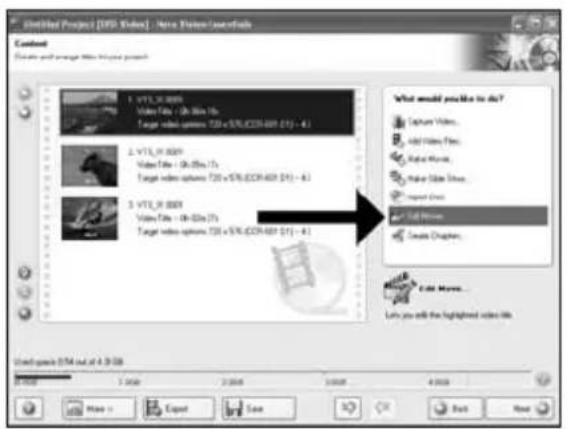
ES Puede editor laspelliculascargadas, escogiendo "Editarpellicula".
PT Voce pode editor os filmes carregados的选择nando "Editar这部电影".
TR "Filmi Düzenle"yi seçerek yüklenen filmleri duzenleyebilirsiniz.
PL Mozesz edytowac załadowane filmy, klikajac "Edytuj film".
SV Du kan redigera de laddade filmerna genom att valja "Redigera film".
10
Be responsible Respect copyrights
1 ES Inicie "Nero StartSmart".
PT Iniciao "Nero StartSmart".
TR "Nero StartSmart" baslatin.
PL Uruchom program "Nero StartSmart".
SV Starta "Nero StartSmart".

ES Elija "Datas" o "Audio".
PT Selecione "Dados" ou"Audio".
TR "Ver" veya "Ses"yu segin.
PL Kliknj "Dane" lub "Audio".
SV Valj "Data" eller "Audio".
2
ES Para datos, elija "Crear CD de datos" o "Crear DVD de datos".
PT Para dados, seleccion "Ciar CD de dados" ou"Ciar DVD de dados".
TR Veriler ici "Veri CD'si Yarat"veya "Veri DVD'si Yarat" seci.
PL W przypadku danych, kliknij "Utworz dysk CD z danymi" lub "Utworz dysk DVD z danymi".
SV For data valjer du "Skapa Data-CD"ller "Skapa Data-DVD".
ES Para un disco de audio, elija "Crear CD de audio".
PT Para um disco de audio, selecione "Criar CD de audio".
TR Ses diski icin, "Muzik/SeS CD'si Yarat" seicn.
PL W przypadku pfly audio, kliknij "Utworz Audio CD".
SV For en ljudskiva valjer du "Skapa Audio-CD".
3
Be responsible Respect copyrights
1 ES Inicie "Nero StartSmart Essentials".
PT Inicie o "Nero StartSmart Essentials".
TR "Nero StartSmart Essentials"!ba#latin.
PL Uruchom program "Nero StartSmart Essentials".
SV Starta "Nero StartSmart Essentials".
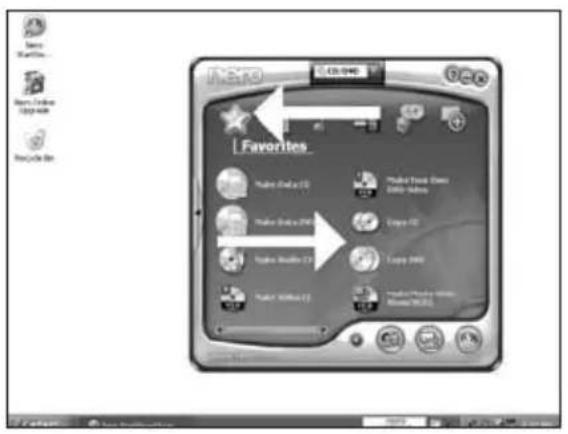
ES Elija "Favoritos" y "Copiar CD" o "Copiar DVD".
PT Selecione "Favoritos" e "Copiar CD" ou "Copiar DVD".
TR "Sik Kullanilanlar"ve "CD Kopyala"veya DVD Kopyala"yi segin.
PL Kliknj "Ulubione" i "Kopiuj CD" lub "Kopiuj DVD".
SV Valj "Favoriter" och "Kopiera CD" aller "Kopiera DVD".
Be responsible Respect copyrights
Be responsible Respect copyrights
Please refer to your PC manual or contact your local dealer for more information.
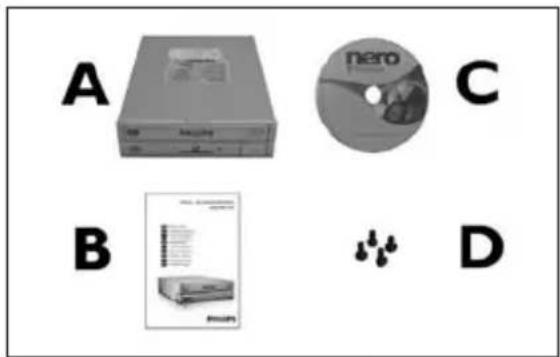
EN This can be found in the box: A: Your new drive C: The Nero software disc B: This manual D: 4 screws in a small bag
关闭计算机。 2
RU BbIKAOHTe BaU KOMNBIOTep.
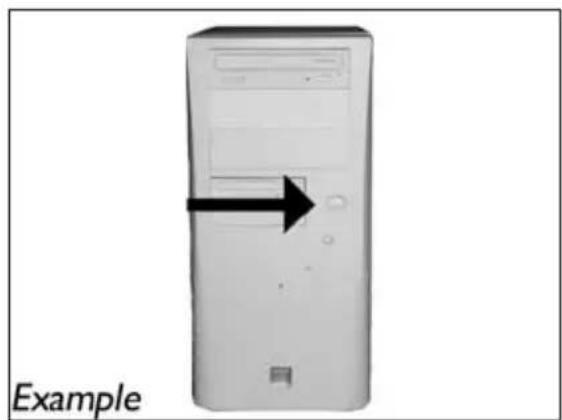
EN Switch your computer off.
EN Touch an unpainted metal part (eg. your heating or an unpainted part of your computer case). This will avoid any damage to your computer by electrostatic discharge.
4 断开计算机电源。
RU OTcoeAHHTe Ka6eAb NITaHnO T BaIIero PC.
DK Tag strmtablet fra computeren ud.
拔掉電腦電源線。
EN Disconnect the power cable from the PC.
EN If you replace a drive, take it out and check which setting it has ("Master" or "Slave"). Remember this setting and go to step 10.
如未安装任何驱动器,则记住“Master(主驱动器)”并转至步骤10。
RU ECaH BbI He HNCTaAMPyTe AACKOBAO, 3aONMHTE yCTaHOBky "Master" n nepeiAnTe K Wary 10.
DK Husk blot pa "Master", hvis du/DDhve installeret, og gtil pkt. 10.
TC 若您未安裝光碟機,請記下“Master”,然後至步驟10。
EN If you have no drive installed, remember "Master" and go to step 10.
EN If you add a drive, check the drive has which remains in the PC ("Master" or "Slave", see step 11), remember the OTHER setting.
EN Find the IDE-cable which may look like this example:
A: Coloured line.
B: Notch and closed hole.
C:Pin1.
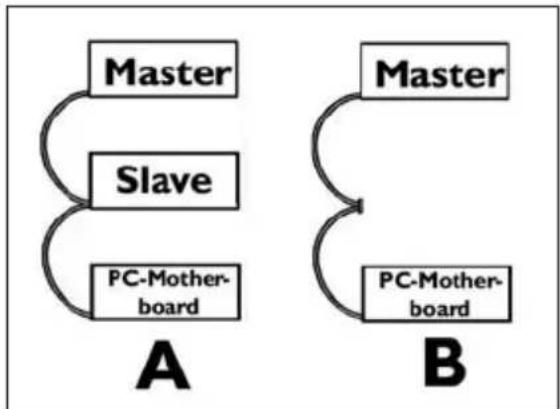
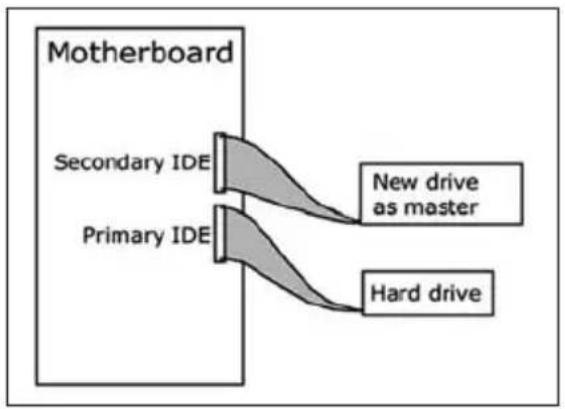
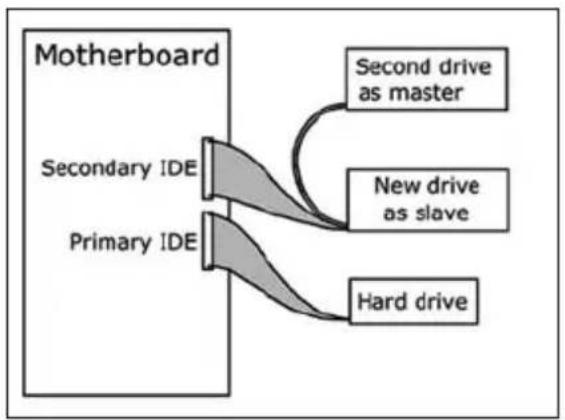
如A(2个设备)或B(1个设备)所示连接IDE线缆。
不要在1条线缆上选择2个“Master(主驱动器)”或2个“Slave(辅驱动器)”设备。
RU PnncoeAHHHTe Ka6eABIDE,KaB A (2 yctpoiCTBa)nn B(ToAkoIyctpoiCTBO).
He Bb6paTte 2 yctpoNCTBa "Master" nn 2 yctpoNCTBa "Slave" yctpoNCTBa Ha OdHOM Ka6eAe.
DK Forbind IDE-kablet som i A (2 enheder) ell B (kun 1 enhed).
Vaelg ikke 2 "Master" eller 2 "Slave" -enheder til 1 kabel.
EN Connect the IDE cable like in A (2 devices) or B (only 1 device).
Do not choose 2 "Master" or 2 "Slave" devices on 1 cable.
15 连接IDE线缆
EN Choose "Nero 7 Essentials" and follow the instructions on the screen. When finished, continue with the next chapter.

更新?
A.KTyaAn3npoBaTb?
Opdatering
如何更新?
Up to date?
1
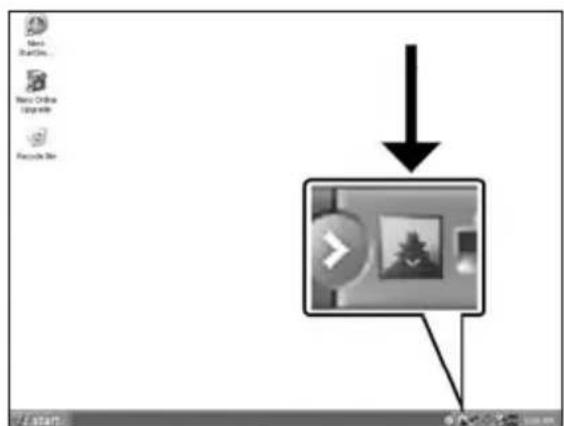
启动PhilipsIntelligentAgent。
如不可用,选择“开始”,(所有)程序”,“PhilipsIntelligentAgent”,“PhilipsIntelligentAgent”。
RU 3anyctre Philips Intelligent Agent.
B cayue oTcTCTBn Bb6epnte "Start",("All) Programs", "Philips Intelligent Agent", "Philips Intelligent Agent".
DK Start Philips Intelligent Agent.
Hvis den ikke er tilgaengelig, sa vaelg "Start", "(Alle) Programmer", "Philips Intelligent Agent", "Philips Intelligent Agent".
TC啟動PhilipsIntelligentAgent。
如果找不到,請選擇「Start(開始)」,「(All)Programs(所有程式)程式集)」,「Philips Intelligent Agent」,「Philips Intelligent Agent」。
EN Start the Philips Intelligent Agent.
If not available, choose "Start", "(All) Programs", "Philips Intelligent Agent", "Philips Intelligent Agent".
2
EN The Windows Firewall may warn you. Click "Unblock" to allow your Nero to be updated.
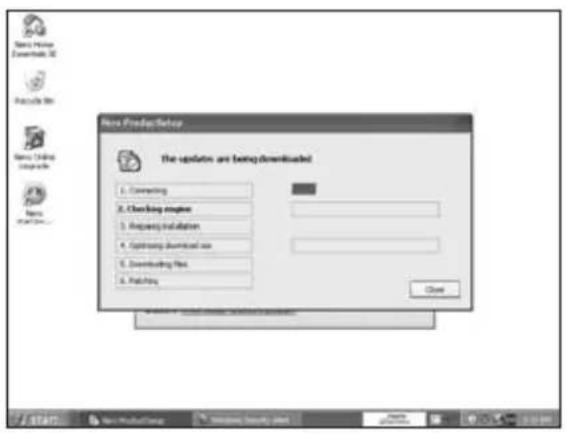
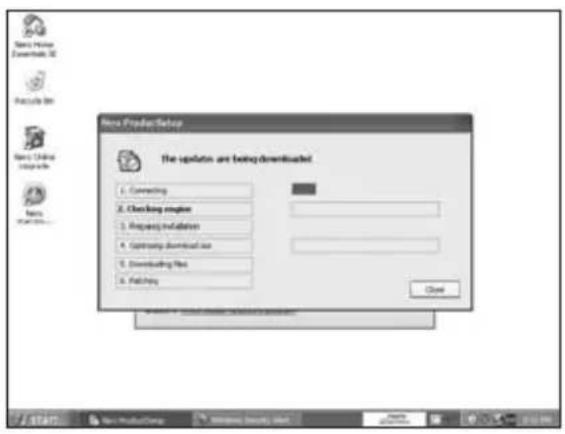
Nero自行下载并更新。
RU Nero BbIOAnHReT 3aRpy3ky n aKtyaAn3aUIO abTOMaTHueckn.
DK Nero downloads og opclateres af sig selv.
Nero會自行下載和更新。
EN Nero downloads and updates itself.
How to print a label using LightScribe?

Be responsible Respect copyrights
Kak co3aTb BnaeOAnck?
Sādan laves en videodisc
如何製作視訊光碟?
How to make a video disc?

Be responsible Respect copyrights
KaK co3aTb Anck AaHHbIX nAn ayAnoAnck?
Sādan laves en data-ller lyddisc
如何製作資料或音樂光碟?
How to make a data or audio disc?

Be responsible Respect copyrights
Be responsible Respect copyrights
Be responsible Respect copyrights
O: Indicates that this toxic or hazardous substance contained in all of the homogeneous materials for this part is below the limit requirement in SJ/T11363 - 2006.
X: Indicates that this toxic or hazardous substance contained in at least one of the homogeneous materials used for this part is above the limit requirement in SJ/T11363 - 2006.

环使用期限 Environmental Protection Use Period
This logo refers to the period (10 years)
This logo refers to the period ( 10 years ) during which the toxic or hazardous substances or elements contained in electronic information products will not leak or mutate so that the use of these substances or elements will not result in any severe environmental pollution, any bodily injury or damage to any assets.

BbIaHHe HeNCpPaBHOCTe
AICKOBOAbIOTTINuecknX AnCKOB Philips n3rOtaBnBAIOCTc cOCo6o TuataeHbOCTbIO. PnB03NKHOBHeHH IpO6aem YacTo OKa3bIbaeTc, YTO AnCKOBd Cam No Ce6e NcnpaBeH. BoAbyIO qAcTb 3TNX IpO6aEM Bbl MoKTe IpocTo peuNTb C NOMOUIIO HCTpyMeHTaBbIX CpeACTB NOAepKKN, npdaRaembix fipmOn Philips
EcmnyBacBo3HNKn npo6aembt
IpoHTaTte INΦopMaLIO, coAepXaUyIOcB COOTBeTCTByIOeM pa3epe pyKOBOCTBa "KaK
2 O6paTnTecb K Be6-calram IIOAePJKn Philips www.philips.com/storageupdates n www.philips.com/support: AANHTepaKTINBHOI IOAePJKN, BbIABHeHrHENCIPaBHOCTeN INOCAADHX AKTyAAM3AUH.
3 EAN BO BPEM NCTAAMN NNNKCNAYATALNBbl CTOANKHYNCB C OIOANHTeAbHbIMN TpyHOCTTBMn BAm Caeayet 06paNTbcB Philips Customer Care no 3AEKTPOHNOHTe NNI NO TEaepohy, KOToPbIe MOXHO HauTN B VInTePheTe no apecy www.philips.com/contact.
PpeKDe, Yem PpeAbBnTb NpeTeH3n B paMKax rapaHTn Ha AnCKOBoA, Bbl AOxKbI 3anPoCnTb CcbIAOuHbI Homep BO3BpaTa no aApecy www.philips.com/support nAN CBra3aTbcra c Philips Customer Care.
AonoaHnTeAbHa HhOpMaun no rapaHTn npecTaBAeHa B nAnke "Philips Warranty" kaTAlora Ha nporpaMMHom dNcke Nero.

Be responsible Respect copyrights
"He3aKOHHe N3rOToBaeHHe KOIN MaTePnAob, 3auuueHHbIX OT KOnPiPOBaHnR, BKAIOyAR KOMIbIOTepHbIe IpOrpaMMbl, faiAbI, TeAE-, paAnOTpaHCAUHN I 3ByKO3aNCHMOKeT paccMaTpNaBaTbCak HApuyEHe ABTOPCKNX Pab IN PpeCaEoBaTbCn NO yTOAOBHOMy 3aKHOdaTeAebCTBy. HactoUee O6OpdyOBaHHe He DOAXHO ICNoAe3OBaTbCn B NoDO6HbIX LcIax."
IPEAOCTEPEXKEHNE
IaCTIKOBbIe MeUKM MOrTy IpeCTaBArTB OAnCHOCTb AAR JIN3Hn. Bo 36ekahne OanchoCTN ydyuEHHe He OpyckaiTe HaxoJdeHHN 3TNX MeUKOB PAdOM C MaAeHuaM N MaAeHbKIMN AeTbMn.
www.philips.com/storageupdates

Be responsible Respect copyrights
Be responsible Respect copyrights
More info or help needed
Visit www.philips.com/storageupdates

Troubleshooting
Philips optical disc drives are manufactured with utmost care. In case of problems, it often appears that the drive itself is not defective. You can simply solve most of these problems by using the support tools offered by Philips.
When you're experiencing problems:
1 Please check the information in the "How to..." manual.
2 Check the Philips support websites www.philips.com/storageupdates and www.philips.com/support for interactive support, troubleshooting, and the newest software updates.
3 Should you encounter any more difficulties during installation or use, please contact Philips Customer Care via the e-mail address or telephone numbers that can be found at www.philips.com/contact.
Prior to claiming a drive for warranty, you must request a return reference number at www.philips.com/support or contact Philips Customer Care.
Additional warranty information is available in the "Philips Warranty" folder on the Nero software disc.

"The making of unauthorised copies of copy-protected material, including computer programmes, files, broadcasts and sound recordings, may be an infringement of copyrights and constitute a criminal offence. This equipment should not be used for such purposes."
WEEE mark:Disposal of your old product
Your product is designed and manufactured with high quality materials and components, which can be recycled and reused. Please inform yourself about the local separate collection system for electrical and electronic products, including those marked by following symbol.
Please act according to your local rules and do not dispose of your old products with your normal household waste.
WARNING
Plastic bags can be dangerous.
To avoid danger of suffocation, keep this bag away from babies and small children.

FCC Compliance
FCC 15.105 rule:
This equipment has been tested and found to comply with the limits for a Class B digital device, pursuant to Part 15 of the FCC Rules. These limits are designed to provide reasonable protection against harmful interference in a residential installation. This equipment generates, uses and can radiate radio frequency energy and, if not installed and used in accordance with the instructions, may cause harmful interference to radio communications. However, there is no guarantee that interference will not occur in a particular installation. If this equipment does cause harmful interference to radio or television reception, which can be determined by turning the equipment off and on, the user is encouraged to try to correct the interference by one or more of the following measures:
- Reorient or relocate the receiving antenna.
- Increase the separation between the equipment and receiver.
- Connect the equipment into an outlet on a circuit different from that to which the receiver is connected.
- Consult the dealer or an experienced radio/TV technician for help.
Warning: Changes or modifications made to this equipment not expressly approved by Philips may void the FCC authorization to operate this equipment.
FCC 15.19 rule:
This device complies with Part 15 of the FCC Rules and with RSS-210 of Industry Canada. Operation is subject to the following two conditions:
(1) this device my not cause harmful interference, and
(2) this device must accept any interference received, including interference that may cause undesired operation.
CE
Electric-, Magnetic- and Electromagnetic Fields ("EMF")
- Philips Royal Electronics manufactures and sells many products targeted at consumers, which, like any electronic apparatus, in general have the ability to emit and receive electro magnetic signals.
- One of Philips' leading Business Principles is to take all necessary health and safety measures for our products, to comply with all applicable legal requirements and to stay well within the EMF standards applicable at the time of producing the products.
- Philips is committed to develop, produce and market products that cause no adverse health effects.
- Philips confirms that if its products are handled properly for their intended use, they are safe to use according to scientific evidence available today.
- Philips plays an active role in the development of international EMF and safety standards, enabling Philips to anticipate further developments in standardization for early integration in its products.
Safety Precautions
USA/Canada: This player is for use only with IBM compatible UL listed Personal Computers or Macintosh UL listed workstations, weighing less than 18kg .
LASER SAFETY
This unit employs a laser. Do not remove the cover or attempt to service this device when connected due to the possibility of eye damage.
LASER-SICHERHEIT
USE OF CONTROLS OR ADJUSTMENTS OR PERFORMANCE OF PROCEDURES OTHER THAN THOSE SPECIFIED HEREIN MAY RESULT IN HAZARDOUS LASER RADIATION EXPOSURE.
WARNING
Output power (measured above the objective lens)
Read: 1.4 mW - 2.5 mW
Write: 90mW (CD)-27 mW (DVD)
Beam divergence 60 degree
Additional information available at our website:
www.philips.com/storageupdates
www.philips.com/storage
Specifications subject to change without notice.
All dimensions shown are approximate.
All rights reserved.
Reproduction, copying, usage, modifying, hiring, renting,
public performance, transmission and/or broadcasting in whole or part is prohibited without the written consent of Philips Electronics N.V.

- How to... for Internal ReWriters using Nero 7 and LightScribe
- EN
- Contents
- DE
- Inhalt
- How to install?
- #
- How to print a label using LightScribe?
- How to make a video disc?
- How to make a data or audio disc?
- More info or help needed
- Troubleshooting
- WEEE mark:Disposal of your old product
- WARNING
- Probleemoplossing
- Be responsible Respect copyrights
- 断开计算机电源。
- 更新?
- Nero自行下载并更新。
- 环使用期限 Environmental Protection Use Period
- BbIaHHe HeNCpPaBHOCTe
- IPEAOCTEPEXKEHNE
- FCC Compliance
- FCC 15.105 rule:
- FCC 15.19 rule:
- Electric-, Magnetic- and Electromagnetic Fields ("EMF")
- Safety Precautions
- LASER SAFETY
- LASER-SICHERHEIT
Brand : PHILIPS
Model : SPD6007BD
Category : DVD Recorder