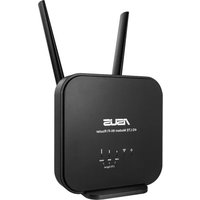
WL500g Deluxe - Wireless Router ASUS - Free user manual and instructions
Find the device manual for free WL500g Deluxe ASUS in PDF.

User questions about WL500g Deluxe ASUS
0 question about this device. Answer the ones you know or ask your own.
Ask a new question about this device
Download the instructions for your Wireless Router in PDF format for free! Find your manual WL500g Deluxe - ASUS and take your electronic device back in hand. On this page are published all the documents necessary for the use of your device. WL500g Deluxe by ASUS.
USER MANUAL WL500g Deluxe ASUS
WL500g / WL500g Deluxe Wireless Router (For 802.11g/b Wireless Clients)
WL500b Wireless Router (For 802.11b Wireless Clients)
Quick Start Guide
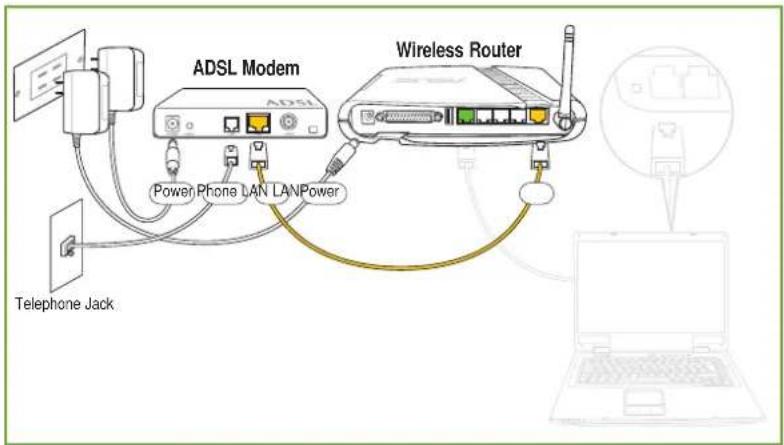
Hardware and Software Setup
(Step 1)
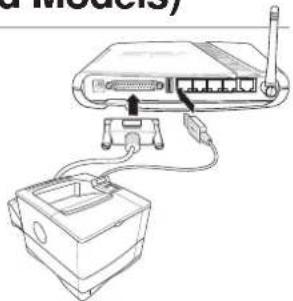
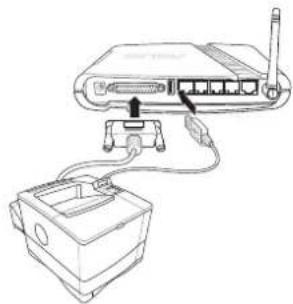
Connect your ADSL Modem and Wireless Router as shown in the illustration. A LAN cable must be connected between the LAN port on the ADSL and the WAN port on the Wireless Router.
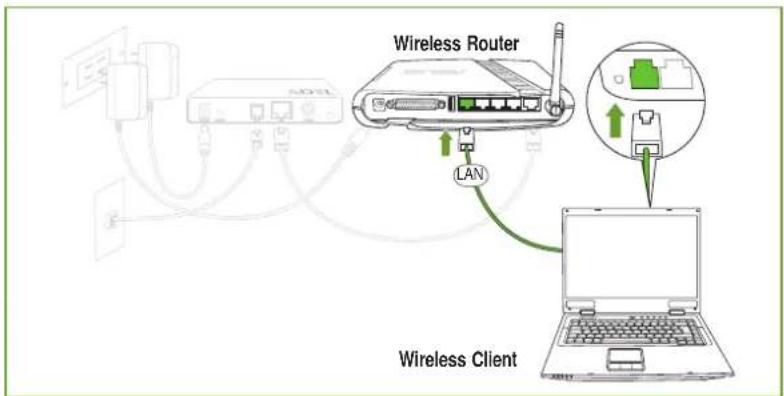
(Step 2)
Connect the Wireless Router to your computer through the LAN port.
Hardware and Software Setup (Cont.)
(Step 3)
Enter one of the following addresses in your web browser:
WL500g
[http://my)..or [http:/my.WL500g] or [http://192.168.1.1]
WL500g Deluxe
[http://my router] or [http://my.WL500g.Deluxe] or [http://192.168.1.1]

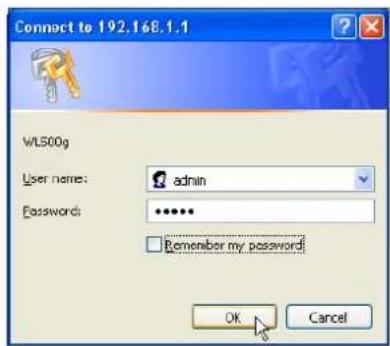
(Step 4)
Login with factory default settings:
```bash User name: admin
Password: admin
(Step 5)
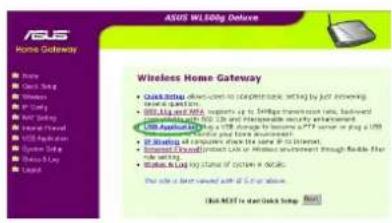
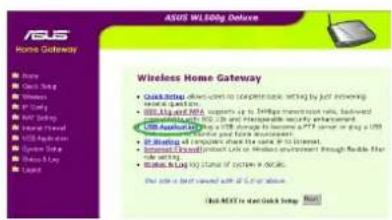
The home page displays quick links to configure the main features of the Wireless Home Gateway.
Click Next to begin Quick Setup.
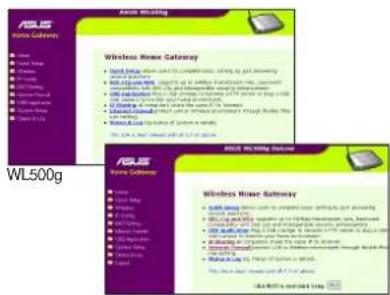
WL500g Deluxe
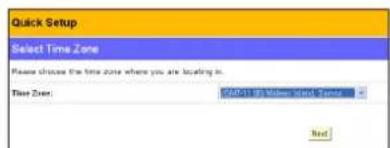
(Step 6)
Select your time zone or the closest region using the pull-down menu.
Click Next to continue.
Hardware and Software Setup (Cont.)
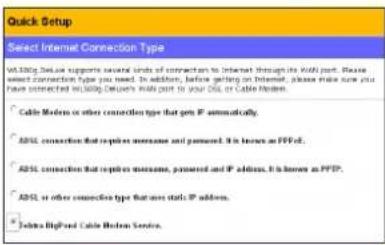
(Step 7)
Select the connection type you have subscribed to. ("ADSL" uses a standard phone cable and "Cable" uses a heavy round TV cable.)
Click Next to continue.
(Step 8)
Enter your subscriber's account User Name and Password in order to connect to your ISP.
Click Next to continue.
(Step 9)
Fill in Host Name and MAC Address if required by your ISP. Fill in the server name or server IP address of the HeartBeat Server when you are connecting with BigPond (Telstar BigPond Cable
(Step 10)
Normally, you would select Yes to "Get IP automatically" and "Get DNS Server automatically". If you select No to either one, you will need to input information from your ISP.
Click Next to continue.
(Step 11)
Enter the SSID and make WEP settings if you want to add security to your wireless network.
Click Finish to continue.
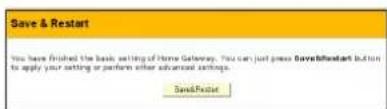
(Step 12)
Click Save&Restart to save the settings to the Wireless Router and enable the new settings.
Click Finish to continue.
users only). Click Next to continue.
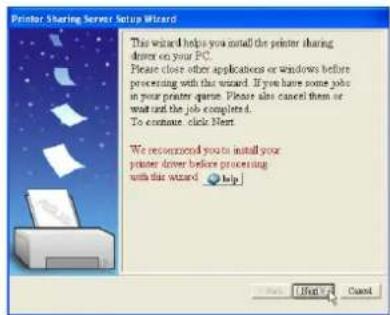
Wireless Printing (Selected Models)
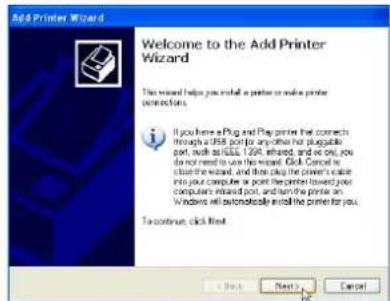
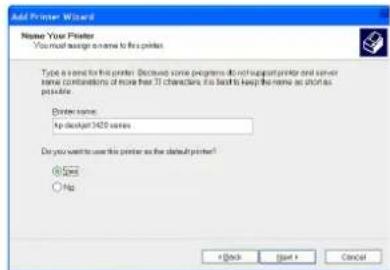
Add Printer Wizard
You should add your printer to your computer to simplify the Wireless Router Printer Setup. If you run the "Printer Setup Wizard" without your printer driver installed, it will direct you to the "Add Printer Wizard". Connect your printer to your computer using the parallel port or the USB port (if available).
(Step 1)
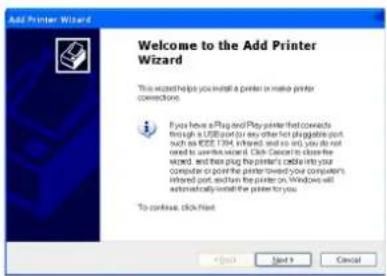
Run the "Add Printer Wizard" from Start | Printers and Faxes | Add Printer.
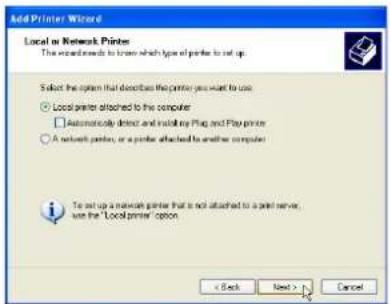
(Step 2)
Choose "Local printer attached to this computer".
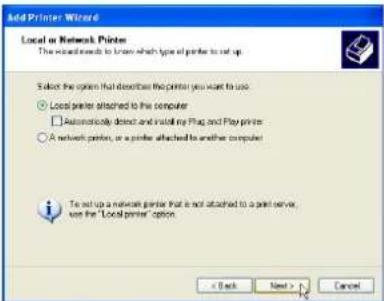
(Step 3)
Select the parallel port or USB port that your printer is connected to.
Wireless Printing (Cont.)
English
(Step 4)
Find your printer manufacturer and model. Click Have Disk if you cannot find your printer in the list and use the driver provided with your printer.
Note: WL-500g only supports a parallel printer. WL-500g Deluxe only supports a USB printer.
(Step 5)
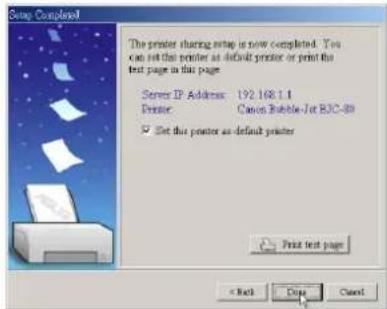
Click Next to set this as your default printer.
(Step 6)
You can print a test page.
(Step 7)
Click Finish to close the wizard.
Note: You can also add printer drivers using the disc provided by your printer manufacturer. However, you must disable the manufacturer's printer utility (if Installed) if you wish to use the wireless LAN Printer Server function.

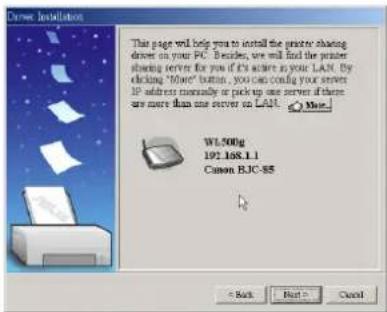
Printer Setup Wizard
Make sure your printer is connected to the Wireless Router printer port or USB port and its power is turned on. Launch the "Printer Setup Wizard" through the Start menu. The wizard will explore all available ASUS Wireless Routers and model information of the printers attached to them in your local network.
Note: WL-500g has one parallel port and one USB port. WL-500g Deluxe has two USB ports and no parallel port.
(Step 1)
Having a printer installed on the printer port (LPT1) or a USB port makes the setup process easier (refer to the following page).
(Step 2)
If the printer is found, the name of the printer will be shown on this screen.
Note: If there is an error communicating with the printer, you will get this message. Make sure that the printer is ON, ready, and connected. Click Back and Next.
If you can see this message, this means no Server found during this search. Please click "More" to search again after checking all the settings.
Printer Setup Wizard (Cont.)
(Step 3)
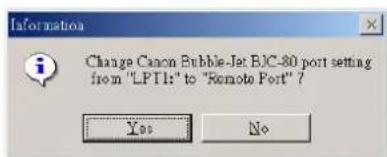
This setup wizard will change your default printer to use "Standard TCP/IP port" which is serviced by the Wireless Router.
(Windows XP/2000: This setup wizard will guide you to select or add a "Standard TCP/IP port". Refer to "Setup for LPR client under Windows XP" for details.)
(Windows 98/ME: This setup wizard will change your default printer to use "Remote Port" which is serviced by the Wireless Router.)
(Step 4)
Click Done when setup is complete.
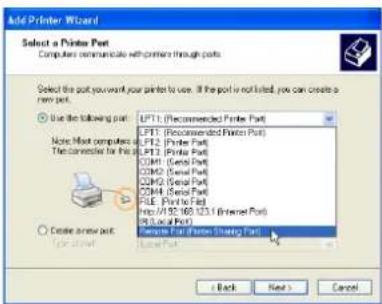
Setup for LPR client (Windows XP)
(Step 1)
Run the "Add Printer Wizard" from Start | Printers and Faxes | Add Printer.

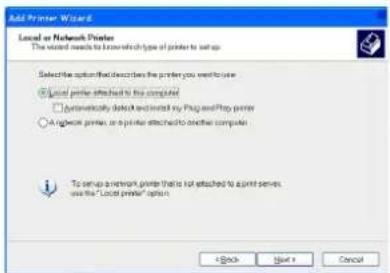
(Step 2)
Choose "Local printer attached to this computer" then press Next.

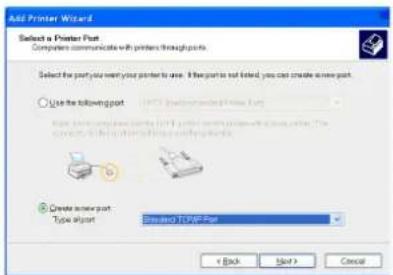
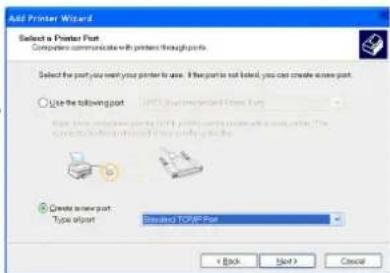
(Step 3)
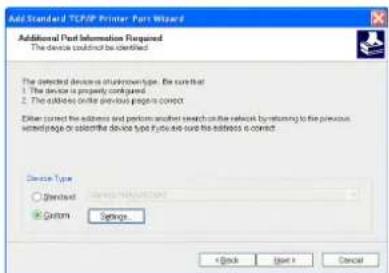
Click on "Create a new port" and select "Standard TCP/IP Port" in the pull down menu. Then press Next.
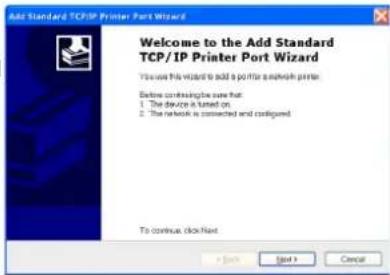
(Step 4)
Click Next on the "Add Standard TCP/IP Printer Port Wizard".

Setup for LPR client (Cont.)
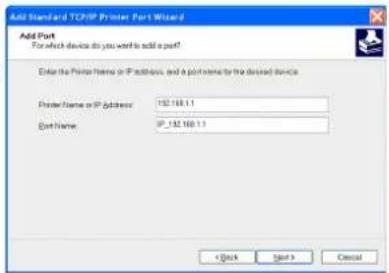
(Step 5)
Input the IP address of the WL500g in the "Printer Name or IP Address" field and the press Next.

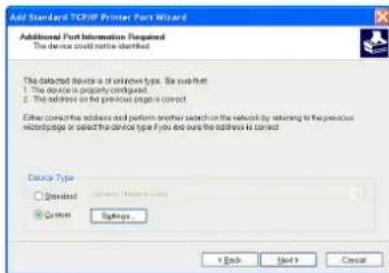
(Step 6)
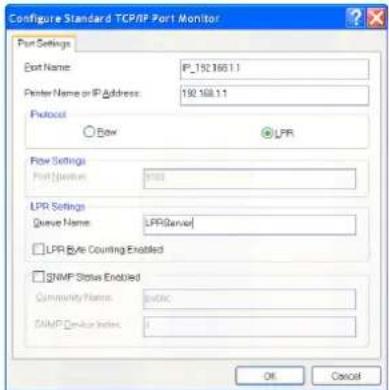
Select "Custom" and then click Settings...
(Step 7)
Select Protocol LPR and type LPRServer in "Queue Name field".
(Step 8)
After completing settings, press Next.
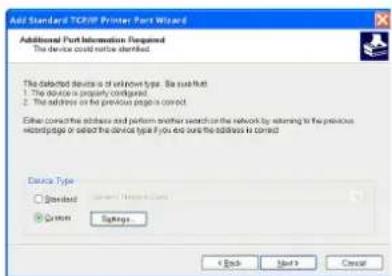
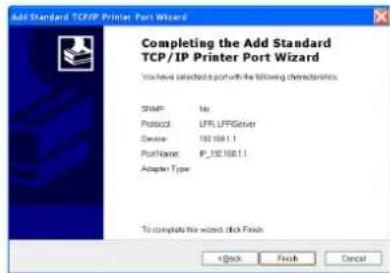
Setup for LPR client (Cont.)
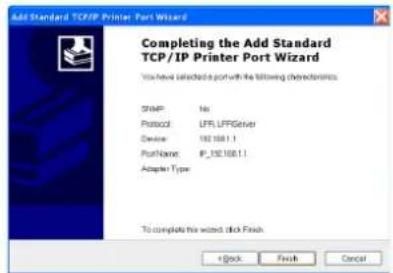
(Step 9)
Press Finish to complete the "Add Standard TCP/IP Printer Port Wizard" and go back to "Add Printer Wizard".

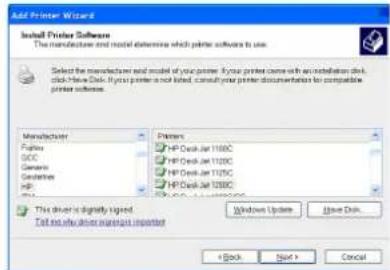
(Step 10)
Find the manufacturer and model of your printer. Click Have Disk if you cannot find it in the list and use the driver provided with your printer.

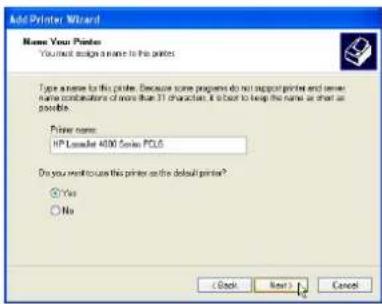
(Step 11)
Click Next to set this as your default printer.

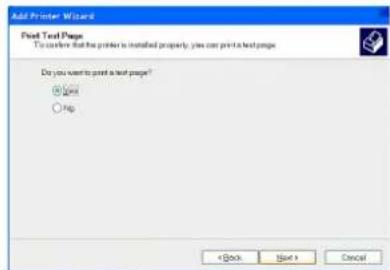
(Step 12)
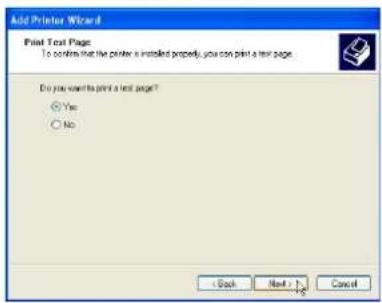
Select Yes and Next to print a test page, otherwise select No.
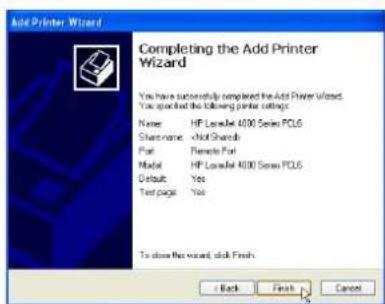
(Step 13)
When the "Add Printer Wizard" is complete, click Finish to close the wizard.
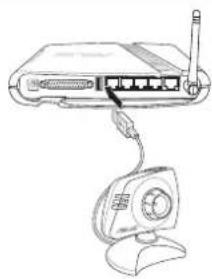
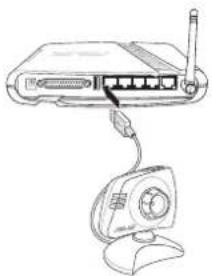
Web Camera Setup
Connect your USB camera using the USB port on the WL-500b/g Wireless Router.
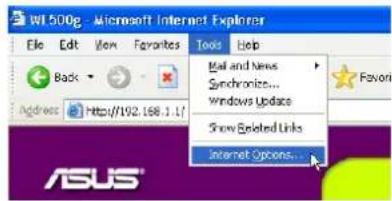
Internet Browser Setting
For clients that use Netscape or other browser that don't support ActiveX, you don't need additional setting to view an image in browser. For client that use IE 5.0 or above, you need to set IE to get a better support on
ActiveX as following:
(Step 1)
Go to Internet Options from the "Tools" menu.
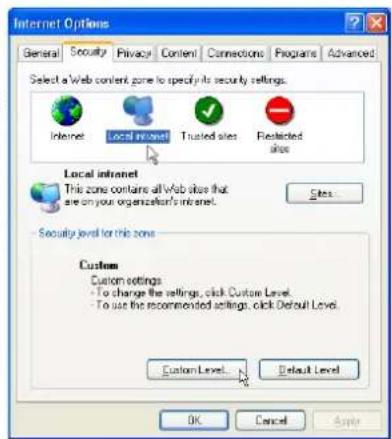
(Step 2)
Click Local Intranet settings and click Custom Level.


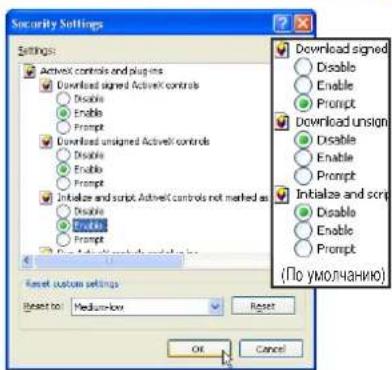
(Step 3)
Enabled the three ActiveX controls and plug-ins.
By default, these items are disabled and will prevent the ASUS Wireless Router's web camera function from working.

Web Camera Setup (Cont.)
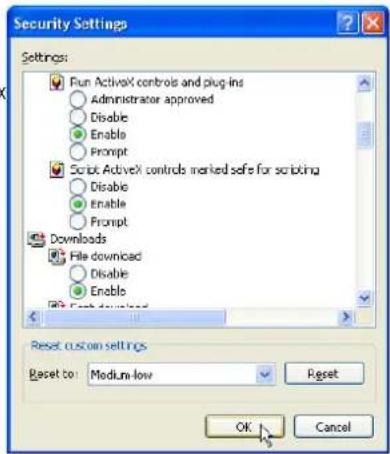
(Step 4)
By default, these three items should already be enabled. Enable them if they have been changed.


(Step 5)
Click Yes to change the security settings.

Web Camera Software Setup

The WL-500b/g Wireless Router's web interface will help you setup the software portion of the web camera.
(Step 1)
Open your browser to one of the following addresses:
http://my.WL500b or http://my.WL500g (depending on model)
http://my_ROUTer or http://192.168.1.1
(Step 2)
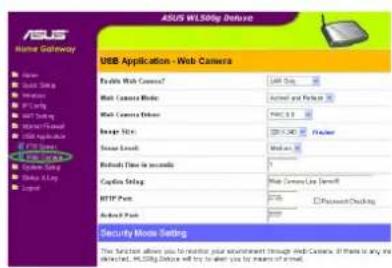
Select Web Camera under USB Application on the menu.
(Step 3)
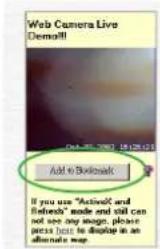
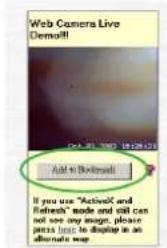
Make settings on this page such as image size. Click Preview if you want to see how it would look.
(Step 4)
Click Add to Bookmark to save a link to this page.
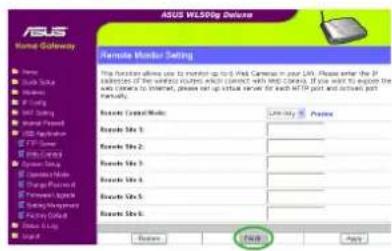
(Step 5)
Make settings to the Remote Monitor if necessary. Click Finish when you are done.

mot de passer: admin

(Etape 5)
Telstar BigPond uniquely). Cliquez
```bash User name: admin
Password: admin

(Passo 5)
Scegliere "Local printer attached to this computer (Stampante locale collegata al computer)".
(Passo 3)
Stampa Wireless (Cont.)
(Passo 4)
```bash User name: admin
Password: admin

(Paso 5)
BbIbePte HxKhbl TnT coeHHeHn. BbIbePte TmNcnoJIb3yEmoRo coeHHeHn.
(Dnra coeHnH Tnna "ADSL"ncnoB3yETcCTaHdapThb TepeoHHKa6eJb,a dnncoeHNHeHmTnna "Cable Modem"ncnoB3yETcTOctb kpyTb TB Ka6eJb)
Дяпюлженин НадмITE KHOПКу Next(Danee).
(Liar 8)
BBeInTe Mm nonb3OBateN n Paponb a6oHeHtCKoYyEHTHO 3aInc dnn NOKIOeHnK INTEpHET-npoBaIdepy.
Ipy npdoJKeHnHaXmTe KHOkny Next (Danee).
(Liar 9)
3aONHHTe NHyKbI Host Name (Mma xocTa) n MAC Address (MAC-apec),ecn 3TOr Tpe6yET INTEpHET npOBaIep.BBeDITe MM cepBepa Hnn IP-aPdec cepBepa Heart-Beat Server np CoedINHeHH qEe3 cTb BigPond (TOnkO JnN PON30BaTeJe KabeJbHO Cetn Te KHOIKY Next (Danee).
(Lar 10)
ObHNO BbIbpaTcRa IINyHKTOB "IOnyHTb IP-APDEC ABTomATmHeckn" INoYHTb APDEC DNS-CePBePA ABOMaTHueckn".EcmBbIpaHO Het nKAKOro-NIO 3 HIX,HEo6XoIMBO BECTM COOTBeTBCTByUOy IOHOFOPMaHIO,IOyueHHy U NHTpeHET npOBaIDepa.
Дя npdoJokhen HaKMITE KhoNky Next (Jaee).
(Lar 11)
BBeHTe SSID (cTeBOE mM) n HactpoIte npaMeTpBI WEP (KIOU uMPoBaHn),ecm He6xOIMMo CdeNaTb paOTo c 6ecnpoBDHO CEbHO 60nee 6e3oNacOH.
Длпюдолженин hyKMITE KhoNky Finsh (3akOHHTb).
(Lar 12)
HaKMMTe KhoNkY CoXpaHHTb Hnepe3anyTb
Ia coXpaHeHHaCTpoek 6ecnpoBDOHO
MapuPyTHaTopa HAKTBAUHNHObIX HaCTpoek.
Bb6epnte npHT "Local printer attached to this computer (JokalnbHn npntep, POKJIIOUeHHbK 3TOMY KOMMbIOTepy), 3aTeM HAKMTe Next (Danee).
(Lar 3)
Haxmnte "Create a new port (Co3aTb HOBBn npT) IN B bInadaouem MeHO Bb6epnte nyHKT Standard TCP/IP Port (CTaHapTHbN npT TCP/ IP). 3aTe m Haxmnte KhoNky Next (Danee).
(Liar 4)
HaxMMTe KhoNky Next (Danee) B "Add Standard TCP/IP Printer Port Wizard (MacTepe no6abNeHna CTaHapTHoro TCP/IP npota npntepa").

HactpoJa KJIeHTa LPR (IpoDoJxKeHne)
(LiAr 5)
BBeInTe IP-aPec WL500g B none "Printer Name or IP Address (IMa pInHtepa nnIP-aPec), n 3aTEM HaxMITE KHOIky Next (Danee).
(LJar 6)
BbIbePte nyHKT "Custom (Oco6oe), n HAXMITE KHOKNy Settings (NapaMeTpbl)...
(Liar 7)
BbIbePte npToKoL LPR n Tn LPRServer B noJe "Queue Name field (Mma opepe).

(Liar 8)
Iocne 3aBepHnnpceca HactpoKn, HaxMNTe KhoNky Next (Danee).

wnckd
Hactpoia KIneHTa LPR (PpOdoJxKeHne)
(LJar 9)
HaKMMTe KhoNky Finsh (ToTOBO)ДЯ 3aBepSeHnRA paObTy "Add Standard TCP/IP Printer Port Wizard (MacTepa no6abJIeHnRA CTaIapTHoro TCP/IP npTa npINTEpa)", IN BO3bpATA K "Add Printer Wizard (MacTepy ycTaHOBKn pInHTepa)".
(LJar 10)
HaHnTe Ipn03BODHTEN MoDJIb BaUero npInHTepa.HaxmITE KHOKny Have Disk (YcTaHOBBtB c nCKA),ecnn Bbl He CMOTJn HAHTI pInHTepB CnNCKe, NcNOnb3yTe dpaiBeP npInHTepa, NOCTabJIeMbI B KOMJIeKTE C pInHTepoM.
(Lar 11)
HaxMMTe KhoNky Next(Daee)IraYcTaHOBKn 3TOrO npnHTepa B KaueCTBe pnpHTepa No yMOJUaHIO.
(Lar 12)
Bb6epTe Yes (a) N Next (Danee) nneatn TectoBoi CtpaHus, Hnn Bb6epTe No (Her).

(Lar 13)
Iocne 3aBepenHpa6oTb1 "Add Printer Wizard (MacTepe yCTaHOBKn pInHTepa)" HaxMnte KHOkiy Finsh (ToTOBO) dJa 3akpbltnk OKHa macTepe.

HactpoJa HHTepHeT-KaMepbI
IpoCoeHHnHe KaMepy USB K nopTy USB Ha 6ecnpoBODHom MapuPyTn3aTope WL-500b:g.
Hactpoikn HntepHeT-6pay3epa
Knnehtb, nncnbsyioune Netscape nn pyrue 6pay3epb, He noDpeKmbaOuine ActiveX, He HxkdaotcB HactpoKe dnonlntelbHbIX npametpoB nnpocmoTpa 106paxeHn B 6pay3epe. Y KnneHTOB, nncnbsyioux IE bpcnn 5.0 nnn Bbiue, nnyuwei noDpeKkN ActiveX Heo6xoMo Hactpontb npametpbIE cneyooum o6pa3om:
(Lar 1)
B MEnHO "Tools (CepBnC) npeiInTe K nyHkTy Internet Options (NapaMeTpbl HtepHET).
(Lar 2)
Bb6epnte npHKT n3 cnnCKa noHnHa3BaHnEm HacTpoek Local Intranet (MecTHaNHTpace) n danee Bb6epnte Custom Level (Dpyro).
(Lar 3)
BkIIOUHTe TPN AnEMeHTa N MOyJN NOKIIIOHnRA ActiveX.
IyoMOnaHnO,3nnapaMeTpblOTKIOueHbIMoYrNOMeHaTbHOPMaJIbHOpa6OteUHTepHET-KaMEpbI,NOKIOueHHOpe36ecnpoBDOHO mappyTu3atop ASUS.
wnx3d
HactpoJa IVHTepHeT-KamepbI (PpOdoJxKeHne)
(Liar 4)
No ymoJhauHHO,3TN TPNIyHKTA yKe DOJIKNHbI 6bIb BkIOUHeHb. BKIOUHTe INx,ecn INX COCTOHRME6bIIO N3MeHEHO.
(Lar 5)
Haxmte Yes (a) nIy I3MeHeHHn HAcTpoek 6e3oNAChOCTn.

Pycckn
HactpoKa no INHTepHeT-KaMepbI
Web-nteppeic 6ecnpoBODHOro MapuTyH3atopa WL-500b/g nomoxet Bam hactpontb nporpaMMHy qactb HnTepHET-KaMepbl.
(Lar 1)
OtkpoTe 6pay3ep n BBeIte OINH n3 yka3aHHbIX aPecOB:
http://my.WL500b mnn http://my.WL500g (B 3aBcIMOCnT O mdoJI)
http://my.router.unm. http://192.168.1.1
(Lar 2)
BbIepeTe Web Camera (HHTepHeT Kamepa) B NIKTE MeHIO PnIOXKeHne USB.
(LIar 3)
Ha 30i ctpnue HacTpaBaoTc TaKne napaMeTpb, KaK pa3Mep N3o6paxKeHnE. HaxMITE KHOIky Preview (PpeBaPnteBHyn npocMToP),ecJn Heo6xOIMNOnocMToPeTb,KaKoe 6yDet nOnyuHcN3o6paxKeHne.
(Liar 4)
HaKMMTE KHOIky Add to Bookmark (D6abNTB u36paHnoe) COXPAHENH CCbIKN HA 3Ty CTpaHUY.
(LiAr 5)
Hactpoite napametpy ydaJIeHHOro MOHTOPa,ecIN 3TO HeOxMO.10 OKOHuaHN HACTPOIK HAKMITE KONKY Finish (ToTOBO).


Pycckn
Router sem fios WL500g / WL500g Deluxe (Para clients sem fios 802.11g/b)
Router sem fios WL500b (Para clients sem fios 802.11b)

Guia de consultarapida
```bash User name: admin
Password: admin

(Etapa 5)
| Quick Setup |
| Select Internal Connection Type |
| WELCOME Page suggests several kinds of connection to internet through Wi-Fi port. Please select connection type you need. In addition, before getting on Internet, please make sure you have connected WELCOME Page's port to your DSL or Cable Holder. |
| Cable Modem or other connection type that port P automatically. |
| ADSL connection that requires reassurance and password. It is known as PPPoE. |
| ADSL connection that requires reassurance, password and IP address. It is known as PPPID. |
| ADSL or other connection type that uses static IP address. |
| Tulip BigRed Cable Cable Cord Cable. |
| Quick Setup | |
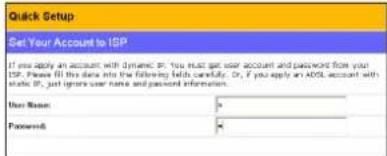
| Set Your Account to ISP | |
| If you apply an account with dynamic IP, You must get user account and password from your ISP. Please fill this data into the following fields carefully. Dr, if you apply an ADSL account with static IP, you will have your name and password information. | |
| Use Name: | # |
| Password: | * |
| Quick Setup | |
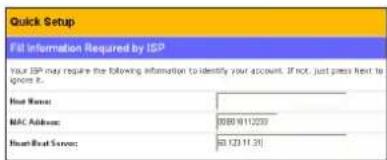
| Fill Information Required by ISP | |
| Your ISP may require the following information to identify your account. IF not, just press next to know it. | |
| Host Name: | |
| M&C Address: | 3105 9112230 |
| Account Service: | 8112311331 |
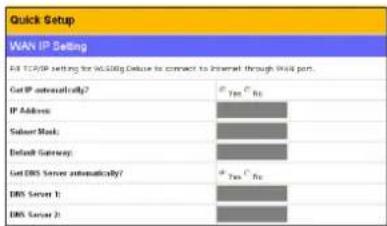
| Quick Setup | |
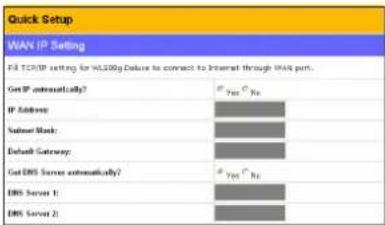
| VAN IP Setting | |
| FET C/IP setting for V3.00g Deluxe to connect to Internet through VLAN port. | |
| Get IP automatically? | Yes No |
| IP Address: | |
| Subnet Mask: | |
| Local Gateway: | |
| Get DNS Server automatically? | Yes No |
| DNS Server 1: | |
| DNS Server 2: | |
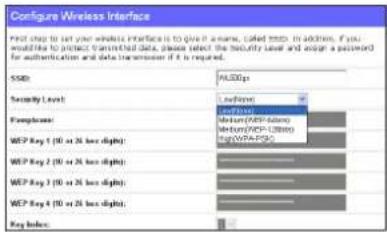
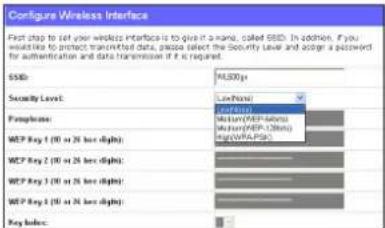
| Configre Wireless Interface | |
| First step to set your wireless interface is to qoill it name, called #n. In addition, if you would like to protect transmitted data, please select the security level and assign a password for authentication and data transmission if it is required. | |
| SSID: | ALSO24 |
| Security Level: | ### |
| Fquences: | ### |
| WEP Key 1 (50 or 26 hex-digit): | ### |
| WEP Key 2 (50 or 26 hex-digit): | |
| WEP Key 3 (50 or 26 hex-digit): | |
| WEP Key 4 (50 or 26 hex-digit): | |
| Key hoder: | |
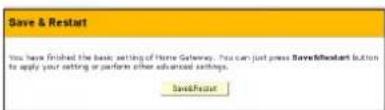
| Save & Restart |
| You have finished the basic setting of Home Calendar. You can just press Save/Restart button to apply your setting to perform other educational settings. Save/Restart |
If you can see this meseage, this means no Server found during this search. Please click "More" to search again after checking all the settings.