A Modo Mio Minu LM 500 - Coffee machine Lavazza - Free user manual and instructions
Find the device manual for free A Modo Mio Minu LM 500 Lavazza in PDF.
| Product type | Espresso coffee machine with integrated milk frother |
| Brand | Lavazza |
| Model | A Modo Mio Minu LM 500 |
| Dimensions (H x W x D) | 253 x 272 x 291 mm |
| Weight | Approximately 4.2 kg |
| Power supply | See rating plate (e.g. 220-240 V ~ 50/60 Hz) |
| Rated power | See rating plate (approx. 1200-1400 W) |
| Water tank capacity | 0.5 L (removable) |
| Coffee type | Compatible capsules Lavazza A MODO MIO |
| Main functions | Preparation of espresso coffee and milk froth (Cappuccinatore) |
| Sleep mode (Stand-by) | Automatic after 9 minutes of inactivity |
| Milk frother function | Removable Cappuccinatore for heating and frothing milk |
| Maintenance and descaling | Descaling recommended every 3-4 months; regular cleaning of parts |
| Child safety | Use under supervision for children from 8 years; do not leave unattended |
| Automatic safety shut-off | In case of overheating of the Cappuccinatore or lack of water |
| Body material | Thermoplastic |
| Power cable length | 0.8 m |
| Package contents | Machine, cable, 12 trial capsules, user manual, warranty, welcome book |
| Repairability | Interventions only by Authorized Service Centers |
| Warranty | Manufacturer warranty (conditions in the manual) |
Frequently Asked Questions - A Modo Mio Minu LM 500 Lavazza
User questions about A Modo Mio Minu LM 500 Lavazza
0 question about this device. Answer the ones you know or ask your own.
Ask a new question about this device
Download the instructions for your Coffee machine in PDF format for free! Find your manual A Modo Mio Minu LM 500 - Lavazza and take your electronic device back in hand. On this page are published all the documents necessary for the use of your device. A Modo Mio Minu LM 500 by Lavazza.
USER MANUAL A Modo Mio Minu LM 500 Lavazza
Dear Customer thank you for purchasing the Lavazza A MODO MIO espresso coffee machine and for choosing our company. Before operating the machine, we recommend you carefully read the operating instructions that explain how to use, clean and maintain it in perfect working order. We hope you enjoy brewing authentic Italian coffee, thanks to Lavazza!
Felicitations!
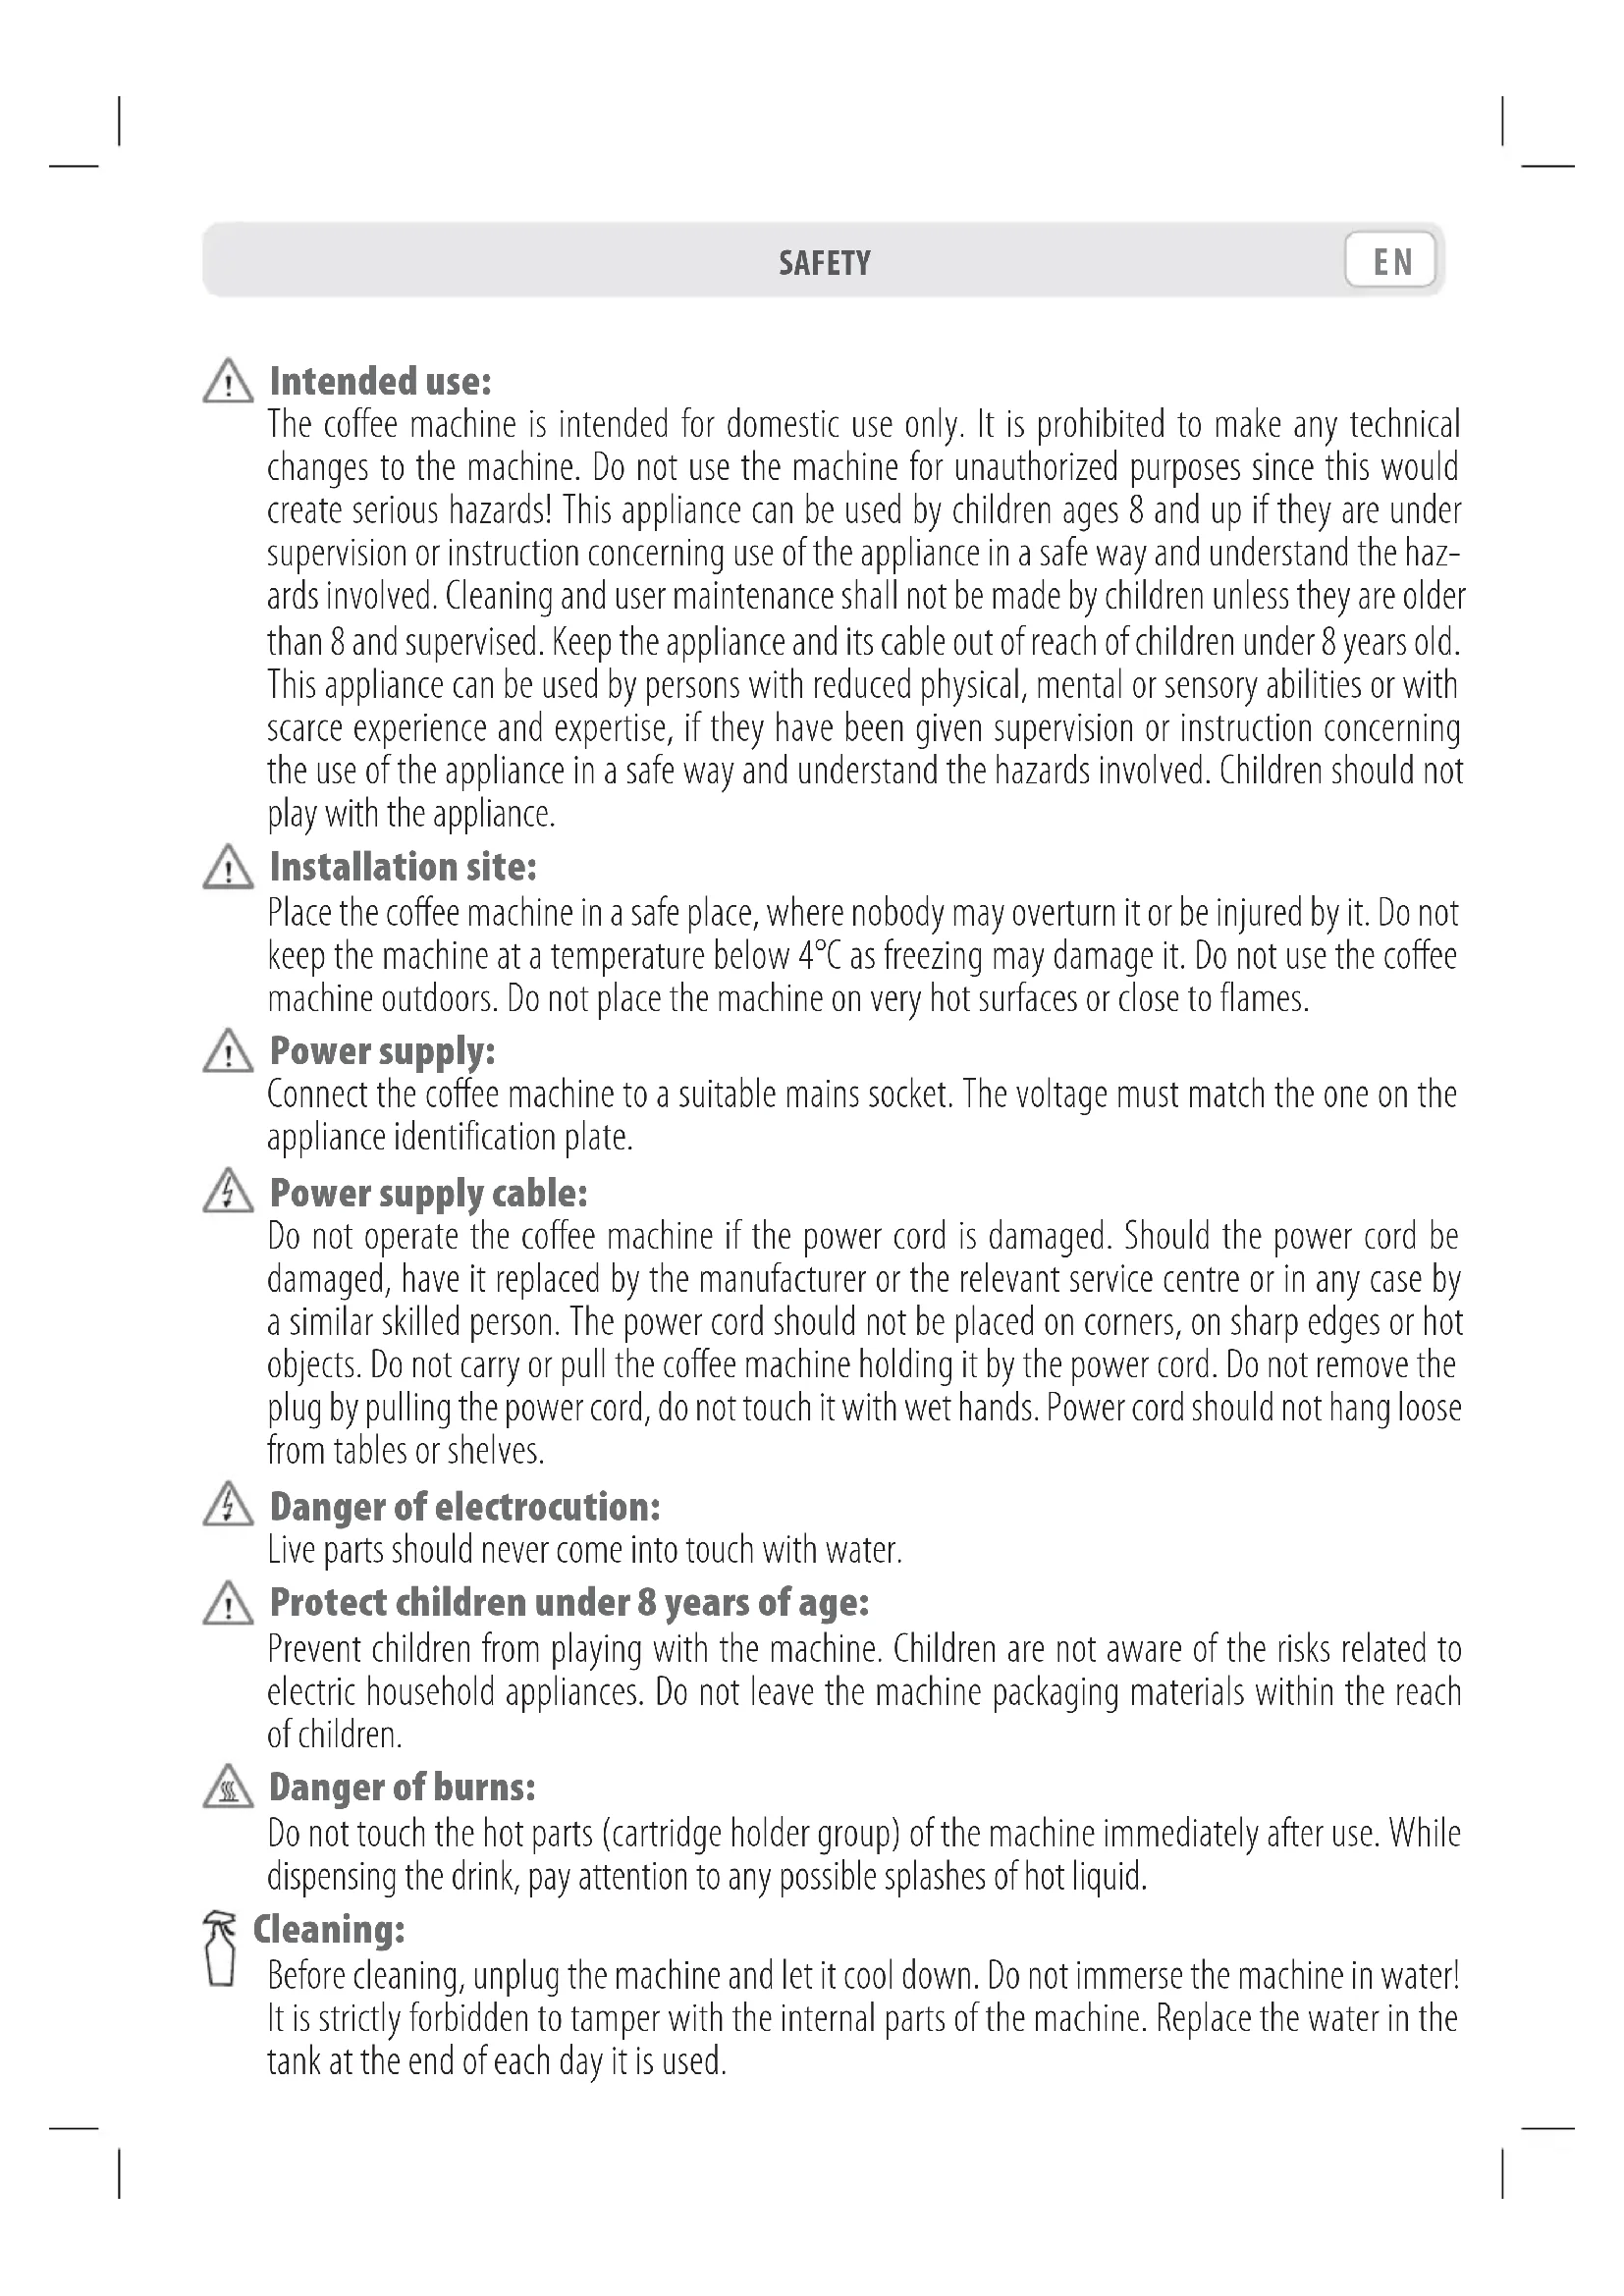
The coffee machine is intended for domestic use only. It is prohibited to make any technical changes to the machine. Do not use the machine for unauthorized purposes since this would create serious hazards! This appliance can be used by children ages 8 and up if they are under supervision or instruction concerning use of the appliance in a safe way and understand the hazards involved. Cleaning and user maintenance shall not be made by children unless they are older than 8 and supervised. Keep the appliance and its cable out of reach of children under 8 years old. This appliance can be used by persons with reduced physical, mental or sensory abilities or with scarce experience and expertise, if they have been given supervision or instruction concerning the use of the appliance in a safe way and understand the hazards involved. Children should not play with the appliance.
Installation site:
Place the coffee machine in a safe place, where nobody may overturn it or be injured by it. Do not keep the machine at a temperature below 4^ as freezing may damage it. Do not use the coffee machine outdoors. Do not place the machine on very hot surfaces or close to flames.
Power supply:
Connect the coffee machine to a suitable mains socket. The voltage must match the one on the appliance identification plate.
Power supply cable:
Do not operate the coffee machine if the power cord is damaged. Should the power cord be damaged, have it replaced by the manufacturer or the relevant service centre or in any case by a similar skilled person. The power cord should not be placed on corners, on sharp edges or hot objects. Do not carry or pull the coffee machine holding it by the power cord. Do not remove the plug by pulling the power cord, do not touch it with wet hands. Power cord should not hang loose from tables or shelves.
Danger of electrocution:
Live parts should never come into touch with water.
Protect children under 8 years of age:
Prevent children from playing with the machine. Children are not aware of the risks related to electric household appliances. Do not leave the machine packaging materials within the reach of children.
Danger of burns:
Do not touch the hot parts (cartridge holder group) of the machine immediately after use. While dispensing the drink, pay attention to any possible splashes of hot liquid.
Cleaning:
Before cleaning, unplug the machine and let it cool down. Do not immerse the machine in water! It is strictly forbidden to tamper with the internal parts of the machine. Replace the water in the tank at the end of each day it is used.

Foring the machine:
If the machine remains inactive for a long time, unplug it and store it in a dry place out of reach of children. Keep it protected from dust and dirt.

Servicing / Maintenance:
In case of failure, problems or a suspected fault resulting from falling of the machine, immediately unplug the machine. Do not attempt to operate a faulty machine. Servicing and repairs can only be performed by Authorized Service Centres. All liability for damages resulting from work not carried out by professionals is declined.

Water tank:
Fill the tank only with fresh, non-sparkling, drinking water. Do not operate the machine if the water is not at least above the minimum level indicated on the tank.

Capsule compartment:
This machine can only be used with compatible capsules; do not put your fingers or any other object in the capsule compartment. The capsules can be used only once.

chine disposal at the end of its operational life:
INFORMATION FOR USERS: in compliance with Directives: 2002/95/EC, 2002/96/EC and 2003/108/EC (and later amendments), relative on the restriction of the use of certain hazardous substances in electrical and electronic equipment, and on the disposal of e-wastes. The symbol with the crossed dustbin shown on both equipment and package (in compliance with European Directive 2002/96/EC), indicates that the product at the end of its service life shall be collected as separate waste. The equipment shall be brought to a special waste centre. For more information about correct disposal you can contact any competent public administration office as well as an electric and electronic equipment dealer.
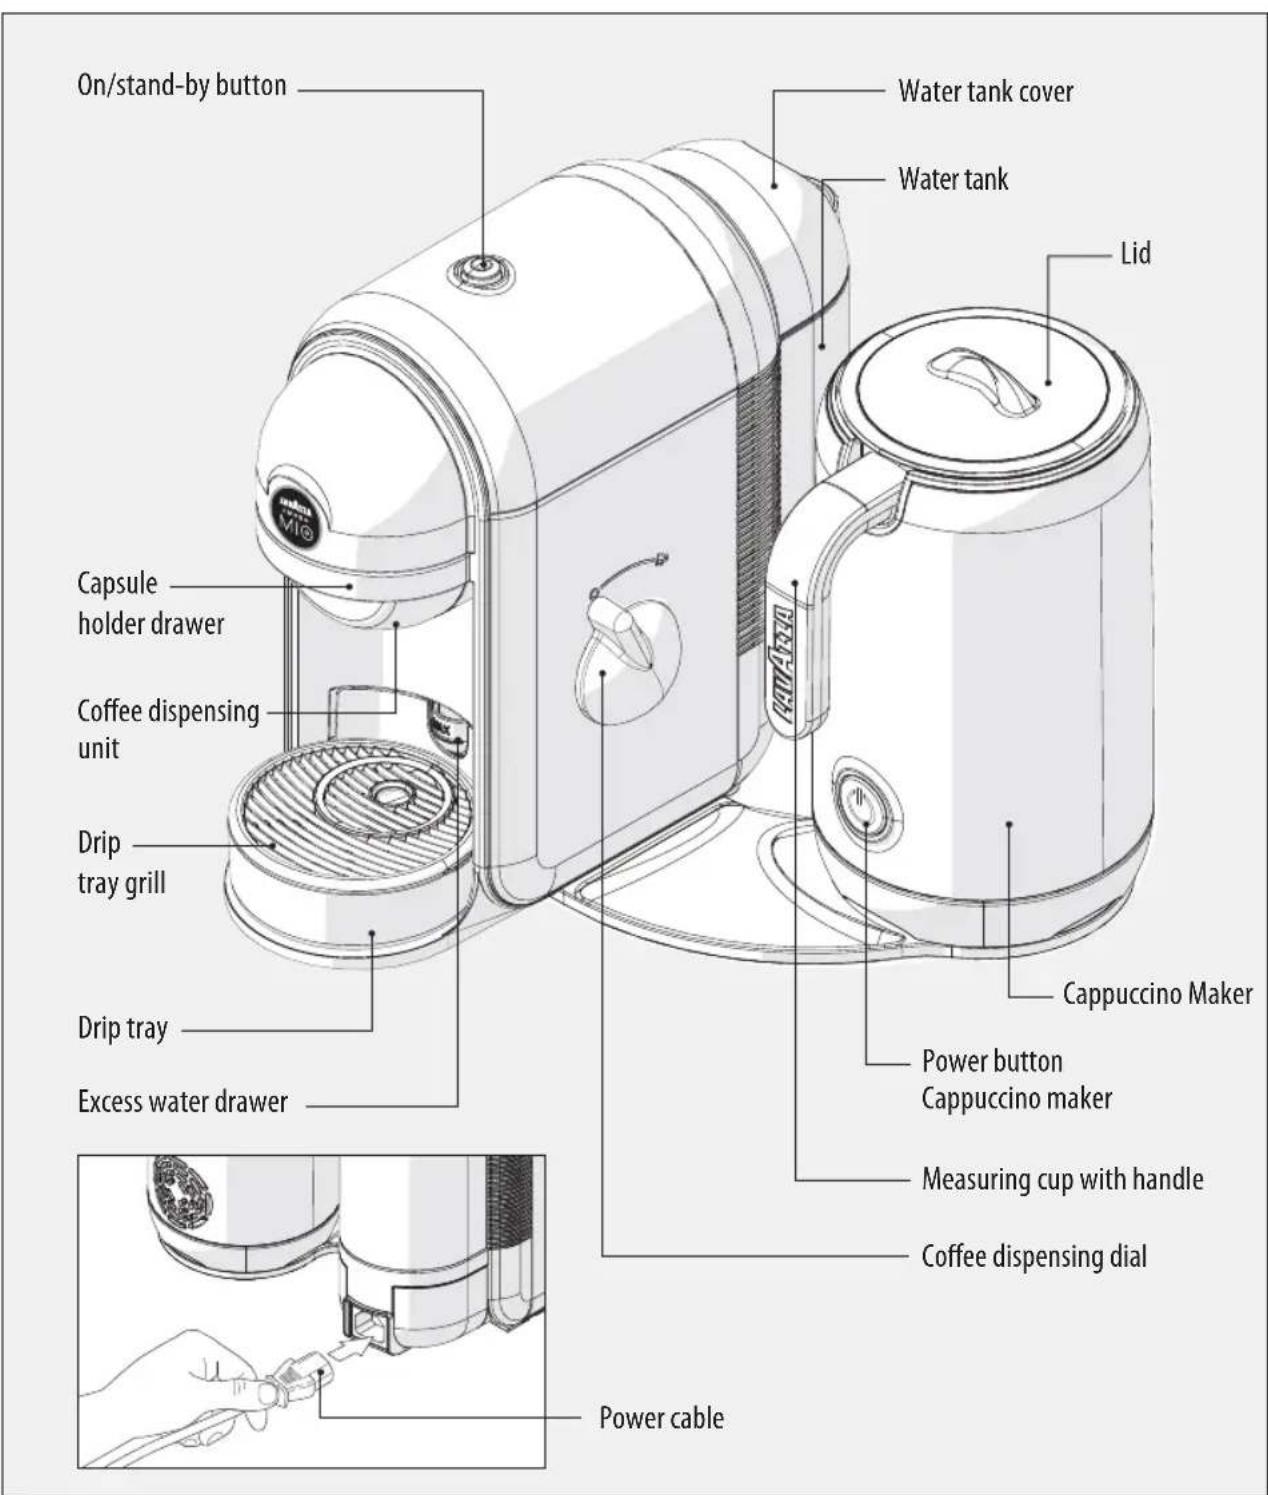
MACHINE COMPONENTS
EN
PACKAGE CONTENT\*
- Minù Caffè Latte machine
- power supply cable
-
12 assorted capsules Lavazza A MODO MIO
-
instruction booklet
- warranty sheet
- Lavazza A MODO MIO welcome kit booklet
No liability is held for damage caused by:
- incorrect use not in accordance with the intended purposes;
- repairs not carried out by authorized service centres;
- tampering with the power supply cable;
- tampering with any parts of the machine;
- the use of non-original spare parts and accessories;
- failure to descale;
storage at temperatures below 4^ - use in places with temperature below 10^ or above 40^ ;
- use in places with relative humidity above 95% ;
- use of capsules others than indicated.
In these cases, the warranty is not valid.
STARTING THE MACHINE
The coffee and cappuccino machine can be used individually or simultaneously.
Place the coffee machine on a flat and stable surface, far from water and heat sources. Disconnect power supply, if any. Machine damages due to non-observance of these indications are not covered by warranty.
Strong electromagnetic interferences can influence the normal machine operation. If necessary, switch off the machine with the main switch, and then switch it on again to reactivate the operation. If the problem remains, use the machine in a place not subject to electromagnetic interferences.
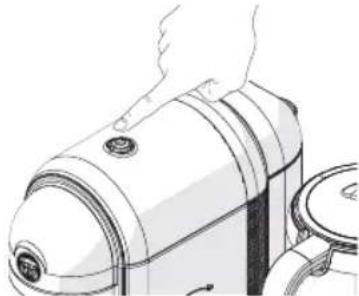
Lift and remove the cover, then the water tank itself.
2 Rinse off the tank.
3 Fill the water tank up to the MAX level indicated, using only fresh drinking water. Refit the tank.
Hot water and other liquids can damage the tank and the machine. Do not operate the machine without water: make sure that there is enough water in the tank.
4 Insert the power cable.
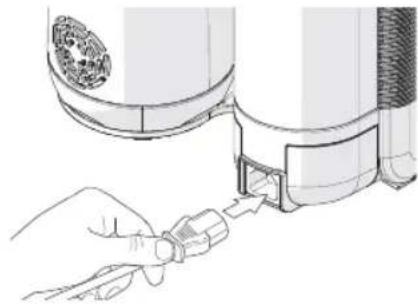
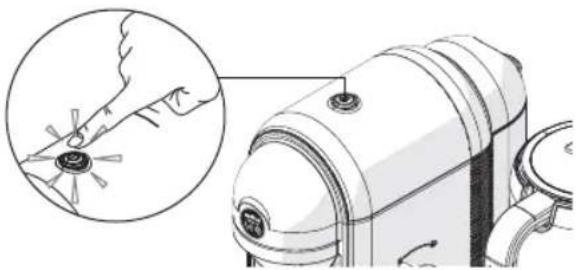
Press the start-up/stand-by button to start the machine.
The coffee machine starts the heating cycle. The power-on/stand-by button will start blinking with a green light.
The machine is ready when the start-up/stand-by button is on with the steady green light.
STAND-BY FUNCTION
To ensure the energy conservation the machine automatically passes to the stand-by mode after 9 minutes of not being used. This mode is indicated by the switching off of the button. The machine can be manually put in the stand-by mode by pressing the appropriate button.
The machine can be reactivated by pressing the button again.
Make sure that the start-up/stand-by button is on with the steady green light and that the coffee dispensing dial is in the stop position before manually putting the machine to the stand-by mode.
COFFEE DISPENSING

Make sure that the start-up/stand-by button is on with the steady green light.

Only compatible capsules may be inserted in the capsule holder draw. Do not insert fingers or other objects.

Single-dose capsules are prepared to dispense one coffee/product. DO NOT use the capsules more than once. Inserting two or more capsules can cause the machine to malfunction.

To always have a coffee at the perfect temperature, it is recommended to preheat the cup with hot water. Position the cup under the dispensing spout without inserting the capsule. Turn the coffee dial to the dispensing position to provide enough hot water to preheat the cup.

The first time you use the coffee machine, run a water supply only (without capsule), before starting a coffee supply.

Place the cup under the coffee dispenser for a classic espresso.


Remove the drip tray to use cups of different sizes for a long coffee.

If, during the dispensing cycle power supply is interrupted or water is exhausted within the tank proceed as follows:
-
Turn the coffee dial to the stop position.
-
Restore the power supply or fill the water tank up to the indicated MAX level.
-
Press the start-up/stand-by button; wait for the steady green light to be on.
- Replace the capsule inside the capsule holder drawer with a new one.
- Restart the coffee dispensing.

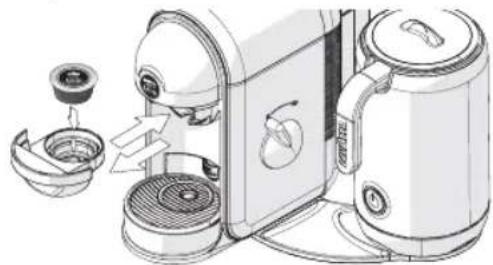
Remove the capsule holder drawer, insert a capsule and insert the drawer again.

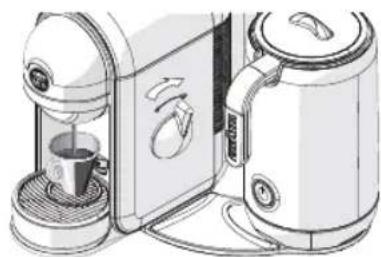
Turn the coffee to the dispensing position and wait for the desired quantity to be provided.

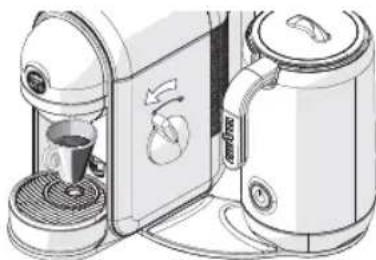
Turn the coffee dial to the stop position.

The coffee automatically stops dispensing after 110 seconds.

Wait until the start-up/stand-by button is on with steady green light before removing the capsule holder drawer.

Pull out the capsule holder drawer, remove the used capsule and insert the drawer again with a new capsule. The machine is ready to dispense a new coffee.
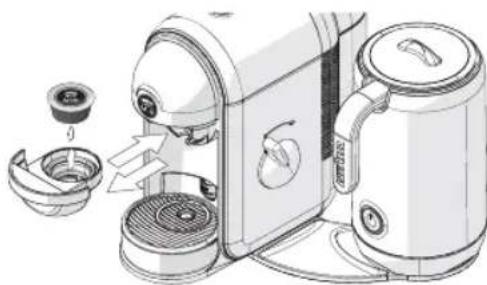
COMPONENTS OF THE CAPPUCCINO MAKER
Cappuccino maker lid
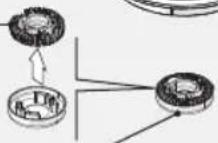
Notched crown (to froth)
Smooth crown (to heat and blend)
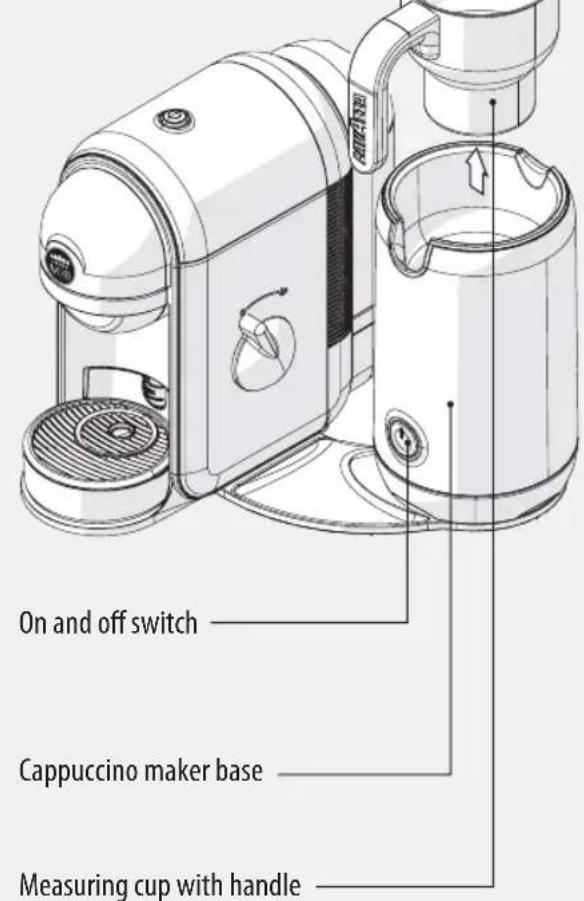
On and off switch
Cappuccino maker base
Measuring cup with handle

This machine can only be operated with original accessories provided by the manufacturer.
No liability will be assumed for any damage caused by misuse of the cappuccino maker or non-compliance with the instructions contai- ned in this manual.
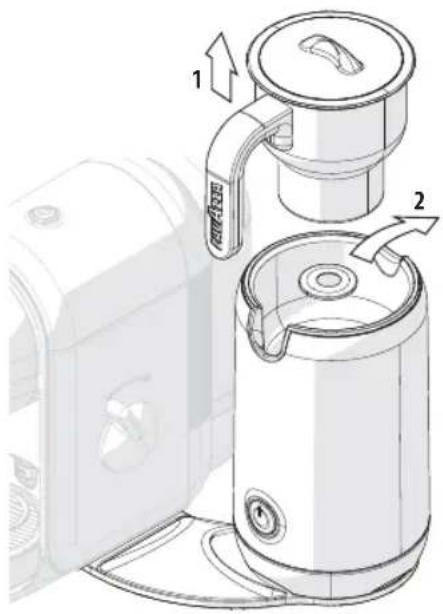
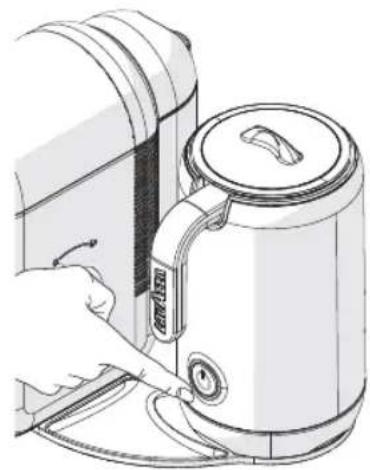
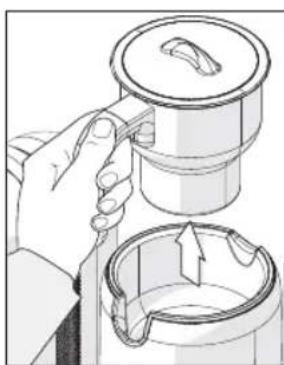
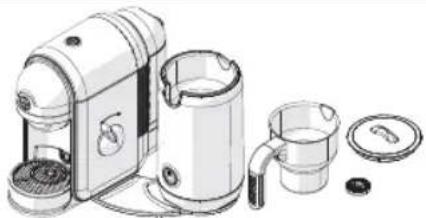
STARTING THE CAPPUCCINO MAKER
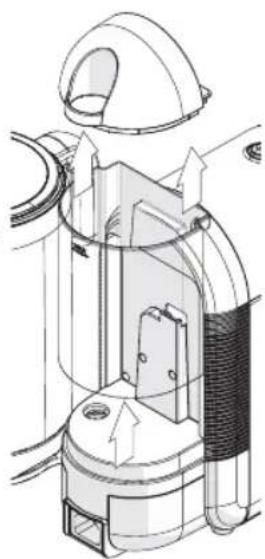
The first time using the cappuccino maker, lift the container (1) and remove the protective ring (2) located inside the base. Place the container on the base.

The coffee and cappuccino machine can be used individually or simultaneously.
Verify the presence of all the accessories and their integrity. After a long period without use, consult the section "Maintenance and Cleaning".

This product was only designed to heat and froth milk. Do not insert other types of liquids or solids in the container. Do not leave the Cappuccino maker unattended when in use.
To get the best results, use cold milk from the fridge.
Make sure that the bottom of the container and the contact area inside the base are clean and dry.
FILLING AMOUNT
Always respect the MIN and MAX level marked inside the container.

Do not operate the cappuccino maker with an empty container or with a quantity of milk below the MIN level. This can cause the machine to overheat. In case of overheating, the machine will automatically turn off. Do not fill the container over the MAX level, it may cause hot milk to splash.
USE OF THE CAPPUCCINO MAKER
EN
To froth milk, fill the container up to the 120ml
mark under the MAX level

To heat up and blend the milk, fill the container up to the 180ml
mark above the MAX level
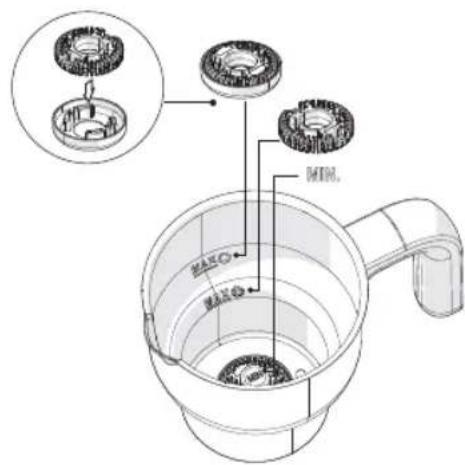
SELECTION OF ACCESSORIES
- To heat and froth the milk at the same time, use only the notched crown.
- To heat the milk and blend (e.g., hot chocolate), adjust the notched crown inside the smooth crown, place them in the container making sure that the smooth crown is facing down.

Do not use the cappuccino maker without inserting the supplied crowns.
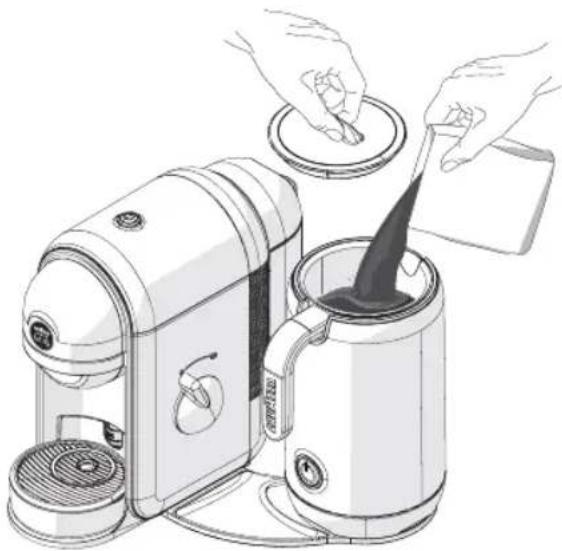
HEAT AND FROTH MILK

Place the container on the base, making sure it is positioned correctly.

Remove the lid from the milk container.

Place the chosen crown on the assembly ledge that is located on the bottom of the container.
Noticed crown (to froth milk) Smooth crown (to heat and blend)

Pour the milk into the container. Refer to chapter "Filling amount".

Place the lid on the container.

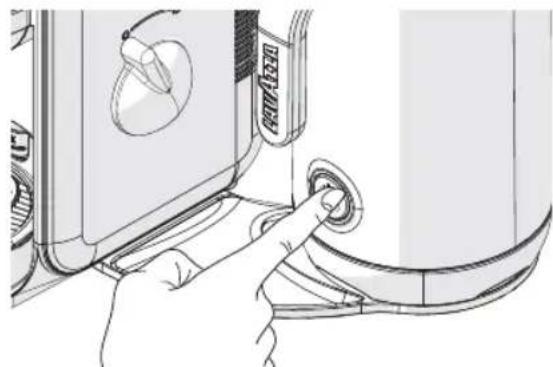
Press the On/Off switch.

The lid must always be inserted during operation.
The appliance emits a beep.
The power button lights up with a flashing green light.
The machine starts the heating cycle.
The heating process ends automatically when the milk is sufficiently hot.
The machine emits a double beep to indicate the end of the heating process.
12 The power switch turns off.

Remove the hot container only by the handle.

Open the lid and pour the frothed milk into the cup.
EN
USE OF THE CAPPUCCINO MAKER

Ensure the machine is disconnected from the power outlet and that it has cooled down before cleaning. For more detailed information, refer to "Maintenance and Cleaning".
TEMPORARY OR FINAL INTERRUPTION OF THE CYCLE
To interrupt the heating cycle of the milk, press the On/Off switch.
To reactivate the heating cycle or froth milk, press the On/Off switch.
If the milk is sufficiently hot at the moment of the interruption of the process, the machine will not be able to be restarted.
FROTHING COLD MILK
It is possible to froth milk without having to heat it up.
Proceed as shown in points froth milk
1 to 5 in chapter "Heat and
Press and hold the On/Off switch for at least 2 seconds.
The machine emits a long sound.
The machine turns on and starts to froth the milk.
4 After a minute the frothing process ends automatically.
The machine emits a double beep to indicate the end of the frothing cycle.
The power switch turns off.
After one cycle of frothing cold milk it is possible to immediately start a new process.
PREPARATION OF HOT CHOCOLATE
The machine is also suitable for the preparation of chocolate drinks.
Proceed as shown in points froth milk".
1 to 6 in chapter "Heat and
After about a minute, while in the process of heating, open the lid and pour the desired quantity of cocoa powder.
Place the lid back again.
The lid must always be inserted during operation; it can only be opened to add cocoa powder.
To avoid blocking the mechanism, do not use chocolate flakes or pieces.
The heating process ends automatically when the chocolate is sufficiently hot.
The machine emits a double beep to indicate the end of the heating process.
The power switch turns off.

Never use solvents, alcohol or other aggressive substances or ovens for drying the coffee machine components. Wash machine components (electric components excluded) with cold/lukewarm water and non-abrasive clothes/sponges. Dishwater can be used for the following Minu Caffe Latte machine components - drop drawer, cup rest grid, excess-water drawer. Rinse the tank every day. Do not leave water in the circuit for over 3 days or, should this happen, then run a water supply (without capsule) before starting a coffee supply.
COFFEE DISPENSER CLEANING
To clean the dispenser, perform a weekly COFFEE BRENING procedure without inserting the capsule.
CLEAN THE EXCESS WATER DRAWER AND THE DRIP TRAY

Empty and clean the excess water drawer and the drip tray after 10 coffees made or every two / three days.

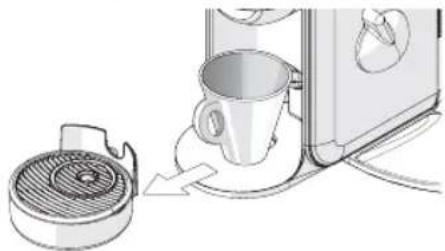
Take off the drip tray and remove the drip tray grill.
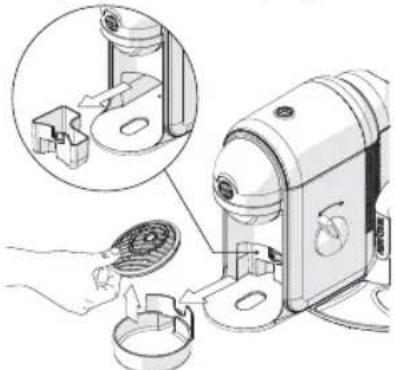

Remove and empty the excess water drawer. Clean and dry all parts before putting them back

Check periodically that the excess water drawer and the drip tray are not full so as to avoid malfunctioning and damages to the machine.
CLEANING THE CAPPUCCINO MAKER

Disconnect the power plug from the outlet before cleaning the Cappuccino maker and its accessories. To avoid the risk of electric shock, do not clean or immerse in water the power cord or the base of the machine.
- The container, the crown and the lid must be washed after each use with warm water and a little detergent, or washed in the dishwasher.
If necessary, the notched crown can be cleaned with a small brush.
Thoroughly dry all accessories. - The base can be cleaned with a soft damp cloth dipped in a small amount of liquid detergent.
- Do not use abrasive detergent solutions or solvents
DESCALING
Limescale normally builds up with extended use of the appliance; the machine needs descending every 3-4 months and/or whenever a reduction in water flow is noticed.

In the event of any operational conflict, this use and maintenance manual shall prevail on any indication specified on accessories and/or components sold separately.

For descending can be used a descending product for coffee machines of non-toxic and/or harmful type, commercially available.

Do not drink the descending solution and products dispensed until the completion of the cycle. Never use vinegar as a descending solution.

Remove and empty the water tank.

Refill the tank with a descending solution and water as specified on the package of the descending product. Refit the tank.

Power the machine ON and place a suitable container under the spout.

Turn the coffee dial to the dispensing position and dispense 2 cups (approximately 150ml each) of water.

Turn off the machine.

Allow the descending solution to work for about 15-20 minutes with the machine turned off.

Turn on the machine by pressing the start-up/stand-by button and perform the steps described in poin 4 and 5. Turn off the machine using the start-up/stand-by button for 3 minutes.

Repeat the steps described in point 7 until the water tank is completely empty.

Remove the tank and rinse it with fresh drinking water. Fill it completely.

Turn on the machine by pressing the start-up / stand-by button. Place a suitable container under the dispenser. Turn the coffee dial to the dispensing position and dispense the entire content of the tank

When the water is finished, refill the tank and repeat the steps described in point 10. When finished, the end of the descending cycle is completed.
| Problem encountered Possible causes | Solution | |
| Machine does not turn on.Power light is off after havingpressed the start-up/stand-by button. | » Machine is not connected to the power source. | » Connected the machine to the power source.» Contact customer service. |
| The machine requires a lot of time toheat up. | » The machine has limescale build-up. | » Descale the machine. |
| The machine is very noisy. | » No water in the tank. | » Top up the tank with fresh drinking water. |
| Red flashing light | » Water tank fitted incorrectly or absent.» Coffee dial in wrong position. | » Fit the water tank correctly.» Turn the coffee dial to the stop position.» Contact customer servicea. |
| The coffee flows out too fast and no creamy froth forms on the surface. | » Capsule already used. | » Replace the capsule inside the capsule holder drawer with a new one. |
| No coffee flows out or it just drips out slowly. | » Dispensing spout is clogged. | » Clean the coffee dispensing spout(see MAINTENANCE AND CLEANING). |
| No coffee flows out and the drip tray fills with water. | » Coffee dial in wrong position. | » Turn the coffee dial to supply position. |
| The button of the cappuccino makerflashes green accompanied by threebeeps. | » Malfunction of the cappuccino maker | » Contact customer service. |
TECHNICAL SPECIFICATIONS
Nominal Voltage - Power Rating - Power Supply: See label on the appliance
- Measurements: Height Width Depth 253 mm 272 mm 291 mm
Weight: approx. 4,2 kg
Water tank: 0.5L - Removable type
- Housing materials: Thermoplastic
- Cable Length: 0.8 m
Thermo fuses - Instantaneous aluminum boiler with temperature probe
Destination d'usage:
Compartment capsules:
Reparacoes/Manutenacao:
Pressionar a tecla de ligar/desligar (On/Off).

cappuccino-inrichting
Getandwiel
(om op te schuimen)
Glad wiel
cappuccino-inrichting
KOUDE MELK OPSCHUIMEN
The manufacturer reserves the right to make changes without prior notice.