Connect 150 - Radio Auna - Free user manual and instructions
Find the device manual for free Connect 150 Auna in PDF.
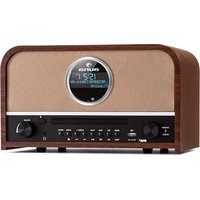
| Product type | Internet radio / network audio player with integrated 2.1 system |
| Dimensions (W x D x H) | 55 x 155 x 161 mm |
| Weight | 2.2 kg |
| Power supply | AC adapter 12 V / 1500 mA, 220 V 50 Hz, standby consumption < 1 W |
| Display | 2.4-inch TFT, 320 x 240 pixels |
| Supported networks | WiFi 802.11 b/g/n, Ethernet 10/100, encryption WEP/WPA/WPA2 (PSK), WPS |
| Reception modes | Internet radio, DAB/DAB+, FM (RDS), network playback (UPnP/DLNA), USB, AUX, Bluetooth |
| Compatible audio formats | MP3, WMA, WAV, AAC, FLAC |
| Connectors | 3.5 mm headphone jack, 3.5 mm AUX input, 3.5 mm Line-Out output, USB 2.0 port, RJ45 LAN port, DC IN |
| Remote control | Infrared, range 5 m, CR2025 battery (3 V) |
| Special functions | 2 independent alarms with snooze, sleep timer (15/30/45/60 min), equalizer (Normal, Flat, Jazz, Rock, Movie, Classic, Pop, News, Custom) |
| Audio power | 2.1 system with built-in subwoofer |
| Cleaning | Dry cloth only, do not use volatile liquids |
| Safety instructions | Do not expose to water, do not block ventilation slots, do not repair yourself, use only recommended accessories |
| Package contents | Radio, AC adapter, remote control, 3.5 mm audio cable, instruction manual |
| Article numbers | 10028153, 10028154 |
Frequently Asked Questions - Connect 150 Auna
User questions about Connect 150 Auna
0 question about this device. Answer the ones you know or ask your own.
Ask a new question about this device
Download the instructions for your Radio in PDF format for free! Find your manual Connect 150 - Auna and take your electronic device back in hand. On this page are published all the documents necessary for the use of your device. Connect 150 by Auna.
USER MANUAL Connect 150 Auna
Shared Media Streaming / USB
DAB 15
FM-Radio 16
AUX 16
Wecker & Sleep-Timer 17
Problembehebung 18
text_image
Windows Media Player Library Sharing Do you want to allow this device to play content from your 'Windows Media Player Library' You can customize the music, pictures, and video to share. Windows LAN Internet Radio Sharing settings... Disable future notifications Allow Denytext_image
Media Sharing Share music, pictures, and video on your network. Sharing settings ✓ Share my mode to Strainer Linux Enter... Settings... Allow Drop Cashortics... OK Cancel Applytext_image
Setup wizard Start now? YES NOZeit/Datum (Time/Date)
text_image
WPS Setup ! Push WPS button at the other end Press SELECT to continuetext_image
WPS Setup Enter PIN 98467583 at the other end Press SELECT to continuetext_image
Network settings Please wait Connecting .. \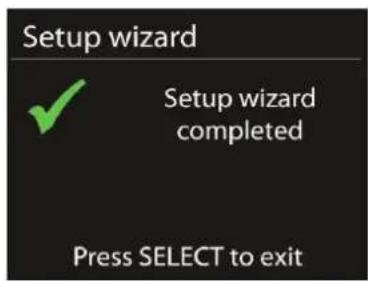
text_image
Setup wizard Setup wizard completed Press SELECT to exittext_image
Internet radio Last listened > Station list > System settings > Main menu >Zuletzt gehört
text_image
Stations Location > Genre > Search stations > Popular stations > New stations >Favoriten
text_image
Music player Shared media > USB playback My playlist > Repeat play: Off Shuffle play: Offtext_image
JB-Laptop: Audio Music > Playlists >text_image
DAB Stations: 15 Scanning /text_image
FM 03:28 Alice 97.3 Best Music in the worldtext_image
FM Scan setting Audio setting Setting settings > Main menutext_image
Auxiliary input 03:28 Audio In Today's Date: 23/08/2013text_image
Alarm 1 Enable: Daily Time: 07:30 Mode: Internet Radio Preset: Last listened Volume: 10text_image
Set snooze time 5 minutesProblembehebung
natural_image
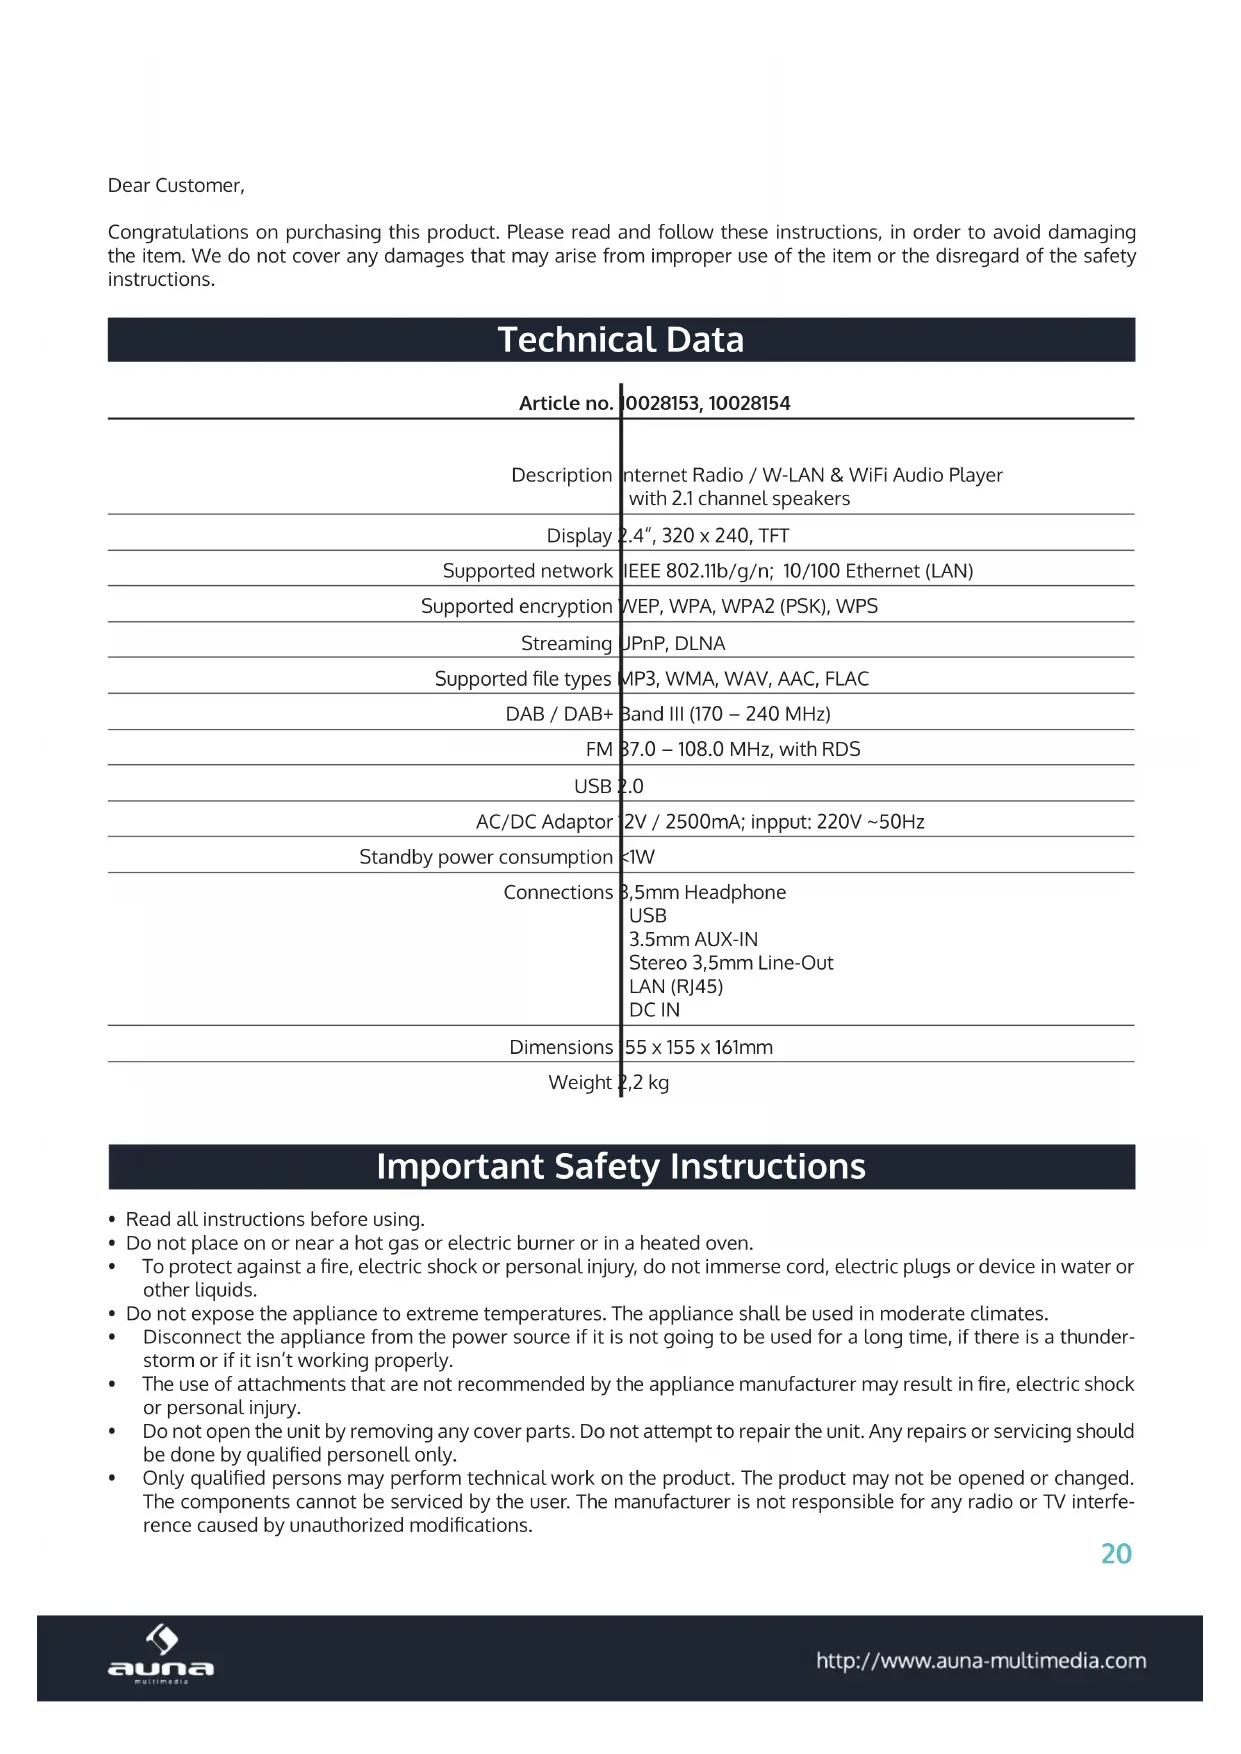
Symbol of a trash bin crossed with a diagonal line, no text or numbers presentCongratulations on purchasing this product. Please read and follow these instructions, in order to avoid damaging the item. We do not cover any damages that may arise from improper use of the item or the disregard of the safety instructions.
Technical Data
| Article no. | 0028153, 10028154 |
| Description | Internet Radio / W-LAN & WiFi Audio Player with 2.1 channel speakers |
| Display | 2.4", 320 x 240, TFT |
| Supported network | IEEE 802.11b/g/n; 10/100 Ethernet (LAN) |
| Supported encryption | WEP, WPA, WPA2 (PSK), WPS |
| Streaming | JPnP, DLNA |
| Supported file types | MP3, WMA, WAV, AAC, FLAC |
| DAB / DAB+ | Band III (170 – 240 MHz) |
| FM | 87.0 – 108.0 MHz, with RDS |
| USB | 2.0 |
| AC/DC Adaptor | 2V / 2500mA; input: 220V ~50Hz |
| Standby power consumption | <1W |
| Connections | 8.5mm HeadphoneUSB3.5mm AUX-INStereo 3.5mm Line-OutLAN (RJ45)DC IN |
| Dimensions | 55 x 155 x 161mm |
| Weight | 2.2 kg |
Important Safety Instructions
- Read all instructions before using.
- Do not place on or near a hot gas or electric burner or in a heated oven.
- To protect against a fire, electric shock or personal injury, do not immerse cord, electric plugs or device in water or other liquids.
- Do not expose the appliance to extreme temperatures. The appliance shall be used in moderate climates.
- Disconnect the appliance from the power source if it is not going to be used for a long time, if there is a thunderstorm or if it isn't working properly.
- The use of attachments that are not recommended by the appliance manufacturer may result in fire, electric shock or personal injury.
- Do not open the unit by removing any cover parts. Do not attempt to repair the unit. Any repairs or servicing should be done by qualified personell only.
-
Only qualified persons may perform technical work on the product. The product may not be opened or changed. The components cannot be serviced by the user. The manufacturer is not responsible for any radio or TV interference caused by unauthorized modifications.
-
The appliance is not a toy. Do not let children play with it. Never let children insert foreign objects into the appliance.
- Do not use the appliance for other than intended use. This appliance has been designed solely for domestic use; the manufacturer's liability shall not be engaged in the event of any professional use, by any misuse or by any use not complying with the operating instructions.
- Before turning on the power for the first time, make sure that the power cord is properly installed and the voltage switch is correctly set.
- Never clean the surface of the device with solvents, paint thinners, cleansers or other chemical products. Instead, use a soft, dry cloth or soft brush.
- Save these instructions.
Controls
Front
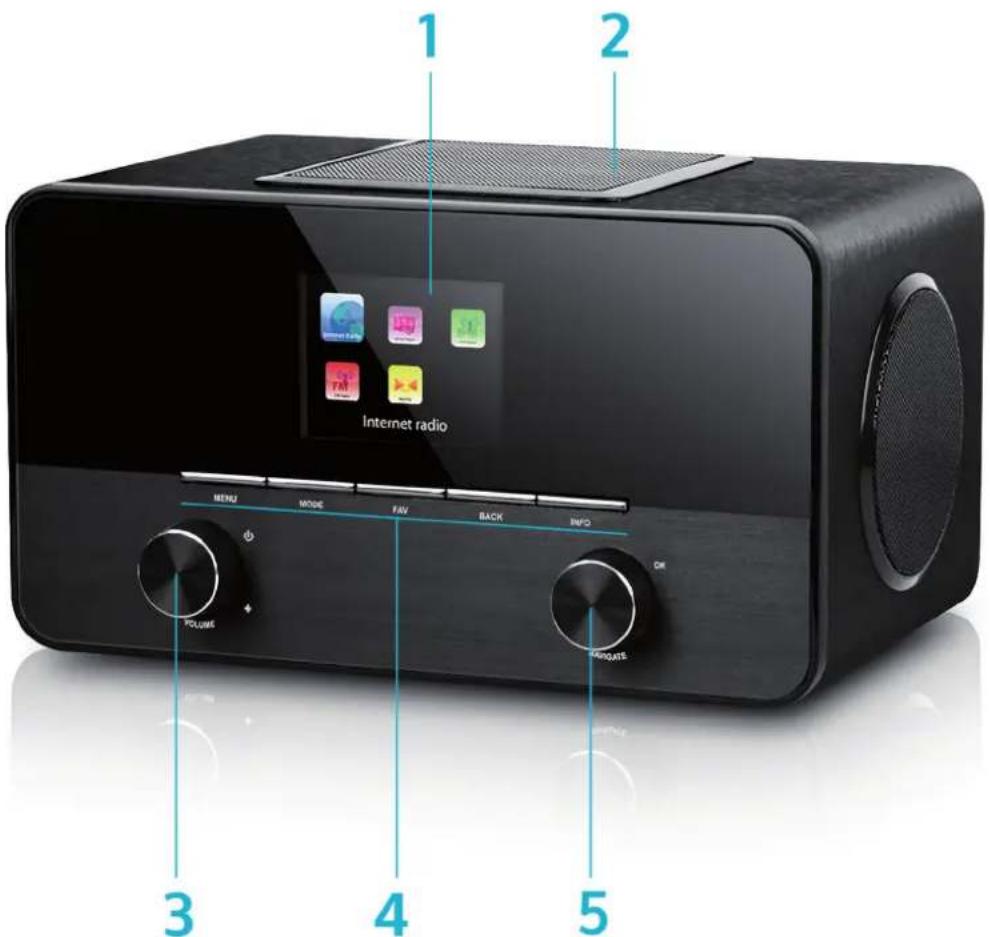
text_image
1 2 Internet radio MENU MODE FAV BACK INFO OK POLUME 3 4 5| Display 1 7 Power on/off | |||
| Subwoofer 2 8 USB slot | |||
| Volume / On/Standby 3 9 LAN (Rj45) socket | |||
| Control panel 4 10 DC IN | |||
| NAVIGATE (scroll) / OK 5 11 Line-Out: connect external amplifier here | |||
| AUX IN: connect external media players (such as smartphones) here, using a 3.5mm audio cable | 6 | 12 | Headphone jack: connect any headphones with a 3.5mm audio cable |
Rear
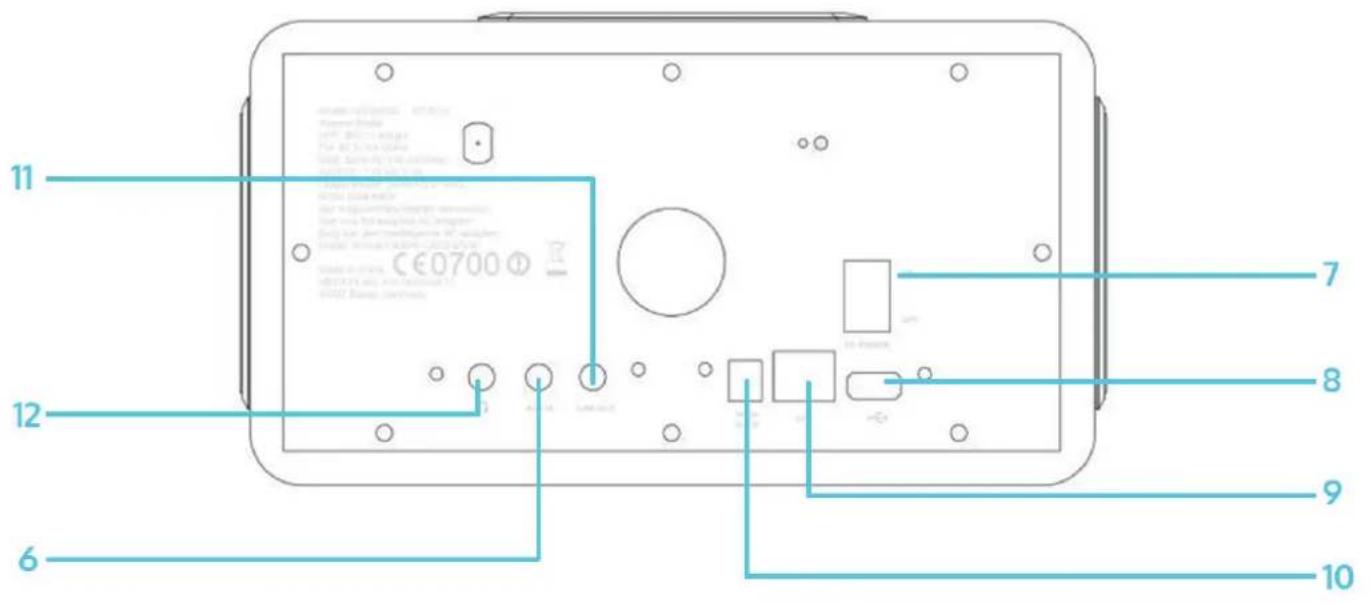
text_image
11 12 6 7 8 9 10Remote Control
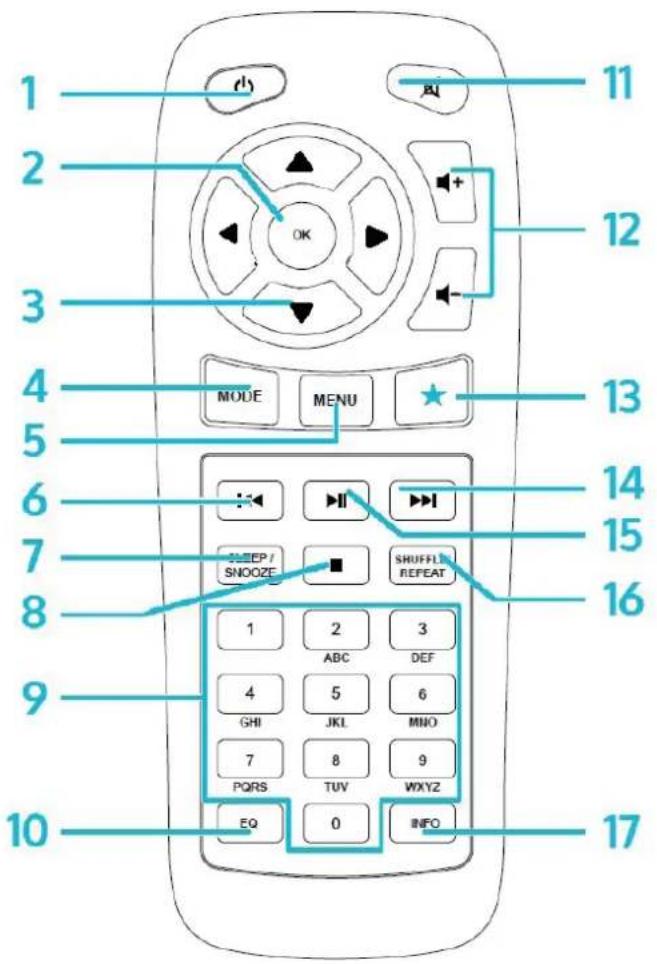
text_image
1 2 3 4 5 6 7 8 9 10 11 12 MODE MENU 13 14 15 16 SLEEP / SMOOZE SHUFFL REPEAT 1 2 3 ABC DEF 4 5 6 GHI JKL MNO 7 8 9 PQRS TUV WXYZ EQ 0 INFO 17| On/Standby 1 10 EQ | |||
| OK 2 11 Mute | |||
| Arrow keys for navigating through menus or lists 3 12 VOL+/VOL- (change the volume) | |||
| MODEChoose between FM, DAB, internet radio, AUX,BT, network media player | 4 | 13 | FAVGo to favourites / stored presets |
| MENU 5 14 | ▶▶ | ||
| ◀◀ | 6 | 15 | ▶II |
| SLEEP/SNOOZE 7 16 SHUFFLE/REPEAT | |||
| ■ | 8 17 | INFO | |
| Num pad 9 | |||
Use your thumb to press the lid of the battery compartment and pull it out. Install a CR2025 type 3V battery into the battery compartment, taking care to insert it with the positive (+) side up.
Caution: Risk of explosion of battery if replaced by an incorrect type.
Getting Started
The items enclosed in the packaging box are as follows:
- Unit
- Power adaptor
• Audio cable with 3.5mm jack at both ends
- User manual
Connect the power adaptor to the back of the unit and plug it into power socket.
Get the network environment ready
- For wired LAN
Use an Ethernet cable (RJ45 jack) to connect the LAN ports on the unit and your network device. Check if the light indicators on the network device are in appropriate status.
- For WIFI
Make sure you have setup the wireless network and you have the WEP, WPA or WPA2 security password to activate the connection.
You may also use the WPS (WiFi Protected Setup) function for easy pairing between the network device and the unit. Check if the light indicators on the network device are in appropriate status.

text_image
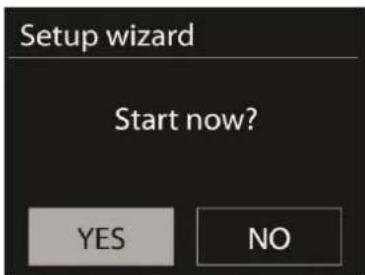
23/08/2013 03:28 06:55 08:00At initial use, the system asks whether you want to start the Setup Wizard. Select YES to continue the setup. Details of the Setup Wizard will be explained below. After choosing NO, the next screen asks if you would like to run the wizard next time unit is started.
The unit will automatically connect to the network that was set the last time you had the radio powered on. In case you want to change the network, enter System Setting to configure the corresponding connection.
Music Sharing from PC
• To share the music files from PC, the following steps are done on the PC:
- Connect the PC to the network. Ensure that unit is powered on and connected to the same network.
text_image
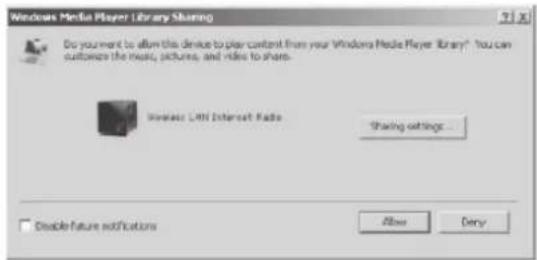
Windows Media Player Library Sharing Do you want to allow this device to play content from your Windows Media Player Library*. You can customize the music, pictures, and video to share. Wireless Liff Internet Radio Sharing settings... Disable future notifications Allow Deny- Open the UPnP platform Windows Media Player (11 or later). Alternatively, other platforms or servers such as Windows Media Connection can be used.
text_image
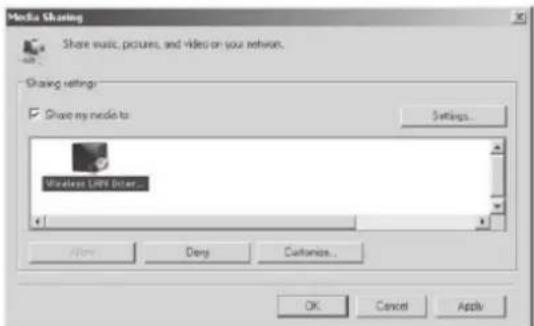
Media Sharing Share music, pictures, and video on your network. Sharing settings: Share my mode to Wireless LRF User... Settings... Add... Delete Customize... OK Cancel Apply- Allow to share your media to Wireless LAN Internet Radio, which is the device name for music streaming. Add the audio files and folders you want to share to the media library.
Settings
In the main menu, you can select the following modes: Internet Radio, Media Player, DAB, FM, AUX IN, Sleep; Alarm and System Settings.
System Settings
Setup Wizard
text_image
Setup wizard Start now? YES NOTime/date
Display format: Select 12or 24 as the time format.
Auto-update
The time and date can be updated manually or automatically from DAB, FM or network.
Auto-update works with data sent over DAB, FM or the Internet. The clock is only updated when in a corresponding mode, so it is best to select a mode you use regularly.
DAB and FM use time signals broadcast with radio transmissions. Network uses a time signal sent from the Internet
radio portal when in any network-connected mode.
Time zone, daylight
Set your time zone. If your country uses daylight saving and it is in effect, turn on the Daylight savings option.
Manual update
If you set „No update“, the wizard prompts you to set the time and date manually. The date and time are displayed as dd-mm-yyyy and hh:mm.
The active value appears flashing. Adjust each value with the navigation wheel or on the remote control. Once the value is set, press to continue setting the next value.
Network
Wlan region
Select the WLan region to obtain the optimal WLan connectivity: Canada, Spain, France, Japan, Singapore, Australia, and Republic of Korea.
Scanning for the network
The unit is compatible with all common network protocols and encryption methods. It searches for available networks and list them out for you choose.
There will be hints for the type of network – if you plug the LAN cable, it will highlight the network as [wired]; if your network device supports WPS function, it will display [WPS] before the SSID (the name of network device). Select the one you want to connect to.
For the wireless connection, you will be prompted to type in the pass phrase.
Standard encrypted network
text_image
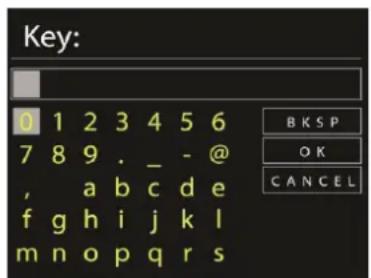
Key: 0 1 2 3 4 5 6 7 8 9 . _ - @ , a b c d e f g h i j k l m n o p q r s B K S P O K C A N C E LTo enter the network's key, use the navigate wheel or the direction keys on the remote control to move the cursor through the characters and press OK to confirm.
There are three options accessible by tuning the navigation wheel back before the first characters – Backspace, OK and Cancel.
WPS encrypted network
WPS encrypted networks are identified by WPS at the start of the network name when the unit searches the available AP. Useone of the following methods of connection:
- Push button
The unit prompts you to press the connect button on the router. It then scans for a ready Push Button Connect network and connects.
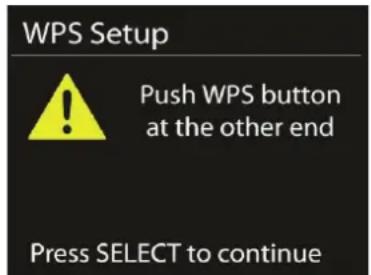
text_image
WPS Setup Push WPS button at the other end Press SELECT to continue- Pin
The unit generates an 8-digit code number which you enter into the wireless router, access point, or an external registrar.

text_image
WPS Setup Enter PIN 98467583 at the other end Press SELECT to continue- Skip WPS
Enter key as for a standard encrypted network. For more information on setting up a WPS encrypted network, see your WPS router's instructions.
- Completion
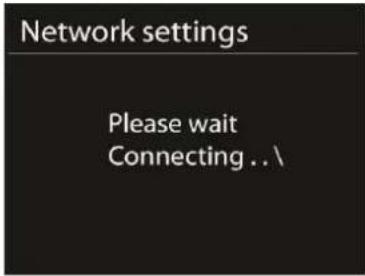
The Unit attempts to connect to the selected network. It will show „connected“ if the setup is successful.
text_image
Network settings Please wait Connecting .. \It will show connected if the setup is successful. If connecting fails, the unit returns to a previous screen to try again.
text_image
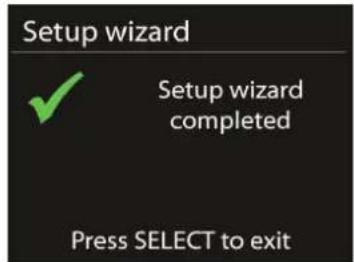
Setup wizard Setup wizard completed Press SELECT to exitPress SELECT to quit the setup wizard.
Equaliser
text_image
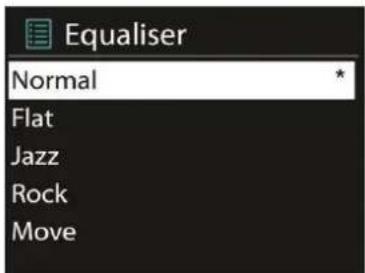
Equaliser Normal Flat Jazz Rock MoveSeveral preset EQ modes are available: Normal, Flat, Jazz, Rock, Movie, Classic, Pop and News. Also a user-defined setting is available; create your own EQ with custom bass, treble and loudness settings. Press EQ on the remote control to quick enter the equalizer menu.
Network
Network wizard
Enter to search AP SSID, then input the WEP/WPA key or choose Push Button/Pin/Skip WPS to connect to the wireless network.
- PBC Wlan setup
Push Button Configuration, it is to connect the AP that supports WPS(Wi-Fi Protected Setup).
- View settings
View the information of current connected network: Active connection, MAC address, Wlan region, DHCP, SSID, IP address, Subnet mask, Gateway address, Primary DNS and Secondary DNS.
- Wlan region
Select the Wlanregion to obtain the optimal Wlan connectivity: Canada, Spain, France, Japan, Singapore, Australia, and Republic of Korea.
Manual settings
Choose wired or wireless network connection and enable or disable DHCP (Dynamic Host Configuration Protocol).
- Network profile
Unit remembers the last four wireless networks it has connected to, and automatically tries to connect to whichever one of them it can find.
From here you can see the list of registered networks. You can delete unwanted networks by turning and pressing then choosing YES to confirmdelete.
- Keep network connected
If you choose to keep network connected, the WiFi will not disconnect even you are in standby mode. Otherwise, the connection will only available.
Time/Date
Set the time manually or auto update, time format, time zone and daylight.
Language
The default language is English. Change it as your preference.
Factory reset
A factory reset resets all user settings to default values, so that time and date, network configuration and presets are lost. However, the unit's current software version is maintained, as is registration with the Internet radio portal. Internet radio favourites therefore remain unless you re-register your unit with another account on the portal website.
Software update
From time to time, software upgrades may be created with bug fixes and/or additional features. You can either check manually or set the unit to check periodically automatically (this is the default). If newer available software is detected, you will be asked if you want to go ahead with an update. If you agree, the new software is then downloaded and installed. After a software upgrade, all user settings are maintained.
NOTE: Before starting a software upgrade, ensure that unit is plugged into a stable main power connection. Disconnecting power during an upgrade may permanently damage the unit.
Info
View the firmware version and the radio ID.
Backlight
You may change the backlight of each environment (power on or standby) to High, Medium or Low. And adjust the timeout duration which the radio turns to standby backlight level when it has not been controlled.
Internet Radio
Unit can play thousands of radio stations and podcasts from around the world though a broadband Internet connection. When you select Internet radio, the unit directly contacts the Frontier Silicon Internet radio portal (which is supported by v-tuner) to get a list of stations.
The portal also enables multiple lists of favourite stations that you can personalize.
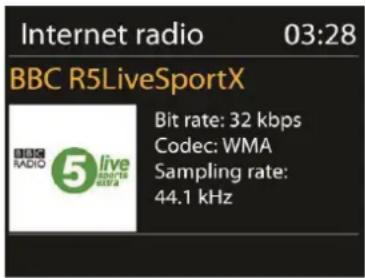
text_image
Internet radio 03:28 BBC R5LiveSportX BIT rate: 32 kbps Codec: WMA Sampling rate: 44.1 kHzIf you are already listening to an Internet radio station, you can press 'Return' or 'Play' on the remote control to quickly return to the last visited branch of the menu tree, rather than Menu to go to the first menu of Internet radio mode.
text_image
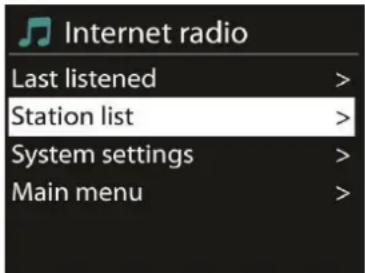
Internet radio Last listened > Station list > System settings > Main menu >Last listened
When Internet radio mode restarts, the last-listened station is selected. To select another recently used station, enter here to select the listed station. Most recent stations appear at the top of the list.
Station list
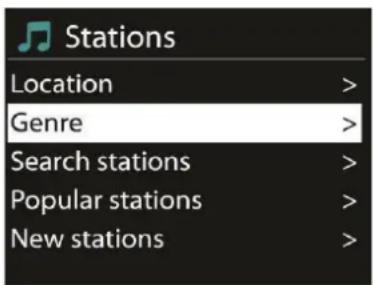
text_image
Stations Location > Genre > Search stations > Popular stations > New stations >Browse Internet broadcasts that organized into different categories, Location, Genre, Popular and New. You can also find the station with Search by keyword.
Favourites
Favourites are stored with the Internet radio portal, and are available through all Internet radios registered on the
same account. Before favourites can be used, the radio has to be registered with the Internet radio portal.
To register your unit, choose Station list > Help > Get access code to get your radio's unique portal access code first. (Do not confuse the portal access code with the Radio ID from System settings.
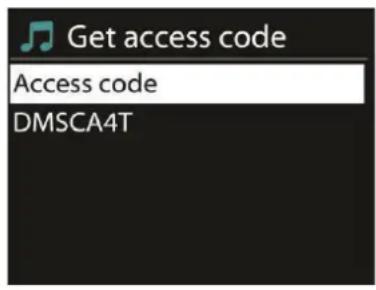
text_image
Get access code Access code DMSCA4TVisit www.wifiradio-frontier.com. If this is your first visit to the portal, register for a new account, entering the following information:
- access code
- your e-mail address
- password
- radio model.
If you already have an account and wish to add an additional radio, log in to your account and select My preferences > Add another Wi-Fi radio.
Once your radio is registered with the portal, you can immediately use the Internet radio favourites and added stations features.
To store a playing station as a favourite, press and hold select until the display shows 'Favourite added'. The station appears in the default favourites list Stations.
My added stations
Even though the Internet radio portal contains thousands of stations, you may want to listen to stations not listed. You can add your own via the portal.
Presets
Presets are stored in the radio and cannot be accessed from other radios.
To store an Internet radio preset, press and hold 'Preset' until the display shows the Save preset screen. Select one of the 10 presets to save the currently playing station.
To select a preset, press 'Preset', then select one of the listed preset stations. When a preset station is playing, it shows Pn(P1, P2 etc) at the bottom of the screen.
'P1' to 'P10' on the remote control are for the use of preset station 1-10.
Now playing information
While the stream is playing, the screen shows its name and description. To view further information, press.
Each time you press, another set of information is displayed, cycle through name/description, genre/location, reliability, codec/sampling rate, playback buffer and today's date.
Media Player
Music player mode plays audio files in MP3, WMA, WAV, AAC or FLACformat from a computer on the local network, or frm a USB sick.
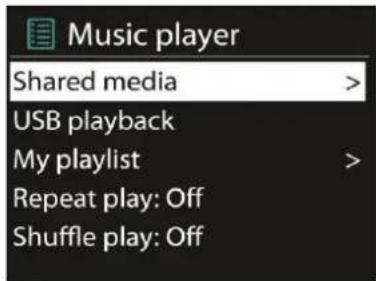
text_image
Music player Shared media > USB playback My playlist > Repeat play: Off Shuffle play: OffIf you are already playing a music file, you can press 'Return' or 'Back' on the remote control rather than 'Menu' to quickly to quickly return to the last visited branch of the menu tree.
You can use ◀◀ or ▶ play the previous or next track, press and hold to rewind or fast forward. Press to play or pause.
5.4.1 Shared media
It you have set up shared media, you should see an entry consisting of
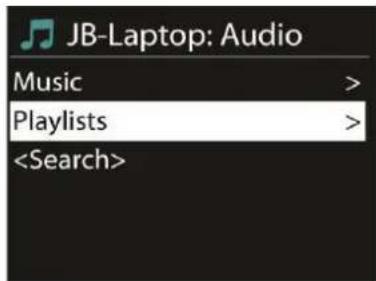
From this point on, the menus are generated from the shared media server. The first menus shows a list of media types, for example Music, Video, Pictures and Playlists. unit can only play music and playlists.
text_image
JB-Laptop: Audio Music > Playlists >There is also a search function which finds tracks in a similar way to Internet radio search.
From Music, there are numerous ways of selecting tracks including Genre, Artist, Album, Composer and Rating.
text_image
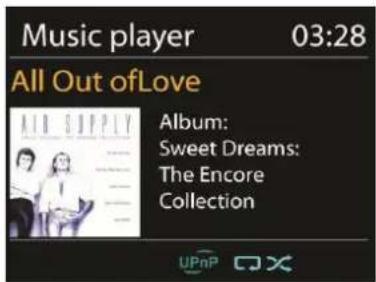
Music player 03:28 All Out of Love Album: Sweet Dreams: The Encore CollectionOnce you have found a track you want to play, press. A short press plays the track immediately.
USB playback
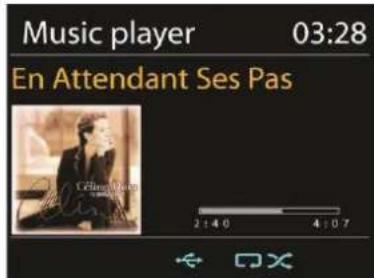
From this point on, menus are generated from the folders on the USB device. Browse folders with the navigatereel and 'Return' button, or direction keys on the remote control. The display shows folder and file names (not necessarily track names).

text_image
Music player 03:28 En Attendant Ses Pas Celine Music 2:4.0 4:0.7Once you have found a track you want to play, press SELECT. A short press plays the track immediately.
text_image
Music player 03:28 En Attendant Ses Pas Céure Mouton 2:4:0 4:07Repeat/shuffle
You can set to repeat tracks or play them in random order. Press ☐ and ☑ on the remote control for shortcut.
Now playing information
While a track is playing, the screen shows its track and artist (UPnP) or file name (USB). There is also a progress bar with figures for elapsed and total track time. At the bottom of the screen, an icon indicates UPnP or USB depending on the source. To view further information, press INFO.
Each time you press INFO, another set of information is displayed, cycling through the information:
UPnP: track/artist/progress bar/track times, album, codec/sampling rate, playback buffer and today's date. USB: file name, folder, path, codec/sampling rate, playback buffer and today's date.
DAB
DAB mode receives DAB/DAB+ digital radio and displays information about the station, stream and track playing.
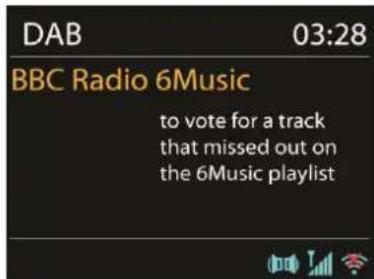
text_image
DAB 03:28 BBC Radio 6Music to vote for a track that missed out on the 6Music playlistScanning for stations
The first time you select DAB radio mode, or if the station list is empty, unit automatically performs a full scan to see what stations are available. You may also need to start a scan manually to update the list of stations for one of the following reasons:
• Available stations change from time to time.
• If reception was not good for the original scan, this may result in an empty or incomplete list of available stations.
• If you have poor reception of some stations (burbling), you may wish to list only stations with good signal strength.
To start a scan manually, choose Full scan. To scan only stations with good signal strength, select Local scan.
Once the scan is complete, the radio shows a list of available stations. To remove stations that are listed but not unavailable, choose Prune invalid.
Turn the navigatereel to view a list of stations and press to select. Once selected, the station plays and the screen shows information about station, track or show as broadcast.
Presets
To store a DAB preset, press and hold PRESET until the display shows the Save preset screen. Select one of the 10 presets to save the currently playing station.
To select a preset, press PRESET briefly, then select one of the listed preset stations. When a preset station is playing, it shows Pn (P1, P2 etc) at the bottom right of the screen.
P1 to P10 on the remote control are for the use of preset station 1-10.
Now playing information
While the stream is playing, the screen shows its name and DLS (Dynamic Label Segment) information broadcast by the station giving real-time information such as programme name, track title and contact details. Stereo broadcasts are indicated with an icon at the top of the screen. To view further information, press INFO.
Each time you press INFO, another set of information is displayed, cycling through DLS text, programme type, ensemble name/frequency, signal strength/error rate, bite rate/codec/channels and today's date.
Settings
• Dynamic range compression (DRC)
If you are listening to music with a high dynamic range in a noisy environment, you may wish to compress the audio dynamic range. This makes quiet sounds louder, and loud sounds quieter. You can change DRC as off, low or high.
- Station order
You can choose the order of the DAB station list to be either Alphanumeric, Ensemble or Valid.
Ensemble lists groups of stations that are broadcast together on the same ensemble. Valid lists valid stations first, alphanumerically, then off-air stations.
FM
FM radio mode receives analogue radio from the FM band and displays RDS (Radio Data System) information about the station and where broadcast.
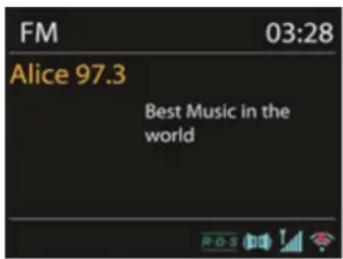
text_image
FM 03:28 Alice 97.3 Best Music in the worldTo find a station, press SELECT. The frequency display starts to run up as unit scans the FM band. Alternatively, you can scan up or down by pressing and holding the buttons ◀ or ▶ or tune manually with quick presses or by turning NAVIGATE.
5.7.1 Preset
To store a FMpreset, press and hold PRESET until the display shows the Save preset screen. Select one of the 10 presets to save the currently playing station.
To select a preset, press PRESET briefly, then select one of the listed preset stations. When a preset station is playing, it shows Pn (P1, P2 etc) at the bottom right of the screen.
P1 to P10 on the remote control are for the use of preset station1-10.
Now playing information
While the stream is playing, the screen shows its frequency, or if RDS information is available, station name and any
further RDS information such as programme name, track title and contact details. If no information is available, just the frequency is shown. Stereo broadcasts are indicated with an icon at the top of the screen, To view further information about the broadcast, press INFO.
Each time you press INFO, another set of information is displayed, cycling through RDS text, further RDS text (station/programme type), frequency and today's date.
Settings
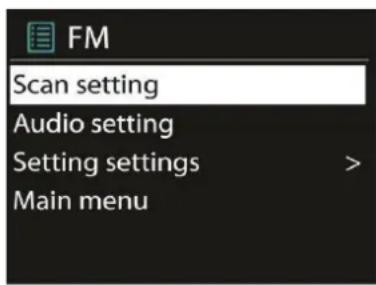
text_image
FM Scan setting Audio setting Setting settings > Main menu- Scan settings
By default, FM scans stop at any available station. This may result in a poor signal-to-noise ratio (hiss) from weak stations. To change the scan settings to stop only at stations with good signal strength, select Yes after choosing S-strong station only? - Audio settings
All stereo stations are reproduced in stereo. For weak stations, this may result in a poor signal-to-noise ratio (hiss). To play weak stations in mono, select FM weak reception: Listen in mono only and then YES.
AUX IN
Aux in mode plays audio from an external source such as an MP3 player. To play audio with Aux in mode:
- Turn the volume low on both unit and, if adjustable, the audio source device.
- Connect the external audio source to the Aux in 3.5mm stereo socket.
- Either press MODE until the display shows AUX IN or select AUX in under Main menu.
- Adjust the volume of the unit(and, if necessary, the audio source device) as required.
Sleep & Alarm
Sleep
To set the sleep timer, select Sleep under Main menu or press SLEEP on the remote control. Choose from Sleep OFF, 15 MINS, 30 MINS, 45 MINS or 60 MINS.
Once you select a sleep period, the system returns to the main menu. Press MENU to return to the Now playing screen.
Alarm
There are two versatile wake-up alarms with snooze facility, and a sleep function to turn the system off after a set period. Each alarm can be set to start in a particular mode.
Select Alarms under Main menu to set or change an alarm.

Alarm 1
Enable: Daily
Time: 07:30
Mode: Internet Radio
Preset: Last listened
Volume: 10
Select the alarm number (1 or 2) then configure the following parameters:
- Enable: on/off,
• Frequency: Daily, Once, Weekends or Weekdays,
• Time,
• Mode: Buzzer, Internet Radio, DABor FM, - Preset: Last listened 1-10,
• Volume: 0-20
To activate the new settings, scroll down and select Save.
The screen shows active alarms with an icon at the bottom left.
At the set time, the alarm will sound. To temporarily silence, press SNOOZE button. You can change the snooze period with the SELECT control if you like. The radio returns to standby for the set period, with the silenced alarm icon flashing.
Set snooze time
5 minutes
Other Features
Headphone jack
The unit featured with headphone jack for you to continue enjoying the music in vary environments, such as noisy background, or the area that requires every one keeping silent.
It is recommended to reduce the volume before put on the headphones. After the headphones are positioned properly, increase the volume to the desired level.
Line out jack
It allows you to connect an audio cable from the unit to your own HiFi speaker system to enhance sound performance.
Troubleshooting
| Error Remedy | |
| The device does not switch on. Check | t the power adaptor is connected properly |
| No sound - Turn on the sound as it may be muted- Increase the volume- Pull any connected headphone or speaker from the connector jack. | |
| No network connection can be established. | - Check the LAN cable or the WLAN function- Try to set an IP address at the device- Activate the DHCP function on the router and make the connection again at the device- A firewall is activated on the network — set the respective program in such a way that access is possible- Reboot the router |
| WiFi connection cannot be established | - Check the availability of WLAN network on the router.- Place the device closer to the router- Make sure the password is correct.. |
| Wired connection cannot be established. | - Check the availability of LAN network on the access point.- Reconnect or even replace the LAN cable. |
| No station is found - Check the network as well as the access point and firewall.- The station may not be available currently, try it again later or select another station.- The link of the station is changed or the station no longer transmits, ask the provider for information.- The link of manual added station is not correct, make sure it is correct and re-enter | |
| Hiss in FM mode - Check/move the FM antenna- Move the radio | |
| No stations available /burbling / intermittent in DAB mode. | - Move the radio.- Rescan local stations only (high-strength).- Check the local DAB coverage. |
| Alarm does not work. - Switch on the alarm.- Due to the volume setting, refer to the solutions of „No sound”.- The source of alarm was set to be station but there is no network connection. Change the source of alarm or reconfigure the connection. | |
| USB driver or MP3 player is not detected. | - Check if the USB driver or MP3 player is plugged properly.- Some USB hard disks need external power supply, make sure it is connected to the power.- Not all MP3 players can be read directly on the device — use an USB drive instead. |
| NetRemote does not show or connect to CONNECT-150 | - Reopen the App.- If you have several streaming from several devices at the same time, it may cause crash, reboot CONNECT-150 and/or your device. |
| All other undetermined cases. | - CONNECT-150 may process large amount of data after a period of operation, no matter in which mode, it will cause the system freeze or malfunction. Reboot CONNECT-150 if necessary.- The normal function of the product may be disturbed by strong Electro-Magnetic Interference. If so, simply reset the product to resume normal operation by following the instruction manual. In case the function could not resume, please use the product in other location.- The device may malfunction when used in areas with strong radio interference. The device will work properly again once there is no more interference. |
Environment Concerns

natural_image
Symbol of a trash bin crossed with a diagonal line, representing no waste or discharge (no text or labels)According to the European waste regulation 2002/96/EG this symbol on the product or on its packaging indicates that this product may not be treated as household waste. Instead it should be taken to the appropriate collection point for the recycling of electrical and electronic equipment. By ensuring this product is disposed of correctly, you will hep prevent potential negative consequences for the environment and human health, which could otherwise be caused by inappropriate waste handling of this product. For more detailed information about recycling of this product, please contact your local council or your household waste disposal service.
Declaration of Conformity
This product is conform to the following European directives:
1999/05/EC (R&TTE)
2011/65/EC (RoHS)
CE
Chère cliente, cher client,
text_image
Windows Media Player Library Sharing Do you want to allow this device to play content from your Windows Media Player library? You can customize the music, pictures, and ideas to share. Windows LHR Internet Radio Sharing settings... Enable Deny □ Enable future notificationstext_image
Media Sharing Share music, pictures, and video on your network. Sharing settings ✓ Share my mode to Settings... Wireless Link Enter... Allow Drop Customize... OK Cancel Applytext_image
Setup wizard Start now? YES NOtext_image
WPS Setup ! Push WPS button at the other end Press SELECT to continuetext_image
WPS Setup Enter PIN 98467583 at the other end Press SELECT to continueAchever l'installation
text_image
Network settings Please wait Connecting . . \
text_image
Setup wizard Setup wizard completed Press SELECT to exittext_image
Internet radio Last listened > Station list > System settings > Main menu >Dernière écoute
text_image
Stations Location > Genre > Search stations > Popular stations > New stations >Favoris
text_image
JB-Laptop: Audio Music > Playlists >text_image
DAB Stations: 15 Scanning /text_image
FM 03:28 Alice 97.3 Best Music in the worldtext_image
FM Scan setting Audio setting Setting settings > Main menutext_image
Alarm 1 Enable: Daily Time: 07:30 Mode: Internet Radio Preset: Last listened Volume: 10text_image
Set snooze time 5 minutesnatural_image
Symbol of a trash bin crossed out by a diagonal line, with no text or labels present.text_image
Windows Media Player Library Sharing Do you want to allow this device to play content from your Windows Media Player library? You can customize the music, pictures, and video to share. Send to LHR Internet Radio Sharing settings... Disable Future notifications Allow Denytext_image
Media Sharing Share music, pictures, and video on your network. Sharing settings ✓ Share my media to Settings... Wireless Light Enter... Allow Drop Customs... OK Cancel Applytext_image
Setup wizard Start now? YES NOOra e data (Time/Date)
text_image
WPS Setup ! Push WPS button at the other end Press SELECT to continuetext_image
WPS Setup Enter PIN 98467583 at the other end Press SELECT to continueFine impostazioni
text_image
Network settings Please wait Connecting .. \
text_image
Setup wizard Setup wizard completed Press SELECT to exittext_image
Internet radio Last listened > Station list > System settings > Main menu >text_image
Stations Location > Genre > Search stations > Popular stations > New stations >Preferiti
text_image
Music player Shared media > USB playback My playlist Repeat play: Off Shuffle play: Offtext_image
JB-Laptop: Audio Music > Playlists >text_image
DAB Stations: 15 Scanning /text_image
FM 03:28 Alice 97.3 Best Music in the worldtext_image
FM Scan setting Audio setting Setting settings > Main menutext_image
Alarm 1 Enable: Daily Time: 07:30 Mode: Internet Radio Preset: Last listened Volume: 10natural_image
Symbol of a trash bin crossed with a diagonal line, no text or numbers presenttext_image
Windows Media Player Library Sharing Do you want to allow this device to play content from your Windows Media Player library? You can customize the music, picture, and video to share. Windows LAN Internet Radio Sharing settings... Disable future notifications Abso Denytext_image
Media Sharing Share music, pictures, and video on your network. Sharing settings Share my media to Wireless LRF Enter... Options Drop Customize... OK Cancel Applytext_image
Setup wizard Start now? YES NOtext_image
WPS Setup Push WPS button at the other end Press SELECT to continuetext_image
WPS Setup Enter PIN 98467583 at the other end Press SELECT to continuetext_image
Network settings Please wait Connecting .. \