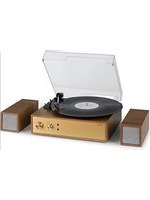
V20 DAB - Hi-fi system Auna - Free user manual and instructions
Find the device manual for free V20 DAB Auna in PDF.
User questions about V20 DAB Auna
0 question about this device. Answer the ones you know or ask your own.
Ask a new question about this device
Download the instructions for your Hi-fi system in PDF format for free! Find your manual V20 DAB - Auna and take your electronic device back in hand. On this page are published all the documents necessary for the use of your device. V20 DAB by Auna.
USER MANUAL V20 DAB Auna
V-20 DAB Painlage System
Stereoanlage Stereo System Equipo estéréo Chaine stéréo Impianto stereo Stereoinstallatie 0926 10
10027
www.auna-multimedia.com

bar
| Category | Value | |---|---| | Category 1 | 100 | | Category 2 | 100 | | Category 3 | 100 | | Category 4 | 100 | | Category 5 | 100 | | Category 6 | 100 | | Category 7 | 100 | | Category 8 | 100 | | Category 9 | 100 | | Category 10 | 100 | | Category 11 | 100 | | Category 12 | 100 | | Category 13 | 100 | | Category 14 | 100 | | Category 15 | 100 | | Category 16 | 100 | | Category 17 | 100 | | Category 18 | 100 | | Category 19 | 100 | | Category 20 | 100 | | Category 21 | 100 | | Category 22 | 100 | | Category 23 | 100 | | Category 24 | 100 | | Category 25 | 100 | | Category 26 | 100 | | Category 27 | 100 | | Category 28 | 100 | | Category 29 | 100 | | Category 30 | 100 | | Category 31 | 100 | | Category 32 | 100 | | Category 33 | 100 | | Category 34 | 100 | | Category 35 | 100 | | Category 36 | 100 | | Category 37 | 100 | | Category 38 | 100 | | Category 39 | 100 | | Category 40 | 100 | | Category 41 | 100 | | Category 42 | 100 | | Category 43 | 100 | | Category 44 | 100 | | Category 45 | 100 | | Category 46 | 100 | | Category 47 | 100 | | Category 48 | 100 | | Category 49 | 100 | | Category 50 | 100 | | Category 51 | 100 | | Category 52 | 100 | | Category 53 | 100 | | Category 54 | 100 | | Category 55 | 100 | | Category 56 | 100 | | Category 57 | 100 | | Category 58 | 100 | | Category 59 | 100 | | Category 60 | 100 | | Category 61 | 100 | | Category 62 | 100 | | Category 63 | 100 | | Category 64 | 100 | | Category 65 | 100 | | Category 66 | 100 | | Category 67 | 100 | | Category 68 | 100 | | Category 69 | 100 | | Category 70 | 100 | | Category 71 | 100 | | Category 72 | 100 | | Category 73 | 100 | | Category 74 | 100 | | Category 75 | 100 | | Category 76 | 100 | | Category 77 | 100 | | Category 78 | 100 | | Category 79 | 100 | | Category 80 | 100 | | Category 81 | 100 | | Category 82 | 100 | | Category 83 | 100 | | Category 84 | 100 | | Category 85 | 100 | | Category 86 | 100 | | Category 87 | 100 | | Category 88 | 100 | | Category 89 | 100 | | Category 90 | 100 | | Category 91 | 100 | | Category 92 | 100 | | Category 93 | 100 | | Category 94 | 100 | | Category 95 | 100 | | Category 96 | 100 | | Category 97 | 100 | | Category 98 | 100 | | Category 99 | 100 | | Total (Total) |text_image
QR code image containing encoded data, no visible human-readable textINHALT
Technische Daten 4
text_image
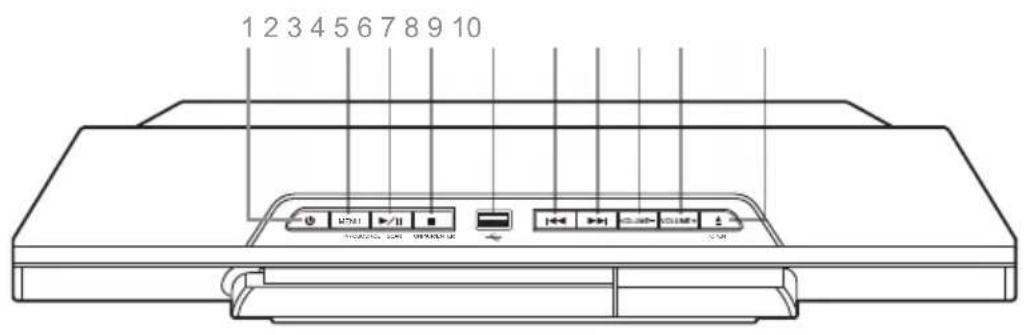
1 2 3 4 5 6 7 8 9 10 MTN1 MOSOLED LED VSPRLED LEDVorderansicht

text_image
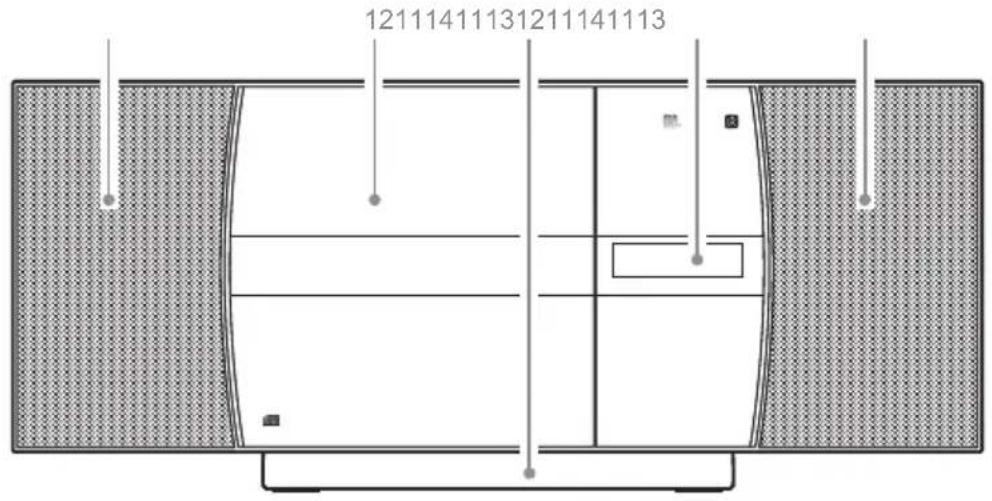
12111411131211141113Rückansicht
text_image
1515161718 200x 18natural_image
Technical line drawing of two views of a mechanical component with internal compartments and mounting holes (no text or symbols)Fig 1. Fig 2.
INBETRIEBNAHME
natural_image
Two battery diagrams showing different internal configurations: one with a black triangular tip and one with a black plus sign inside, both enclosed in U-shaped containers (no text or symbols)BEDIENUNGSHINWEISE
Member of Berlin Brands Group
Handwerkerstr. 11
15366 Dahlwitz-Hoppegarten
Deutschland
natural_image
Symbol of a trash bin crossed with a diagonal line, representing no waste or discharge (no text or labels)Congratulations on purchasing this equipment. Please read this manual carefully and take care of the following hints to avoid damages. Any failure caused by ignoring the items and cautions mentioned in the instruction manual are not covered by our warranty and any liability. Scan the QR code to get access to the latest user manual and other information about the product.

text_image
QR code image containing encoded data, no visible human-readable textCONTENTS
Specifications 20
Safety Instructions 22
Product Description 24
Remote Control 26
Initial Use 27
Operation 28
CD / USB 28
Radio: FM/DAB 29
DAB / FM 29
BT 30
AUX 30
Display Illumination 31
System Settings 31
Disposal Considerations 32
Declaration of Conformity 32
SPECIFICATIONS
| Power supply 230 V ~ 50 Hz, power consumption max. 27 W | |
| Speakers 2 x 3", 10 W @ 4 Ω (THD @ 1 kHz: max. 10 %) | |
| Radio Band FM: 87.5 MHz - 108 MHz / DAB: 174 - 240 MHz | |
| BT specificationsFrequency bandMaximum radio-frequency power | 2402–2480 MHz4 dBm |
| USB | Compatible w/ USB 1.1 & USB 2.0File types: MP3 (32 ~ 320 kbps) |
| CD | D/A converter: Multi bit D/A converterFrequency response: 20 - 20,000 Hz |
| Scope of delivery Unit, remote contorl, user manual | |
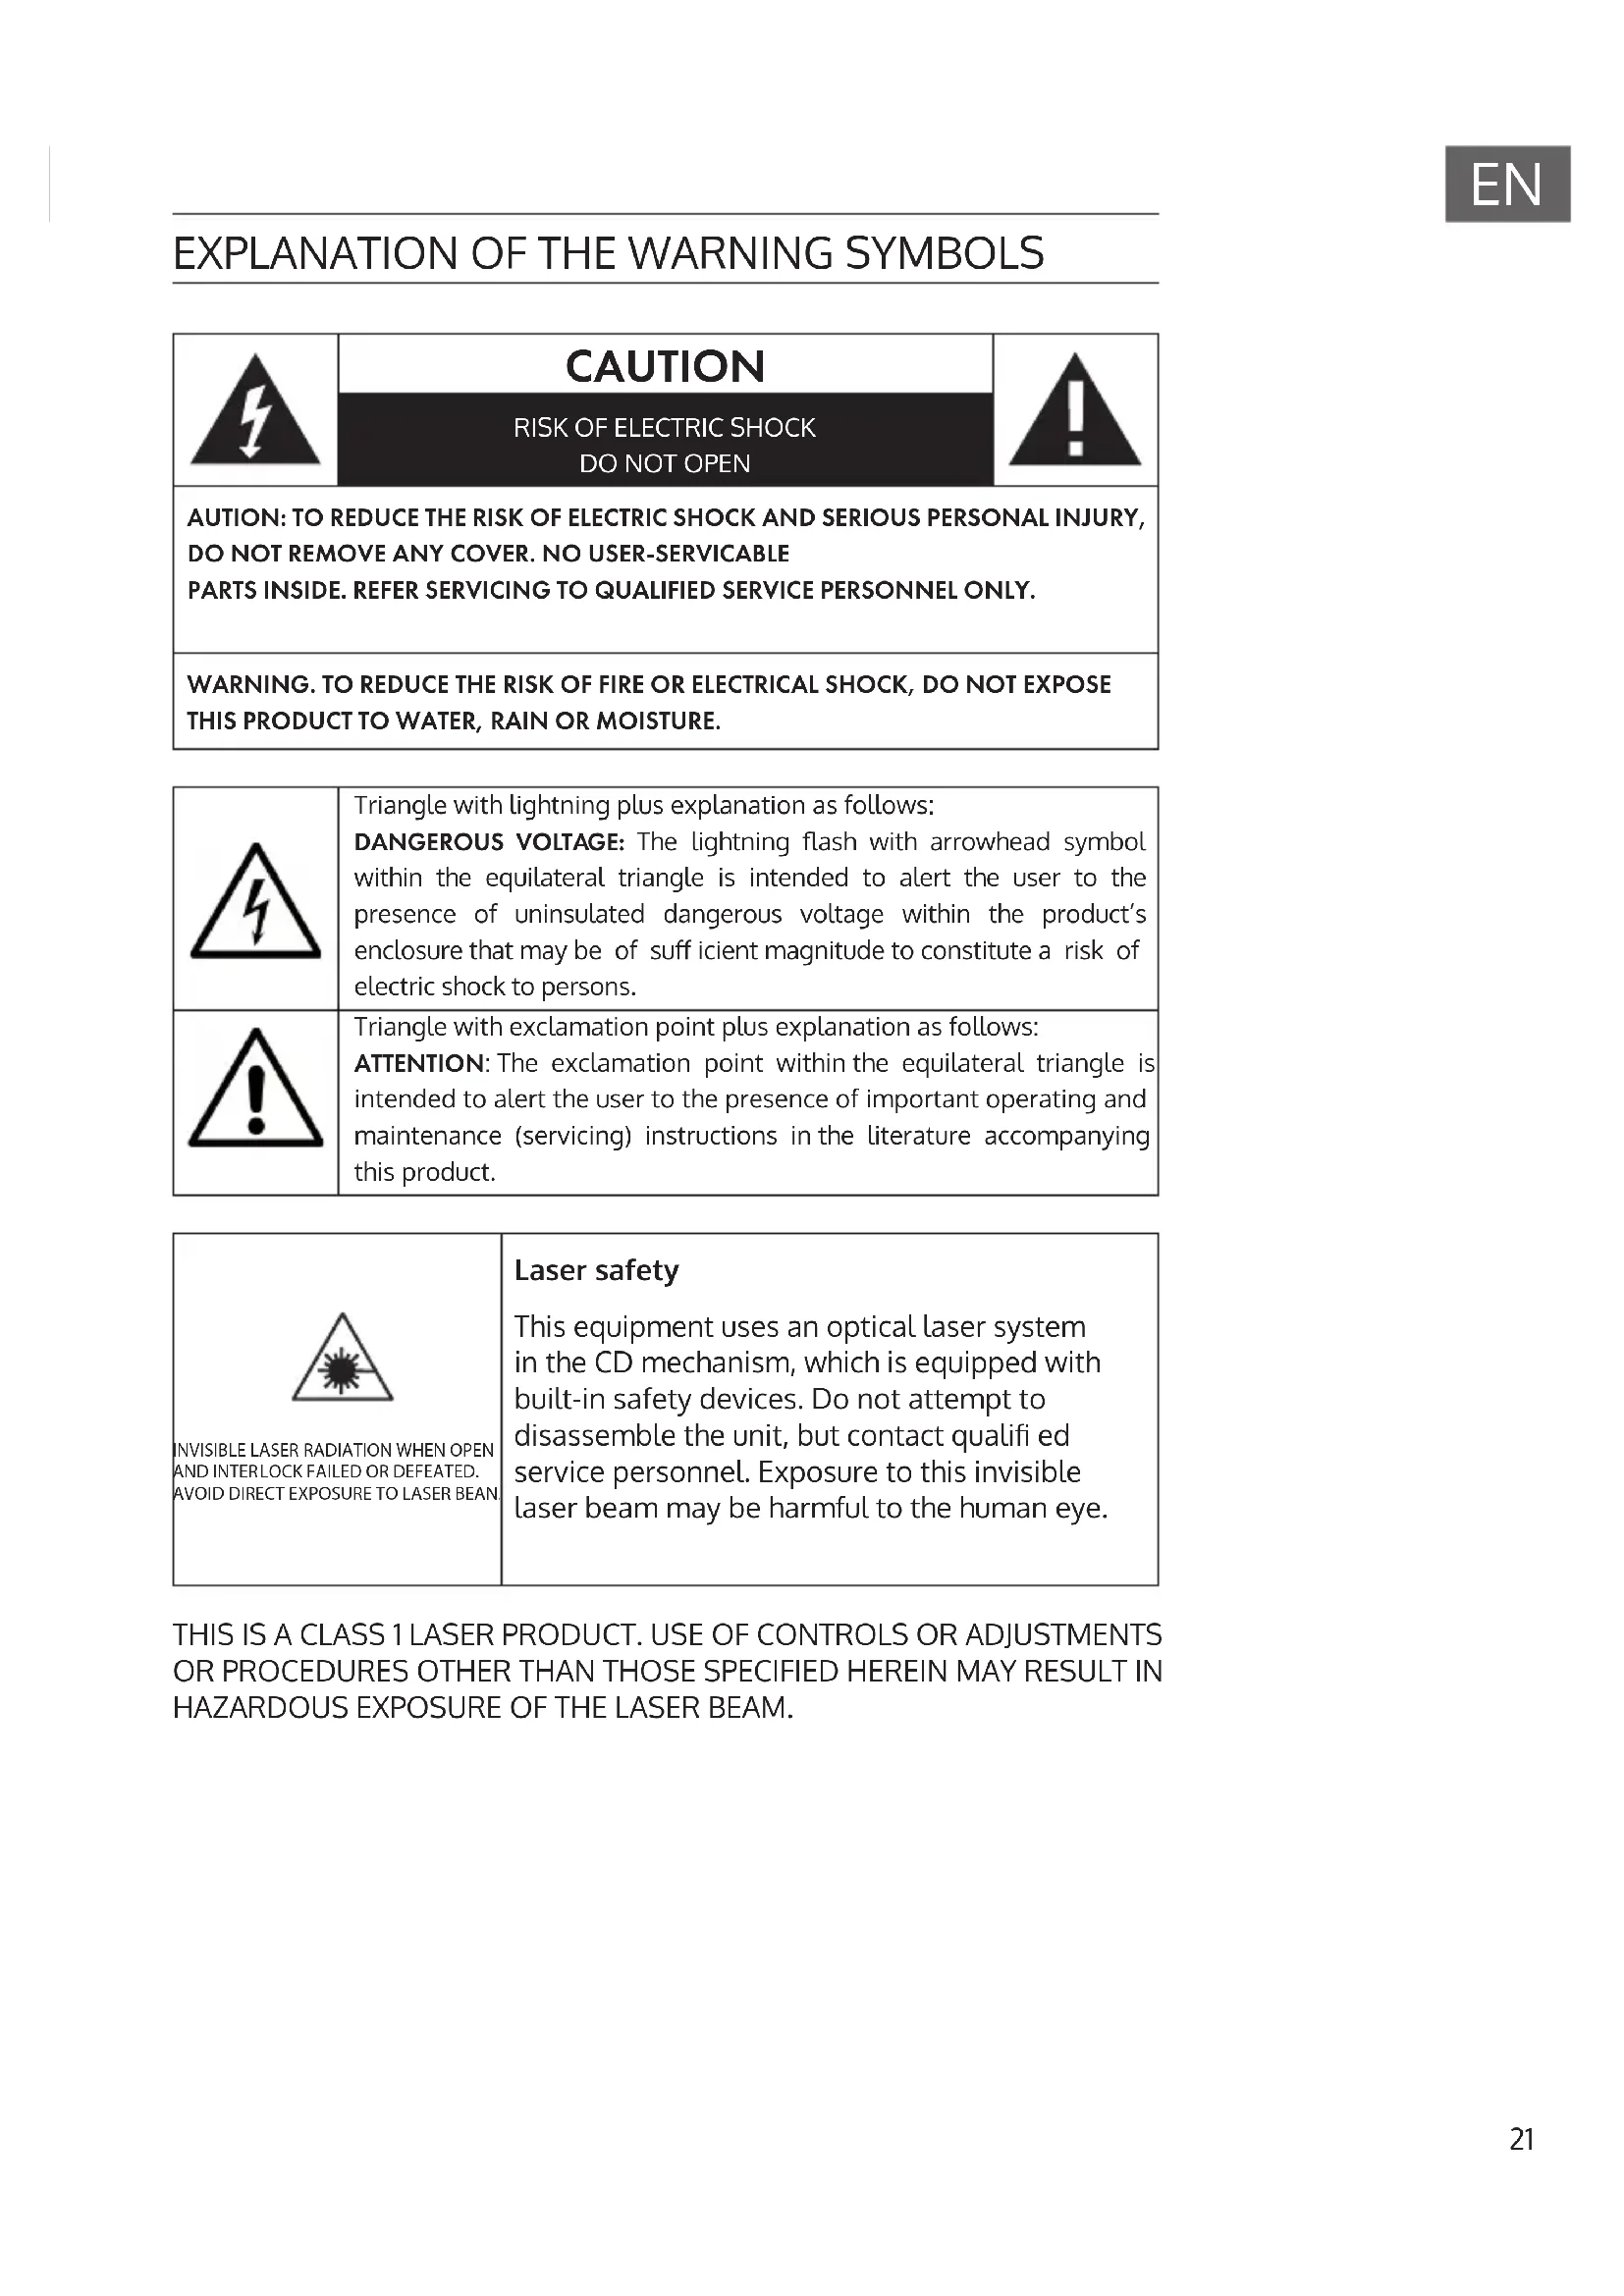
EXPLANATION OF THE WARNING SYMBOLS

CAUTION
RISK OF ELECTRIC SHOCK DO NOT OPEN

AUTION: TO REDUCE THE RISK OF ELECTRIC SHOCK AND SERIOUS PERSONAL INJURY, DO NOT REMOVE ANY COVER. NO USER-SERVICABLE PARTS INSIDE. REFER SERVICING TO QUALIFIED SERVICE PERSONNEL ONLY.
WARNING. TO REDUCE THE RISK OF FIRE OR ELECTRICAL SHOCK, DO NOT EXPOSE THIS PRODUCT TO WATER, RAIN OR MOISTURE.
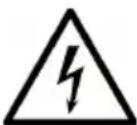
Triangle with lightning plus explanation as follows:
DANGEROUS VOLTAGE: The lightning flash with arrowhead symbol within the equilateral triangle is intended to alert the user to the presence of uninsulated dangerous voltage within the product's enclosure that may be of sufficient magnitude to constitute a risk of electric shock to persons.

Triangle with exclamation point plus explanation as follows:
ATTENTION: The exclamation point within the equilateral triangle is intended to alert the user to the presence of important operating and maintenance (servicing) instructions in the literature accompanying this product.
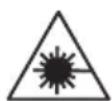
INVISIBLE LASER RADIATION WHEN OPEN AND INTERLOCK FAILED OR DEFEATED. AVOID DIRECT EXPOSURE TO LASER BEAN
Laser safety
This equipment uses an optical laser system in the CD mechanism, which is equipped with built-in safety devices. Do not attempt to disassemble the unit, but contact qualified service personnel. Exposure to this invisible laser beam may be harmful to the human eye.
THIS IS A CLASS 1 LASER PRODUCT. USE OF CONTROLS OR ADJUSTMENTS OR PROCEDURES OTHER THAN THOSE SPECIFIED HEREIN MAY RESULT IN HAZARDOUS EXPOSURE OF THE LASER BEAM.
SAFETY INSTRUCTIONS
General instructions
- Lightning - If you are not going to use the unit for a longer period of time or if there is a thunderstorm, pull the plug out of the socket or disconnect the unit from the antenna connection. This will prevent damage to the unit due to lightning and overvoltage.
- Overload - Do not overload sockets, extension cords or integral sockets as this may result in a fire or electric shock.
- Foreign objects and liquid ingress - Never push objects of any kind into the unit through openings as they may touch dangerous voltage points or short out parts that could result in a fire or electric shock. Never spill liquids of any kind on the unit.
- Repair and maintenance - Do not attempt to service this unit yourself as opening or removing covers may expose you to dangerous voltages or other hazards. Refer all servicing to qualified service personnel..
- Damage requiring service - Unplug the appliance from the mains and refer servicing to qualified service personnel if any of the following occurs:
(a) If the power cord or plug is damaged.
(b) If liquid has been spilled or objects have fallen on the unit.
(c) If the unit has been exposed to rain or water.
(d) If the unit has been dropped or damaged.
(e) If the performance of the unit is significantly reduced.
- Spare parts - If spare parts are required, ensure that the specialist company replacing the parts only uses spare parts that are approved by the manufacturer or have the same characteristics as the original part. Unauthorised replacement may result in fire, electric shock or other hazards.
- Heat - Do not install near any heat sources such as radiators, heat registers, stoves, or other apparatus (including amplifiers).
Special notes on operation
- Children from the age of 8, mentally, sensory and physically impaired persons may only use the appliance if they have been familiarised in detail with the functions and safety precautions by a supervisor responsible for them beforehand and understand the risks involved.
- Before use, check that the mains cable is undamaged. If the mains cable or plug are damaged, they must be replaced by the manufacturer, an authorised specialist company or a similarly qualified person. Children should be supervised to ensure that they do not play with the appliance. Make sure that children and babies do not play with plastic bags or other packaging materials.
- Make sure that the mains plug/mains adapter always remains easily accessible so that the appliance can be quickly disconnected from the mains in an emergency.
- When you are no longer using the appliance, switch it off and unplug it from the mains.
PRODUCTDESCRIPTION
Top view
text_image
1 2 3 4 5 6 7 8 9 10 MTN1 MOSOEN 2.01 WSPB0.01 USB USB USB USBFront view
text_image
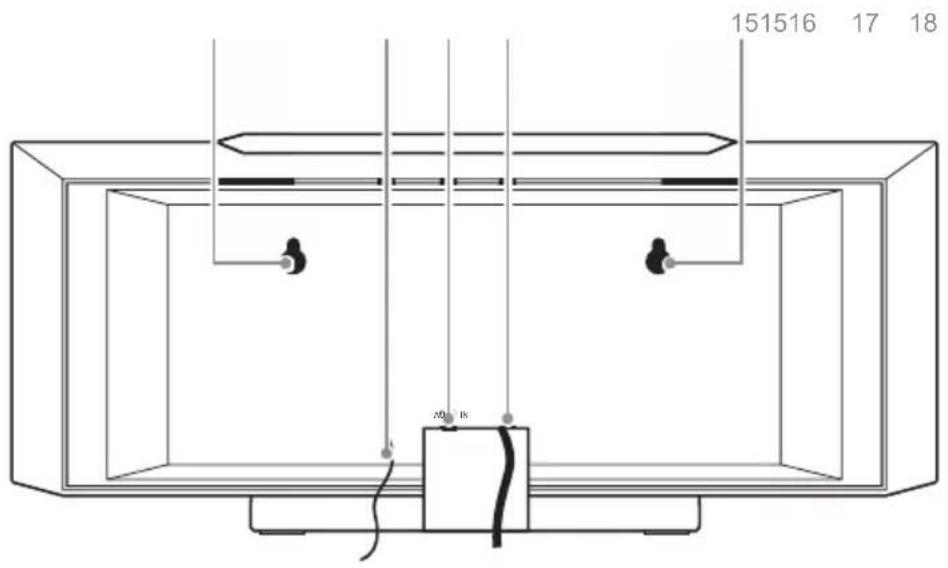
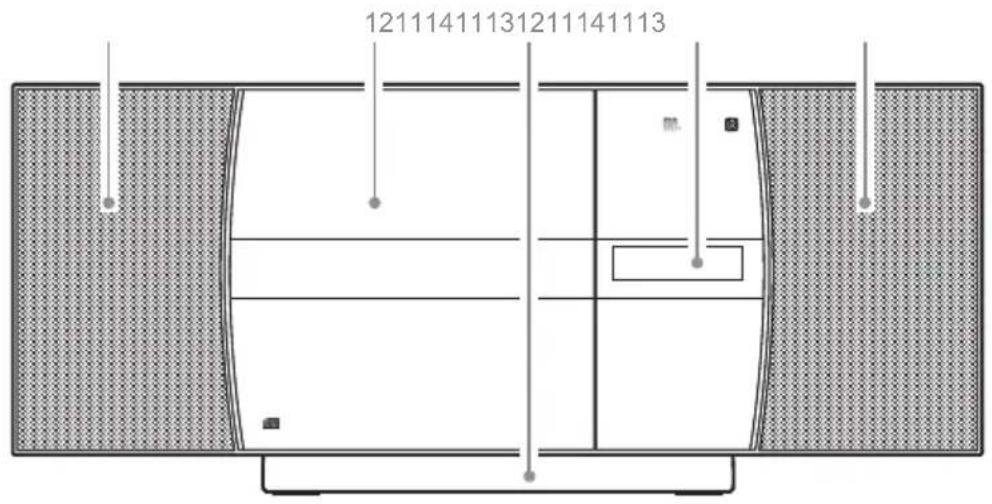
12111411131211141113Rear view

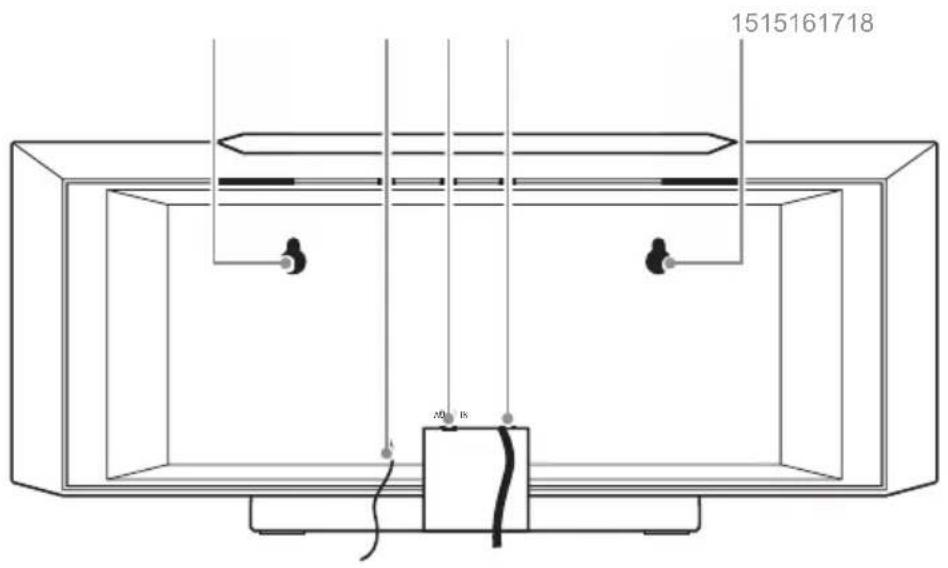
text_image
1515161718 200mm x11 Standby/Source Press to switch on Press&hold to switch to standby Repeatedly press for source selection
2 Menu/Info
3 Play/Pause
4 Stop
5 USB Port Connect USB drive here (not suitable for PC connection)
6 Previous (track/station/preset)
7 Next (track/station/preset)
8 Decrease volume
9 Increase volume
10 Open CD tray
11 Speakers
12 CD tray
13 Stand (detachable)
14 Display
15 Hooks for wall mount
16 Antenna
17 AUX-IN (3.5 mm)
18 Mains cable
REMOTECONTROL
Standby: Standby mode ON/OFF button
FM/DAB: Press to switch between FM & DAB radio
USB: Press to enable USB mode
CD: Press to enable CD mode
MENU: Press enable the DAB/FM menu options
^ PRESET: Tune up and menu navigation button
<TUNE: Tune down and menu navigation button LIGHT: Light on/off
◀◀/ ▶▶: Skip to the previous or next track in CD mode.
FOLDER +/-: Skip folders on a disc or USB flash drive
X-BASS: Press to enhance the bass output
MONO/ST: Press to switch between FM radio stereo & mono modes
NUMERIC BUTTONS digits directly
MEMORY/PROGRAM: Press and hold to store a radio station preset/Press in CD STOP mode to program a playlist
SLEEP: Press to activate the sleep timer settings

text_image
FMDAB USB CD AUDIO IN OPENCLOSE METH SCAN PRESE TUNE ENTER TUNE PRESET LIGHT LQ I-II +TREBLE FOLDER - X-BASS VOL - MONOIST. REPEAT RANDOM INTRO 1 2 3 4 5 6 7 8 9 0 10+ MUTE MEMORY SLEEP INFO UNPAIR
AUDIO IN: Press to enable the audio in mode.
OPEN/CLOSE: Press to eject or close the disc compartment
BLUETOOTH: Press to enable Bluetooth mode
SCAN: Press to perform a station scan FM/DAB
ENTER: Press select menu options
TUNE: Tune up and menu navigation button
EQ: Press to cycle EQ sound modes
▶ II PLAY/PAUSE: Press for play, pause functions
■ STOP: Press to stop playback
TREBLE: Press enable BASS & TREBLE adjustments
VOLUME +/-: Press + to increase and - to decrease the volume level
INTRO: Press to playback the first 10 seconds off all tracks on a CD
RANDOM: Press to playback CD tracks in a random order
MUTE: Press to mute audio playback.
UNPAIR: Press and hold to unpair a connected Bluetooth device
INFO: Press in DAB mode to display information
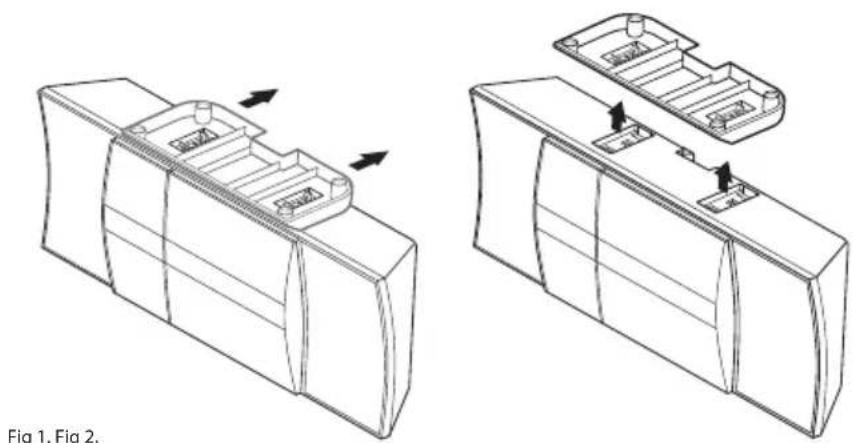
Stand
To detach the stand, carefully turn the unit upside down and push the stand towards the rear (see fig 1). Then lift it up (see fig 2). Do the opposite to re-attach the stand again.
natural_image
Technical line drawings of two mechanical components with arrows indicating assembly or movement (no text or symbols)INITIAL USE
Connect the mains plug to a household mains socket (230 V \~50 Hz). Press POWER/STANDBY.
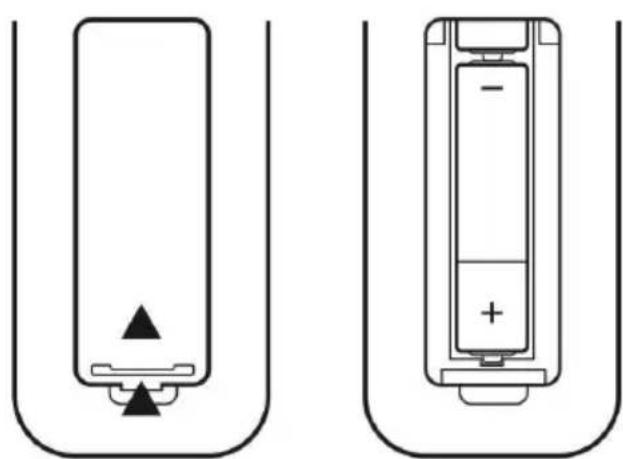
Insert two batteries (type AAA) in the RC battery compartment. Mind the correct polarity as indicated:
natural_image
Two battery diagrams showing different internal configurations: one with a black triangular tip and one with a black plus sign inside, both enclosed in U-shaped containers (no text or symbols)OPERATION
Global Functions
MODE: Switch the unit on with STANDBY/SOURCE, then press repeatedly to select CD - DAB - FM - AUX - USB - BT.
VOL+/-: Press VOL+/- to adjust the output volume.
MUTE: Press MUTE to toggle mute on/off.
X-BASS: Toggle to switch the bass enhancement on/off.
EQ: Press repeatedly to cycle through pre-set EQ settings (Classic - Pop - Vocal - Jazz - Flat - Rock - EQ off).
Sleep: While the device is playing, press SLEEP repeatedly to switch on and set the sleep timer in steps of 10 minutes (90 mins - 80 mins - 70 mins - ... - 10 mins - off).
Num pad operation: Track 02 : Press 2; Track 12 : Press 2 then 10+; Track 22 : Press 2 then 10+ twice
CD / USB
- Press SOURCE to switch to CD/USB mode.
- Press OPEN/CLOSE to open the CD tray. Insert an audio/MP3 disc with the printed side facing towards you. The CD will be read automatically. Insert a USB thumb drice into the USB socket on the device top.
- Use ◀◀, ▶▶ and ||to conveniently navigate through your music library.
- Playing MP3 CDs or USB drives containing folder structures, use FOLDER+/- to toggle folders.
- Play modes: Press REPEAT (repeat current track / repeat all tracks / repeat folder/ repeat mode off), INTRO (scan whole CD/USB drive and play first 10 s of each song) or RANDOM (paly songs in randomized order) on the RC.
- Program: You can compile a playlist consisting of up to 20 songs. Stop playback and press MEMORY. Use ◀◀◀ / ▶▶▶ to select the desired track, then press MEMORY to add it to your playlist. Repeat this procedure (max 20 x) and start playback (▶)
USB/ MP3 information
Do not remove the USB device during playback.
Max 999 tracks and 99 folders can be recognised
USB flash drive format: FAT 16, 32 only.
USB reading speed may be elected by the number of files on the device
RADIO: FM/DAB
DAB functions
On initial selection of DAB mode, a station scan will be performed. All found stations will be saved to presets in alphanumerical order. The first station (according to the list) will be played automatically after the scan has finished successfully. Use the NEXT/PREVIOUS buttons to cycle through the list of saved station, then press ENTER to tune in the currently highlighted station.
For a new scan, press and hold MENU/INFO for 3 seconds. Confirm with ENTER.
Prune: Press the MENU button on the remote or press and hold the MENU/INFO button on the micro system. When the 'FULL SCAN' option appears press either TUNE or TUNE buttons on the remote or / buttons on the micro system and locate 'PRUNE', press the ENTER button on the remote or UNPAIR/ENTER on the micro system. 3. Use the TUNE or TUNE buttons on the remote or / buttons on the micro system to select 'YES' and press the ENTER button on the remote or UNPAIR/ENTER on the micro system.
DRC: Press the MENU button on the remote or press and hold the MENU/INFO button on the micro system. When the 'FULL SCAN' option appears press either TUNE or TUNE buttons on the remote or / buttons on the micro system and locate 'DRC', press the ENTER button on the remote or UNPAIR/ENTER on the micro system. Use the TUNE or TUNE buttons on the remote or / buttons on the micro system to select between DRC OFF, DRC LOW and DRC HIGH. Press the ENTER button on the remote or UNPAIR/ENTER on the micro system to save the setting.
DAB / FM
Use 1 to manually search the band for stations (hold for automatic scan in the respective direction). Press STOP to interrupt the scan.
Save stations: Press and hold MEMORY and use 🔊 to select the desired preset number. Confirm pressing ENTER. Alternatively press and hold the number button you want to save the station to.
Press MEMORY briefly to enter the station preset list. Use the arrow buttons to cycle through the list. Tune in the desired station with ENTER. Alternatively, use the number buttons to directly tune in the desired station.
Press MONO/ST to toggle stereo/mono reception.
Press INFO repeatedly to toggle display modes:
FM: Radio Text (if available)- Program Type - Program Name - Audio Mode (mono/stereo) - Time&Date
DAB: DLS (Dynamic label segment is a scrolling message that the broadcaster may include with their transmissions. This message usually includes information, such as program detail etc.) - Signal strength - Program Type - Ensemble/Multiplex (A multiplex/ensemble is a collection of radio stations that are bundled and transmitted on one frequency. There are national and local multiplexes. Local ones contain stations that are specific to that area e.g. MXR West.) - Channel (current frequency) - Mode (current mode) - Time&Date .
BT
The BT function can be used to stream music from any BT device such as smartphones or tablets, but does not support hands free telephone operation.
- Switch the V-20 on and press SOURCE to switch to BT mode.
- Activate BT on your BT device and pair with the V-20 DAB.
- Use your BT device to operate audio/media playback or use th V-20 buttons ◀◀/▶▶▶
- Type in "0000", if prompted to enter a password.
- NFC: When enabled on the transmitting audio device; all that is required is for you to touch the NFC logo on the front of the micro system with the NFC hotspot on your compatible audio device. Enable NFC on your audio device (such as a mobile phone). Touch the NFC hot spot on your audio device to the NFC logo on the front of the micro system. You may need to move the device around slightly to hit the exact contact point. When the connection is made, a melody is played and the 'BT-LINK' text on the display will stop flashing and the device will be automatically connected.
- To remove a paired device using the micro system, press and hold the UNPAIR/ENTER button on the micro system or press the UNPAIR button on the remote The 'BT LINK' text will begin flashing again.
AUX
Aux-In: Use a 3.5 mm audio cable to connect external media/audio players to the AUDIO IN socket on the rear. Press SOURCE repeatedly to switch to AUX mode. Operate the playback on your external device. If using the headphone out, set it to about 70% volume, to avoid hum. Adjust the output volume on the V-20, then.
DISPLAY ILLUMINATION
When the unit is standby mode the backlight will dim after 10 seconds. Press the LIGHT button on the remote control to illuminate the backlight for 10 seconds.
SYSTEM SETTINGS
The system settings (TIME/DATE, AUTO UPDATE, FACTORY RESET) are accessible through the MENU button: Press MENU (RC: hold), then scroll through the list, using the arrow buttons. Press ENTER to enter sub menus or confirm any change. Use the arrow buttons to adjust values.
Factory Reset
To reset the device to factory presets, press MENU and use the arrow buttons to select the SYSTEM sub menu. Scroll through to SYSTEM RESET with the arrow buttons, then press ENTER. Please note: All station presets and changes will be deleted.
DISPOSALCONSIDERATIONS

natural_image
Symbol of a trash bin crossed with a diagonal line, representing no waste or discharge (no text or labels)If there is a legal regulation for the disposal of electrical and electronic devices in your country, this symbol on the product or on the packaging indicates that this product must not be disposed of with household waste. Instead, it must be taken to a collection point for the recycling of electrical and electronic equipment. By disposing of it in accordance with the rules, you are protecting the environment and the health of your fellow human beings from negative consequences. For information about the recycling and disposal of this product, please contact your local authority or your household waste disposal service.
This product contains batteries. If there is a legal regulation for the disposal of batteries in your country, the batteries must not be disposed of with household waste. Find out about local regulations for disposing of batteries. By disposing of them in accordance with the rules, you are protecting the environment and the health of your fellow human beings from negative consequences.
DECLARATION OF CONFORMITY

text_image
CE UK CAManufacturer:
Chal-Tec GmbH, Wallstrasse 16, 10179 Berlin, Germany.
Importer for Great Britain:
Berlin Brands Group UK Ltd
PO Box 1145
Oxford, OX1 9UW
United Kingdom
Hereby, Chal-Tec GmbH declares that the radio equipment type V-20 DAB is in compliance with Directive 2014/53/EU. The full text of the EU declaration of conformity is available at the following internet address: use.berlin/10029926
For Great Britain: Hereby, Chal-Tec GmbH declares that the radio equipment type V-20 DAB is in compliance with the relevant statutory requirements. The full text of the declaration of conformity is available at the following internet address: use.berlin/10029926
Estimado cliente:
text_image
QR code image containing encoded data, no visible human-readable textÍNDICE
Datos técnicos 34
natural_image
Technical line drawings of two mechanical components with directional arrows indicating movement (no text or symbols)Fig 1. Fig 2.
PUESTA EN MARCHA
natural_image
Two battery diagrams showing different internal configurations: one with a positive charge and arrow, the other with a negative charge and plus sign (no text or symbols)INSTRUCCIONES DE USO
Funciones generales
natural_image
Symbol of a trash bin crossed with a diagonal line, representing no waste or discharge (no text or labels)Berlin Brands Group UK Ltd
PO Box 1145
Oxford, OX1 9UW
United Kingdom
text_image
QR code image containing encoded data, no visible human-readable textSOMMAIRE
Fiche technique 48
natural_image
Technical line drawings of two mechanical components with arrows indicating assembly or movement (no text or symbols)MISE EN MARCHE
natural_image
Two battery diagrams showing different internal configurations: one with a black triangular tip and one with a white battery labeled '−' and '+' (no text or symbols beyond basic markings)UTILISATION
Fonctions générales
natural_image
Symbol of a trash bin crossed out by a diagonal line, with no text or labels present.DÉCLARATION DE CONFORMITÉ

text_image
CE UK CAFabricant :
Chal-Tec GmbH, Wallstraße 16, 10179 Berlin, Allemagne.
Berlin Brands Group UK Ltd
PO Box 1145
Oxford, OX1 9UW
United Kingdom
text_image
QR code image containing encoded data, no visible human-readable textINDICE
Dati tecnici 62
natural_image
Technical line drawings of two views of a mechanical component, showing internal structure and mounting features (no text or symbols)Fig 1. Fig 2.
MESSA IN FUNZIONE
natural_image
Two battery diagrams showing different internal configurations: one with a black triangular tip and one with a black plus sign inside, both enclosed in U-shaped containers (no text or symbols)natural_image
Symbol of a trash bin crossed out by a diagonal line, with no text or labels present.Berlin Brands Group UK Ltd
PO Box 1145
Oxford, OX1 9UW
United Kingdom
text_image
QR code image containing encoded data, no visible human-readable textINHOUD
text_image
1 2 3 4 5 6 7 8 9 10 MTN1 MOSOLED LED VSPRLED LEDVoorkant
text_image
12111411131211141113Achterkant