R4 mk3 - Hi-fi system Ruark Audio - Free user manual and instructions
Find the device manual for free R4 mk3 Ruark Audio in PDF.

User questions about R4 mk3 Ruark Audio
0 question about this device. Answer the ones you know or ask your own.
Ask a new question about this device
Download the instructions for your Hi-fi system in PDF format for free! Find your manual R4 mk3 - Ruark Audio and take your electronic device back in hand. On this page are published all the documents necessary for the use of your device. R4 mk3 by Ruark Audio.
USER MANUAL R4 mk3 Ruark Audio
Integrated Music System
R4 mk3
| User guide | EN |
| Brugervejledning | DA |
| Bedienungsanleitung | DE |
| Guía del usuario | ES |
| Guide de l'utilisateur | FR |
| Manuale dell'utente | IT |
| Gebruikershandleiding | NL |
| Brukerveiledning | NO |
| 사용자 가이드 | KR |
ruarkaudio
Thank you for choosing our R4 Integrated Music System.
Please take the time to read this user guide as it will help you get the best from your radio.
With due care, we're confident your R4 will give you many years of listening pleasure but, should you need help or advice, please do not hesitate to contact us. As a British, family-run company, we pride ourselves on our customer service and will always do our utmost to help.
Once again, thank you for choosing Ruark Audio.
Alan O. Raurke
Alan O'Rourke
Founder and managing director
Contents
EN
| What's in the box 4 | Optical audio input 17 | ||
| Overview | 5 | Headphones | 17 |
| Controls | 6 | Line out 17 | |
| Remote control 7 | Bluetooth | 18 | |
| Getting started 8 | DAB radio 20 | ||
| Common functions 10 | FM radio 22 | ||
| System settings 13 | Specifications | 23 | |
| Alarms, snooze and sleep 14 | Troubleshooting | 23 | |
| CD | 15 | Safety and regulatory information 24 | |
| USB | 16 | Guarantee information 27 | |
| Aux audio inputs 17 | General care 27 | ||
EN-3
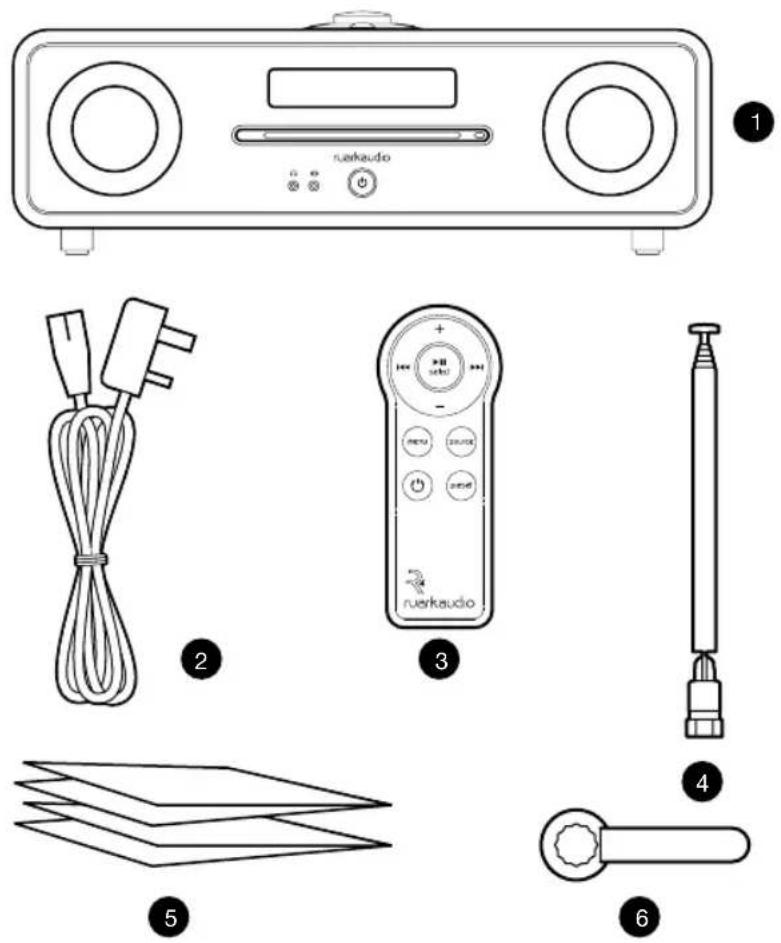
What's in the box
Ensure that all the parts listed below are in the box.
If any part is missing, do not use the music system. If purchased in the UK, contact us directly. If purchased outside the UK, please contact your Ruark Audio dealer.
- R4 music system
- Mains power cord
- Remote control
- Telescopic aerial
- User guide
- Aerial spanner
If possible, please retain carton and all packing materials.
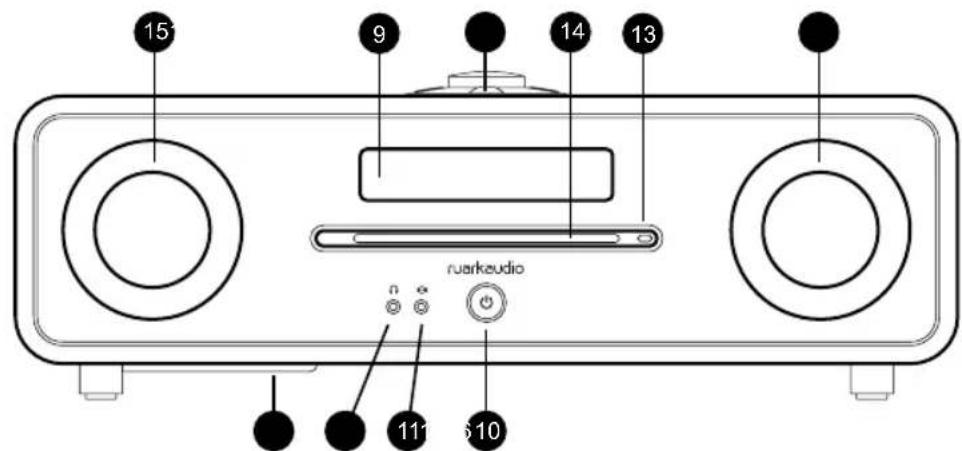
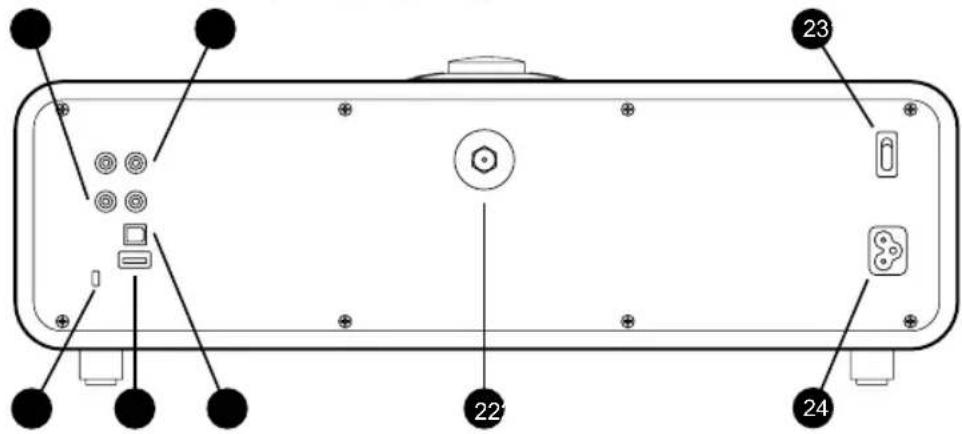
Overview
- Controls
- Display
- ⏻ (STANDBY)
- Front Aux audio input
- Headphone
- CD eject
- CD loading slot
- Stereo speaker
- Sub woofer
- Line out audio output
- Rear Aux audio input
- Security slot
- USB playback
- Optical audio input
- Aerial connector
- Power switch
- Mains power inlet
EN
EN-5
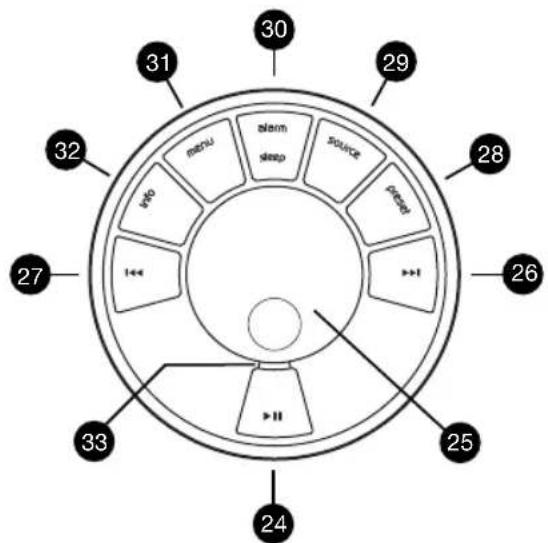
Controls
- ▶press to play/pause a track or mute radio
- CONTROL KNOB / SELECT
Rotate to adjust volume from a Now-playing screen Rotate to browse menus, tracks or station lists Press to select
- ▶▶▶ – press to skip to next station/track/menu option
- press to skip to previous station/track/menu option
- PRESET – press to recall a saved station or press and hold for two seconds to save a radio station
- SOURCE – press to change audio source
- ALARM/SLEEP – press once to set alarm 1, press twice to set alarm 2 or press and hold for two seconds to set sleep timer
- MENU – press to show the menu or navigate back to the previous menu or folder. Press and hold to return to the Now Playing screen.
- INFO – press to change the displayed information about the current station or track
- Indicator light – indicates your R4 is on and flashes when Bluetooth is ready to pair or when pressing a key on the remote.
How long you press a key is important
Press = tap or press and immediately release
Press and hold = press and release after two seconds
Remote control
- (STANDBY) – press to power on or off the radio
- ▶II/ SELECT – Press to play/pause a track or mute radio or to select a menu item
-
- press to skip to previous station/track/menu option
- ▶press to skip to next station/track/menu option
- SOURCE – press to change audio source
- MENU – press to show the menu or navigate back to the previous menu or folder
- VOL - press + or - to change the volume
- PRESET – press to recall a saved station or press and hold for two seconds to save a radio station.
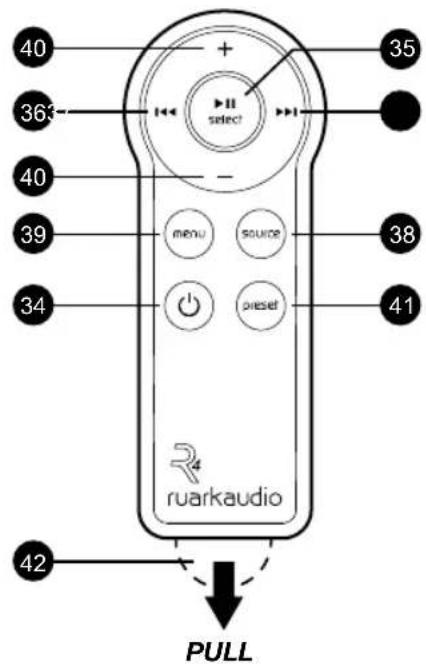
NOTE: before using your remote for the first time you must remove the orange plastic tab (42) to activate the battery.
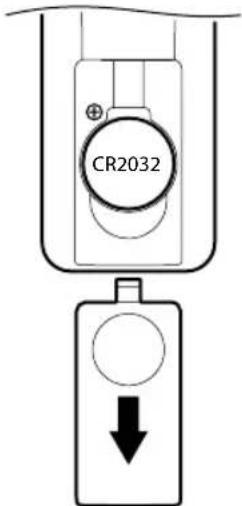
Fitting battery
- Press and slide the battery cover to remove it
- Replace the CR2032 Lithium coin cell by sliding it under the spring contact, ensuring the flat side marked with + faces up
- Slide the battery cover back
Getting started
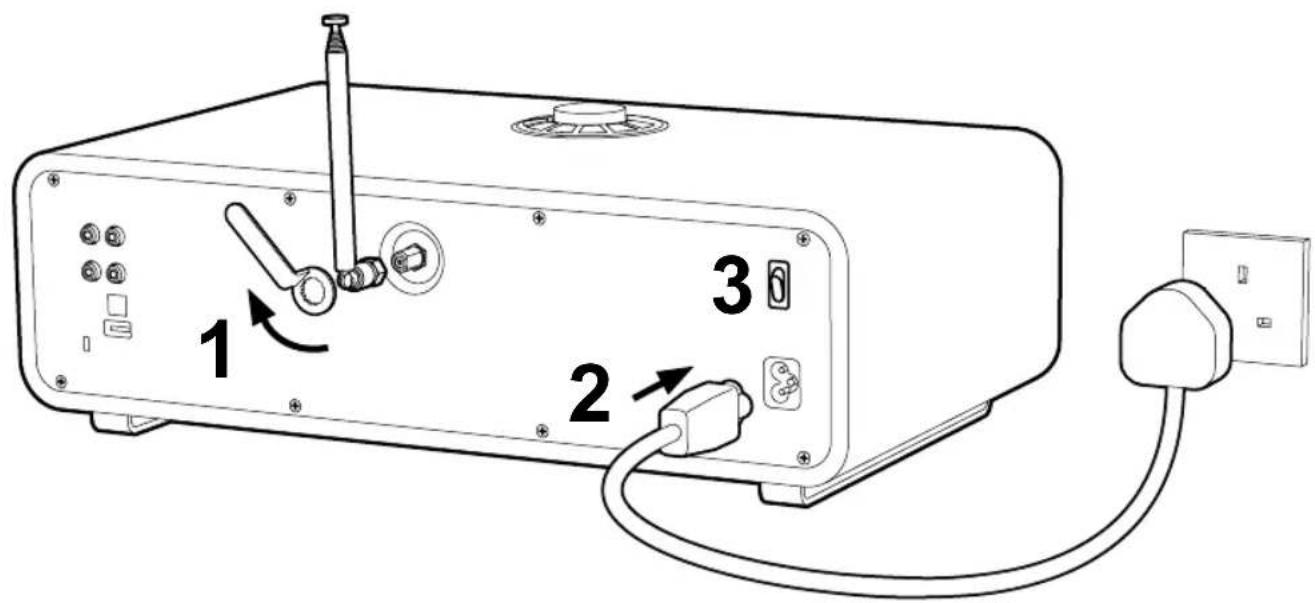
1. Fit aerial
Connect the aerial to the socket on the back of your R4 and carefully tighten the nut with the spanner provided.
Place your R4 on a suitable shelf or table and fully extend the aerial to ensure you get the best possible radio reception.
2. Connect power cord
Plug the mains power cord into the mains power socket on the back of your R4 and into a mains outlet.
3. Switch mains power on
Switch the mains power switch on the back of your R4 to the ON position. Your R4 is now in standby.
3. Turn on
Press ☐ to turn your R4 on, the Ruark Audio logo will show.
ruarkaudio
When you turn on your R4 for the first time you will see the source select menu. Rotate the CONTROL KNOB to select the source you want to listen to and then press the knob to confirm.
Select source
< DAB >
Common functions
Switch on and to standby
Press Do turn your radio on/standby. You can turn your R4 completely OFF by switching the power switch on the back to OFF. Please note that alarms will not sound when the unit is OFF.
Now-playing screens
Unless you're adjusting a setting, the screen will look like the example below.
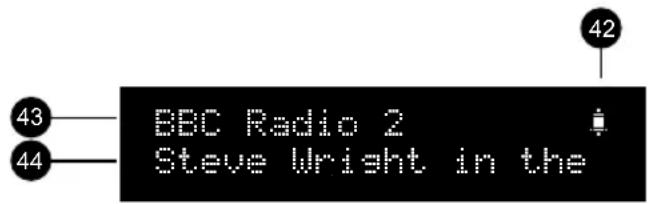
- Alarm icon
- Station/track name
- Radiotext, Album title, etc.
Menu screens
The menus enable you to set the various options such as adjusting the bass and treble. To change a setting, press MENU to display the list of available options, rotate the CONTROL KNOB to scroll through the list, and then press the knob to confirm your selection.

- Menu title
- Menu option
Navigating menu screens
To change settings – press MENU
To scroll through options – rotate CONTROL KNOB or press ▶▶1 or ▶keys
To select option – press CONTROL KNOB
To return to previous options – press MENU
To exit menu – press and hold MENU until the Now Playing screen is shown or wait for a few seconds.
Currently saved settings are marked with an asterisk ( )
Adjust volume
Rotate the CONTROL KNOB from any Now-playing screen.

Speaker volume and headphone volume are adjusted separately, so when headphones are plugged in the volume is shown as Volume (HP).
Please note: rotating the CONTROL KNOB when a menu or station list is displayed will scroll through the options or stations and not change the volume.
Change audio source
Press SOURCE to view the current source, rotate the CONTROL KNOB to scroll through the list of sources, then press the knob to select a source. (You can also press SOURCE repeatedly to cycle through the list of sources instead of rotating the knob.)
Pause track or mute radio
Press ▶ and then press again to resume listening.
Play next/previous track
Press ▶ skip to the next track in the folder or album, press ▶ skip to the start of the current track, press again to skip to the previous track.
Fast forward or rewind track
Press and hold ▶ or (may not work with Bluetooth).
Change FM radio station
Press ▶ to seek the next or previous station. See FM section for more details.
Change DAB radio station
Press ▶▶ to show the station list. Press again or rotate the CONTROL KNOB to scroll through the list of stations, then tune to currently displayed station by pressing the CONTROL KNOB.

You can also display the station list by selecting MENU > Station list.
See DAB section for more details.
Save preset
Press and hold PRESET until Save preset is shown, rotate the CONTROL KNOB to choose the preset number, then press the knob to save the current station. Presets are either marked with the station name, frequency or as ‘(Empty)’.
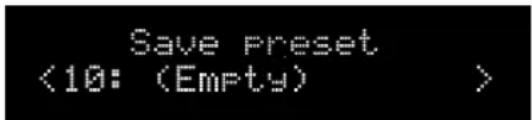
If you save a station over an existing preset, the new station will replace it.
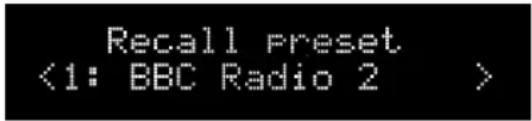
Recall preset
Press PRESET, rotate the CONTROL KNOB to scroll through the preset station list, then press the knob to select a station. (You can also scroll through the presets by repeatedly pressing PRESET.)
Connect a Bluetooth device
Your R4 will automatically connect to the last connected device. If it's not available or you have not yet paired your device, your R4 will enter into pairing mode. See Bluetooth section for more details.
EN-12
Browse USB or CD
Select MENU > Browse to show contents of the CD or USB disk. Rotate the CONTROL KNOB to scroll through the track list. Press the CONTROL KNOB to play a track or view folder content, press MENU to exit a folder and return to parent folder.
Play from CD
Insert CD into slot and playback will start automatically or press ▶ if ICD is already inserted.
Play from USB
Insert USB flash drive or connect hard disk to the USB socket on the back and playback will start automatically or press ▶USB drive is already inserted.
Station or track information
Press INFO to cycle through the different station / track information available.
Please note that MENU > System > Audio > Bass means press MENU, select System, select Audio and finally select Bass
System settings
Bass, Sub and treble
MENU > System > Audio > Bass, Treble or Sub level
Adjust the bass, sub and treble levels using the CONTROL KNOB then press it to save the setting.
Loudness
MENU > System > Audio > Loudness
Loudness automatically boosts the treble and bass frequencies at lower volumes. Select ON or OFF.
3D sound
MENU > System > Audio > 3D
3D widens the stereo sound stage and creates a more immersive and involving sound. Select ON or OFF.
Display brightness
MENU > System > Display
Adjust the brightness of the display when ON (On level) and in standby (Standby level). When the standby brightness is set to OFF, pressing any key will briefly illuminate the display.
You can also adjust the standby brightness when your R4 is in standby by pressing ▶▶1 or ▶◀◀
Display timeout
MENU > System > Display > Timeout
When set to ON, the display will automatically turn off after 20 seconds and turn on again as soon as you press any button or rate the knob.
Date and time
MENU > System > Date and time
The time and date are automatically synchronised with national time signals broadcast over DAB and FM (when available).
You can also set the time manually by turning off auto update and you can select the time and date format.
Inactive standby
MENU > System > Inactive standby
Set your R4 to automatically go into standby after 2 hours without any audio playing. Default is ON.
Factory reset
MENU > System > Factory reset
Resets all settings and clears presets.
Software update
Should this be necessary, full instructions will be supplied with the software update.
Alarms, snooze and sleep
Setting an alarm
An active alarm is indicated by the alarm icon and when it sounds, the icon flashes.
Press ALARM once to set or change alarm 1 and twice for alarm 2, then press the CONTROL KNOB to select.
Follow the on-screen instructions to set the alarm time, duration, source and volume by using the CONTROL KNOB. Rotate it to scroll through options and press it to select.
Alarm 1 setup 07:00
You will also be prompted to choose if and when the alarm repeats (daily, once, weekends or weekdays) and source.
Quickly turn alarms on and off
Press ALARM once for alarm 1 and twice for alarm 2, then rotate the CONTROL KNOB to choose On or Off, and finally press the knob to save the setting.
Snooze
Press the CONTROL KNOB to temporarily silence a sounding alarm, press it again to increase the snooze period (5, 10, 15 or 20 minutes).
To cancel an alarm that is sounding or snoozing, press and hold the CONTROL KNOB for two seconds or press ALARM.
Sleep timer
To set the time after which your R4 will automatically switch to standby, press SLEEP for two seconds. Then press the CONTROL KNOB, rotate it to choose the delay in minutes (Off, 15, 30, 45, 60, 90) and finally press the knob again to confirm your selection. The display brightness will change to the standby brightness setting.
Alarms can also be set with your R4 radio in standby
CD
Press SOURCE and rotate the CONTROL KNOB or repeatedly press SOURCE until CD is displayed, then press the knob to select it.
When you insert a disc your R4 will automatically change to CD mode and start playing the disc.
Pause track
Press ▶ and then press again to resume listening.
Stop playback
Press and hold ▶ until playback stops and the display changes to show the total number of tracks.
Play next/previous track
Press ▶ skip to the next track in the folder or album, press ◀ skip to the start of the current track, press again to skip to the previous track.
Fast forward or rewind track
Press and hold ▶ or .
Now playing information
Generally, track number and time is shown on audio CDs and track and album name is shown on E-CDs/MP3 CDs.
To change what is displayed press INFO to cycle through the additional options or select MENU > Info
and choose from Artist, Album, Track number, Track time or Time and date.
Browse disc
To browse data discs with music files such as MP3 or AAC, press MENU > Browse then rotate the CONTROL KNOB to show the folders or tracks available.
Tracks are displayed

Folders are displayed as

To go back to the parent folder, press MENU.
USB
Press SOURCE and rotate the CONTROL KNOB or repeatedly press SOURCE until USB is displayed, then press the knob to select it.
Pause track
Press ▶ and then press again to resume listening.
Stop playback
Press and hold ▶ until playback stops and the display changes to show the total number of tracks.
Play next/previous track
Press ▶ skip to the next track in the folder or album, press ▶ skip to the start of the current track, press again to skip to the previous track.
Fast forward or rewind track
Press and hold ▶el . ◀◀◀
Now playing information
Typically, the track name is shown with additional information below. To change what is displayed press INFO to cycle through the additional options or select MENU > Info and choose from Artist, Album, Folder name, Track number, Track time or Time and date.
Browse USB disk
To browse USB, press MENU > Browse then rotate the CONTROL KNOB to show the folders or tracks available.
The USB disk name is shown on the top line. If the name is blank the top level folder will show as USB (Root).
Tracks are displayed

Folders are displayed as

To go back to the parent folder, press MENU.
Rights-protected WMA and AAC tracks cannot be played on your R4.
USB charging
To charge your USB device, connect it to the USB socket on the back using a suitable USB cable.
Your R4 will charge most smartphones including iPhones and most Android and Windows phones but is not compatible with Apple iPad, iPad mini or any other device that requires a charger with an output greater than 5W (5V 1A).
Aux audio inputs
Listen to an external audio device such as a portable music player using a 3.5mm stereo jack cable connected to the Front Aux socket, or a phono (RCA) cable connected to the Rear Aux. For optimum playback quality, we recommended you set the volume of the auxiliary device to approximately three quarters.
Press SOURCE and rotate the CONTROL KNOB or repeatedly press SOURCE until Front Aux or Rear Aux is displayed, then press the control knob to select it.
Optical audio input
Connect your optical cable to the optical input on the back of your R4. Press SOURCE and rotate the CONTROL KNOB or repeatedly press SOURCE until Optical is displayed, then press the knob to select it.
Audio input level
If playback from the Aux or Optical inputs is too low or high relative to other sources you can adjust the input level by selecting MENU > Input level.
Headphones
Connect your headphones to the 3.5mm stereo jack socket (on the front of your R4.
Headphone volume is adjusted independently from speaker volume, so when headphones are plugged in the volume is shown as Volume (HP).
Line out
The stereo audio output allows you to connect your R4 to other audio devices via the phono (RCA) sockets on the back panel. This is a line level output so the volume is controlled via the external device.
NOTE: If the audio input level is too high the sound may distort and if it's too low the playback volume may be too low relative to other sources. Either adjust the volume on your audio device or the input level on your R4.
Bluetooth
Your R4 is Bluetooth enabled and can receive music streamed from Bluetooth devices such as a smartphone.
Press SOURCE and rotate the CONTROL KNOB or repeatedly press SOURCE until Bluetooth is displayed, then press the knob to select it.
To connect your device you must first establish a secure connection to your R4, a process called pairing.
Pairing your Bluetooth device
When you have changed the source to Bluetooth, wait until Awaiting connection... is shown and the indicator light (33) on top flashes.
Use the Bluetooth setup on your smart device to pair and connect it to your R4. It will appear in the list of paired devices as Ruark R4.
When connected, ✝ Connected to [your device name] (eg Archie's phone) is displayed.
It may take a few seconds for your R4 to appear in the list on your device, and in some cases you may need to input "0000" as the pairing password.
If you do not connect within a few minutes, your R4 will stop attempting to connect and show No connection. To connect, select MENU > Connect device.
Connecting your Bluetooth device
As soon as you switch to Bluetooth, your R4 will display Connecting... as it attempts to connect to the last device it was connected to.
If that device isn't available, it displays Awaiting connection... If a device doesn't connect within three minutes, it will display No connection. To connect to your R4, ensure the Bluetooth function on your device is on and select Ruark R4 from the paired devices list on your Bluetooth device.
Play audio
Once connected, audio from your Bluetooth device will play through your R4. For more information on playing audio from your Bluetooth device, refer to your device's documentation.
NOTE: you may need to select your Ruark R4 or Bluetooth as your audio output on your device.
Pause track
Press ▶ and then press again to play.
Your R4 includes aptX coding technology so if your smart device is also aptX enabled, you will benefit from CD-quality streaming.
Play next/previous track
Press ▶ skip to the next track in the folder or album, press ◀ skip to the start of the current track, press again to skip to the previous track.
Adjust volume
We recommend that you adjust the volume on your Bluetooth device so that the playback volume is about the same as other sources. You can then use the volume control on your R4 to adjust overall playback volume.
Now-playing information
If your Bluetooth device and app support Bluetooth metadata, the track name is shown with additional information below. To change what is displayed press INFO to cycle through the additional options or select MENU > Info and choose from Artist, Album, Device name or Time and date.
Operating range
This is typically up to 10 metres (30 feet) from your R4, although obstructions such as walls may reduce this.
Connect new device
To disconnect the current device and connect a new one, select MENU > Connect device.
Connect a paired device
To connect to a previously paired device, select it from the pairing list from MENU > Paired devices.
You can pair up to 10 devices, although you will only be able to play audio from one device at a time.
Clearing the paired devices list
If you are having trouble connecting your Bluetooth device, we recommend you clear all pairing information. To do this, select MENU > Forget devices.
You will also need to delete Ruark R4 from the paired devices list on your Bluetooth device before pairing it to your R4 again.
For help with using Bluetooth, please visit www.ruarkaudio.com/support.
Note: You cannot use the Bluetooth function on your R4 to connect to Bluetooth headphones
DAB radio
Your R4 radio receives DAB / DAB+ digital radio and displays information about the station and programme being broadcast.
Press SOURCE and rotate the CONTROL KNOB or repeatedly press SOURCE until DAB is displayed, then press the knob to select it.
The first time you select DAB, or if the station list is empty, it will automatically perform a full scan to find what stations are available.
Change station
Press ▶ to show the station list. Pressing it again shows the next or previous station, to tune to a station, select it by pressing the CONTROL KNOB.

If you do not select the station by pressing the knob your radio will return to the current station.
Once the station list is displayed, you can scroll through the list by rotating the CONTROL KNOB and selecting a station by pressing the knob.
You can also show the station list by selecting MENU > Station list.
EN-20
DAB radio text (DLS)
DLS (Dynamic Label Segment) is information broadcast by the station. Each time you press INFO, the next set of information is displayed, cycling through radio text, programme type, signal strength, signal format and date.
Save preset
You can store 10 DAB stations in your preset list. See 'Common functions and system settings' section.
Recall preset
'See Common functions and system settings' section.
Station scan
If the station list is empty the radio will automatically perform a scan as soon as you switch to DAB.
In any case, we recommend you do a scan from time to time to update the station list because:
- New stations sometimes become available
• Stations close or may no longer be received - Reception was poor during the original scan (for example the aerial wasn't extended)
- You move the radio to a different region
To do a scan, select MENU > Scan.
Remove weak or invalid stations
Weak (burbling) or invalid stations have a ‘?’ in front of the station name. They can all be removed by selecting MENU > Prune.
Station order
The DAB station list can be ordered by Alphanumeric or Ensemble. Alphanumeric puts the stations in alphabetical order, Ensemble groups stations from the same broadcaster together.
To change station order, select Menu > Station order and select Alphanumeric (default), Ensemble or Valid. Valid shows available stations first and places invalid stations last (marked with ‘?’).
Now playing information
To change what is displayed below the station name press INFO to cycle through the additional options or select MENU > Info and choose from Radio text, Programme type, Signal strength, signal format or time and date.
For optimal reception, use an external aerial.
If using the supplied telescopic aerial, fully extend it and adjust its position.
EN-21
FM radio
Your R4 radio receives analogue radio from the FM band and when available, displays the station name and radio text using RDS/RBDS information (Radio Data System/Radio Broadcast Data System).
Press SOURCE and rotate the CONTROL KNOB or repeatedly press SOURCE until FM is displayed, then press the knob to select it.
Change station
Press ▶ to automatically tune to the next available FM station. If RDS/RBDS is unavailable the frequency is displayed instead.
![89.80 [No RadioText]](/content/2026/02/383826/images/137fe5df3a5ab3d826ac5450f574a332b9f4e9d3e35aa136f15f1c9e7cc566d9.jpg)
You can change the scan setting to only stop at stations with a strong signal by selecting Menu > Scan setting > Strong stations.
Manual tune
Select MENU > Manual tune and rotate the CONTROL KNOB to change the frequency. To exit manual tuning and show RDS/RBDS data press the control knob or wait a few seconds.
EN-22
FM radio text (RDS/RBDS)
RDS is information broadcast by some FM stations.

Choose from radio text, programme type, frequency, signal strength and date by selecting MENU > Info.
Save preset
You can store 10 FM stations in your preset list. The station name will be stored only when RDS/RBDS is available. See ‘Common functions’ section.
Recall preset
'See Common functions' section.
For optimal reception, use an external aerial.
If using the supplied telescopic aerial, fully extend it and adjust its position.
Specifications
- 2 x 3.5 in custom high-fidelity drivers
• 4.0 in sub woofer - Tuned bass reflex cabinet
- 80W nominal power output
• Enhanced 3D sound processor
• DAB, DAB+ and FM tuner with RDS - Removable DAB/FM aerial with F-Type connector
- Security slot
- OLED display
• Full function remote control - MP3, WMA, AAC - see www.ruarkaudio.com/support for further details on supported formats
Inputs and outputs
• A2DP, aptX Bluetooth
- Front Aux audio input - 3.5mm stereo jack
- Rear Aux audio input - stereo RCA/phono
• Line out audio output - line level stereo RCA/phono
• 3.5 mm headphone output
• USB 2.0 playback, 5W (5V 1A) output
Power
- Input power 100-240VAC, 50-60 Hz 1.5A max
Physical
• Dimensions: 440x250x125mm (17.3x9.8x4.9ins)
• Weight: 6.7kg (14.8lbs)
Specification and design subject to modification without notice.
Troubleshooting
For help with your product, please refer to the FAQ (Frequently Asked Questions) page in the support area of our website.
www.ruarkaudio.com/support
EN-23
Safety and regulatory information
- Read this user guide and follow all instructions, it will help you set up and operate your product properly.
- Heed all warnings and keep this user guide for future reference.
- Do not attempt to use a damaged device as this could result in a dangerous electric shock.
- Do not open the unit or remove any panels to expose the electronics. No user serviceable parts inside.
- Refer all servicing to qualified service personnel. Servicing is required when the device has been damaged in any way, such as power-supply cord or plug is damaged, liquid has been spilled or objects have fallen into the device, the device has been exposed to rain or moisture, does not operate normally, or has been dropped.
- This device is intended to be operated ONLY from the AC voltages listed on the back panel or included power supply. Operation from voltages other than those indicated may cause irreversible damage to the device and void the product warranty.
- Use only the power supply provided with the device or an approved alternative.
- Ensure that the power adapter, mains plug or mains connector into the unit is readily accessible in case disconnection from the mains is required.
- The mains adapter, mains plug or mains connector must be removed from the socket to completely disconnect the system from mains power.
-
Do not place any naked flame sources, such as lighted candles, on or near the device. Do not install near any heat sources such as radiators, stoves, or other devices (including amplifiers) that produce heat.
-
Avoid exposure to extreme heat or cold.
- Only use attachments/accessories specified for this device. Make no modifications to the system or accessories. Unauthorised alterations may compromise safety, regulatory compliance, and system performance.
- Only use the supplied aerial or an approved replacement.
- To reduce the risk of fire or electrical shock, do not expose the device to rain or moisture. Do not expose this device to dripping or splashing, and do not place objects filled with liquids, such as vases, on or near the device. As with any electronic products, use care not to spill liquids into any part of the system. Liquids can cause a failure and/or a fire hazard.
- Unplug this device during lightning storms or when unused for long periods of time to prevent damage to this device.
- To prevent risk of fire or electric shock, avoid overloading wall outlets, extension cords, or integral convenience receptacles.
- Long-term exposure to loud music may cause hearing damage. It is best to avoid extreme volume when using headphones, especially for extended periods.
- Do not install this device in a confined space. Always leave a space of at least 10cm around the device for ventilation and ensure that curtains or other objects never cover ventilation openings on the device.

LITHIUM COIN CELL SAFETY NOTICE. The remote control contains a lithium coin cell battery which if ingested, may cause chemical burns. Keep new and used batteries out of reach of small children. If you think batteries may have been ingested, seek immediate medical attention. Do not handle leaking or damaged batteries. Danger of explosion if battery is incorrectly replaced. Replace only with the same or equivalent type.
This device is labelled in accordance with European Directive 2002/96/EC concerning waste electrical and electronic equipment. This symbol indicates that the product or associated batteries should not be disposed of as general household waste. As with any electrical equipment, please dispose of it according to local regulations.

CE COMPLIANCE INFORMATION
This product conforms to all EU Directive requirements as applicable by law. You may obtain a free copy of the Declaration of Conformity by contacting your dealer, distributor, or Ruark Audio.
Ruark Audio hereby declares that this product is in compliance with the essential requirements and other relevant provisions of Directive 1999/5/EC.

CAUTION
RISK OF ELECTRIC SHOCK DO NOT OPEN

WARNING: DO NOT OPEN! RISK OF ELECTRIC SHOCK. Voltages in this equipment are hazardous to life. No user-serviceable parts inside. Refer all servicing to qualified service personnel.
Place the unit near the main power socket and make sure you can easily access the power switch.

The lightning flash with arrowhead symbol is intended to alert the user to the presence of uninsulated “dangerous voltage” within the products enclosure that may be of sufficient magnitude to constitute a risk of electric shock to persons.

The exclamation point with arrowhead symbol is intended to alert the user to the presence of important operating and maintenance (servicing) instructions in the literature accompanying the product.
WARNING: This product is intended to be operated ONLY from the AC Voltages listed on the back panel or included power supply of the product. Operation from other voltages other than those indicated may cause irreversible damage to the product and void the products warranty. The use of AC Plug Adapters is cautioned because it can allow the product to be plugged into voltages in which the product was not designed to operate. If the product is equipped with a detachable power cord, use only the type provided with your product or by your local distributor and/or retailer. If you are unsure of the correct operational voltage, please contact your local distributor and/or retailer.

CLASS I CONSTRUCTION This equipment must be EARTHED.
CLASS 1 LASER PRODUCT
This equipment is fitted with a LASER diode which can harm the eyes. Do not attempt to disassemble the casing or use any part of the contents for any purpose other than its intended use.
Guarantee information
We guarantee this product to be free from defects for a period of two years from date of purchase, providing due care and attention has been paid. Product failure through accidental damage (however caused), excessive wear and tear, negligence or unauthorised modification will void your guarantee.
Should you experience a problem please contact us via our website www.ruarkaudio.com or by calling directly on 01702 601410 where we will advise the course of action. If your product needs to be returned it should be packaged in its original packing along with proof of purchase. If it is not possible to return the product by hand, then it should be sent carriage prepaid by a reputable parcel carrier. If the original packing is not available, replacement packing can be purchased from us.
Guarantee for overseas sales
The distributor in the country of purchase guarantees products purchased outside the UK. For details, please contact your local Ruark distributor or outlet.
THIS GUARANTEE IN NO WAY VARIES OR REMOVES THE PURCHASER'S STATUTORY RIGHTS. E&OE
General care
- Clean with a soft, lint-free duster or slightly dampened cloth. Do not use wax sprays or other substances as these may damage the surface finish or impair performance.
- Do not expose your unit to direct sunlight, high humidity, dust, excessive vibration or extreme temperatures, all of which can affect the finish, performance and reliability of the unit.
- Recommended operating temperature range is 5°C to 40°C.
- Natural wood finish cabinets will vary and lighten or darken with age, particularly when exposed to sunlight.
Copyright and trademarks
© 2016 Ruark Audio. All rights reserved. Ruark Audio, the Ruark Audio logo, and other Ruark Audio marks are owned by Ruark Audio and may be registered. All other trademarks are the property of their respective owners. Ruark Audio assumes no responsibility for any errors that may appear in this manual and the information contained in it may change without notice.
Bluetooth® and associated logos are registered trademarks owned by Bluetooth SIG, Inc.
Qualcomm aptX is a product of Qualcomm Technologies International, Ltd.
All other trademarks are the property of their respective owners.
ruarkaudio
59 Tailors Court, Temple Farm Industrial Estate,
Southend on Sea, Essex, SS2 5TH, UK
+44 (0) 1702 601 410 www.ruarkaudio.com
Designed in
Great Britain

20160929.1
R_4
Integreret musiksystem
R4 mk3
User guide EN
Brugervejledning DA
1. Montér antenne
Select source
< DAB >
Fællesfunktioner
- Alarm-ikon
- Stations-/spor-navn
- Radiotekst, album-titel etc.
Menu-skærme
MENU > System > Date and time
CLASS 1 LASER PRODUCT
59 Tailors Court, Temple Farm Industrial Estate,
Southend on Sea, Essex, SS2 5TH, UK
+44 (0) 1702 601 410 www.ruarkaudio.com
Designet i
Storbritannien

20160929.1
R_4
Kompaktmusiksystem
R4 mk3
User guide EN
Brugervejledning DA
1. Antenne anbringen
CLASS 1 LASER PRODUCT
59 Tailors Court, Temple Farm Industrial Estate,
Southend on Sea, Essex, SS2 5TH, UK
+44 (0) 1702 601 410 www.ruarkaudio.com
Entworfen in
Großbritannien

20160929.1
R_4
Sistema de música integrado R4 mk3
User guide EN
Brugervejledning DA
1. Instalar la antena
CLASS I CONSTRUCTION
CLASS 1 LASER PRODUCT
59 Tailors Court, Temple Farm Industrial Estate,
Southend on Sea, Essex, SS2 5TH, UK
+44 (0) 1702 601 410 www.ruarkaudio.com