TSXW80 - Speakers YAMAHA - Free user manual and instructions
Find the device manual for free TSXW80 YAMAHA in PDF.
User questions about TSXW80 YAMAHA
0 question about this device. Answer the ones you know or ask your own.
Ask a new question about this device
Download the instructions for your Speakers in PDF format for free! Find your manual TSXW80 - YAMAHA and take your electronic device back in hand. On this page are published all the documents necessary for the use of your device. TSXW80 by YAMAHA.
USER MANUAL TSXW80 YAMAHA
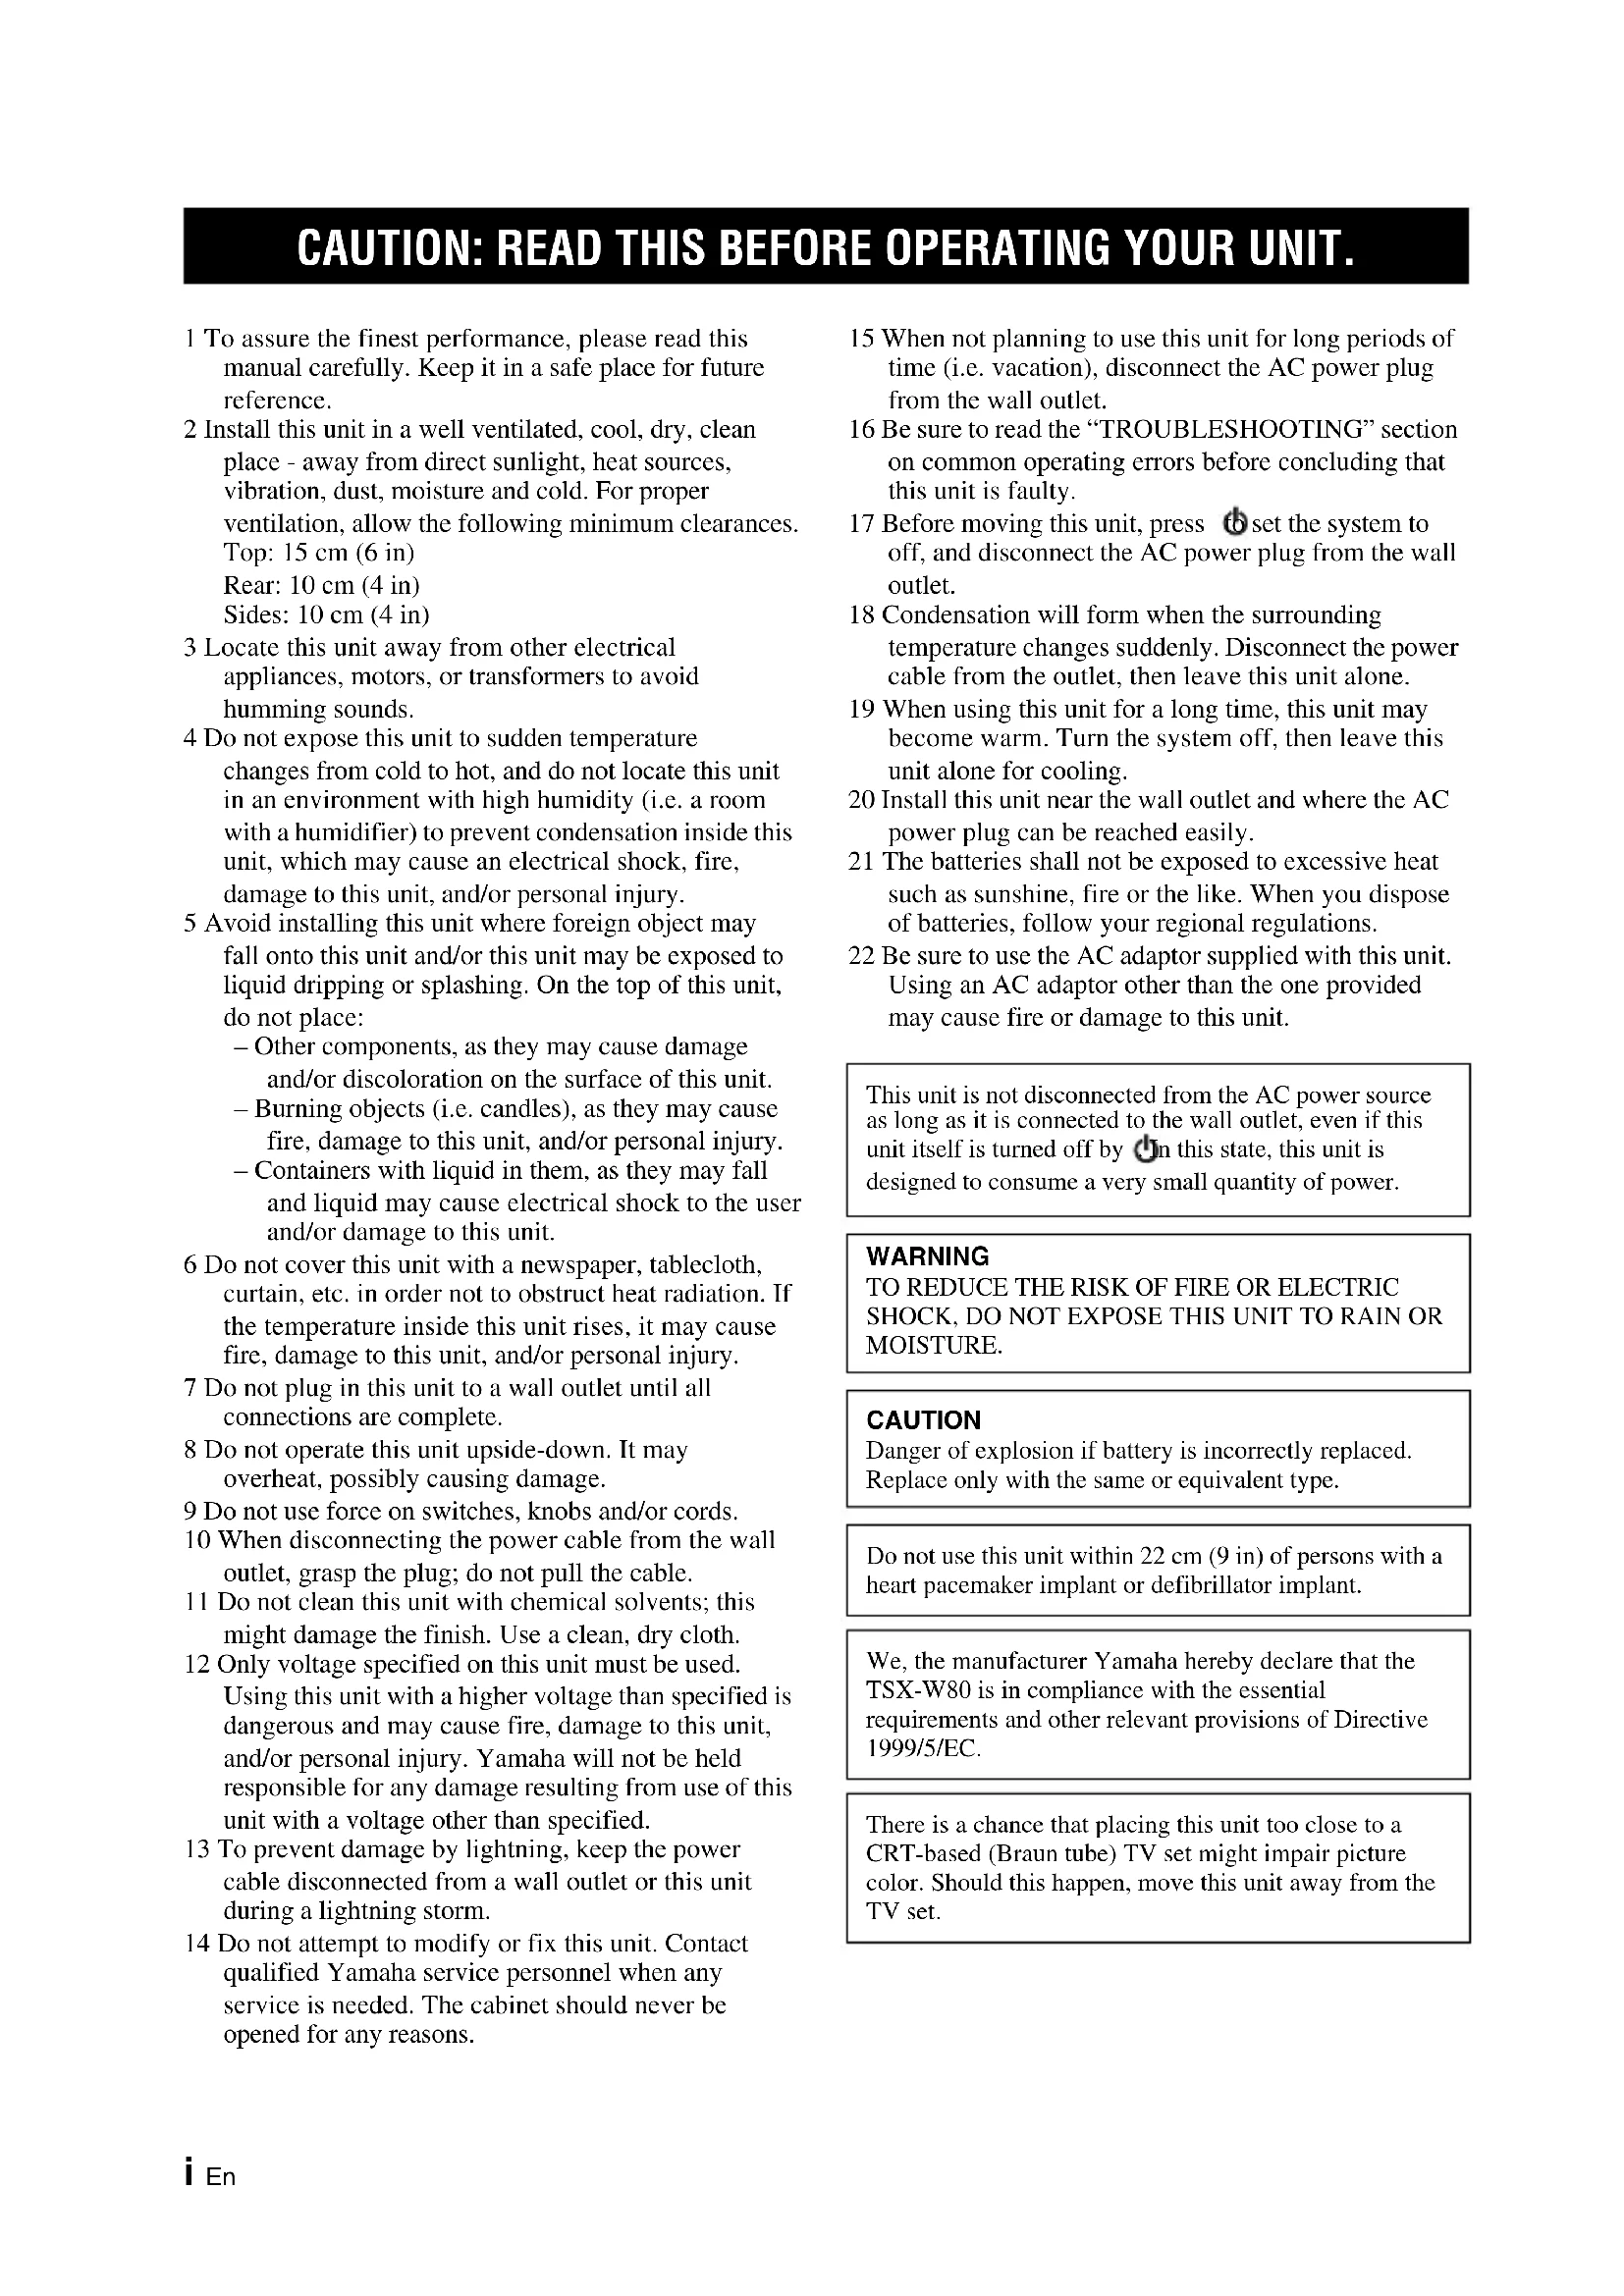
1 To assure the finest performance, please read this manual carefully. Keep it in a safe place for future reference.
2 Install this unit in a well ventilated, cool, dry, clean place - away from direct sunlight, heat sources, vibration, dust, moisture and cold. For proper ventilation, allow the following minimum clearances.
Top: 15 cm (6 in)
Rear: 10 cm (4 in)
Sides: 10 cm (4 in)
3 Locate this unit away from other electrical appliances, motors, or transformers to avoid humming sounds.
4 Do not expose this unit to sudden temperature changes from cold to hot, and do not locate this unit in an environment with high humidity (i.e. a room with a humidifier) to prevent condensation inside this unit, which may cause an electrical shock, fire, damage to this unit, and/or personal injury.
5 Avoid installing this unit where foreign object may fall onto this unit and/or this unit may be exposed to liquid dripping or splashing. On the top of this unit, do not place:
- Other components, as they may cause damage and/or discoloration on the surface of this unit.
– Burning objects (i.e. candles), as they may cause fire, damage to this unit, and/or personal injury.
- Containers with liquid in them, as they may fall and liquid may cause electrical shock to the user and/or damage to this unit.
- Other components, as they may cause damage and/or discoloration on the surface of this unit.
- Burning objects (i.e. candles), as they may cause fire, damage to this unit, and/or personal injury.
- Containers with liquid in them, as they may fall and liquid may cause electrical shock to the user and/or damage to this unit.
6 Do not cover this unit with a newspaper, tablecloth, curtain, etc. in order not to obstruct heat radiation. If the temperature inside this unit rises, it may cause fire, damage to this unit, and/or personal injury.
7 Do not plug in this unit to a wall outlet until all connections are complete.
8 Do not operate this unit upside-down. It may overheat, possibly causing damage.
9 Do not use force on switches, knobs and/or cords.
10 When disconnecting the power cable from the wall outlet, grasp the plug; do not pull the cable.
11 Do not clean this unit with chemical solvents; this might damage the finish. Use a clean, dry cloth.
12 Only voltage specified on this unit must be used. Using this unit with a higher voltage than specified is dangerous and may cause fire, damage to this unit, and/or personal injury. Yamaha will not be held responsible for any damage resulting from use of this unit with a voltage other than specified.
13 To prevent damage by lightning, keep the power cable disconnected from a wall outlet or this unit during a lightning storm.
14 Do not attempt to modify or fix this unit. Contact qualified Yamaha service personnel when any service is needed. The cabinet should never be opened for any reasons.
15 When not planning to use this unit for long periods of time (i.e. vacation), disconnect the AC power plug from the wall outlet.
16 Be sure to read the “TROUBLESHOOTING” section on common operating errors before concluding that this unit is faulty.
17 Before moving this unit, press ⓑ set the system to off, and disconnect the AC power plug from the wall outlet.
18 Condensation will form when the surrounding temperature changes suddenly. Disconnect the power cable from the outlet, then leave this unit alone.
19 When using this unit for a long time, this unit may become warm. Turn the system off, then leave this unit alone for cooling.
20 Install this unit near the wall outlet and where the AC power plug can be reached easily.
21 The batteries shall not be exposed to excessive heat such as sunshine, fire or the like. When you dispose of batteries, follow your regional regulations.
22 Be sure to use the AC adaptor supplied with this unit. Using an AC adaptor other than the one provided may cause fire or damage to this unit.
This unit is not disconnected from the AC power source as long as it is connected to the wall outlet, even if this unit itself is turned off by ⚙ in this state, this unit is designed to consume a very small quantity of power.
WARNING
TO REDUCE THE RISK OF FIRE OR ELECTRIC SHOCK, DO NOT EXPOSE THIS UNIT TO RAIN OR MOISTURE.
CAUTION
Danger of explosion if battery is incorrectly replaced. Replace only with the same or equivalent type.
Do not use this unit within 22 cm (9 in) of persons with a heart pacemaker implant or defibrillator implant.
We, the manufacturer Yamaha hereby declare that the TSX-W80 is in compliance with the essential requirements and other relevant provisions of Directive 1999/5/EC.
There is a chance that placing this unit too close to a CRT-based (Braun tube) TV set might impair picture color. Should this happen, move this unit away from the TV set.
CONTENTS
NAMES OF PARTS AND THEIR FUNCTIONS 2
BASIC FUNCTIONS....4 LISTENING TO iPod™ AND EXTERNAL SOURCES ....6
LISTENING TO RADIO STATIONS .... 8 TROUBLESHOOTING.... 9 SPECIFICATIONS.... 12
■Features
- Hi-quality iPod/iPhone, radio and external device playability.
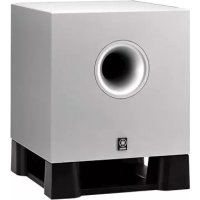
- Firm bass sound and spacious stereo sound from 2.1 ch powered speaker (tweeter × 2, woofer × 1), SR-Bass™ (Yamaha Swing Radiator Bass technology) and DSP in a compact unit.
- Easy user-intuitive interface by buttons with Guide LED and knob dials.
Yamaha AirWired
Real-time uncompressed music transfer without sound degradation is realized by Yamaha original digital wireless transfer technology, AirWired. You can also control system on/off and volume with the iPod by AirWired.

You can use a subwoofer wirelessly with the Wireless subwoofer kit (SWK-W10, etc., sold separately). Refer to the owner's manual of the SWK-W10 for details.
■About this manual
- This unit is iPod and also iPhone-compatible. "iPod" described in this manual may also refer to "iPhone".
- This manual describes how to operate this unit using buttons on the unit. Some of these operations are also available using the remote control.
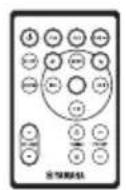
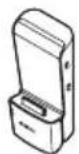
■Supplied accessories
Remote control AC adaptor Power cable Transmitter Indoor FM antenna
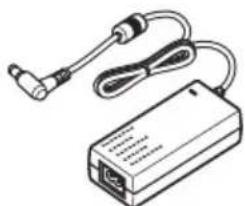
natural_image
Line drawing of a device with two cables and a connector (no text or symbols)(DC 15 V, 2.66 A, model number: NU40-2150266-13)

YIT-W11TX

natural_image
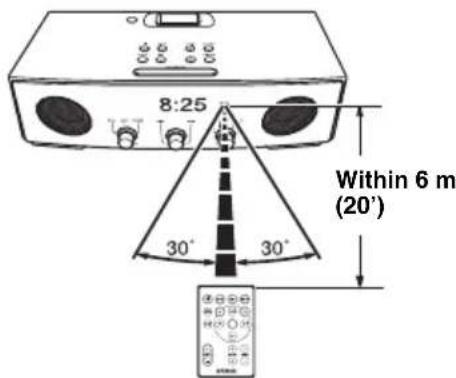
Illustration of a coiled cable or wire with two connectors (no text or symbols)■ Using the remote control
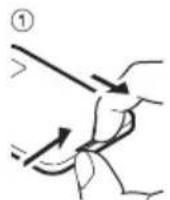
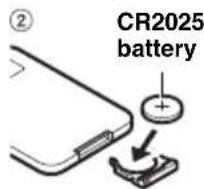
■ Replacing the battery in the remote control
NAMES OF PARTS AND THEIR FUNCTIONS
■Front and top panel
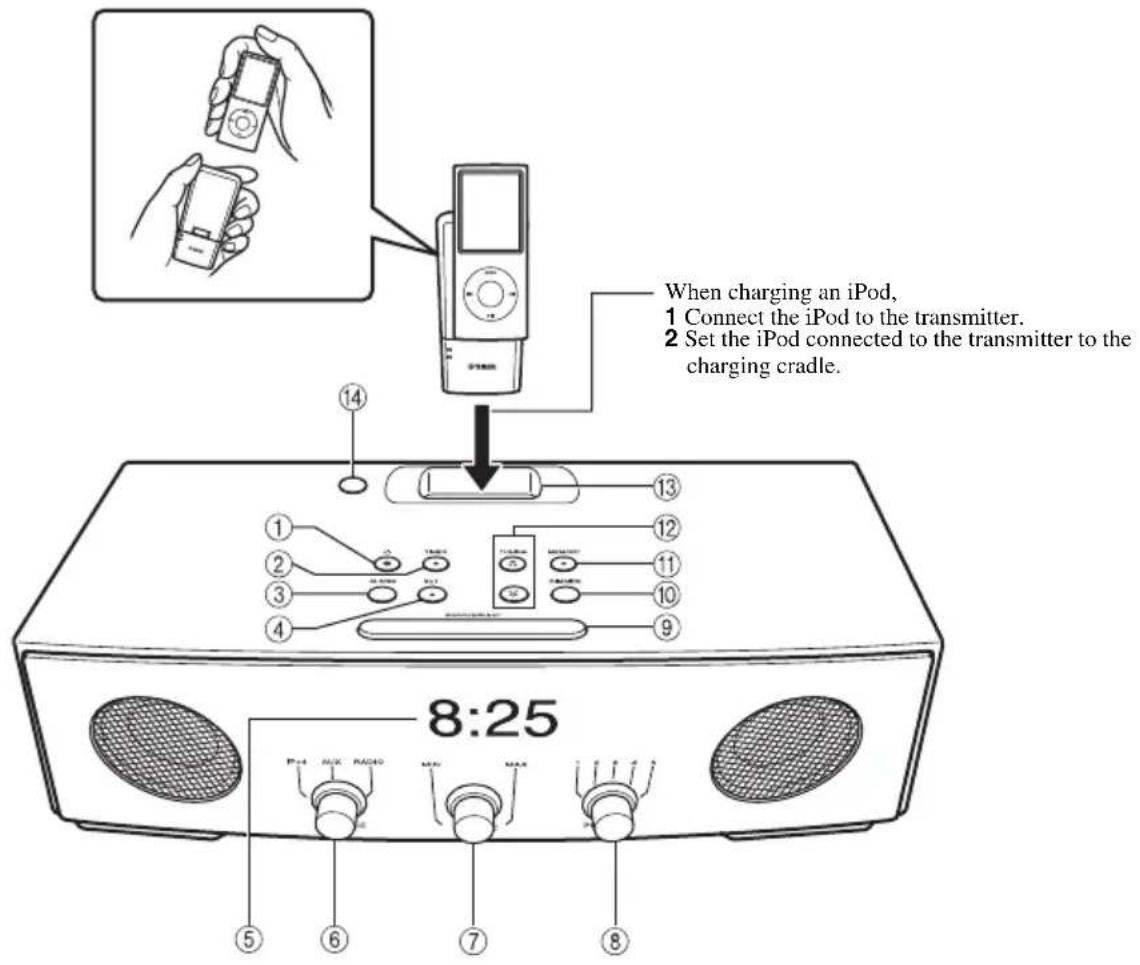
①: Press to turn the system on/off.
Time is displayed even when the system is off.

- Press and hold ☑ the top of the unit for more than 3 seconds to set the system to standby mode. All the information on the front panel display is not displayed in standby mode. This can reduce power consumption. To cancel standby mode, press ⏻
- Even in system off/standby mode, the alarm function is available.
② TIMER: Timer setting (P. 5)
③ ALARM: Alarm on/off (P. 4)
④ SET: Alarm setting (P. 4)
⑤Front panel display
⑥SOURCE: iPod, AUX, RADIO
⑦VOLUME: Volume control
⑧PRESET: Storing your favorite 5 radio stations (P. 8)
⑨ SNOOZE/SLEEP (P. 5)
⑩DIMMER: Setting brightness of the front panel A (auto) → 3 (brightest) 2 → 1 (darkest) back to A

When A (auto) is set, the brightness of the front panel is adjusted automatically depending on the brightness of the room.
⑪ MEMORY (P. 7, P. 8)
⑫ TUNING (P. 8)
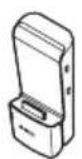
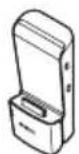
⑬Charging cradle: For charging an iPod
⑭Illumination sensor: Measuring surrounding illuminance. Do not cover this sensor.
■Rear panel
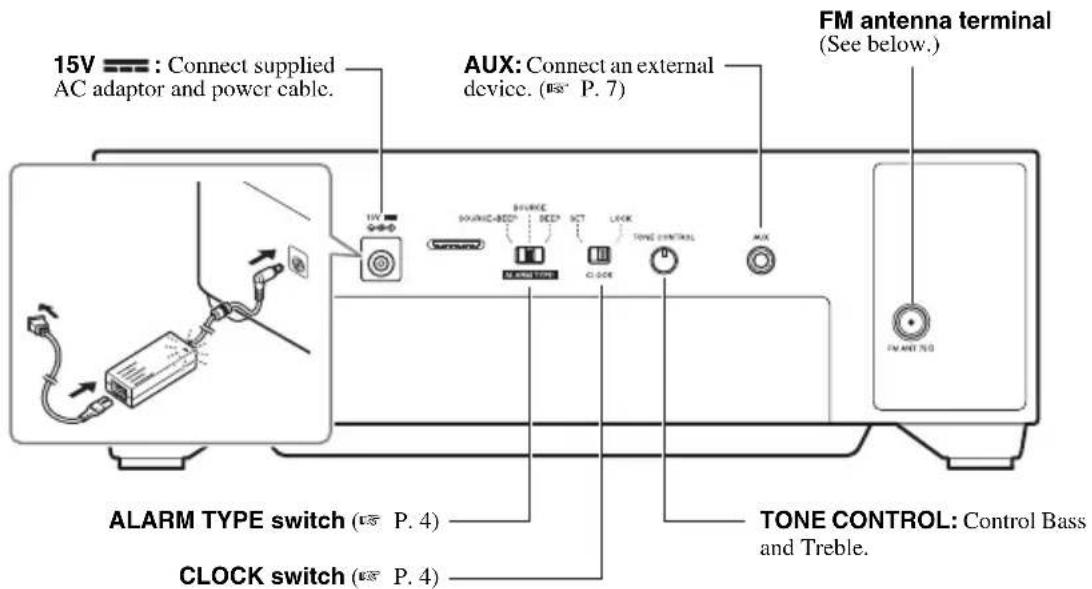
■Connecting antenna

Notes
• The antenna should be stretched out.
- If radio reception is poor, change the height, direction, or placement of the antenna.
- If you use an outdoor antenna instead of the supplied FM antenna, reception will be better.
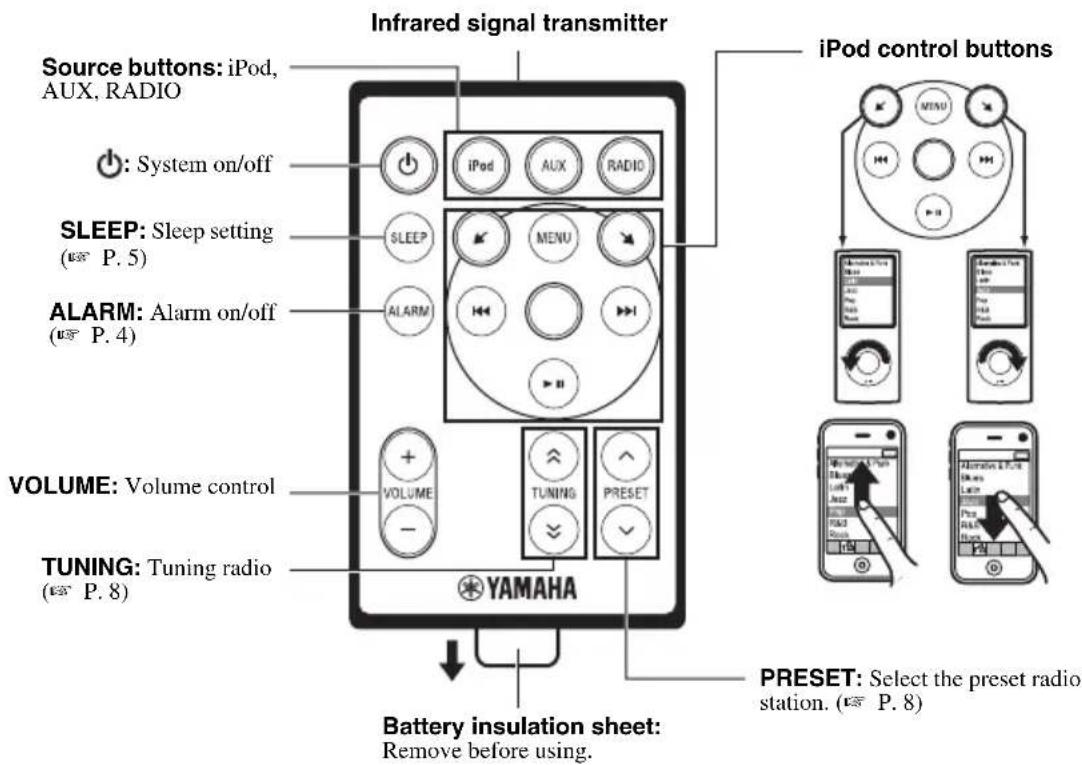
■Remote control
BASIC FUNCTIONS
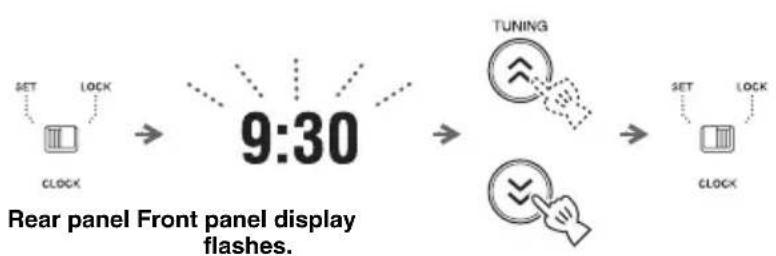
Adjusting the clock
flowchart
graph LR
    A["SET"] --> B["CLOCK"]
    C["LOCK"] --> D["9:30"]
    D --> E["TUNING"]
    E --> F["SET"]
    F --> G["CLOCK"]
    G --> H["9:30"]
    style D fill:#f9f,stroke:#333
    style E fill:#ccf,stroke:#333
    style F fill:#cfc,stroke:#333
    style G fill:#fcc,stroke:#333
1 Set CLOCK to SET.
2 Set the time with TUNING.
3 S e t CLOCK to LOCK.
Note
The time settings are lost approximately one week after unplugging the unit.
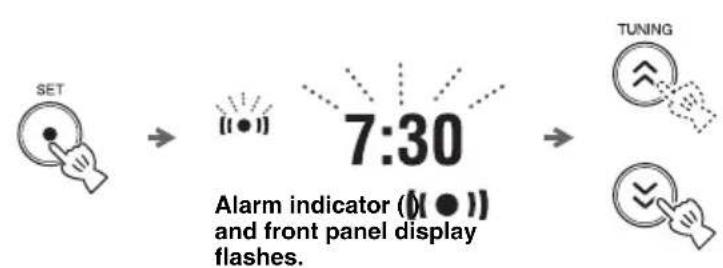
Alarm setting
This unit can play back iPod/radio and/or beep sound at the set time.
■Setting the alarm time and sound
flowchart
graph LR
    A["SET"] --> B["7:30 timer"]
    B --> C["TUNING"]
    B --> D["Flashes on screen"]
flowchart
graph LR
    A["Source+BEEP"] --> B["ALARM TYPE"]
    B --> C["iPod"]
    C --> D["AUX"]
    C --> E["RADIO"]
    D --> F["SOURCE"]
    E --> F
    F --> G["MIN"]
    G --> H["VOLUME"]
    H --> I["MAX"]
![→ SET → [●] 10:15](/content/2026/02/382769/images/ab615eb19e3d222af83d1fda2ab6077cdb9f2ca13c05afabc506732c17f81399.jpg)
1 Press SET.
2 Set the alarm time with TUNING.
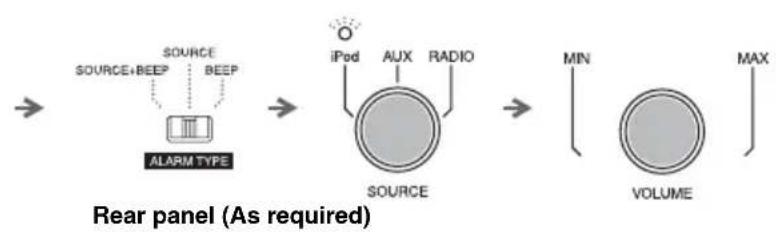
3 Set ALARM TYPE.
- SOURCE+BEEP: selected source (played back from 3 minutes before the alarm time) and beep sound (played back at the alarm time)
- SOURCE: selected source
• BEEP: beep sound only
When you select SOURCE+BEEP or SOURCE, select:
- iPod: this unit resumes the song you listened to last time.
• RADIO: this unit plays back the radio station you listened to last time.
4 Set the alarm volume.
5 Press SET.
Alarm is set and the alarm indicator
Note
When iPod is selected as a source, set the iPod to the charging cradle (P. 2). If iPod is not set at the alarm time, beep sound is played back.
■Switching the alarm on/off

Switch on/off the alarm function.
When the alarm is on, the alarm indicator (lights up and alarm time is displayed for a while.
Operations during playing back alarm sound
At the set time, alarm sound plays back. During playback, operations below are available.
■Using the snooze function

Press SNOOZE/SLEEP.
The alarm sound stops and resumes after 5 minutes.
■Stopping the alarm
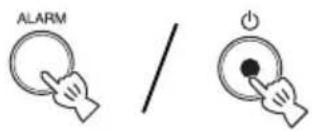
Press ALARM or ⏻
[Non-Text]
- Unless you stop the alarm, the alarm stops after 60 minutes automatically.
- When you stop the alarm, the alarm time setting, etc., is saved for convenient use next time.
Sleep setting
You can set the time to turn off the system automatically when sleep is set to on.
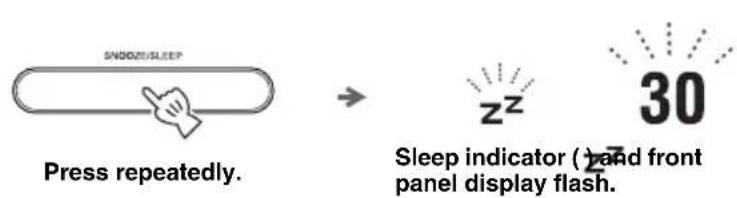
Select the sleep time.
You can set 30, 60, 90 or 120 minutes. When the sleep function is on, the sleep indicator (24ghts up.
[Non-Text]
To cancel the sleep, press SNOOZE/SLEEP.
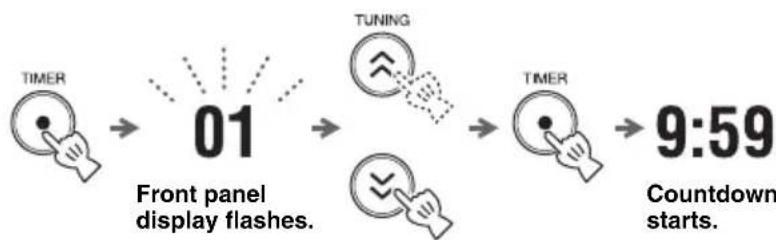
Timer setting
You can set the countdown timer.
flowchart
graph LR
    A["TIMER"] --> B["01"]
    B --> C["TUNING"]
    C --> D["TIMER"]
    D --> E["9:59"]
    style A fill:#f9f,stroke:#333
    style B fill:#ccf,stroke:#333
    style C fill:#cfc,stroke:#333
    style D fill:#fcc,stroke:#333
    style E fill:#cff,stroke:#333
1 Press TIMER.
2 Set the countdown time with TUNING.
You can set the time,
• 1 to 15 minutes: minute steps.
• 20 to 120 minutes: 10-minute steps.
3 Press TIMER.
Countdown starts. When the timer reaches 0, the timer sound plays back.
[Non-Text]
• To stop the timer sound, press TIMER.
• To cancel the timer, press TIMER during countdown.
Note
Sleep and timer cannot be used together.
- Sleep cannot be set during countdown.
- Sleep is set to off when timer is set while sleep is on.
LISTENING TO iPod™ AND EXTERNAL SOURCES
Listening to your iPod™
For details on compatible iPod models, refer to "SPECIFICATIONS" (P. 12).
■Playing back
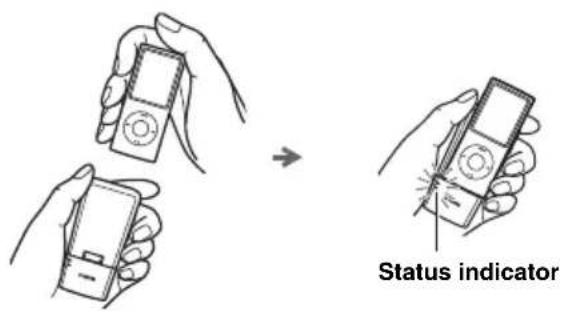

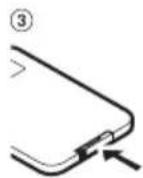
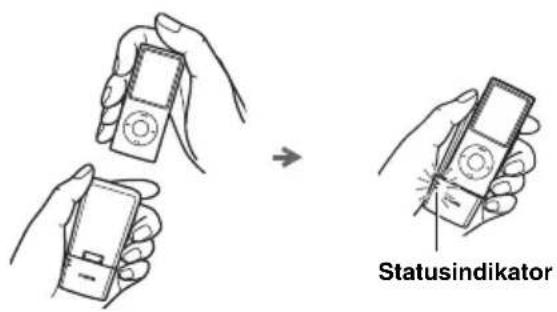
1 Connect your iPod to the transmitter.
2 The status indicator blinks, and wireless communication starts.
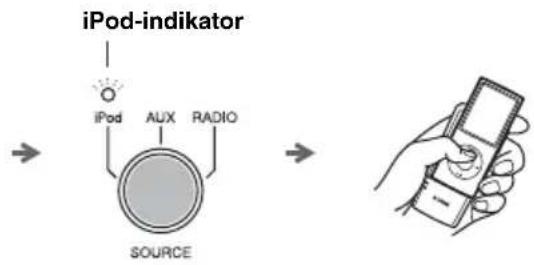
3 S e t SOURCE to iPod.
4 Play the iPod.

- You can remove the iPod whenever you want.
- When music/video in the iPod is played back, this unit turns the system on automatically and plays back the iPod even if the unit is system off.
- To charge the iPod, set the iPod to the charging cradle on the unit (P. 2).
- You can control the volume by the iPod.
- This unit turns the system off automatically after a while if the iPod is turned off or removed from the transmitter when SOURCE is set to iPod.
Notes
- If an iPod to be connected to the transmitter is playing back, playback of iPod stops.
- When using a microwave oven, wireless LAN or cordless telephone, etc., sound may be cut. Place the unit away from these devices.
■Status indicator of transmitter
| LED status The current status of the unit | |
| Lights up green Wireless communication between the unit and transmitter is established. | |
| Flashes green once Adjusting the volume level. | |
| continuously Connection in progress, please wait. | |
| Flashes red once The volume of this unit is set to maximum or minimum. | |
| 2 seconds An unsupported iPod is connected. | |
| continuously Error occurs. Remove the iPod from the transmitter, and connect again. | |
| Flashes red 2 times continuously The battery of the iPod is low. | |
| Off An iPod is not connected or wireless communication has not been established. |

The iPod indicator of SOURCE on the unit:
- lights up when wireless communication has been established.
- flashes if the status is other than above.
Note
If cutting/no sound occurs, refer to "TROUBLESHOOTING" (P. 10).
Group setting
Connection between transmitter and unit is made by setting their group settings the same.
■Group setting for the unit
flowchart
graph LR
    A["Source"] --> B["MEMORY"]
    B --> C["TUNING"]
    C --> D["MEMORY"]
    style A fill:#f9f,stroke:#333
    style D fill:#bbf,stroke:#333
    note1["Press and hold."]
1 Set SOURCE to iPod.
2 Press and hold MEMORY.
3 Set the group with TUNING.
Select A1, A2, A3, B1, B2 or B3.
B1/B2/B3 are displayed as b1/b2/b3 on the front panel display.
4 Press MEMORY.
■Group setting for the transmitter
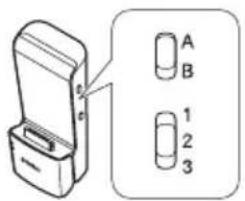
Set the group selection switch.
Playing back external sources
■Playing back
Rear panel
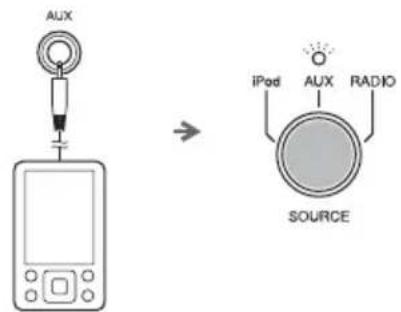
1 Connect your portable audio device to AUX using a commercially available 3.5 mm (1/8 in) mini plug cable.
Note
Turn down the volume of this unit and your portable audio device before connection.
2 S e t SOURCE to AUX.
3 Start playback on the connected portable audio device.
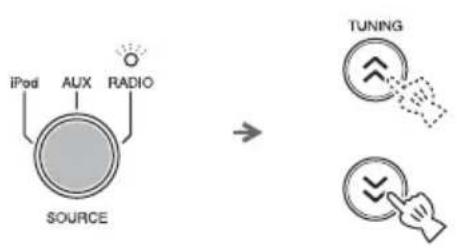
LISTENING TO RADIO STATIONS
Tuning radio stations
flowchart
graph TD
    A["SOURCE"] --> B["iPod"]
    A --> C["AUX"]
    A --> D["RADIO"]
    E["TUNING"] --> F["Switch with arrow"]
    G["Switch with arrow"] --> H["Arrow pointing to the right"]
1 S e t SOURCE to RADIO.
2 For automatic tuning, press and hold TUNING.
For manual tuning, press TUNING repeatedly.
Note
If you tune to a station manually, the sound is monaural.
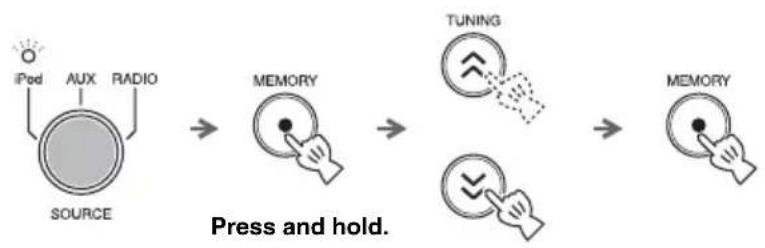
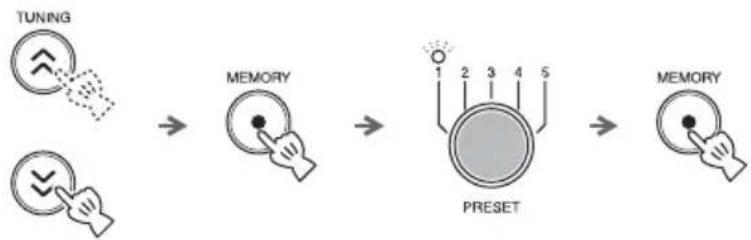
Presetting radio stations
You can store your favorite radio stations with the preset function.
flowchart
graph LR
    A["TUNING"] --> B["MEMORY"]
    B --> C["PRESET"]
    C --> D["MEMORY"]
1 Tune into a favorite radio station.
2 Press MEMORY.
3 Select the PRESET number you want to store to.

To cancel the preset, press TUNING again.
4 Press MEMORY to complete.
Selecting preset radio stations
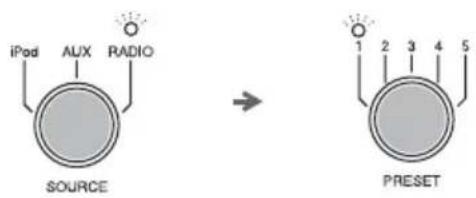
1 Set SOURCE to RADIO.
2 Select the preset radio station with PRESET.
TROUBLESHOOTING
In case of a problem with the unit, check the following list first. If you cannot solve your problem with the suggested solutions or if your problem is not listed below, turn off and unplug the unit, and consult the nearest authorized Yamaha dealer or service center.
General
| Problem Cause Solution | ||
| The system turns on but immediately shuts off. | The power cable may be connected improperly. | Make sure the power cable is plugged into the wall outlet firmly. |
| The unit may have received a strong electrical shock such as lightning or excessive static electricity. | Set the system to off, and disconnect the power cable. Wait about 30 seconds, reconnect the power cable, and turn on the system. | |
| The speakers make no sound. | The volume may be set to the minimum level. | Adjust the volume level. |
| The source may be incorrect. Select the correct source. | ||
| Sound suddenly turns off. | The sleep (P. 5) may be set. | Turn on the system and play the source again. |
| The unit does not operate properly. | The unit may have received a strong electrical shock such as lightning or excessive static electricity, or power supply may have dropped. | Set the system to off, and disconnect the power cable. Wait about 30 seconds, reconnect the power cable, and turn on the system. |
| A digital or high-frequency equipment produces noises. | The unit may be placed too close to the digital or high-frequency equipment. | Place the unit farther away from the equipment. |
| The clock setting has been cleared. | The unit is left more than one week after you disconnect the power cable from the wall outlet. | Plug the power cable into the wall outlet firmly, and set the clock again (P. 4). |
| iPod does not play back at the alarm time even if SOURCE is set to iPod. | The iPod is not set to the charging cradle. | Set the iPod to the charging cradle (P. 2). |
| ALARM TYPE is set to BEEP. | Set ALARM TYPE to SOURCE+BEEP or SOURCE (P. 4). | |
| Clock flashes and the unit cannot be operated. | CLOCK on the rear panel is set to SET, and this unit is in clock setting mode. | Set CLOCK to LOCK. |
| Sound is cracked/distorted or there is abnormal noise. | Input source volume is excessive, or volume of this unit is excessive (especially Bass). | Adjust volume with VOLUME, or adjust Bass with TONE CONTROL. |
iPod™
| Problem Cause Solution | ||
| The iPod does not charge up. | The iPod connecting to the transmitter is set in the charging cradle improperly. | Remove the iPod connecting to the transmitter from the unit, then set it in the charging cradle again (P. 2). |
| No sound | The iPod is not connected to the transmitter firmly. | Connect the iPod firmly. |
| Earphones are connected. Remove the earphones. | ||
| Distance between the unit and the iPod is too far. | Move the transmitter closer to the unit. | |
| The battery of the iPod is low. Charge the iPod. | ||
| The iPod software version has not been updated. | Download the latest iTunes software to update the iPod software version to the latest. | |
| The iPod is in the process of connecting with the unit. | Please wait for a while. | |
| The unit and transmitter are not connected since they are set to different groups. | Set both the unit and transmitter to the same group (P. 7). | |
| The unit is connected to another unit. Select a different group by changing the group setting of the unit and transmitter (P. 7). | ||
| Cannot change the volume by changing the volume of the iPod. | - The iPod is not supported by this unit.- The iPod is not connected correctly.- The iPod software version is out of date.- The transmitter is connected to several units. | - Use the supported iPod.- Connect the iPod firmly.- Update the iPod software version to the latest.If the problem cannot be solved, even the latest software, reset the iPod.- Change the group setting (P. 7). |
| The iPod display does not change by pressing the remote control volume keys. | ||
| Suddenly the speaker produces sound even though an iPod is not connected. | The unit is connected to another transmitter. | Change the group setting (P. 7). |
| Transmitted sound is cut.(Status indicator of transmitter flashes green and iPod indicator of SOURCE on unit flashes.) | The signal from the transmitter is blocked by your body or metallic objects, etc. | Change the way of holding, the orientation, or the position of the transmitter to avoid your body or metallic objects blocking the signal. |
| There is a device (microwave oven, wireless LAN, cordless telephone, etc.) outputting signals in the 2.4 GHz frequency band nearby. | Place the unit away from these devices, or turn them off. If the device is IEEE802.11n-compliant, change the channel setting of the device so as not to affect the unit. | |
| If noise occurs at the same frequency the transmitter is using, the unit will search and move to another (unused) frequency, which may cause sound to be cut. | This is not malfunction. If cut occurs frequently, relocate the unit. | |
Radio reception
| Problem Cause Solution | ||
| Too much noise during stereo broadcast. | The FM antenna may be connected improperly. | Make sure the FM antenna is connected properly (P. 3). |
| The radio station you selected may be far from your area, or the radio wave reception is weak in your area. | Try manual tuning to improve the signal quality (P. 8) or use a multi-channel outdoor antenna. | |
| Even with an outdoor antenna, radio wave reception is weak. (Sound is distorted.) | Multipath reflection or other radio interferences may have occurred. | Change the height, direction, or placement of the antenna. |
Remote control
| Problem Cause Solution | ||
| The remote control does not work properly. | The remote control may be operated outside its operation range. | For information on the remote control operation range, refer to “Using the remote control” (P. 1). |
| The remote control sensor on the unit may be exposed to direct sunlight or lighting (inverted fluorescent lamps). | Change the lighting or orientation of the unit. | |
| The battery may be worn out. Replace the battery with a new one (P. 1). | ||
| There are obstacles between the sensor of the unit and the remote control. | Remove the obstacles. | |
| Wireless communication is not established when SOURCE is set to iPod. | Play the iPod to establish wireless communication (P. 6). | |
SPECIFICATIONS
■PLAYER SECTION
iPod
- Supported iPod .... iPod (5th generation), iPod classic, iPod nano, iPod touch, iPhone, iPhone 3G, iPhone 3GS
AUX IN
- Input connector ......STEREO L/R: 3.5 mm (1/8 in) STEREO mini Jack
■AMPLIFIER SECTION
• Maximum output power ....4 W + 4 W + 8 W (6 Ω 1 kHz, 10% THD)
- Driver unit .... 4 cm (1 5/8 in) full-range driver × 2 5.5 cm (2 1/8 in) woofer + SR-BASS × 1
■TUNER SECTION
- Tuning range FM 87.50 to 108.00 MHz
■TRANSMITTER SECTION
• Frequency 2.4 GHz
- Transmission range.... Approx. 20 m (65.6 ft) (without interference)
- Number of units which can be simultaneously transmitted to....Up to 7 units (depending on the circumstances)
■For U.K. customers
If the socket outlets in the home are not suitable for the plug supplied with this appliance, it should be cut off and an appropriate 3 pin plug fitted. For details, refer to the instructions described below.
Note
The plug severed from the mains lead must be destroyed, as a plug with bared flexible cord is hazardous if engaged in a live socket outlet.
GENERAL
- Power Supply....AC 100 to 240 V, 50/60 Hz
- Power consumption....10 W
- System off consumption ....3.5 W
- Standby consumption.... 1.0 W or less
- Dimensions (W × H × D)....260 × 90.3 × 141 mm
(10 1/4 × 3 1/2 × 5 1/2 in)
• Weight....1.2 kg (2.6 lbs.)
Specifications are subject to change without notice.
iPod™, iPhone™
iPod is a trademark of Apple Inc., registered in the U.S. and other countries.
iPhone is a trademark of Apple Inc.
"Made for iPod" means that an electronic accessory has been designed to connect specifically to iPod and has been certified by the developer to meet Apple performance standards.
“Works with iPhone” means that an electronic accessory has been designed to connect specifically to iPhone and has been certified by the developer to meet Apple performance standards.
Apple is not responsible for the operation of this device or its compliance with safety and regulatory standards.
■Special Instructions for U.K. Model
IMPORTANT
THE WIRES IN MAINS LEAD ARE COLOURED IN ACCORDANCE WITH THE FOLLOWING CODE:
Blue: NEUTRAL
Brown: LIVE
As the colours of the wires in the mains lead of this apparatus may not correspond with the coloured markings identifying the terminals in your plug, proceed as follows:
The wire which is coloured BLUE must be connected to the terminal which is marked with the letter N or coloured BLACK. The wire which is coloured BROWN must be connected to the terminal which is marked with the letter L or coloured RED.
Make sure that neither core is connected to the earth terminal of the three pin plug.
Limited Guarantee for European Economic Area (EEA) and Switzerland
Thank you for having chosen a Yamaha product. In the unlikely event that your Yamaha product needs guarantee service, please contact the dealer from whom it was purchased. If you experience any difficulty, please contact Yamaha representative office in your country. You can find full details on our website (http://www.yamaha-hifi.com/ or http://www.yamaha-uk.com/ for U.K. resident).
The product is guaranteed to be free from defects in workmanship or materials for a period of two years from the date of the original purchase. Yamaha undertakes, subject to the conditions listed below, to have the faulty product or any part(s) repaired, or replaced at Yamaha's discretion, without any charge for parts or labour. Yamaha reserves the right to replace a product with that of a similar kind and/or value and condition, where a model has been discontinued or is considered uneconomic to repair.
Conditions
- The original invoice or sales receipt (showing date of purchase, product code and dealer's name) MUST accompany the defective product, along with a statement detailing the fault. In the absence of this clear proof of purchase, Yamaha reserves the right to refuse to provide free of charge service and the product may be returned at the customer's expense.
- The product MUST have been purchased from an AUTHORISED Yamaha dealer within the European Economic Area (EEA) or Switzerland.
- The product must not have been the subject of any modifications or alterations, unless authorised in writing by Yamaha.
- The following are excluded from this guarantee:
a. Periodic maintenance and repair or replacement of parts due to normal wear and tear.
b. Damage resulting from:
(1) Repairs performed by the customer himself or by an unauthorised third party.
(2) Inadequate packaging or mishandling, when the product is in transit from the customer. Please note that it is the customer's responsibility to ensure the product is adequately packaged when returning the product for repair.
(3) Misuse, including but not limited to (a) failure to use the product for its normal purpose or in accordance with Yamaha's instructions on the proper use, maintenance and storage, and (b) installation or use of the product in a manner inconsistent with the technical or safety standards in force in the country where it is used.
(4) Accidents, lightning, water, fire, improper ventilation, battery leakage or any cause beyond Yamaha's control.
(5) Defects of the system into which this product is incorporated and/or incompatibility with third party products.
(6) Use of a product imported into the EEA and/or Switzerland, not by Yamaha, where that product does not conform to the technical or safety standards of the country of use and/or to the standard specification of a product sold by Yamaha in the EEA and/or Switzerland.
- Where the guarantee differs between the country of purchase and the country of use of the product, the guarantee of the country of use shall apply.
- Yamaha may not be held responsible for any losses or damages, whether direct, consequential or otherwise, save for the repair or replacement of the product.
- Please backup any custom settings or data, as Yamaha may not be held responsible for any alteration or loss to such settings or data.
- This guarantee does not affect the consumer's statutory rights under applicable national laws in force or the consumer's rights against the dealer arising from their sales/purchase contract.
Information for Users on Collection and Disposal of Old Equipment and Used Batteries

These symbols on the products, packaging, and/or accompanying documents mean that used electrical and electronic products and batteries should not be mixed with general household waste.
For proper treatment, recovery and recycling of old products and used batteries, please take them to applicable collection points, in accordance with your national legislation and the Directives 2002/96/EC and 2006/66/EC.
By disposing of these products and batteries correctly, you will help to save valuable resources and prevent any potential negative effects on human health and the environment which could otherwise arise from inappropriate waste handling.
For more information about collection and recycling of old products and batteries, please contact your local municipality, your waste disposal service or the point of sale where you purchased the items.
[Information on Disposal in other Countries outside the European Union]
These symbols are only valid in the European Union. If you wish to discard these items, please contact your local authorities or dealer and ask for the correct method of disposal.
Pb
Note for the battery symbol (bottom two symbol examples):
This symbol might be used in combination with a chemical symbol. In this case it complies with the requirement set by the Directive for the chemical involved.
ATTENTION : VEUILLEZ LIRE CE QUI SUIT AVANT D'UTILISER L'APPAREIL.
natural_image
Illustration of a pair of tweezers tied with a string (no text or symbols)flowchart
graph TD
    A["SOURCE"] --> B["iPod"]
    A --> C["AUX"]
    A --> D["RADIO"]
    E["TUNING"] --> F["Arrow with checkmark"]
    G["Arrow with hand icon"] --> H["Arrow with checkmark"]
flowchart
graph TD
    A["SOURCE"] --> B["iPod"]
    A --> C["AUX"]
    A --> D["RADIO"]
    E["TUNING"] --> F["Switch with arrow"]
    G["Switch with arrow"] --> H["Arrow pointing down"]
DELARNAS NAMN OCH FUNKTIONER......2
GRUNDLÄGGANDE FUNKTIONER ....4
LYSSNA PÅ iPod™ OCH EXTERNA KÄLLOR
6
LYSSNA PÅ RADIOSTATIONER...... 8
FELSÖKNING 9
SPECIFIKATIONER 12
Egenskaper
natural_image
Line drawing of a device with two cables and a rectangular box (no text or symbols)(DC 15 V, 2,66 A, modellnumer: NU40-2150266-13)

YIT-W11TX
inomhusbruk

natural_image
Illustration of a coiled cable or wire with two connectors (no text or symbols)LYSSNA PÅ iPod™ OCH EXTERNA KÄLLOR
Lyssna på din iPod™
För information om kompatibla iPod-modeller se "SPECIFICATIONER" (s. 12).
■Uppspelning
flowchart
graph TD
    A["SOURCE"] --> B["iPod"]
    A --> C["AUX"]
    A --> D["RADIO"]
    E["TUNING"] --> F["Switch with arrow"]
    G["Switch with arrow"] --> H["Arrow pointing to the right"]
natural_image
Line drawing of a battery with two cables and connectors (no text or symbols)natural_image
Illustration of a pair of medical instruments or tools with no visible text or symbolsNote
flowchart
graph TD
    A["SOURCE"] --> B["iPod"]
    A --> C["AUX"]
    A --> D["RADIO"]
    E["TUNING"] --> F["Switch icon with arrow"]
    G["Switch icon with arrow"] --> H["Arrow pointing to right"]
natural_image
Line drawing of a device with two cables and a rectangular box (no text or symbols)natural_image
Illustration of a pair of scissors with handles, no text or symbols presentPara cancelar sleep, pulse SNOOZE/SLEEP.
flowchart
graph TD
    A["SOURCE"] --> B["iPod"]
    A --> C["AUX"]
    A --> D["RADIO"]
    E["TUNING"] --> F["Switch icon with arrow"]
    G["Switch icon with arrow"] --> H["Arrow pointing to right"]
    I["Switch icon with arrow"] --> J["Arrow pointing to left"]
natural_image
Line drawing of a handheld electronic device with cables and ports (no text or symbols)(DC 15 V, 2,66 A, modelnummer: NU40-2150266-13)

YIT-W11TX

natural_image
Illustration of a coiled cable or wire with two connectors (no text or symbols)flowchart
graph TD
    A["SOURCE"] --> B["iPod"]
    A --> C["AUX"]
    A --> D["RADIO"]
    E["TUNING"] --> F["Switch icon with arrow"]
    G["Switch icon with arrow"] --> H["Arrow pointing to right"]
    I["Switch icon with arrow"] --> J["Arrow pointing to left"]
natural_image
Line drawing of a coiled cable or clamp with two connectors (no text or symbols)flowchart
graph TD
    A["SOURCE"] --> B["iPod"]
    A --> C["AUX"]
    A --> D["RADIO"]
    E["TUNING"] --> F["Switch with arrow"]
    G["Switch with arrow"] --> H["Arrow pointing to the right"]
    I["Arrow pointing to the left"] --> J["Arrow pointing to the right"]