
XHM20 - Pregnant PIONEER - Free user manual and instructions
Find the device manual for free XHM20 PIONEER in PDF.
| Product type | Amplified speaker (micro system) PIONEER X-HM20 |
| Color | Not specified |
| Main unit dimensions (W x H x D) | 215 mm x 99 mm x 300 mm |
| Weight of main unit | 3.8 kg |
| Speaker dimensions (W x H x D) | 132 mm x 260 mm x 173 mm |
| Weight of one speaker | 2.0 kg |
| Power supply | 220-240 V AC, 50/60 Hz |
| Power consumption | 45 W (on), 0.4 W (standby) |
| Amplifier output power | 15 W + 15 W RMS (1 kHz, 10% THD, 4 ohms) |
| Speaker impedance | 4 ohms |
| Speaker type | 2-way (5 cm tweeter, 10 cm woofer) |
| Playback functions | CD, CD-R/RW (MP3/WMA), USB, iPod/iPhone/iPad, FM/AM radio |
| Radio functions | RDS (Radio Data System), 40 presets |
| Connectivity | Line input, video output (for iPod/iPhone), 3.5 mm headphone jack |
| Timer | Daily/one-time programming, sleep timer |
| Care and cleaning | Wipe with a soft, dry cloth. Do not use chemical products. |
| Safety | Do not expose to water, open flames. Ventilation: 10 cm around. Unplug if not used for an extended period. |
| Operating temperature | +5 °C to +35 °C |
Frequently Asked Questions - XHM20 PIONEER
User questions about XHM20 PIONEER
0 question about this device. Answer the ones you know or ask your own.
Ask a new question about this device
Download the instructions for your Pregnant in PDF format for free! Find your manual XHM20 - PIONEER and take your electronic device back in hand. On this page are published all the documents necessary for the use of your device. XHM20 by PIONEER.
USER MANUAL XHM20 PIONEER
Discover the benefits of registering your product online at http://www.pioneer.co.uk (or http://www.pioneer.eu).
The lightning flash with arrowhead symbol, within an equilateral triangle, is intended to alert the user to the presence of uninsulated "dangerous voltage" within the product's enclosure that may be of sufficient magnitude to constitute a risk of electric shock to persons.
CAUTION
RISK OF ELECTRIC SHOCK DO NOT OPEN
CAUTION:
TO PREVENT THE RISK OF ELECTRIC SHOCK,DO NOT REMOVE COVER (OR BACK).NO USER-SERVICEABLE PARTS INSIDE.REFER SERVICING TO QUALIFIED SERVICE PERSONNEL.

The exclamation point within an equilateral triangle is intended to alert the user to the presence of important operating and maintenance (servicing) instructions in the literature accompanying the appliance.
D3-4-2-1-1_A1_En
WARNING
This equipment is not waterproof. To prevent a fire or shock hazard, do not place any container filled with liquid near this equipment (such as a vase or flower pot) or expose it to dripping, splashing, rain or moisture.
D3-4-2-1-3 A1 En
WARNING
Before plugging in for the first time, read the following section carefully.
The voltage of the available power supply differs according to country or region. Be sure that the power supply voltage of the area where this unit will be used meets the required voltage (e.g., 230 V or 120 V) written on the rear panel.
D3-4-2-1-4* A1 En
WARNING
To prevent a fire hazard, do not place any naked flame sources (such as a lighted candle) on the equipment.
D3-4-2-1-7a A1_EN
VENTILATION CAUTION
When installing this unit, make sure to leave space around the unit for ventilation to improve heat radiation (at least 10cm at top, 10cm at rear, and 10cm at each side).
WARNING
Slots and openings in the cabinet are provided for ventilation to ensure reliable operation of the product, and to protect it from overheating. To prevent fire hazard, the openings should never be blocked or covered with items (such as newspapers, table-cloths, curtains) or by operating the equipment on thick carpet or a bed.
D3-4-2-1-7b*A1_EN
Operating Environment
Operating environment temperature and humidity: +5^ to +35^ (+41^ to +95^) less than 85% RH (cooling vents not blocked)
Do not install this unit in a poorly ventilated area, or in locations exposed to high humidity or direct sunlight (or strong artificial light)
D3-4-2-1-7c*A1En
If the AC plug of this unit does not match the AC outlet you want to use, the plug must be removed and appropriate one fitted. Replacement and mounting of an AC plug on the power supply cord of this unit should be performed only by qualified service personnel. If connected to an AC outlet, the cut-off plug can cause severe electrical shock. Make sure it is properly disposed of after removal.
The equipment should be disconnected by removing the mains plug from the wall socket when left unused for a long period of time (for example, when on vacation).
D3-4-2-2-1a_A1_En
CAUTION
The STANDBY/ON switch on this unit will not completely shut off all power from the AC outlet. Since the power cord serves as the main disconnect device for the unit, you will need to unplug it from the AC outlet to shut down all power. Therefore, make sure the unit has been installed so that the power cord can be easily unplugged from the AC outlet in case of an accident. To avoid fire hazard, the power cord should also be unplugged from the AC outlet when left unused for a long period of time (for example, when on vacation).
D3-4-2-2-2a*A1En
This product is for general household purposes. Any failure due to use for other than household purposes (such as long-term use for business purposes in a restaurant or use in a car or ship) and which requires repair will be charged for even during the warranty period.
K041_A1_En
Information for users on collection and disposal of old equipment and used batteries
(Symbol for equipment)

Symbol examples) for batteries

These symbols on the products, packaging, and/or accompanying documents mean that used electrical and electronic products and batteries should not be mixed with general household waste.
For proper treatment, recovery and recycling of old products and used batteries, please take them to applicable collection points in accordance with your national legislation.
By disposing of these products and batteries correctly, you will help to save valuable resources and prevent any potential negative effects on human health and the environment which could otherwise arise from inappropriate waste handling.
For more information about collection and recycling of old products and batteries, please contact your local municipality, your waste disposal service or the point of sale where you purchased the items.
These symbols are only valid in the European Union.
For countries outside the European Union:
If you wish to discard these items, please contact your local authorities or dealer and ask for the correct method of disposal.
K05Ba_A1_En
CAUTION
This product is a class 1 laser product classified under the Safety of laser products, IEC 60825-1:2007, but this product contains a laser diode higher than Class 1. To ensure continued safety, do not remove any covers or attempt to gain access to the inside of the product. Refer all servicing to qualified personnel.
The following caution label appears on your unit.
Location: Inside of the unit
CAUTION
CLASS 38 VIBBLE AND RARELLE LASER RATION WHEN OPEN,NOO EXPOSURE TO THE BEAM
ATTENTION
RADIATIONS LASER VISIBLIES ET INVISIBLES DE CLASSE 3B QUAND OUVERT, EVITEZ TOUT EXPOSITION AU FAISCEAU.
ADVARSEL
KLASSE 38 SYNLIG OUG SYNLIG LASERSTRAING VED ABBNNG, UNOGA UDSATTEL SE FOR STRALING.
WARNING
KCLASS 38 SYNCH OCH OSYNCH LASERSTRALING NAR DENNA DEL ARI OPENNAD, UNIVIK ATT UTSATIDIS FOR STRALEN.
VORSICHT
B8 GEOFFICIER BEADECCKING BT SIGHTBARE UND UNSIGHTBARE LASERTRAHLUNG DER KASSE 58 IN CERATENNEREN VORHANDEN, NCHT DEV LASERTRAHLASSZETTM
PRECAUTION
CUANDO SE ABERE HAY RADIACION LAPER DE CASE 3B VISIBLE E INVISIBLE, EVITE LA EXPOSION A LOS RAYOS LASER.
VAROI
AVAATEASS AOLE ALTINNA NAKYVALLE JANAKYMATTOMALE LUXOAN 38 LASERSATELYLE, ALKA SATOSATESEEN.
CLASS 1 LASER PRODUCT
D58-5-2·b*_B1_En
Condensation
If the player is moved suddenly from a cold place into a warm room (in winter, for example) or if the temperature in the room in which the player is installed rises suddenly due to a heater, etc., water droplets (condensation) may form inside (on operating parts and the lens). When condensation is present, the player will not operate properly and playback is not possible. Let the player stand at room temperature for 1 or 2 hours with the power turned on (the time depends on the extent of condensation). The water droplets will dissipate and playback will become possible.
Condensation can also occur in the summer if the player is exposed to the direct wind from an air-conditioner. If this happens, move the player to a different place.
ENGLISH
X-HM10/X-HM20 CD Receiver System consisting of main unit and speaker system.
Introduction
Thank you for purchasing this PIONEER product. To obtain the best performance from this product, please read this manual carefully. It will guide you in operating your PIONEER product.
Special Note
Supply of this product does not convey a license nor imply any right to distribute content created with this product in revenue-generating broadcast systems (terrestrial, satellite, cable and/or other distribution channels), revenue-generating streaming applications (via Internet, intranets and/or other networks), other revenue-generating content distribution systems (pay-audio or audio-on-demand applications and the like) or on revenue-generating physical media (compact discs, digital versatile discs, semiconductor chips, hard drives, memory cards and the like). An independent license for such use is required. For details, please visit http://mp3licensing.com
MPEG Layer-3 audio coding technology licensed from Fraunhofer IIS and Thomson.
Accessories
Please confirm that the following accessories are included.
| iPhone adaptors x 3 (X-HM20 only) | Remote control x 1 “AA” size battery x 1 AM loop aerial x 1 | ||
| FM aerial x 1 | Power cord Warranty card These operating instructions | ||
CONTENTS
Page
Page
General Information
Precautions 5
Controls and indicators 5-6
Preparation for Use
System connections 7-8
Remote control 8
Basic Operation
General control 9
Setting the clock (Remote control only) 9-10
iPod, iPhone and iPad
Listening to the iPod, iPhone or iPad (X-HM20 only). 10 - 12
CD or MP3/WMA disc Playback
Listening to a CD or MP3/WMA disc 13
Advanced CD or MP3/WMA disc playback . 14 - 15
MP3/WMA folder mode
(only for MP3/WMA files) 15-16
USB
Listening to USB mass storage device/MP3 player 16-17
Advanced USB playback 17
Radio
Listening to the radio 18
Advanced Features
Using the Radio Data System (RDS) 19-21
Timer and sleep operation (Remote control only) 21-23 Headphones 23
References
Troubleshooting chart 24-25
Maintenance 25
Specifications 26
Notice 27
General
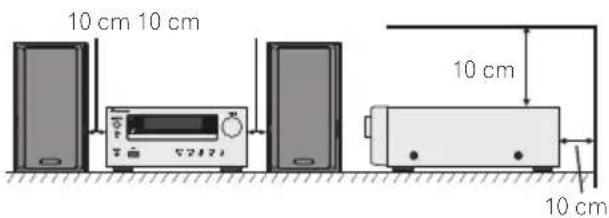
Use the unit on a firm, level surface free from vibration.
- Place the speakers at least 30cm away from any CRT TV to avoid colour variations across the TV screen. If the variations persist, move the speakers further away from the TV. LCD TV is not prone to such variation.
- Keep the unit away from direct sunlight, strong magnetic fields, excessive dust, humidity and electronic/electrical equipment (home computers, facsimiles, etc.) which generate electrical noise.
-Do not place anything on top of the unit.
Do not expose the unit to moisture, to temperatures higher than 60^ (140^) or to extremely low temperatures.
If your system does not work properly, disconnect the AC power lead from the wall socket. Plug the AC power lead back in, and then turn on your system.
In case of an electrical storm, unplug the unit for safety.
Hold the AC power plug by the head when removing it from the wall socket, as pulling the lead can damage internal wires.
The AC power plug is used as a disconnect device and shall always remain readily operable.
Do not remove the outer cover, as this may result in electric shock. Refer internal service to your local PIONEER service facility.
The ventilation should not be impeded by covering the ventilation openings with items, such as newspapers, tablecloths, curtains, etc.
No naked flame sources, such as lighted candles, should be placed on the apparatus.
- Attention should be drawn to the environmental aspects of battery disposal.
The apparatus is designed for use in moderate climates.
Warning:
The voltage used must be the same as that specified on this unit. Using this product with a higher voltage other than that which is specified is dangerous and may result in a fire or other type of accident causing damage. PIONEER will not be held responsible for any damage resulting from use of this unit with a voltage other than that which is specified.
Volume control
The sound level at a given volume setting depends on speaker efficiency, location, and various other factors. It is advisable to avoid exposure to high volume levels. Do not turn the volume on to full at switch on. Listen to music at moderate levels. Excessive sound pressure from earphones and headphones can cause hearing loss.
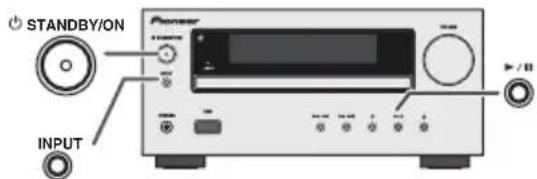
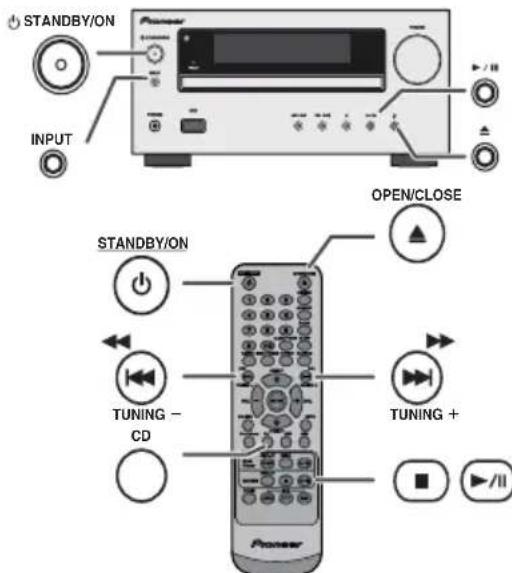
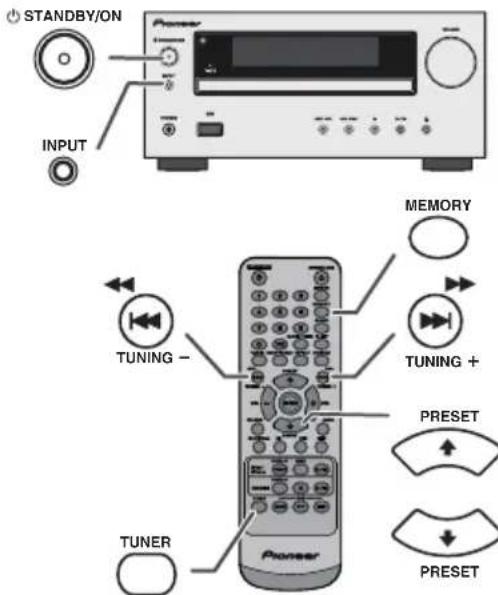
Controls and indicators
iPod/iPhone functions are only available for X-HM20.
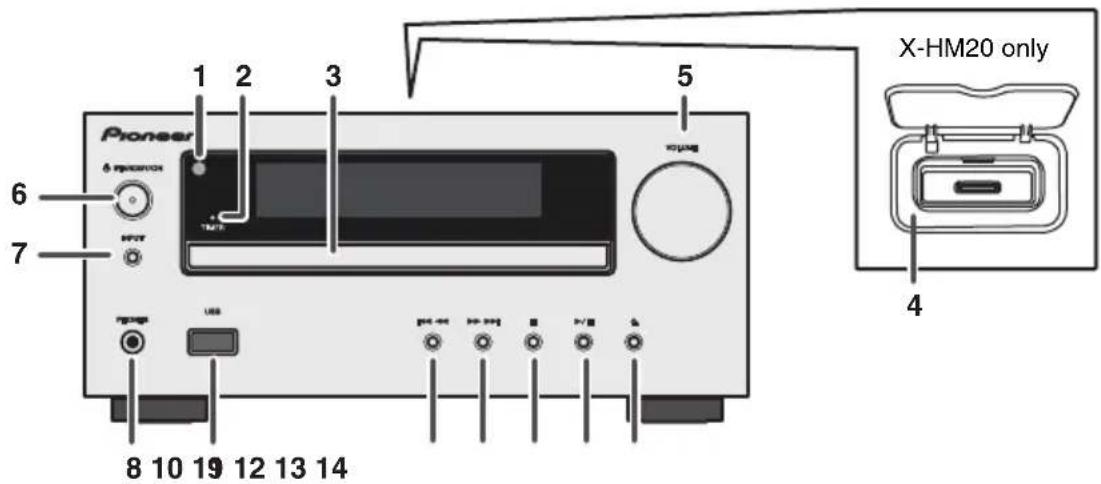
■Front panel
Page
- Remote sensor 8
- Timer indicator 22
- Disc Tray 13
- Docking Station for iPod or iPhone 11
- Volume Control 9
6.STANDBY/ON Button 11,13,18 - INPUT Button 9,11,13,16,18
- Headphone Socket 23
- USB Terminal 16
Page
- Tuner Preset Down, CD/USB Track Down, iPod/iPhone Skip Down 12, 13
- Tuner Preset Up, CD/USB Track Up, iPod/iPhone Skip Up 12, 13
- Disc/USB Stop Button 12, 13
- Disc/USB/iPod/iPhone Play or Pause Button 12, 13
- Disc Tray Open/Close Button 13

*11, 13, 31, 32 buttons are only available for X-HM20.
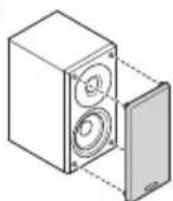
■Speaker system
- Tweeter
2.Woofer - Bass Reflex Duct
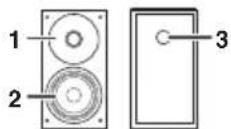
■Speaker grilles are removable (X-HM20 only)
Make sure nothing comes into contact with the speaker diaphragms when you remove the speaker grilles.
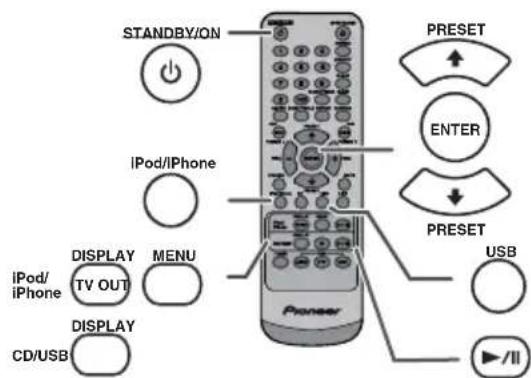
Remote control
Page
- Remote Control Transmitter 8
2.STANDBY/ONButton.9.11.13.21 - Numeric Buttons 14
4.P.BassButton. 9
5.Bass/TrebleButton 9 - Tuning Down, Skip Down, Fast Reverse, Time Down Button .9, 12, 13, 16, 18, 19, 21
- Tuner Preset Up Button, iPod Cursor Up. 11, 12, 16, 18
- Volume Down Button 9
- Tuner Preset Down Button, iPod Cursor Down 11, 12, 16, 18
- Folder Button 16
- iPod/iPhone Button 11
12.CDButton 13
13.iPod/iPhone DISPLAY TV OUT Button . . . .11, 12 - CD/USB DISPLAY Button. 16
15.Tuner Button. 18,19
16.RDS ASPM Button 19 - Open/Close Button. 13
- Dimmer Button 9
- Memory Button. 14, 18
- Clear Button 14, 18
21.Sleep Button. 23 - Clock/Timer Button 9, 22
23.RandomButton 12,14 - Repeat Button. 12, 14
- Tuning Up, Skip Up, Fast Forward, Time Up Button .9, 12, 13, 16, 18, 19, 21
- Volume Up Button 9
- Enter Button 9, 11, 12
28.Mute Button 9 - Line Button 8, 25
- USB Button 16
- iPod/iPhone Play/Pause Button 12
32.iPod/iPhone Menu Button 12 - CD/USB Play/Pause Button. 12, 13, 14
- CD/USB Stop Button 13, 14
35.RDS Display Button 19
36.RDS PTY Button. 19
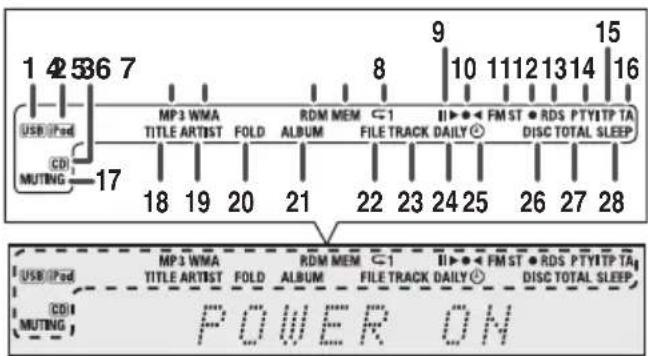
Display
Page
- USB Indicator 16
- iPod Indicator 10
3.CD Indicator 13
4.MP3 Indicator 13
5.WMA Indicator 13
6.RDM (Random) Indicator. 14 - MEM (Memory) Indicator 14
- Repeat Indicator. 14
- Play/Pause Indicator 12
0.Tuning FM/AM Indicator 18 - FM Stereo Mode Indicator 18
- Stereo Station Indicator. 18
3.RDS Indicator 19
4.PTY Indicator 19 - TP Indicator 19
- TA Indicator 19
7.Muting Indicator 9 - Title Indicator 16
- Artist Indicator 16
- Folder Indicator 16
- Album Indicator 16
- File Indicator. 16
- Track Indicator 14
4.Daily Timer Indicator 21
5.Once Timer Indicator 21 - Disc Indicator 13
- Total Indicator. 16
- Sleep Indicator 23
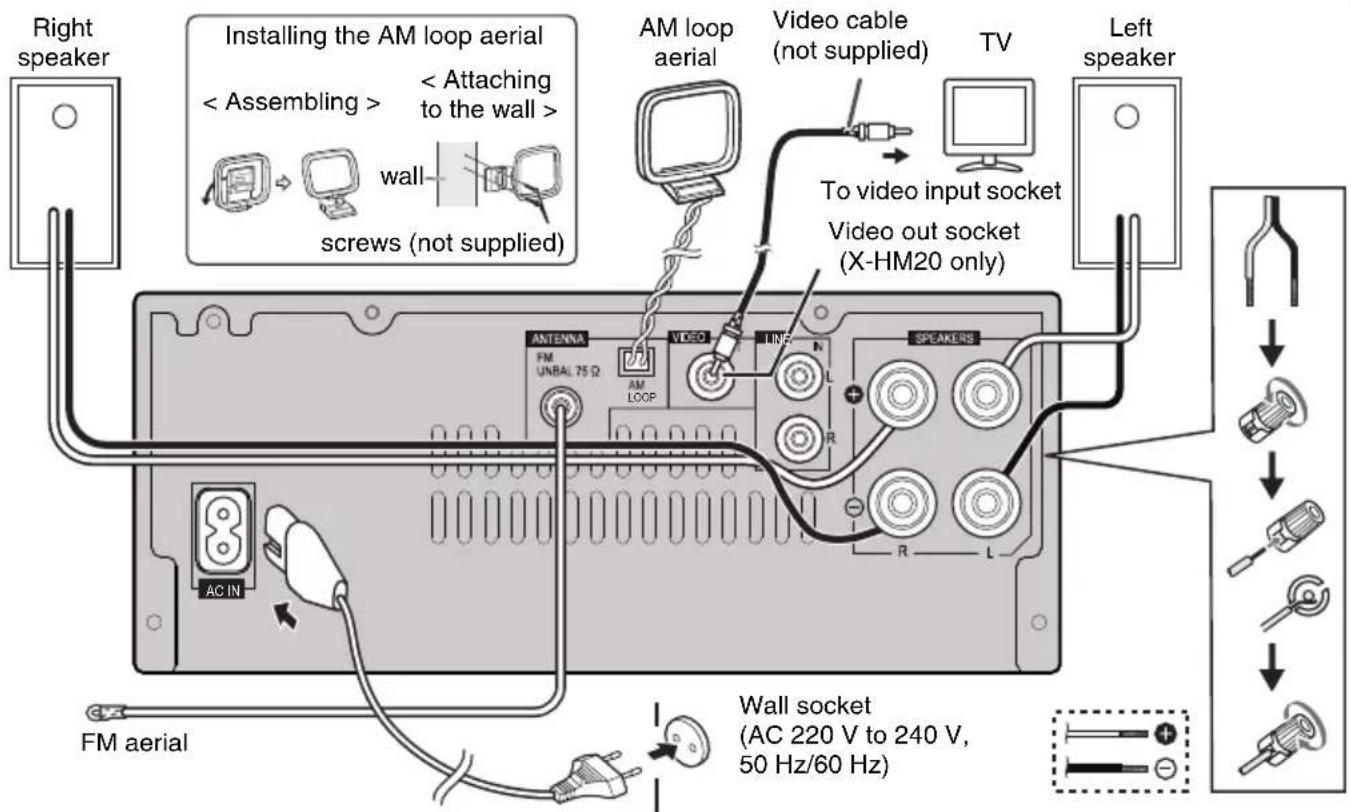
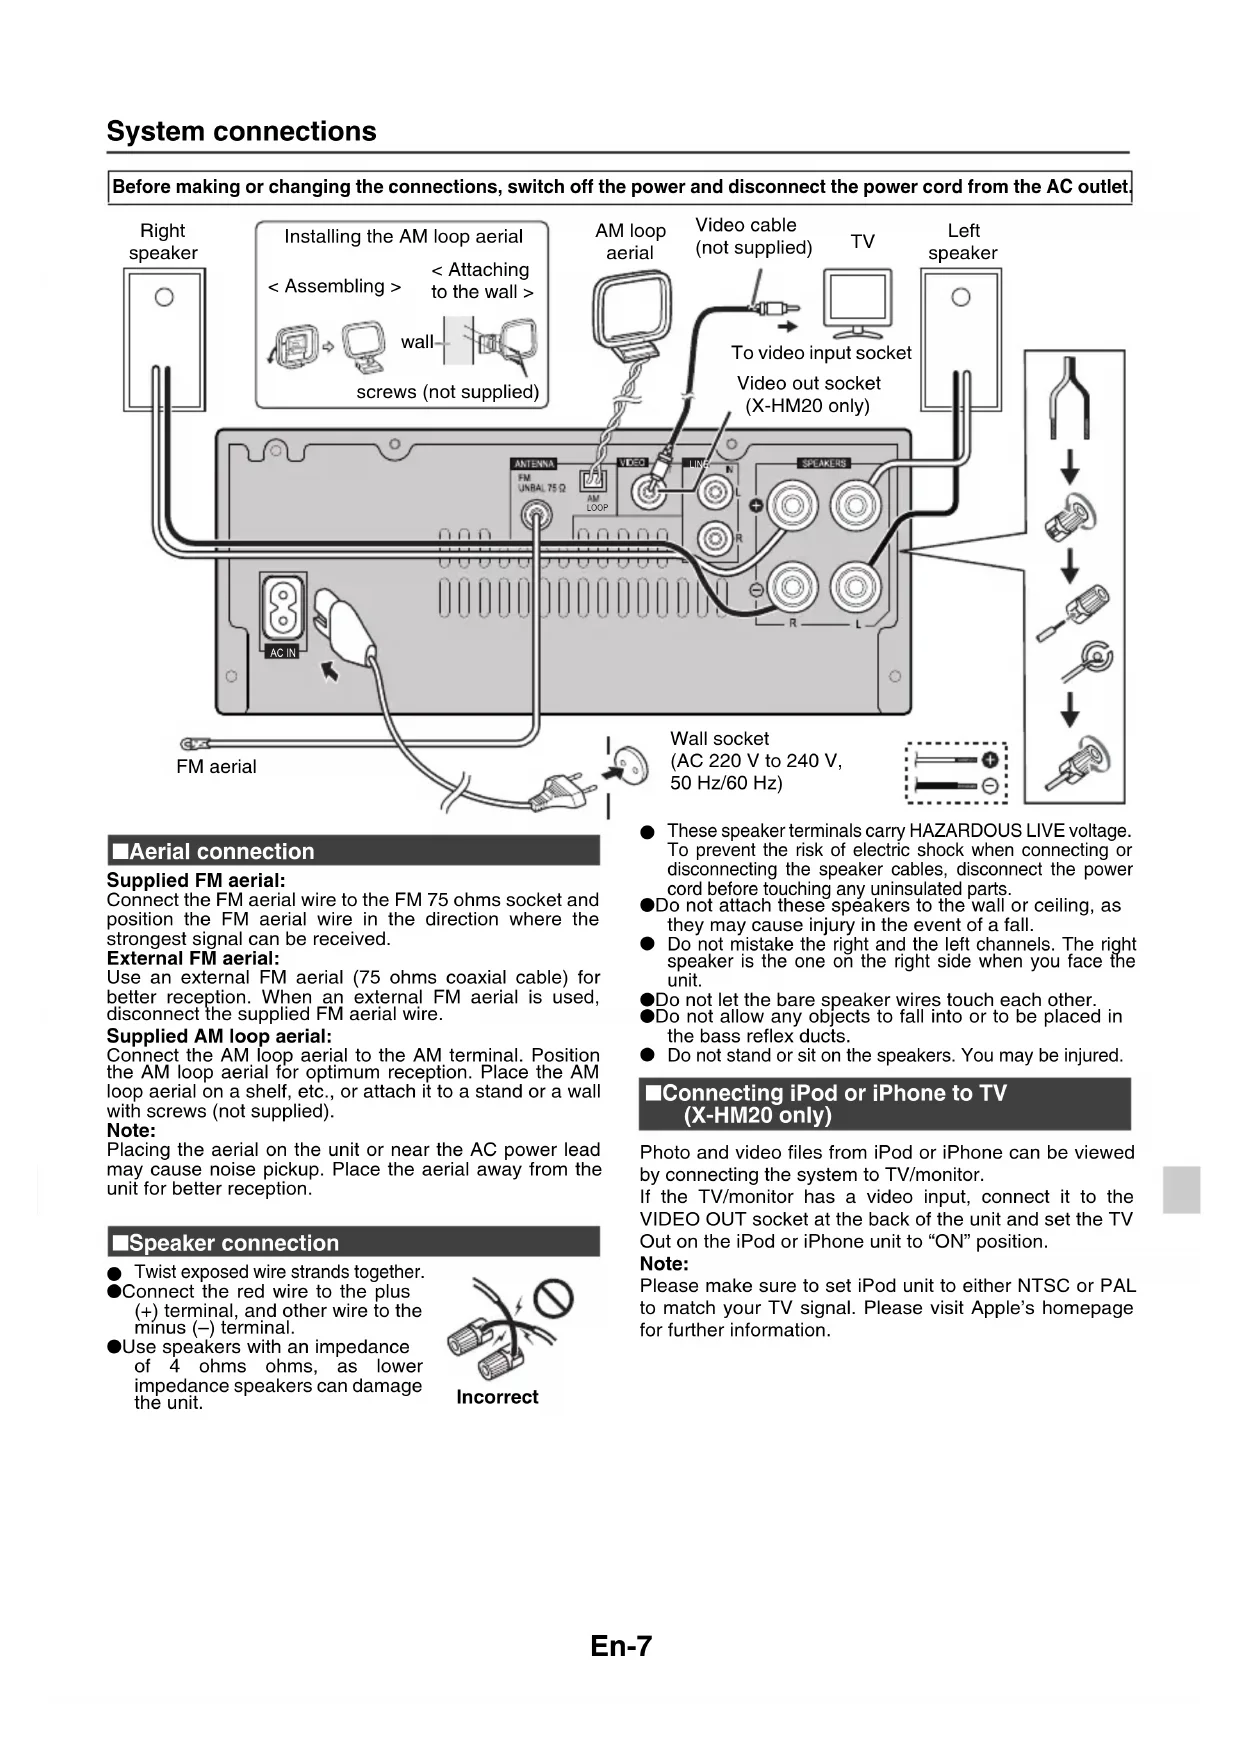
Before making or changing the connections, switch off the power and disconnect the power cord from the AC outlet.
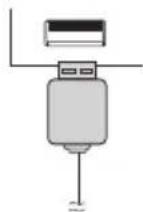
■Aerial connection
Supplied FM aerial:
Connect the FM aerial wire to the FM 75 ohms socket and position the FM aerial wire in the direction where the strongest signal can be received.
External FM aerial:
Use an external FM aerial (75 ohms coaxial cable) for better reception. When an external FM aerial is used, disconnect the supplied FM aerial wire.
Supplied AM loop aerial:
Connect the AM loop aerial to the AM terminal. Position the AM loop aerial for optimum reception. Place the AM loop aerial on a shelf, etc., or attach it to a stand or a wall with screws (not supplied).
Note:
Placing the aerial on the unit or near the AC power lead may cause noise pickup. Place the aerial away from the unit for better reception.
■Speaker connection
- Twist exposed wire strands together.
Connect the red wire to the plus (+) terminal, and other wire to the minus (-) terminal.
Use speakers with an impedance of 4 ohms ohms, as lower impedance speakers can damage the unit.

Incorrect
These speaker terminals carry HAZARDOUS LIVE voltage. To prevent the risk of electric shock when connecting or disconnecting the speaker cables, disconnect the power cord before touching any uninsulated parts.
Do not attach these speakers to the wall or ceiling, as they may cause injury in the event of a fall.
- Do not mistake the right and the left channels. The right speaker is the one on the right side when you face the unit.
Do not let the bare speaker wires touch each other.
Do not allow any objects to fall into or to be placed in the bass reflex ducts.
- Do not stand or sit on the speakers. You may be injured.
Connecting iPod or iPhone to TV (X-HM20 only)
Photo and video files from iPod or iPhone can be viewed by connecting the system to TV/monitor.
If the TV/monitor has a video input, connect it to theVIDEO OUT socket at the back of the unit and set the TV Out on the iPod or iPhone unit to "ON" position.
Note:
Please make sure to set iPod unit to either NTSC or PAL to match your TV signal. Please visit Apple's homepage for further information.
System connections (continued)
AC power connection
After checking all the connections have been made correctly, plug the AC power lead of this unit into the wall socket.
Note:
Unplug the AC power lead from the wall socket if the unit will not be in use for a prolonged period of time.
Caution:
- Handle the power cord by the plug part. Do not pull out the plug by tugging the cord, and never touch the power cord when your hands are wet, as this could cause a short circuit or electric shock. Do not place the unit, a piece of furniture, or other object on the power cord or pinch the cord in any other way. Never make a knot in the cord or tie it with other cables. The power cords should be routed so that they are not likely to be stepped on. A damaged power cord can cause a fire or give you an electric shock. Check the power cord once in a while. If you find it damaged, ask your nearest Pioneer authorized independent service company for a replacement.
Do not use any power cord other than the one supplied with this unit.
Do not use the supplied power cord for any purpose other than that described above.
Connecting a TV, etc.
Connect to the TV using an audio cable.
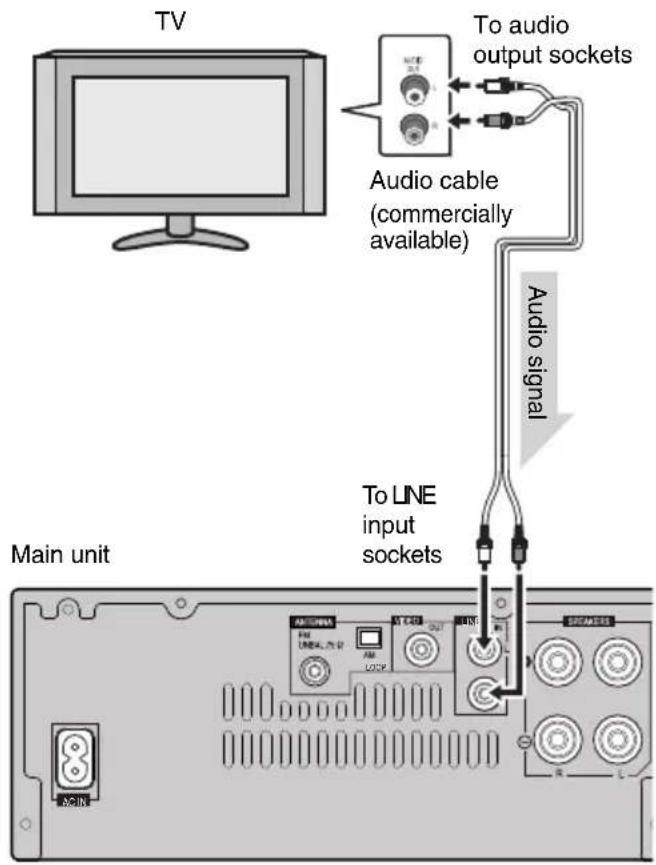
To select Line In function:
On main unit: Press INPUT button repeatedly until Line In is displayed.
On remote control: Press LINE button repeatedly until Line In is displayed.
Remote control
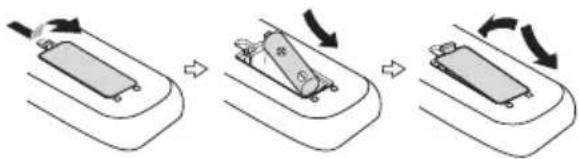
■Battery installation
1 Open the battery cover.
2 Insert the supplied battery according to the direction indicated in the battery compartment.
When inserting or removing the battery, push it towards the (-) battery terminal.
3 Close the cover.
WARNING:
- Do not use or store battery in direct sunlight or other excessively hot place, such as inside a car or near a heater. This can cause the battery to leak, overheat, explode or catch fire. It can also reduce the life or performance of battery.
Caution:
- Remove the battery if the unit will not be used for a long period of time. This will prevent potential damage due to battery leakage.
- Do not use rechargeable battery (nickel-cadmium battery, etc.).
- Installing the battery incorrectly may cause the unit to malfunction.
Notes concerning use:
- Replace the battery if the operating distance is reduced or if the operation becomes erratic. Purchas an "AA" size battery.
Periodically clean the transmitter on the remote control and the sensor on the unit with a soft cloth. - Exposing the sensor on the unit to strong light may interfere with operation. Change the lighting or the direction of the unit if this occurs.
- Keep the remote control away from moisture, heat, shock, and vibrations.
- When disposing of used battery, please comply with governmental regulations or environmental public instruction's rules that apply in your country or area.
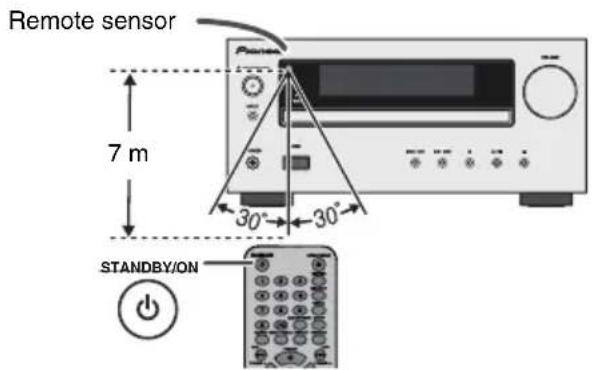
■Test of the remote control
Check the remote control after checking all the connections. Point the remote control directly at the remote sensor on the unit. The remote control can be used within the range shown below:
General control
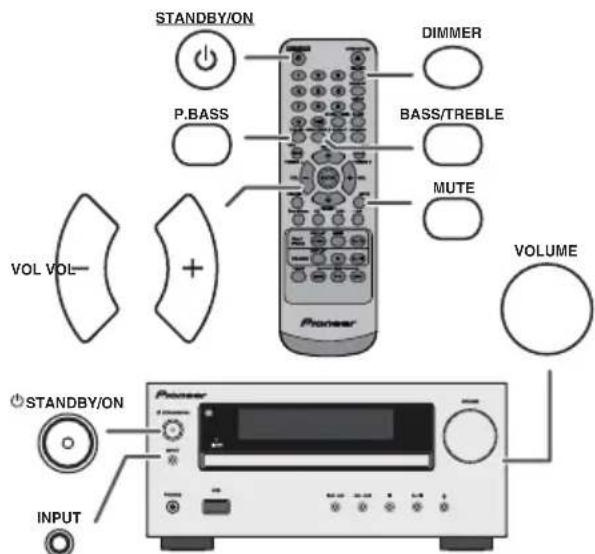
To turn the power on
Press the STANDBY/ON button to turn the power on.
After use:
Press the STANDBY/ON button to enter the power stand-by mode.
Display brightness control
To dim the display brightness, press the DIMMER button on the remote control.

Volume auto set-in
If you turn off and on the main unit with the volume set to 17 or higher, the volume starts at 16.
Volume control
Turn the volume knob towards VOLUME (on main unit) or press VOL + / - (on remote control) to increase or decrease the volume.
Auto power on function
When you press any of the following buttons, the unit turns on.
-
iPod / iPhone, CD, USB, LINE, TUNER on the remote control: Selected function is activated.
-
button on the main unit: The unit turns on and playback of the last function will start (CD, TUNER, USB, iPod, LINE IN)
Auto power off function
The main unit will enter the stand-by mode (when iPod/iPhone is not docked) after 15 minutes of inactivity during:
iPod/iPhone: No connection.
CD/USB:In the stop mode.
LINE IN:No detection of input signal or very low sound audibility.
Note:
X-HM20 only: However, if iPod/iPhone is docked, the unit will begin charging.
"Charge Mode" will be displayed during standby mode.
■Muting
The volume is muted temporarily when pressing the MUTE button on the remote control. Press again to restore the volume.
■P.Bass control
When the power is first turned on, the unit will enter the P.bass mode which emphasises the bass frequencies. To cancel the P.bass mode, press the P.BASS button on the remote control.
Bass control
1 Press the BASS/TREBLE button to select "Bass".
2 Within 5 seconds, press the VOL (+ or -) button to adjust the bass.

Treble control
1 Press the BASS/TREBLE button to select "Treble".
2 Within 5 seconds, press the VOL (+ or -) button to adjust the treble.

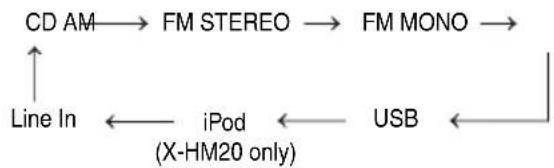
Function
When the INPUT button on main unit is pressed, the current function will change to different mode. Press the INPUT button repeatedly to select desired function.
Note:
The backup function will protect the memorised function mode for a few hours should there be a power failure or the AC power lead becomes disconnected.
Setting the clock (Remote control only)
In this example, the clock is set for the 24-hour (00:00) display.
1 Press the STANDBY/ON button to turn the power on.
2 Press the CLOCK/TIMER button.
3 Within 10 seconds, press the ENTER button. To adjust the day, press the Enter button and then press the ENTER button.
Setting the clock (Remote control only) (continued)
4 Press the button to select 24-hour or 12-hour display and then press the ENTER button.

5 To adjust the hour, press the or button and then press the ENTER button. Press the or button once to advance the time by 1 hour. Hold it down to advance continuously.
6 To adjust the minutes, press the button and then press the ENTER button. Press the button once to advance the time by 1 minute.
To confirm the time display:
Press the CLOCK/TIMER button. The time display will appear for about 5 seconds.
Note:
When power supply is restored after unit is plugged in again or after a power failure, reset the clock (page 9).
To readjust the clock:
Perform "Setting the clock" from step 1. If the "Clock" does not appear in step 2, step 4 (for selecting the 24-hour or 12-hour display) will be skipped.
To change the 24-hour or 12-hour display:
1 Clear all the programmed contents. [Refer to "Factory reset, clearing all memory" on page 25 for details.]
2 Perform "Setting the clock" from step 1 onwards.
Note:
The timer setting will reset if the power cord is pulled out or when there is a blackout.
Listening to the iPod, iPhone or iPad (X-HM20 only)
Supported iPod, iPhone and iPad models:
iPad
iPhone 4
iPhone 3GS
iPhone 3G
iPhone
- iPod touch (4th generation)
- iPod touch (3rdgeneration)
- iPod touch (2ndgeneration)
- iPod touch (1st generation)
- iPod classic
- iPod nano (6th generation)
- iPod nano (5th generation)
- iPod nano (4th generation)
- iPod nano (3rdgeneration)
- iPod nano (2ndgeneration)
Notes:
This system has been developed and tested for the software version of iPod/iPhone/iPad indicated on the website of Pioneer (http://pioneer.jp/homeav/support/ios/eu).
- Installing software versions other than indicated on the website of Pioneer to your iPod/iPhone/iPad may result in incompatibility with this system.
-Charging terminal for iPod, iPhone and iPad:
| Condition | Docking station | USB terminal |
| USB function NO | YES | |
| Other function YES | NO | |
| Stand-by YES | NO |
The message "This accessory is not made to work with iPhone" or similar, may appear on the iPhone screen when:
-battery is low.
- the iPhone is not properly docked (eg. slanting). if this occure, remove and re-dock the iPhone.
- This product is made for iPhone. To prevent random interference when iPod/iPhone is docked, the headphone output is disabled and "HP INVALID" will be displayed.
You may also experience brief audio interference during incoming calls.
iPad connection (USB Terminal)
1 Insert the connector to the the iPod, iPhone or iPad.
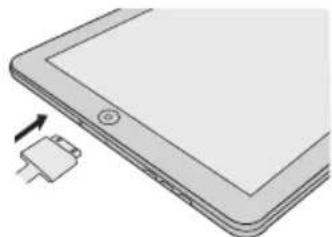
2 Connect the iPad to the unit via USB connector.
Note:
USB connector do not support VIDEO out.
iPod, iPhone or iPad Playback (USB Terminal)
1 Press the STANDBY/ON button to turn the power on.
2 Press the USB button on the remote control or INPUT button repeatedly on the main unit to select USB fnction.
3 Connect iPod, iPhone or iPad to the unit. "iPod" will appear.
4 Press the (CD/USB /) button to start playback.
Note:
Stop button ( ) is invalid during iPod, iPhone or iPad playback.
iPod and iPhone adaptor connection (Docking Station)
Note:
Please use the adaptor supplied with your iPod or iPhone unit.
| iPhone Adaptor No. | iPhone Description | Capacity |
| 12 iPhone | 4GB & 8GB & 16GB | |
| 15 iPhone | 3G, iPhone 3GS | 8GB & 16GB & 32GB |
| 19 iPhone | 4 16GB & 32GB |
To insert adaptor for iPod or iPhone (Docking Station)
1 Open the docking station for iPod and iPhone by pulling up.

2 Insert the adaptor for iPod and iPhone into unit and connect your iPod or iPhone.
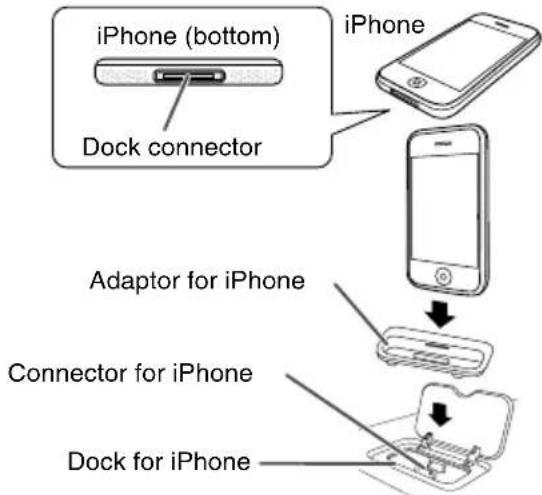
Caution:
Unplug all accessories from the iPod or iPhone before inserting it into the dock.
To remove adaptor for iPod or iPhone (Docking Station)
Insert the tip of a screwdriver ("- type, small) into the adaptor hole as shown and lift upward to remove.

iPod or iPhone playback (Docking Station)
1 Press the STANDBY/ON button to turn the power on.
2 Press the iPod/iPhone button on the remote control or INPUT button repeatedly on the main unit to select iPod function.
3 Insert iPod or iPhone unit in iPod dock of main unit.
4 Press the (Pod/iPhone /) button to start playback.
iPhone playback
Sound will only switch from iPhone to the main unit after authentication process is completed in approximately 10 seconds.
- Incoming calls will pause the playback.
- Once the calls are answered, the conversation can only be heard through the built-in iPhone speaker. Turn on the iPhone speaker or undock the iPhone to start conversation.
■To disconnect iPod, iPhone or iPad
Simply remove the iPod or iPhone from the docking station or iPad from USB terminal. It is safe to do so even during playback.
■Watching videos on a TV connected to iPod or iPhone
1 Press the DISPLAY TV OUT button for more than 2 seconds. "TV Display" will appear on display.
2 Press the ENTER button to start playback.
Notes:
- If the TV Out setting is already turned on at video menu, the video is automatically displayed on the TV screen when ENTER key is pressed.
TV out display is not support through USB terminal. (iPad) - To return to watching video on iPod or iPhone screen, press the MENU button to enter video menu. Then press the DISPLAY TV OUT button for more than 2 seconds until "iPod Display" appears.
- During iPod or iPhone video playback, pressing the DISPLAY TV OUT button will not toggle video out display between iPod and TV.
Caution:
- Unplug all accessories for the iPod or iPhone before inserting it into the iPod docking station.
- Stop button ( ) at main unit is invalid during iPod function.
Navigating the iPod, iPhone or iPad menus
1 Press the iPod/iPhone MENU button to view the menu on iPod, iPhone or iPad unit. Press it again to go back to previous menu.
2 Use the PRESET (or) button to select an item on the menu and then press ENTER button.
Note:
When navigating the iPod, iPhone or iPad menu with remote control, do not operate any of the buttons on the iPod or iPhone unit. The volume level is adjusted by pressing the VOL (+ or -) button on the main unit or the remote control. Adjusting the volume on the iPod, iPhone or iPad units give no effect.
iPod and iPhone operations:
The operations described below depend on the generation iPod and iPhone you are using.
System on operation:
When the main unit is powered on, iPod, iPhone or iPad units will automatically power on when docked in the unit.
System off (stand-by operation):
When the main unit is turned to stand-by mode, the docked iPod, iPhone or connected iPad unit will automatically turn to stand-by mode.
Various iPod, iPhone and iPad functions
| Function | Main unit | Remote control | Operation | |
| Dock USB | ||||
| Play | ▶/|| | iPod/iPhone | CD/USB | Press in the pause mode. |
| Pause | ▶/|| | iPod/iPhone | CD/USB | Press in the playback mode. |
| Track up/down | TUNING - TUNING + | TUNING - TUNING + | TUNING - TUNING + | Press in the playback or pause mode. If you press the button in the pause mode, press the button to start the desired track. |
| Fast forward/reverse | TUNING - TUNING + | TUNING - TUNING + | TUNING - TUNING + | Press and hold down in the playback mode. Release the button to resume playback. |
| Display | — | iPod/iPhone DISPLAY TV OUT | — | Press for more than 2 seconds to toggle the video out display between iPod or TV. |
| Repeat | — | REPEAT | REPEAT | Press to toggle repeat mode. |
| Shuffle | — | RANDOM | RANDOM | Press to toggle shuffle mode. |
| iPod Menu | — | iPod/iPhone MENU | iPod/iPhone MENU | Press to view the iPod menu during iPod function. |
| iPod Enter | — | ENTER | ENTER | Press to confirm the selection. |
| iPod Cursor Up/Down | — | RESET PRESET | PRESET PRESET | Press to select the iPod menu. |
This system can play back a standard CD, CD-R/RW in the CD format and CD-R/RW with MP3 or WMA files, but cannot record on them. Some audio CD-R and CD-RW discs may not be playable due to the state of the disc or the device that was used for recording.
MP3:
MP3 is a form of compression. It is an acronym which stands for MPEG Audio Layer 3. MP3 is a type of audio code which is processed by significant compression from the original audio source with very little loss in sound quality.
This system supports MPEG 1 Layer 3 and VBR files.
During VBR file playback, time counter in the display may differ from its actual playback time.
- Bitrate which is supported by MP3 is 32 kbps to 320 kbps.
WMA:
WMA files are Advanced System Format files that include audio files which are compressed with Windows Media Audio codec. WMA is developed by Microsoft as an audio format file for Windows Media Player.
- "MP3" and "WMA" indicator will light up after the unit reads information on an MP3 or WMA disc.
- Bitrate which is supported by WMA is 64 kbps to 160 kbps.
■Disc playback
1 Press the STANDBY/ON button to turn the power on.
2 Press the CD button on the remote control or INPUT button repeatedly on the main unit to select CD function.
3 Press the button to open the disc tray.
4 Place the disc on the disc tray, label side up.
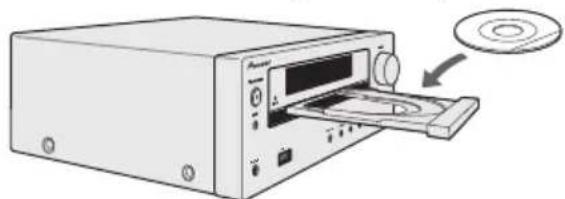
5 Press the button to close the disc tray.
6 Press the / (CD/USB / ) button to start playback. After the last track is played, the unit will stop automatically.
Caution:
- Do not place two discs in one disc tray.
- Do not play discs of special shapes (heart, octagon, etc). It may cause malfunctions.
- Do not push the disc tray whilst it is moving.
- If the power fails whilst the tray is open, wait until the power is restored.
- If TV or radio interference occurs during CD operation, move the unit away from the TV or radio.
- Be sure to place 8cm disc in the middle of the disc tray.
- Due to the structure of the disc information, it takes longer to read an MP3/WMA disc than a normal CD (approximately 20 to 90 seconds).
Various disc functions
| Function | Main unit | Remote control | Operation |
| Play | CD/USB | Press in the stop mode. | |
| Stop | CD/USB | Press in the playback mode. | |
| Pause | CD/USB | Press in the playback mode. Press the button to resume playback from the paused point. | |
| Track up/down | TUNING - TUNING + | Press in the playback or stop mode. If you press the button in the stop mode, press the button to start the desired track. | |
| Fast forward/reverse | TUNING - TUNING + | Press and hold down in the playback mode. Release the button to resume playback. |
Direct track search
By using the Numeric buttons, the desired tracks on the current disc can be played.
Use the Numeric buttons on the remote control to select the desired track whilst playing the selected disc.
The Numeric buttons allow you to select up to number 9.
- When selecting number 10 or higher, use the “>10” button.
A. For example, to choose 13
1 Press the >10 button once.
2 Press the "1" button.
3 Press the "3" button.

Selected track number
B. For example, to choose 130
1 Press the >10 button twice.
2 Press the "1" button.
3 Press the "3" button.
4 Press the "0" button.
Notes:
A track number higher than the number of tracks on the disc cannot be selected.
- During random play, direct search is not possible.
To stop playback:
Press the CD/USB button.
Repeat play
Repeat play can play one track, all tracks or a programmed sequence continuously.
To repeat one track:
Press the REPEAT button repeatedly until "Repeat One" appears. Press the CD/USB / button.
To repeat all tracks:
Press the REPEAT button repeatedly until "Repeat All" appears. Press the CD/USB / button.
To repeat desired tracks:
Perform steps 1 - 5 in "Programmed play" section on this page and then press the REPEAT button repeatedly until "Repeat All" appears.
To cancel repeat play:
Press the REPEAT button repeatedly until "Normal" appears and "disappears.

Note:
During repeat play, random play is not possible.
Random play
The tracks on the disc can be played in random order automatically.
To random play all tracks:
Press and hold down RANDOM button on the remote control until "Random" appears. Press the CD/USB / button.
To cancel random play:
Press the RANDOM button until "RDM" indicator disappears.

Notes:
- If you press the button during random play, you can move to the track selected next by the random operation. On the other hand, the button does not allow you to move to the previous track. The beginning of the track being played will be located.
- In random play, the unit will select and play tracks automatically. (You cannot select the order of the tracks.)
- During random play, repeat play is not possible.
Caution:
After performing repeat play, be sure to press the CD/USB
) button. Otherwise, the disc will play continuously.
■Programmed play (CD)
You can choose up to 32 selections for playback in the order you like.
1 Whilst in the stop mode, press the MEMORY button on the remote control to enter the programming save mode.

2 Press the buttons on the remote control to select the desired track.

3 Press the MEMORY button to save the track number.
Advanced CD or MP3/WMA disc playback (continued)
4 Repeat steps 2 - 3 for other tracks. Up to 32 tracks can be programmed. If you want to check the programmed tracks, press the MEMORY button repeatedly. If you make a mistake, the programmed tracks can be cleared by pressing the CLEAR button.
5 Press the CD/USB / button to start playback.
■Programmed play (MP3/WMA)
1 Whilst in the stop mode, press the MEMORY button to enter the programming save mode.

2 Press the PRESET (or ) button on the remote control to select the desired folder.

Then press the button on the remote control to select the desired tracks.

3 Press the MEMORY button to save the folder and track number.
4 Repeat steps 2 - 3 for other folder/tracks. Up to 32 tracks can be programmed.
5 Press the (CD/USB/) button to start playback.
To cancel the programmed play mode :
During programmed stop mode, press the CD/USB button. The display will show "Memory Clear" and all the programmed contents will be cleared.
Adding tracks to the programme:
If a programme has been previously stored, the "MEM" indicator will be displayed. Press the MEMORY button. Then follow steps 2 - 3 to add tracks.
Notes:
- When a disc is ejected, the programme is automatically cancelled.
- If you press the STANDBY/ON button to enter the stand-by mode or change the function from CD to another, the programmed selections will be cleared.
- During the programme operation, random play is not possible.
MP3/WMA folder mode (only for MP3/ WMA files)
To play back MP3/WMA (Windows Media Audio) file
There are many music sites on the internet that you can download MP3/WMA (Windows Media Audio) music files. Follow the instructions from the website on how to download the music files. You can then play back these downloaded music files by burning them to a CD-R/RW disc.
- Your downloaded song/files are for personal use only. Any other usage of the song without owner's permission, is against the law.
■About folder playback order
If MP3/WMA files are recorded in several folders, a folder number will be set to each folder automatically.
These folders can be selected by the FOLDER button on the remote control. If there is no supported file formats inside the selected folder, the folder is skipped and the next folder will be selected.
Example: How to set folder number if MP3/WMA format files are recorded as below figure.
1 ROOT folder is set as folder 1.
2 As for folders inside ROOT folder (Folder A and Folder B), the folder which is recorded earlier on the disc will be set as folder 2 and folder 3.
3 As for folder inside Folder A (Folder C and Folder D), the folder which is recorded earlier on the disc will be set as folder 4 and folder 5.
4 Folder E that is inside Folder D will be set as folder 6.
The folder and file order information which is recorded on the disc depends on the writing software. There maybe possibilities that this unit will playback the files not according to our expected playback order.
For CD MP3/WMA, 99 numbers of folders and 999 files inclusive of the folders which have non playable files can be read.
Folder mode on/off can be operated by the FOLDER button on the remote control. Files that are played when folder mode is set to the on position, may differ from those played back when folder mode is turned off.
MP3/WMA folder mode (only for MP3/WMA files) (continued)
■Procedure to playback MP3/WMA disc with folder mode on
To play back CD-R/RW.
1 Press the CD button, and load an MP3/WMA disc. Press the FOLDER button and disc info will be displayed.
2 Press the PRESET (or) button to select desired playback folder. (Folder mode on)
3 Select desired file to be played back by pressing the 串 or 串 button.
4 Press the (CD/USB/) button. Playback will start and file name will be displayed.
Title, Artist and Album name are displayed if they are recorded on the disc.
In case of playback with the folder mode on, press the PRESET (or) button, and the folder can be selected even though it is in playback/pause mode. It will continue playback/pause mode in the 1st track of the selected folder.
Display content can be changed by pressing the CD/USB DISPLAY button.
Note:
If "Not Support" is displayed, it means "Copyright protected WMA file" or "Not supported playback file" is selected.
Listening to USB mass storage device/MP3 player
Notes:
This product is not compatible with MTP and AAC file systems from USB mass storage device or MP3 player.
Some external storage devices may not operate with this system.
Operation of external storage devices (USB memory devices, external hard disks, etc.) is not guaranteed.
To play back USB/MP3 player with folder mode off
1 Press the USB button on the remote control or INPUT button repeatedly on main unit to select USB function. Connect the USB memory device that has MP3/WMA format files on the unit. When the USB memory is connected to the main unit, the device information will be displayed.
2 Select desired file to be played back by pressing the or button.
3 Press the (CD/USB/) button. Playback will start and the file name will be displayed.
-Title, Artist and Album name are displayed if they are recorded in the USB memory device.
-Display content can be changed by pressing the CD/USB DISPLAY button.
Note:
To pause playback:
Press the / (CD/USB / ) button.
Listening to USB mass storage device/MP3 player (continued)
To play back USB/MP3 player with folder mode on
1 Press the USB button on the remote control or INPUT button repeatedly on main unit to select USB function. Connect the USB memory device that has MP3/WMA format files on the unit. When the USB memory is connected to the main unit, the device information will be displayed.
2 Press the FOLDER button, and press the PRESET (or ) button to select desired playback folder. To start playback with folder mode on, go to step 4. To change the playback folder, press the PRESET( or ) button to select another folder.
3 Select desired file to be played back by pressing the or button.
4 Press the (CD/USB/) button. Playback will start and the file name will be displayed.
-Title, Artist and Album name are displayed if they are recorded in the USB memory device.
- Display content can be changed by pressing the CD/USB DISPLAY button.
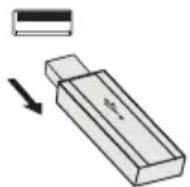
■To remove USB memory device
1 Press the CD/USB button to stop playback.
2 Disconnect USB memory device from the USB terminal.
Notes:
PIONEER will not be held liable for the loss of data whilst the USB memory device is connected to the audio system.
- Files compressed in MP3 and/or WMA format can be played back when connected to the USB terminal.
This USB memory's format supports FAT 16 or FAT 32.
PIONEER cannot guarantee that all USB memory devices will work on this audio system.
- USB cable is not recommended for use in this audio system to connect to USB memory device. Use of the USB cable will affect the performance of this audio system.
This USB memory cannot be operated via USB hub.
The USB terminal in this unit is not intended for a PC connection but is used for music streaming with a USB memory device.
External HDD-storage cannot be played back via USB terminal.
- If the data inside the USB memory is large, it may take longer time for the data to be read.
This product can play WMA and MP3 files. It will automatically detect the file type being played. If unplayable file is played on this product, "Not Support" is indicated and the file will be automatically skipped. This will take a few seconds. If abnormal indications appear on the display due to the unspecified file, turn off the unit and then turn it on again.
This product relates to USB mass storage devices and MP3 players. It may however face some irregularities due to various unforeseen reasons from some devices. Should this happen, turn off the unit and then turn it on again.
The USB port is only intended for direct connection to a USB memory device without any cable.
During CD function, MP3 player will not be charging.
Not support will be displayed if you connect an iPod to USB terminal when the USB function is selected.
Advanced USB playback
The following functions are the same as CD operations:
Page
Direct track search 14
Repeat play 14
Random play 14
Programmed play (MP3/WMA). 15
Notes:
-If USB memory device is not connected, "USB No Media" will be shown on the display.
This unit only supports "MPEG-1 Audio Layer-3" format. (Sampling Frequency is 32 kHz, 44.1 kHz, 48 kHz)
-Playback order for MP3 files may differ depending on the writing software used during file download.
- Bitrate which is supported by MP3 is 32 kbps to 320 kbps, WMA is 64 kbps to 160 kbps.
For MP3/WMA files, please put ".MP3" ".WMA" extension. Files cannot be played back if there is no MP3/WMA extension.
- Playlists are not supported on this unit.
This unit can display Folder Name or File Name up to 32 characters.
Maximum total number of MP3/WMA files is 999.
Total number of folders read is 99 including folder with non-playable file. However, the display shows only folder with MP3 files.
The display playback time may not be displayed correctly when playing back a variable bitrate file.
The ID3TAG information supported are TITLE, ARTIST and ALBUM only. Title name, artist name and album name can be displayed by pressing the DISPLAY button during file playback or pause mode.
WMA meta tag also supports title, artist and album name which are recorded in WMA files. Copyright protected WMA files cannot be played back.
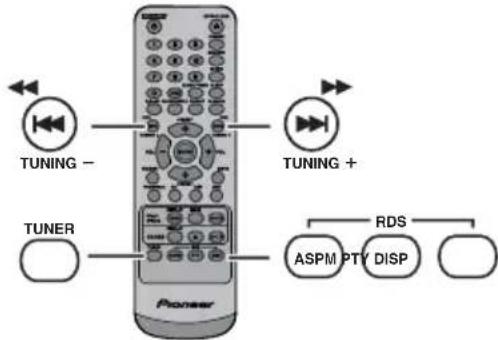
■Tuning
1 Press the STANDBY/ON button to turn the power on.
2 Press the TUNER button repeatedly to select the desired frequency band (FM or AM).
3 Press the TUNING + or - button on the remote control to tune in to the desired station.
Manual tuning:
Press the TUNING ^+ or - button repeatedly to tune in to the desired station.
Auto tuning:
When the TUNING + or - button is pressed for more than 0.5 seconds, scanning will start automatically and the tuner will stop at the first receivable broadcast station.
Notes:
- When radio interference occurs, auto scan tuning may stop automatically at that point.
Auto scan tuning will skip weak signal stations. - To stop the auto tuning, press the TUNING + or - button again.
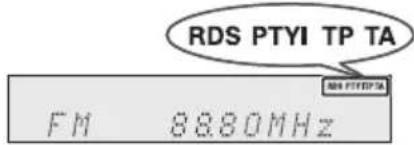
- When an RDS (Radio Data System) station is tuned in, the frequency will be displayed first, and then the RDS indicator will light up. Finally, the station name will appear.
Full auto tuning can be achieved for RDS stations "ASPM", see page 19.
To receive an FM stereo transmission:
Press the TUNER button to select stereo mode and "ST" indicator will be displayed. "▶" and "▶" will appear when an FM broadcast is in stereo.
If the FM reception is weak, press the TUNER button to extinguish the "ST" indicator. The reception changes to monaural, and the sound becomes clearer.
■Memorising a station
You can store 40 AM and FM stations in memory and recall them at the push of a button. (Preset tuning)
1 Perform steps 1 - 3 in "Tuning".
2 Press the MEMORY button.

3 Within 30 seconds, press the PRESET (or ) button to select the preset channel number. Store the stations in memory, in order, starting with preset channel 1.
4 Within 30 seconds, press the MEMORY button to store that station in memory. If the "MEMORY" and preset number indicators disappear before the station is memorised, repeat the operation from step 2.
5 Repeat steps 1 - 4 to set other stations, or to change a preset station. When a new station is stored in the memory, the station previously memorised for that preset channel number will be erased.
Note:
The backup function protects the memorised stations for a few hours should there be a power failure or the AC power lead become disconnected.
To recall a memorised station
1 Press the PRESET (or ) button for less than 0.5 seconds to select the desired station.
To scan the preset stations
The stations saved in the memory can be scanned automatically. (Preset memory scan)
1 Press the PRESET (or ) button for more than 0.5 seconds. The preset number will flash and the programmed stations will be tuned in sequentially, for 5 seconds each.
2 Press the PRESET (or ) button again when the desired station is located.
To erase entire preset memory
1 Press the TUNER button on remote control or press the INPUT button on main unit repeatedly to select Tuner function.
2 In Tuner function, press the CLEAR button until "Tuner Clear" appears.

Tuner Clear
RDS is a broadcasting service which a growing number of FM stations provide. These FM stations send additional signals along with their regular programme signals. They send their station names, and information about the type of programme such as sport, music, etc.
When tuned to an RDS station, "RDS" and the station name will be displayed.
"TP" (Traffic Programme) will appear on the display when the received broadcast carries traffic information, and "TA" (Traffic Announcement) will appear whilst a traffic information is on air.
"PTYI" (Dynamic PTY Indicator) will appear whilst the Dynamic PTY station is received.
You can control the RDS by using the buttons on the remote control only.
Information provided by RDS
Each time the RDS DISPLAY button is pressed, the display will switch as follows:

Station name (PS) Programme type (PTY)

Frequency Radio text (RT)
When tuning in to a station other than an RDS station or to an RDS station which sends weak signal, the display will change in the following order:
Using the Auto Station Programme Memory (ASPM)
Whilst in the ASPM operation mode, the tuner will automatically search for new RDS stations. Up to 40 stations can be stored.
If you have already stored some stations in memory, the number of new stations you can store will be less.
1 Press the TUNER button on the remote control or INPUT button repeatedly on the main unit to select TUNER function.
2 Press and hold down the RDS ASPM button on the remote control.
1 After "ASPM" has flashed for about 4 seconds, scanning will start (87.50 - 108.00 MHz).

2 When an RDS station is found, "RDS" will appear for a short time and the station will be stored in memory.

3 After scanning, the number of stations stored in memory will be displayed for 4 seconds, and then "END" will appear for 4 seconds.

To stop the ASPM operation before it is complete:
Press the RDS ASPM button whilst it is scanning for stations.
The stations which are already stored in memory will be kept there.
Notes:
If the same station is broadcasting on different frequencies, the strongest frequency will be stored in memory.
Any station which has the same frequency as the one stored in memory will not be stored.
-If 40 stations have already been stored in memory, the scan will be aborted. If you want to redo the ASPM operation, erase the preset memory.
If no station have been stored in memory, "END" will appear for about 4 seconds.
If the RDS signals are very weak, station names may not be stored in memory.
The same station name can be stored in different channels.
In a certain area or during certain time periods, the station names may temporarily be different.
Notes for RDS operation
If any of the following events occur, it does not mean that the unit is faulty:
- "PS", "No PS" and a station name appear alternately, and the unit does not operate properly.
If a particular station is not broadcasting properly or a station is conducting tests, the RDS reception function may not work properly.
When you receive an RDS station whose signal is too weak, information like the station name may not be displayed.
No PS", No PTY" or No RT" will flash for about 5 seconds, and then the frequency will be displayed.
Notes for radio text:
The first 14 characters of the radio text will appear for 4 seconds and then they will scroll across the display.
If you tune in to an RDS station which is not broadcasting any radio text, "No RT" will be displayed when you switch to the radio text position.
- Whilst radio text data is received or when the text contents change, "RT" will be displayed.
■To recall stations in memory
To specify programmed types and select stations (PTY search):
You can search a station by specifying the programme type (news, sports, traffic programme, etc. ... see page 20) from the stations in memory.
1 Press the TUNER button on the remote control or INPUT button repeatedly on the main unit to select TUNER function.
2 Press the RDS PTY button on the remote control.

"SELECT" and "PTY TI" will appear alternately for about 6 seconds.
3 Within 6 seconds, press the button to select the programme type.

Each time the button is pressed, the programme type will appear. If the button is held down for more than 0.5 seconds, the programme type will appear continuously.
4 Whilst the selected programme type is flashing (within 6 seconds), press the RDS PTY button again.

After the selected programme type has been lit for 2 seconds, "SEARCH" will appear, and the search operation will start.
Notes:
If the display has stopped flashing, start again from step 2. If the unit finds a desired programme type, the corresponding channel number will lit for about 8 seconds, and then the station name will remain it.
If you want to listen to the same programme type of another station, press the RDS PTY button whilst the channel number or station name is flashing. The unit will look for the next station.
If no station can be found, "NOT FOUND" will appear for 4 seconds.
If you select the traffic programme:
If you select the traffic programme (TP) in step 3, "TP" will appear.
(This does not mean that you can listen to the traffic information at that time.)
When the traffic information is broadcast, "TA" will appear.
Descriptions of the PTY (Programme Type) codes, TP (Traffic Programme) and TA (Traffic Announcement)
You can search for and receive the following PTY, TP and TA signals.
| NEWS Short | accounts of facts, events and publicly expressed views, reportage and actuality. |
| AFFAIRS Topical programme expanding or enlarging upon the news, generally in different presentation style or concept, including debate, or analysis. | |
| INFO Programmes whose purpose is to impart advice in the widest sense. | |
| SPORT Programme concerned with any aspect of sport. | |
| EDUCATE Proprogramme intended primarily to educate, of which the formal element is fundamental. | |
| DRAMAL All radio plays and serials. | |
| CULTURE Proprogrammes concerned with any aspect of national or regional culture, including language, theatre, etc. | |
| SCIENCE | Programmes about the natural sciences and technology. |
| VARIED | Used for mainly speech-based programmes usually of light-entertainment nature, not covered by other categories. Examples include: quizzes, panel games, personality interviews. |
| POP M | Commercial music, which would generally be considered to be of current popular appeal, often featuring in current or recent record sales charts. |
| ROCK M | Contemporary modern music, usually written and performed by young musicians. |
| EASY M | Current contemporary music considered to be "easy-listening", as opposed to Pop, Rock or Classical, or one of the specialised music styles, Jazz, Folk or Country. Music in this category is often but not always, vocal, and usually of short duration. |
| LIGHT M | Classical music for general, rather than specialist appreciation. Examples of music in this category are instrumental music, and vocal or choral works. |
| CLASSICS | Performances of major orchestral works, symphonies, chamber music, etc., and including Grand Opera. |
| OTHER M | Musical styles not fitting into any of the other categories. Particularly used for specialist music of which Rhythm & Blues and Reggae are examples. |
| WEATHER | Weather reports and forecasts and meteorological information. |
| FINANCE | Stock Market reports, commerce, trading, etc. |
| CHILDREN | For programmes targeted at a young audience, primarily for entertainment and interest, rather than where the objective is to educate. |
Using the Radio Data System (RDS) (continued)
| SOCIAL Programe | mmes about people and things that influence them individually or in groups. Includes: sociology, history, geography, psychology and society. |
| RELIGION Any | aspect of beliefs and faiths, involving a God or Gods, the nature of existence and ethics. |
| PHONE IN Invo | ving members of the public expressing their views either by phone or at a public forum. |
| TRAVEL Features | es and programmes concerned with travel to near and far destinations, package tours and travel ideas and opportunities. Not for use for announcements about problems, delays, or roadworks affecting immediate travel where TP/TA should be used. |
| LEISURE Program | ames concerned with recreational activities in which the listener might participate. Examples include, Gardening, Fishing, Antique collecting, Cooking, Food & Wine, etc. |
| JAZZ Polyphonic | syncopated music characterised by improvisation. |
| COUNTRY Songs | which originate from, or continue the musical tradition of the American Southern States. Characterised by a straightforward melody and narrative story line. |
| NATION M Current | ent Popular Music of the Nation or Region in that country's language, as opposed to International "Pop" which is usually US or UK inspired and in English. |
| OLDIES Music | from the so-called "golden age" of popular music. |
| FOLK M Music | which has its roots in the musical culture of a particular nation, usually played on acoustic instruments. The narrative or story may be based on historical events or people. |
| DOCUMENT Pragramme | concerned with factual matters, presented in an investigative style. |
| TEST Broadcast | when testing emergency broadcast equipment or receivers. |
| ALARM | Emergency announcement made under exceptional circumstances to give warning of events causing danger of a general nature. |
| TP | Broadcasts which carry traffic announcements. |
| TA | Traffic announcements are being broadcast. |
Timer and sleep operation (Remote control only)
Timer playback:
The unit turns on and plays the desired source (CD, TUNER, USB, iPod, LINE IN) at a preset time.
This unit has 2 types of timer: ONCE TIMER and DAILY TIMER.
Once timer:
Once timer play works for one time only at a preset time. ("indicator).
Daily timer:
Daily timer play works at the same preset time every day that we set. For example, set the timer as a wake-up call every morning.
("DAILY" indicator).
Using the once timer and daily timer in combination:
For example, use the once timer to listen to a radio programme, and use the daily timer to wake up.
1 Set the daily timer (page 21).
2 Set the once timer (page 21).
Timer playback
Before setting timer:
- Check that the clock is set to the correct time (refer to page 9). If it is not set, you cannot use the timer function.
For timer playback: Plug in USB or load discs or dock iPod to be played.

1 Press the STANDBY/ON button to turn the power on.
2 Press and hold the CLOCK/TIMER button.
3 Within 30 seconds, press the button to select "Once" or "Daily", and press the ENTER button.
4 Within 30 seconds, press the button to select "Timer set", and press the ENTER button.
5 To select the timer playback source (CD, TUNER, USB, iPod, LINE IN), press the button. Press the ENTER button.
When you select the tuner, select a station by pressing the button, and then press the ENTER button. If a station has not been programmed, "No Preset" will be displayed and timer setting will be cancelled.
6 To adjust the day, press the button and then press the ENTER button.
7 Press the ENTER button to adjust the hour. Press the or button and then press the ENTER button.
8 To adjust the minutes, press the button and then press the ENTER button.
9 Set the time to finish as in steps 7 and 8 above.
10 Adjust the volume using the VOL (+ or -) button, and then press the ENTER button. Do not turn the volume up too high.
11 Press the STANDBY/ON button to enter the power stand-by mode. The "TIMER" indicator lights up and the unit is ready for timer playback.
12 When the preset time is reached, playback will start. The volume will increase gradually until it reaches the preset volume. The timer indicator will blink during timer playback.
13 When the timer end time is reached, the system will enter the power stand-by mode automatically.
Once timer:
The timer will be cancelled.
Daily timer:
The timer operates at the same time every day. It will continue until the daily timer setting is cancelled.
Cancel the daily timer when it is not in use.
Notes:
- When performing timer playback using another unit connected to the USB terminal, select "USB" or "LINE IN" in step 5.
This unit will turn on or enter the power stand-by mode automatically. However, the connected unit will not turn on or off. To stop the timer playback, follow step "Cancelling the timer setting" of this page.
Checking the timer setting:
1 Turn the power on and press and hold down the CLOCK/TIMER button.
2 Within 30 seconds, press the Enter button to select "Once" or "Daily", and press the ENTER button.
3 Within 30 seconds, press the button to select "Timer Call", and press the ENTER button.
Cancelling the timer setting:
1 Turn the power on and press and hold down the CLOCK/TIMER button.
2 Within 30 seconds, press the Enter button to select "Once" or "Daily", and press the ENTER button.
3 Within 30 seconds, press the Enter button to select "Timer Off", and press the ENTER button. Timer will be cancelled (the setting will not be cancelled).
Reusing the memorised timer setting:
The timer setting will be memorised once it is entered. To reuse the same setting, perform the following operations.
1 Turn the power on and press and hold down the CLOCK/TIMER button.
2 Within 30 seconds, press the button to select "Once" or "Daily", and press the ENTER button.
3 Within 30 seconds, press the Enter button to select "Timer On", and press the ENTER button.
4 Press the STANDBY/ON button to enter the power stand-by mode.
Note:
The clock setting will reset if the power cord is pulled out or when there is a blackout.
Timer and sleep operation (Remote control only) (continued)
Sleep operation
The radio, compact disc, iPod, USB and Line In can all be turned off automatically.
1 Play back the desired sound source.
2 Press the SLEEP button.
3 Within 5 seconds, press the Numeric button to set the time (1 minute - 99 minutes)
4 "SLEEP" will appear.
5 The unit will enter the power stand-by mode automatically after the preset time has elapsed. The volume will be turned down 1 minute before the sleep operation finishes.
To confirm the remaining sleep time:
1 Whilst "SLEEP" is indicated, press the SLEEP button.
To cancel the sleep operation:
Press the STANDBY/ON button whilst "SLEEP" is indicated. To cancel the sleep operation without setting the unit to the stand-by mode, proceed as follows.
1 Whilst "SLEEP" is indicated, press the SLEEP button.
2 Within 5 seconds, press the "0" button twice until "SLEEP 00" appears.
■To use timer and sleep operation together
Sleep and timer playback:
For example, you can fall asleep listening to the radio and wake up to CD in the next morning.
1 Set the sleep time (see above, steps 1 - 5).
2 Whilst the sleep timer is set, set the timer playback (steps 2 - 9, page 22).
Headphones
Do not turn the volume on to full at switch on and listen to music at moderate levels. Excessive sound pressure from earphones and headphones can cause hearing loss.
Before plugging in or unplugging the headphone, reduce the volume.
- Be sure your headphone has a 3.5 mm diameter plug and impedance between 16 and 50 ohms. The recommended impedance is 32 ohms.
- Plugging in the headphone disconnects the speakers automatically. Adjust the volume using the VOLUME control.
X-HM20 only: Audio from the iPod/iPhone cannot be heard via the headphones connected to the unit. "HP INVALID" will be displayed if you connect the headphones when the iPod/iPhone function is selected.
Troubleshooting chart
Many potential problems can be resolved by the owner without calling a service technician.
If something is wrong with this product, check the following before calling your authorized PIONEER dealer or service centre.
General
| Symptom Possible | le cause |
| ●The clock is not set to the correct time. | ●Did a power failure occur? Reset the clock. (Refer to page 9) |
| ●When a button is pressed, the unit does not respond. | ●Set the unit to the power stand-by mode and then turn it back on.●If the unit still malfunctions, reset it. (Refer to page 25) |
| ●No sound is heard. ●Is | the volume level set to "Min"?●Are the headphones connected?●Are the speaker wires disconnected? |
CD player
| Symptom Possible | le cause |
| ●Playback does not start.●Playback stops in the middle or is not performed properly. | ●Is the disc loaded upside down?●Does the disc satisfy the standards?●Is the disc distorted or scratched? |
| ●Playback sounds are skipped, or stopped in the middle of a track. | ●Is the unit located near excessive vibrations?●Is the disc very dirty?●Has condensation formed inside the unit? |
Remote control
| Symptom Possible | le cause |
| ●The remote control does not operate. | ●Is the AC power lead of the unit plugged in?●Is the battery polarity correct?●Is the battery dead?●Is the distance or angle incorrect?●Does the remote control sensor receive strong light? |
■Tuner
| Symptom Possible | le cause |
| ●The radio makes unusual noises continuously. | ●Is the unit placed near the TV or computer?●Is the FM aerial or AM loop aerial placed properly?Move the aerial away from the AC power lead if it is located nearby. |
USB
| Symptom Possible | |
| ●Device cannot be detected. | ●Is there any MP3/WMA file available?●Is the device properly connected?●Is it an MTP device?●Does the device contain AAC file only? |
| ●Playback does not start. | ●Is it a copyright protected WMA file?●Is it a false MP3 file? |
| ●Wrong time display.●Wrong file name display. | ●Is Variable Bitrate file being played back?●Is the File Name written in Chinese or Japanese characters? |
iPod and iPhone (X-HM20 only)
| Symptom Possible | |
| ●No sound is produced. No image appears on the TV/monitor. | ●The iPod or iPhone is not playing. ●The iPod or iPhone is not properly connected to the unit. ●Is the AC power lead of the unit plugged in? ●The video cable is not properly connected. ●The TV/monitor's input selection is not properly set. ●The iPod TV out feature has not been set to output video. ●Audio from the iPod/iPhone cannot be heard via the headphones connected to the unit. |
| ●iPod or iPhone will not charge. | ●The iPod or iPhone is not making full contact with the connector. ●Using iPod (3 rd generation). ●The iPod or iPhone is not supported. Refer to page 10 for compatible models. ●The iPod or iPhone unit cannot be charged whilst the main unit is in USB mode. |
| ●“This accessory is not made to work with iPhone” or “This accessory is not supported by iPhone” appears on iPhone screen. | ●The iPhone battery is low. Please charge the iPhone. iPhone is not properly docked. |
Troubleshooting chart (Continued)
Condensation
Sudden temperature changes, storage or operation in an extremely humid environment may cause condensation inside the cabinet (CD pickup, etc.) or on the transmitter on the remote control. Condensation can cause the unit to malfunction. If this happens, leave the power on with no disc in the unit until normal playback is possible (about 1 hour). Wipe off any condensation on the transmitter with a soft cloth before operating the unit.
■If problem occurs
When this product is subjected to strong external interference (mechanical shock, excessive static electricity, abnormal supply voltage due to lightning, etc.) or if it is operated incorrectly, it may malfunction.
If such a problem occurs, do the following:
1 Set the unit to the stand-by mode and turn the power on again.
2 If the unit is not restored in the previous operation, unplug and plug in the unit again, and then turn the power on.
Note:
If neither operation above restores the unit, clear all the memory by resetting it.
Factory reset, clearing all memory
1 Press the STANDBY/ON button to turn the power on.
2 Press the LINE button button on the remote control or INPUT button repeatedly on the main unit to select LINE IN function.
3 In LINE IN function, press the button on the main unit press and hold the button until "RESET" appears.

Caution:
This operation will erase all data stored in memory including clock, timer settings, tuner preset, and CD programme.
Before transporting the unit
Remove the iPod, USB memory device and disc from the unit. Then, set the unit to the power stand-by mode. Carrying the unit with iPod or USB memory device left docked or discs left inside might damage the unit.
Care of compact discs
Compact discs are fairly resistant to damage, however mistracking can occur due to an accumulation of dirt on the disc surface. Follow the guidelines below for maximum enjoyment from your CD collection and player.
Do not write on either side of the disc, particularly the non-label side from which signals are read. Do not mark this surface.
- Keep your discs away from direct sunlight, heat, and excessive moisture.
Always hold the CDs by the edges. Fingerprints, dirt, or water on the CDs can cause noise or mistracking. If a CD is dirty or does not play properly, clean it with a soft, dry cloth, wiping straight out from the centre, along the radius.

Maintenance
Cleaning the cabinet
Periodically wipe the cabinet with a soft cloth and a diluted soap solution, then with a dry cloth.
Caution:
- Do not use chemicals for cleaning (petrol, paint thinner, etc.). It may damage the cabinet.
Do not apply oil to the inside of the unit. It may cause malfunctions.
As part of our policy of continuous improvement, PIONEER reserves the right to make design and specification changes for product improvement without prior notice. The performance specification figures indicated are nominal values of production units. There may be some deviations from these values in individual units.
General
| Power source AC | 220 V to 240 V, 50 Hz/60 Hz |
| Power consumption | Power on: 45 W (X-HM20) 30 W (X-HM10) Power stand-by: 0.4 W |
| Dimensions Width: | 215 mm Height: 99 mm Depth: 300 mm |
| Weight 3.8 kg (X-H) | M20) 3.7 kg (X-HM10) |
Amplifier
| Output power RMS: 15 W + 15 W (1 kHz, 10 % T.H.D., 4 ohms) | |
| Output terminals S | speakers: 4 ohms 20 Hz to 20 kHz Video output (X-HM20 only): 1 Vp-p Headphones: 16 ohms (recommended: 32 ohms) |
| Input terminals Line in (Analog input): 500 mV/47 k ohms | |
CD player
| Type Single disc multi-play compact disc player | |
| Signal readout Non-contact, 3-beam semiconductor laser pickup | |
| D/A converter Multi bit D/A converter | |
| Frequency response | 20 Hz to 20 000 Hz |
| Dynamic range 90 dB (1 kHz) | |
USB
| USB host interface | ● Complies with USB 1.1 (Full Speed)/2.0 Mass Storage Class. ● Support Bulk only and CBI protocol. |
| Support file | ● MPEG 1 Layer 3 ● WMA (Non DRM) |
| Bitrate support | ● MP3 (32 kbps to 320 kbps) ● WMA (64 kbps to 160 kbps) |
| Other | ● Maximum total number of MP3/WMA files is 999. ● Maximum total number of folders is 99 INCLUSIVE of root directory. ● The ID3TAG information supported are TITLE, ARTIST and ALBUM only. ● Supports ID3TAG version 1 and version 2. |
| File system support | ● Support USB devices with Microsoft Windows/DOS/FAT 12/FAT 16/FAT 32. ● 2 kbyte block length for sector. |
Tuner
| Frequency range FM | 87.5 MHz to 108 MHz AM: 522 kHz to 1,620 kHz |
| Preset | 40 (FM and AM station) |
■Speaker
| X-HM20 | |
| Type | 2-way type speaker system 5 cm Tweeter 10 cm Woofer |
| Maximum input power | 15 W |
| Impedance | 4 ohms |
| Dimensions | Width: 132 mm Height: 260 mm Depth: 173 mm |
| Weight | 2.0 kg/each |
| X-HM10 | |
| Type | 2-way type speaker system Piezoelectric Tweeter 10 cm Woofer |
| Maximum input power | 15 W |
| Impedance | 4 ohms |
| Dimensions | Width: 132 mm Height: 260 mm Depth: 158 mm |
| Weight | 1.6 kg/each |
About iPod/Phone/iPad:
Made for

iPod iPhone iPad
"Made for iPod", "Made for iPhone" and "Made for iPad" mean that an electronic accessory has been designed to connect specifically to iPod, iPhone, or iPad, respectively, and has been certified by the developer to meet Apple performance standards. Apple is not responsible for the operation of this device or its compliance with safety and regulatory standards. Please note that the use of this accessory with iPod, iPhone, or iPad may affect wireless performance.
iPad, iPhone and iPod are trademarks of Apple Inc., registered in the U.S. and other countries.
© 2011 PIONEER CORPORATION.
All rights reserved.
IMPORTANT

KLASS 38 SYNILC CCH OSYNLIG LASERSTRALNNG NAR DENNA DEL
AR OPPNAD. UNOVK ATT LTSATTADIG FOR STRALEN.
BEIGEOPFENETERABDECKNGIST SICHTBARE UND UNSICHTBARE LASERSTRAFLUNG DER
KLASSE 38 IM GERATENNEREN VORHANEN, MONT DEN LASERSTRAHLAUSSETZEM
CUANDO SE ABBRE HAY RADIACION LASER DE CLASE 2B VISIBLE E INVISIBLE. EVITE LA
EXPOSICION A LOS RAYOS LASER.
Lecture repeteee. 14
KLASSE 38 SYNLGOG USYNLG LASERSTRALNGVED AINNG.
UNDAUSSATTESELFORSTRALING.
WARNING
KCLASS 38 SYNGO CHOSYNGLASERSTRAUNNGNARDENNADE
AR OFPNAD. UNDNK ATT UTSATTADG FOR STRALEN.
VORSICHT
USB/ player MP3 16-17
© 2011 PIONEER CORPORATION.
CLASS 28 VISIBLE AND NIBLE LASER RADION WHEN OPEN,AND EXPOSURE TO THE BEAM
ATTENTION
RADATIONS LASER VISIBLES ET INVISIBLES DE CLASSE 3B QUAND
ADVARSEL
OUVERF,ENVE2TOUEXPOSSIONAOFAISCEAU
WARNING
KLASSE 38 SYN10 CC USYN10 LASERSTRAL NOVED ABNNO.
UNOCA UDBETTELSE FOR STRALING.
VORSICHT
KCLASS 38 SYNLY CCH OYSYNI LKRASERALNNO NAR DENNA DEL ACR OPNDN, UNOVIK ATT UTSATTADQ DOF STRALEN.
SEIGEFOFENETERABDECKUNGISTSICHTBAREUNDUNSSICHTBARELASERSTRALUNGDER
PRECAUCION
CUANDO SE ABERE HAY RADIACION LASER DE CLASE 2B VISIBLE E INVisible. EVITE LA
VARO!
ANATTAESSA OLET ALTTINA NAKYVALLE IA NAKYMATTOMALLE LUOKAN 38
LASERSATELYLLE,ALAKATSO SATEESEEN
LASER KLASSE 1
D58-5-2-2b*B1_De
Uber Kondensation
Uber iPod/Phone/iPad
Made for

iPod iPhone iPad
© 2011 PIONEER CORPORATION.
© 2011 PIONEER CORPORATION.
KLASSE 1 LASERPRODUCT
D58-5-2-2b*B1_Ni
Over condensvocht
© 2011 PIONEER CORPORATION.
CLASS 31 WIRE AND WIRE LASER RADIUS AN WHEN OPEN, ADO EXPOSURE TO THE EAM
ATTENTION
RADIATIONS LASER VISIBLES SET IVISIBLES DE CLASSES JB QUAND
ADVARSEL
KLASSE 3B SYNLIG DO USYNL LASERSTRALING VED ABINING, LINDOUS SYPHONICS COE STAINING
WARNING
KCLASS 3B SYNLOG OCH GSYNLIG LASERSTRALING NAR DENNA CEL
VORSICHT
Oprhbly npabIeHH HnHnKkAToPb 5-6
IoproTOBka K nCNoJIb3OBaHnIO
CoeHHHeHn cHCTREbI 7-8
IyJIbT,INCTaHIOHOHO yipabJIeHH. 8
OchOBhble onepaun
O6iee ynpabJeHnE 9
YcTAnOBKa YacOB (ToJIbKO cIyJIbTa JY) 9-10
iPod, iPhone u iPad
IpocnyHBAHne iPod,iPhone Hn iPad (TOIBKO X-HM20) 10-12
Bocnpon3BeDeHne DnCKOB CD nIe MP3/WMA
IIpocIyIHHBaHHe IINcKOB CD HIN MP3/WMA 13
YcOBepHHeCTBOBaHHOC BocPOn3BeIeHHe IHCKB CD HIN MP3/WMA 14-15
PekHM IaIKH MP3/WMA (TOJIbKO IJIa aIIOB MP3/WMA) 15-16
USB
IIpocJyHnBaHHe 3aIOMHHaIOIero ycTpoiCTBa 6OJIbIOH emKoCTH USB/MP3-Ⅱeepa .16-17
YcoBepHeHCTBOBaHnHOe BocnpoH3BeJeHHe USB .17
Papno
IpocJyHbHne paHonepea. 18
DOnonHnTeNbHbIe yHKcH
HcIOIb3OBAaIIHe cHCTeMb paIHOaIIbIX (RDS) 19-21
Pa6oTa c TaIIMePOM H CIIaIIHpeXHM (ToIbKO c IIyIbTa IY) 21-23
Haynnnkn 23
Cnpabouhble matepnaIbI
Ta6JIuHa HeHcIpaBHOcte 24-25
06cJyKHaHc 25
CneHΦHKaHH 26
Ipcdyipckkienie 27
06uue cBeDeHHa
YcTaNABHBAIte yCTPOINCTBO HA TBepIO,POBHOIOBEPXHOCTN 6e3 BN6paHII.
PacnoIarantePomKOrOBOpHTeHgpacToHHMHHHyM30cm OTIO6OTo ⅡIT-TeJEBH3Opa BO H36EkanHe OTKIOHnB IBcTe HA 3KpAne TeJEBn3Opa. PIn HaJIHNOTKIOHeHn, OTOIBNHsTe POMKOrOBOPHTeHIOJaIbHicOTeJEBn3Opa. KK-TeJIeBH3Op HC IIOBepKeH TaKHBM BHOpAHM
IpeoxpaHHTc yctpoHCTBO OT BO3dEChTBHIIpAMORO COHCHHO CBeta,CHIBHX MAHHTHBIX HOIEJ,HPe3MPOH HIIbH,BIaKHOCHT H OJIckTPOHHOR/OJCKTPCCKCCKO O60pyoBaHHN (OMaHHHC KOMBIOTepb,FAKCbH, H.T.I.),CO3aIOHETO JIKKTPNCECKHE NOMEXH.
Hc pa3McIIaIte HnKaKHX IpCIMCTOB Ha BcpxHc CTOPOHc yctpoHCTBa.
He noDBpcraTc ycToHCTBO BO3CnCTBHO BtAR, TCMnepaTp BbHIE 60°C HJIN CBEPXHH3KHX TMnepaTp.
EcHcTeMa paboTaet HnPaBnBHo,OTcoeHHHTe Ka6CbI INTHaHHNepMeHHORo TOKa OT ceteBOH po3ETKn. ChOBA NIOcEOHHHTe Ka6Cb IINTAHHNepcMeHHORo TOKa H 3aTcM BKIOOHTE CHCTEMVy
Ipn rpo3c,OTKIOHTc yctpoCTBO OT cTn D6C30NaCHOCTH.
PnO TOCINHENHN BNIKN KabeJI INHTAHN INepeMeHHORTO KAOTcCBOI PO3CTKN, IepKITcB 3a BNIKY, TAK KAp NpH BHTARBAHH3a Ka6JIb MOKET IOBPeINHTCB RBYTPEHII HPOBOJKA.
Bnka Ka6cIg INrTaHHN IpcmHHO TOKa HcIOb3yctKa Ka paBeHNHTeJI H NOJKHb BccIHa HxOHTbcB B paOoYem COCTOBHH.
He ChnmaTe HapyxHyIO KpbIiky, TAK KaK 3TO MOKeT npBecTN K NOPaHexHIO 3NeKTPueckNIM TOKOM. O6patNTecb 3a BHYTpEHHM 06CnyXkBaHNEM B MecTHbI cepBcHbI ueHp PIONEER.
He 6IOKpyIe BEHTJIaIINHO 3aKpbITHEm BEHTNIIOHOHBIX
OTBepCTH KAKHMN-JIN6O HpeMetAMn, HAIIpHmep, Ra3eTAMn, CKaTePTAMn, IIITOPAMH H.II.
He pa3meiHa aIapate HcToHHKOnKpbTOrO OrH, Hnppmep, 3aXKeIIbIe cBeH.
O6paHaeBHMaHHeHaKOJOrHcckHeacNEKbIyTHIN3aHHN ydaHn HcIOJIb30BaHbIX 6aTapei.
AIInapar IpcIHa3Nauch HJIHcIOJIb3OBaHHB yCIOBHX yMEpeHIoro KJHMata.
PpeDynpexKeHneH:
HcnoB3yemoc HnppckHe cOJBKaIaTb HnnpjKeHHem, yka3aHHbIM Ha 3OM aIIapate. HcnoJb3OBaHne 3TOrHO H3deJIINn IIpH npjRkeHHN BblIe yka3aHIHO RBAIETCs OIacBbIM H MoKCT IPNBCCTN K IOXApY HIN dpyromy HechactHomClyauHO, BB3bBAIOUeMy IOBpeKJeHne. KomnaHH PIONEER He 6yDet HeCTN OTBeTcBEHHOCt 3a IIIO6oc IOBpeKHeHC, BHTCKaIOUeC H3 HcNOJIb3OBaHH 3TOrA IIIapata IIH HnnpjKeHHN, OTJHHOM OT yka3aHHORo Ha anipate.
PeryuipoBaHne rpoMkoCTn
YpOBeH 3ByKa IIpH 3aHaHHo HAcTPOIke rPOMKocTH 3aBHCHT O KII I pOMKOROBOPHTcJIe, paIOIOKeHHN HpyHX pa3JInuHbIX PAKTOPOB. PckOMeHJyCTcH N36craTB BO3JeCTBnH BbICOKHX ypOBHe rPOMKocTH. IIpH BKJIOUChHH YcTPOIcTBa Hc BKJIOUaHte rPOMKocTB Ha IOJIHyO MOIHOCtB. CJyuaHte My3bIKy IIpH cpeINHX ypOBHx rPOMKocTH. IN36bIToOHc 3ByKOBoc IaBAJIeHHc H3 HayIIHHKOB HrOIOBbIX TeIcfoHOB MoKcT BbIBaTB IOTcpIO cIyxa.
Oprahbl ynpabJeHnN n HndkaTOpbl
HaKMHTc KHOIIy STANDBY/ON, tOToBb BkIOHHTb IHTaHHc.
Tocne nCnoB3OBAHnA:
HaKMHTe KHOIIKy STANDBY/ON, YTO6bI BOITIN B pcKHM OKHJaHn.
PerynipoBaHne npKocTn dncnpea
IyMeHbHeHH npKocn HacHJie HaKMHTe KHOHKY DIMMER ha nyIbTe Dv.
Dimmer1 (HcHcHcTeMHbH). Dimmer2 (HcHcHc cTaHOBHTcTcMHcc) DimmerOff (Hc HcHpKn).
A B T O M A T N U E C K A Y C T A H O B K A r p o m k o c t n
PnBbIKIOueHHN BcIIOueHHN OCHOBHOrO 6IOKA CypOBHEm rPOMKoCTH, yCTaHOJIeHHbIM Ha 3HAueHHe 17 HIN BBIIe, rPOMKOCTb HAuHHAcTc co 3HAueHH 16.
PerynipoBaHne rpomKocTn
YIO6b yBENHHTb HIN yMeHNHTb rPOMKCTb, NOBepHInTe peRyJITop rPOMKCTN VOLUME (Ha OCHOBHOM 6IOKe) HIN HAKMITE KHOIIky VOL+/-(HA NyIbte JY).
ФункцаabTomatueckoro BKIOUeHINI nHTAHNIA
AIIIapat BKIOHuaeTc npn HauKATIN JIO60 N3 CJIeLyOUIHX KHOIOK:
- iPod/iPhone, CD, USB, LINE, TUNER ha ny. IBRE DY: AKTHBpyetc Bb6paHna dyHKnna.
KhoIIKa /Ha oCHOBHOM 6IOKe: AIIIapAT BKHIOHaETc, H HAHTeTc BocipOn3BeJHeHne IocJIHeH cyHKINn (CD, TUNER, USB, iPod, LINE IN)
Функца aBTOMaTnueckOTO BbIKIOueHINIITAHNIA
OCHOBHON 6JOK BOJET B peKHM OKHDAHH (ecHN yCTpOHTBO iPod/ iPhone He ycTAHOBcHOB B JOK-CTAHIO) HcTeCHHH 15 MHHYT 6e3JeCTBHn IIHcJIyIOUHX ycIOBHX:
Ipey yCTaHOBKO B DOK-CTaHIO OTCOeHNHTe BCE npHaJIeXHOCTn OT iPod HIN iPhone.
I nra chrtna aanntepa nna iPod nn iPhone (OK-CTaHnna)
Bctabte HAKOHeHHK OTBePTKN (TTHa, MaJIbH) BOTBePCThe aadIITepa, KaK IOKa3aHO Ha pHCyHKe, H IOHNMTTE BBEpx JIN CHHTN.

Bocnpoun3BeDeHne iPod nIi iPhone (DOK-CTaHn)
1 HaKMHTc KHOKy STANDBY/ON, TIO6bI BKIOHHTb IITaHNC.
2 HaKMHTe KHOIky iPod/iPhone Ha NITBE DY HIN HECKOIO Ka3 KHOIky INPUT HA OCHOBHOM 6JOKC, YTO6bI BB6paTB YHKIIIO iPod.
3 YcTaHOBHTc yCtpoHCTBO iPod HnH iPhone B JOK-ctAHnHO iPod OCHOBHOrO 6JOKa.
4 HaKMHTe KHOITKy (iPod/iPhone ), TTO6bHaHATB BOCIPON3BEJHeH.
Bocnpoun3BeDeneiPhone
3ByK 6yIeT NepeKIOHcBc C iPhone Ha OCHOBHO 6JIOK TOJIbKO IocJIe 3aBepueHHn Ipouceca ayTeHTHnKaunn PnHmepHO B TeueHne 10 cekyH.
BxoJHHe Bb3OBb6yT npHOCTaHaBAHBaTB BcPiOn3BeJeHHe.
IocieOTBetaHa Bb3OBbpa3rObopMOKHO CbHbATbTObKOuepe3 BcTPOeHHbI rPOMKOrOBOpHTeJIb iPhone. Yo6bHaHATb pa3roBOP, BKIOHTe rPOMKOrOBOpHTeJIb iPhone HIN OTcoEHHHtte iPhone ot JOK-CTAHHH.
B. Hanpimep, YTo6bI BbIbpaTb Homep 130
1 Haxmte Iba pa3a KhoIky 10
2 HaKMHTe KHOIIKy 1
3 HaKMHTe KHOIky 3
4 HaKMHTe KHOIky 0
Примочаня:
HeJIb3B BbI6paTb HOMep DOpOKKN, IIpeBbIIaIOUHIN YHCJIO DOpOKe HA INCKe.
Bo Bpem BAocipOn3BcJeHHN B CJIyuaHHOIIOCEIOBATeJIbIOCTH INPMO IHCK IIeBO3MOKeII.
Дя OCTaHOBKn BOCPon3BedeHn:
HaxmTe KHOIIky (CD/USI).
Nobtophoe BocnpOn3BedeHne
IIpn IOBTOPHOM BOCINPOH3BCDCHHH MOKHO HCIPcPBIBHO BOCIOHBOJNTb OHy IOpOKy, BCE IOpOKN HIN IOpOKKN B 3aIporpAMMPOBAHIO NocJeIOBaTeJIbIOCTH.
Iaay3bBBOCPOH3BeHeHH:
HaKMHTe KHOIky / (CD/U8B/).
PpocnyuBaHne 3anomnHaouoero yctpoiCTBa 60nbwoeMKoCTN USB/ MP3-npeepa (npoDolxKeHne)
ДяВOCnpoN3BedeHnA USB/MP3-nIeepa C BKNIOUeHHbIM pexNMOM napanK
1 HaKMHTe KHOIKy USB Ha IYIbTe DY HIN HeCKOJIbKO pa3 KHOIKY INPUT HA OCHOBHOM 6IOKE, YTO6bl Bb6paTb FyHKIIHO USB. IIOJKIOHHTe yCTPOIcTBo IaAMrTH USB, KOtOPoe coDEpKHT paAIbIb fOpMaTa MP3/WMA Ha yCTpoIHCTBe. Ec.II yCTPOIHCTBO IaMRTN USB IOIKIIHOAcTcKa K OCHOBHOMy 6IOKY, TO 6yIeT OTO6paKaTbc HfOpMaIIHn 06 yCTPOIHCTBe.
2 HaKMHTe KHOIIky FOLDER H 3aTeM KHOIIky PRESET (HIN H) TIO6bbl6paTb JKeJaaemyIOIaIKy IJIb BOCnPOH3BeJeHH. YTO6bHaATb BOCnPOH3BcDcHc C BKIOUCHHbIM PcKHMOM IIANIK, INpcjNTtC K IIIary 4. YTO6bH3MeHITb IaIKy IJIb BOCnPOH3BcDcHH, HaKMHTe KHOIIky PRESET (HIN H) DJIa BbOpaIpyoIHnKN.
3Bb6epHrTeKcIaembIΦaIIITINIBOCnPOH3BeIeHHaKaB KHOIKy H.
4 HaKMHTe KHOHNY (CD/USB ).HaHHCTcBocIpOH3BeIChHC, H OTO6pa3HTcH Mma paHJa.
OTo6paKaHOTcHa3BaHHe IecHH, HmHNCIOJIHTeJIH Ha3BaHHe aIb6oma, cJH OH 3aIIHCaHI Ha yCTpoIcTBe nAMrTH USB.
CoepKHMoe HnCIIe MoKHO H3McHHTb, HaKaB KHOITKY CD/USB DISPLAY.
ДяудаленуyctpoиctbanamATNUSB
1 HaxMMTc KHOIIky (CD/USB) ⅡIaOCTaHOBKN BOCIPOH3BCdCHHa.
2 OToCoeHHHt cYcTpoHCTBO NAMHTN USB or pa3bca USB.
Примейанн:
KOMIIHIN PIONEER He 6yIeT HeCTN OTBETCTBeHHIOCTb 3a HOTepIO DaHHbIX BO BpeM NODKJIIOueHHy cTpoiCtBA HAMrTH USB K ayINO CHCTME.
PhaiIbI, cKaTbIe BΦopMaTe MP3 H/HJIN WMA, MoKHO BOCIIPOH3BOIDHT bPiNIOIKJIHOHeHH K pa3bemy USB.
3TOT fopmat nAMrTH USB noJIepKnBaet faIIOByoCnCTemyFAT16HIN FAT32.
KoIIaHII PIONEER Hc MoKCT rapaHTnPoBaTb, TTO BCC yctpoiCtBa IaMaTH USB 6yIyT paOToBb Ha 3ToI ayIno cnCTeMe.
B 30I ay1no cHCTeMe He peKOMeHHyETc HcIOJIb3OBaTB Ka6CB USB IIN NOIKIIIOCHHN yCTPOiCtBA nAMrtn USB. HcIOJIb3OBAHHe Ka6EJ USB He 6yTe BJIINrTa Ha pa6OHe xapakTepeHCTKN 30Iay1no cHCTeMBI.
To yctpoicTBO nAMrTH USB He moKeT pa6oTaTB uepe3 KOHueHTparOp USB.
Pa3bcm USB Ha 3OM aIIIapate Hc IIpeIHa3HauCh IJIa IIOIKIOCHHHa KOMIbIOTcpa, a HCIOJIb3yctc IJIa IOTOKOBI HepeJaH My3bIK c yctpOHTBa IAMrTH USB.
BHeHHH JckcTKn HnCK HcJIb3a BOcIIpoH3BOJHTb Hepe3 pa3bcm USB.
EeINBIIAMHTUSBcOpKHTc60JIbIOIo6bEm DaHHBX, MOKeT IOTpe6OBaTBc4 6OJIbIE BpEmH INIg CHTbIBaHHJ DaHHBX.
3TO yCTPOINCTBO MOKET BOCIPON3B0NHTb faJIbIb B opMaTAX WMA H MP3. OHO aBTOMaTHueckn 6HApyKNaBaET TII BOCIPON3B0DnMoIO faiHa.EcIH Ha 3TOM yCTPOINCTBE IPOHNpBbAeTcR HeBCOPON3B0DnMbn faiI,OTOBpaKaetc HINHkAnu
3TO H3JeHne OTHOCHTcK 3aIOMHHaIOUHM yCTPOHCTBAM 60JIbIIOH EMKOCTH USB H MP3-IIeepam. OHaKO, OHo MOKeT HMeTB HEKOtOpbIE c60H B pa6Ote H0 pa3JINuHBM HeIpeBDHdEHHbIM IIpHuHHaM OT HeKOTOpbIX ycTPOHCTB. ECIN 3TO IpoH3OHET, BbKJIIOHHTe anIapat H 3aTEM CHOBACRO BKJIOHTc.
Iopr USB IpeHuaHaeu ToJIbKO IINI pIaMOrO HOJIIOUcHnK yctpoHCTBy IaMaTH USB 6e3 HcIIIOB3OBaHHKa6eJIA.
Bo Bpempa6oTbI HcKa CD, MP3-IIeep He 6yJeT 3apxkaTbc.
EcJIN IIpN BbI6ope yHKUHN USB Bbl IIOKJIHOaTe iPod Ka pa3bemy USB, oTo6pa3HTcH HIIINKaIHn «Not support>.
YCOBepseHCTBOBaHHoe Bocpon3BeDeHne USB
Cneyuouune yHKunnaHnauHbI yHKnmaM npu pa6ote CD:
Ctp.
Ppmaon nonck dopoxkn 14
NoBtopHoe BocnpOn3BeJeHne 14
Bocnpo3BeDHe BcnyauHOn
nocJeIOBaTeIbHOCTn 14
3anporpaMMnpoBaHHoe BocnpoN3BeJeHne (MP3/WMA) 15
Приимechanical:
EcJIN yCTPOHCTBO IAMrTH USB He NOIKIOHoeHO,Ha HnCJIeE IOBHTcR HNIIKAaIINR «USB No Media>.
3TO yCTPOINCTBO IIOJIePKHBAET TOIbKO fOpMaT «MPEG-1 Audio Layer-3》.(JAcToTa DNCKpeTH3aIIHH COCTABJIaER 32 KΓI,44,1 KΓI,48 KΓI)
IopraIOK BocpoH3BeHeHHaIOB MP3 MoKeT OTINHcTaBcR, B 3aBHCHMOCTN OT 3aIHcIBaHOICrO IporpaMMHOrO oecHeeHHn, HcIOJIb3yEmoTO IIpH 3aIpy3Ke aHa.
BHTpeiT, KOtOpbI IIOJIePjKHBaETcH qOpMaTOM MP3, COCTABJIAETOT 32 KHT/ceK IO 320 KHT/ceK, a IIIA fOpMaTAWMA -OT 64 KHT/ceK IO 160 KHT/ceK.
- Πια φαηνοB MP3/WMA yctaHOBHTE paCCHpeHne «.MP3» n «.WMA», Ππρ ΘORYCTBn paCCHpeHn MP3/WMA φαΠΙΤΑ BOCΠPOH3BecTH IeBO3MÖKHO.
CINCKN BOCINPOH3BedeHHn He IIOJIepKHBaIOTc Hn 3TOM yCTPOIcTBe.
HaTOMyCTPOINCTBEMOKETOTOBpaKaATbcHMMHANKNHIMIpaHJIpa3MepomIO32CHMBOIOB.
MaKCHMaJIbHOe cYMMaPHOe YHcJIO paHIOB MP3/WMA paBHO 999.
CymMapHOC YHCJIO CHTHBACMBIX IAIOK paBHO 99, BKIOOaI HAIKN C HEBOCIPON3BOIDIMMHN aJAMN. OHaKO, HAINCIIE NOKA3IBAETc TOJIbKO IAIKA c faJAMN MP3.
BpMa BOCpOHH3BeEHHH HcHJIe MoKeT OTo6paKaHbCn HeIpaBHbIO Iprn BocPOn3BeEHHH faJIa C IpeMeHHbIM 6HTpeHtOM.
- IIOJIcPKHBACMbIMI HAHHbIMN ID3TAG ABJIOTeCToJIbIO HA3BAHHe, NCIOTJINHTTEJBn AJlb6OM. Ha3BaHne IIeCHN, HMI HCIIIOJIHNTeI H Na3BaHInc AJIb6Oma MOKHO OTO6pa3HTb, HAKB KHOINKY DISPLAY BO BpemBOCINPOIH3BCdCHHnФaHJa HINpcKHMIAay3b.
WMA meta tag TaKke IIOJIePKHBAeT 3aROIOBOK, HMa HIOIINHTEJI HA3BaIIHe aJIbOOMa, KOTOpBE 3aIHNCbIAIOTcB PhaiJax WMA. FauJIbI foOpMaTa WMA, OxpaHaERMOrABTOPCKHM IIpaBOM, BOCIIPOH3BOIDHTb HcBO3MOKHO.

HacTpoiKa
1 HaKMHTe KHOIky STANDBY/ON, TIO6bIKBKNIOHTb IITaHHe.
2 HaKMHTc KHOKNy TUNER HccKOJIbKO pa3, YTO6b Bbl6paTB XcJACMbH qactOTHb IHaHa3OH (FM HIN AM).
3 HaKMHTe KHOIIKy TUNING+HIN-HaIyIbTe DY,HTO6bHaCTPOHTbcBa HAKeJIaEMyIO CTAHIO.
PyuHaHaCtpoiKa:
HaKMHTe KHOHky TUNING + HIN - HeCKoJIbKO pa3, YTO6bHaCTpOHTbc Ha JeklaemyIO CTAHIO.
- ABTomatnuecka HacTpoiKa:
EeHH KHOIIKA TUNING+HIN-HaKHMaeTcB TteueHHe 60JIee 0,5 ckyHbI, ABOMATNcckn 3aNyCTHTcR cKaHHPOBaHHe, H TOHep OCTAHOBHTcHa IIepBOI IIpHHMaemoi paIHocTaHH.
Примechanical:
- PpiHIOBJIeHH paIHOIIOMex HAcTPOHc a BtOMaTHueCKM cKaHpOBaHH MoKet aBTOMaTHueCKN OCTaHOHTbcB 9TOM MecTe.
HactpoKa c aBTOMaTHueckn cKaHHPOBaHNem 6yTeT HPOUYCKATb CTAHIN CO Cna6bIM CHTHAJOM. - ⅡIaOCTaHOBKn aBTOMaTHHeCKoH HAcTPOKn HOBTOPHo HAKMHTe KHOKNy TUNING+HH-.
- HactpoKe Ha cTaHUNo RDS (CnCTema paHNOaHHbX), ChauJa 6yJeT OTo6paKaTbcra Hactota, a 3aTeM 3aropntc HnHKaTOp RDS. HaKoHeu, NoBHTca Ha3BaHHe cTaHInn.
IIOJIHOABTOMAHUcckOHaCTpoiKNMOKHOIOCTHbIIra cTaIHINRDS《ASPM》,cm. cTp.19.
Bocnpon3BeDHeNc TaHemepom:
YcTpoHCTBO BKIIIOHaTeR H BOCIpOH3BOJHT KcIaEmBn HcTOHHK (CD, TUNER, USB, iPod, LINE IN) B 3aJaHHoe Bpcm.
3To ycTpoIcTBo IMeet 2 Tnna TaMepa:
ODHOPA3OBbI TAIMEP n EXEHNHEBbI TAIMEP.
Ondopa3OBbI TaMep:
OIOHopa3OBbTaiMep cpa6aTaBbAcTe OINH pa3 ToIbKO B 3aHaHHoc BpeMa. (NHDkaTop «© »)
EkeDHeBbI TaMep:
EeJHeBbI TaMep cpa6aTbIbAET BOHO ITO JKe 3aHaHHe BpemBa KaJbIy yCTaHOBJIEHHbI JeHb. HApHMeP, yCTaHOBHTc TaIMep KaK 3BOHOK 6yDJIbHHKa KaKIOc yTpo. (HdNKaTOp «DAILY»).
HcIOJIb3OBAHHc OJHOpa3OBORo TaIMcpa B COUcTaHH CCKeIHCBHBIM TaIMcpOM:
Haipnmep, HcnoIb3yHe OndopaoBbT aHMeP 11poocJiunBaHHaHIOIporpaMMb, a cKcHcBbT TaHMc pIPO6yKeHH.
1 YcraHOBHTe eKeJHeBHBHbI TaIImep (Ctp. 21).
2 YcraHOBHTe OOHopa3OBbI TaHMeP (ctp. 21).
Bocnpon3BeDeHne c TaIMePOM
Ipeed yctaHOBKO TaMepa:
Y6eHITecb, yTO qacb ycTaHOBJEHH Ha IpaBHLbHO BpeM (cm. cTp. 9). EcJIN qacb He ycTaHOBJEHH, fyHKIIO TaHMepa HcIOJIb3OBaTb HeJIb3J.
- JIA BOCIPPOH3BCDCHNc TaMcpOM: IIOKHOHTC yCTPOHCTBO USB, 3aRpy3HTe DnCKH HIN yCTAHOBHTe B DOK-CTAHHIO BOCIPPOH3BOIDMOe yCTPOHCTBO iPod.

1 HaKMHTe KHOHkY STANDBY/ON, qTO6bB KIOOHHTb HNTaHHe.
2 HaKMHTe H yIepKbAaTe KhoNNky CLOCK/TIMER.
3 B TeueHHe 30 cekyIHHaKMHTe KHOIIky IHN HIOI, YTO6bI Bb6paTb HapameTp «Once» HIN «Daily», H aKMHTe KHOIIky ENTER.
B TeueHHe 30 cekyHnHaKMHTe KHOIIKy HIN HTO6bI Bb6paTb npaMeTp «Timer set>, nHaKMHTe KHOIIKy ENTER.
5 IINBb6opa HcToUHHKa BOCIPOH3BcDEHHc TaIMepOM (CD, TUNER, USB,iPod,LINE IN) HAKMHTe KHOIKy HIN HAI. HaKMHTe KHOIKY ENTER.
PnB Bb6ope TIOhepa, Bb6epHTe CTAHHIO, HAKAB KHOIKY KINH N H3aTcM HAKMHTe KHOIKY ENTER. EcIH cTAHHN He 6bila 3aIporpamHPOBaHa, Ha JINCIIIE CNOBHTcR HINHKaIIH NcNo Presct, H yCTaHOBA TaHMePA dyET OTMeHeHa.
6 IpyIINPOBKN HnHnHAKMHTe KHOIKy HnH H3aTEM HAKMTc KHOIKY ENTER.
7 HaKMHTC KHOIKY ENTER INI yCTaHOBKN YacOB. HaKMHTC KHOIKY HIN H 3ATCM HAKMHTC KHOIKY ENTER.
8 IpyJINpOBKN MHNyT HAKMHTe KHOIKY HIN H 3aTEM HAKMHTe KHOIKY ENTER.
9 YcTaHOBHTe OKOHaTeJIbHO BpeM, KAK OHcaHO B IIIarax 7 n 8 BIIHIE.
10 OtperyIpyIe rpoMIOCTb c HOMOIIbIO KHOIIKN VOL (+HIN-) H 3aTeMaKMIte KHOIIKY ENTER. He HAcTpaHbaIte rpoMIOCTb IcTHIKOM BICOKTO yPOBHa.
11 HaKMITE KHOIIKY STANDBY/ON, YTO6bI BOITN BpeKHM OKNJAAHH. 3aRopaetc HnHnKATOP «TIMER», n yctpoHCTBO rOToBO K BOCIpOH3BeDEHHIO C TaHmepOM.
12 PnIOCTHKeHH 3aHaHHo BPMeHH HauHETcB OBCIPOHN3BeHHe. IpOMKocTB 6yET yBEINHBAbCn IOCTeNEHHO, NOKa He IOCTHHT 3aHaHHOro 3HaueHHN. HINHKatOp TaHmepa 6yET MHRATb BO BpeM BOCIPHOHN3BeHn C TaHmepom.
13Пи IOCTHKeHH BpeMeHH OOKHuAHN IO TaHMepy, cHCTema ABROMaTHueCKH BOIeT B peKHM OKHJaHH.
Ondopa3OBbI TaMep:
Taimep 6yIDTOTMeHEn.
ExeJHeBbI TaIMeP:
Taimep cpaatbbaet BOHO TO Ke BpemKaKmI DeHb.3o 6yiet IpoIOJkaTbce DO Tex NOp, NOKA He 6yET OTMeHeHa yCTaHOBka TaMepa.OTMcHHTc KcEINCBHb Taimep,ccn OH He HcIOJIb3yctcr.
Приимechanical:
- PpH BbIIIOJIHEHHN BOCIIPOH3BcIeHHN C TaIMcPOM c HOMOIIbIOpyrOroycTPOIcTBa,IOJIIOHOeHHOroKpa3bemy USB,Bb6epHTe
HN BNare5.
3TO yCTPOIcTBO ABOTOMATHUeCKH BKJIOHTC HIN BOJCTB peKHM OKNDAHHN. OHaKO, IIOCOEHNHeHHOE yCTPOIcTB HC 6yIcT BKJIOaTbC HIN BBIKIOaTbC. YTO6bl OCTaHOBTB BOCIIPOH3BcDEHNC C TaIMcpOM, BBIOJIHNTe IIpoJeDpy «OTMeHa yCTaONOBKn Taimepa» Ha 3ToI cTPaHIIC.
PpOBepka yCTaHOBKn TaIMepa:
1 BkIOHTe IHTaHHe H HaxKMHTe, yIepKHBa, KHOIIky CLOCK/TIMER.
2 B TcHHe 30 cKyHn HAKMHTe KHOIky | HIN | YTO6bBb6paTb HapamCtp «Once» HIN «Daily», H HAKMHTe KHOIky ENTER.
3 B TeueHHe 30 cekHyHaKMHTe KHOIky HIN HTO6bI Bb6paTb npamcTp «Timer Call》,HaKMHTe KHOIky ENTER.
OTmeHa yCTaHOBKn TaIMepa:
1 BkIOHTe HHTaHHe H HAKMHTe, yIepKHBa, KHOIIky CLOCK/TIMER.
2 B TcHHe 30 ckyHn HxMHTe KHOIky I HIN H, TTObbl6paTb HapamTp «Once» HIN «Daily», HxKMHTe KHOIky ENTER.
3 B TeHeH3 0ckyH1 HaKMITE KHOIky | HIN | TIO6bI Bb6paTb NapamCtp «Timer Off》,H HAKMITE KHOIky ENTER. TaHmep 6ydet OTMeHEn (ycTaHOBka He 6ydet OTMeHeHa).
NoBtophoe nCnObl3OBaHne 3aHeceHHoB B NaMaTb yCTaHOBKn TaMepa:
YcTaHOBka TaMepa 6yTe 3aIOMHHatbCnIOe ee BBeDeHn. IIOBTOPOHO HIOJIb3OBAHH OHOH n ToJ Ke yCTaHOBN BbIOIHHTe CJeTyIOUHe ONEpaHH.
1 BkHouHTe HHTAHHHe HnKaMMTe, yIepKHBaB, KHOIIky CLOCK/TIMER.
2 B TeueHHe 30 ckyHn HaaKMHTe KHOIky Hn Hn H, TTO6bl Bb6paTb napaMetp «Once» Hn «Daily», HaaKMHTe KHOIky ENTER.
3 B TeHeHHe 30 cekHII HAKMHTE KHOIky | HIN | TTo6bI Bb6paTb Hapametp «Timer On》,HakmHTe KHOIky ENTER.
4 Haxmte Khoiky STANDBY/ON, qto6bBoHTBpeKHM OKnDaHH.
Примочанe:
YcTaHOBka YacOB 6yTe c6paCbBAIbCg IPh BtACKBaHH Ka6JIa HHTAHH N3 po3CTK HIN IPh OTKIOCHHH NCKTPOIHTHAHH.
Pa6ota c TaImePOM n CnAun peXnM (ToIbKO c npIbTa Dy) (npoDoJxKeHne)

Cnaynn pexnm
PaIIO, KOMIIaKT-ⅡHCK, iPod, USB H IINHeHHb BXoT MOryT OTKIOHaTbc aBTOMaTHueckn.
1 BocipnoH3BeHTe JKeJiaeMbI HcTOHHK 3ByKa.
2 HauKMHTe KhoNky SLEEP.
3 B TeCHHe 5 cckyH HauKMHTe IIHpOByIO KHOIIky yCTaHOBKN BpcMeHH. (1MHHyTa-99MHHT)
4IIOABNTcHnHnKanHg «SLEEP»
5 YcTpoCTBO ABTOMATHueCKH BOIET BpeKHM OKHuaHHIO HCTeueHH 3aIaIIHO BPemEH. TpOMKOCTb 6yIET yMeHHbHaTbC3a1 MHHITy DO OKOHuaHH cIIIICrO pckHMA.
IIN NOITBepKdEHNIOCTAOUceroCBypeMeH CNJUero peKmA:
1 Korda noka3bIbaCTcHnHnKaIIHn «SLEEP», HauMHTc KhoNky SLEEP.
Длг OTMeHbI cnaeero pexkMa:
HaKMHTe KHOIIKY STANDBY/ON, KOIa IOKa3bIbAcTcHIIHKaIIH N'SLEEP》,UTO6bI OTMcHITb cIIHIIH pckHM 6c3 yctAHOBKn yctpoHCTBa B peKHM OKHDAHHB, BBIIOJIHNTE cJIeTyIOHce.
1 KOrJa Ioka3bIbaCTc HIIINKaIIHra «SLEEP», HaKMHTc KHOITKY SLEEP.
2 B TcHHe 5 cckyHJI Iba pa3a HaKMHTc KHOIky «0», NOKa Hc NOBHTcY HINKAnH «SLEEP 00».

PIONEER CORPORATION, 2011.
Bce npaba 3aunneHbI.
PpimMeaHne:
B COOTBETCTBUN CO CTaTbe 53aKoHa PocCnCKoΦeepaun "O 3aUnte npab notpe6nten" u Kka3aHneM PtPABNTeJIbCTBa PocCnCKo Φeepaun N 720 ot 16 nIOH 1997 roa Kopnpaun Pioneer Europe NV yCTaHaBnBaet ycIOBne Ha cIeDyHOu IpoDOJXnTeJIbHOCTb Cpoka cIyKbI oΦNuaJIbHO nOcTaBIAEMy H PoCCnckn pbHOK TObApOB.
Aydno n Bndeoo6opydoBaHne:7net
Ipehochoe
aydnoo6obpyoBaHne:
6
Dpyroe o6bopyoBaHne (HayuHnK, MmKpOpoH n T.D.): 5 neT
ABTOMO6nIbHa
3JIeKToHnKa:
6
D3-7-10-6 A1Ru
NET
http://www.pioneer.co.uk
http://www.pioneer.fr
http://www.pioneer.es
http://www.pioneer.de
http://www.pioneer.it
http://www.pioneer.nl - http://www.pioneer.be
http://www.pioneer-rus.ru
http://www.pioneer.eu
© 2011 PIONEER CORPORATION.
All rights reserved.
© 2011 PIONEER CORPORATION.
PIONEER ELECTRONICS (USA) INC.
P.O. BOX 1540, Long Beach, California 90801-1540, U.S.A. TEL: (800) 421-1404
PIONEER ELECTRONICS OF CANADA, INC.
340 Ferrier Street, Unit 2, Markham, Ontario L3R 2Z5, Canada TEL: 1-877-283-5901, 905-479-4411
PIONEER EUROPE NV
Haven 1087, Keetberglaan 1, B-9120 Melsele, Belgium TEL: 03/570.05.11
PIONEER ELECTRONICS ASIACENTRE PTE. LTD.
253 Alexandra Road, #04-01, Singapore 159936 TEL: 65-6472-7555
PIONEER ELECTRONICS AUSTRALIA PTY. LTD.
5 Arco Lane, Heatherton, Victoria, 3202, Australia, TEL: (03) 9586-6300
PIONEER ELECTRONICS DE MEXICO S.A. DE C.V.
Blvd. Manuel Avila Camacho 138 10 piso Col.Lomas de Chapultepec, Mexico, D.F. 11000 TEL: 55-9178-4270
K002_B4_Ru