
XDS301K - Pregnant PIONEER - Free user manual and instructions
Find the device manual for free XDS301K PIONEER in PDF.
| Product Type | iPod/iPhone dock speaker with FM radio and alarm |
| Brand | Pioneer |
| Model | XDS301K |
| Dimensions (W × H × D) | 243 mm × 46 mm × 150 mm |
| Weight | 660 g |
| Power supply | AC 100-240 V, 50/60 Hz, output DC 5 V/2 A |
| Power consumption | 10 W (standby: 0.65 W) |
| Output power | 2 × 2.5 W RMS (1 kHz, 15% THD, 4 Ω) |
| Speakers | 36 mm full-range driver, 4 Ω impedance |
| FM tuner | 87.5 MHz to 108.0 MHz, 0.05 MHz step |
| Radio memory | 20 preset stations |
| Audio inputs | 3.5 mm AUX-in jack (stereo) |
| Dock | For iPod/iPhone with included adapters |
| Supplied accessories | AC adapter (2 connectors), remote control, warranty card, instruction manual, 5 iPod/iPhone adapters |
| Main functions | iPod/iPhone playback, FM radio, alarm clock (buzzer, iPod, FM), auxiliary input, remote control |
| Display | Clock, source, alarm mode, volume (00-30), FM frequency, preset number |
| Care and cleaning | Disconnect the AC adapter before cleaning; use a soft, dry cloth. Do not use solvents. |
| Safety | Do not expose to water or moisture; do not obstruct ventilation openings; do not place open flames on the device; use only the supplied adapter. |
| Repairability | No user-serviceable parts; refer all servicing to qualified personnel. |
| Batteries | Remote control: lithium battery; clock battery (replaceable); observe polarity. |
| General information | Domestic use; compatible with iPod classic, nano, touch, and iPhone (listed models); charges iPod/iPhone on the dock. |
Frequently Asked Questions - XDS301K PIONEER
User questions about XDS301K PIONEER
0 question about this device. Answer the ones you know or ask your own.
Ask a new question about this device
Download the instructions for your Pregnant in PDF format for free! Find your manual XDS301K - PIONEER and take your electronic device back in hand. On this page are published all the documents necessary for the use of your device. XDS301K by PIONEER.
USER MANUAL XDS301K PIONEER
The lightning flash with arrowhead symbol, within an equilateral triangle, is intended to alert the user to the presence of uninsulated "dangerous voltage" within the product's enclosure that may be of sufficient magnitude to constitute a risk of electric shock to persons.
CAUTION
RISK OF ELECTRIC SHOCK DO NOT OPEN
CAUTION:
TO PREVENT THE RISK OF ELECTRIC SHOCK,DO NOT REMOVE COVER (OR BACK). NO USER-SERVICEABLE PARTS INSIDE.REFER SERVICING TO QUALIFIED SERVICE PERSONNEL.

The exclamation point within an equilateral triangle is intended to alert the user to the presence of important operating and maintenance (servicing) instructions in the literature accompanying the appliance.
D3-4-2-1-1_A1_En
WARNING
This equipment is not waterproof. To prevent a fire or shock hazard, do not place any container filled with liquid near this equipment (such as a vase or flower pot) or expose it to dripping, splashing, rain or moisture.
D3-4-2-1-3_A1_En
WARNING
Before plugging in for the first time, read the following section carefully.
The voltage of the available power supply differs according to country or region. Be sure that the power supply voltage of the area where this unit will be used meets the required voltage (e.g., 230V or 120V ) written on the AC adapter label.
D3-4-2-1-4*A1En
WARNING
To prevent a fire hazard, do not place any naked flame sources (such as a lighted candle) on the equipment.
D3-4-2-1-7a A1 En
VENTILATION CAUTION
When installing this unit, make sure to leave space around the unit for ventilation to improve heat radiation (at least 15cm at top, 5cm at rear, and 1cm at each side).
WARNING
Slots and openings in the cabinet are provided for ventilation to ensure reliable operation of the product, and to protect it from overheating. To prevent fire hazard, the openings should never be blocked or covered with items (such as newspapers, table-cloths, curtains) or by operating the equipment on thick carpet or a bed.
D3-4-2-1-7b*A1_EN
WARNING
Store small parts out of the reach of children and infants. If accidentally swallowed, contact a doctor immediately.
Operating Environment
Operating environment temperature and humidity: +5^ to +35^ (+41^ to +95^) less than 85% RH (cooling vents not blocked)
Do not install this unit in a poorly ventilated area, or in locations exposed to high humidity or direct sunlight (or strong artificial light)
D3-4-2-1-7c*A1En
If the AC plug of this unit does not match the AC outlet you want to use, the plug must be removed and appropriate one fitted. Replacement and mounting of an AC plug on the power supply cord of this unit should be performed only by qualified service personnel. If connected to an AC outlet, the cut-off plug can cause severe electrical shock. Make sure it is properly disposed of after removal.
The equipment should be disconnected by removing the mains plug from the wall socket when left unused for a long period of time (for example, when on vacation).
D3-4-2-2-1a_A1_En
CAUTION
button on this unit will not completely shut off all power from the AC outlet. Since the power cord serves as the main disconnect device for the unit, you will need to unplug it from the AC outlet to shut down all power. Therefore, make sure the unit has been installed so that the power cord can be easily unplugged from the AC outlet in case of an accident. To avoid fire hazard, the power cord should also be unplugged from the AC outlet when left unused for a long period of time (for example, when on vacation).
D3-4-2-2-2a*A1_EN
When using this product, confirm the safety information shown on the bottom of the unit and the AC adapter label.
D3-4-2-2-4 B1 En
This product is for general household purposes. Any failure due to use for other than household purposes (such as long-term use for business purposes in a restaurant or use in a car or ship) and which requires repair will be charged for even during the warranty period.
K041_A1_En
Information for users on collection and disposal of old equipment and used batteries
Symbol for equipment

Symbol examples for batteries
Pb
These symbols on the products, packaging, and/or accompanying documents mean that used electrical and electronic products and batteries should not be mixed with general household waste.
For proper treatment, recovery and recycling of old products and used batteries, please take them to applicable collection points in accordance with your national legislation.
By disposing of these products and batteries correctly, you will help to save valuable resources and prevent any potential negative effects on human health and the environment which could otherwise arise from inappropriate waste handling.
For more information about collection and recycling of old products and batteries, please contact your local municipality, your waste disposal service or the point of sale where you purchased the items.
These symbols are only valid in the European Union.
For countries outside the European Union:
If you wish to discard these items, please contact your local authorities or dealer and ask for the correct method of disposal.
K058a_A1_En
When disposing of used batteries, please comply with governmental regulations or environmental public instruction's rules that apply in your country/area.
D3-4-2-3-1_B1_En
CAUTION
Danger of explosion if battery is incorrectly replaced. Replace only with the same or equivalent type recommended by the manufacturer.
D3-4-2-3-2_A1_En
WARNING
Do not use or store batteries in direct sunlight or other excessively hot place, such as inside a car or near a heater. This can cause batteries to leak, overheat, explode or catch fire. It can also reduce the life or performance of batteries.
D3-4-2-3-3_A1_En
Battery CAUTION
Incorrect use of batteries may result in such hazards as leakage and bursting.
Observe the following precautions:
- Insert the plus and minus sides of the batteries properly according to the marks in the battery case.
- Batteries with the same shape may have different voltages. Do not use different batteries together.
When using lithium batteries, please observe the following:
- Dispose of used battery cells immediately after replacement. Keep away from children.
If swallowed, please contact a doctor immediately.
Lithium batteries may present a fire or chemical burn hazard if misused. Do not disassemble, heat above 100 ^ C , or incinerate. - Remove the battery if the unit isn't going to be used for a month or more.
AC adapter CAUTION
- Make sure to grasp the body of the AC adapter when removing it from the power outlet. If you pull the power cord, it may become damaged which could lead to fire and/or electrocution.
- Do not attempt to plug in or remove the AC adapter with wet hands. This may result in electrocution.
- Insert the prongs of the AC adapter all the way into the power outlet. If the connection is incomplete, heat may be generated which could lead to fire. Furthermore, contact with the connected prongs of the adapter may result in electrocution.
- Do not insert the power cord of AC adapter into a power outlet where the connection remains loose despite inserting the prongs all the way into the outlet. Heat may be generated which could lead to fire. Consult with the retailer or an electrician regarding replacement of the power outlet.
- Do not place the unit, a piece of furniture, etc., on the power cord, or pinch the cord. Never make a knot in the cord or tie it with other cords. The power cords should be routed such that they are not likely to be stepped on. A damaged AC adapter and power cord can cause a fire or give you an electrical shock. Check the AC adapter and the power cord once in a while. When you find it damaged, ask your nearest PIONEER authorized service center or your dealer for a replacement.
Store the AC adapter out of the reach of children and infants.
The AC adapter cord may accidentally wind around the neck and it may cause suffocation.
Place the speakers at least 30~cm away from any CRT TV to avoid colour variations across the TV screen. If the variations persist, move the speakers further away from the TV.
Any other device liable to be influenced by magnetism should also be kept at a distance from the speaker system.
Table Of Contents
Before Start. 6
Accessory Check Up
Remote Control Check Up
Clock Battery Check Up
Switching type power adapter
Connect DC Power
Remote Control 8
X-DS301 Unit 9
Display information
How to use the FM antenna
Playing iPod/iPhone. 11
Connecting iPod/iPhone
Listening to FM Radio. 13
Using Auxiliary Input. 14
Using Alarm. 15
Setting The Alarm
Switching Alarm Mode
When Alarm Sounds
Setting The Clock
Additional Information 16
Troubleshooting
Specifications
- There will not be additional notification in this booklet if there is/ or will be any design change to the product itself.
- Thank you for the purchase of Pioneer product, please read Operating Instructions before use for the 1st time for correct operation. Keep this Operating Instructions for your future reference.
1. Accessory Check Up
Check the following items when opening the package:
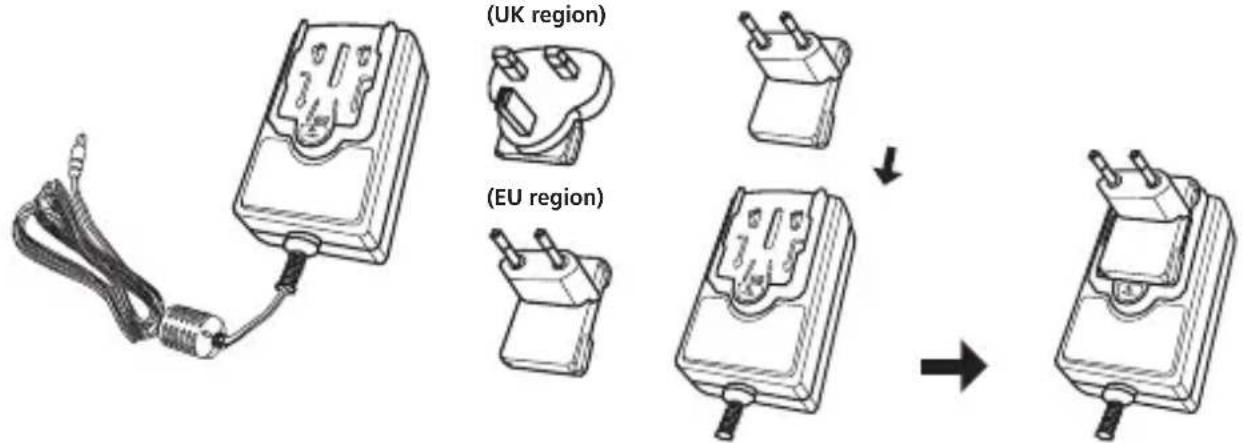
- Switching type power adapter × 1 (include Power Plug × 2 )
Remote control × 1
Warranty card × 1 - Operating Instructions (This Document)
iPod/iPhone adapters × 5
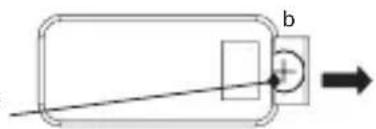
2. Remote Control Check Up
- Remove the insulation insert as shown in illustration (a) before 1st time use.
- To replace battery, open the battery drawer in the direction as shown in illustration (b).
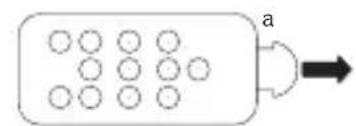
Battery, Model number: CR2025 3V
3. Clock Battery Check Up
Remove the insulation insert before 1st time use.
Screw
Insulation Insert
Battery, Model number: CR2025 3V
4. Switching type power adapter
Slide the power plug along the guide rails of the AC adapter as shown in the figure below until there is an audible click.
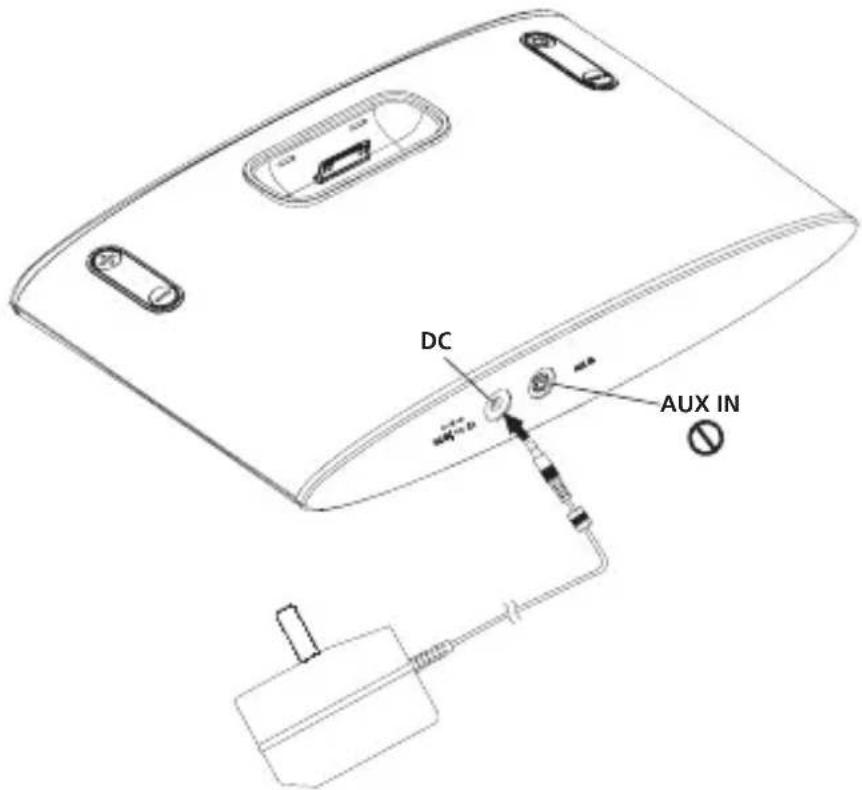
5. Connect DC Power
- Plug the power adapter DC jack into the "DC-in" port of the unit, Plug the adapter head in power outlet.
- When connected, the system will go into Standby Mode and display will show the clock time.
- Use only the power adapter included in this package, do not use power adapter of different specification.

- Standby/On
- Mute
- Memory: to store favorable stations
- MENU iPod/iPhone: to enter iPod/iPhone menu
- Alarm mode: switch between different alarm sound mode from BUZZ (default) iPod FM Alarm off
- Previous
- ENTER: to enter or confirm the actions on iPod/iPhone
- Next
- Volume +
- Play/Pause
- Up: to scroll up the list in iPod/iPhone
- Volume -
- FUNC:to switch between sources: FM AUX iPod
- Down: to scroll down the list in iPod/ iPhone
- Snooze

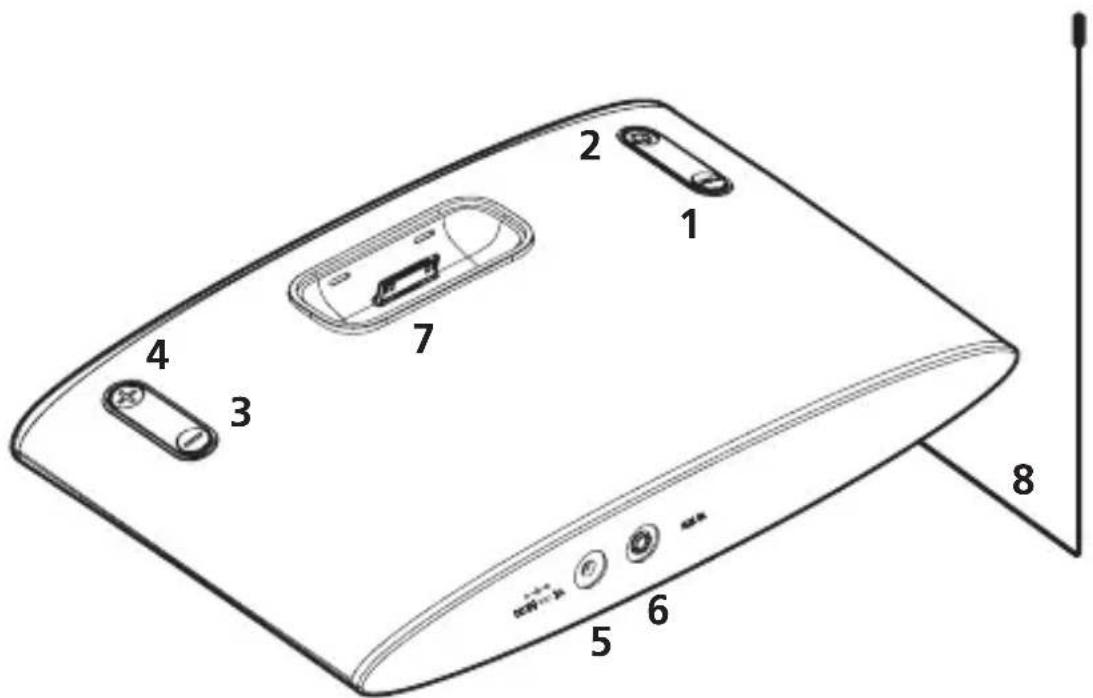

- FUNC: to select sources of music input, repeat FUNC button to cycle through different sources.

- Standby/On

- Volume -

- Volume +
- DC-in: to connect power adapter
- AUX-in: Auxiliary input for any device that has 3.5mm jack
- iPod/iPhone Dock
- FM antenna
Display information
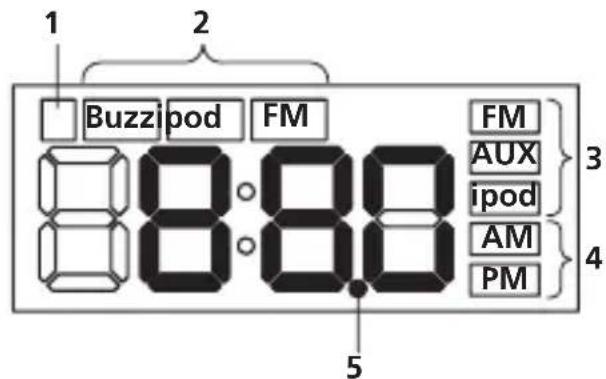
- This indicator lights up when the alarm is set. It blinks during the alarm setup.
- The selected alarm mode is displayed.
- The source that is currently selected is displayed.
- Whether the time is AM or PM is displayed.
- The FM receiver frequency is 0.05 MHz step.
When the decimal dot is blinking, the actual frequency is value which added 0.05MHz to the indicated value of the display.
For example, the decimal point blinks when 88.05 MHz is tuned in, it lights up when 88.00 MHz is tuned in.
The clock time is displayed under normal conditions. It returns to the clock display after the following operations are completed.
The volume (00 - 30) is displayed during volume key operation.
- The FM receiver frequency or preset number (P01 - P20) is displayed while tuning of the radio station.
- Setting time is displayed during the alarm or the clock setup.
How to use the FM antenna
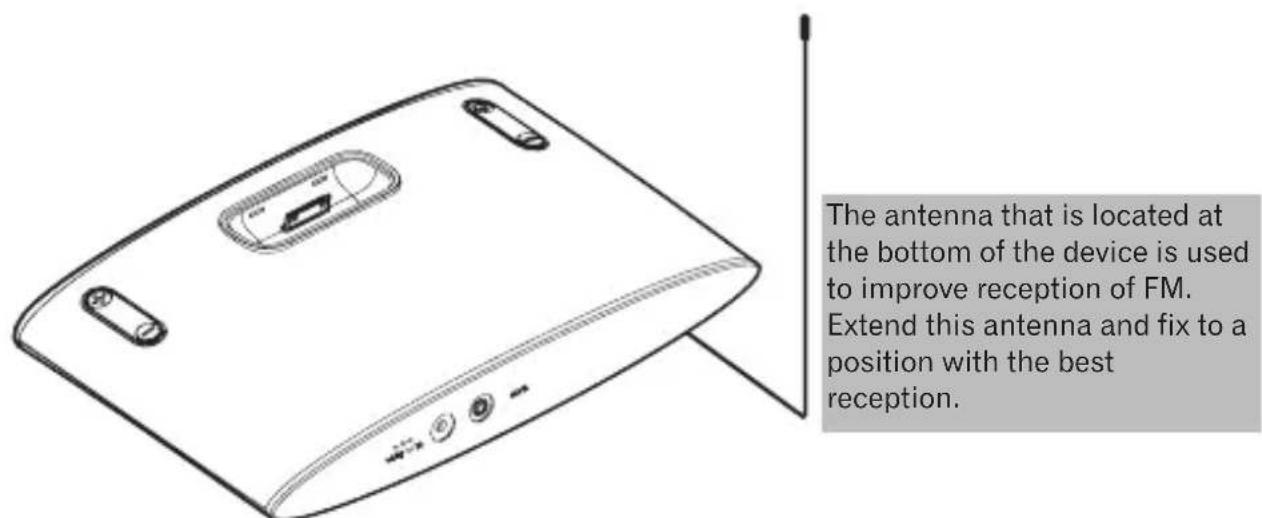
Do not use the antenna to move the main device or tug strongly on the antenna line. It may damage the antenna.
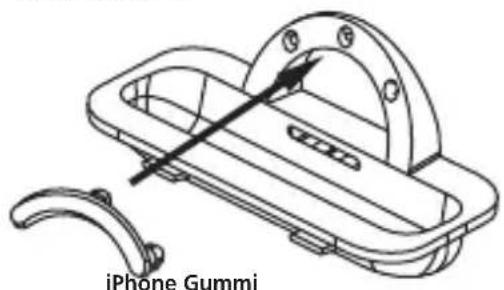
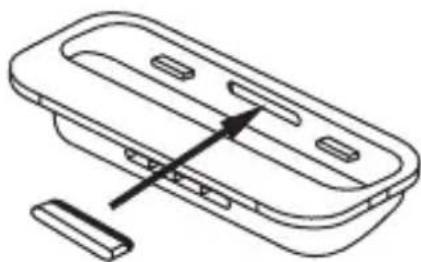
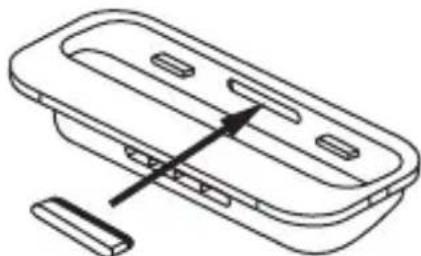
1. Connecting iPod/iPhone
Be sure to use the dock adapter that matches your iPod/iPhone to ensure proper fit and to prevent connector damage.
- Refer to adapter identification chart below to select the proper dock adapter.
- Insert the proper dock adapter into dock area and ensure the adapter clicks to secure.
- Insert the iPod/iPhone carefully. (iPod/iPhone should be removed from any kind of protective frame or cover.)
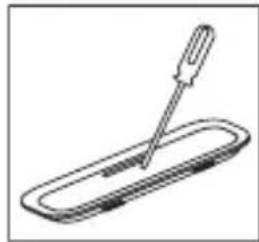
- To remove or replace the dock adapter, use a finger or a tool to pry the click on the dock cover.
Adapter identification chart
| Adapter Symbol | ||
| iPod classic 80 GB C | ||
| 160 GB (2007) D | ||
| 160 GB (2009) C | ||
| nano 2nd generation A | ||
| 3rd generation B | ||
| 4th generation A | ||
| 5th generation B | ||
| touch 1st generation | ||
| 2nd generation | ||
| 3rd generation | ||
| 4th generation | ||
| iPhone 4 GB 8 GB 16 GB | E | |
| 3G 8 GB 16 GB | ||
| 3GS 8 GB 16 GB 32 GB | ||
| 4 8 GB 16 GB 32 GB | ||
| 4S 16 GB 32 GB 64 GB | ||
All adapters other than Adapter Symbol A and B come with a rubber.
iPhone Rubber
Adapter E Adapter C, D
2. Press UNC to select iPod source
Cycle through different sources until the display shows "iPod".
3. Press Play/Pause to start playing music
- Use to operate.
- You can also operate directly from the iPod/iPhone.
- Operate directly on iPod/iPhone under the following circumstances: Wish to repeat or randomly play the song.
Operate under iPod source
- Press on the remote control to enter iPod/iPhone main menu.
- Press 和 and down on the remote control to select in iPod/iPhone menu.
- Press on the remote control to enter or confirm actions.
NOTE
- When operating directly on iPod/iPhone, do hold the iPod/iPhone with the other hand to prevent loose connection.
- iPod/iPhone will start charging when docked. (It will also charge under Standby mode)
- iPod/iPhone will not play automatically when docked if the source is not selected as "iPod".
- This system has been developed and tested for the software version of iPod/iPhone indicated on the website of Pioneer.
- Installing software versions other than indicated on the website of Pioneer to your iPod/ iPhone may result in incompatibility with this system.
Listening to FM Radio
The FM tuner is able to find the radio stations automatically and store as pre-set stations.
1. Press UNC to switch to FM source
The display will show the radio frequency meaning it's now under FM source.
2. Select Radio Stations
There are two ways of tuning FM stations:
Automatic Tune
Press and hold previous/ and next on the remote control, the tuner will automatically search for next available stations and stop at the stations.
Repeat same steps to automatically find more available stations.
Manual Tune
Press previous/ and next on the remote control to tune the radio manually.
3. Storing Stations
You can store up to 20 pre-set stations.
To store stations:
- Press FUNC to switch to FM source.
- Select radio stations.
- Press Memory to enter preset station memory mode.
- Press up and down to selected preset station number.
- Press memory to store your station.
4. Listening To Pre-Set Stations
Press JNC to switch to FM source.
Press up/ and down to toggle between preset stations (P01 - P20).
Stay or press Enter after select the preset station, you can listen selected FM radio station.
Using Auxiliary Input
-
Connect the music source such as MP3 player to the Aux-in port at back of the unit with a 3.5mm aux cable.
-
Press FUNC and switch to AUX source. When AUX source is selected, the display will show "AUX" on the screen.
NOTE
- When playing music through AUX source, the music volume will vary depending on the volume of the music player. If there is distortion when the volume is set at max, lower the music player's volume and to avoid distortion.
Setting The Alarm
Set the alarm time under STANDBY mode (Turn the power off)
- Press and hold JNC (on either system or remote control) to enter alarm setting mode.
- The "Minute" of the alarm time on the display starts to blink.
[System] Press Volume +/Volume - to adjust the time.
[Remote] Press Up/own to adjust the time.
- Press JNC again to adjust "Hour".
[System] Press Volume +/Volume - to adjust the time.
[Remote] Press Up/own to adjust the time.
- The display will show "END" when alarm time set is complete.
Switching Alarm Mode
[Remote] Press arm Mode to switch between different alarm sounds: BUZZ (default sound) iPod FM Alarm off sound
[System] When the system is in STANDBY mode, press and hold Power to switch between different alarm sounds: BUZZ (default sound) iPod FM Alarm off sound
When Alarm Sounds
- Press SNOOZE on the remote, the alarm will stop and re-sound every 10 minutes.
- Press POWER to turn off the alarm.
Setting The Clock
Set the clock time under STANDBY mode. (Turn the power off)
- After the alarm time set is complete, press FUNC to enter clock time set.
- The "Minute" of the clock time on the display starts to blink.
[System] Press Volume +/Volume - to adjust the time.
[Remote] Press Up/ wn to adjust the time.
- Press UNC again to adjust "Hour".
[System] Press Volume +/Volume - to adjust the time.
[Remote] Press Up/ wn to adjust the time.
- The display will show "END" when clock time set is complete.
Troubleshooting
Incorrect operations are often mistaken for trouble and malfunctions. Check the points below when your X-DS301-K does not operate properly. The problem sometimes may lie in electrical components, please also check the components and appliances being used. Contact your nearest Pioneer authorized service if the problem still exists.
If this happens: Try this:
No audio stream or music intermittency.
- Check power supply to make sure it's correctly connected to the outlet.
- Check 3.5mm AUX IN cable to make sure it's correctly connected.
- Check iPod/iPhone connection to make sure it's correctly docked.
- Check sources to make sure your audio input is switched to correct source.
The power does not turn on. Use the AC adapter and connect the device to the power plug on the wall.
Can't operate the remote control. Replace the batteries.
The clock is not set to the correct time. Replace the batteries.
- Reset the clock.
Specifications
- Amplifier section
RMS power output: 2.5W + 2.5W (1 kHz, 15% T.H.D, 4 Ω)
Tuner section
Frequency range (FM): 87.5 MHz to 108.0 MHz
Speaker section
Transducer: 36mm Full Range Driver (Impedance: 4
Miscellaneous
Power requirements: AC 100 V to 240 V, 50 Hz/60 Hz, DC 5 V/2 A
Power consumption: 10 W
In standby: 0.65 W
Dimensions (W)× (H)× (D) .. 243mm× 46mm× 150mm
Weight: 660 g
Specifications and the design are subject to possible modifications without notice, due to improvements.

iPhone, iPod, iPod classic, iPod nano, and iPod touch are trademarks of Apple Inc., registered in the U.S. and other countries.
"Made for iPod" and "Made for iPhone" mean that an electronic accessory has been designed to connect specifically to iPod or iPhone, respectively, and has been certified by the developer to meet Apple performance standards. Apple is not responsible for the operation of this device or its compliance with safety and regulatory standards. Please note that the use of this accessory with iPod or iPhone may affect wireless performance.
This equipment is compatible with the audio of the iPod classic, iPod nano (2G/3G/4G/5G/6G), iPod touch (1G/2G/3G/4G), iPhone, iPhone 3G, iPhone 3GS, iPhone 4, iPhone 4S. However, some of the functions may be restricted for some models.
© 2012 PIONEER CORPORATION.
All rights reserved.
IMPORTANT

Adapter E Adapter C, D
© 2012 PIONEER CORPORATION.
This product is for general household purposes. Any failure due to use for other than household purposes (such as long-term use for business purposes in a restaurant or use in a car or ship) and which requires repair will be charged for even during the warranty period.
Observe the following precautions:
© 2012 PIONEER CORPORATION.
WAARSCHUWING NETSNOER
WAARSCHUWING batterij
Adapter E Adapter C, D
© 2012 PIONEER CORPORATION.
© 2012 PIONEER CORPORATION.
© 2012 PIONEER CORPORATION.
© 2012 PIONEER CORPORATION.
All rights reserved.
© 2012 PIONEER CORPORATION.
PIONEER ELECTRONICS (USA) INC.
P.O. BOX 1540, Long Beach, California 90801-1540, U.S.A. TEL: (800) 421-1404
PIONEER ELECTRONICS OF CANADA, INC.
340 Ferrier Street, Unit 2, Markham, Ontario L3R 2Z5, Canada
TEL: 1-877-283-5901, 905-479-4411
PIONEER EUROPE NV
Haven 1087, Keetberglaan 1, B-9120 Melsele, Belgium TEL: 03/570.05.11
PIONEER ELECTRONICS ASIACENTRE PTE. LTD.
253 Alexandra Road, #04-01, Singapore 159936 TEL: 65-6472-7555
PIONEER ELECTRONICS AUSTRALIA PTY. LTD.
5 Arco Lane, Heatherton, Victoria, 3202, Australia, TEL: (03) 9586-6300
PIONEER ELECTRONICS DE MEXICO S.A. DE C.V.
Blvd. Manuel Avila Camacho 138 10 piso Col.Lomas de Chapultepec, Mexico, D.F. 11000
TEL: 55-9178-4270
K002_B3_En