
CDX397MK2 - Cd player/recorder YAMAHA - Free user manual and instructions
Find the device manual for free CDX397MK2 YAMAHA in PDF.
| Product Type | CD Player/Recorder |
| Brand | YAMAHA |
| Model | CDX397MK2 |
| Dimensions (W x H x D) | 435 x 87 x 287 mm |
| Weight | 3.5 kg |
| Power Supply | 220-240 V, 50 Hz |
| Power Consumption | 13 W |
| Supported Formats | CD audio, CD-R, CD-RW, MP3, WMA |
| Playback Functions | Programmed, random, repeat (track, folder, disc), A-B repeat |
| Display | Display with CD-TEXT data, adjustable brightness |
| Outputs | Analog output (LINE OUT), digital optical output (DIGITAL OUT) |
| Output Level | Adjustable (OUTPUT LEVEL +/- keys) |
| Remote Control | Yes, with AAA batteries |
| Recording | Track programming for tape recording, synchronized recording |
| Search | Manual, skip, index, peak level |
| Space Insertion | Automatic (4 seconds between tracks) |
| Safety | Do not expose to rain or moisture, do not open the casing, Class I laser |
| Maintenance | Clean with a dry, clean cloth; do not use chemical solvents |
| Spare Parts and Repairability | Have any repair done by a Yamaha authorized service center |
Frequently Asked Questions - CDX397MK2 YAMAHA
User questions about CDX397MK2 YAMAHA
0 question about this device. Answer the ones you know or ask your own.
Ask a new question about this device
Download the instructions for your Cd player/recorder in PDF format for free! Find your manual CDX397MK2 - YAMAHA and take your electronic device back in hand. On this page are published all the documents necessary for the use of your device. CDX397MK2 by YAMAHA.
USER MANUAL CDX397MK2 YAMAHA
1 To assure the finest performance, please read this manual carefully. Keep it in a safe place for future reference.
2 Install this sound system in a well ventilated, cool, dry, clean place with at least 10cm on the top, 10cm on the left and right, and 10 cm at the back of CDX-397MK2 away from direct sunlight, heat sources, vibration, dust, moisture, and/or cold.
3. Locate this unit away from other electrical appliances, motors, or transformers to avoid humming sounds.
4 Do not expose this unit to sudden temperature changes from cold to hot, and do not locate this unit in an environment with high humidity (i.e. a room with a humidifier) to prevent condensation inside this unit, which may cause an electrical shock, fire, damage to this unit, and/or personal injury.
5 A v oid installing this unit where foreign object may fall onto this unit and/or this unit may be exposed to liquid dripping or splashing. On the top of this unit, do not place:
- Other components, as they may cause damage and/or discoloration on the surface of this unit.
- Burning objects (i.e. candles), as they may cause fire, damage to this unit, and/or personal injury.
- Containers with liquid in them, as they may fall and liquid may cause electrical shock to the user and/or damage to this unit.
6 Do not cover this unit with a newspaper, tablecloth, curtain, etc. in order not to obstruct heat radiation. If the temperature inside this unit rises, it may cause fire, damage to this unit, and/or personal injury.
7 Do not plug in this unit to a wall outlet until all connections are complete.
8 Do not operate this unit upside-down. It may overheat, possibly causing damage.
9 Do not use force on switches, knobs and/or cords.
10 When disconnecting the power cable from the wall outlet, grasp the plug; do not pull the cable.
11 Do not clean this unit with chemical solvents; this might damage the finish. Use a clean, dry cloth.
12 Only voltage specified on this unit must be used. Using this unit with a higher voltage than specified is dangerous and may cause fire, damage to this unit, and/or personal injury. Yamaha will not be held responsible for any damage resulting from use of this unit with a voltage other than specified.
13 Do not attempt to modify or fix this unit. Contact qualified Yamaha service personnel when any service is needed. The cabinet should never be opened for any reasons.
14 When not planning to use this unit for long periods of time (i.e. vacation), disconnect the AC power plug from the wall outlet.
15 Be sure to read the "TROUBLESHOOTING" section on common operating errors before concluding that this unit is faulty.
16 Before moving the unit, first remove the disc from the unit, press POWER to turn the unit off, and then disconnect the AC power plug from the wall outlet.
17 Condensation will form when the surrounding temperature changes suddenly. Disconnect the power cable from the outlet, then leave the unit alone.
18 When using the unit for a long time, the unit may become warm. Turn the power off, then leave the unit alone for cooling.
19 Install this unit near the wall outlet and where the AC power plug can be reached easily.
20 The batteries shall not be exposed to excessive heat such as sunshine, fire or like.
As long as this unit is connected to the AC wall outlet, it is not disconnected from the AC power source even if you turn off this unit by POWER.
DANGER
When this unit is plugged to the wall outlet, do not place your eyes close to the opening of the disc tray and other openings to look into inside.
WARNING
TO REDUCE THE RISK OF FIRE OR ELECTRIC SHOCK, DO NOT EXPOSE THIS APPLIANCE TO RAIN OR MOISTURE.
Laser component in this product is capable of emitting radiation exceeding the limit for Class 1.
For U.K. customers
If the socket outlets in the home are not suitable for the plug supplied with this appliance, it should be cut off and an appropriate 3 pin plug fitted. For details, refer to the instructions described below.
Note:
The plug severed from the mains lead must be destroyed, as a plug with bared flexible cord is hazardous if engaged in a live socket outlet.
SPECIAL INSTRUCTIONS FOR U.K. MODEL
IMPORTANT:
THE WIRES IN MAINS LEAD ARE COLOURED IN ACCORDANCE WITH THE FOLLOWING CODE:
Bluc: NEUTRAL
Brown: LIVE
As the colours of the wires in the mains lead of this apparatus may not correspond with the coloured markings identifying the terminals in your plug, proceed as follows:
The wire which is coloured BLUE must be connected to the terminal which is marked with the letter N or coloured BLACK. The wire which is coloured BROWN must be connected to the terminal which is marked with the letter L or coloured RED. Making sure that neither core is connected to the earth terminal of the three pin plug.
CONTENTS
FEATURES 2
SUPPORTED DISC TYPES 2
UNPACKING 3
NOTES ABOUT THE REMOTE CONTROL 3
CONNECTIONS 4
IDENTIFICATION OF COMPONENTS 5
Front panel 5
Display 5
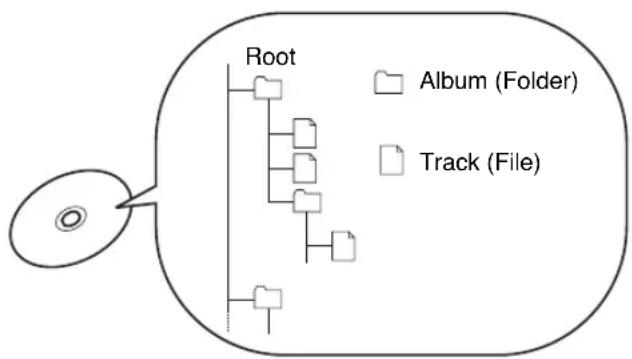
Remote control 6
BASIC OPERATION 7
To pause playback 8
To stop playback 8
To turn off the power 8
To play back the desired track 8
To search an folder/file on an MP3 or WMA disc 8
To skip to the beginning of the desired track (Skip search) 9
To advance or reverse playback rapidly (Manual search) 9
Changing display 10
Changing brightness of the display 11
Automatic spacing 11
Adjusting the output level 11
Automatic tape-programming (for Audio CD) 16
Manual tape-programming (for Audio CD) 18
Random sequential tape-programming (for Audio CD) 19
Automatic searching for the peak level on a disc (for Audio CD) 20
CD SYNCHRONIZED RECORDING 21
NOTES ABOUT DISCS 22
Discs playable with this unit 22
Notes about handling compact discs 22
TROUBLESHOOTING 23
SPECIFICATIONS 24
FEATURES
CD-R, CD-RW Disc Playability (For details, refer to page 22.)
CD-TEXT Data Display capability
Program Play
Random-Sequence Play
Single Track/Entire Disc Repeat Play
Automatic Spacing Function
- Track Programming Function Useful for Recording Tracks Fitted onto Any Length of Tape
Automatic Peak Level Search Function
CD Synchronized Recording
Adjustable Display Brightness
Remote Control Capability
Optical Digital Output
MP3, WMA Disc Playability
SUPPORTED DISC TYPES
You can enjoy music discs with this unit. Since some disc operations of this unit are limited to specific disc types, the supported disc types are indicated using the icons shown below. Each icon means that the operation is limited to the corresponding disc type. For information on supported disc standards and disc usage notes, refer to "NOTES ABOUT DISCS" (page 22). Operations with no icon indicated are available for all disc types.
| Music CD | MP3, WMA |
| MP3, WMA Audio CD |
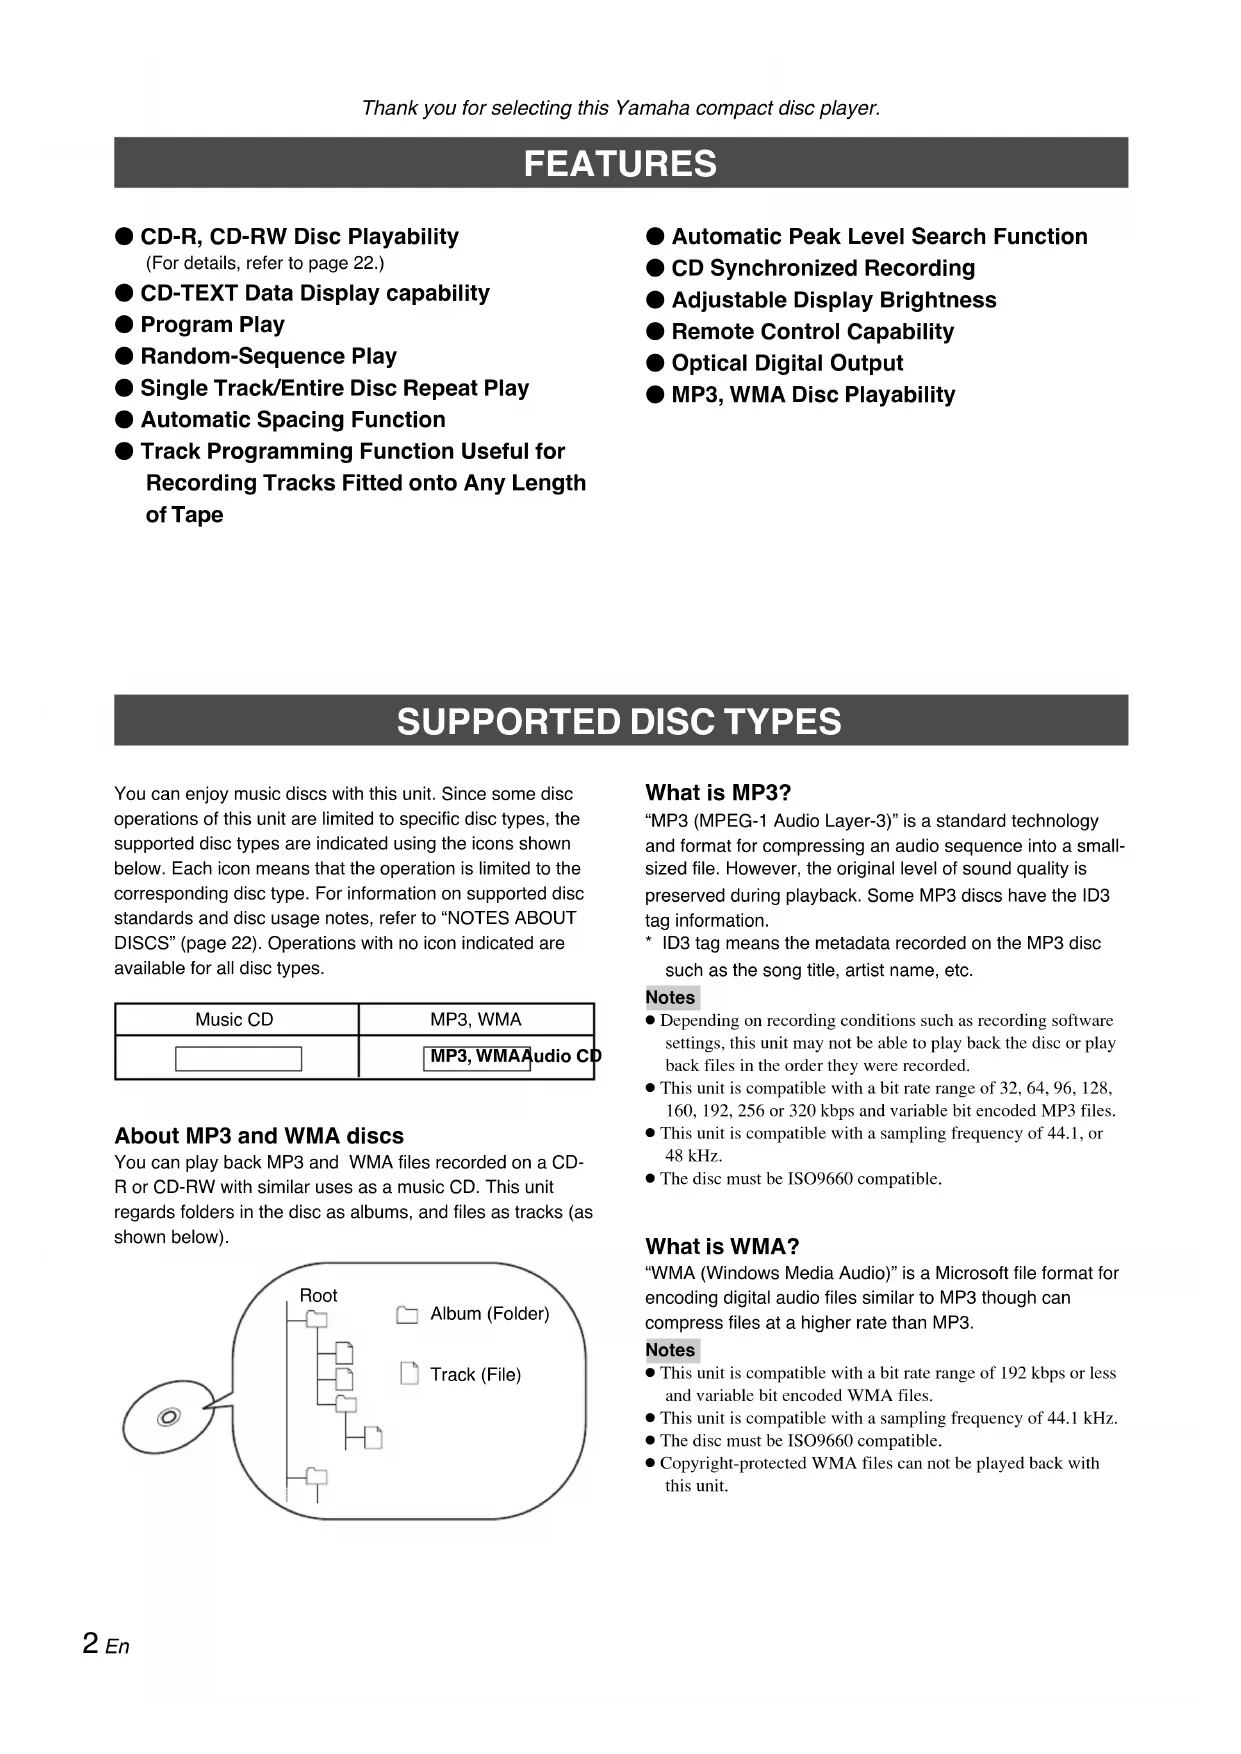
About MP3 and WMA discs
You can play back MP3 and WMA files recorded on a CD-R or CD-RW with similar uses as a music CD. This unit regards folders in the disc as albums, and files as tracks (as shown below).
What is MP3?
"MP3 (MPEG-1 Audio Layer-3)" is a standard technology and format for compressing an audio sequence into a small-sized file. However, the original level of sound quality is preserved during playback. Some MP3 discs have the ID3 tag information.
- ID3 tag means the metadata recorded on the MP3 disc such as the song title, artist name, etc.
Notes
- Depending on recording conditions such as recording software settings, this unit may not be able to play back the disc or play back files in the order they were recorded.
- This unit is compatible with a bit rate range of 32, 64, 96, 128, 160, 192, 256 or 320 kbps and variable bit encoded MP3 files.
- This unit is compatible with a sampling frequency of 44.1, or 48kHz .
The disc must be ISO9660 compatible.
What is WMA?
"WMA (Windows Media Audio)" is a Microsoft file format for encoding digital audio files similar to MP3 though can compress files at a higher rate than MP3.
Notes
- This unit is compatible with a bit rate range of 192 kbps or less and variable bit encoded WMA files.
- This unit is compatible with a sampling frequency of 44.1kHz .
The disc must be ISO9660 compatible.
Copyright-protected WMA files can not be played back with this unit.
UNPACKING
Carefully remove this unit and accessories from the box. You should find the unit itself and the following accessories.
Remote control Audio pin cable

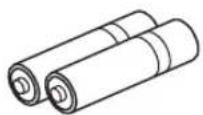
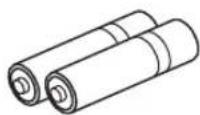
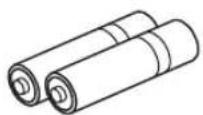
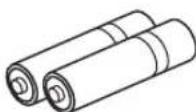
Batteries (AAA, R03, UM-4) x 2
NOTES ABOUT THE REMOTE CONTROL
Battery installation
- Turn the remote control over and remove the battery compartment cover by sliding it in the direction of the arrow.
- Insert the batteries (AAA, R03, UM-4) according to the polarity markings on the inside of the battery compartment.
- Close the battery compartment cover.
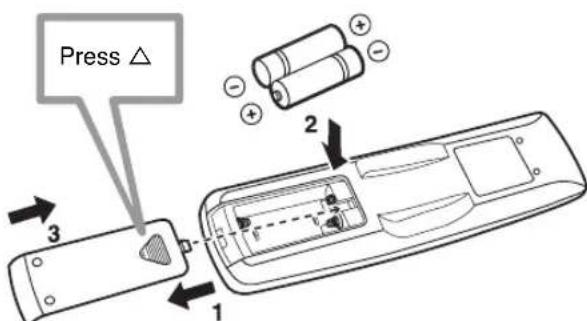
Battery replacement
If you notice that the remote control must be used closer to the main unit, the batteries are weak. Replace both batteries with new ones.
Notes
- Use only AAA, R03, UM-4 batteries for replacement.
- Be sure the polarities are correct. (See the illustration inside the battery compartment.)
- Remove the batteries if the remote control is not used for an extended period of time.
- If batteries leak, dispose of them immediately. Avoid touching the leaked material or letting it come in contact with clothing, etc. Clean the battery compartment thoroughly before installing new batteries.
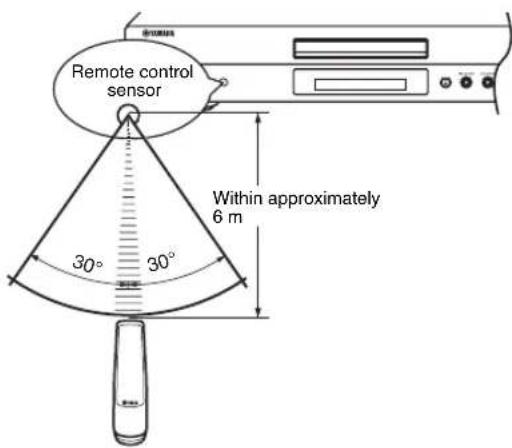
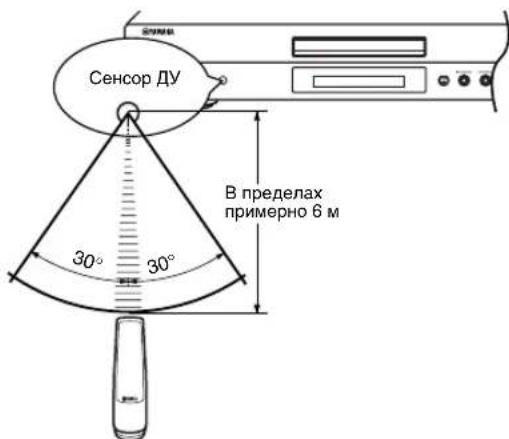
Remote control operation range
Notes
- There should be no large obstacles between the remote control and the main unit.
- If the remote control sensor is directly illuminated by strong lighting (especially an inverter type fluorescent lamp etc.), the remote control might not work properly. In this case, reposition the main unit to avoid direct lighting.
CONNECTIONS
- Before making any connection, switch OFF the power to the unit and the amplifier or other component.
-
Connections should be made to the correct input terminals of the amplifier or another component.
-
If the placement of this unit causes noise to another equipment, such as a tuner, separate them from each other.
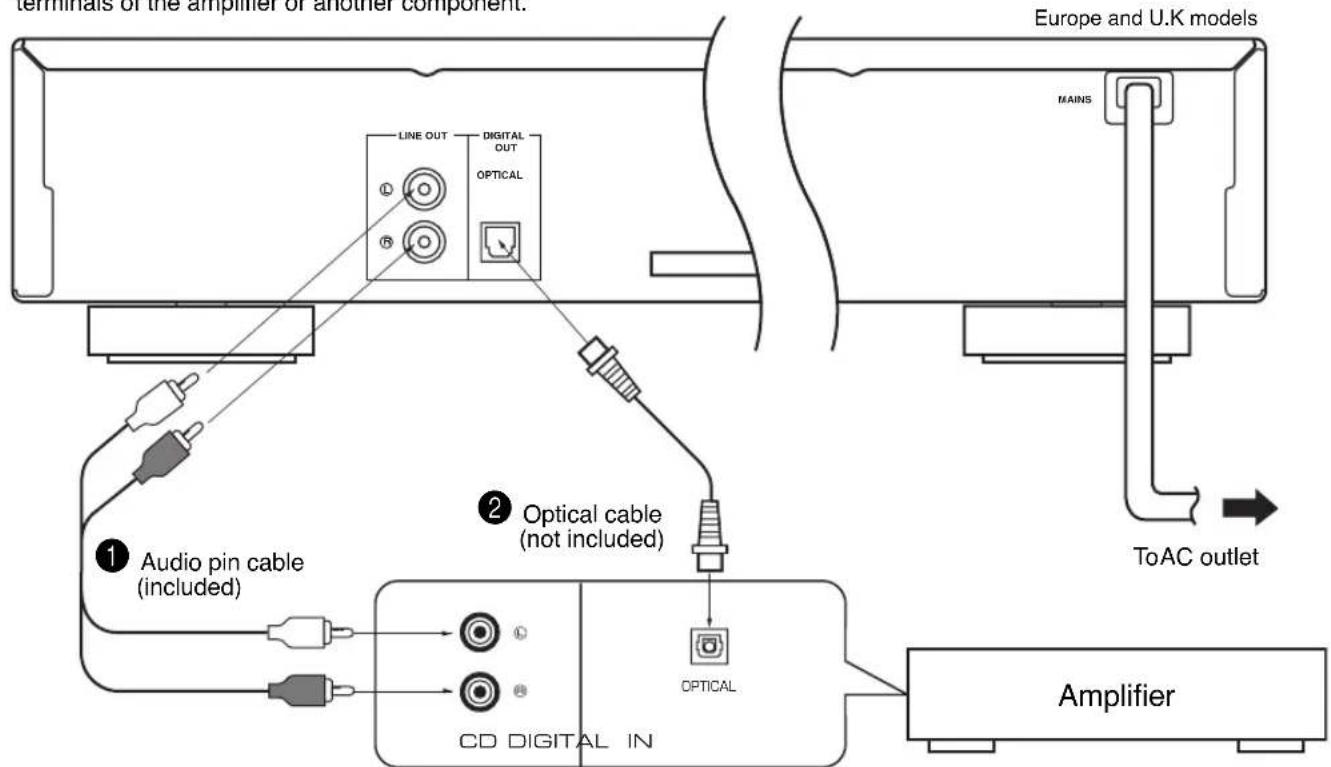
To connect this unit to your amplifier, choose one of the ways listed below.
Caution Do not plug in this unit to a wall outlet until all connections are complete.
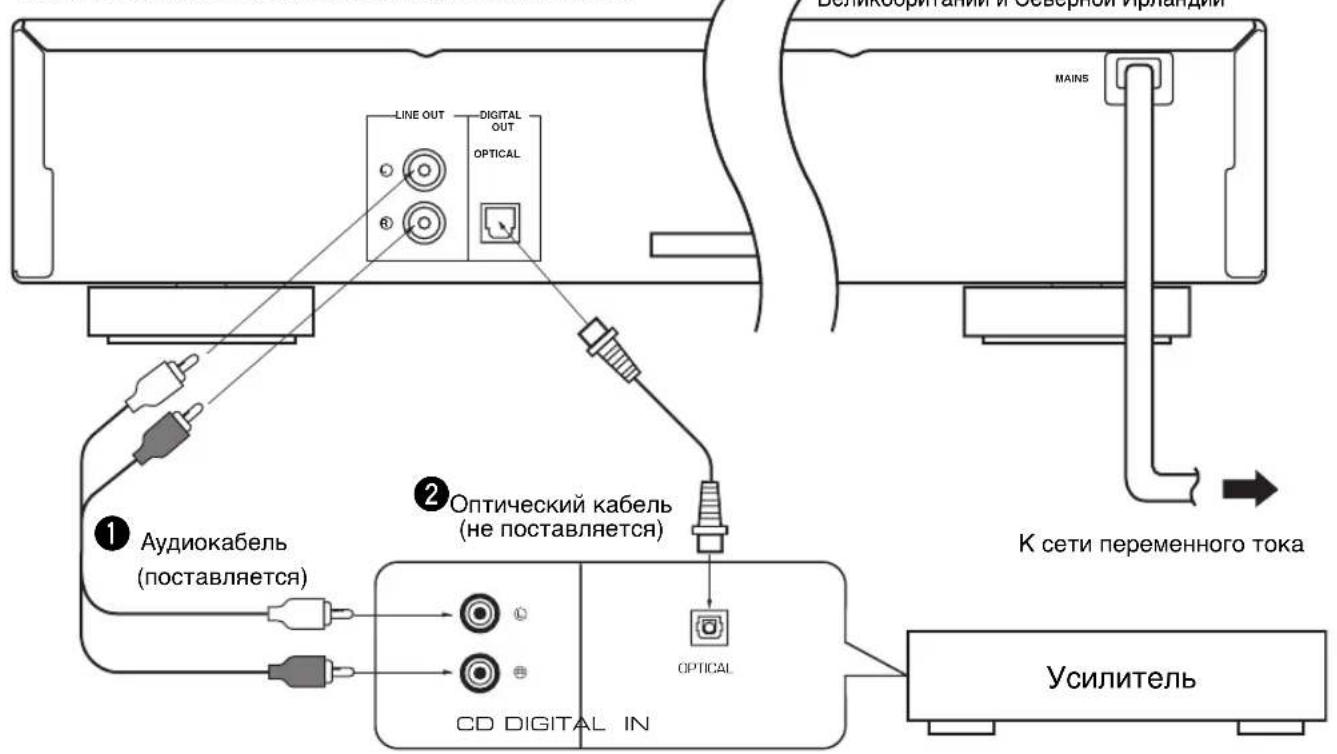
When the LINE OUT (analog) terminals of this unit are used ( 1 )
Connect these terminals to the "CD" (or "AUX") terminals of the amplifier. For details concerning these connections, refer to the operation instructions of the amplifier being used.
- Be sure that the left ("L") and right ("R") of these terminals are connected to the corresponding (left and right) terminals of the amplifier or another component.
The level of signals output from any of these terminals into an amplifier can be adjusted by the OUTPUT LEVEL +/- buttons.
- When using the DIGITAL OUT (OPTICAL) terminal, set the level of signals output into an amplifier to max. by using the OUTPUT LEVEL +/- buttons.
When the DIGITAL OUT (OPTICAL) terminal of this unit is used (2)
-
Make the connection from this terminal to the optical input terminal of an amplifier by using a commercially available optical cable.
-
Use a reliable optical cable.
-
This terminal can also be connected to the optical input terminal of an MD recorder etc. to record CD onto MD directly.
To connect this unit to the AC outlet
After you made all connections, connect the power cable of this unit to the AC outlet.
IDENTIFICATION OF COMPONENTS
( ) indicates the page number on which the controls are best described.
Front panel
The control functions on the main unit and on the remote control are virtually identical, with the exceptions below.
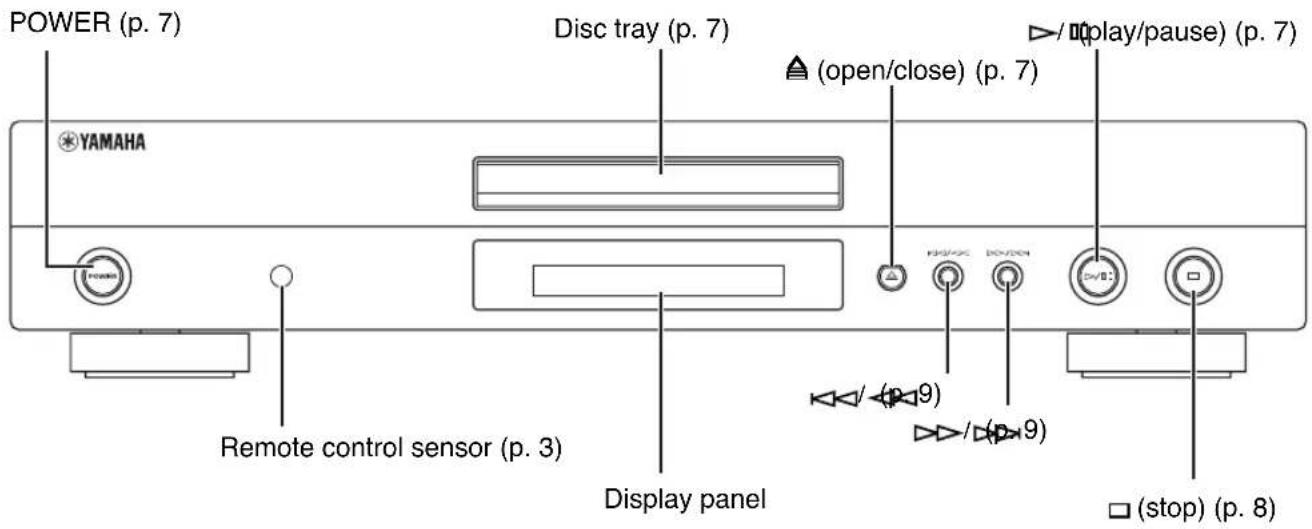
- / on the main unit has both the functions of (play) and (pause) on the remote control.
- < < < < < and > > / > > on the main unit has both the functions of < < < < < (skip) and < < < < < (search) on the remote control.
Display
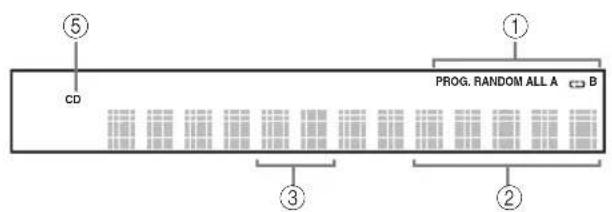
Audio CD
MP3, WMA
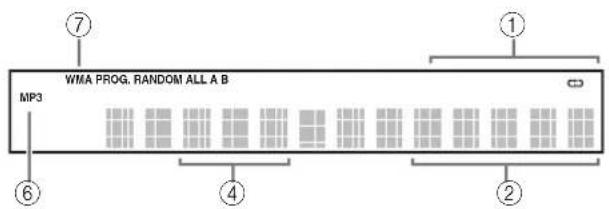
① Lights up the icon for the selected playback mode.
② Shows the time displays. (For details, refer to on page 10.)
③ Shows the track number selected or being played back.
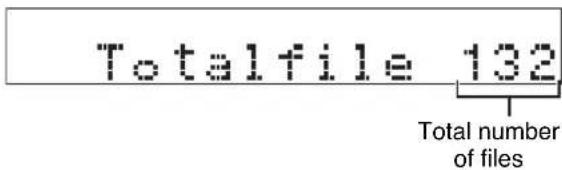
④ Shows the file number.
⑤ Lights up when a music disc is in the disc tray.
Lights up when the MP3 disc is played back.
⑦ Lights up when the WMA disc is played back.
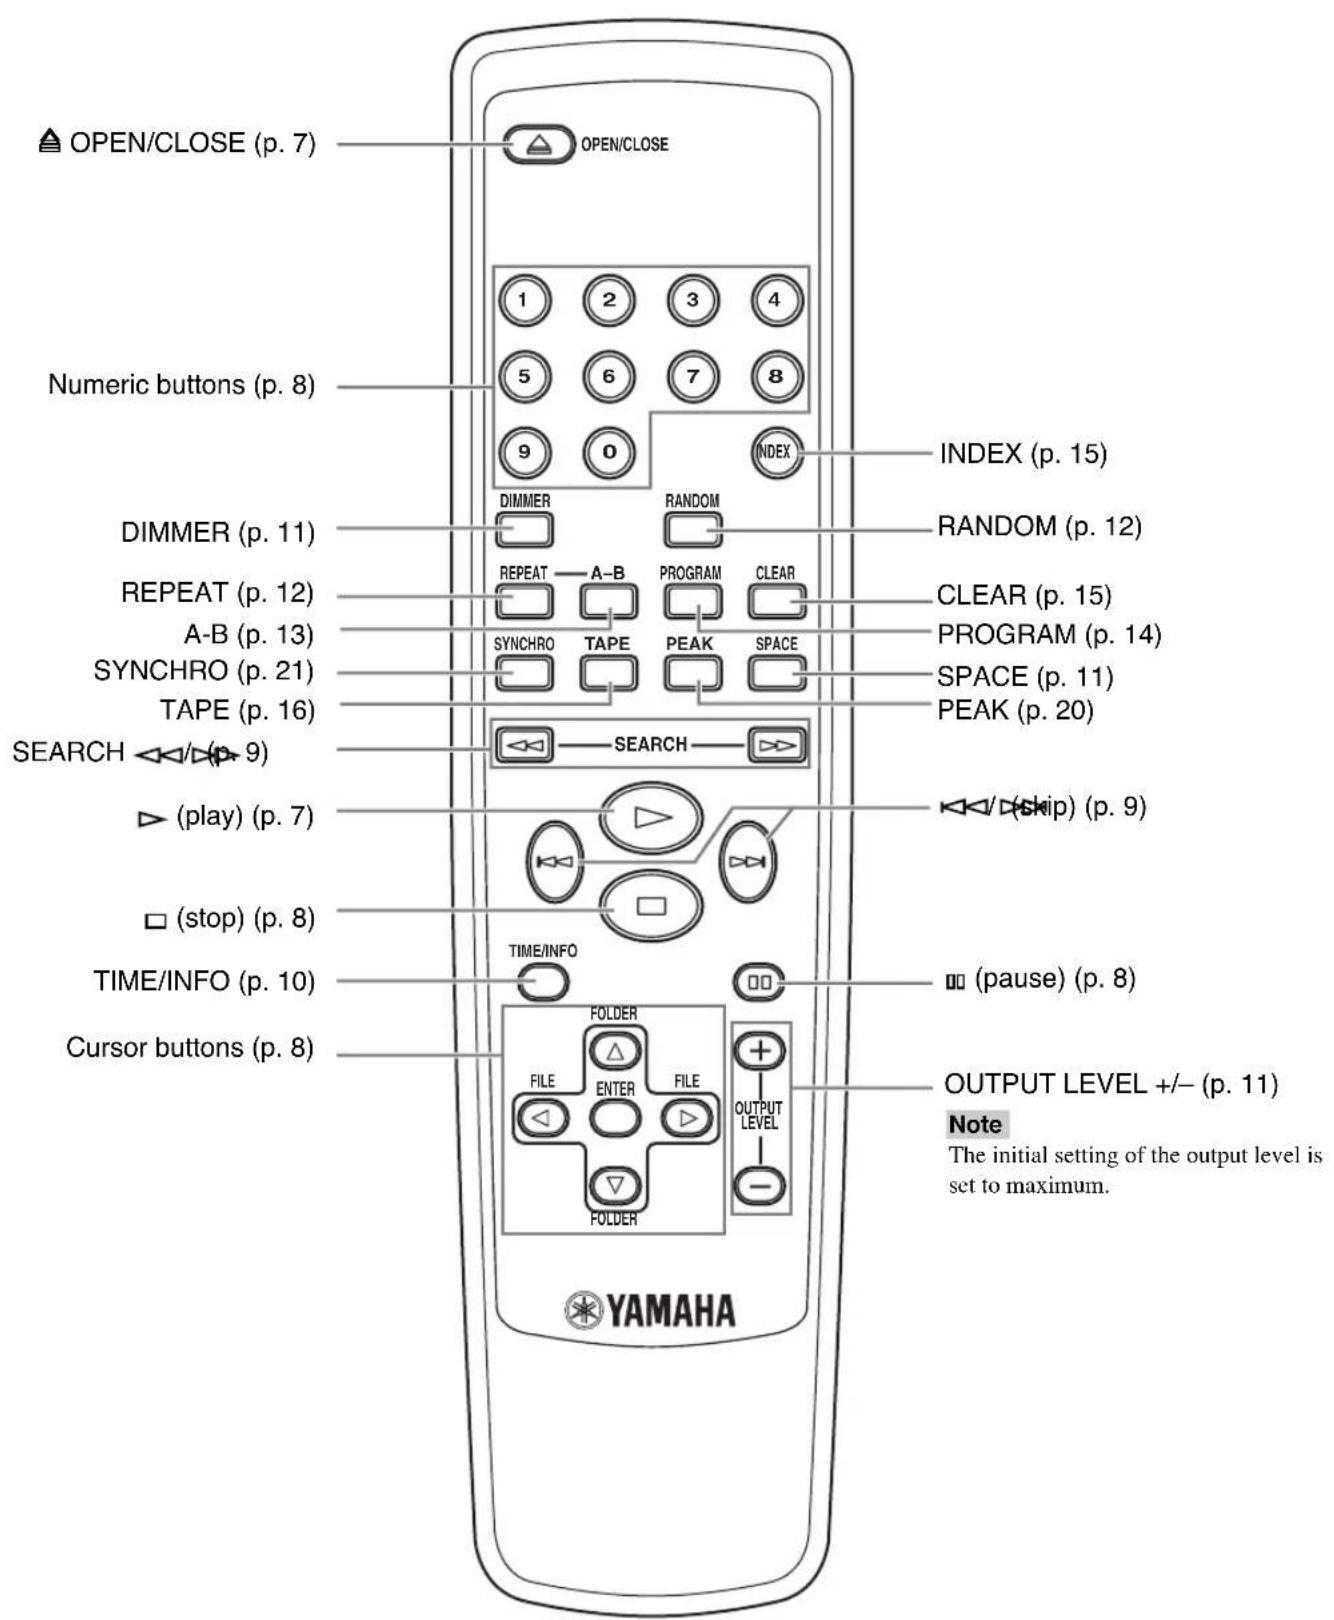
This manual describes how to operate this unit by using the remote control. To operate this unit from the front panel, use the corresponding buttons on the front panel.
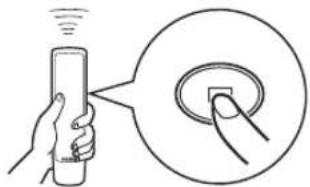
BASIC OPERATION
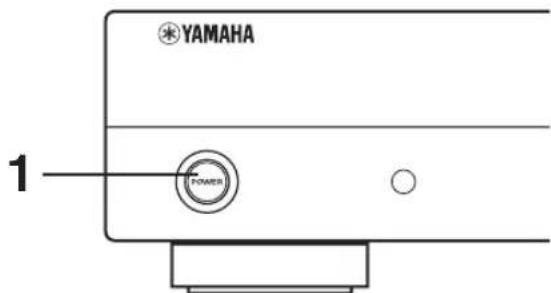

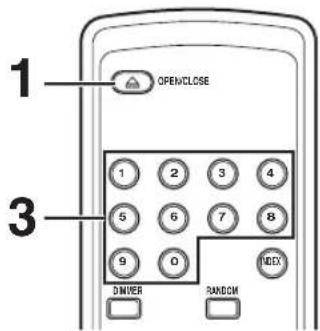
1 Press POWER to turn on the power.
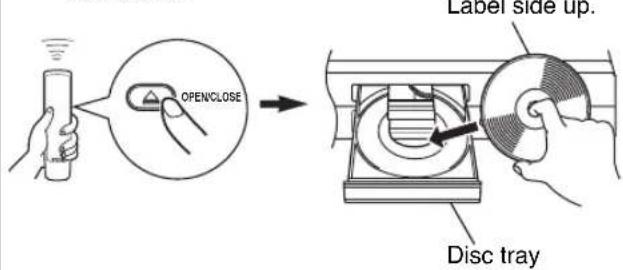
2 Press OPEN/CLOSE to open the disc tray, and load a disc. Label side up
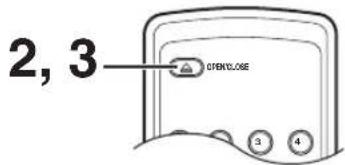

3 Press OPEN/CLOSE to close the disc tray.

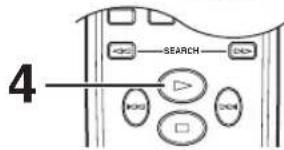
4 Press to start playback.
Playback starts from the first track of the disc.
Notes
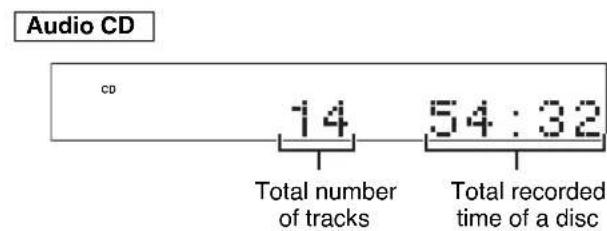
After closing the disc tray by pressing OPEN/CLOSE, the display shows the following information.
MP3,WMA
- Additionally, you can close the disc tray by pressing , a numeric button or RANDOM, or by pressing the front edge of the disc tray gently. If the tray is closed in one of these ways, playback starts automatically; however, the display will not show the total number of tracks nor the total recorded time of the disc.
Caution
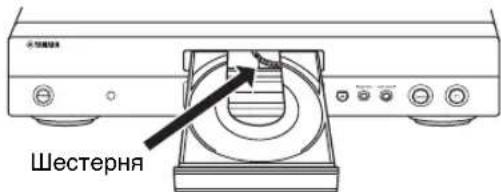
When the disc tray is open, do not touch the inside gear wheel. If you touch the gear wheel, your finger may be caught in the closing tray and injured.

To pause playback

Press
To resume the playback, press gain (or press).
- front panel can also be used to stop the playback temporarily or to resume the playback.
To stop playback
Press
- If you press again, the playback starts from the first track.
To turn off the power
Press POWER again.
- If you turn on the power again with a disc still on the tray, the playback starts automatically from the first track.
To play back the desired track
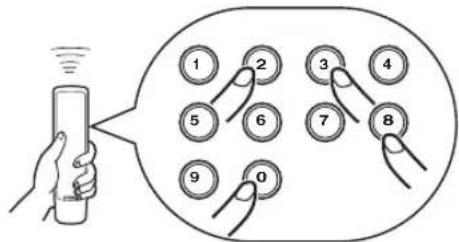
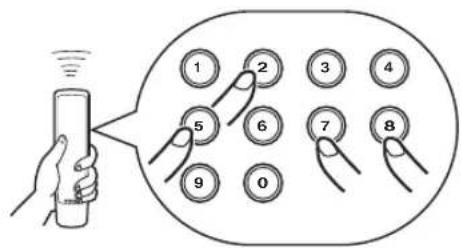
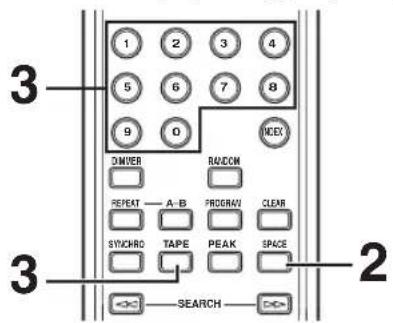
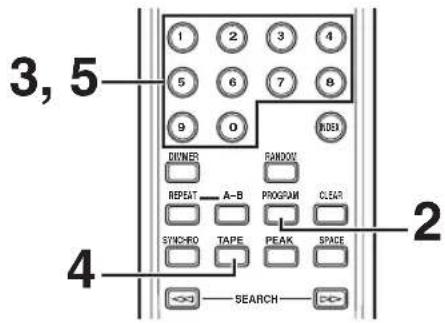
Select a desired track by using the numeric buttons.
Example: To select a track number 5
Press "0" and then, press "5".
- In case of an MP3 or WMA file which has 100 files or more, press "0" twice and then, press "5".
- Pressing a desired track and waiting for a few second can also start playback.
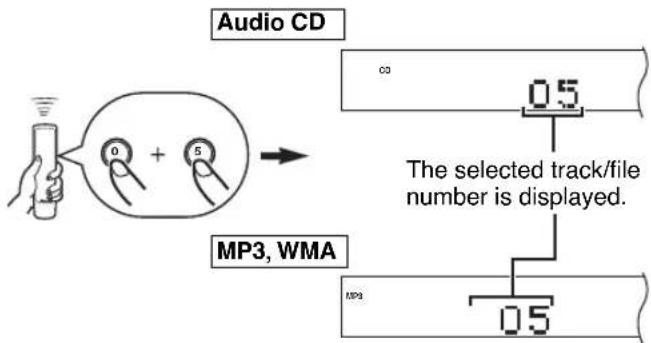
- This display is an example of an MP3 disc.
- The file number is recognized per disc, not per folder. That is, the number assigned to each file corresponds sequence of a disc.
To search an folder/file on an MP3 or WMA disc
You can play back the desired folder or file by using cursor buttons.
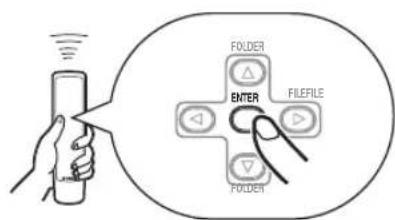
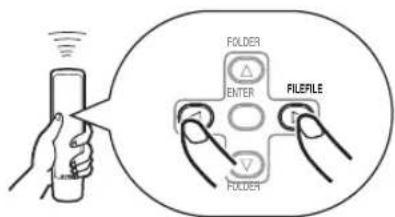
1 Press FOLDER / to select the desired folder.
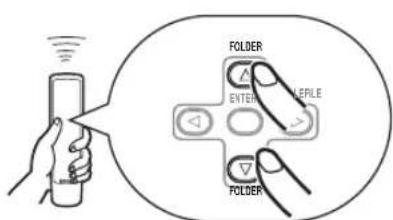
2 Press ENTER.
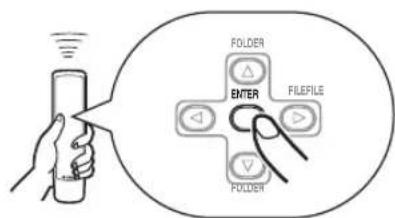
3 Press FILE /D to select the desired file.

4 Press ENTER.
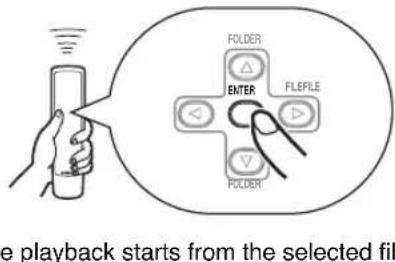
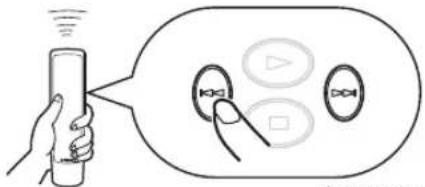
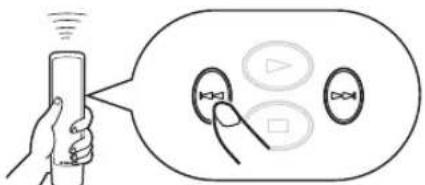
To skip to the beginning of the desired track (Skip search)
To play back from the beginning of the next track
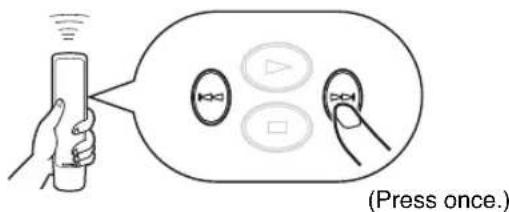
To play back from the beginning of the current track
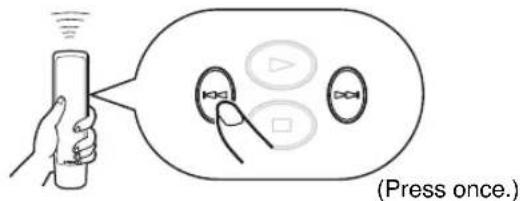
To play back from the beginning of the preceding track
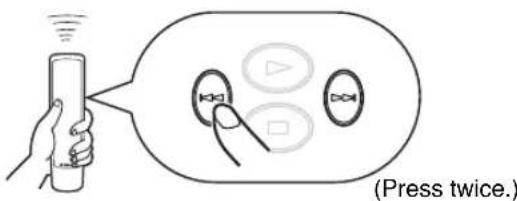
These operations can also be performed when the unit is paused or stopped.
- Pressing and holding (or on the remote control skips tracks continuously toward lower (or higher) numbers.
These operations can also be performed using and on the front panel.
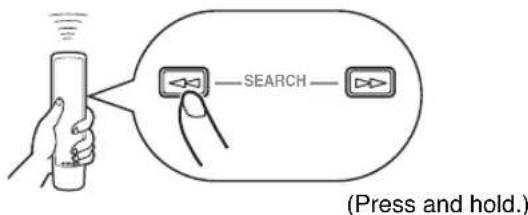
To advance or reverse playback rapidly (Manual search)
To advance rapidly
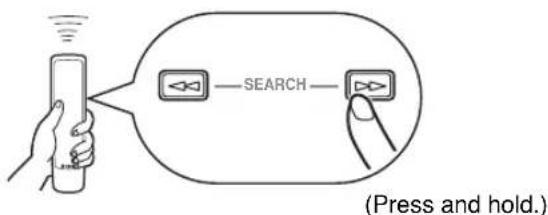
The sound can be heard (although slightly garbled) during manual search in either direction. This is convenient for locating a precise position within a track, or for reviewing the contents quickly.
In case Manual search is performed, pause will be canceled.
These operations can also be performed using and on the front panel.
To reverse rapidly
Changing display
When playing back an Audio CD
You can select the following displays (① - ④) by pressing TIME/INFO. When you play back a CD-TEXT disc, the disc title, artist name, and track name (⑤ - ⑦) are also displayed.
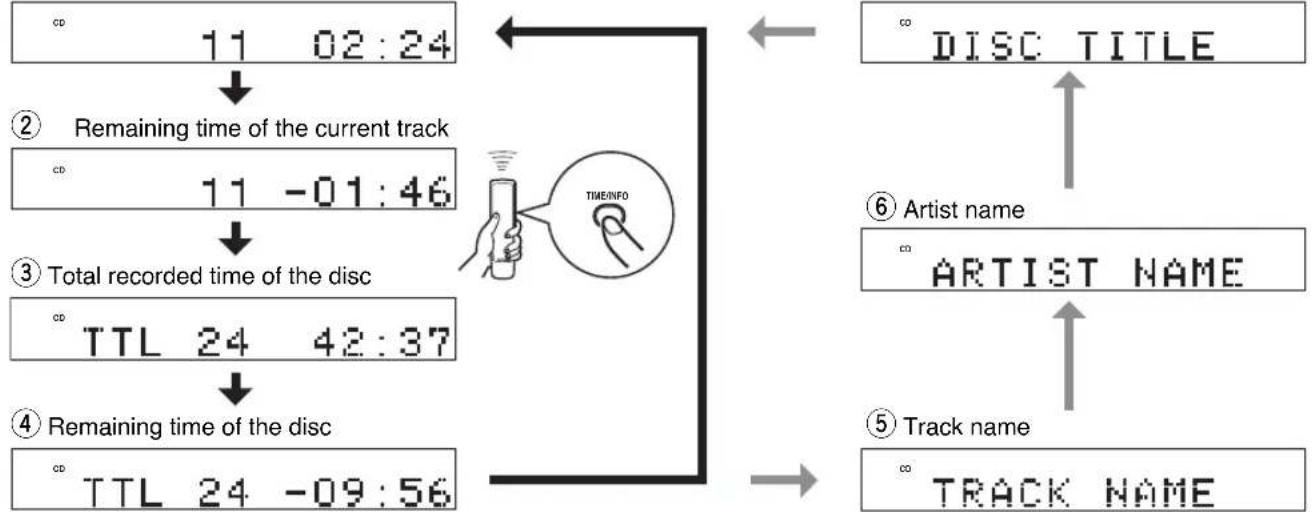
① Elapsed time of the current track (Default)
Notes
The text information may not be displayed with some CD-TEXT discs.
- This unit can only show alphanumeric characters.
When playing back an MP3 or WMA
You can select the following displays (1 - 9) by pressing TIME/INFO.
① Scrolling display (Default)

Scrolling display shows the song title, artist name and album name of the selected item.
Notes
- Some information of ID3 tags may not be displayed with some discs.
- This unit can only shows alphanumeric characters.
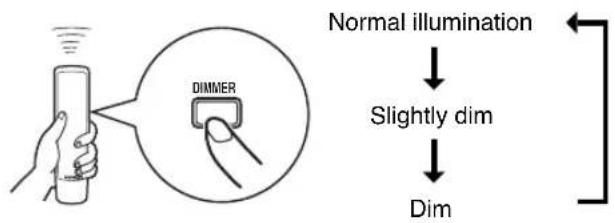
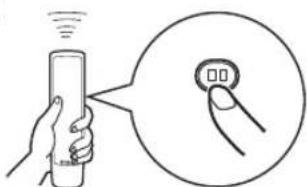
Changing brightness of the display
You can change brightness of the display in three degrees by pressing DIMMER.
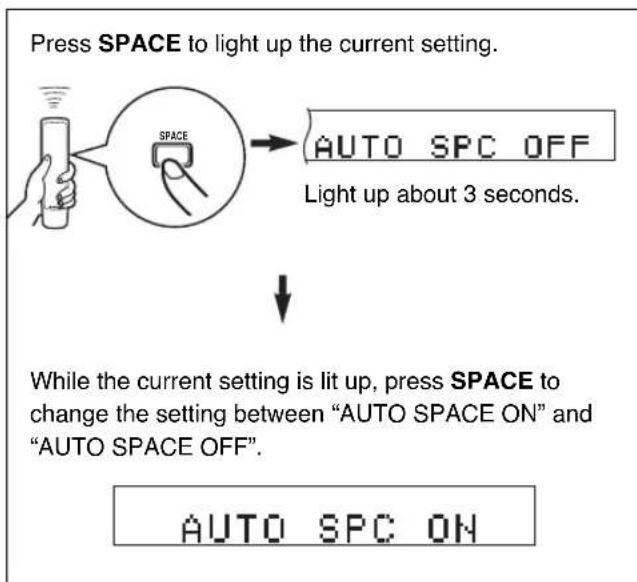
Automatic spacing
If you record a disc onto tape with an insufficient time space between tracks, the tape deck will not be able to perform blank search operations on the tape correctly. To enable a track search operation, use this function to add an interval of about 4 seconds between tracks.
Notes
- When the automatic spacing function is in effect, the display of the total time and of the total remaining time includes each interval of the 4 seconds between tracks.
- When the automatic spacing function is in effect during the playback, "AUTO SPC 4" (the remaining seconds of the interval) appears and is counted down each time blinking at the interval between the tracks.
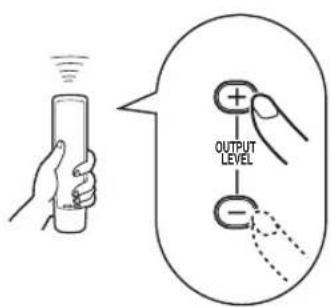
Adjusting the output level
You can adjust the level of signals output to the amplifier by pressing OUTPUT LEVEL +/-
Note
While playing back an MP3/WMA disc, the level of the audio signal sent to the DIGITAL OUT (OPTICAL) terminal is fixed at maximum regardless of the displayed volume level.
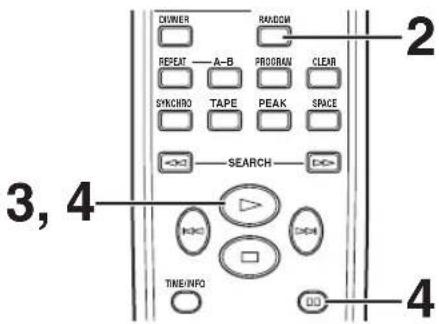
You can play back the tracks on a disc in a random sequence.
To perform random-sequence play Press RANDOM.

To cancel random-sequence play Press RANDOM.

Note
If the power is switched off during random-sequence play, pressing POWER again to turn on the unit automatically restores random-sequence play.
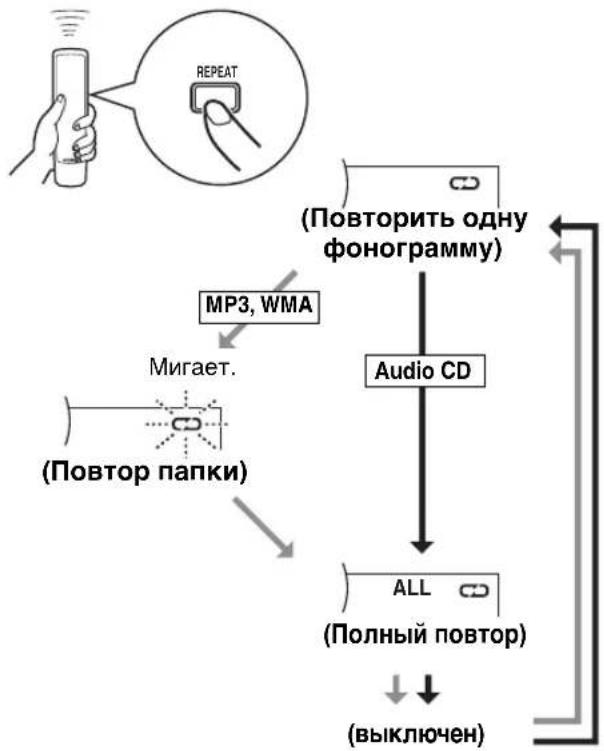
REPEAT PLAY
Repeat a selected item
You can play back any desired track, album or the entire disc repeatedly by pressing REPEAT. The repeat playback mode changes whenever you press REPEAT.
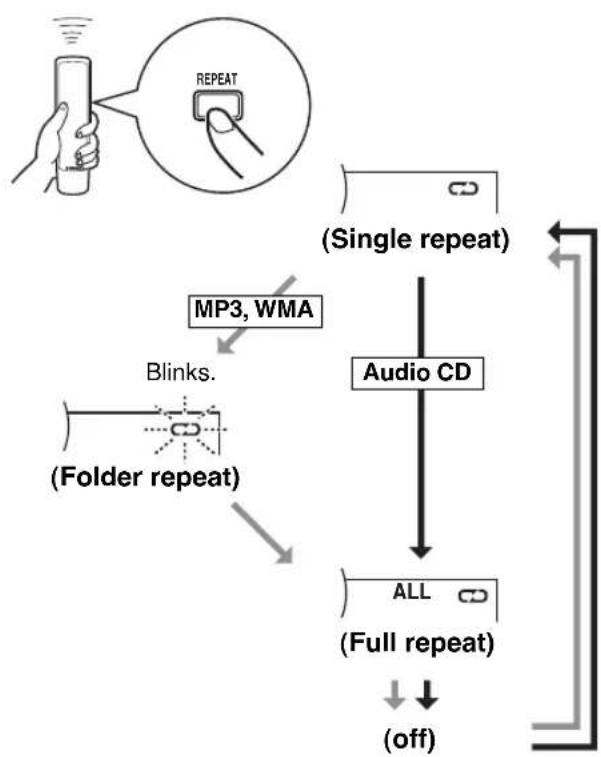

(Single repeat)
A single track is played back repeatedly.
- This also works for program play and random-sequence play. (If repeat play is switched off, program play or random-sequence play is resumed.)

(Folder repeat)
MP3,V
- The all files in the selected folder are played back repeatedly.
ALL
(Full repeat)
All tracks (the entire disc) are played back repeatedly.
- During program play, all programmed tracks are played back repeatedly.
- If the power is switched off during full repeat play, pressing POWER again to turn on the unit automatically restores full repeat.
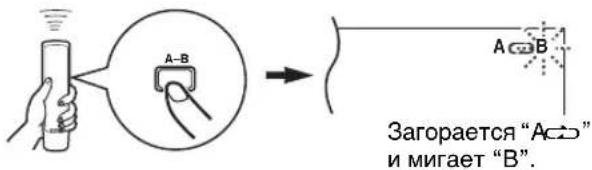
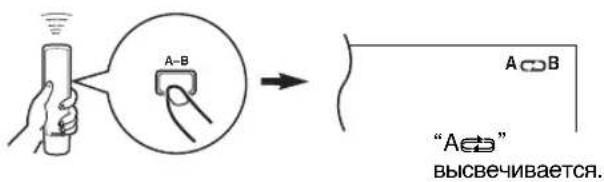
Repeat A-B
You can repeat the specified section of the disc by setting two points (start and end point).
1 Press A-B to select the start point of repeat play.

2 Press A-B to select the end point of repeat play.
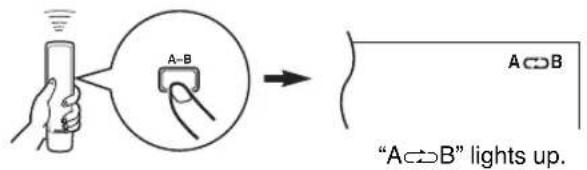
The selected section is played back repeatedly.
To cancel the repeat A-B
Press A-B repeatedly until "A B" disappears from the display.
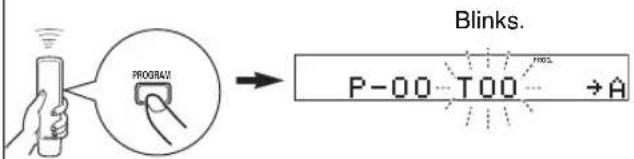
PROGRAM PLAY
You can enjoy listening to your favorite tracks in any desired order by programming tracks. 40 tracks can be programmed in sequence.
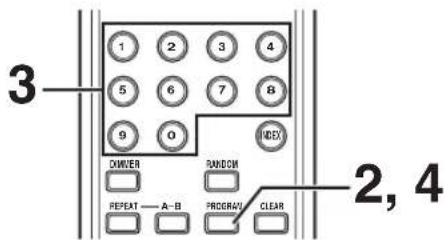
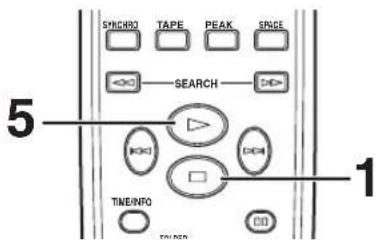
1 Press to stop the playback.
3 Program a desired track by pressing the corresponding numeric button.
Repeat this operation to program more tracks. You can select the same track again. MP3, WMA
2 Press PROGRAM.

The file number is recognized per disc, not per folder. That is, the number assigned to each file corresponds sequence of a disc.
4 When programming is finished, press PROGRAM.

5 Press start program play.

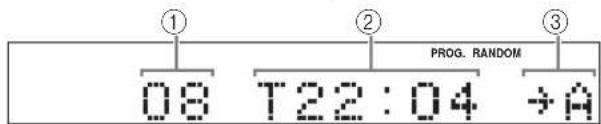
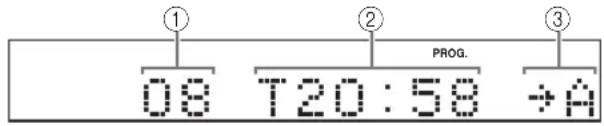
Display information in step 3
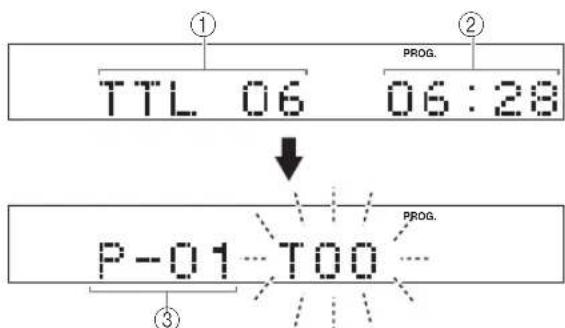
① Shows the total number of the tracks currently programmed.
② Shows the total time of the tracks currently programmed.
③ Shows the program number for the track to be programmed next.
To stop program playback
Press The first programmed track number is displayed. To resume program play, press . The playback starts from the first programmed track number.
To clear program data
There are several methods, as described below.
- Press or CLEAR while the unit is stopped.
- Open the disc tray.
- Switch off the power.
To check program data
- If during program play, press .□
- Press PROGRAM.
- Each time ispressed, the track numbers and sequential order of the programmed tracks can be checked one after another. The display of the track number can be returned (sequentially in reverse order) by pressing
To correct program data
- Follow the procedure described in "To check program data".
- Display the track number to be corrected by pressing
- Press a numeric button to select a desired track to replace the one displayed. The previously programmed track is cleared from the memory, and the new one is programmed.
- Press PROGRAM to complete the correction. To start program play immediately after making the correction, press instead of pressing PROGRAM.
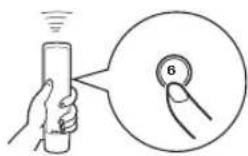
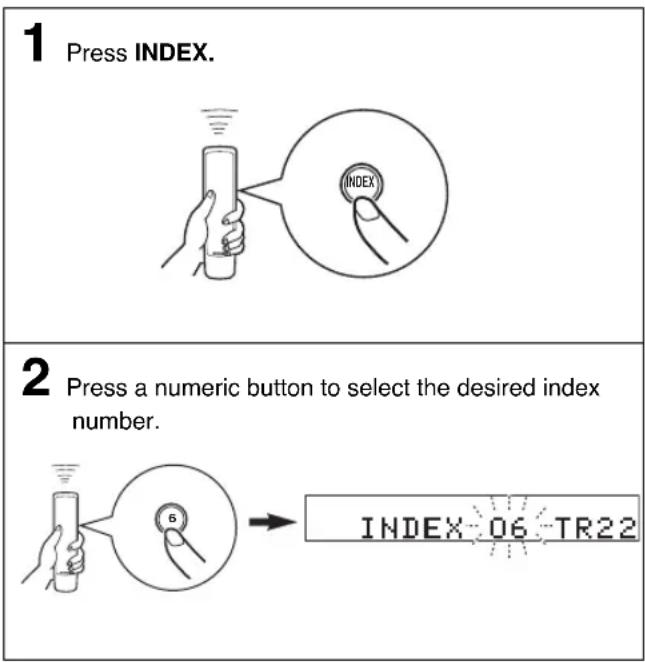
INDEX SEARCH
If the disc includes index numbers, playback can be started from any desired index number.
To cancel the index search function
Press INDEX.
Notes
- Not all discs have index numbers. In addition, among those discs which have index numbers, not all discs necessarily have more than one index number.
The index system is a method for sub-dividing tracks into smaller divisions for easier location of those parts. The liner notes contained in the disc case usually tell that such index numbers are included with the markex - For some discs, playback may starts slightly prior to the actual designated index point.
- If the disc has no encoded index points, playback starts from the beginning of the selected track.
The index number can be designated only while "TNDEX" is illuminated.
TRACK PROGRAMMING FOR RECORDING TO TAPE
The unit can program tracks on a disc for recording onto tape. By considering the total possible recording time of the tape, the unit automatically programs tracks or help you program tracks so they fits onto the tape with the least amount of unrecorded space at each end of the tape.
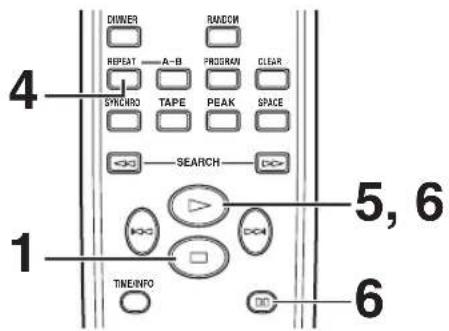
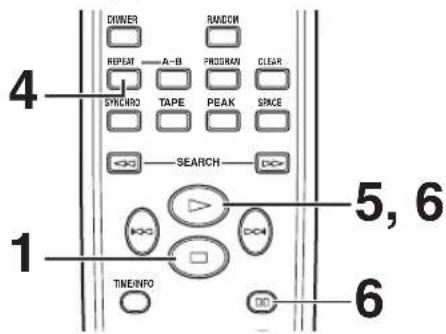
Automatic tape-programming (for Audio CD)
The unit automatically programs tracks on a disc with their original order.

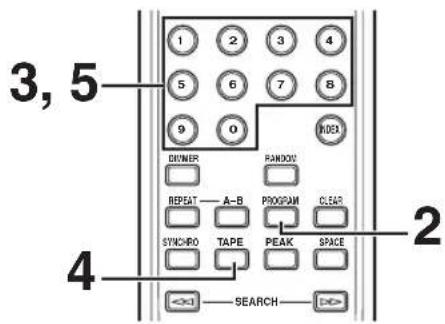
1 Press stop the playback.

- The peak level search function of this unit is useful for adjusting recording level on the tape deck. (For details, refer to page 20.)
If desired, you can also enter the total poss recording time of the tape manually.
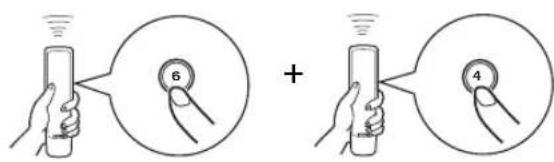
Example: For a C-64 tape (32 minutes on each side), press "6" and "4".
2 If desired, you can automatically insert additional time space between tracks. (For details, refer to page 11.)

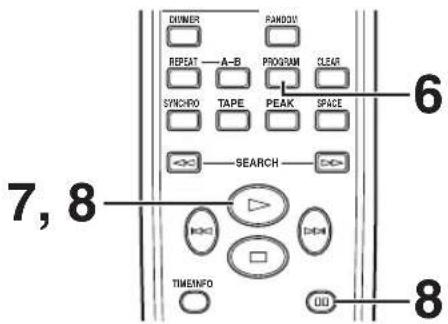
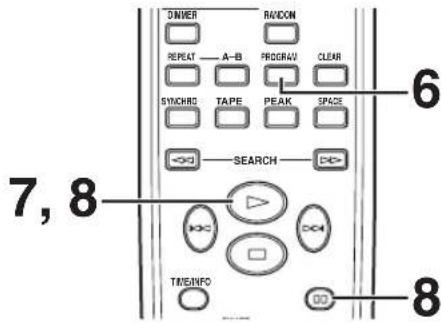
4 Press REPEAT.

The unit automatically programs tracks for both side A and side B considering the total time of the tape.
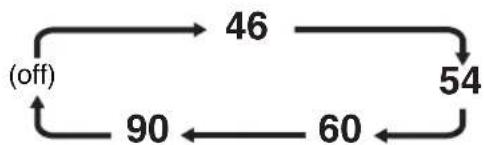
3 Press TAPE to show the total possible recording time of the tape on the display.

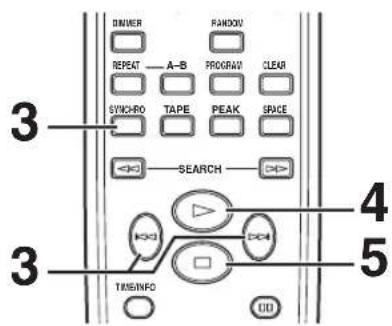
5 Start recording on the tape deck, and then press on the remote control of this unit.
6 This unit automatically pauses at the end of the side A. Turn the tape over to the side B, resume recording on the tape deck, and then press on the remote control of this unit to start playback.
You can select any of the four tape lengths by pressing TAPE.
Notes
- In step 4, you can check the program data for side A and side B after pressing REPEAT. Information for each side is displayed for 3 seconds.

① Shows the number of programmed tracks.
② Shows the total time of programmed tracks.
③ Shows the side of the tape.
- All tracks may not be programmed if the tape length is not enough. To program all tracks, use a tape that is longer than the actual playing time.
-
You can check, cancel or correct program data. (For details, refer to page 15.)
-
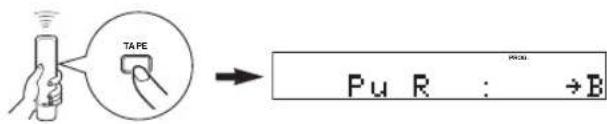
When checking program data, note that "Pu" appears between track numbers for side A and side B.
-
Up to 40 tracks can be programmed. A pause inserted between side A and B is counted as one track.
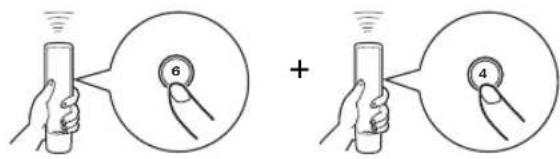
- CD synchronized recording function can be used if your tape deck is compatible with this unit. If so, in step 5 and 6, press SYNCHRO and then press the remote control of this unit. Recording automatically starts. (For details, refer to page 21.)
Manual tape-programming (for Audio CD)
This is for recording desired tracks in any order onto a tape.
1 Follow steps 1-3 on page 16.
2 Press PROGRAM.
5 Use numeric buttons to select the track numbers (to be recorded on the side B) in any order.
3 Use numeric buttons to select desired tracks (to be recorded on the side A) in any order.
- Programmed track numbers light up on the display.
6 Press PROGRAM.
7 Start recording on the tape deck, and then press on the remote control of this unit.
8 This unit automatically pauses at the end of the side A. Turn the tape over to the side B, resume recording on the tape deck, and then press on the remote control of this unit to start playback.
4 When track selection for side A is finished, press TAPE.
A pause is inserted.
Notes
- If, in step 3 or 5, "Err" appears on the display, the track number just selected cannot be programmed because there is not enough time remaining on the tape.
- In step 3 or 5, each time a selection is made, the track number and the remaining time of the tape is displayed, and then the display changes to indicate the next program number.
- You can check, cancel or correct program data. (For details, refer to page 15.)
- When checking program data, note that "Pu" appears between track numbers for side A and side B.
- Up to 40 tracks can be programmed. If, however, a pause is inserted, it is counted as one track.
- CD synchronized recording function can be used if your tape deck is compatible with it. If so, in step 7 and 8, press SYNCHRO and then press on the remote control of this unit. Recording automatically starts. (For details, refer to page 21.)
Random sequential tape-programming (for Audio CD)
The unit automatically programs tracks in random sequential order for recording to tape.
1 Follow steps 1-3 on page 16.
2 Press RANDOM.

- The unit automatically programs tracks at random for both side A and side B considering the total time of the tape.
3 Start recording on the tape deck, and then press on the remote control of this unit.
4 This unit automatically pauses at the end of the side A. Turn the tape over to the side B, resume recording on the tape deck, and then press on the remote control of this unit to start playback.
Notes
- Because programmed data changes every time RANDOM is pressed, the unrecorded space at the end of each side of the tape also varies accordingly.
- All tracks may not be programmed if the tape length is not enough. To program all tracks, use a tape that is longer than the actual playing time.
- In step 2, you can check the program data for side A and side B. Information for each side is displayed for 3 seconds.
① Shows the number of programmed tracks.
② Shows the total time of programmed tracks.
③ Shows the side of the tape.
- Up to 40 tracks can be programmed. A pause inserted between side A and B is counted as one track.
- CD synchronized recording function can be used if your tape deck is compatible with it. If so, in step 3 and 4, press SYNCHRO and then press the remote control of this unit. Recording automatically starts. (For details, refer to page 21.)
Automatic searching for the peak level on a disc (for Audio CD)
This unit automatically searches for the peak level of the disc, and play back the part repeatedly. When recording to tape, this feature is very helpful for adjusting the recording level on the tape deck.
1 Press stop the playback.
2 Press PEAK.
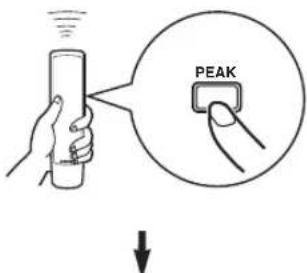
"PK" lights up on the display, and the peak level search is performed on the disc. It takes a few minutes to search for the peak lev

After searching, this unit plays back the part around the peak level for about 4 seconds repeatedly. According to the peak level, adjust the recording level on your tape deck. (For details, refer to the owner's manual of the tape deck.)

To cancel the peak level search function Press
Note
Even if the peak level search is performed several times on the same disc, the same part may not be always selected. That is because the unit searches for the peak level among parts of the disc that are randomly selected by the internal microcomputer.
CD SYNCHRONIZED RECORDING
This unit can automatically synchronize a tape deck recording with CD play. With this function, you can record a CD on tape easily and precisely.
This recording method requires a Yamaha tape deck compatible with this function. (Refer to the tape deck operation manual to find out whether it is compatible or not.)
- This unit and the tape deck must be placed close to each other so that both of them can simultaneously receive the signals from the remote control of this unit.
1 Press OPEN/CLOSE to open the disc tray, and load a disc.


2 Load a tape on the tape deck.
- The peak level search function of this unit is useful for adjusting recording level on the tape deck. (For details, refer to page 20.)
3 Press SYNCHRO.
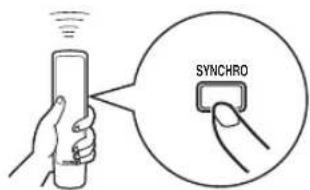
This unit enters into the pause mode, and the tape deck enters into the REC/PAUSE mode.
- In this state, the time display on this unit blinks on and off.
If necessary, select a desired track by pressing a numeric button or

Both CD playback and tape deck recording start.
* CD playback starts shortly after starting the recording.
5 If you want to stop recording temporarily and restart recording from a desired track, stop this unit by pressing and the tape deck as well, then follow steps 3-4 again.
To cancel synchronized CD-tape recording function
Press
Notes
- To finish or stop the recording, make proper operations on the tape deck. (For details, refer to the owner's manual of the tape deck.)
- Programmed sequence of tracks can also be recorded with this function instead of recording an entire disc. (For details, refer to pages 14 - 15.)
- This function can also be used together with the automatic tape-programming function. (For details, refer to pages 16-17.)
NOTES ABOUT DISCS
Discs playable with this unit
This compact disc player is designed only for playing back compact discs bearing the marks shown below. Never attempt to load any other type of disc into the unit. The unit can also play back 8-cm (3-inch) compact discs.

... Compact discs (digital audio)
The most popular discs for commercially available audio CDs.

CD-R,CD-RW digital audio discs
Music CDs made by copying onto a CD-R or CD-RW (including MP3 or WMA format files).
Notes
- Be sure to use a CD-R or CD-RW disc made by a reliable manufacture.
- Be sure to use a CD-R or CD-RW disc which has at least one of the following phrases on the disc or disc case. FOR CONSUMER
- Be sure to use a finalized CD-R or CD-RW disc.

... CD-TEXT discs
The discs recorded with text data such as album titles, track titles and artist names.
These discs can be played back with ordinary CD players, however, the text data can be displayed only with CD players which have the ability to display such data.
Note
This compact disc player may not be able to play back some CD-RW discs or discs on which recording was not made correctly.
To prevent a malfunction of this unit:
- Do not use any nonstandard shaped disc (heart etc.) available on the market because it might damage the unit.

- Do not use a disc with tape, seals, or paste on it. If you use such a disc, a disc may get stuck in the unit, or damage to the unit may result.
Notes about handling compact discs

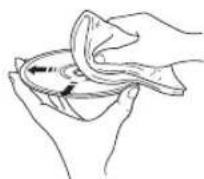
Always handle the disc with care so that its surface is not scratched.
- Compact discs are not subjected to wear during playback, but damage to the disc surface when the disc is being handled can adversely affect the disc playback.
- Be sure to use a felt-tip pen or similar writing tool when writing on the label side of the disc. Do not use a ball-point pen, pencil, or other hard-tipped writing tool, as these may damage the disc and may adversely affect the disc playback.
- Do not warp discs.
- When a disc is not currently being used, remove it from the unit and store in an appropriate case.
- When removing or storing a disc, be careful not to scratch the playing surface.
- Compact discs are not affected by small particles of dust or fingerprints on their playing surface, but even so they should be kept clean. Wipe by using a clean, dry cloth. Do not wipe with a circular motion; wipe straight outward from the center.
- Do not try to clean the disc's surface by using any type of disc cleaner, record spray, anti-static spray or liquid, or any other chemical-based liquid because such substances might irreparably damage the disc's surface.
- Do not expose discs to direct sunlight, high temperature or high humidity for a long period of time because these might warp or otherwise damage the disc.
To play back an 8-cm CD
Place it in the inner recessed area of the disc tray. Do not put a normal (12-cm) CD on top of an 8-cm CD.
TROUBLESHOOTING
If the unit fails to operate normally, check the following points to determine whether the fault can be corrected by the simple measures suggested. If it cannot be corrected, or if the fault is not listed in the SYMPTOM column, disconnect the power cord and contact your authorized Yamaha dealer or service center for help.
| SYMPTOM | PROBABLE CAUSE | REMEDY |
| The unit does not switch ON when POWER is pressed. | The power cord is not connected nor completely connected. | Securely connect the power cord. |
| The disc tray does not close completely. | A foreign object is obstructing the tray. | Carefully check the disc tray and remove the foreign object. |
| Playback does not start. | The disc is damaged. | Check the disc carefully; replace it if necessary. |
| There is moisture on the laser pickup. | Wait 20 to 30 minutes after switching the unit ON before trying to play back a disc. | |
| The disc is loaded upside down. | Reload the disc with the label side up. | |
| The disc is dirty. | Clean the disc. | |
| The CD-RW (ReWritable) disc is not recorded correctly. | Replace the disc with a correctly-recorded disc playable with this unit. | |
| The disc is a non-standard disc not playable with this unit. | ||
| Playback is delayed, or begins at the wrong place. | The disc may be scratched or damaged. | Check the disc carefully; replace it if necessary. |
| No sound. | Improper output cable connections. | Connect the cables properly. If the problem persists, the cables may be defective. |
| Improper amplifier operation. | Set the amplifier controls to the correct input selection. | |
| The OUTPUT LEVEL +/- buttons are set at minimum. | Adjust the volume by using the OUTPUT LEVEL +/- buttons. | |
| Sound “snips”. | The unit is being subjected to vibrations or impacts. | Relocate the unit. |
| The disc is dirty. | Clean the disc. | |
| Sound “hums”. | Improper cable connections. | Securely connect the audio cables. If the problem persists, the cables may be defective. |
| Noise from a nearby tuner. | The tuner is too close to the unit. | Move the tuner and the main unit farther apart. |
| Noise from inside of the disc tray. | The disc may be warped. | Replace the disc. |
| The remote control does not work. | The batteries of the remote control are too weak. | Replace the batteries with new ones. |
| Remote control is too far away or tilted too much. | Use within 6 m and 60° radius. | |
| Direct sunlight or lighting (of an inverter type fluorescent lamp etc.) is striking the remote control sensor of the main unit. | Reposition the main unit. | |
| TV functions strangely when the remote control is used. | Remote control is being used near TV set with a remote control sensor. | Relocate the main unit away from the TV or cover TV's remote control sensor. |
SPECIFICATIONS
Audio Section
Frequency response 2 Hz - 20 kHz, ± 0.5 dB
Harmonic distortion + noise (1 kHz)
0.003% or less
S/N ratio 105 dB or more
Dynamic range 95 dB or more
Output voltage (1 kHz, 0 dB) 2.0 ± 0.5 V
Laser Diode Properties
Material . GaAlAs
Wavelength 780 nm
Emission Duration continuous
Laser Output max. 44.6 W^*
- This output is the value measured at a distance of about 200 mm from the objective lens surface on the Optical Pick-up Block.
General
Power requirements
Europe and U.K. models 220-240 V, 50 Hz
Power consumption 13 W
Dimensions (W× H× D) 435x87x287mm
Weight 3.5 kg
Please note that all specifications are subject to change without notice.
Pile (AAA, R03, UM-4) × 2
REMARQUES CONCERNANT LA TELECOMMANDE
Batterier (AAA, R03, UM-4) x 2
ANMÄRKNINGAR OM FJÄRRKONTROLLEN
ALL (Full repetering)
PROGRAMMING FÖR INSPELNING PÅ BAND
Harmonisk distortion (1 kHz)
0,003 % aller minre
Signal brusforhallande 105 dB erler mer
Dynamikomrade 95 dB erler mer
Utgangsspanning (1 kHz, 0 dB) 2,0 ± 0,5 V
| CD musica | MP3, WMA |
| Audio CD | MP3, WMA |
Dischi MP3 e WMA
Batterie (AAA, R03, UM-4) x 2
NOTE SUL TELECOMANDO
Pila (AAA, R03, UM-4) x 2

NOTAS SOBRE EL CONTROL REMOTO
HERHAALDE WEERGAVE 12
GEPROGRAMMERDE WEERGAVE 14
INDEX ZOEKEN 15
PROGRAMMEREN VAN SPOREN VOOR OPNAME OP CASSETTEBAND 16
GEPROGRAMMERDE WEERGAVE
CD GESYNCHRONISEERDE OPNAME
Ecnn annapat noKIOUOeH K po3ETke, n36eAte NOHOCTb rna3a 6nI3KO K annapaty H He cTapaITeCb 3arJHyTb BHTpb Yepe3 loTOK IcNcKa nnI dpYrne OTBepCTnI.
NPEDYNPEXKDEHNE
BO IN36EKAHNE IOXAPA UNI YDAPA 3JIETPNUECKIM TOKOM, HE IIOBEBPAIte DAHHbI ANIAPAT BO3JEINCTBUNM DOXJN IINI BNAI.
Ja3epHbIKOMHOHeHT DaHHoro 3denna MoKeT BbIeNtB paNaunIO, npeBbIaOuOyO orpaHueHHbI ypoBeHb paDaunn dnn KnaCa 1.
CODEPJXKAHNE
Функци.. 2
IODEPXINBAEMbIE TINbI INCKOB.....2
PACNAKOBKA 3
INPMEUAHNA NO NylbTy Dy 3
COEINHEHNA 4
IIDEHTNΦUKAUJAKOMNOHETOB 5
ΦpoNTaJIbHaЯ nAHeIb 5
Ducnnei 5
PnybT Dy 6
OCHOBHbIE ONEPALUNI 7
Pay3a Bocnpon3BedeHn 8
OctaHOBKa BOCnpon3BeJeHHN 8
OTKIOUeHne NITaHNA 8
Bocnpon3BeJeHne HxKHOJ FOHorpaMMbl... 8
Ponck pankn/panna Ha MP3 nwn WMA DnCKe 8
IepexoHa NaHauano HxKHOJ OOHorpaMMbl (Ponck c nepexoDom) 9
БыICTpa npokpyTKa Bnpei nIi Ha3aI (PyuHoi nonc) 9
PepkIIOueHne IINcIIeR 10
IpekeJIIOUeHHe IApKoCTn DInCnJIeR 11
ABTomatueckn INTEpBaI 11
HactpoKa BbIXoHoro ypOBHa 11
BOCINPOIN3BEDEHNE BCJYUAHOM IOPRAKKE 12
IOBTOPHOE BOCIPON3BEDEHNE 12
BO3MOXHbIE HENCnPABHOCTN IN CnOCObI INX YCTPAHEHNA 23
TEXHUNCHECKNE XAPAKTEPNUCTUKN 24
ФУHKLIMN
Bo3MOxHocTb BOCnpon3BeDeHnA CD-R, CD-RW-ДИСКOB (Подрбпee,смOTpUte cTp.22.)
- Bo3MOxHocTb OTo6paXeHnAaHHbIX CD-TEXT
PporpamMHOe BocnpOn3BeJeHne
Bocnpoun3BeDeHne B cIyauHOM nopAKe
- Повторhoe BocnpOn3BeDeHne OndHон
ФоногрamMbI/Bcero ДИСКа
ΦyHKuaABTo npo6eHa
ФункцяnporpaMMnpoBaHnA ΦohorpamM, NOle3HaJdIaHnC HΦoHorpamM, NOMEuaOuXcH Na KaccTe JIO60I npoDOLKHTeBHOCTN
Функця abTomatnueckoro noncka nkoBOrO ypOBH
CnHxpoHn3npoBaHHa 3aIncb CD-Диcka
HactpoKa npKocT nucnJeA
FyHKnua DnctaHcNOHHoro ynpabJeHnA
OnTnueckn uΦpOBoB BbIXoD
Bo3MOxHocTb BocnpoN3BeDeHnMP3, WMA-dncKOB
Batapeu (AAA, R03, UM-4) x 2
Dnana3OH pa60tbI nylbTa D
PpIMeuaHn
Mexny nyu ochoBbHm annapaTOM He DonxHO 6bIb HnKaNX 6oBux npenrCTBn.
EcHnHa ceHcOp DY nonaaeT npAMoN CnIbHbN CBET (ocObeHNO OT cnyopeCueHTHO NAmNb INHBepTePHO Tnna nT.D.), nybT DY moKet cpaTaBtB HnpabInbHo. B TakOM cnyae, nepeCTaBbTe OCHOBHO annapat Ha MeCTO, Kyda He naaet npAMoN CBET.
COEINHEHNA
-
Pered BbInonHeHnem KaKx-Ni6o noKJIOUeHn, yCTaHOBnB nepeKJIIOuHaTeJB Ha OFF, oTKJIIOUHTe nITaHne annapata n ycNInTeTnI INn dpynx KOMnoHErTOB.
CoeHHeHaOnXHb6bTbCepaHbK npaBnHbIM BXoHbIM TepMHaJAm ycnInTeIa nnDpyrO KOMnoHEHaTa. -
Пи пьленишуma Ha Дуrom obopydobAHn, Hanpimep TIOhepa, n3-3a 6IIN3KORo paCNoIOnOKeHn DaHHoro annapata, paCNoIOnOKeHn IX Ha HeKOToPOM paCCTOHN.
Для подкюецни дан Horo annapaTa K ycnnteIIO, Bbl6epnTe OdH n3 Hxkeyka3aHHbIX MToIDOB.
PpeoctepexeHne Poka Bce coeHNHe He 3aBepHeHb, He cJeYET NOKIOUOaTb daHHb annapaT K po3eTke.
PnncnoB3ObaHn TepmHaNoB LINE OUT (aHaIorobbIe) daHHoro annapaTa ( 1
IOnKIOUHTe DaHbIe TepMHaJIb K TePMHaJAm "CD" (nIN "AUX") Ha ycInTeIe. IOpO6He e DaHHbIX NOIKLIOHeHAX, CMOTpIte HcTpyKuHIO NO 3KcNpyaTuIN K nCNOJB3yEMOMY yCNlNTeIIO.
*PpOBepbTe,TOJeBbI (L^ ) n npaBbI (R^ ) TepMNHaJIbIOKJIOHcHbIK COOTBeTCTByIOUm (JeBbI n npaBbI) TepMNHaIam YcNJNTeJI NIN DpyrOTo KOMNoHEHTA.
- YpOBeHb CnHrHaIOB, BbIbOIMMbI OT JIb6bIX DaHHbIX TepMnHaIOB Ha ycNlHTeJIb, MOKET peYlnpOBAtbcR KhONKaMn OUTPUT LEVEL +/-
-ПиИСЮЛБЗОВАнNТЕРМИHA DIGITAL OUT (OPTICAL), c nOMOцьо KHONOK OUTPUT LEVEL +/- yCTaHOBNTe MaKcIMMaJIbHbIy yPoBeHb BblOda CnHAnOB Ha yCINJIteJIb.
Pn nCnoB3OBaHm TepMnHaJa DIGITAL OUT (OPTICAL) daHHoro annapata ( 2 )
C nOmoBIO OTdIbHO npOdaIOUeOra ONTnueckoro Ka6JIa, NOKIIIOHTe DaHbIy TepMHaN K ONTnueckOMy BXoDHOMy TepMHaNly yCUNITEJI. * IcnoJb3yIte HaedKbIOnTnueckn Ka6JIb.
-Даннгов.TермиалMOKHO TAKKE NOДКПИЧТБ K ONТИССССМУ BXODHOMY TEPMUNAHy MD-maHRHTOFOHa N T.D.ДЯпROM 3anCn CD-DnCKa Ha MD-DnCK.
■Поdkлочене дан Horo annapata K ceTи nepemehHoro Toka
Pocne BbIIOJIHeHnB CEx NpIKIOUeHn, NpIKIOUHTe CINOB Kabeb DaHHOrO annapaT K CETn IepemEHoro ToKa.

4 HaxmTe DnHaaya Bocnpoun3BeJeHnA.
HaHnHaETC Bocnpoun3BedeHne C nepBoi
foHOrpammbHa dncke.
PpmeaHn
- Посце зakpbITINNotkaДИСКАнжATиEM 念 OPEN/ CLOSE,ндИСПЛEE OTO6paxaETcN cneDyUOuaH INФОмаIGN.

Audio CD
Oouee KOJIuYeCTBO 0HOHOrpamma
06uee Bpem 3aHcN Ha DCKe

MP3, WMA
O6uee KOJnueCTBO paJIOB
B DOnoJIHeHHe, IToK DNCKa MOxHo 3aKpbITb, HaxKaB D, UcΦpOByIO KHOKNy INI RANDOM, INI TINXO HaxKaB NpeEHHIOU YACTb IOTKa DnCKa. EcIn IOTOK DnCKa 6bl IN 3aKpbIT OdHM N3 DaHHbIX MeTOOB, BOCPON3BeDeHne HAuHaETc ABTOMaTNUeCKN; ODAHko, Ha DnCnIee He 6byET NOKa3bIBaTbC6Obuee KOINueCTBO FOHOrpaMM n 06uee Bpemr 3aNcN Ha DnCke.
PpeoocTepeKeHne
Korda NotOK DnCKa OTkpbl, He npkacaiTecb K BHytpenHe Wectephe. Pnp npkochoBehnn K Wectephe, np3aKpbIbAHHH IOTka DnCKa, naNeu MOKeT 3actpTaB MoKHO nopaHnTBcR.
Pay3a Bocnp0n3BeDeHn
Haxmte
B036HOBJHBOCppon3BeHNA,CHOBaHaXMnTe
(HnHaXKMNTeD
* Hn pOHTaJIbHOI NaHEII TaKKe MoXeT NcNoJIb3OBaTbcA IINBpEMEHIO OCTaHOBKn BOCpON3BeDeHr INI DnB036HOBNEHr BOCpON3BeHn.
OcTaHOBKa BOCnPOn3BedeHnA
HaXmTe
*Ecnn CHOBa HaxKaTb BOCnpon3BeDeHne HaunHaetcAOT nepBoo pOHorpamMbI.
OTKJIouyeHne NITaHHN
CHoBa HaXMMTe POWER.
*Ecni CHOBA BKNIOUHTb NITaHne N B NOTKe DnCKa yCTAHOBJIeH DNCK, BOCPON3BeDEHHe NaHHaETcABTOMATNUeCKN C NEPBOI FOHOrpaMMbl.
Bocnpon3BeDeHne HyxHoH OOHorpaMMbI
C NOMOUII UINPPOBIX KHOIOK BbIEepHTe HxHyIO
foHOrpammy.
Ppimep:BbIbpaTbΦOHorpamMyHomep5
Haxmte "0" n 3aTeM haxmte "5".
ДиMP3иWMAфaina,ecncoepKntc100и6ooneфainOB,HaxMnTe“0”DbaXdbI 3aTeM HaxMnTe“5”.
Ecni HabpaTb HyKHyO fOHOrpAMMy I NOdoXdaTb HeCKoJIbKO ceKHyI, 3TO TaKKe npINBOuNT K Haany BOCnPoN3BeDeHnA.
- OTo6paXeH Ha npImpe MP3 nIcKa.
*Pacno3haeTcHOMep paanHa Ha DnCKe, a He B panKe. TakIM o6pa3oM, HOpE kaxdoRo paanHa 06o3Haayet nocJeDoBATEbHOCt b Ha DnCKe.
Ponck pankn/phiJaHa MP3 nJn WMA dincke
C NOMOUI KypcOpHbIX KHONOK MOXHO BOCnpoINb HyKHyIO nAny nnI.
1 Haxab FOLDER V/△, BbIbepe Te HxKHyIO nanky.
2 Haxmte ENTER.
3 Haxab FILE </D, BbIbepeTe hyxHbI paai.
4 Haxmte ENTER.
Haunhaetc Bocnpoun3BeJeHne OT BbipaHHoro faInna.
IepexoHa hauaHouxHoi oHOrpaMMbI (PoncK c IepexoOom)
Bocnpo3BeHHe c Hauana cIeJyOuei fohorpaMMbI

(HaKmTeOdINpa.)
- DAnHbIe ONEpaun TaKxMe MOryT BbINOHNrTbcN, KOrda annapaT HaxOuNTcB Pexnme nay3bl NIn OCTaHOBNk.
- Ecnn HaxkTaB n ydepKnBaTb (H) HabTe Dv, cHOrpamMb6yDyT NoCToAHHO npOnyckatcb B HAnpaJIeHN HxKnHX (NN BBICOKnx) HomePOB.
- DAnHbIe Oepaunn TaKxE MoXHO BbINOHHTb C nOmoUIO K/11 N D/D Ha pOHTaJIbHOI naHeN.
Bocnpoun3BeDene c naaI npdeIduyuee fohorpaMMbl
(HaKmTeOuHpa.)
Bocnpon3BeHne OTHaHaI npdeI dyuei fOHOrpaMMbl
(Haxmnte Dba paa.)
HaxmAR OUTPUTLEVEL+/-,MOxHOOTpeyInpoBaTb ypoBeH BblXO,HBIX CnHaJIOB Ha ycInTeJb.

PpmeaHne
PnB Bocnpon3BeHm MP3/WMA-dncka, ypoBHeb aydnocnHa, noCbnaemoro Ha tepMaHaJ DIGITAL OUT (OPTICAL), yctaHOBneH Ha MaKcmaJIbHoE 3HaueHne, He3aBNCmo OT OTo6paKeHHOro ypOBH rPOMKOCTN.
BOCNPOIN3BEIDENBE CJIyAHOM IOPAIDEK
ΦoHOrpaMMbHa DaNcKe MoXHO BOCPOn3BODnTB B CnyaHNoI NOcJeIOBaTeBHOCTN.
ДЯ BOCPON3BedeHЯ B ClyuHOM NOPAKe HaxMTe RANDM.

OTMeHa BOCnpoN3BeDeHnB CnUyAHOM NOpAKe HaxMnte RANDM.

PpmeaHne
EcnBBO BpEMBAocpnn3BeDEHNA B CnyaHOM npAKe 6blIO OTKIOUcHNOITaHne, pni NOBTOPHM HaxaTNN POWER IN BKIOUcEHNA annapaTA, BOCpnn3BeDEHNE B CnyauHOM nOPRAKE ABOTMaTueCKN BO3O6HOBnRETC.
IOBTOPHOE BOCNPOIN3BEIDEHNE
Повтор ВьбраHHORO заимеhta
HaxaB REPEAT, MoXHO NOBTOPOHO BOCnpon3BeCTN IIO6yIO HxKHyO fOHOrpaMMy, aIb6oM uIN BeCb Dnck. PexmNOBTOPOHO BOCnpon3BeDeHnIpeKNIouaETc npKAnOM HaKaTnREPEAT.

(ПОВТОРИТ b OДну ФОHORpAMMy)
IOBTOPHO BOCPON3BOOHTCA OHaΦoHOrpaMma.
*3To TaKKe cpa6aTbIbAe TnI npOrpAMMHorO BOCnpOn3BeDeHn I BOCnpOn3BeDeHn B CnyaHOM npRdKe. (Pn OTKJIuOHeHn NOBTOPOBBOcPOn3BeDeHn, BO306HOBJIaTeCn npOrpAMMHoe BOCnpOn3BeDeHne Hn BOCnpOn3BeDeHne B CnyaHOM npRdKe.)

(Повтор пankи)
MP3, WMA
*IOBTOHO BOCPON3BOJTCBCE paJIbI B BVb6paHHo nnke.

(Nonhbln noBtOp)
TOBTOHO BOCPON3BOJATCBAce pOHOrpaMMb(Becb NCK)
*Bo Bpemnporpammmoro Bocnpon3BedeHn, NOBTOPOBOcnpon3BOaTcB BCE 3anporpammpoBaHHbIe foHOrpammbl.
PnOTKIOUeHIN NITaHNA BO BpEMI NOHORO NOBTOPOBOBCNPOUN3BeDEHNA,PIN NOBTOPHOM HaxkATNI POWER IN BKIOUeHNN annapaTa,NOHoe NOBTOPOHoe BOCpON3BeDEHNE aBTOMaTNUeCKN BO306HOBNRETCR.
Повторе A-B
Moxho noBtOpHO Bocnpn3BecTOn onpeDeHHeHHb pa3dE nncka, yCTaHOBB DBe ToKKn (ToKn HaJaI N KOHa).
1 Haxab A-B, BbI6epnte TOnky HauaJa dna IOBTOpHOro BOCnpon3BeDeHHa.
2 Haxab A-B, BbI6epnte KOHeuHyo ToUky IJIa NOBTOPOHO BOCpOUN3BeDEHHA.
BbIOnHHeTcNIOBTOpHoe BocnpOu3BeJeHne BbIpaHHoro pa3deJa.
OTmeHa nobTopa A-B
IobtopHo haxmMaTe A-B do oTKIOueHnB"A B"Ha Ducnnee.
ПОНТРAMMHOE BOCПОИЗBEДЕНЕ
C nOmoUbO fYHKuIN npOrpAMMnPoBaHn foHOrpaMM, MoXHo IPOcNyUWBaT b JIO6MbIe foHOrpaMMb B JIO6oBIOncJeDoBaTeJIbHOCTn. MoXHO 3anPorpAMMnPoBaTb 40 foHOrpaMM B NOcJeDoBaTeJIbHOCTn.
1 Haxmte 0raocTaHOBKn Bocnpn3BeJeHn.
3 Haxab cooTBeTcTByUO uΦpoByIO KHOKNy, 3anporpaMMpyTe HyxHyO fOHOrpamMy.
IobtopaTe daHHyO onepaHIO dna nporpaMMpoBaHnOcTaIbHbIX fOHOrpAMM. MoXHO CHOBA Bb6paTb OdHaKOByIO fOHOrpAMMy.
2 HaxmTe PROGRAM.

MP3,WMA
Pacno3HaETcHomep paIa Ha nCke,a He B nanke.TakIM o6pa3OM,Homep kaKdOro paIa na 06O3HaayetnocJeOBaTeBHOCTb Ha nCke.
4 По заBERSEнЯ пограмИpoВаня, наЖмITE PROGRAM.

5 Haxmte TaHa hauana nporpaMMHOro Bocpon3BeHeHn.


Hhopmaunn Dncnne Ha ware 3
1 Noka3bIbaeT 06uee KOJIuYeCTBO 3anporpamMnpoBaHHbIX pOHOrpaMM.
② Ioka3bIbaeT obuee Bpem 3anporpaMMnpoBaHHbx FOHorpAMM.
③ Ioka3bIbaeT nporpamMhBn HOMep dIa CneDyUoIe PohORpAMMbI dNpORpAMMnPOBaHn.
OctahOBKa nporpaMMHOro Bocnpn3BedeHn
HaxmTe OTo6paKaeTcHOMep nepBoi 3anporpamMnpoBaHHofoHOrpAmMbI.ДЯ BO3OBHeHnIporpAMMHOBOCnpOn3BeDeHnHAxMTe BocnpOn3BeDeHne HauHaeTcOT npBoi 3anporpamMnpoBaHHofoHOrpAmMbI.
OuHcTka daHHbIX npoPpaMMbl
CyeTHeCKOJIbKO MeTOOB,ONICaHHbIX HnKe.
- Bo Bpemr ocTaHOBKn annapaTa, HaxMnTe nn Clear.
- OTkpoIe IOTOK DnCKa.
OTKJIIOUHTe NITaHne.
Ppocmpt nporpaMMHOHΦopMaun
1.BoBpemI nporpamMHOBOcnpOn3BeDeHn,HaXMMTe
2. HaxmTe PROGRAM.
3.Прикадомнжати,HNOOчepEDNo
npocmotpeTbHomepaФOHOrpamMn
nocleIOBaTeNbHbI NOpAOK 3aNporpAMMnPOBaHHbIX
ФOHOrpamM.MoxHo npocmatPbATbHomepa
ФOHOrpamMHa3aI(nocleEOBaTeNbHO B O6paTHOM
nopAKe),Hakmma
I3MeHeHne nporpaMMHO INΦopMaun
1.CneyuTe npoceIype, onncahHOB B "PpocmTo nporpaMMHO INHcOpMaun".
2. Haximam Kto6pa3nte Homep oHOrpaMMbI dna nCnpaBneHnA.
3. Haxmamu cHpOBe KHOKN, Bb6epTe fOHorpaMMy 3aMeHb BiJeHeHNo. Pahee 3anporpaMMnpoBaHHa fOHorpaMma ydaJIeTcN i3 naMTn, n porpaMMpyETcHOBa fOHorpaMma.
4.ДЯЗавершенинзмени,нхмITE PROGRAM.ДЯн HeMeДпенHOrO nporpaMMHOrO BOCpOn3BeDeHnI NOcJIe NcnpaBJIeHnI,HaXmITE DMeCTO HaXKaTINKHOPIKII PROGRAM.
INHDEKCHbI INOCK
EcnHa dncke coepkataHnHeckhble Homepa, MoXHO hauaTb Bocpon3BeDeHne OT IIO6o INHeekcho Homepa.
1 Haxmte INDEX.

2 Haxab uipobvIO KhoNky, BbIbepeTe HyXhbl INHeKCHbl HOMep.

OTMeHa yHKuHnHeKCHOro noncka
HaKmTe INDEX.
PpmeaHn
He Ha BCex DNCKax IMeOTcHnDEKChbIe Homepa.B DOONHeHne, CpeDNckOB C INHEKCHbIMN HOMepaMn, He Ha BCex DNCKax IMeETcBOnbIe ONDHO INHEKCHOHomepa.
- INDEKCHA CNTMa - 3TO MeToI NOpa3JeHnH HOHOrpAMM Ha MaJIbIe pa3JeJIbI dJI6 BoJee IerKOrO NOnCKa TaKnx pa3DeNoB. EcNt TaKne INDEKCHBe Homepa IMeOTcHa DInCKe, Ha yNaKOBKe DnCKa ObBuH OTo Obo3HaayeTc3HaKOM IN.DEX.
-Дя HeKOTOpbIX DnCKOB, BOCPON3BeDEHne MoKeT HaHaHaTbcr HEmHO r paHee HaJaI INDeKCHOI TOuKn.
EcHnHaDnCKHe HmEOTcKoDnpoBaHHbIeNHDeKChbIe TOUKN,BOcnpOu3BeDeHHe HaunHaeTcC HauJa BbI6paHHofoHOrpaMMbl.
- INHNeKChbIe HOMepa MoXHO 06O3HaHaTb TOJbKO BO Bpemr BaICBeuBaHn“INDEX”.
ПОНТРAMMнОВAHNEФOHOTPAMMДЛЯЗПИСНHA KACCETY
AnnapaT MoKet nporpamMnpoBaTb foHOrpAMMbHa NcKe DnA 3aNcH Ha KaccTe. YuHTbBaO6Uee DocTyHoe BpeM dna 3aNcH Ha KaccTe, annapaT aBtOMaTnueckn nporpaMMpyet foHOrpAMMbI nn NOMraE TnporpaMMpoBaTb foHOrpAMMbITakIM o6pa3oM, Yo6bI OHn NomeCTnJncb Ha KaccTeC HAmMeHbWe npdoJnxTeNbHO He3aNcaHHoro yAcTkHa KaKdOM KOHe KaccTebl.
A B T O M A T N U E C K O E p o r p a m M I P O B A H N e k a c c e t b i (d n A u d i o C D - d n c k a)
Annapat aTOMaTneckn nporpaMMpye foHOrpaMbHa nCkE B INxCxOJHO NOcIeOBAteJIbHOCTN.
1 Haxmte ⅡIЯ octaHOBKn BocnpOn3BeJeHnA.

*FyHKUa NOncKa NIKOBOrO yPoBHa DaHHoro annapata Noe3Ha dHa HAcTpoKn yPoBHa 3aHcN Ha KaccetHoJ Deke. (NoDpO6Hee, CMOTpuTe cTp.20.)
2 Pn Heo6xOaMocTn, MoXHo aBTOMaTHueckn yCTaHaBnBaTb DOnONHtTeIbHbI INHTepBaI MEXdy fOHOrpaMMam. (IoDpO6Hee, cMOTpnte cTp. 11.)

3 HaxmTe TAPE nOTo6paXeHnHa dncnnee oBcero doctynHoro BpeMeHN 3aNNc Ha KaccTe.

Haxmra TAPE,MOxHO Bb6paTb YeTbpe Tnna npoOJIKHTeBHOCTN KACCtbl.

Pn HeoXoDmOCTn, MoxHO BpyHyIO BBecTn 06ue Bo3MOxHoe Bpem 3aIncn Ha KaccTe.
Ппмер:ДЯксятblC-64(32MHHytblHaKaKdoi CTopoH),нжмTe“6"и“4".
4 Haxmte REPEAT.

YuHTbBaJ Ooee BpMa Ha KaccTe, annapat aBTOMaTnueeCKn nporpaMMpyet fOHOrpaMMbl dIa CTOpOHbA nCTOpOHbB.
5 Haunte 3a nncb Ha KaCCeTHoI DeKe, H 3aTeM Haxmnte PHa npIbTe Dv daHoro annapata.
6 DaaHbI aannapat aBtOMaTHueckn yCTaHaBnBaetc Hnay3y Ha KOHcE cTOpOnbI A. IpeBepHInTe Kaccety Ha cTOpOHy B, BO3o6HOBInTe 3anncb Ha KaccETHOJ DeKe, H 3aTEM HaxMInTe HnyIbTe DY daHHoro aannapata dna Hauana Bocppon3BeDeHn.
PpIMeuaHnA
Ha Ware 4, MoXHO npOCMOTpeb npOrpaMMHyIO INHΦopMaIIO DnA CTOpOHb A n CTOpOHb B, HaxkAB REPEAT. IHΦopMaIIN DnA KaKDoCTOpOHb OTObpaKaTc3 cekyHdbI.
① OTo6paKaet KOJIuYeCTBO 3anporpaMMnpoBaHHbIX ΦOHOrpaMM.
② OTo6paXaET oBuee BpeM 3anporpamMnpoBaHHbIX ΦOHOrpAMM.
③ OTo6paXaetCTopoHyKacceTbl.
- Ecni npoJnxTeIbHocTb KacceTb HeIOCTaTOHa, HBeO3MOxHO 6yIe 3aIporpammmipOBaTb BCE oHOrpAmMbI. IIn nporpaMMnpoBaHHBCEX oHOrpAMM, INcNoIb3yIte Kaccety, npoONKxTeIbHocTb KOTOpOn DoJIbWe Yem BpeMa BOCPon3BeDeHn.
- MoKHO npocmOpTeB, OTMeHHTb NIN NCnPaBtB nporpaMMHyIO INΦopMaUIO. (NoDpo6Hee, CMOTpntcTp. 15.)
*Pn npocmTope nporpamHOn HOpopMaun, NOMHTe,TO MeJy HomepaMn oHOrpamM dIa CTOpohbA nCTOpohbB OTo6paXkaetc "Pu".
- MoxHo 3aIporpammpoBaTb Do 40 fOHorpamM. Nay3a, BCTabJIeHHa MEXy CTOpOH A n CTOpOH B, yHTbIbaETcA KAK OJHa fOHorpamMa.
- Ecnn KaccetHaJaKe NaOpDepXnBaET DaHHb annapaT, MoKHO nCNoJb3ObaTb cyHKUHcXxpoHHo 3aHcN CDnCKa. B Takom cnYae, Ha Ware 5 n 6, HaxmTe
SYNCHRO 3aTeM HaxMnTe Cha NylbTe Dy daHoro annapata. HaunHaetc ABTomatueckar 3anncb. (Noop6hee, CMOTpnte ctp.21.)
PyuHoe nporpaMMnpOBaHne kaccetbI (dJa Audio CD-dncka)
DHaHNa FyHKnna NoE3Ha Ia 3nnc Ha KaCCeTy HxKhBix fOHOrpamm B IIO6o NocJeDoBaTeIbHOCTn.
1 CnepnyTe waram 1-3 ha ctp. 16.
2 HaxmTe PROGRAM.

5 C NOMOUsbIO UINpOBbIX KHOJOK Bbl6epnte HxKhbIe FOHOrpaMMbl (nla 3aNcH Ha cTOpHy B) B IIO6oI NOcNeIOBaTeJIbHOCTN.

3 C nOmoBIO uHpOBbIX KHOJOK BbIepeHte HxKhble FOHorpaMMbl (nla 3aNNcHa cTOpHy A) B IIOboI NOcJIeDOBaTeJIbHOCTN.

Ha dncnnee BbcBueHbaOTc Homepa 3anporpammpoBaHHbIX pOHOrpAMM.
4 No 3aBepWeHIO BbIbopa foHOrpamM dIa CTOpOHbIA, HaxMtTe TAPE.

BctaBnHepTc npay3a.
6 Haxmte PROGRAM.
7 Haunte 3aHcB Ha KaccetHOJeKe, H 3aTeM Haxmnte △Ha nyIbTe Dy daHHoro annapata.
8 DaHHbI aannapat aBTOMaTHueCKn yCTaHaBnBaetc Hnay3y Ha KOHcE CTOpOnbI A. IpepeBepHInTe Kaccety Ha cTOpOny B, BO3o6HOBInTe 3anncb Ha KaccETHO JKe, n 3aTEM HaxMInTe HnyIbTe Dy DaHHoro aannapata dna Hauana BocpOn3BeDeHn.
PpIMeuaHnA
Ecni,Ha Ware 3nn5,Ha dncnnee oTo6paKaetcraErr, 3TO O3HaayeT,TO Bb6paHHbHOMep FOHorpamMbI He MoXeT 6blb 3anporpammpoBaH,TAK KaK Ha Kaccete OCTaETcHedocTaTOHO BpeMeHn.
Ha Ware 3 nnn 5, npn KaKdOM BbIbope, OTo6paKaIOCTaHomep oHOHOrpMMbl NocTabuWeecBpeMa Ha KaccTe, H3aTeM ducnne nepeKJIIOyaeTcHa INDkaUO CNe dyUoIero nporpAMMHoro HOMep.
Moxho npocmtpb,OTMeHHTNINNCpABnTb nporpaMHyIOHΦopMaHIO.(NoDpo6hee,CMOTPteCTp.15.) *PnpipocmTppe nporpaMMHOHΦopMaUH, NOMHTe, 7TO MEXky HomepaMnΦOHOrpAMM DnA CTOpOHB B OTo6paXaETc“Pu”.
Moxho 3anporpammpoBaT do 40 oHOrpaMM. PnBCTabKe nay3bl, OHa CHTaETcA, KaO dHa oHOrpaMa.
- Moxho nCnoB3oBaTb cyHKUH CnHXPOHHO 3aHNC CD-dnCKa, ecn OHa noDepKNaBaetc KaccTeo. B TAKOM cIyue, ha ware 7 n 8, haxMnte SYNCHRO 3aTEM haxMnte Dha npIbTe DY daHHoro annapaTa. ABTomatueeKn HauHnaetc 3aHNCb. (NoDpO6Hee, CMOTPte cTp.21.)
BO3MOXHbIE HENCIPABHOCTN IN CNOCObI INX YCTPAHEHnA
Ecnn daHbIn annapat He pa6oTaet KaK obuHNO, npOBepbTe CneDyUOme NyHKtbl IIN BByABHeHHa TOrO, MoXHO IN NCpABnTB Oun6Ky npocTbIMn PpeINoXeHHbIMn MeToDamN. Ecnn HeBO3MOxHO NcPpABnTB OUn6Ky, INn ECn OUn6ka He yKa3aHa B KOJOnHKe CMMTOM, oTOcoEduHnTE CNIOBn Ka6eJIb nCBxNtEc b c ATOpn3uPoBaHHbIM dUNepom YamaHa INn cepBNC-ueHTpOM.
| СИМПТOM | ВОЗМоЖнAЯ ПИЧИНА | ИСПРАВЛЕНЕ |
| Апnapат Н вклочаетя при нжати M POWER. | He подклочen симову кабел ял он подклочen He naDEжно. | HaDEXHNo подклочe Tсимову Кабел. |
| Лотok диска неюностыю зakрыт. | ВHEшни подмет засторий лотok диска. | ВИHMaTeьно ИЗчITE ЛOTOK Диска и ИЗВLEkIne ТОСТОРОННО П�ДмETы. |
| Восрочьевесян нани haetя. | ДиSC NOВржден. | ВИHMaTeьно ИЗчITE ДИСК; пri небхODIMOCTN 3amEHNTe erO. |
| Ha lazeрнOM okошke образовалась kondeнcaця. | ПОДЖДITE рprimeperno 20 - 30 мHyT посLE ВКлочени apnapata и 3aTeM полытайтесь BOCPON3BVEcTи ДИСК. | |
| ДиSC uSTahOBlen BeRxHne STOPOHО ВиИЗ. | ПеуUCTAHOBITE ДИСК 3ТИКЕTOHО STOPOHО BVEpX. | |
| ДиSC 3aRpy3NeH. | ОчstInte ДИСК. | |
| CD-RW (pepezacnbSbBaembl) дSC неравиьно задиан. | ЗаменITE ДИСК на правиьно ЗадианнБй ДИСК, BOCPON3BOmMbI нданHom apnapate. | |
| HecTaHdAPTHbIe ДИСКI He ВOCPON3BODAITCЯ на дANHOM annapate. | ||
| Восрочьевеся ЗадерхиBaeTсЯ, ялнани haetя нec He c ToRо MeCTa. | ДиSC moKET 6bITb noцapanah ял пobpexдEN. | ВИHMaTeьно ИЗчITE ДИСК; пri небхODIMOCTN 3amEHNTe erO. |
| ÖtCyTCTByET 3bUayHne. | Heprabinblbte подклочenv Выхodblx KaBelen. | HaJEXHNo подклочe KaBelen.Если немправнocь.Tбе重点领域 OCTaETС, Кабел могут 6bITb DeФeKTbIMI. |
| YcniliteJB pa6oTaET He nprabinblho. | UctahOBIne усiliteJB Na правиьнБй Истчнik. | |
| KhONKII OUTPUT LEVEL +/- уctahOBleHbI Na MINHIMaJIbHbI уровь. | С поMuью кнОК OUTPUT LEVEL +/-otperuJIpye TpROMKoCTb. | |
| Зчанe "пponадаeT". | Annapat подBERPGСВУRIHNO ВИБраци ял тOLЧКOB. | ПерemeCTITE apnapat. |
| ДиSC 3aRpy3NeH. | ОчstInte ДИСК. | |
| Зчанe "иckajtsaT". | HeprabinblHoe подклочenv Кabelen. | HaJEXHNo подклочe aydINOkaBelen. Если HeyncpavBocThB СElse оctaETCS, КабEL MOry T bIbT DeФeKTbIMI. |
| Шуг ot 6lin3ko paclonoloxeHHoro TuHepa. | TOnHep pa6oTOJoxeH симskOM 6lin3ko OT apnapata. | ОтоДВиьTe TОнER и OCHOВио apnapat dpyr ot dpyra. |
| Шуг ni3 loTka dinca. | ДиSC moKET 6bITb NsCKPribLhen. | ЗаменITE ДИСК. |
| Пульт DY He pa6oTaT. | ОчEH CBsble BCaTapeKIN pylbTa DY. | ЗаменITE BCaTapeKIN Ha HOBlye. |
| Пульт DY NaHaxOДТСЯ чeHь ДалЕКо ил симskOM NaKIOHEn. | ИсpoЛьзуITE в р dedeALX 6 М и пri paDMyce 60°. | |
| Ha ceHcop DY OCHOBHOrO apnapata пonaДaJOТ праьыс coJlneHbIe LnyH ил сВET (OT ФлуорсcentHол amblby INHBeRPTEHORO Ttua nДр.). | ПereyuctaHOBIne OCHOBHо annapat. | |
| ТВ pa6oTaET HeecTBecTBeHHO pri исpoьзовани руь DA. | Пульт DY IncpONl3yETC Bo3ne TB C сeHcspom DY. | ОтоДВиьTe OCHOBHо apnapat ot TB ил праKKpoIte ceHcspor DY Na TB. |
TEXHINUeCKNEXAPAKTEPNUCTUKN
3BYKOBBIEXAPAKTEPNCTUKN
YacToTHaXapaKTepeNCTnKa 2Γu-20KΓu±0,5d6
NckaeHHn Wymbl (1 KfU)
0,003% uJIM MeHee
Othoehne cHnHaM
105d5n6oee
HnHaMnueckn Dnana3OH
95 dUnn 60nee
BbIXoJHoe HapjXeHne (1
2,0±0,5B
XapakTepcTNKn Ia3epHoro dnoDa
Tun .GaAlAs
Дин ha BOJIHbI
780HM
PpOdoJXHTeJIbHOCTb 3MnCCnn
NOCTOHHa
BbIXoHoe HapXeHne Ia3epa 44,6 B^* maKcymyM
* DaHHoe BbIXoHoe HnprXeHne n3MepeHo Ha pacCTOaHIn pImepHO 200 MM OT NOBepXHOCTN IINH3bl oBeKtNaHa ONTNUeCKOM pniemHOM 6Ioke.
OBUH PA3DEJI
HannpaxeHe
MoJennn Dnna CoeHHeHHoro KoponeBCTBa
BeiKo6puTahnn n CeBepHoI npHaHnn,
n Ebponbl 220-240 B,50
3Hepronotpe6JeHne 13 BaTT
T6apntbI (xBx) 435x87x287 MM
Bec 3,5 kr
TexHueckx XapaKTepeNtIKMOry Tn3MeHrTbC8e3 npEbpntelbHOro yBeDoMHeHra.
注意:在操作本机之前请阅读此部分。
VISIBLE AND INVISIBLE LASER RADIATION WHEN OPEN. AVOID EXPOSURE TO BEAM.
ADVARSEL
SYNLIG OG USYNLIG LASERSTRALING VED ABNING. UNDG A UDSAETTELSE FOR STRALING.
ADVARSEL
SYNLIG OG USYNLIG LASERSTRALING NAR DEKSEL APNES. UNNGA EKSPONERING FOR STRALEN.
WARNING
SYNLIG OCH OSYNLIG LASERSTRALNING NAR DENNA DEL AR ÖPPNAD. BETRAKTA EJ STRÄLEN.
VARO!
AVATTAESSA OLET ALTIINA NAKYVALLE JA
NAKYMATTOMALLE LASER SA TEILYLLE. ALKATSO SATEESEEN.
VORSICHT
© 2007 YAMAHARCORPORATION All rights reserved.

- DANGER
- WARNING
- For U.K. customers
- Note:
- SPECIAL INSTRUCTIONS FOR U.K. MODEL
- IMPORTANT:
- CONTENTS
- FEATURES
- SUPPORTED DISC TYPES
- About MP3 and WMA discs
- What is MP3?
- Notes
- What is WMA?
- UNPACKING
- NOTES ABOUT THE REMOTE CONTROL
- Battery installation
- Battery replacement
- CONNECTIONS
- When the LINE OUT (analog) terminals of this unit are used ( 1 )
- When the DIGITAL OUT (OPTICAL) terminal of this unit is used (2)
- To connect this unit to the AC outlet
- IDENTIFICATION OF COMPONENTS
- Front panel
- Display
- BASIC OPERATION
- Caution
- To pause playback
- To stop playback
- To turn off the power
- Press POWER again.
- To play back the desired track
- To search an folder/file on an MP3 or WMA disc
- To skip to the beginning of the desired track (Skip search)
- To advance or reverse playback rapidly (Manual search)
- Changing display
- When playing back an Audio CD
- When playing back an MP3 or WMA
- Changing brightness of the display
- Automatic spacing
- Adjusting the output level
- Note
- To perform random-sequence play Press RANDOM.
- To cancel random-sequence play Press RANDOM.
- REPEAT PLAY
- Repeat a selected item
- (Single repeat)
- (Folder repeat)
- MP3,V
- ALL
- (Full repeat)
- Repeat A-B
- To cancel the repeat A-B
- PROGRAM PLAY
- Display information in step 3
- To stop program playback
- To clear program data
- To check program data
- To correct program data
- INDEX SEARCH
- To cancel the index search function
- Press INDEX.
- TRACK PROGRAMMING FOR RECORDING TO TAPE
- Automatic tape-programming (for Audio CD)
- Manual tape-programming (for Audio CD)
- Random sequential tape-programming (for Audio CD)
- Automatic searching for the peak level on a disc (for Audio CD)
- To cancel the peak level search function Press
- CD SYNCHRONIZED RECORDING
- To cancel synchronized CD-tape recording function
- NOTES ABOUT DISCS
- Discs playable with this unit
- ... Compact discs (digital audio)
- CD-R,CD-RW digital audio discs
- ... CD-TEXT discs
- To prevent a malfunction of this unit:
- Notes about handling compact discs
- To play back an 8-cm CD
- TROUBLESHOOTING
- SPECIFICATIONS
- Audio Section
- Laser Diode Properties
- General
- REMARQUES CONCERNANT LA TELECOMMANDE
- ANMÄRKNINGAR OM FJÄRRKONTROLLEN
- ALL (Full repetering)
- PROGRAMMING FÖR INSPELNING PÅ BAND
- Dischi MP3 e WMA
- NOTE SUL TELECOMANDO
- NOTAS SOBRE EL CONTROL REMOTO
- GEPROGRAMMERDE WEERGAVE
- CD GESYNCHRONISEERDE OPNAME
- NPEDYNPEXKDEHNE
- CODEPJXKAHNE
- ФУHKLIMN
- Dnana3OH pa60tbI nylbTa D
- PpIMeuaHn
- COEINHEHNA
- Для подкюецни дан Horo annapaTa K ycnnteIIO, Bbl6epnTe OdH n3 Hxkeyka3aHHbIX MToIDOB.
- PnncnoB3ObaHn TepmHaNoB LINE OUT (aHaIorobbIe) daHHoro annapaTa ( 1
- Pn nCnoB3OBaHm TepMnHaJa DIGITAL OUT (OPTICAL) daHHoro annapata ( 2 )
- ■Поdkлочене дан Horo annapata K ceTи nepemehHoro Toka
- PpmeaHn
- PpeoocTepeKeHne
- Pay3a Bocnp0n3BeDeHn
- OcTaHOBKa BOCnPOn3BedeHnA
- OTKJIouyeHne NITaHHN
- Bocnpon3BeDeHne HyxHoH OOHorpaMMbI
- Ponck pankn/phiJaHa MP3 nJn WMA dincke
- IepexoHa hauaHouxHoi oHOrpaMMbI (PoncK c IepexoOom)
- PpmeaHne
- BOCNPOIN3BEIDENBE CJIyAHOM IOPAIDEK
- IOBTOPHOE BOCNPOIN3BEIDEHNE
- Повтор ВьбраHHORO заимеhta
- (ПОВТОРИТ b OДну ФОHORpAMMy)
- (Повтор пankи)
- MP3, WMA
- (Nonhbln noBtOp)
- Повторе A-B
- OTmeHa nobTopa A-B
- ПОНТРAMMHOE BOCПОИЗBEДЕНЕ
- MP3,WMA
- OctahOBKa nporpaMMHOro Bocnpn3BedeHn
- OuHcTka daHHbIX npoPpaMMbl
- Ppocmpt nporpaMMHOHΦopMaun
- I3MeHeHne nporpaMMHO INΦopMaun
- INHDEKCHbI INOCK
- OTMeHa yHKuHnHeKCHOro noncka
- ПОНТРAMMнОВAHNEФOHOTPAMMДЛЯЗПИСНHA KACCETY
- A B T O M A T N U E C K O E p o r p a m M I P O B A H N e k a c c e t b i (d n A u d i o C D - d n c k a)
- PpIMeuaHnA
- PyuHoe nporpaMMnpOBaHne kaccetbI (dJa Audio CD-dncka)
- BO3MOXHbIE HENCIPABHOCTN IN CNOCObI INX YCTPAHEHnA
- TEXHINUeCKNEXAPAKTEPNUCTUKN
- 3BYKOBBIEXAPAKTEPNCTUKN
- XapakTepcTNKn Ia3epHoro dnoDa
- OBUH PA3DEJI
- 注意:在操作本机之前请阅读此部分。
- ADVARSEL
- VARO!
- VORSICHT
Brand : YAMAHA
Model : CDX397MK2
Category : Cd player/recorder