
ES 050 - Coffee machine ROWENTA - Free user manual and instructions
Find the device manual for free ES 050 ROWENTA in PDF.
| Product type | Espresso machine |
| Brand | Rowenta |
| Model | ES 050 |
| Power | 750 W |
| Voltage | 220-240 V ~ 50/60 Hz |
| Boiler capacity | 240 ml |
| Number of cups | 1 to 4 cups (small) or 2 large |
| Functions | Coffee extraction, steam production for frothing milk |
| Brewing type | Pressure (heats water under pressure) |
| Filter | Removable filter for 1 to 4 cups |
| Coffee type | Ground coffee, espresso ground recommended |
| Measuring spoon included | Yes |
| Material | ABS plastic, stainless steel (steam wand) |
| Control | Rotary knob (off, coffee, steam) |
| Power indicator light | Yes |
| Safety | Anti-overheating and overpressure device; mandatory grounding plug |
| Cappuccino accessory | Included |
| Drip tray | Integrated with removable grid |
| Maintenance | Regular descaling required; clean with damp sponge |
| Repairability | Authorized after-sales service; spare parts available |
Frequently Asked Questions - ES 050 ROWENTA
User questions about ES 050 ROWENTA
0 question about this device. Answer the ones you know or ask your own.
Ask a new question about this device
Download the instructions for your Coffee machine in PDF format for free! Find your manual ES 050 - ROWENTA and take your electronic device back in hand. On this page are published all the documents necessary for the use of your device. ES 050 by ROWENTA.
USER MANUAL ES 050 ROWENTA
Preparation de cappuccinos
A. ON/OFF pilot light.
B. Selector knob
C. Filter-holder with 4-cup coffee dish
D. Measuring spoon
E. Water spill-off tank.
F. Water spill-off tank removable grid
G. Cappuccino accessory
H. Steam nozzle
I. Water tank lid
Fig. II
B. Selector knob.
B1. Stop position.
B2. Coffee-making position.
B3. Hot steam position.
Fig. III
C.Filter-holder
C1. Removable filter-holder for 1 to 4 cups
C2. Lock for removal of coffee grounds
1. BEFORE USING FOR THE FIRST TIME
Read all the instructions and keep them to hand.
Respect SAFETY INSTRUCTIONS!
Technical details.
- Class I appliance (with earthed plug).
- 1 to 4 cups (4 small or 2 big).
- Steam function
Water tank capacity: 240 ml. - Power: 750 W.
Voltage: 240 V. - Anti-overheating and anti-overpressure safety device.
2. SAFETY INSTRUCTIONS
Before using the appliance for the first time, follow the instructions in the paragraph "Using for the first time - rinsing" (paragraph 4).
- Supply voltage: this appliance only works with 230-240 V AC current.
Check that your domestic electric mains has the correct supply voltage for this appliance; plugging in the appliance without checking can cause irreversible damage that is not covered by the guarantee.
-This appliance must always be plugged into a mains socket that is connected to earth. If you wish to use an extension cord, make sure that it is rated at 10A minimum with an earth connection and that it is in perfect condition.
- Be Careful: when this appliance is switched on it is under pressure. For this reason, it should be supervised whilst in use.
- Follow the instructions given in the leaflet very carefully when using the steam function to avoid any possible scalds from steam.
- Never remove the filter-holder or open the water tank lid, without having previously released the remaining pressure in the appliance. To do this, unplug the appliance and turn the selector knob to the steam position until all the pressure is completely released.
Turn the knob back to stop (fig. 1).
-Do not stand or use the appliance on hot surfaces (e.g. cooker hotplates) or close to a flame to avoid damaging the plastic parts.
- When using the espresso appliance some of the parts can reach extremely high temperatures, which can cause burns. Always use the insulated filter-holder handle and warn other users of possible dangers (emission of steam, steam nozzle and filter-holder).
- Use and store the appliance out of reach of children.
- Do not switch on the appliance without putting in water.
- Do not immerse the appliance in water.
- Do not use the steam to heat any inflammable liquids.
- Never unplug the appliance by pulling on the supply cord.
- Disconnect by removing the plug from the mains:
- before filling up the water tank,
- before any cleaning and maintenance,
*after use. - in the event of any any malfunction.
Household appliances should not be used if: - the supply cord or the appliance is visibly damaged,
- the appliance has fallen or been dropped or if it is leaking; non-visible damage can affect appliance safety.
- If the supply cord is damaged it should be replaced by the manufacturer, a Rowenta service centre, or a person with an equivalent qualification, to avoid any danger.
- This appliance can only be repaired with special tools. In the event of damage to the supply cord or for any other problem, you should contact an approved service agent (see enclosed list).
3. PRACTICAL ADVICE
For espresso coffee with a powerful aroma, we recommend using freshly ground special espresso coffee. -Keep ground coffee in the refrigerator; it will keep its aroma longer.
- Do not overfill the filter. Use the measuring spoon. Remove any excess ground coffee.
Important!
- Before using for the first time, or after not having used for a considerable time, rinse the appliance as indicated in paragraph 4 "Using for the first time - rinsing".
- Fill the water tank with cold water.
- Never remove the filter-holder or open the water tank lid, without having previously released the remaining pressure in the appliance (paragraph 2).
4. USING FOR THE FIRST TIME - RINSING
Check that the appliance is unplugged.
- Unscrew the lid of the water tank (fig. 2).
- Measure out 240ml of water and pour into the tank (fig 3)
Important: for 'hot' coffee, never use more than this amount of water. - Put the lid back on and screw right down (fig. 4).
- Fit the coffee filter (without any coffee) into the appliance (fig.5): turn it firmly from left to right to put it into 'locked' position (fig. 6).
- Place one container/cup under the filter holder and another under the steam nozzle
- Plug the appliance in.
- Turn the selector knob to the "coffee making" position (fig. 8).
- The ON/OFF pilot light will light up (fig. 9)
- After a few minutes, hot water starts dripping. When the container/cup is half full, turn the selector knob gently to (fig. 10).
- When there is no more steam, turn to stop (fig. 1)
5. MAKING ESPRESSO COFFEE
Check that the appliance is unplugged and that there is no pressure. (see safety instructions)
- Unscrew the lid of the water tank (fig. 2)
Measure out the right amount of water for your needs and pour it into the water tank. For instance:
an Italian-sized cup (small cup for strong coffee) = 25 to 50 ml
a standard-sized cup (for milder coffee) = 75 to 100 ml
Up to 4 Italian cups or 2 standard cups can be made at one time, without adding water to the tank. - Pour the water into the tank (fig 3) and completely screw down the lid (fig 4).
- Plug in the appliance. Fit the filter into the filter-holder. (fig.5)
- Put the coffee into the filter holder using the measuring spoon. 1 full measuring spoon is the amount for 1
French or Italian cup (strong coffee) - Remove any excess coffee on the edge of the filter-holder.
Important: do not pack down the ground coffee.
-
Fit the filter-holder into the appliance turning it from left to right and locking it firmly into place (fig. 6).
-
Place a cup or low recipient (max. 20ml ) under the filter-holder (figure 7)
-
Turn the selector knob to "coffee" (fig. 8).
-
The ON/OFF pilot light will light up (fig. 9)
After 1 to 2 minutes, the coffee starts dripping.
Wait until the coffee has stopped dripping before removing the container/cup and then turn the selector knob to the stop position. (fig. 1).
Be careful! We advise you not to switch off the appliance before the "coffee" cycle is completely finished. At the end of the cycle, steam will dry out the coffee grounds thus producing a disc that is dry and easy to remove.
- Eliminate any remaining pressure in the appliance. To do this, unplug the appliance and turn the knob to steam until all the pressure is completely released. Turn the knob back to stop (fig. 1).
Only once you have done this can the filter-holder be removed.
To throw away the coffee grounds, keep the filter in place by pressing down with your finger on the special tipping lock, turn over the filter-holder and shake it to make the coffee grounds fall out.
6. PRODUCING STEAM FOR REHEATING
Steam is used to froth up milk and also to heat up water (tea, hot drinks).
-
Check that the appliance is unplugged and that there is no contained pressure.
-
Measure out a small amount of water and put it into the tank. For example: 50ml of water to heat up 100ml of water.
Important: for maximum efficiency, avoid putting more than 100ml of water into the tank.
-
Completely screw down the lid (fig. 4).
-
Plug in the appliance.
-
Immerse the steam nozzle in the liquid to be heated up
-
Turn the knob to (fig. 10).
-
The ON/OFF pilot light will light up (fig. 9).
-
Steam is produced after 2 to 3 minutes preheating.
-
Once the liquid is hot, turn back to stop and unplug.
-
Before turning the knob again, turn the knob to the position (fig. 10) to remove any steam, take care to put a recipient underneath the steam nozzle.
Be careful to avoid the risk of burns.
Important: Immediately after use, wash the steam nozzle with a moist sponge.
Making cappuccinos
If you want to make cappuccinos, add 50 ml to the volumes indicated above. We recommend frothing up the milk before making the coffee. After having put the coffee into the filter-holder:
-
Fill up a small recipient with milk (use full fat milk if possible for a denser froth). For instance: 2/3 frothy milk to 1/3 espresso coffee.
-
Turn the knob to the position
When the steam starts coming out, immediately place the recipient underneath it and make circular movements going up and down to froth up the milk (fig 11). Put a cup underneath the filter-holder
- Turn the knob to the "coffee" position. Once the coffee has finished dripping, delicately pour on the frothy milk to finish the cappuccino.
Let the pressure go down before opening the lid of the water tank.
7. CLEANING AND SERVICING
Unplug the appliance and let it cool down before cleaning.
- Release the remaining pressure in the appliance before removing the filter-holder and the lid of the water tank.
A. - Main appliance.
- Unplug the appliance from the mains and let it cool down every time you clean it.
- Occasionally wipe the outside of the appliance with a damp cloth. Regularly wash and dry the water spill-off tank and its grid.
- Do not use alcohol-based or abrasive cleansing products or solvents
- Regularly clean the grid through which the hot water passes with a damp sponge (fig. 12). Unplug the appliance before proceeding with this cleaning operation.
B. - Cappuccino accessory
- Remove the cappuccino accessory by pulling it off downwards.
- Rinse it in clean water to remove any traces of milk.
- Do not use either alcohol or solvents as above.
- For any other maintenance operations, contact your retailer or approved service agent.
8. DESCALING
| Number of coffees per week | Hardness of water | ||
| soft water (< 19° th) | hard water (< 19-30° th) | very hard water (> 30° th) | |
| less than 10 | every 6 months | every 3 months | every 2 months |
| more than 10 | every 2 months | every month | every 3 weeks |
We advise descending your espresso appliance regularly.
No repairs caused by scale problems are covered by the guarantee.
-
We recommend using pure clear spirit vinegar (and above all not wine vinegar).
-
We do however advise you to regularly rinse out the steam nozzle (see paragraph "Using for the first time").
-
Descaling the water tank
Check that your appliance is unplugged and that there is no contained pressure.
1. Put in the filter-holder (without coffee) locking it into place (turning from left to right) (fig. 6).
2. Pour 1/4 of a litre of clear spirit vinegar into the water tank
3. Do not put the screw lid back on
4. Place a recipient under the filter-holder (fig 7)
6. Plug in the appliance and turn the selector knob to the correct position
6. Let the vinegar boil for 1 minute.
7. Wait at least 30 minutes
8. Unplug the appliance
9. Empty out the contents of the water tank by turning it over and rinsing out several times.
2 Descaling the circuit
- put 1/4 liter of clear spirit vinegar into the water tank.
- put the lid back on to the water tank and fit the empty filter holder into the 'appliance.
- turn on the espresso appliance, leaving the knob in position until all the vinegar has run through.
- during this operation, turn the selector knob and produce steam with the nozzle 2 or 3 times.
- after descaling, run clean water through the appliance 2 or 3 times to rinse it out (without coffee in the
filter-holder). Don't forget to rinse out the steam circuit as well.
9. GUARANTEE
Be careful! The guarantee does not cover any repairs that are due to accumulated scale. For all after-sales problems or for spare parts, consult our Helpline below or an approved service agent.
| Problems | Probable causes Solutions | |
| ESPRESSO The coffee drips too slowly | ground coffee too fine | use more coarsely ground |
| filter blocked | clean it with a brush | |
| water passage grid is clogged up | clean the appliance when cold | |
| presence of scale | descale the expresso appliance | |
| Grounds in the coffee | dirty filter-holder or dirty filter | clean them with hot water |
| ground coffee too fine | use more coarsely groundcoffee | |
| The coffee doesn't drip | knob in position | Knob in position |
| The espresso leaks onto filter-holder sides | filter-holder is clogged up | remove any excess ground coffee |
| filter-holder badly positioned | put it back into place and lock it into position | |
| bad taste (vinegar) | insufficient rinsing | follow the rinsing instructions |
| STEAM Water runs out of the filter-holder | knob in position | Knob onto |
| little or no steam in position | knob opened too early | close the knob for 2 minutes |
| The steam nozzle doesn't froth up the milk | blocked steam nozzle rinse out the steam nozzle | |
| skimmed milk used | use full cream or half cream milk | |
| milk not fresh or cold enough | Always use very fresh, cold milk | |
| container doesn't have the right shape | use a small diameter container-neck (small jug) | |
| OTHERS Appliance not working | abnormal heating triggers off the safety device | contact an approved service center. |
Any problems ore queries, please contact our Customer Relations team on:
0845 602 1454 - UK
(01) 47 51947 - Ireland
This product has been designed for domestic use only. Any commercial use, inappropriate use or failure to comply with the instructions, the manufacturer accepts no responsibility and the guarantee will not apply.
WIRING INSTRUCTIONS
(forukonly)
Warning:
this appliance must be earthed.
Important :
the wires in this lead
are coloured in
accordance with
the following codes:
Green and Yellow: earth
Brown:live
Blue: neutral
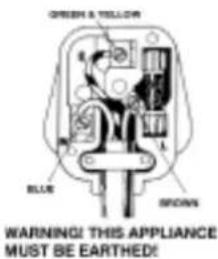
- Connect the green/yellow wire to the terminal in the plug marked "E" or by the earth symbol - or coloured green or coloured green and yellow.
- Connect the brown wire to the terminal in the plug marked "L" or coloured red.
-
Connect the blue wire to the terminal in the plug marked "N" or coloured black.
-
A 13 amp fuse should be fitted when the appliance is connected to a BS 1363 A plug.
- Seek professional advice if unsure of the correct procedure for the above.
- Important : if the electrical cord of this appliance is damaged or shows signs of wear, it must only be replaced by an authorised Tefal Service Centre (see section After Sales Service).
About your factory fitted plug (supplied with certain models only)
- The cord is already fitted with a plug incorporating an appropriate fuse. If the plug does not fit your socket outlet, see paragraph below. Should you need to replace the fuse in the plug supplied an appropriately rated approved BS 1362 fuse must be used (refer to wiring instructions specification for fuse rating). If the plug supplied does not fit your socket outlet, it should be removed from the mains lead and disposed of safety. The flexible cord insulation should be stripped back as appropriate and a suitable alternative plug fitted.
- If the plug has external access to the fuse (non-rewirable type plug) please note that the fuse cover is an important part of the plug. Please ensure that it is always refitted correctly. If you lose this cover please do not use the plug. You may contact Rowenta UK Limited for a replacement.
DESCRIPCION
Fig.1
- Cumpra as INSTRUÇOES DE SEGURANÇA!
CharacteristicasTecnicas.
5. ESPRESSON VALMISTUS

- Preparation de cappuccinos
- Fig. II
- Fig. III
- BEFORE USING FOR THE FIRST TIME
- Technical details.
- SAFETY INSTRUCTIONS
- PRACTICAL ADVICE
- Important!
- USING FOR THE FIRST TIME - RINSING
- Check that the appliance is unplugged.
- MAKING ESPRESSO COFFEE
- Check that the appliance is unplugged and that there is no pressure. (see safety instructions)
- PRODUCING STEAM FOR REHEATING
- Making cappuccinos
- CLEANING AND SERVICING
- DESCALING
- GUARANTEE
- WIRING INSTRUCTIONS
- (forukonly)
- Warning:
- Important :
- About your factory fitted plug (supplied with certain models only)
- DESCRIPCION
- Fig.1
- ESPRESSON VALMISTUS
Brand : ROWENTA
Model : ES 050
Category : Coffee machine