
AXM549BT - Hi-fi system HITACHI - Free user manual and instructions
Find the device manual for free AXM549BT HITACHI in PDF.
| Brand | Hitachi |
| Model | AXM549BT |
| Product type | Hi-fi system |
| Dimensions (main unit) | 222 (L) x 90 (H) x 255 (P) mm |
| Dimensions (speaker) | 115 (L) x 152 (H) x 212 (P) mm |
| Weight | Not specified in the manual |
| Power (AC adapter input) | AC 100-240 V, 50-60 Hz, 1.2 A |
| Power (AC adapter output) | DC 15 V, 3 A |
| Power consumption | 35 W |
| Output power | 25 W x 2 |
| Speaker impedance | 4 Ω |
| FM reception range | 87.5 - 108 MHz |
| Compatible CD formats | CD audio, CD-R, CD-RW |
| Main functions | FM radio, CD player, USB, Bluetooth, Timer (automatic on/off), Clock, Equalizer (FLAT/POP/JAZZ/ROCK/CLASSIC), Super Bass, Sound compensation, Repeat (A-B, track, all, random), Track programming (20) |
| Other functions | RDS (Radio Data System), Auto/manual tuning, Preset for 20 FM stations, Normal/power saving standby mode, Brightness adjustment (3 levels), A-B repeat, Intro playback (10 sec) |
| Connectivity | Bluetooth (range 10 m), USB (for USB flash drive/card reader), AUX input (RCA), Speaker outputs (terminals), FM antenna (coaxial socket) |
| Included accessories | Main unit, 2 speakers, Remote control (battery included), 2 speaker cables, FM antenna, AC adapter, User manual |
| Maintenance and cleaning | Clean the device with a dry cloth. For discs, wipe from the center to the edge with a soft, slightly damp cloth (water only). Do not use solvents, benzene, thinner, or antistatic sprays. |
| Safety | Do not open the casing (risk of electric shock). Do not expose to moisture, splashes, or heat sources. Maintain a distance of 10 cm around the device for ventilation. Use only the specified battery type. Keep batteries out of reach of children. Follow instructions for headphone listening (do not exceed 100 dB SPL). |
| Spare parts and repairability | Contact the store of purchase. No user-serviceable parts. For any problem, consult a qualified repair technician. |
| General information | Manual available in several languages (FR, EN, etc.) on notice-facile.com. Keep the manual for future reference. The rating plate is located under the device. |
Frequently Asked Questions - AXM549BT HITACHI
User questions about AXM549BT HITACHI
0 question about this device. Answer the ones you know or ask your own.
Ask a new question about this device
Download the instructions for your Hi-fi system in PDF format for free! Find your manual AXM549BT - HITACHI and take your electronic device back in hand. On this page are published all the documents necessary for the use of your device. AXM549BT by HITACHI.
USER MANUAL AXM549BT HITACHI
HITACHI Inspire the Next
AXM549BT
Bluetooth Micro system Micro Chaîne Bluetooth Bluetooth Microsysteem Sistema Micro Hi-Fi Bluetooth
Microcadena Bluetooth Bluetooth mikrosystém Bluetooth mikrosystém Bluetooth Müzik Seti

natural_image
Black and silver electronic audio equipment including a CD, remote control, and speaker with a black case (no visible text or symbols)Before operating please read these instructions thoroughly. Lisez attentivement cette notice d'utilisation en totalité avant d'utiliser le produit. Voor gebruik, lees deze gebruiksaanwijzing grondig door. Prima di utilizzare il prodotto, leggere attentamente le istruzioni. Lea detenidamente estas instrucciones antes de utilizar el aparato. Nežli začnete přístroj používat, přečtěte si prosím pozorně tento návod. Pred spustením si pozorne prečítajte návod. Lütfen çalıştırmadan önce bu talimatların tamamını okuyun.
Downloaded from www.vandenborre.be
Some Dos And Don't On The Safe Use Of Equipment
This equipment has been designed and manufactured to meet international safety standards but, like any electrical equipment, care must be taken if you are to obtain the best results and safety is to be assured.
\*\*\*\*\*\*\*\*\*\*\*\*\*\*\*\*\*\*\*\*\*\*\*\*\*\*
DO read the operating instructions before you attempt to use the equipment.
DO ensure that all electrical connections (including the mains plug, extension leads and interconnections between the pieces of equipment) are properly made and in accordance with the manufacturer's instructions. Switch off and withdraw the mains plug before making or changing connections.
DO consult your dealer if you are ever in doubt about the installation, operation or safety of your equipment.
DO be careful with glass panels or doors on equipment.
DO route the mains lead so that it is not likely to be walked on, crushed, chafed, or subjected to excessive wear and tear or heat.
\*\*\*\*\*\*\*\*\*\*\*\*\*\*\*\*\*\*\*\*\*\*\*\*\*\*\*
DON'T remove any fixed cover as this may expose dangerous voltages.
DON'T obstruct the ventilation openings of the equipment with items such as newspaper, tablecloths, curtains, etc. Overheating will cause damage and shorten the life of the equipment.
DON'T allow electrical equipment to be exposed to dripping or splashing, or objects filled with liquids, such as vases, to be placed on the equipment.
DON'T place hot object or naked flame sources such as lighted candles or nightlights on, or close to equipment. High temperatures can melt plastic and lead to fires.
DON'T use makeshift stands and NEVER fix legs with wood screws-to ensure complete safety always fit the manufacturer's approved stand or legs with the fixings provided according to the instructions.
DON'T use equipment such as personal stereos or radios so that you are distracted from the requirements of traffic safety. It is illegal to watch television whilst driving.
DON'T listen to headphones at high volume, as such use can permanently damage your hearing.
DON'T leave equipment switched on when it is unattended unless it is specifically stated that it is designed for unattended operation or has a stand-by mode. Switch off using the switch on the equipment and make sure that your family know how to do this. Special arrangements may need to be made for infirm or handicapped people.
DON'T continue to operate the equipment if you are in any doubt about it working normally, or if it is damaged in any way-switch off, withdraw the mains plug and consult your dealer.
ABOVE ALL,
NEVER let anyone especially children push anything into holes, slots or any other opening in the case - this could result in a fatal electrical shock;
NEVER guess or take chances with electrical equipment of any kind - it is better to be safe than sorry!
To achieve the utmost in enjoyment and performance, please read this manual carefully before attempting to operate the unit in order to become familiar with its features, and assure you, years of faithful, trouble free performance and listening pleasure.
Important Notes
* Keep instructions: the safety and operating instructions should be retained for future reference.
* Avoid installing the unit in locations described below:
Places exposed to direct sunlight or close to heat radiating appliances such as electric heaters.
On top of other stereo equipment that radiate too much heat. Places lacking ventilation or dusty places. Places subject to constant vibration. Humid or moist places.
* Make sure not to obstruct the ventilation openings.
* Before turning on the power for the first time, make sure the power cord is properly installed.
* The mains plug/direct plug-in adapter is used as disconnect device, the disconnect device shall remain readily operable.
* The product shall not be exposed to dirpping or splashing and that no objects filled with liquids, such as vases, shall be placed on the product.
* To completely disconnect the power input, the mains plug of apparatus shall be disconnected from the main. Unplug the unit from the wall outlet before storms to prevent damage due to lightning and any power fluctuation.
* When the standby LED and display are not illuminated; this indicates that the power switch is set to off or the set is disconnected from the mains.
* Minimum distances 10cm around the apparatus for sufficient ventilations.
* Attention should be drawn to the environmental aspects of battery disposal.
* The mains plug should not be obstructed or should be easily accessed during intended use.
* The ventilation should not be impeded by covering the ventilation openings with items such as newspaper, table-clothes, curtains etc.
* No naked flame sources usch as lighted candles should be placed on the apparatus.
* Battery shall not be exposed to excessive heat such as sunshine, fire or the like.
For safety reasons, do not remove any covers or attempt to gain access to the inside of the product. Refer any servicing to qualified personnel.
Do not attempt to remove any screws, or open the casing of the unit; there are no user serviceable parts inside, refer all servicing to qualified service personnel.


CAUTION: TO REDUCE THE RISK OF ELECTRIC SHOCK DO NOT REMOVE COVER (OR BACK), NO USER SERVICEABLE PARTS INSIDE, REFER SERVICING TO QUALIFIED SERVICE PERSONNEL.

DANGEROUS VOLTAGE
There is high voltage, that may be of sufficient magnitude to constitute a risk of electric shock to persons is present within this product enclosure.

ATTENTION
The owner manual contains important operating and maintenance instructions, for your safety, it is necessary to refer to the manual.
WARNING: TO PREVENT FIRE OR SHOCK HAZARD, DO NOT EXPOSE THIS APPLIANCE TO DRIPPING OR SPLASHING.
Note:
- This unit will become warm when used for a long period of time. This is normal and does not indicate a problem with the unit.
- If unusual conditions occur in the display or buttons, switch the unit off then turn on the unit again.
- The rating label is located on the base of the unit.
- The marking information is located at the bottom of apparatus.
Laser Product
This product is equipped with low power laser equipment. For your own safety do not remove any covers or take the product apart. Repair work must be carried out by qualified personnel.

Caution:
This product is equipped with low power laser equipment inside, for your safety, don't open the laser radiation protective equipment. Don't look at the laser radiation district when the equipment is operating.
Correct Handling of Batteries
- Improper or incorrect use of batteries may cause corrosion or battery leakage, which could cause fire, personal injury or damage to property.
- Use only the types of the batteries which are indicated in this manual.
- Do not dispose of the used batteries as domestic waste. Dispose of them in accordance with the local regulations.
- Small button cell batteries such as used in the remote handset for this unit are easily swallowed by young children and this can be dangerous. Keep loose button cells away from young children and make sure that the battery holder tray is secure in the remote control. Seek medical advice if you believe a cell has been swallowed.
- Batteries (battery pack or batteries installed) shall not be exposed to excessive heat such as sunshine, fire or the like.
CAUTION
Danger of explosion if battery is incorrectly replaced.
Replace only with the same or equivalent type.

At full power, prolonged listening to the player can damage the ear of the use.
WARNING: To protect your hearing
It is important that any headphones or earphones used in conjunction with this product are compliant with French Decree of 8 November 2005 implementing Article L.5232-1 This ensures that the sound level does not exceed 100 dB SPL. The prolonged listening at high volume for more than five hours a week can damage your hearing.
To prevent possible hearing damage, do not listen at high volume levels for long periods.

text_image
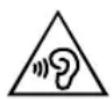
BATTERY SAFETY GUIDELINESUsed correctly, domestic batteries are a safe and dependable source of portable power. Problems can occur if they are misused or abused — resulting in leakage or, in extreme cases, fire or explosion.
Here are some simple guidelines to safe battery use designed to eliminate any such problems.

text_image
Take care to fit your batteries correctly, observing the plus and minus marks on the battery and appliance. Incorrect fitting can cause leakage or, in extreme cases, fire or even an explosion.
text_image
Replace the whole set of batteries at one time, taking care not to mix old and new batteries or batteries of different types, since this can result in leakage or, in extreme cases, fire or even an explosion.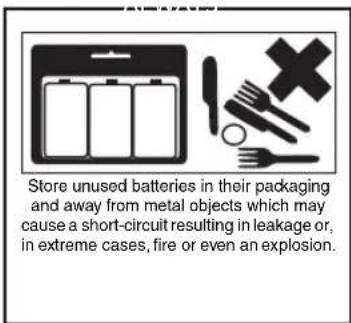
text_image
Store unused batteries in their packaging and away from metal objects which may cause a short-circuit resulting in leakage or, in extreme cases, fire or even an explosion.
text_image
Removed dead batteries from equipment and all batteries from equipment you know you are not going to use for a long time. Otherwise the batteries may leak and cause damage.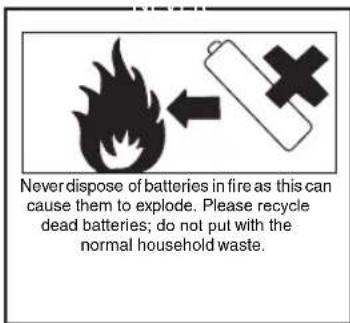
text_image
Never dispose of batteries in fire as this can cause them to explode. Please recycle dead batteries; do not put with the normal household waste.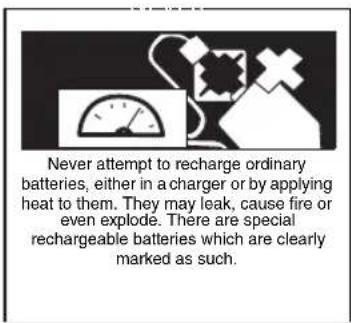
text_image
Never attempt to recharge ordinary batteries, either in a charger or by applying heat to them. They may leak, cause fire or even explode. There are special rechargeable batteries which are clearly marked as such.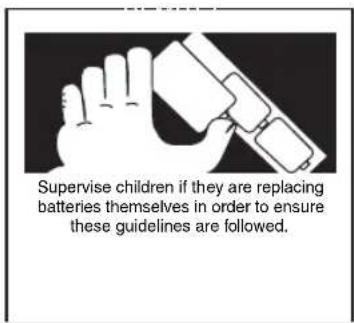
text_image
Supervise children if they are replacing batteries themselves in order to ensure these guidelines are followed.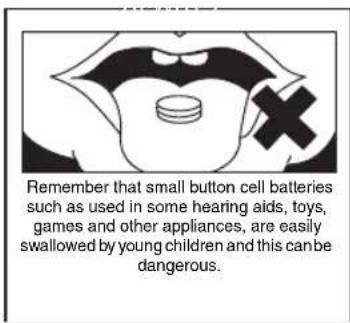
text_image
Remember that small button cell batteries such as used in some hearing aids, toys, games and other appliances, are easily swallowed by young children and this can be dangerous.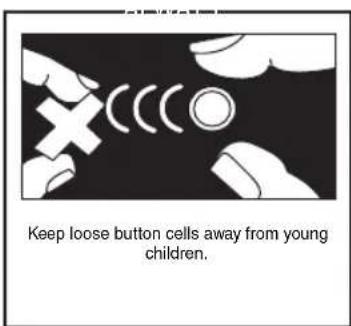
text_image
Keep loose button cells away from young children.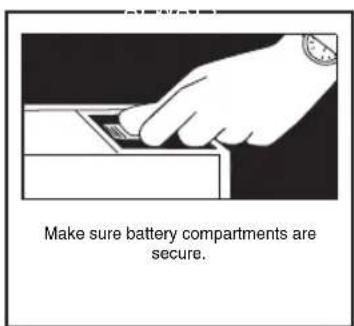
text_image
Make sure battery compartments are secure.
text_image
Seek medical advice if you believe a cell has been swallowed.Table of Contents
Some Dos And Don't On The Safe Use Of Equipment 1
Important Notes....2
Correct Handling of Batteries....4
Pack Contents 8
Product Overview 9
Remote Control Overview 10
Installation of Battery 11
Handling the Remote Control ....11
Remote Control Operation Range....12
Connections....13
Connecting the Speakers ....14
Connect to the FM Antenna....14
Connecting Auxiliary Equipment....14
Connecting the AC Power Cable 15
ECO-Power/Standby Features 15
Switching ON / OFF 15
Switching the system to ECO Power/Standby mode....15
Setting the Clock 15
Setting the Clock Manually ....15
Setting the Clock Automatically ....16
Display the Clock ....16
Sound Quality 16
Adjusting the Volume....16
Adjusting the Super Bass ....16
Controlling the Loudness....16
Presetting Equalizer....16
Changing the Front Panel Darkness....16
Listening to Radio Broadcasts....17
Tuning in to a Station....17
Program radio stations....17
To change the FM Reception Mode....17
RDS (Radio Data System) Reception 18
CD Operation....18
CD Playing....18
To Skip Search and Play....18
To Search....19
Text Display During Playback ....19
Programme Play....19
Playing the Beginning (Intro) of each Track....19
Playing Repeatedly (CD disc)....19
MP3/WMA Disc Playing....20
Text Display During Playback 20
To Skip Search or Search and Play....20
To Select Album....20
Playing Repeatedly (MP3 disc)....20
Use the USB 21
Play from Bluetooth device....22
Setting the Sleep Timer 22
Setting the Daily on Timer 23
Specifications 23
Disc Handling 24
Handling Precautions....24
If the surface is soiled (B)....24
Improper disc storage....24
Troubleshooting....25
Pack Contents
Make sure all of the following contents are included.

The Unit
natural_image
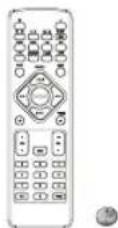
Line drawing of a speaker with two speakers and a circular head (no text or symbols)Speakers x 2 Remote Control

(battery included)

Speaker leads x2

FM Antenna

AC Adaptor
text_image
Instruction ManualInstruction Manual
Product Overview

text_image
Labeled diagram of a portable electronic device with numbered components for identification
text_image
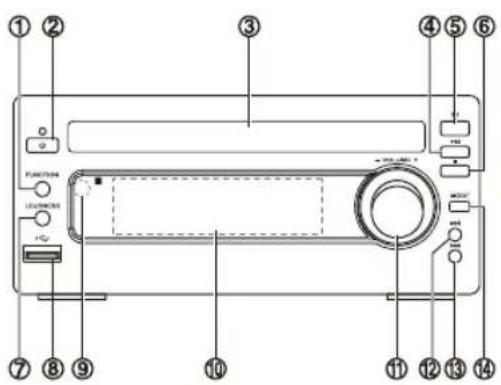
Smartwatch TV 15 15 17 13 19- Function Select Button
- Standby Button
- Disc Tray
- Play/Pause Button (▶)
Tuning Forward Button ( ▶II)
- Open/Close Button( ▲)
- Stop Button( ■)
Tuning Backward Button ( ■)
- Loudness Button ( LOUDNESS)
- USB Jack
- Remote Sensor
- LCD Display Lens
- Volume Control Knob
- Next Button (▶▶)
Preset Up Button ( ▶▶▶)
- Previous Button (◀◀)
Preset Down Button ( ◀◀◀) - Mode Button (MODE)
- Speaker Output Terminals (L&R)
- DC Jack
- AUX Input Terminals (L&R) (AUX IN)
- FM Antenna Socket
- Bluetooth Antenna

text_image
① ② ③ ④ ⑤ ⑥ ⑦ ⑧ ⑨ ⑩ ⑪ ⑫ ⑬ ⑭ ⑮ ⑯ ⑰ ⑱ ⑲ ⑳ ㉑ ㉒ ㉓ ㉔ ㉕ ㉖ ㉗ ㉘ ㉙ ㉚ ㉛ ㉜ ㉝ ㉞ ㉟ ㉳ ㉴ ㉵ ㉶ ㉷ ㉸ ㉹ ㉺ ㉻ ㉒ ㉓ ㉔ ㉕ ㉖ ㉗ ㉘ ㉙ ㉚ ㉛ ㉜ ㉝ ㉞ ㉟ ㉳ ㉟+ 10+ 2 3 4 5 6 7 8 9 10+ 0 PROB PRESET DISPLAY MUTE VOL MAINING- Standby Button ( )
- CD Function Button ( CD )
- Tuner Function Button ( ) FM
- Mode Button ( MODE)
Stereo/mono Select Button ( MODE)
- Intro Button ( INTRO)
- Loudness Button ( LOUDNESS)
- Preset Equalizer Button ( P-EQ)
- Clock Button ( CLOCK)
- Next Button ( ▶▶▶)
Preset Up Button ( PRESET + )
- Search Backward Button (◀◀)
Tuning Backward Button ( ◀◀) - Previous Button (◀◀)
Preset Down Button ( PRESET -) - Play/Pause Button (▶II)
- Album Up Button (ALB +)
- Album Down Button (ALB -)
- Mute Button (MUTE)
- Number Button (0-9, 10+)
- Open/Close Button (▲)
- USB Function Button (USB)
- Bluetooth Function Button ( )
AUX Function Button ( AUX)
- Repeat A-B Button (A-B)
- Dimmer Button (DIM)
- Super Bass Button (S-BASS)
- Sleep Button (SLEEP)
- Timer Button (TIMER)
- CD Display Button (DISPLAY)
RDS Display Button ( DISPLAY)
- Search Forward Button (▶▶)
Tuning Forward Button ( ▶▶)
- Stop Button (■)
Pairing Cleared Button ( PAIRING)
- Volume Up Button (VOL+)
- Volume Down Button (VOL-)
- Program Button (PROG)
Memory Button ( PROG)
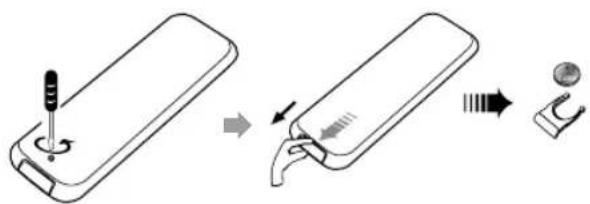
Installation of Battery
-
Remove the insulating mylar strip from the battery. It is located at the bottom back side of the remote control.
-
Loosen the screw on the battery compartment cover with a screwdriver. Pull out the battery compartment with your fingernails.
-
Replace a new battery (size 2025) correctly and fully insert the battery compartment back to the original position. Tighten the screw with a screwdriver.
text_image
Diagram illustrating the step-by-step installation of a handheld device, showing tool positioning and component assembly.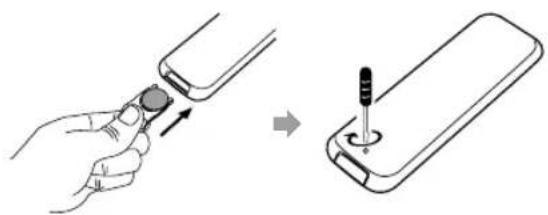
natural_image
Illustration showing a hand inserting a plug into a smartphone, then adding a screwdriver to the battery (no text or symbols present)Handling the Remote Control
- Remove the batteries if the remote control is not going to be used for an extended period of time.
- To avoid possible failure, read the following instructions and handle the remote control properly.
- Do not drop or cause impact to the remote control.
- Do not spill water or any liquid on the remote control.
- Do not place the remote control on a wet object.
- Do not place the remote control under the direct sunlight or near sources of excessive heat.
- Do not use caustic cleaners (porcelain, stainless steel, toilet, or oven cleaner etc.) on the remote, as it may suffer damage.
Note:
Remove the battery from remote control handset when it is not to be used for a long period. Otherwise it can be damaged due to leakage of battery.
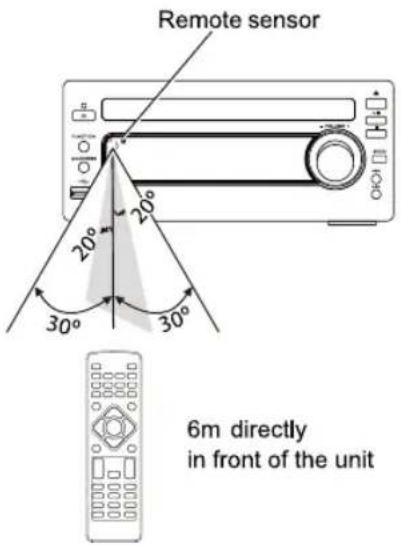
Remote Control Operation Range
text_image
Remote sensor 20° 20° 30° 30° 6m directly in front of the unitPoint the remote control to the unit no more than 6 meters from the remote control sensor and within 60^ horizontally and 20^ vertically of the front of the unit. The operating distance may vary according to the brightness of the room.
Note:
- Make sure that there is no obstacle between the infrared remote sensor of the unit and remote control. If you install the unit on rack, etc., the remote controllable range may decrease depending on the thickness or colour of glass door of rack.
- Do not expose the infrared remote sensor to direct sunlight or other strong light, such as inverter fluorescent light.
Connections
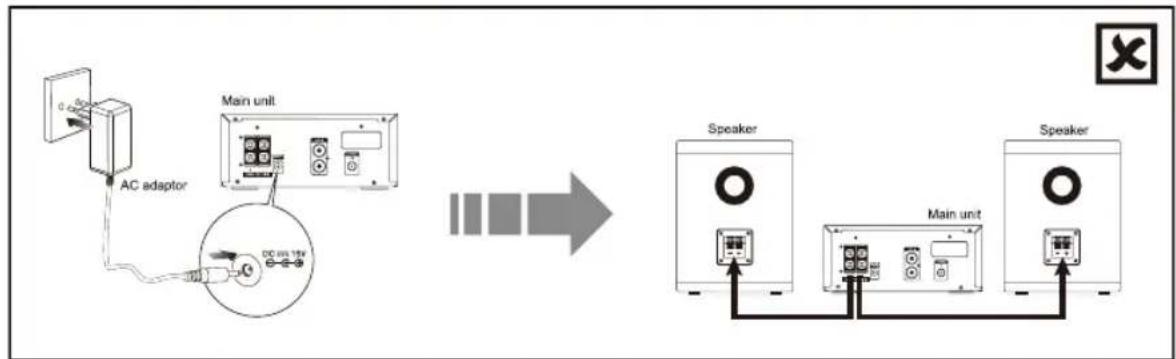
Caution: Make all connections before plugging the unit into the AC Power outlet.
Please read these additional installation notes before use.
If the following steps are not followed correctly the unit may become damaged.
Please note the correct steps for setting up the unit are as follows:
- The speaker wires between CD player and speaker are to be connected first.
- After the above cables are correctly connected, the AC power cord can then be connected to power outlet.
Caution:
i) Reversing the steps by connecting the AC power cord first will cause malfunction of the unit.
ii) During operation, if the control cable requires to be reconnected, the AC power supply must be disconnected first. Otherwise, damage to the unit may be caused.

flowchart
graph LR
    A["Speaker"] --> B["Main unit"]
    B --> C["Speaker"]
    D["AC adaptor"] --> E["Main unit"]
    E --> F["DC bus 15V"]
    style A fill:#f9f,stroke:#333
    style B fill:#ccf,stroke:#333
    style C fill:#cfc,stroke:#333
    style D fill:#fcc,stroke:#333
    style E fill:#cff,stroke:#333
    style F fill:#ffc,stroke:#333
flowchart
graph LR
    A["AC adaptor"] --> B["Main unit"]
    B --> C["Speaker"]
    C --> D["Main unit"]
    D --> E["Speaker"]
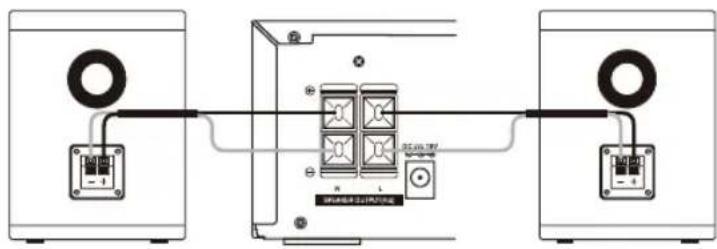
Connecting the Speakers
Connect the speaker cords between the terminals as shown below.
Connect the cable with a black head to the (-) terminals and cable with a red head to the (+) terminals.
text_image
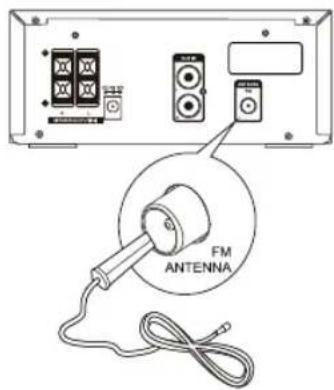
Diagram showing three speakers connected to a central device with labeled ports and connectionsConnect to the FM Antenna
- Connect the supplied FM Antenna to the FM Antenna socket on the rear of the unit.
text_image
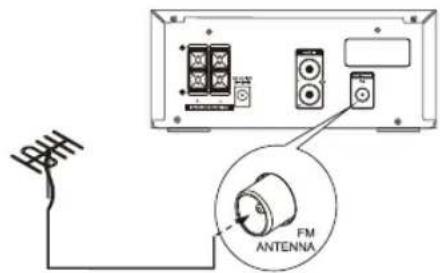
FX FM ANTENNA- If reception is poor, connect the outside antenna.
Note: Before attaching a 75 ohm coaxial lead (the kind with a round wire going to an outside antenna), disconnect the supplied FM wire antenna.
text_image
FM ANTENNACaution:
To avoid noise, keep antennas away from the system, the connecting cord and the AC power cord.
Connecting Auxiliary Equipment
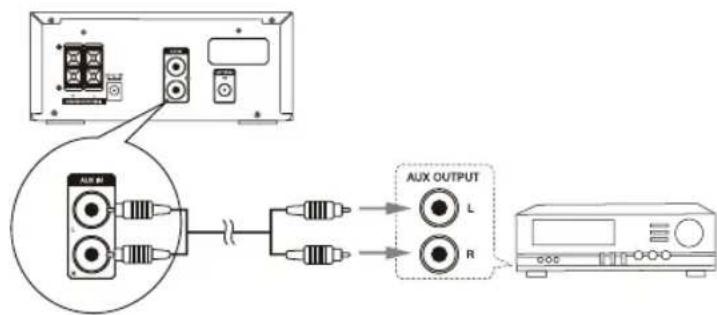
Connect the AUX Input terminals on the rear of the unit to the line output terminals on the auxiliary equipment with an audio cable (not supplied) illustrated below.
flowchart
graph TD
    A["Audio Input"] --> B["Amplifier"]
    B --> C["AUX OUTPUT"]
    C --> D["L"]
    C --> E["R"]
Connecting the AC Power Cable
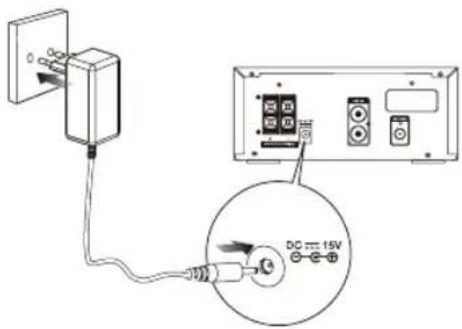
text_image
Diagram showing connection between a power outlet and an electronic device with labeled components including DC 15V and various switches.Insert the AC Power cable into a wall outlet, then your unit is ready to use.
Caution:
* Be sure to unplug the power plug from the outlet when going out or when the unit is not in use for an extended period of time.
ECO-Power/Standby Features
Switching ON / OFF
When you first connect the unit to the DC Jack, the unit will be in standby mode.
- Press the standby ⏻ button to switch the unit on. The word "HELLO" will show in the display.
- Press the standby button to switch the unit back to standby mode. The words "BYE BYE" will scroll across the display.
Switching the system to ECO Power/Standby mode
Press and hold the standby button for 2 seconds or more to switch to ECO Power Standby or normal standby.
* ECO Power standby mode
The clock will not be displayed. Press the CLOCK button to display the clock on the LCD.
* Normal standby mode
The clock display on the LCD.
Setting the Clock
Setting the Clock Manually
Caution: You can set the clock in standby mode only.
- In standby mode, press and hold the clock button (CLOCK), the VFD will display CLOCK SET and CLOCK 24 begins to blink.
- Set the 12/24 hour format with the VOL- or VOL+ button.
- Press the clock button (CLOCK), hour indicator will blink.
- Set the hour with the VOL- or VOL+ button.
- Press the clock button (CLOCK), minute indicator will blink.
- Set the minute with the VOL- or VOL+ button.
- Press the clock button (CLOCK), the built-in clock starts operating.
Note:
- To exit clock setting mode without storing, press the stop button ( ■).
- If no button is pressed in 90 seconds, the unit exits clock setting mode automatically.
- If a power failure occurs or the unit is disconnected from the mains, the clock setting will be lost.
Setting the Clock Automatically
Tune into a RDS station, press and hold the DISPLAY button. The clock will automatically update.
Display the Clock
In any source mode, the built-in clock shows the time on the display by press the CLOCK button.
Sound Quality
Adjusting the Volume
To increase or decrease the volume, rotate the volume control knob (- VOLUME +) on the unit or press the volume up/down buttons (VOL +/-) on the remote control.
Adjusting the Super Bass
You can reinforce the bass sound to maintain rich, full bass at low volume.
Press the super bass button (S-BASS) on the remote control to get the effect, the “” will lit on the front panel. Press the Super Bass button (S-BASS) again to cancel the effect.
Controlling the Loudness
This unit has a loudness function, which can automatically increase the bass sound effect at low volume. It can also increase the bass sound effect at high volume, but it will be relatively less when it is at high volume. Press the loudness button (LOUDNESS) to obtain the loudness function, the “◀” will display on the front panel, press again will disappear.
Presetting Equalizer
You can adjust the sound reproduced simply by choosing from 5 preset equalizers.
During play, press the preset equalizer button (P-EQ) on the remote control repeatedly to select:
• [FLAT] (FLAT)
• [POP] (pop)
• [JAZZ] (jazz)
• [ROCK] (rock)
• [CLASSIC] (classic)
Changing the Front Panel Darkness
This unit has three brightness levels for you to adjust the clock display. Press the dimmer control button (DIM) on the front panel or the remote control repeatedly to choose the desired brightness.
Listening to Radio Broadcasts
Caution: Before listening to the radio, please check that the FM Antenna is correctly connected and adjusted for length and direction.
Tuning in to a Station
- Repeatedly press the function select button (FUNCTION) on the unit or directly press the tuner function button () the remote control to select tuner source.
- The word "TUNER" will be displayed on the front panel.
- Select a station using one of the following methods.
- Auto Tuning
Press and hold the tuning backward/forward button (■/▶■) on the unit or tuning backward/forward button (◀◀/▶▶) on the remote control for one second or more, the frequency changes down or up automatically until a station is found.
- Manual Tuning
Repeatedly press the tuning backward/forward button ( ■/▶■) on the unit or tuning backward/forward button ( ◀◀/▶▶) on the remote control to change the frequency until you find the station you want.
- Preset Tuning (Available only after the stations are preset)
Repeatedly press the preset up/down button (I◄◄/►►) to select the desired preset number. Its band and frequency are displayed on the front panel.
Program radio stations
You can program a maximum of 20 preset radio stations (FM).
- Automatically
Press and hold the programme button (PROG) on the remote control for two second or more to activate automatic program mode.
- [AUTO] is displayed.
- All available stations are programmed.
- The first programmed radio station is broadcast automatically.
- Manually
-
Tune to a radio station.
-
Press the programme button (PROG) on the remote control to activate program mode.
- The preset number will blink.
- Press the ◄◄/►►I button to allocate a number to this radio station.
Note: If you select more than 20, the preset number will be changed to "1" automatically.
-
Press the programme button (PROG) on the remote control again to store the station.
-
Repeat above steps 1 to 4 for each station you want to store in memory with a preset number.
Note: If the system is unplugged or if a power failure occurs, the preset stations will not be erased.
To change the FM Reception Mode
Press the stereo/mono select button (MODE) on the remote control to select the Stereo or Mono channel to receive the best FM reception mode.
RDS (Radio Data System) Reception
Many FM stations are broadcasting added data compatible with RDS (Radio Data System). This radio set offers convenient functions using such data.
Press the display button ( DISPLAY) on the remote control repeatedly to select the information that displayed as follows.
- Station Name
When an RDS station is received, the "RDS" and the name of that station will be displayed.
• PTY (Programme Type)
This describes the “Style” or “genre” of music that is being broadcast e.g. “Rock” or “Classical”.
Time
The broadcaster (Radio station) provides clock and date information automatically so there's no need to manually set this information.
- Text
The broadcaster can include a scrolling text that displays information about the current program.
Frequency
This shows the frequency of the current station e.g. 95.30MHz.
CD Operation
CD Playing
- Repeatedly press the function select button (FUNCTION) on the unit or directly press the CD function button (CD) on the remote control to select the disc source.
- The word "DISC" will be displayed on the front panel.
-
Press the open/close button (▲) to open the disc door and place the disc on the disc tray (with the printed side up).
-
Press the open/close button (▲) to close the disc door, the unit will read the disc and play it automatically.
Note: If in stop mode, please press the play/pause button (▶■) to start playing the disc.
-
Press the play/pause button (▶■) to temporarily stop the playing, press the button again, it will continue to play.
-
Press the stop button (■) to stop the disc playing.
To Skip Search and Play
- Press the previous button ( ◀◀◀ ) once or more to skip previous one or more tracks on the disc.
- Press the next button (▶▶▶) once or more to skip forward one or more tracks on the disc.
To Search
Press and hold the fast backward button ◀◀) or fast forward button ▶▶) on the remote control to search for the position that you intend to start playing.
Text Display During Playback
Repeatedly press the display button (DISPLAY) on the remote control to show the current track number and single remain time, the current track number and single elapsed time or total track number and total remain time.
Programme Play
You can programme up to 20 tracks to play in any desired order. The player must be in stop mode only with a CD inserted.
- Insert a disc and press the ■ button when it starts playing.
- Press the programme button (PROG) on the remote control, the VFD will display "0 1 p -- 0 1" and "PROG" begins to blink.
- Press the number buttons (0-9, +10) on the remote control to select the desired track number.
- Press the programme button (PROG) on the remote control to confirm the track number to be stored.
- Repeat steps 3-4 to select and store all desired tracks.
- Press the ▶■ button to start programme play.
- Press the ■ button once to stop the programme play. Press the ■ button twice to clear programme.
Playing the Beginning (Intro) of each Track
Press the intro button (INTRO) on the remote control to play the beginning of each track consecutively. The playing time of each track is 10 seconds.
When you hear the desired track, press the ▶■ button twice.
Playing Repeatedly (CD disc)
♦ ONE and ALL Repeat Play can be set by pressing the mode button (MODE).
- First press : To repeat the same track, the words “ TRK” and “ REP” will blink.
- Second press : To repeat playing all tracks on a disc, the words “ TRK” will stay lit and “ REP ALL” will blink.
- Third press : To play tracks randomly, the words “ TRK” will stay lit and “SHUF” will blink.
- Fourth press : To cancel the repeat playing, the word “ SHUF” will disappear.
- Repeat A-B can be set by pressing the repeat A-B button (A-B).
- First press : Select the start point, the words “ A-” will stay lit.
- Second press : Select the end point, the words “ A-B” will stay lit.
- Third press : To cancel repeat play, the word “ A-B” will disappear.
Note: The section A and B can be set only within the same track.
MP3/WMA Disc Playing
Note:
* MP3/WMA music playback from CD maybe be affected due to the type and format of disc or condition of the recording. If you are having trouble playing a certain disc, it is recommended to use USB input instead for best MP3/WMA playback.
- Repeatedly press the function select button (FUNCTION) on the unit or directly press the CD function button (CD) on the remote control to select the disc source.
- The word "DISC" will be displayed on the front panel.
-
Press the ▲ button to open the disc door and place the MP3/WMA disc on the disc tray (with the printed side up).
-
Press the open/close button (▲) to close the disc door, the unit will read the disc and play it automatically.
Note: If in stop mode, please press the play/pause button (▶III) to start playing the disc.
-
Press the play/pause button (▶■) to temporarily stop the playing, press the button again, it will continue to play.
-
Press the stop button (■) to stop the disc playing.
Text Display During Playback
Press the DISPLAY button on the remote control, ID3 information (song title and artist) will be displayed or "NO ID3" if there is no ID3 information. Press this button again, album, track and playing time will be displayed.
To Skip Search or Search and Play
- Press the ◄◄◄/►►► button to select the previous/next track.
- Press and hold the ◀◀/▶▶ button on the remote control to search for the position that you intend to start playing.
To Select Album
- Press the album up/down button ( ALB+/-) on the remote control to select the next/previous album, and play the first track of this album.
- If the playing has ended, press the album up/down button ( ALB+/-) on the remote control to select the next/previous album.
Playing Repeatedly (MP3 disc)
♦ ONE and ALL Repeat Play can be set by pressing the mode button (MODE).
- First press : To repeat the same track, the words “ TRK” and “ REP” will blink.
- Second press : To repeat playing album, the words “ TRK” will stay lit and “REP ALB” will blink.
- Third press : To repeat playing all tracks on a disc, the words “ TRK” will stay lit and “REP ALL” will blink.
- Fourth press : To play tracks randomly, the words "TRK" will stay lit and "SHUF" will blink.
- Fifth press : To cancel the repeat playing, the word “ SHUF” will disappear.
♦ Repeat A-B can be set by pressing the repeat A-B button (A-B).
- First press : Select the start point, the words “ A-” will stay lit.
- Second press : Select the end point, the words “ A-B” will stay lit.
- Third press : To cancel repeat play, the word “ A-B” will disappear.
Note: The section A and B can be set only within the same track.
Use the USB
Caution:
Do not use a high-capacity USB hard disks. Only USB flash memory can be used.
By connecting an USB mass storage device (including USB flash memory, USB flash players or memory cards) to this unit, you can enjoy the device's stored music through the unit.
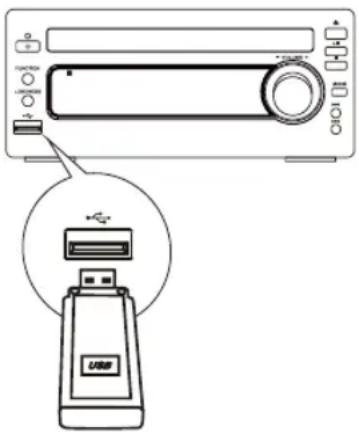
text_image
Diagram showing a device with a USB port and an icon of a USB device inserted into it.- Insert the USB device's USB plug into the socket on the unit.
- Repeatedly press the function select button (FUNCTION) on the unit or directly press the USB function button (USB) on the remote control to select the USB source.
- The word "USB" will be displayed on the front panel.
- The device's stored music will be played automatically.
- When you store more than one folder in the USB flash, use the ALB+/- button on the remote control to select the next/previous folder. Then choose the track with the ◄◀◀/▶▶I button to play the folder.
- The player support the USB music file format of MP3, WMA only.
For devices with USB Cables:
- Insert one plug of the USB cable (not supplied) to the ✉ socket on the unit.
- Insert the other plug of the USB cable to the USB output terminal of the USB device.
For memory Cards:
- Insert the memory card into a card reader (not supplied).
- Use a USB cable (not supplied) to connect the card reader into the socket on the unit.
Play from Bluetooth device
The unit has a Bluetooth function that can receive a signal within 10 metres.
Pairing the unit with a Bluetooth device to listen to music:
- Repeatedly press the function select button (FUNCTION) on the unit or directly press the bluetooth function button (✗) on the remote control to select the bluetooth source.
- The word "BLUETOOTH" will be displayed on the front panel.
- Activate your Bluetooth device and select the search mode.
- "AXM549BT" will appear on your Bluetooth device.
- Select "AXM549BT" and enter "0000" for the password if necessary.
- To disconnect the Bluetooth function, press and hold the pairing cleared button (PAIRING) on the remote control or disable the function from your Bluetooth device.
Note:
- If the signal strength is weak, your Bluetooth receiver may disconnect, but it will re-enter pairing mode automatically.
- This unit supports A2DP (Advanced Audio Distribution Profile).
Setting the Sleep Timer
Use the sleep timer to turn the unit off after a certain number of minutes when in play mode. By setting the sleep timer, you can fall asleep to music and know that your unit will turn off by itself rather than play all night.
When the unit is turned on, press sleep button (SLEEP) repeatedly to select a set period of time (in minutes):
- [SLEEP 120]
- [SLEEP 90]
- [SLEEP 60]
- [SLEEP 45]
- [SLEEP 30]
- [SLEEP 15]
When sleep timer is activated, the “ _z ” is displayed.
To deactivate sleep timer
Press the SLEEP button repeatedly until [SLEEP OFF] is displayed.
When sleep timer is deactivated, the “ _z ”4s disappears.
Setting the Daily on Timer
You can use the setting timer to make the unit automatically turn on at a certain time everyday from standby. When the setting timer is on, the timer indicator “ Ⓜ ” will be displayed. But the clock must be correctly set for the timer to operate correctly.
- In standby mode, press and hold the timer button (TIMER) on the remote control, until [TIMER SET] scrolls on the display.
- Then the source is displayed, e.g. DISC.
- Press the FM, or DISC, or USB button or VOL+/- button to select a source.
- Press the TIMER button, the hour indicator will blink.
- Set the hour with the VOL+/- button.
- Press the TIMER button, the minute indicator will blink.
- Set the minute with the VOL+/- button.
- Press the TIMER button, the volume indicator will blink.
- Adjust volume with the VOL+/- button.
- Press the TIMER button, the timer is set and activated, and "○is displayed.
To deactivate or re-activate an alarm timer
In standby mode, press the TIMER button to activate or deactivate timer.
- If timer is activated, “” is displayed.
- If timer is deactivated, " " is disappeared.
Caution:
* If disc/USB source is selected and the audio cannot be played, TUNER is activated automatically.
Specifications
Power adaptor Input : AC 100-240V 50-60Hz 1.2A
Power adaptor Output : DC 15V = 3A
FM Tuning Range : 87.5\~108 MHz
Power Consumption : 35W
Output Power : 25W x 2
THD : ≤ 1%
Speaker Impedance : 4 Ω
Speaker Input Power : 25W
Dimensions : (Unit) 222(W) x 90(H) x 255(D) mm
(Speaker) 115(W) x 152(H) x 212(D) mm
Compatible CD discs
Audio Compact Disc
CD-R
CD-RW
Disc Handling
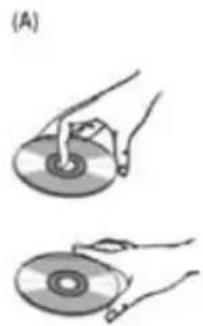
Handling Precautions
- Hold the disc by the edges so the surface will not be soiled with fingerprints. (A) Fingerprints, dirt and scratches can cause skipping and distortion.
- Do not write on the label side with a ball-point pen or other writing implements.
- Do not use record cleaning sprays, benzine, thinner, static electricity prevention liquids or any other solvent.
- Be careful not to drop or bend the disc.
- Do not install more than 1 disc on the disc tray.
- Do not try to close the disc tray when the disc is not installed properly.
- Be sure to store the disc in its exclusive case when not in use.
If the surface is soiled (B)
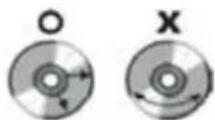
- Wipe gently with a soft, damp (water only) cloth.
- When wiping discs, always move the cloth from the center hole toward the outer edge. (If you wipe the discs using a circular motion, circular scratches are likely to occur, which will cause noise.)
- If the disc is brought from a cold to a warm environment, moisture may form on the disc. Wipe the moisture off with a soft, dry, lint-free cloth before using the disc.
natural_image
Illustration of two hands holding a CD or DVD disc, showing the exterior view (no text or symbols)
natural_image
Two circular discs labeled O and X, each with internal rotation arrows (no text or symbols beyond labels)Improper disc storage
You can damage discs if you store them in the following places:
- Areas exposed to direct sunlight.
• Humid or dusty areas. - Areas directly exposed to a heat outlet or heating appliance.
Troubleshooting
If you are having a problem with your unit, check this list for a possible solution before calling for service.
If you cannot solve the problem from the hints given here, or the unit has been physically damaged, call a qualified person, such as your dealer, for service.
No power
- Ensure that the AC adaptor plug of the unit is connected properly.
- Ensure that there is power at the AC outlet.
- To save power, the unit switches to standby automatically 15 minutes after a play reaches the end and no control is operated.
No sound
- Adjust the volume.
No response from the unit
- Disconnect and reconnect the AC adaptor plug, then turn on the unit again.
Remote control does not work
- Before pressing any function button, first select the correct source with the remote control instead of the main unit.
- Reduce the distance between the remote control and the unit.
- Insert the battery with its polarities (+/- signs) aligned as indicated.
- Replace the batteries.
- Aim the remote control directly at the sensor on the front of the unit.
No disc detected
- Insert a disc.
- Check if the disc is inserted with the print side facing inward.
- Wait until the moisture condensation at the lens has cleared.
- Replace or clean the disc.
- Use a finalized CD or correct format disc.
Cannot display some files in USB device
- The number of folders or files in the USB device has exceeded a certain limit. This phenomenon is not a malfunction.
- The formats of these files are not supported.
USB device not supported
- The USB device is incompatible with the unit. Try another one.
Poor radio reception
- Increase the distance between the unit and your TV or VCR.
- Fully extend and adjust the FM antenna.
Timer does not work
- Set the clock correctly.
- Switch on the timer.
Clock/timer setting erased
- Power has been interrupted or the power cord has been disconnected.
- Reset the clock/timer.
The mark is in compliance with the Waste Electrical and Electronic Equipment Directive 2002/96/EC (WEEE). The mark indicates the requirement NOT to dispose the equipment including any spent or discarded batteries as unsorted municipal waste, but use the return and collection systems available.
If the batteries or accumulators included with this equipment, display the chemical symbol Hg, Cd, or Pb, then it means that the battery has a heavy metal content of more than 0.0005% Mercury, or more than 0.002% Cadmium or more than, 0.004% Lead.
Notes for battery disposal
Your unit contains batteries covered by the European Directive 2006/66/EC, which cannot be disposed of with normal household waste. Please inform yourself about the local rules on separate collection of batteries. The correct disposal of batteries helps prevent potentially negative consequences on the environment and human health.
In the unlikely event of a problem developing, please contact the store where you purchased your equipment.
We continually strive to improve our products; specifications may change without prior notice.
For advice on where to purchase accessories, please contact the store where you purchased your equipment.
Kesa Electricals © UK: EC1N 6TE
CLASSE 1 PRODUIT LASER
Attention:
natural_image
Illustration of various electronic components including batteries, capacitors, and connectors (no text or symbols)CONSIGNES DE SÉCURITÉ CONCERNANT LES PILES
natural_image
Two batteries with charging indicators, one open and one closed, against a black background (no text or symbols)natural_image
Diagram showing battery arrangement with a trash bin and two batteries (no text or symbols)natural_image
Illustration of a battery and various kitchen utensils including a knife, fork, and crossed-out knife (no text or symbols)natural_image
Abstract geometric pattern with diagonal stripes on black background (no text or symbols)text_image
Warning symbol showing a flame next to a battery with a cross, indicating electric shock hazard.natural_image
Pure electrical circuit lines without any symbolsnatural_image
Illustration of a hand holding a device with a rectangular clip (no text or symbols)natural_image
Illustration of a stylized human mouth with a pill and a cross mark (no text or symbols)natural_image
Abstract illustration of hands interacting with a circular object and wave-like symbols (no text or labels)natural_image
Hand inserting a small object into a rectangular box (no text or symbols visible)natural_image
Silhouette of a human torso with a downward arrow and a coin on the chest, accompanied by a cross symbol (no text or labels)natural_image
Line drawing of a speaker with two concentric circles and mounting holes (no text or symbols)text_image
Instruction Manualtext_image
Diagram of a portable electronic device with numbered parts for identification and labeling
text_image
amplifier unit 15 16 17 18 19- Bouton Fonction
- Touche Veille
- Plateau de lecture
- Lecture/Pause (▶II)
text_image
Diagram of a remote control with labeled buttons, function keys, and display screen- Veille ( )
- CD() CD
- Radio ( ) FM
- Mode (MODE)
Stéréo/Mono (MODE)
- Intro (INTRO)
- Compensation sonore (LOUDNESS)
- Égaliseur (P-EQ)
- Horloge (CLOCK)
- Suivant ▶▶▶
Affichage RDS (DISPLAY)
- Avance rapide (▶▶)
text_image
Downloaded from www.vandenborre.betext_image
Diagram showing three speakers connected to a central device with labeled terminals and internal componentstext_image
FM ANTENNAtext_image
FH FM ANTENNAAttention :
text_image
Diagram showing connection between a power outlet and an electronic device with DC power supply labeled 15Vtext_image
Diagram showing a device with a switch and USB port, highlighting the USB device's internal structure.- [SLEEP 120]
- [SLEEP 90]
- [SLEEP 60]
- [SLEEP 45]
- [SLEEP 30]
- [SLEEP 15]
natural_image
Illustration of two hands holding a CD or DVD disc, showing the exterior view (no text or symbols)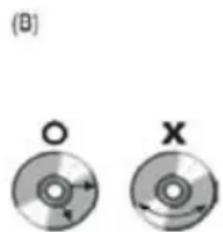
natural_image
Two circular discs labeled O and X, showing internal rotation arrows (no text or symbols beyond labels)Kesa Electricals © UK: EC1N 6TE
Downloaded from www.vandenborre.be
natural_image
Two batteries with different charging symbol designs (no text or labels)natural_image
Diagram showing battery arrangement with a cylindrical container and four battery cells (no text or symbols)natural_image
Illustration of a battery and various kitchen utensils including a knife, fork, and crossed-out knife (no text or symbols)natural_image
Abstract geometric pattern with diagonal stripes on black background (no text or symbols)text_image
Warning symbol showing a flame next to a battery with an 'X' indicating explosion or damagenatural_image
Pure electrical circuit lines without any symbolsnatural_image
Illustration of a hand holding a device with a rectangular clip (no text or symbols)日
natural_image
Illustration of a stylized human mouth with a pill and a cross mark (no text or symbols)natural_image
Abstract illustration of hands interacting with a circular object and wave-like symbols (no text or labels)natural_image
Hand inserting a small object into a rectangular box (no text or symbols visible)natural_image
Silhouette of a human torso with a downward arrow and a coin on the chest, next to a cross symbol (no text or labels)natural_image
Line drawing of a speaker with two concentric circles and mounting holes (no text or symbols)Luidsprekers x 2 Afstandsbediening
(batterij meegeleverd)
text_image
Instruction ManualGebruiksaanwijzing
text_image
Labeled diagram of a portable electronic device with numbered components for identification
text_image
Smartwatch TV 15 15 17 13 19text_image
Downloaded from www.vandenborre.betext_image
Diagram showing three speakers connected to a central device with labeled ports and connectionstext_image
FM ANTENNAtext_image
FM ANTENNAWaarschuwing:
text_image
Diagram showing connection between a power outlet and an electronic device with DC power supply labeled 15Vtext_image
Diagram showing a device with a USB logo and an attached USB card, likely illustrating a physical or electronic setup.natural_image
Illustration of two hands holding a CD or DVD disc, showing the process (no text or symbols present)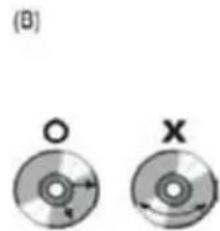
natural_image
Two circular diagrams labeled (B) showing a central hole and a cross with directional arrows, no text or symbols present.Kesa Electricals © UK: EC1N 6TE
Downloaded from www.vandenborre.be
natural_image
Two batteries with different charging symbol designs (no text or labels)natural_image
Diagram showing battery arrangement with a trash bin and two batteries (no text or symbols)natural_image
Illustration of a battery and various kitchen utensils including a knife, fork, and crossed-out knife (no text or symbols)natural_image
Abstract geometric pattern with diagonal stripes on black background (no text or symbols)text_image
Warning symbol showing a flame next to a battery with a cross, indicating hazard or failure.natural_image
Pure electrical circuit lines without any symbolsnatural_image
Illustration of a hand holding a device with a rectangular clip (no text or symbols)natural_image
Illustration of a human mouth with a pill and a cross mark (no text or symbols)natural_image
Abstract illustration of white hands interacting with a circular target and wave signals (no text or symbols)natural_image
Hand inserting a small object into a rectangular box (no text or symbols visible)natural_image
Silhouette of a human torso with a downward arrow and a coin on the chest, accompanied by a cross symbol (no text or labels)natural_image
Line drawing of a speaker with two concentric circles and mounting holes (no text or symbols)Altoparlanti x 2 Telecomando

(batteria inclusa)
text_image
Instruction Manualtext_image
Labeled diagram of a portable electronic device with numbered components for identification
text_image
Smartwatch TV 15 15 17 13 19flowchart
graph TD
    A["Hand with screwdriver"] --> B["Insert cable"]
    B --> C["Close-up cable switch"]
    C --> D["Close-up cable connector"]
    D --> E["Close-up device with handle"]
text_image
Diagram showing three audio equipment setups connected via a cable, with labeled components and connections.text_image
FM ANTENNAtext_image
Diagram showing connection between a power outlet and an electronic device with a DC power supply connected to a 15V AC input.text_image
Diagram showing a device with a USB flash unit and a control panel, illustrating the process of USB drive status.- [SLEEP 120]
- [SLEEP 90]
- [SLEEP 60]
- [SLEEP 45]
- [SLEEP 30]
- [SLEEP 15]
Kesa Electricals © UK: EC1N 6TE
Downloaded from www.vandenborre.be
natural_image
Illustration of various electronic components including batteries, capacitors, and connectors (no text or symbols)natural_image
Two batteries with charging indicators, one open and one closed, against a black background (no text or symbols)natural_image
Diagram showing battery arrangement with arrows indicating direction (no text or symbols)natural_image
Black-and-white icon set showing battery pack, kitchen utensils, and crossed-out fork (no text or symbols)natural_image
Abstract geometric pattern with diagonal stripes on black background (no text or symbols)text_image
Warning symbol showing a flame next to a battery with an 'X' mark, indicating battery hazard or hazard.natural_image
Illustration of a hand holding a device with a rectangular clip (no text or symbols)natural_image
Illustration of a human mouth with a pill and a cross mark, no text or symbols presentnatural_image
Abstract illustration of hands interacting with a circular object and wave-like patterns (no text or symbols)natural_image
Hand inserting a small object into a rectangular box (no text or symbols visible)natural_image
Silhouette of a human torso with a downward arrow and a cross symbol, no text or labels presentnatural_image
Line drawing of a speaker with two concentric circles and mounting holes (no text or symbols)Altavoces x 2 Mando a distancia

(pilas incluidas)

Cables de altavoces x2

Antena FM
text_image
Instruction Manualtext_image
Labeled diagram of a device rear panel with numbered components for identification
text_image
Smartwatch TV 15 15 17 13 19flowchart
graph TD
    A["Hand with screwdriver"] --> B["Insert cable"]
    B --> C["Car panel with switch"]
    C --> D["Car handle"]
    D --> E["Close-up cable"]
text_image
Diagram showing three speakers connected to a central device with labeled ports and connectionstext_image
FM ANTENNAtext_image
FM ANTENNAAtención:
text_image
Diagram showing connection between a power outlet and an electronic device with a DC 15V power supply, including labeled components.text_image
Diagram showing a device with a USB flash unit and a control panel, highlighting the USB component.- [SLEEP 120]
- [SLEEP 90]
- [SLEEP 60]
- [SLEEP 45]
- [SLEEP 30]
- [SLEEP 15]
Downloaded from www.vandenborre.be
natural_image
Two batteries with different charging symbol designs (no text or labels)natural_image
Diagram showing battery arrangement with a trash bin and two batteries (no text or symbols)natural_image
Illustration of a battery and various kitchen utensils including a knife, fork, and crossed-out knife (no text or symbols)natural_image
Abstract geometric pattern with diagonal stripes on black background (no text or symbols)text_image
Warning symbol showing a flame next to a battery with an 'X' indicating explosion or damagenatural_image
Pure electrical circuit lines without any symbolsnatural_image
Illustration of a hand holding a device with a rectangular clip (no text or symbols)natural_image
Illustration of a stylized human mouth with a pill and a cross mark (no text or symbols)natural_image
Abstract illustration of hands interacting with a circular object and wave-like symbols (no text or labels)natural_image
Hand inserting a small object into a rectangular box (no text or symbols visible)natural_image
Silhouette of a human torso with a downward arrow and a coin on the chest, accompanied by a cross symbol (no text or labels)natural_image
Line drawing of a speaker with concentric circles and mounting holes (no text or symbols)text_image
Instruction ManualNávod k obsluze
Přehled produktu

text_image
Labeled diagram of a portable electronic device with numbered components for identification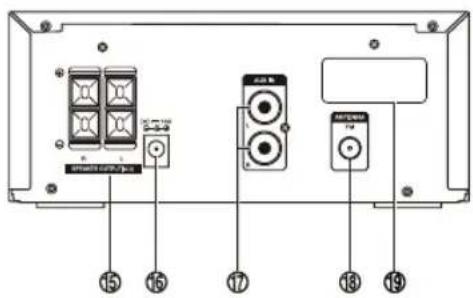
text_image
15 16 17 18 19flowchart
graph TD
    A["Handheld device with sensor"] --> B["Inserted device with adjustment"]
    B --> C["Adjustment to mouse on phone"]
    C --> D["Close-up of device"]
text_image
Diagram showing three speakers connected to a central device with labeled ports and connectionsZapojení FM antény
text_image
FM ANTENNAtext_image
FM ANTENNAUpozornění:
text_image
Diagram showing connection between a power outlet and an electronic device with labeled components including 15V DC output and connected to a terminal block.text_image
Diagram showing a device with a switch and USB device, highlighting the internal structure of the switch.- [SLEEP 120]
- [SLEEP 90]
- [SLEEP 60]
- [SLEEP 45]
- [SLEEP 30]
- [SLEEP 15]
Kesa Electricals © UK: EC1N 6TE
natural_image
Two batteries with different charging symbol designs (no text or labels)natural_image
Diagram showing battery arrangement with a trash bin and two batteries (no text or symbols)natural_image
Illustration of a battery and various kitchen utensils including a knife, fork, and crossed-out knife (no text or symbols)natural_image
Abstract geometric pattern with diagonal stripes on black background (no text or symbols)text_image
Warning symbol showing a flame next to a battery with a cross, indicating hazard or failure.natural_image
Pure electrical circuit lines without any symbolsnatural_image
Illustration of a hand holding a device with a rectangular component (no text or symbols)natural_image
Black-and-white illustration of a human mouth with a pill and a cross mark (no text or symbols)natural_image
Abstract illustration of hands interacting with a circular object and wave-like symbols (no text or labels)natural_image
Hand inserting a small object into a rectangular box (no text or symbols visible)natural_image
Silhouette of a human torso with a downward arrow and a coin on the chest, accompanied by a cross symbol (no text or labels)natural_image
Line drawing of a speaker with two concentric circles and mounting holes (no text or symbols)text_image
Instruction ManualNávod na obsluhu
Prehl'ad výrobku
text_image
Diagram of a computer monitor with numbered labels pointing to ports and function buttons
text_image
Smartwatch TV 15 15 17 13 19text_image
Diagram of a remote control with labeled buttons, function keys, and display screentext_image
Downloaded from www.vandenborre.betext_image
Diagram showing three speakers connected to a central device with labeled ports and connectionsPripojenie FM antény
text_image
FM ANTENNAPozor:
text_image
Diagram showing connection between a power outlet and an electronic device with DC 15V power supply, including labeled components.text_image
Diagram showing a device with a switch and USB drive, highlighting the internal structure of the device.- [SLEEP 120]
- [SLEEP 90]
- [SLEEP 60]
- [SLEEP 45]
- [SLEEP 30]
- [SLEEP 15]
natural_image
Illustration of two hands holding a CD or DVD disc, showing the exterior view (no text or symbols)(B)
Kesa Electricals © UK: EC1N 6TE
natural_image
Two batteries with different charging symbol designs (no text or labels)natural_image
Diagram showing battery arrangement with a cylindrical container and four battery cells (no text or symbols)natural_image
Illustration of a battery and various kitchen utensils including a knife, fork, and crossed-out knife (no text or symbols)natural_image
Abstract geometric pattern with diagonal stripes on black background (no text or symbols)text_image
Warning symbol showing a flame next to a battery with an 'X' indicating explosion or damagenatural_image
Pure electrical circuit lines without any symbolsnatural_image
Illustration of a hand holding a device with a rectangular clip (no text or symbols)natural_image
Illustration of a stylized human mouth with a pill and a cross mark (no text or symbols)natural_image
Abstract illustration of hands interacting with a circular object and wave-like symbols (no text or labels)natural_image
Hand inserting a small object into a rectangular box (no text or symbols visible)natural_image
Silhouette of a human torso with a downward arrow and a coin on the chest, next to a cross symbol (no text or labels)natural_image
Line drawing of a speaker with two concentric circles and mounting holes (no text or symbols)text_image
Instruction ManualKullanma Kılavuzu
Ürüne Genel Bakış

text_image
Diagram of a computer monitor with numbered labels pointing to ports and function buttons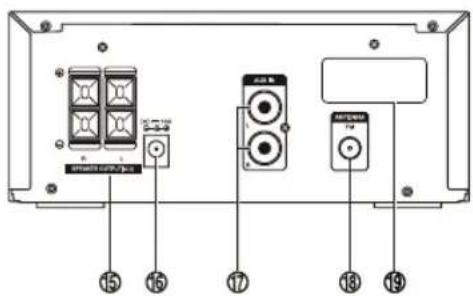
text_image
Smartwatch TV 15 15 17 13 19text_image
Downloaded from www.vandenborre.betext_image
Diagram showing three speakers connected to a speaker output with labeled components and connectionstext_image
FM ANTENNAtext_image
FM ANTENNADikkat:
text_image
Diagram showing connection between a power outlet and an electronic device with DC 15V power supply, including labeled components.text_image
Diagram showing a device with a USB card and a control panel, highlighting the USB card as an electronic device.natural_image
Illustration of two hands holding a CD or DVD disc, showing the exterior view (no text or symbols)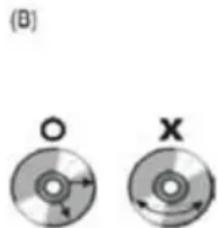
natural_image
Two circular discs labeled O and X with directional arrows, no text or symbols presentHatalı disk saklama
Digital Media Group, Whitebrook Park,
Lower Cookham Road,
Maidenhead, Berkshire SL6 8YA,
HITACHI
Inspire the Next
Declaration of Conformity
The following product has been deemed to comply with the requirements of the listed European Directives:-
R&TTE Directive (1999/5/EC)
Electromagnetic Compatibility Directive (2004/108/EC)
Low Voltage Directive (2006/95/EC)
Product Description: Bluetooth Micro HiFi System
Brand: Hitachi
Model numbers: AXM549BT
EN300 328 V1.7.1 (2006-10)
EN301 489-1 V1.9.2 (2011-09)
EN 301 489-17 V2.1.1 (2009-05)
EN 62479:2010
EN60065:2002+A1:06+A2:10+A11:08+A12:11
The person responsible for this declaration is:
Name: Paul Day
Position: Service Manager

text_image
Signature:Date: 15 January 2013
Darty Group
España France
Darty Hispana S.A. Darty France
Polígono Industrial C.L.A. 129, avenue Galliceni - 93140
Calle Rio Guadalhorce N°4 BONDY,
28906 Getafe (Madrid) France
Darty Turkey Limited
34367, Istanbul – Turkey
DATART INTERNATIONAL, a.s.
Zadunajská cesta 10
851 01 Bratislava
Slovenska republika.