MPX410DMP - Mixer Monacor - Free user manual and instructions
Find the device manual for free MPX410DMP Monacor in PDF.

User questions about MPX410DMP Monacor
0 question about this device. Answer the ones you know or ask your own.
Ask a new question about this device
Download the instructions for your Mixer in PDF format for free! Find your manual MPX410DMP - Monacor and take your electronic device back in hand. On this page are published all the documents necessary for the use of your device. MPX410DMP by Monacor.
USER MANUAL MPX410DMP Monacor
Stereo DJ Mixer with Audio Player and Bluetooth Receiver

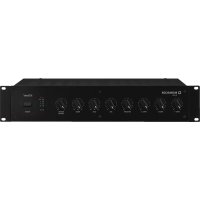
MPX-410DMP
- BOOTH (7)
- MASTER (9)
PFL (18)
-BOOTH (7)
- MASTER (9)
PFL (18)
LINE, AUX: 200 mV/ 6.6 kΩ;
Cinch
PHONO: 2 mV/480 kΩ;
Cinch
Ausgangspiegel
Cinch-Buchsien REC: .0.4 V
These operating instructions are intended for users with basic knowledge in audio technology. Please read the instructions carefully prior to operating the unit and keep them for later reference.
All operating elements and connections described can be found on the fold-out page 3.
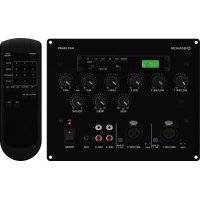
1 Operating Elements and Connections
1.1 Front Panel
1 Display, please refer to fig. 2 for details
a play, = pause, no symbol = stop
b signal source selected with the button MODE (10)
USB = USB connection (2)
SD = slot for SD card (3)
Bluetooth = Bluetooth receiver
AUX = no function
c time already played of a title
d operation mode selected with the button (10)
= repeated replay of all titles
RR = random title sequence
= repeat of the title
e title number (in the selected folder)
f name of the audio file (max. 6 characters)
g audio file type
2 USB port to connect a USB storage device (e.g. USB flash drive, USB hard disk with separate power supply)
3 Slot for an SD card Insert the card (notched corner downwards and facing the unit).
4 Control GAIN to adjust the input amplification (for each of the inputs CH 1-4)
5 Channel fader to adjust the volume of the channel and to fade in and fade out the channel signal (for each of the inputs CH 1-4)
6 Input selector switch
(for each of the inputs CH 1-4)
MP3 = audio player and Bluetooth receiver
AUX/MIC/LINE/PHONO=inputjacks(28)
7 Volume control BOOTH for a monitor system connected to the output BOOTH (24)
8 Level indicators for the sum signal at the XLR output MASTER (25) and at the RCA output MASTER (26)
9 Volume control MASTER for the XLR output
MASTER (25) and the RCA output MASTER (26)
10 Operating buttons for the audio player and the Bluetooth receiver:
MODE switch between
-USB port(2)
slot for SD card (3)
Bluetooth receiver
AUX (without function)
To activate or deactivate the audio player, press the button for 2 s.
start and pause the replay
stop the replay
select the replay mode (please refer to item d)
go to the previous title; for fast reverse within a title, keep the button pressed
go to the next title; for fast forward within a title, keep the button pressed
F- go to the previous folder
F+ go to the next folder
EQ select sound adjustment NORM,ROCK,POP,CLAS...OPER
11 Jack DJ MIC (6.3 mm jack, unbal.) for a DJ microphone
12 Control LEVEL to adjust the volume of the microphone connected to the jack DJ MIC (11)
13 Tone controls HIGH (high frequencies) and LOW (bass frequencies) for the microphone connected to the jack DJ MIC (11)
14 Tone controls HIGH (high frequencies) and LOW (bass frequencies) (for each of the inputs CH 1-4)
15 Crossfader
16 Sliding switches to define the two input channels to be used for crossfading If the crossfader function is not used, set both sliding switches to the position 0.
17 Buttons to select the signals for prefader listening via the headphone output (19): CH 1 ... CH 4 = signals of the input channels MASTER = sum signal
18 Volume control PFL for the headphone output (19)
19 6.3 mm jack to connect stereo headphones (minimum impedance: 8 Ω)
20 Control BALANCE to adjust the balance of the stereo signal at the XLR output MASTER (25) and at the RCA output MASTER (26)
21 POWER switch (with LED indicator above the switch)
1.2 Rear panel
22 Mains jack for connection to a socket (230 V/ 50 Hz) via the mains cable provided
23 Support for the mains fuse Always replace a blown fuse by a fuse of the same type!
24 Output BOOTH (6.3 mm jacks, unbal.) to connect a monitor system for monitoring the sum signal
25 XLR jacks MASTER (bal.) to connect the amplifier for PA applications
26 RCA jacks MASTER to be used additionally or as an alternative to the XLR jacks (25) for connecting an amplifier
27 RCA jacks REC to connect a recorder Irrespective of the position of the control MASTER (9), the sum signal is available at the jacks.
28 Signal inputs for the channels CH 1 to CH 4 MIC (6.3 mm jack, unbal.) for microphones LINE (RCA) for units with line output (e.g. CD player, radio) AUX (RCA) for units with line output PHONE (RCA) for turntables with magnetic system
2 Safety Notes
The unit corresponds to all relevant directives of the EU and is therefore marked with C€.
WARNING

This unit uses dangerous mains voltage. Leave servicing to skilled personnel. Inexpert handling or modification may result in electric shock.
Please observe the following items in any case:
The unit is suitable for indoor use only. Protect it against dripping water and splash water, high air humidity and heat (admissible ambient temperature range: 0 - 40^ ).
- Do not place any vessel with liquid on the unit, e. g. a drinking glass.
- Do not operate the unit and immediately disconnect the mains plug from the socket 1. if the unit or the mains cable is visibly damaged,
2. if a defect might have occurred after the unit was dropped or suffered a similar accident, 3. if malfunctions occur. In any case the unit must be repaired by skilled personnel.
- Never pull the mains cable to disconnect the mains plug from the socket, always seize the plug.
- For cleaning only use a dry, soft cloth; never use water or chemicals.
- No guarantee claims for the unit and no liability for any resulting personal damage or material damage will be accepted if the unit is used for other purposes than originally intended, if it is not correctly connected or operated, or if it is not repaired in an expert way. Likewise, no liability will be accepted for any data loss resulting from a defect or from operating errors and for any consequential damage that is due to this data loss.

If the unit is to be put out of operation definitively, take it to a local recycling plant for a disposal which is not harmful to the environment.
3 Applications
The stereo mixer with integrated audio player and Bluetooth receiver is suited for professional or private DJ applications as well as for a PA system. The mixer is equipped with four stereo input channels and a DJ microphone channel. Headphones may be connected for prefader listening to the input signals or to the sum signal.
The mixer can be placed as desired or may be installed in a rack (482 mm/19"). Rack installation requires a height of 2 RS (rack spaces) = 89mm .
4 Connecting Units
To avoid interfering noise, switch off the mixer or turn back the following controls to minimum prior to connecting/disconnecting:
-BOOTH (7)
- MASTER (9)
PFL (18)
1) Connect the audio sources to the appropriate input jacks (28):
-jacks LINE and AUX to connect units with line level (e.g. CD player, radio)
-jacks PHONO to connect turntables with magnetic system
-jacks MIC to connect microphones
A maximum of three audio sources can be connected to each input channel. Use the appropriate input selector switches (6) to switch between audio sources.
2) Connect a DJ microphone to the jack DJ MIC (11) on the front panel.
3) Connect the amplifier for PA applications to the XLR jacks MASTER (25) or to the RCA jacks MASTER (26). The two jack pairs may be used simultaneously, e. g. for two amplifiers.
4) Connect a monitor system located in a separate control room to the jacks BOOTH (24). Use the control BOOTH (7) to adjust the volume separately.
5) For audio recordings, connect a recorder to the output jacks REC (27). The recording level is irrespective of the position of the control MASTER (9).
6) Use headphones for prefader listening to the signals of the individual input channels and to the sum signal [i.e. the signals can also be monitored when the appropriate channel fader (5) is completely closed or the control MASTER (9) is turned back to minimum]. Connect the headphones (minimum impedance: 8 ) to the jack 19).
7) Use the mains cable provided to connect the mains jack (22) of the mixer to a mains socket (230V / 50Hz)
5 Operation
CAUTION

Never adjust the audio system and the headphones to a very high volume. Permanent high volumes may damage your hearing! Your ear will get accustomed to high volumes which do not seem to be that high any more after some time. Therefore, do not further increase a high volume after getting used to it.
5.1 Switching on and off
To prevent switching noise and excessive volume, set the following output controls to minimum prior to setting the mixer into operation:
-BOOTH (7)
- MASTER (9)
PFL (18)
Use the POWER switch (21) to switch the mixer on and off. When the mixer is switched on, the LED indicator above the POWER switch will light up.
5.2 Level control of the input channels
The following steps merely serve as an aid; other procedures are possible.
1) First, make the following basic adjustments:
a) In all input channels, set the control GAIN (4) and the tone controls HIGH and LOW (14) to mid-position and completely close the channel fader (5).
b) Turn back the control LEVEL (12) to minimum.
c) To deactivate the crossfading function, set the two sliding switches (16) for the crossfader to position 0.
d) Set the control BALANCE (20) to mid-position.
2) To make sure that the input signal can be indicated ahead of the level indicators (8), turn up the control MASTER (9) to approximately % of its maximum.
3) Advance the channel fader of the first channel used to approximately % of its maximum (position number 7 of the fader), use the input selector switch (6) to select the signal source and then feed an audio signal to the channel (e.g. piece of music, microphone announcement).
For channel CH 1, the audio player or the Bluetooth receiver can be selected as a signal source; please refer to chapters 5.5 and 5.6 for more information on how to operate the audio player and the Bluetooth receiver. Set the input selector switch of channel CH 1 to the position MP3.
4) Observe the level indicators for an optimum adjustment of the input amplification: Adjust the control GAIN so that a level of approximately 0 dB is indicated for music peaks.
5) Adjust the sound, using the tone controls HIGH for high frequencies and LOW for low frequencies. Check the level of the channel and, if necessary, use the control GAIN to correct the input amplification.
6) Close the channel fader. Repeat this procedure for all the other input channels.
5.3 Mixing audio sources
Crossfading between two channels
1) After level control of the input channels has been completed, the channel faders (5) can be used to mix the signals of the input channels or to fade them in and out. Always completely close the faders of the channels that are not used.
2) Use the control MASTER (9) to adjust the definite volume of the sum signal, and use the control BALANCE (20) to adjust the stereo balance. The signal level is indicated by the level indicators (8). Usually, the optimum level is obtained at 0 dB. However, if the output level of the mixer is too high or too low for the amplifier connected, attenuate or boost the sum signal accordingly, making sure that no distortions occur.
Use the control BOOTH (7) to separately adjust the volume of a monitor system that has been connected to the jacks BOOTH (24).
3) For an announcement via a microphone connected to the jack DJ MIC (11), use the control LEVEL (12) to adjust the volume, and the tone controls HIGH and LOW (13) to adjust the sound. If it is necessary to improve the audibility of the announcement, use the faders to attenuate the volume of the input channels CH 1 to 4.
4) The crossfader (15) allows crossfading between two channels. Use the sliding switches (16) to select the two channels that are to be crossfaded.
5.4 Prefader listening to the channels
CH 1-4 and to the sum signal
The input channels CH 1 - 4 can be separately monitored via headphones even when the corresponding channel fader (5) is closed. Thus, it is possible to choose the next title to be played, for example. In addition, the sum signal can be monitored even when the control MASTER (9) has been set to minimum.
1) For prefader listening to an input channel, press the appropriate button CH 1-4 (17), or for monitoring the sum signal, press the button MASTER.
2) Use the control PFL (18) to adjust the headphone volume.
5.5 Operating the audio player
Using the audio player, it is possible to replay MP3, WAVE and WMA audio files from USB flash drives, USB hard disks with separate power supply, and memory cards of up to 32 GB.
1) To replay audio files by means of the audio player, use the input channel CH 1: Set the input selector switch (6) of the channel CH 1 to the position MP3.
2) To replay audio files from a memory card, insert the memory card into the slot for the SD card (3) [notched corner downwards and facing the unit].
3) To replay audio files from a USB storage device, insert a USB flash drive, for example, into the USB port (2) or connect a USB hard disk to the USB port.
4) Replay of the audio files will start after the USB storage device or the memory card has been loaded. Various indications will appear on the display (1) for information; please refer to chapter 1.1, item 1. Use the buttons (10) located beneath the display to operate the audio player. If PLEASE PUSH PLAY appears on the display, first press the button otherwise, it will not be possible to operate the player.
MODE switch between
-USB port (2)
slot for SD card (3)
-Bluetooth receiver (chapter 5.6)
AUX (without function)
To activate or deactivate the audio player, press the button for 2 s.
start and pause the replay
stop the replay
select the replay mode
The mode will be indicated in the first line
to the right of the display:
R = repeated replay of all titles
RR = random title sequence
R = repeat of the title
go to the previous title;
for fast reverse within a title, keep the button pressed
go to the next title;
for fast forward within a title, keep the button pressed
F- go to the previous folder
F+ go to the next folder
EQ select sound adjustment
The selected adjustment will be briefly indicated in the second line of the display:
NORM
RCK
POP
CLAS
JZZ
BLUE
HALL
BASS
SOFT
COUN
OPER
5.6 Operating the Bluetooth receiver
The Bluetooth receiver can be used to establish a radio communication to a Bluetooth signal source (e.g. notebook, Smartphone, tablet PC) which allows the mixer to replay audio files stored at the Bluetooth signal source.
Note: The Bluetooth signal source must be compatible with the A2DP protocol (Advanced Audio Distribution Profile); otherwise, no radio communication will be possible.
1) To replay audio files by means of the Bluetooth receiver, use the input channel CH 1: Set the input selector switch (6) of the channel CH 1 to the position MP3.
2) If PLEASE PUSH PLAY appears on the display (1), first press the button.
3) To switch to the Bluetooth receiver, press the button MODE (10) repeatedly until Blue-tooth appears on the display.
4) Activate the Bluetooth function at the notebook, the Smartphone or the tablet PC and establish the connection to the mixer (please refer to the instructions of the respective device, if necessary).
Note: On the display of the Bluetooth signal source, the mixer is indicated by "RST-02".
5) At the Bluetooth signal source, start the replay of a title.
Note: Player functions such as pause, continue or title selection are only available at the Bluetooth signal source.
6) To switch to audio replay from a memory card or from a USB storage device, press the button MODE repeatedly until SD or USB appears in the first line to the left of the display.
6 Specifications
Inputs
(sensitivity/impedance; connection)
MIC: 1.5 mV/600Ω; 6.3 mm jack, unbal.
LINE.AUX: .200mV/6.6kΩ;RCA
PHONO: 2 mV/480 kΩ; RCA
Output level
XLR jacks MASTER: .1.5 V at indication 0 dB
RCA jacks MASTER: 1 V at indication 0 dB
RCAjacksREC:....0.4V
6.3 mm jacks BOOTH: 1 V
Headphone impedance: ≥ 8
Frequency range: 20 - 20 000 Hz
THD: <0.15%
S/N ratio: >60 dB, unweighted
Tone controls
CH1...CH4
bass frequencies: .. ±15 dB/ 50 Hz
high frequencies: .±15 dB /10 kHz
DJ-MIC
bass frequencies: .±12 dB/100 Hz
high frequencies: ± 12 dB/7kHz
Power supply: 230 V/50 Hz
Power consumption: .. 15 VA max.
Ambient temperature: .. 0-40°C
Dimensions
Subject to technical modification.
Table de mixage DJ stéreo
-BOOTH (7)
- MASTER (9)
PFL (18)
-BOOTH (7)
- MASTER (9)
PFL (18)
Alimentation: 230 V/50 Hz
- BOOTH (7)
- MASTER (9)
PFL (18)
-BOOTH (7)
- MASTER (9)
PFL (18)
Prese RCA REC: .0.4 V
Prese jack BOOTH: .1 V
Impedenza cuffia: 8
-BOOTH (7)
- MASTER (9)
PFL (18)
-BOOTH (7)
- MASTER (9)
PFL (18)
PHONO: 2mV/480kCinch
Uitgangsiveau
- BOOTH (7)
- MASTER (9)
PFL (18)
-BOOTH (7)
- MASTER (9)
PFL (18)
-BOOTH (7)
- MASTER (9)
PFL (18)
-BOOTH (7)
- MASTER (9)
PFL (18)