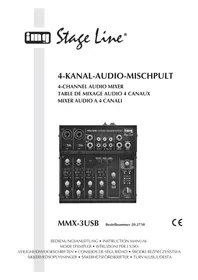
MXT52 MP3 - Mixer Monacor - Free user manual and instructions
Find the device manual for free MXT52 MP3 Monacor in PDF.
User questions about MXT52 MP3 Monacor
0 question about this device. Answer the ones you know or ask your own.
Ask a new question about this device
Download the instructions for your Mixer in PDF format for free! Find your manual MXT52 MP3 - Monacor and take your electronic device back in hand. On this page are published all the documents necessary for the use of your device. MXT52 MP3 by Monacor.
USER MANUAL MXT52 MP3 Monacor
Audio Mixer with MP3 Player
These instructions are intended for installers of PA systems and for users without any specific technical knowledge. Please read these instructions carefully prior to operation and keep them for later reference.
All operating elements and connections described can be found on page 2.
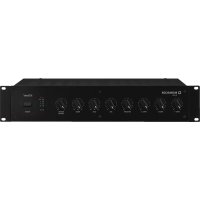
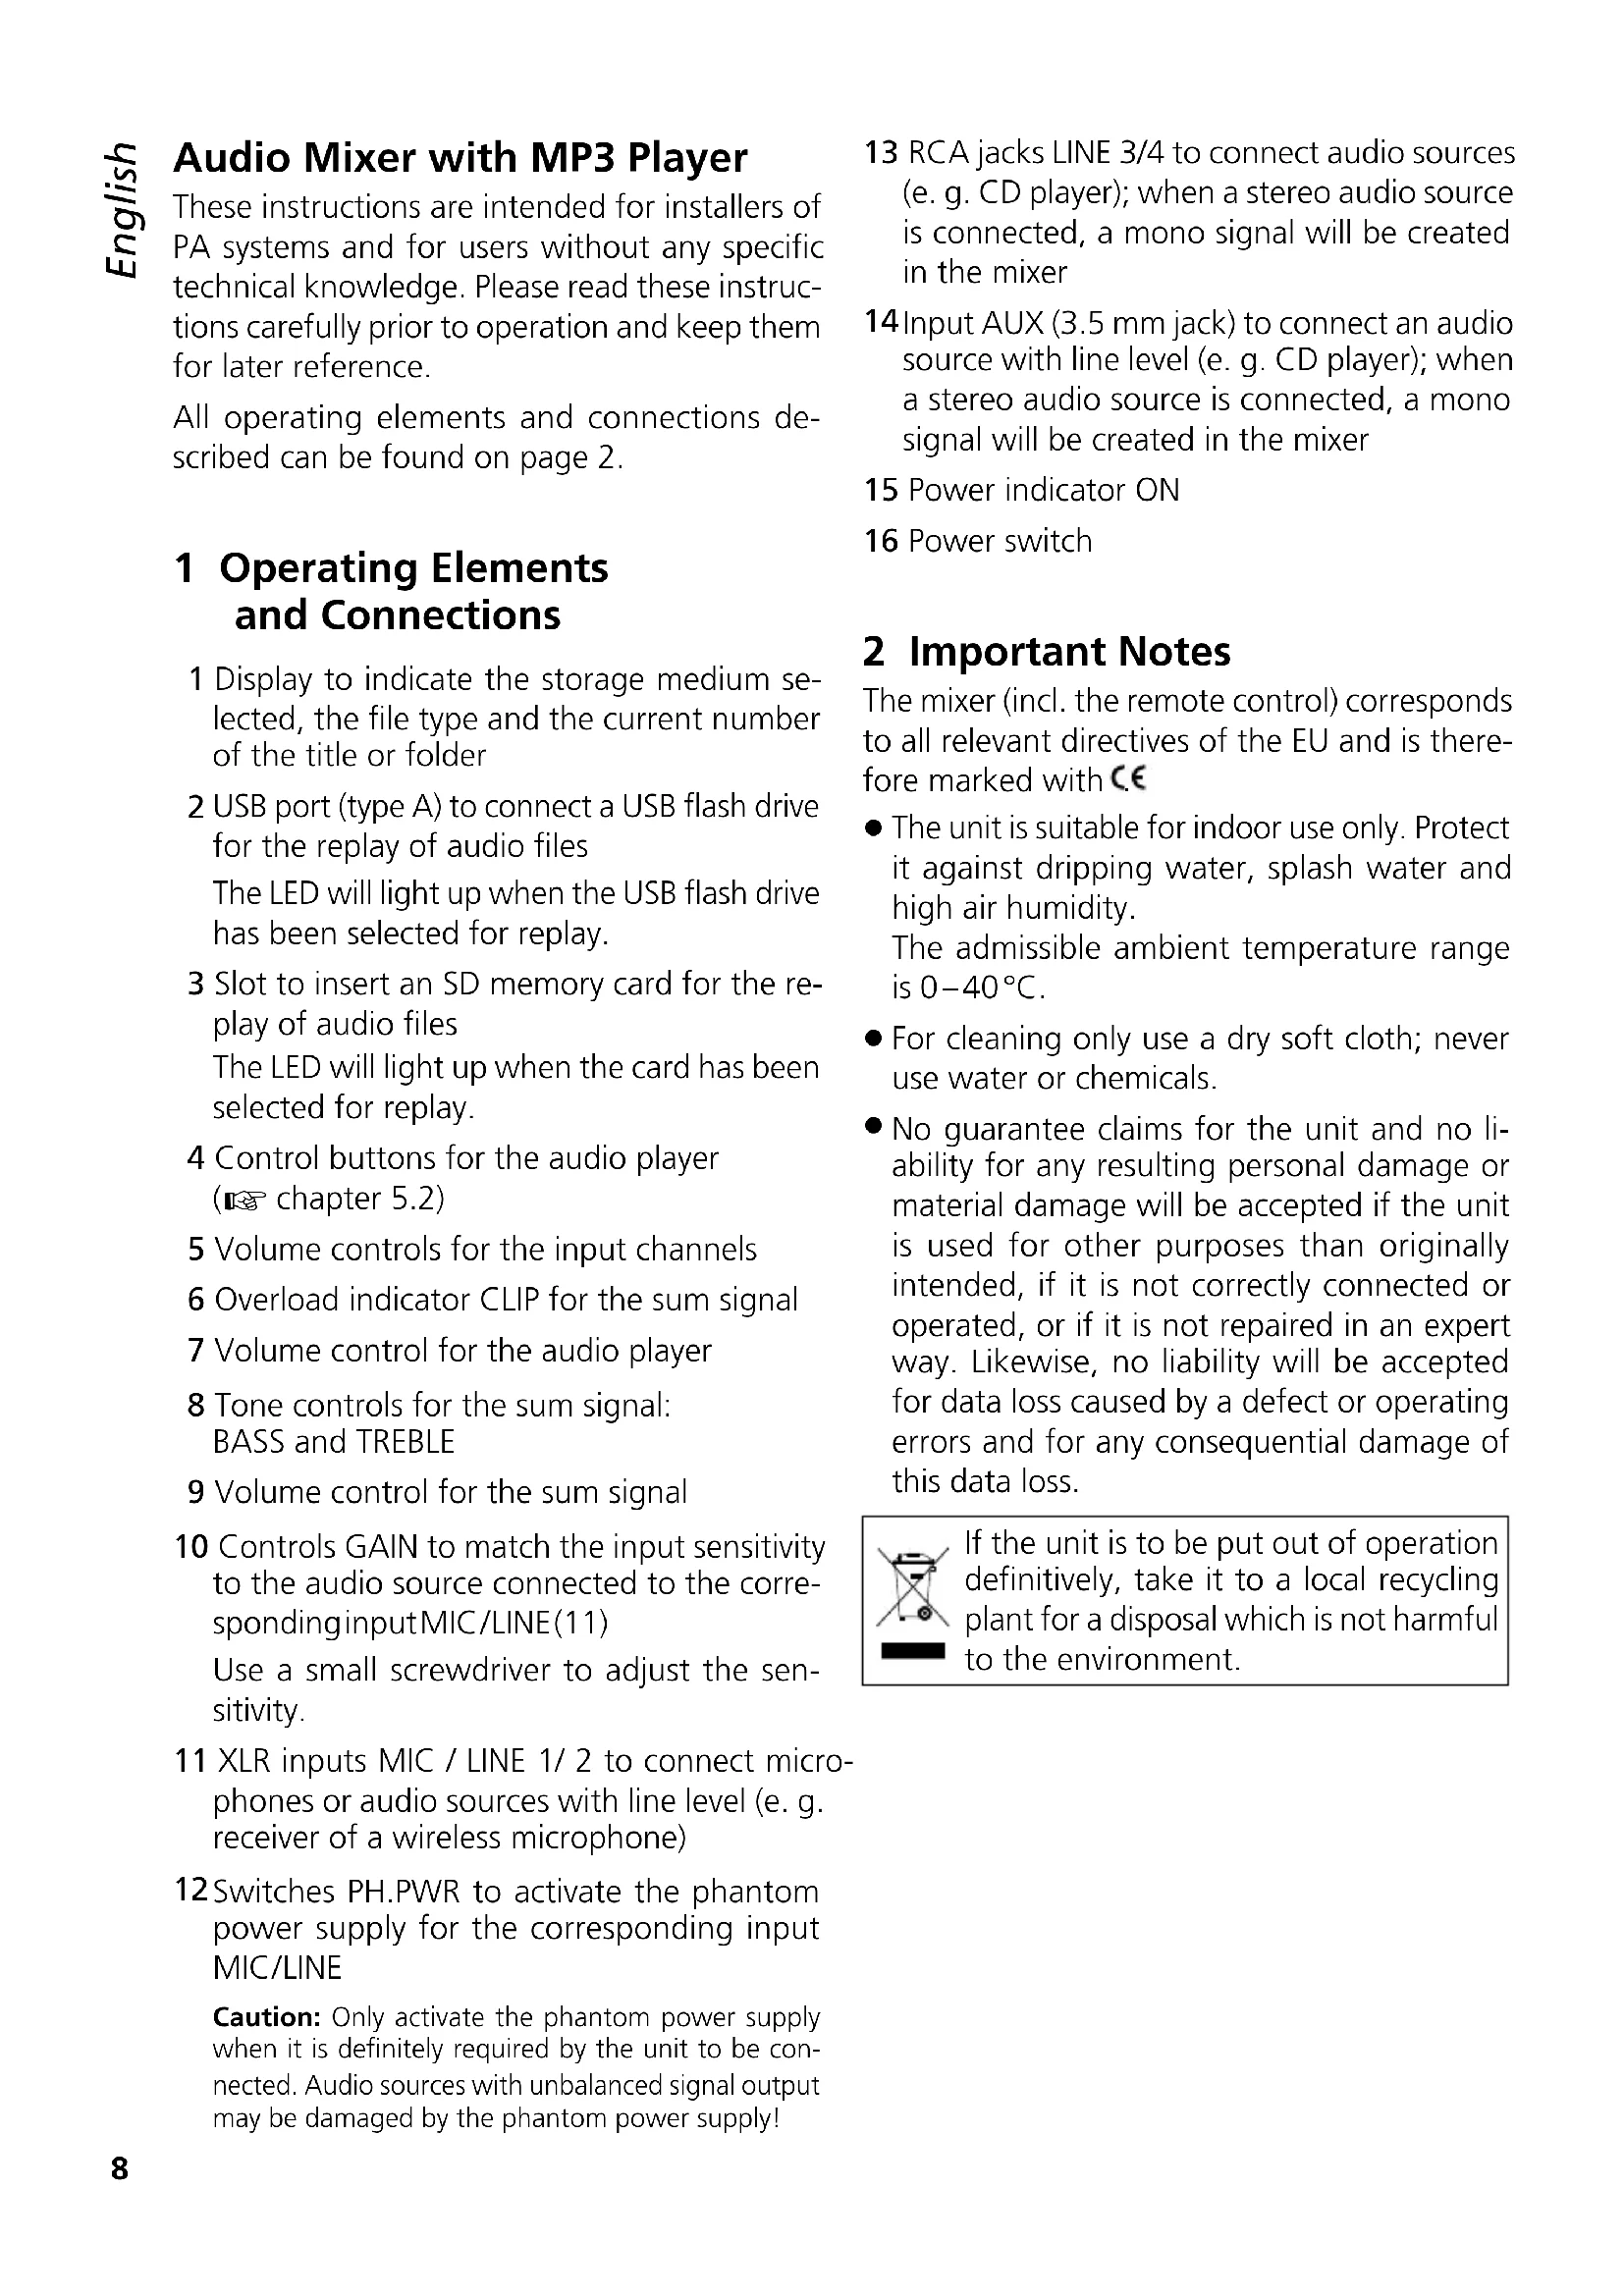
1 Operating Elements and Connections
1 Display to indicate the storage medium selected, the file type and the current number of the title or folder
2 USB port (type A) to connect a USB flash drive for the replay of audio files
The LED will light up when the USB flash drive has been selected for replay.
3 Slot to insert an SD memory card for the replay of audio files
The LED will light up when the card has been selected for replay.
4 Control buttons for the audio player (▶ chapter 5.2)
5 Volume controls for the input channels
6 Overload indicator CLIP for the sum signal
7 Volume control for the audio player
8 Tone controls for the sum signal: BASS and TREBLE
9 Volume control for the sum signal
10 Controls GAIN to match the input sensitivity to the audio source connected to the corresponding input MIC/LINE(11)
Use a small screwdriver to adjust the sensitivity.
11 XLR inputs MIC / LINE 1/2 to connect microphones or audio sources with line level (e.g. receiver of a wireless microphone)
12 Switches PH.PWR to activate the phantom power supply for the corresponding input MIC/LINE
Caution: Only activate the phantom power supply when it is definitely required by the unit to be connected. Audio sources with unbalanced signal output may be damaged by the phantom power supply!
13 RCA jacks LINE 3/4 to connect audio sources (e.g. CD player); when a stereo audio source is connected, a mono signal will be created in the mixer
14 Input AUX (3.5 mm jack) to connect an audio source with line level (e.g. CD player); when a stereo audio source is connected, a mono signal will be created in the mixer
15 Power indicator ON
16 Power switch
2 Important Notes
The mixer (incl. the remote control) corresponds to all relevant directives of the EU and is therefore marked with €€
- The unit is suitable for indoor use only. Protect it against dripping water, splash water and high air humidity.
The admissible ambient temperature range is 0–40°C.
- For cleaning only use a dry soft cloth; never use water or chemicals.
- No guarantee claims for the unit and no liability for any resulting personal damage or material damage will be accepted if the unit is used for other purposes than originally intended, if it is not correctly connected or operated, or if it is not repaired in an expert way. Likewise, no liability will be accepted for data loss caused by a defect or operating errors and for any consequential damage of this data loss.
If the unit is to be put out of operation definitively, take it to a local recycling plant for a disposal which is not harmful to the environment.
3 Applications
The MXT-52MP3 is a monophonic audio mixer for sound reinforcement systems (e. g. PA systems). It is designed for wall and furniture installation. The mixer provides five inputs. Two of these inputs can be used for the connection of microphones; they provide a switchable phantom power supply that is required for electret microphones, for example. Three inputs can be used for the connection of stereo audio sources such as CD players, for example. In addition, the mixer features an integrated audio player for the replay of audio files from a USB flash drive or SD/MMC memory card. An infrared remote control for the audio player is provided.
4 Installation
The mixer is designed for installation into walls or furniture. The dimensions of the unit can be found in figure 2 on page 2. The four holes of the front plate can be used to fasten the mixer. Prior to installation, make the connections on the rear side of the unit.
4.1 Making connections on the rear side
To connect the power supply and the amplifier, open the housing: Remove the screws A of the front plate. Guide the connection cables through the hole on the rear side and make the connections. Then close the housing.
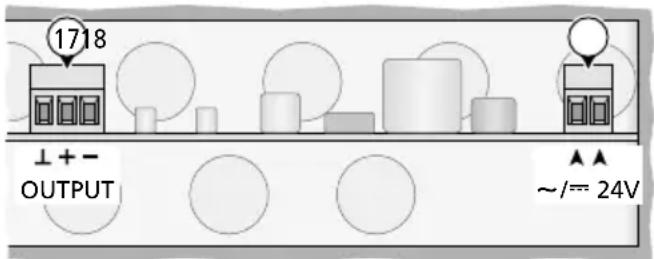
text_image
1718 ↓+ OUTPUT ▲▲ ~/== 24V③ Connections for amplifier and power supply
4.1.1 Amplifier
Connect the input of the amplifier to the terminals of the balanced signal output (17) (fig. 3, OUTPUT).
4.1.2 Power supply
Connect a 24 V power supply unit with a permanent rating of 250 mV to the terminals (18). DC voltage supply or AC voltage supply can be used. Consequently, the polarity does not matter when a DC voltage source is used.
4.1.3 Grounding
The terminal screw on the rear side of the unit can be used as ground connection. This may be necessary when, for example, the mixer is used together with an amplifier that is not connected to ground and hum noise occurs.
4.2 Making connections on the front side
4.2.1 Mono audio sources, microphones
Monophonic signals of microphones or audio sources with line level can be fed in via XLR plugs connected to the jack MIC / LINE 1 or MIC / LINE 2 (11).
The jacks are designed for balanced signals. Audio sources with unbalanced signals can be connected via an XLR plug where the contacts 1 and 3 are connected with each other.
Use a small screwdriver to turn the GAIN control (10) towards "+" (for microphones) or "-" (for audio sources with line level). If required, readjust the control during operation. (When the volume of the sound via this input is too low, turn the control clockwise; when the sound is distorted, turn the control anti-clockwise.)
Phantom power supply
When an audio source (e. g. electret microphone) requires phantom power supply, engage the switch PH. PWR (12) of the corresponding XLR jack: The phantom power (=19 V) for the jack will be activated.
Caution:
- To avoid loud switching noise, only use the switch when the mixer or amplifier is switched off.
- Never connect an audio source with unbalanced signal output to the XLR jack when the phantom power supply has been activated; otherwise, the audio source may be damaged.
4.2.2 Stereo audio sources
Connect units with a stereo output (e. g. CD player, tuner) to the RCA jacks LINE 3/4 (13) or to the 3.5 mm jack AUX (14). The mixer is monophonic; therefore, the left and the right stereo channels will be mixed to a mono signal.
4.3 Remote control
To insert the batteries (2 × 1.5 V, size AAA), remove the battery compartment cover on the rear side of the remote control. Insert the batteries as indicated in the compartment. Close the cover. If the remote control is not used for a longer time, remove the batteries as a precaution so that the remote control will not be damaged in case the batteries should leak.
When the operating range of the remote control decreases, the batteries are discharged and must be replaced.

text_image
Discharged batteries must not be placed in the household waste; always take them to a special waste disposal, e. g. collection container at your retailer.5 Operation
1) Prior to initial switch-on, set all volume controls (5, 7, 9) to "0" to avoid an unexpectedly high volume when the unit is switched on.
2) Switch on the audio sources connected.
3) Use the POWER switch (16) to switch on the MXT-52MP3. The power indicator ON (15) will light up.
4) Switch on the amplifier connected.
5) Replay music, for example, from an audio source or speak into a microphone (operation of the audio player 📋 chapters 5.1 and 5.2)
6) To adjust the volume of the audio sources, use the control (5) of the corresponding connection.
To adjust the volume of the audio player, use the volume control MP3 (7) or the remote control (chapter 5.2).
Adjust the total volume with the control VOLUME (9). When the output is overloaded, the signal will be distorted and the LED indicator CLIP (6) will light up. In this case, turn back the control of the corresponding audio source or the control VOLUME accordingly.
7) Use the controls (8) BASS and TREBLE to adjust the tone as desired.
8) After operation, first switch off the amplifier and then use the POWER switch (16) to switch off the mixer.
5.1 Audio player
The integrated audio player is able to replay audio files in the formats MP3 and WMA. As storage media, USB flash drives or SD[HC] memory cards (also MMC cards) can be used.
Note: Due to the large number of storage device manufacturers and device drivers, it cannot be guaranteed that all storage media are compatible with the audio player.
Connect a USB flash drive to the USB port (2) or / and insert a memory card (contacts facing upwards) into the slot (3) until it engages. To remove the card, slightly push the card into the slot until it disengages.
When the unit is switched on, the replay of the audio file most recently replayed will start. When a storage medium is connected during operation, the replay will start from this medium. The LED indicator at the connection of the storage medium currently used will light up.
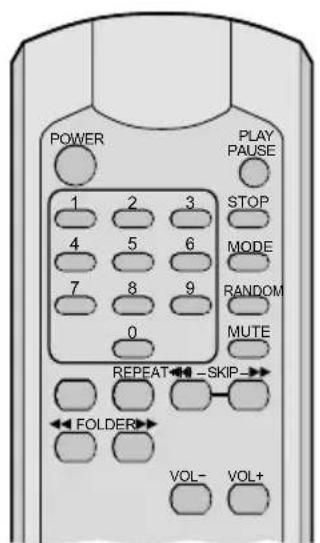
The audio player can be operated via the buttons (4) or the remote control supplied (fig. 4) (chapter 5.2). When pressing a button, always point the remote control to the audio player. Make sure that there are no obstacles between the remote control and the audio player.
The display (1) will indicate the storage medium selected (USB/CARD), the number of the current title and the file type (MP3/WMA). When the replay is started or when a title in a different folder is selected, the number of the folder will be briefly indicated (fxx).
The volume of the replay depends both on VOL-/+ on the remote control and on the volume control MP3 (7).
5.2 Overview of operation for the audio player
| Button | Function | ||
| on the remote controlat the unit | |||
| MODE | √ | to switch on,to change betweenUSB storage medium "USB"and memory card "CARD";to switch off: keep the button pressed for 3 seconds | |
| POWER | √ | to switch on and off | |
| MODE | √ | to change betweenUSB storage medium "USB"and memory card "CARD" | |
| PLAY PAUSE | √ | √ | to start the replay andto change between replayand pause |
| 1...9,0+10 | √ | direct title selection,then press PLAY | |
| ◀◀ / ▶◀◀ SKIP▶▶ | √ | √ | previous/next title:press the button brieflyfastforward/reverse:keep the button pressed(sound muted) |
| FOLDER◀◀ FOLDER▶▶ | √ | √ | to select a folder"fxx" |
| VOL-VOL+ | √ | to change the volume"UOO...U32" | |
| MUTE | √ | to mute and unmute thesound | |
| REPEAT | √ | replay mode- repeat of a single title"REPEAT 1"- repeat of all titles in afolder"REPEAT FOLDER"- repeat of all titles"REPEAT ALL"- no repeats | |
| RANDOM | √ | to switch random replayof all titles on "-"andoff "OFF | |
| STOP | √ | to stop the replayto indicate the number oftitles | |
6 Specifications
Frequency range: ..... 20 – 20 000 Hz
Inputs (connections, type, sensitivity)
2 × microphone/line: ... XLR, bal., 1–230 mV with 19 V phantom power supply, can be activated separately
3 × line: ..... 2 × RCA L / R, unbal., 160 mV 3.5 mm stereo jack, unbal., 160 mV
Storage media: ..... USB storage medium, 32 GB max. SD/SDHC/MMC card
Audio file formats: ..... MP3, WMA
Tone controls
Bass: 100 Hz, ±12 dB
Treble: 12 kHz, ±12 dB
Output, mono
Rated level: 1V
Max. level: ..... 10V
Connection: ....screw terminals, bal.
THD: .... < 0.03 %
S/N ratio: ....> 78 dB
Power supply: 24V, or = /250 mA
Ambient temperature: .... 0–40°C
Dimensions: ..... figure 2
Weight: 1.25 kg
text_image
POWER PLAY PAUSE 1 2 3 STOP 4 5 6 MODE 7 8 9 RANDOM 0 MUTE REPEAT←→-SKIP→ FOLDER VOL- VOL+④ Remote control
Subject to technical modification.
All rights reserved by MONACOR® INTERNATIONAL GmbH & Co. KG. No part of this instruction manual may be reproduced in any form or by any means for any commercial use.
Supports mémoire : ..... support USB, 32 GO max. carte SD/SDHC/MMC
Formati file audio: ..... MP3, WMA
Regolazione toni
Bassi: 100 Hz, ±12 dB
Alti: 12 kHz, ±12 dB
Uscita, mono