
HDTV 32 Plus - TV TECHNISAT - Free user manual and instructions
Find the device manual for free HDTV 32 Plus TECHNISAT in PDF.
| Brand | TechniSat |
| Model | HDTV 32 Plus |
| Category | LCD TV |
| Screen size | 32 inches (81 cm) |
| Resolution | HD Ready (1366 x 768 pixels) |
| Reception | DVB-S, DVB-C, DVB-T, analog, FM radio |
| Connectivity | 3 x HDMI, 2 x SCART, 1 x VGA, 2 x USB, component input, video/S-Video |
| Card reader | Integrated Conax + 2 CI+ slots |
| Hard drive | Integrated, capacity not specified |
| Special functions | PVR (recording), PiP/PaP, SFI+ electronic program guide, freeze frame, timer |
| Audio | Analog audio outputs, SPDIF digital outputs (optical/coaxial), subwoofer, center |
| Power supply | 230 V / 50 Hz |
| Power consumption | Not specified, estimated between 60 and 100 W |
| Dimensions (approx.) | Width: 75 cm, Height: 50 cm, Depth: 22 cm |
| Weight (approx.) | Approximately 8 kg |
| Maintenance | Clean with a soft, dry cloth. Do not use abrasive products. |
| Safety | Child lock via PIN code, automatic shutoff, adequate ventilation required |
| Spare parts | Remote control, batteries, antenna cables, mounting brackets |
| General information | CE marking, compliant with EU standards. Version 09/04. |
Frequently Asked Questions - HDTV 32 Plus TECHNISAT
User questions about HDTV 32 Plus TECHNISAT
0 question about this device. Answer the ones you know or ask your own.
Ask a new question about this device
Download the instructions for your TV in PDF format for free! Find your manual HDTV 32 Plus - TECHNISAT and take your electronic device back in hand. On this page are published all the documents necessary for the use of your device. HDTV 32 Plus by TECHNISAT.
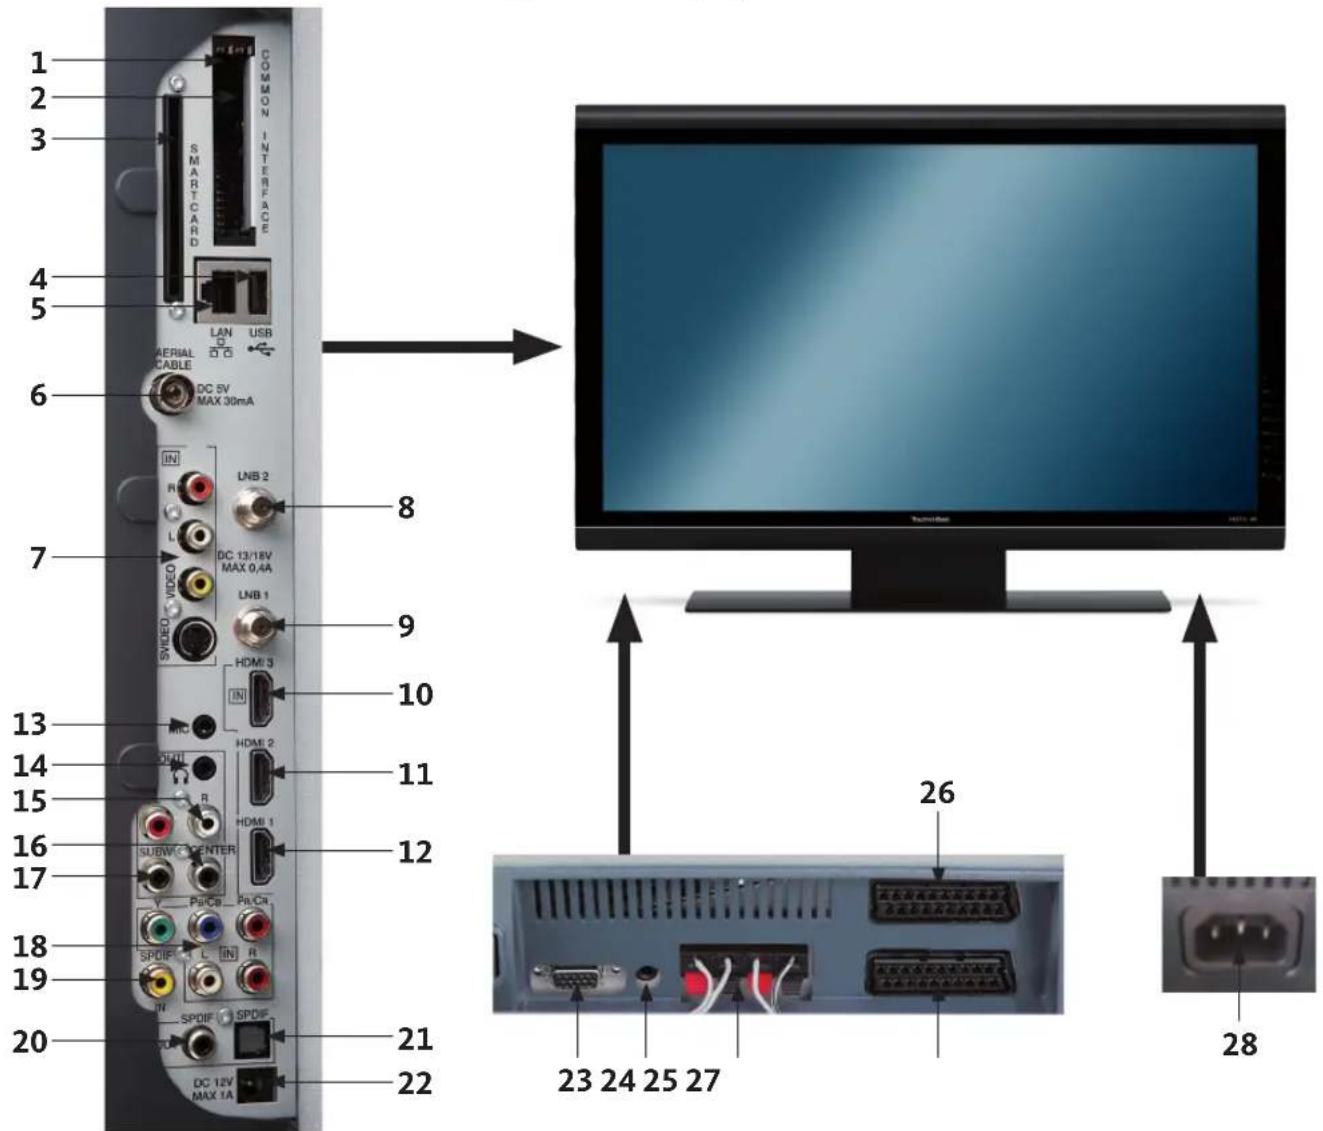
USER MANUAL HDTV 32 Plus TECHNISAT
1 Common Interface Slot 1
2 Common Interface Slot 2
3 Card reader (Adjust the golden chip of the CONAX smart card forwards and in the slot direction)
4 USB connection
5 Network connection (LAN)
6 Antenna input (DVB-C, DVB-T, analogue)
7 Video, S-Video and audio input
8 LNB input 2 (DVB-S)
9 LNB input 1 (DVB-S)
10 HDMI connection 3
11 HDMI connection 2
12 HDMI connection 1
13 Microphone input (Jack 3.5mm)
14 Headphone output (Jack 3.5mm)
15 Audio output (R,L)
16 Centre output
17 Sub-woofer output
18 Component inputs (Y, Pb/Cb, Pr/Cr and audio)
19 Digital audio input (SPDIF electric)
20 Digital audio output (SPDIF electrical)
21 Digital audio output (SPDIF optical)
22 DC 12V output switching voltage ext. Amplifiers
23 VGA connection
24 Audio input (VGA/DVI) (Jack 3.5mm)
25 Loudspeaker connection
26 Scart connection (AV1)
27 Scart connection (AV2)
28 Mains connector
2 Important note
Dear customer,
This quick start guide only describes the most important connection options and the basic operating steps, in order to enable you to become quickly familiar with the HDTV 32, HDTV 32 Plus, HDTV 40, HDTV 40 Plus respectively HDTV 46.
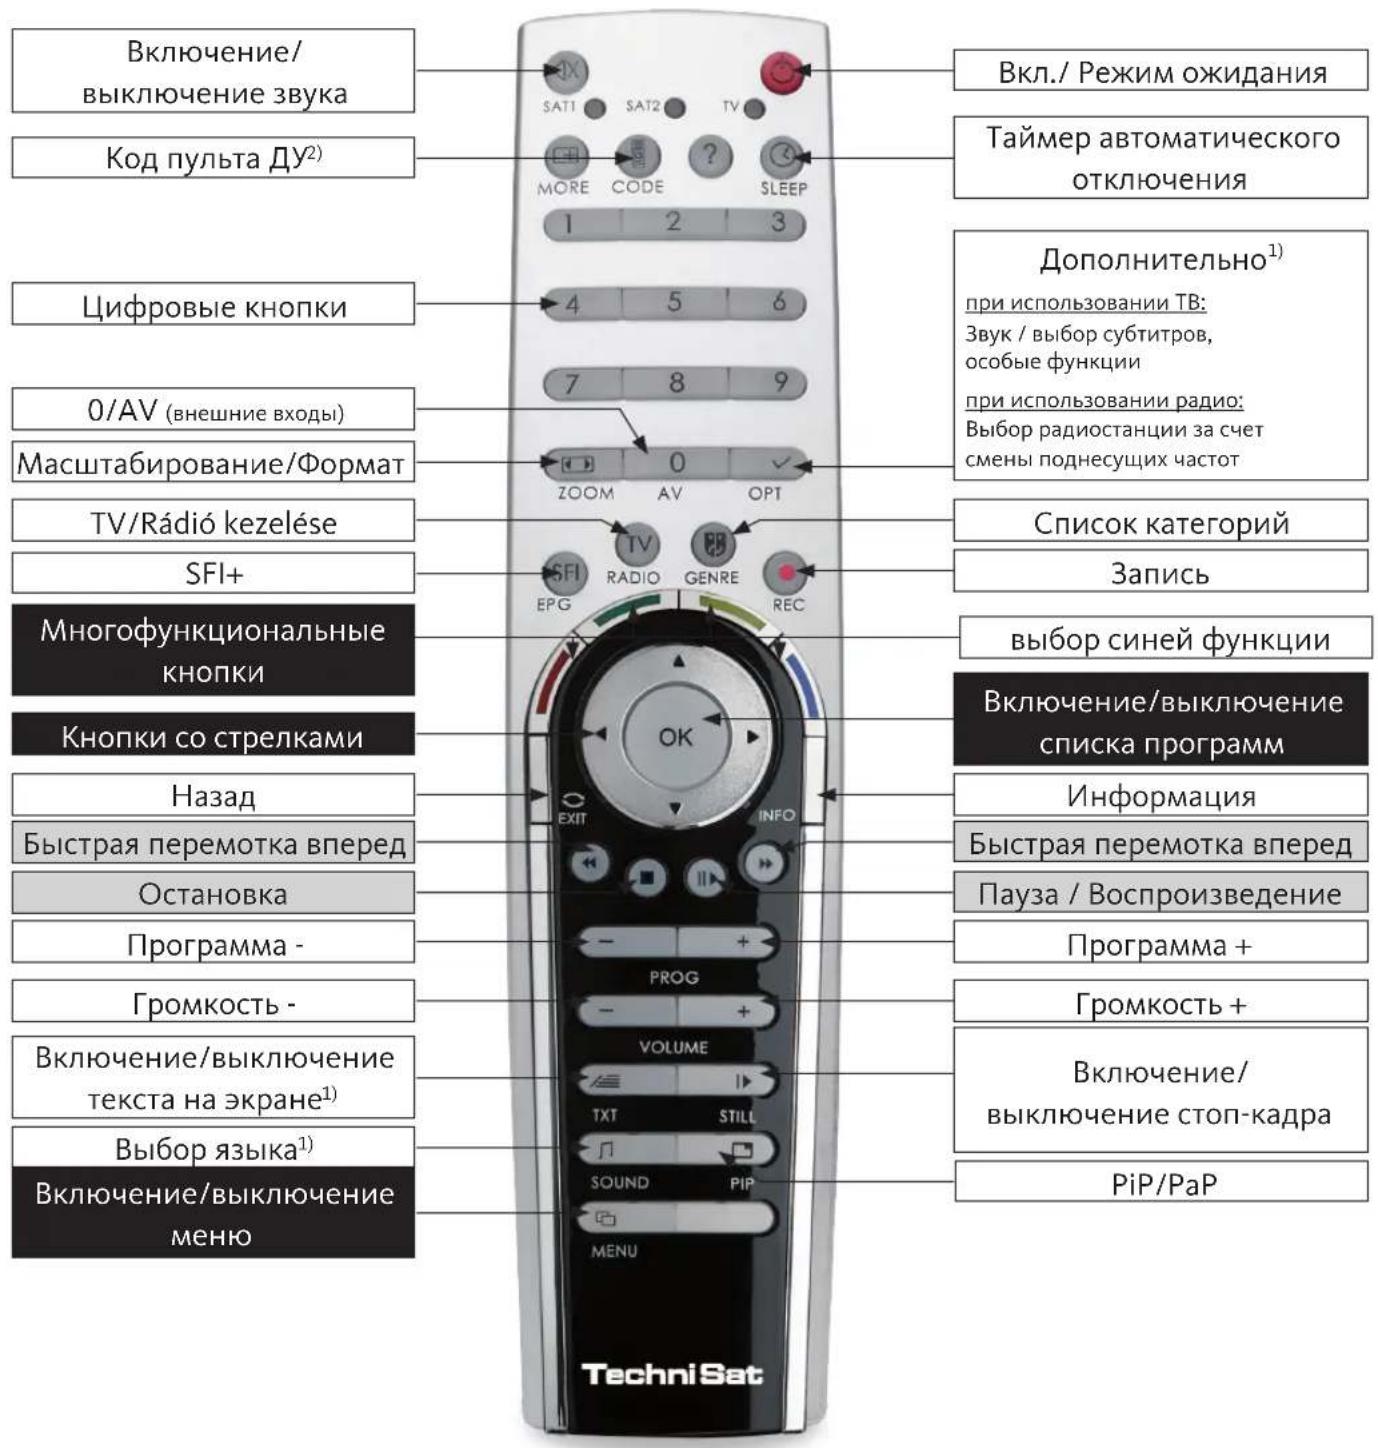
3 Remote control / Inserting the batteries
Open the lid of the battery compartment on the back of the remote control by lightly pressing the marked spot and pushing the lid in the direction of the Arrow.
Insert the supplied batteries while observing the correct polarity (marking visible in the battery compartment) and close again.
4 Connecting
You must first remove the cover, in order to be able to get to the device connections.
For this purpose, lightly press both snap-fits upwards and remove the cover towards the back.
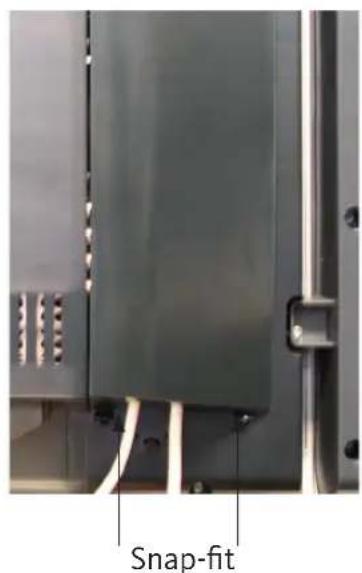
In order to cover the connection cable, lead this along the back of the pedestal behind the detachable plastic holders.
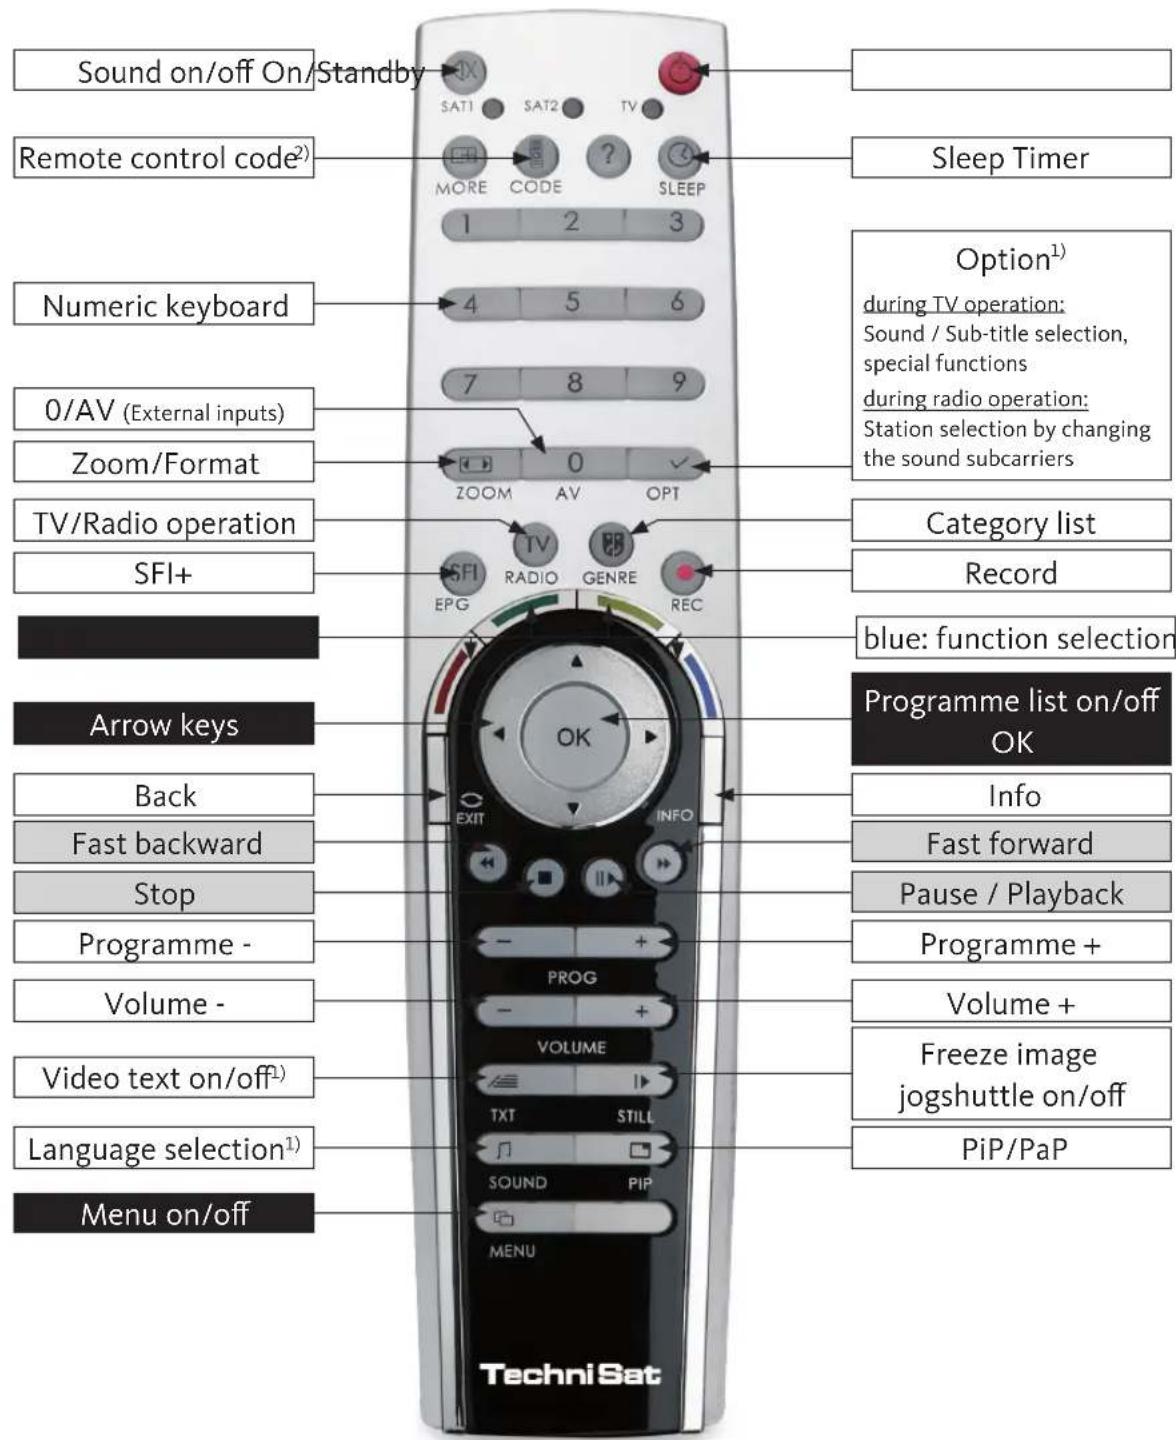
Remote control
1) This function is only available, if the appropriate data are broadcast on the set programme position.
2) Remote control option:
This remote control can control two TechniSat receivers and a TechniSat television set with same encoding by switching the remote control option. The appropriate LED flashes indicating the currently set remote control code when a key is pressed.
To change the remote control option press the remote control code key and then press the OK key as many times as necessary until the LED of the required remote-control option (SAT1, SAT2 and/or TV) flashes briefly.
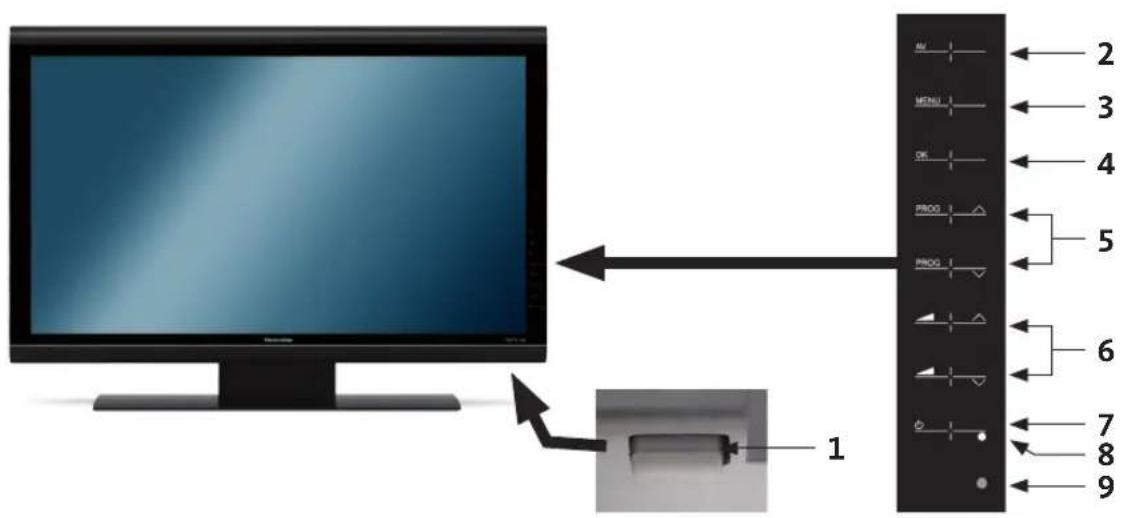
HDTV 46
HDTV 32 Plus / HDTV 40 Plus
HDTV 32 / HDTV 40
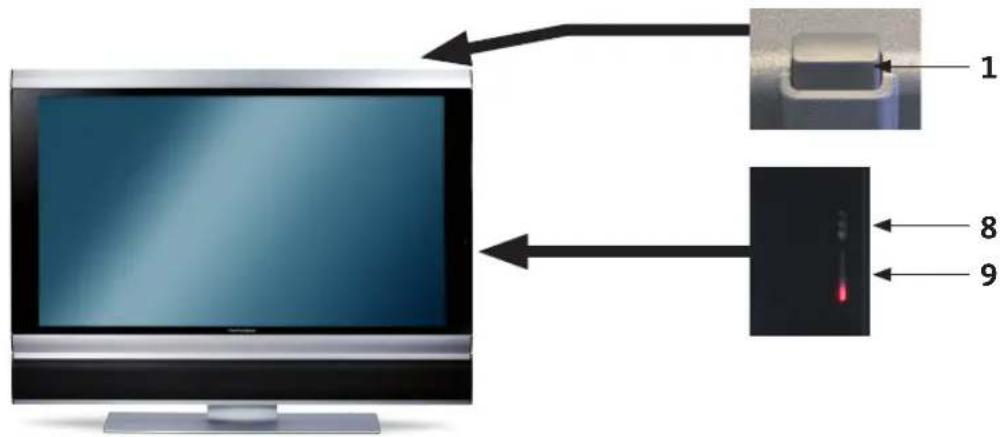
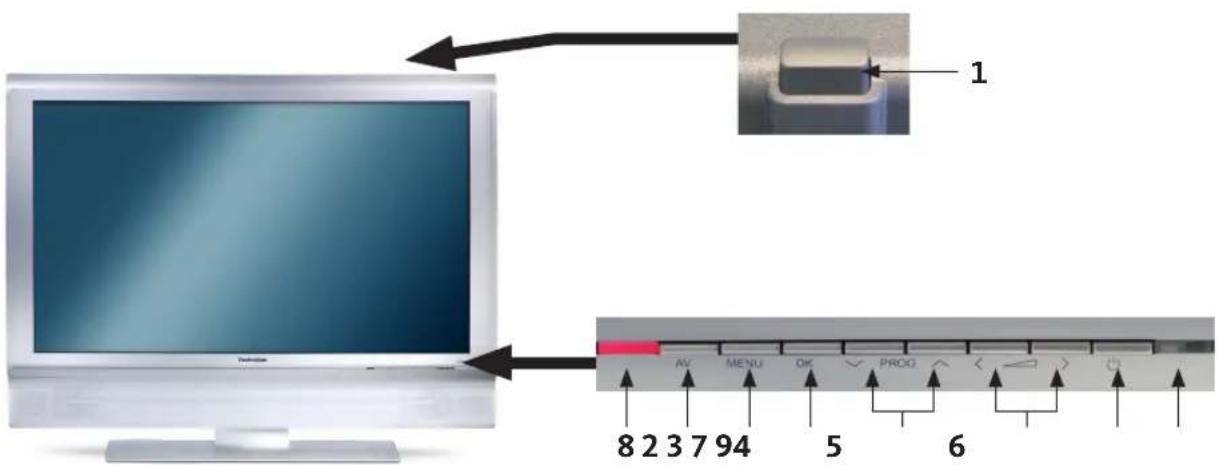
1 Mains switch
2AV
3 Menu
4 OK
5 Programme + / -
6 Volume + / -
7 On/Standby
8 LED
9 IR receiver
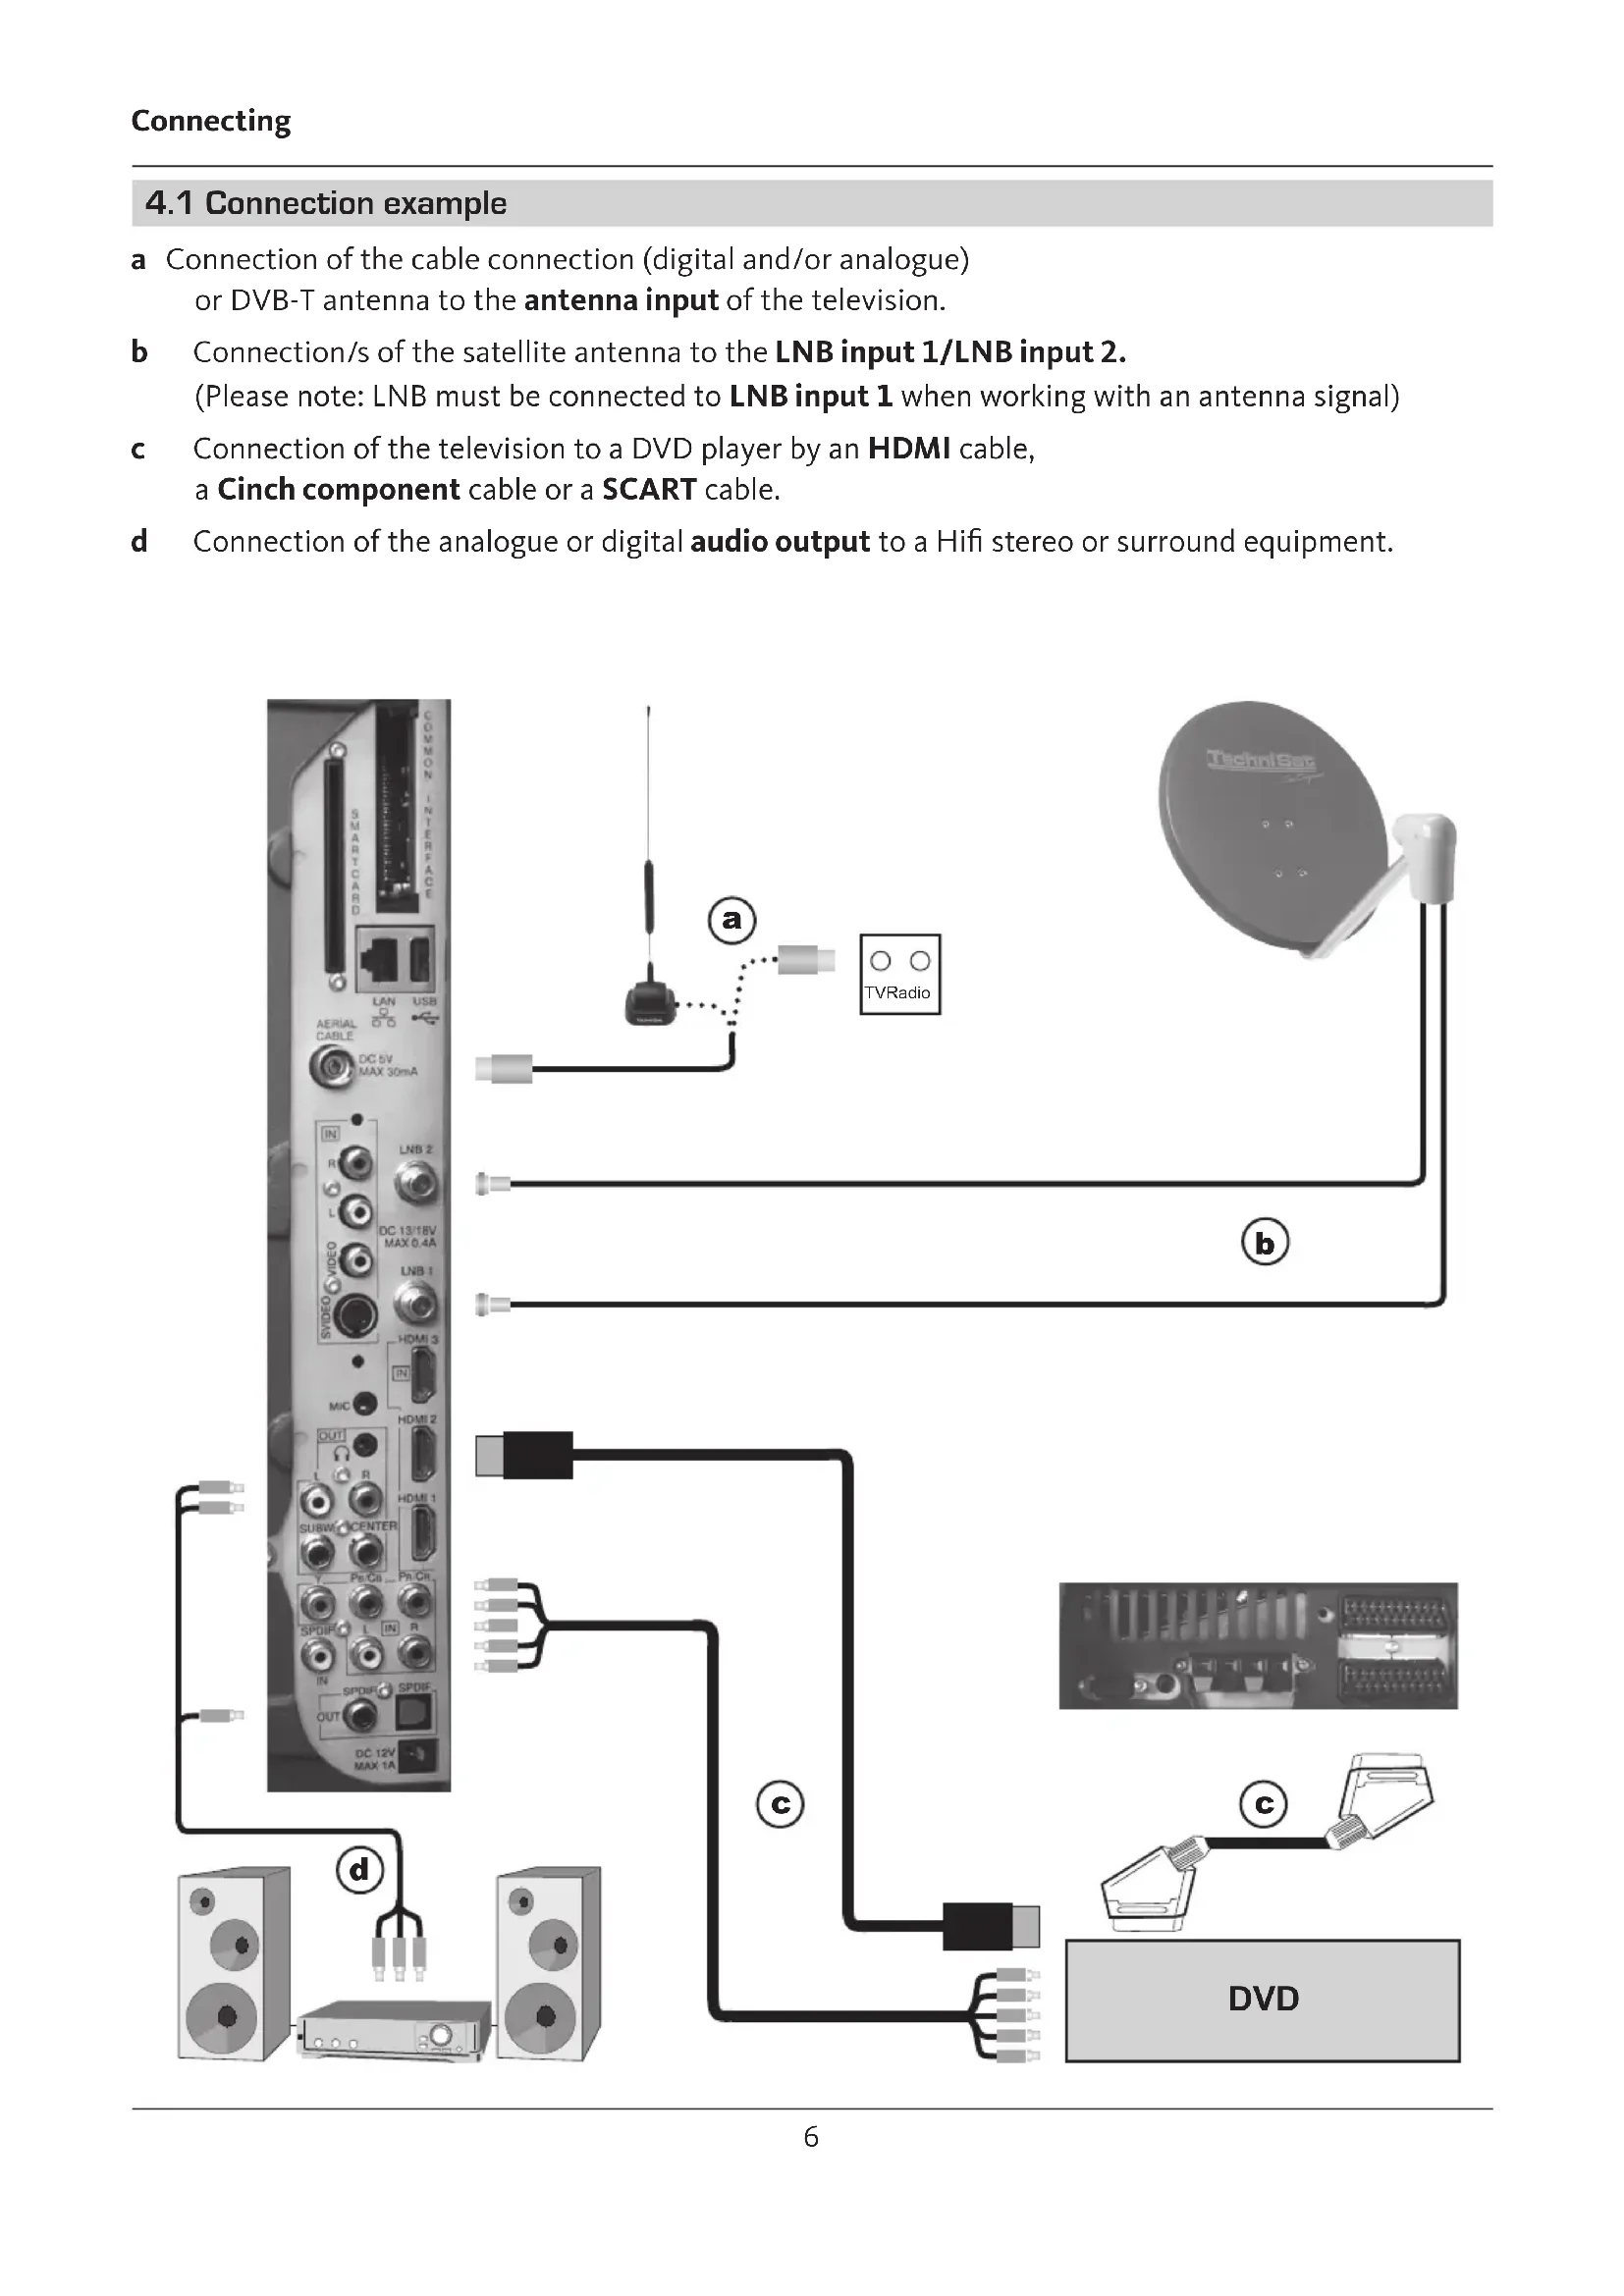
4.1 Connection example
a Connection of the cable connection (digital and/or analogue) or DVB-T antenna to the antenna input of the television.
b Connection/s of the satellite antenna to the LNB input 1/LNB input 2. (Please note: LNB must be connected to LNB input 1 when working with an antenna signal)
c Connection of the television to a DVD player by an HDMI cable, a Cinch component cable or a SCART cable.
d Connection of the analogue or digital audio output to a Hifi stereo or surround equipment.
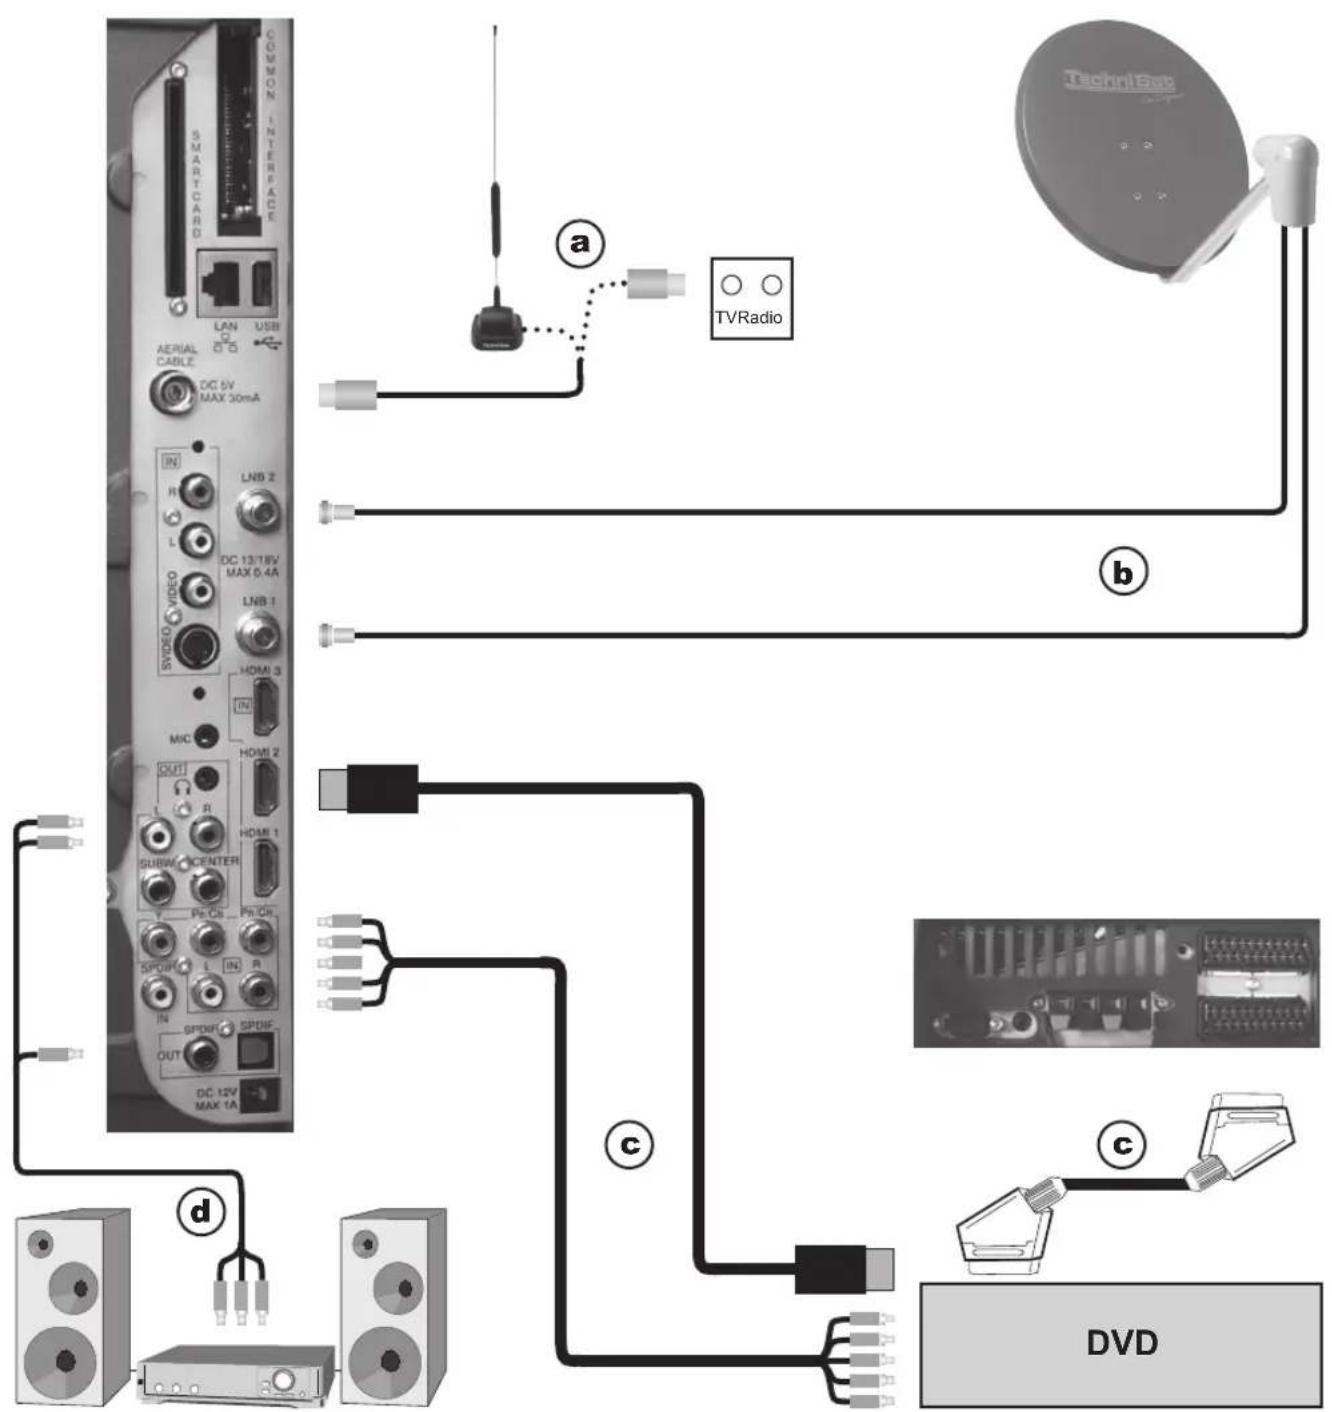
The following references (a b c) refer to the connection example on page 6.
4.2 Antenna/cable connector (analogue and digital)
a Connect the antenna input of the LCD TV set either to a terrestrial antenna or to the outlet of the cable or antenna connection.
Please note that the simultaneous reception of DVB-T and DVB-C signals can lead to problems when receiving some cable and DVB-T programmes.
4.3 Satellite antenna
b Connect the LNB inputs 1/2 to two separated antenna feeders, which are used identically, in order to be able to use the full functional range.
or
Only if one antenna signal is available, then connect it to the LNB input 1 of the device.
4.4 DVD player
c Connect your DVD player either with
- an HDMI connector cable to a HDMI connection
or by
- a DVI/HDMI connector cable to a HDMI connection and additionally with an audio connector cable to the Audio (VGA/DVI) input respectively. Audio digital input (SPDIF electric).
or by
- a SCART cable to a SCART socket
or by
- a Cinch cable to the component inputs of the LCD TV set.
4.5 HiFi/ Surround amplifier
You can connect the LCD TV set to a HiFi /Surround amplifier, in order to achieve the best possible sound quality.
d To achieve this connect the cinch sockets of the analogue audio output
of the television set with a suitable cable with to the input of your HiFi amplifier
(e.g. CD or AUX; Note! The phono-input is not suitable!).
or
If your amplifier should be equipped with an appropriate electrical or optical input (SPDIF), then connect the audio digital output socket (electric or optical) to the input of your amplifier.
4.6 Mains connection
The LCD TV equipment should only be connected to the mains (230 V/50 Hz) after all cables from the device to the associated components have been connected. This prevents destruction of the TV set or of other components.
5 Initial installation
The installation assistant AutolInstall is started automatically when starting the device for the first time; this assistant helps you adjust the most important television settings.
The procedure illustrated here is only exemplary. The exact procedure depends on your settings.
Therefore, follow the instructions on the screen.
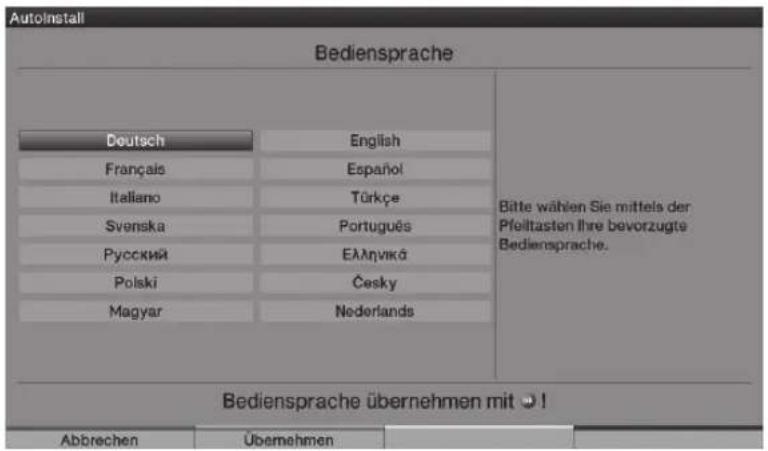
5.1 Operating language
The installation assistant starts with the selection of the operating language.
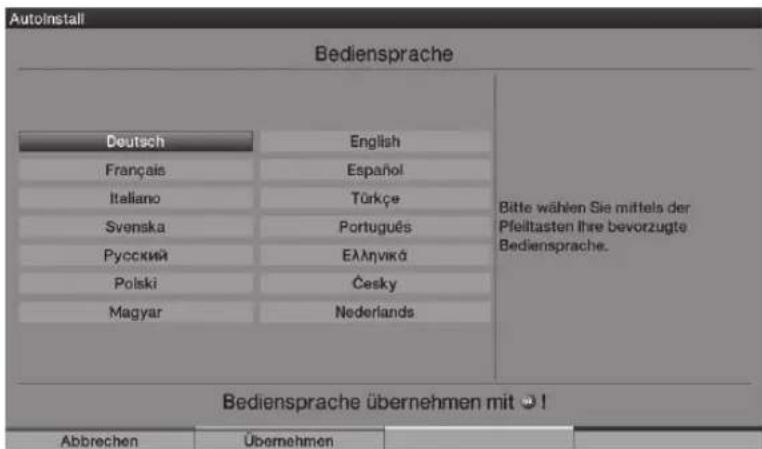
Use the Arrow keys to highlight the operating language that you want to select. The preferential audio language is also set according to this selection.
Confirm by pressing the green Accept control key.
5.2 Setting the country

Use the Arrow keys to select the county in which the unit will be used. According to your selection, the time as well as summer/winter time is set automatically. In addition, this setting automatically sorts the programmes in the installation assistant as well as after a station search run.
Press the green Accept control key, in order to take over the selection and continue to the next installation step.
5.3 Selection of the reception signals
Select the available reception signals with the up/down Arrow keys.
DVB-S for digital satellite programmes;
DVB-C for digital cable programmes;
DVB-T for digital terrestrial programmes;
Analogue CT for analogue terrestrial and cable programmes;
FM radio for VHF radio stations.
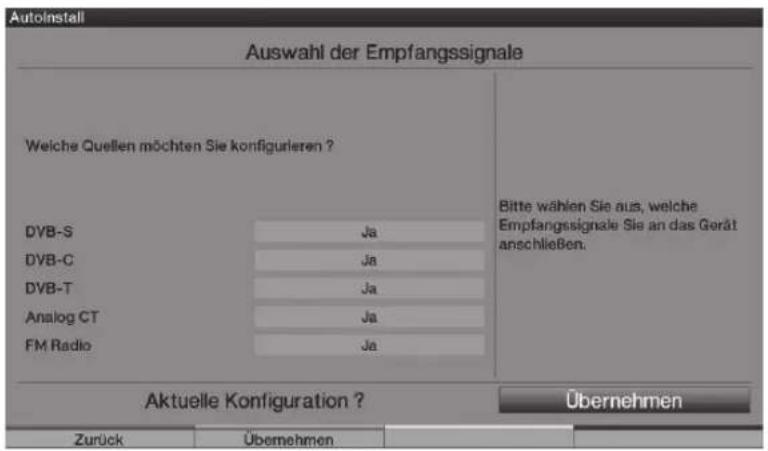
Use the right/left Arrow keys to determine, whether the marked reception signal is available at your location (Yes) or (No).
In order to save the settings, press the green Accept control key.
5.4 Antenna signals (DVB-S)
Select the number of connected DVB-S antenna feeders. (If the source DVB-S has been deactivated, as described in the step "Selection of the reception signals", the "Antenna settings (DVB-T)" window is displayed in place of this window of the installation assistant)

Using the Arrow keys right/left, select whether you have connected one or two antenna signals.
Confirm the selection with the green Accept control key, in order to continue to the "Antenna configuration (DVB-S)".
5.5 Antenna configuration (DVB-S)
In this installation step, you can adapt the settings of your TV set to the configuration of your satellite antenna. (If the source DVB-S has been deactivated, as described in the step "Selection of the reception signals", the "Antenna settings (DVB-T)" window is displayed in place of this window of the installation assistant)
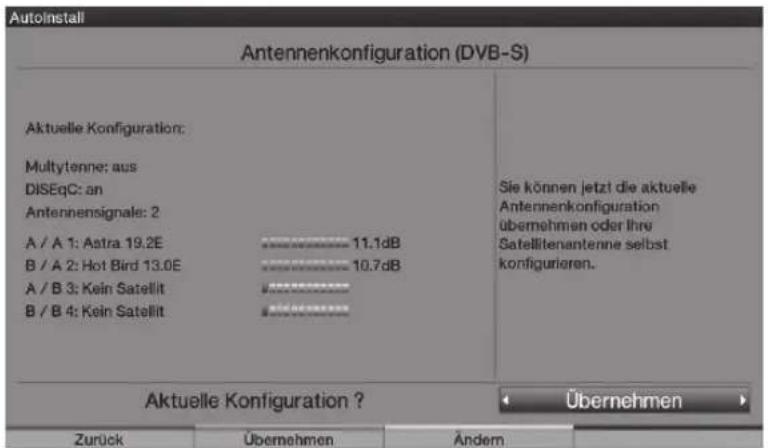
If you would like to accept the standard antenna setting, press the green Accept control key. In this case continue with the "Antenna settings (DVB-T)".
If the configuration of your reception equipment does not comply to the standard setting press in the yellow Change control key.
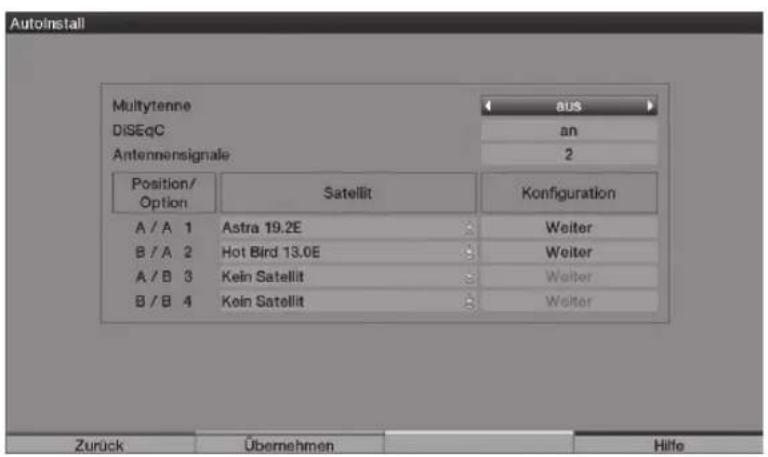
After adapting the configuration press the green Accept control key. The set satellite is now displayed again, in order to check it.
To accept the setting, press the green Accept control key, to change again press the yellow Change control key.
5.6 Antenna settings (DVB-T)
In this step, a channel spectrum with the signal levels of the different channels is displayed, in order to be able to align the DVB-T antenna to achieve the best possible reception.
(The "Station search run/ISIPRO" is immediately displayed, if the DVB-T source has been deactivated)
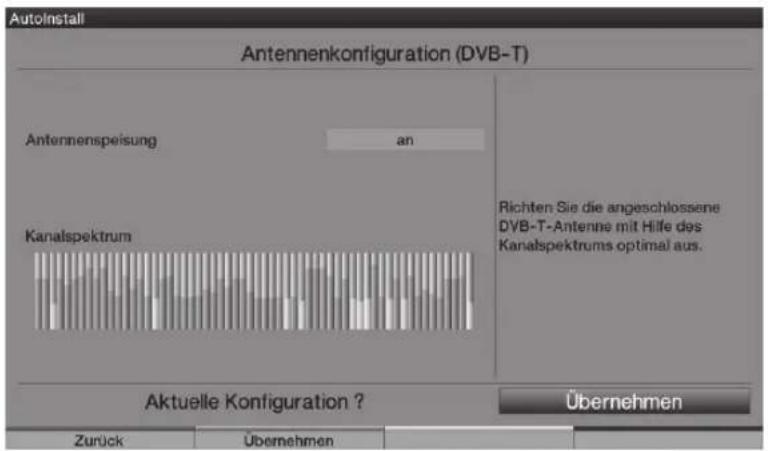
Switch the power supply on with the Arrow keys right/left, if you want to feed an active DVB-T antenna via the coaxial cable and/or off, if you would like to use a passive DVB-T antenna or to feed the active DVB-T antenna via a separate mains adapter.
Accept the setting by pressing the green Accept control key.
5.7 Station search run / ISIPRO (only for DVB-S via ASTRA 19.2° East)

In order to download an existing current programme list, use the Arrow keys up/down to highlight the line ISIPRO - Programme List Update.
The programme list is now downloaded from the satellite; this is followed by a station search run via "All stations", which scans all further selected reception sources.
In order to execute a station search run for all activated sources, mark the field "All Stations" or "All Unencrypted Stations" with the Arrow keys up/down
Pressing the green Start control key starts the programme list update and/or station search run.
5.8 Regional programmes
Some broadcasting stations transmitter their programme with different regional contents. You can now specify which of these regional programmes you prefer.
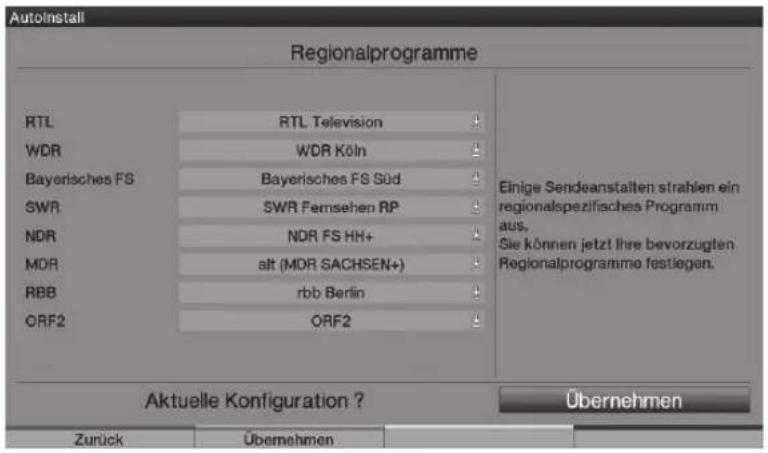
Select the station, whose regional programmes you would like to specify by marking it with the Arrow keys up/down, and open the window with the available regional programmes of this station by pressing the OK key.
Highlight the regional programme you prefer with the Arrow keys up/down and select it by pressing the OK key. Specify all preferential regional programmes in this manner.
Press in the green Accept control key, in order to accept these settings over and to continue to the next installation step.
5.9 Software update (only DVB-S (ASTRA 19.2° East) and DVB-C/DVB-T (when data channel is available)
Your device now checks, whether new system software is available.
You can run an automatic software update if new software is available.
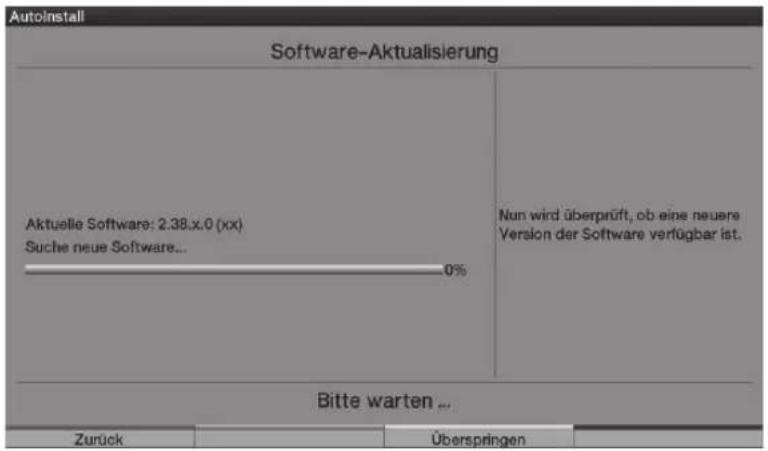
Select the Update field with the Arrow keys right/left and acknowledge with OK.
Please note that the "Software update, please be patient" display now appears as well as three progress bars, which indicate progress of the software download procedure, the entire update progress as well as the progress of the individual update steps. AutoInstall is then carried out in the following.
5.10 Downloading "SFI+" data
Your television set is equipped with an electronic programme guide "SFI+" ("SiehFern INFO Plus"). In order to display this electronic programme guide it must be downloaded.
Your HDTV starts to download the "SFI+" data automatically after a possibly necessary software update. This process will take up to 30 minutes.
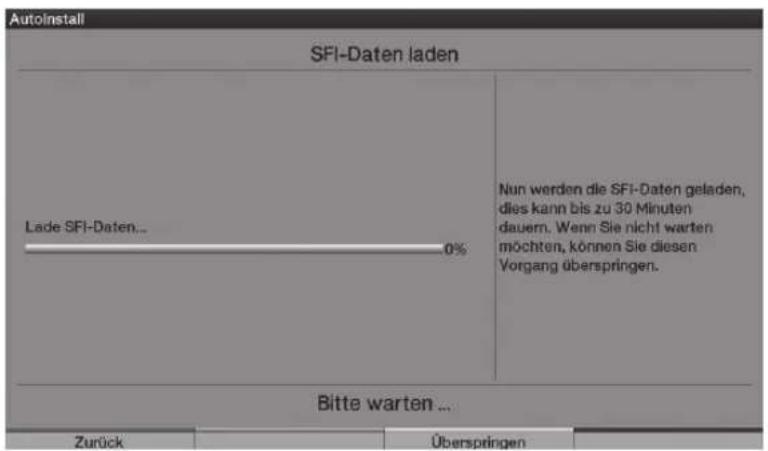
You can skip this procedure, if you do not want to wait until the "SFI+" data has been downloaded. Press the yellow Skip control key to do this.
The "SFl+" data are only available from ASTRA 19.2^ East. The station data are downloaded, if neither ASTRA 19.2^ East nor the data channel via DVB-C/DVB-T are available.
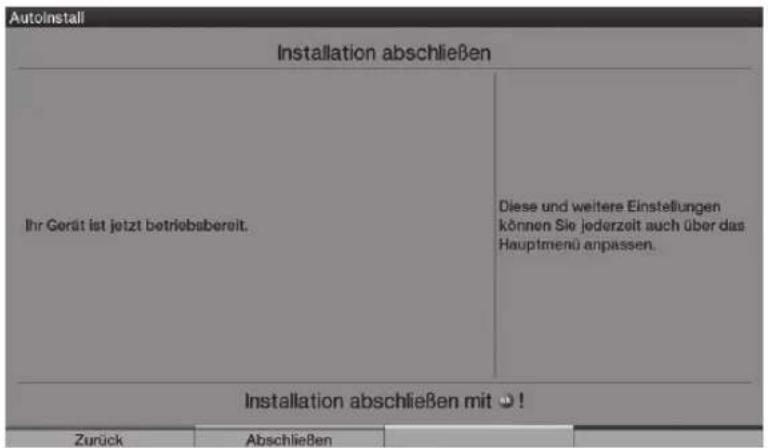
5.11 Terminating the installation assistant
Confirm the final message of the installation assistant by pressing the green Finish function key, in order to return to normal operation.
6 Operation
6.1 Turning the TV set on and off
6.1.1 Turning on with the mains switch on the TV set
Switch the TV set on by pressing the mains switch.
The TV set now runs through an initialisation procedure and cannot be operated during this period. This procedure can take the few seconds.
6.1.2 Turning on from the standby mode
Switched the TV set on by pressing the On/Standby key or the Programme +/- keys
on the remote control /on the TV1) or by pressing one of the numeric keys from 0 to 9 on the remote control. The green LED display signals the operating condition.
6.1.3 Switching to the standby mode
Turn the TV set off by pressing the On/Standby key on the remote control/on the set1).
Please note that when the set is switched off it also checks whether a new operating software
or programme list ^3) is available. This procedure can take some time. The LED shines orange
and the LCD panel is already switched off during the test.
The television set is turned on again immediately, if the On/Standby key is pressed during the test.
The television set switches to standby after the test has been carried out, the LED now shines red.
The TV set is now in the standby mode and can be completely switched off with the mains switch.
If new operating software2) or a new programme list3) was found during the test,
this is displayed when the TV set is switched on the next time.
The new software or programme list can then be downloaded immediately.
6.1.4 Turning off with the mains switch on the TV set
The TV set is completely turned off by pressing the mains switch.
Please note that in this case neither software nor "SFI+" data
can be downloaded and the timer can also not be used.
Please note that the TV set may only be turned off with the mains switch when it is in the standby mode. This prevents the loss of data and possible damage to the files or hard disk.
The device remembers, whether it was set to "On" or "Off",
as entered with the remote control or keys of the set1).
In the case of an electrical power outage, the TV set should therefore be switched off during ongoing operation with the mains switch to prevent it turning itself on inadvertently as soon as power is available again.
1) Only possible with the remote control for HDTV 32 Plus and HDTV 40 Plus.
2) Only from DVB-S (ASTRA 19.2^ East) and DVB-C/DVB-T (when data channel is available).
3) Only from DVB-S (ASTRA 19.2^ East).
6.2 Selecting the programme
6.2.1 By means of the programme up/down keys
You can move up and down through the programmes by one programme position respectively with the Programme +/- key on the remote control/on the set1).
6.2.2 By means of the numeric keyboard
Enter the required programme number by means of the numeric keyboard.
For example:
1 for programme position 1
1, then 4 for programme position 14
2, then 3, then 4 for programme position 234
1, then 2, then 4, then 5 for programme position 1245
When entering multi-digital programme numbers, you have approximately three seconds time after pressing a key to complete the input. If you only want to enter one-, two-, or three-digit figures, you can accelerate the procedure by pressing the last number longer or by pressing the OK key.
6.2.3 By means of the programme list
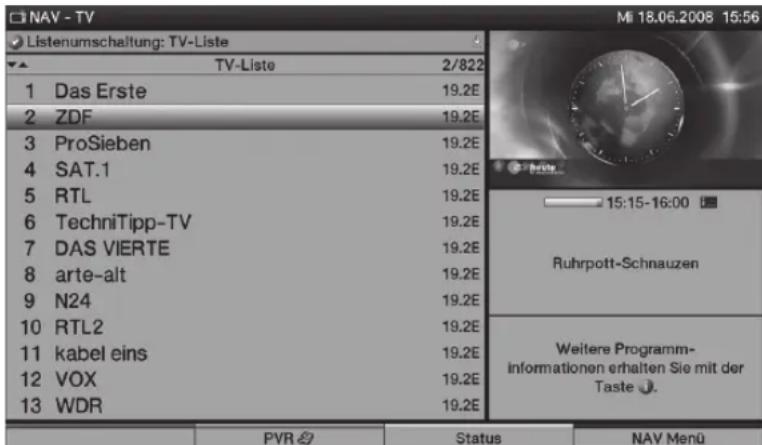
Press the OK key.
The programme list is displayed. Only TV programmes are displayed in the TV mode and only radio programmes in the radio mode. The currently set channel has been marked.
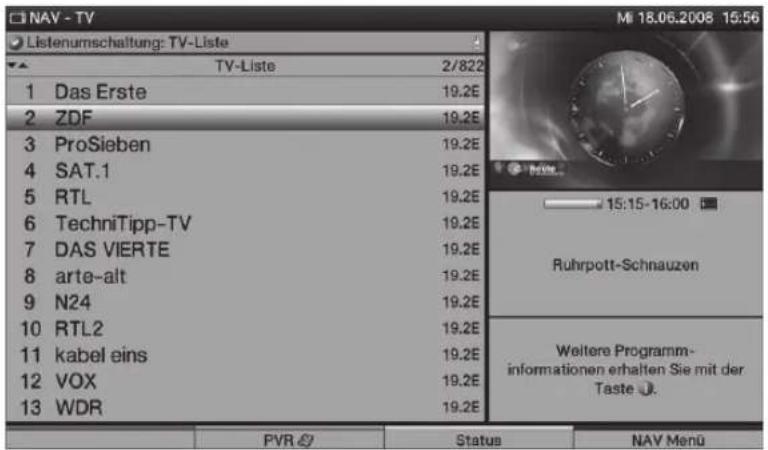
6.2.3.1 Selecting the programme
By means of the Arrow keys or numeric keyboard, you can now select the required programme.
Use the up/down arrow keys to move the marker by one line and use the left/right arrow keys to page forwards and backwards in the list.
You can obtain additional information on the current broadcasts by pressing the INFO key.
To leave the Navigator, press the OK key; the selected programme is now displayed on the screen.
6.2.3.2 Select list
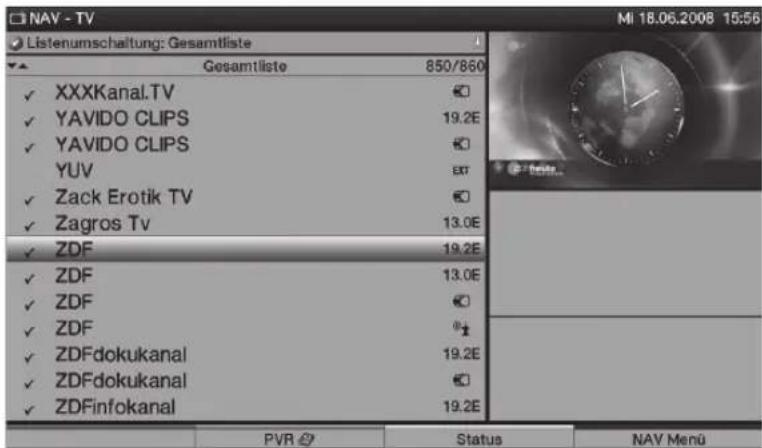
In order to facilitate finding programmes, your device is equipped with various programmes lists. You can select your favourites lists or have the programmes displayed in an alphabetically sorted overview list, in a station list, or according to category.
Press the OK key to open the active programme list.
You can now open the window with the programme list types (Favourites lists, overview list, station lists and category lists) by pressing the Option key.
Use the up/down Arrow keys to select the programme list types or overview list and then press OK to confirm.
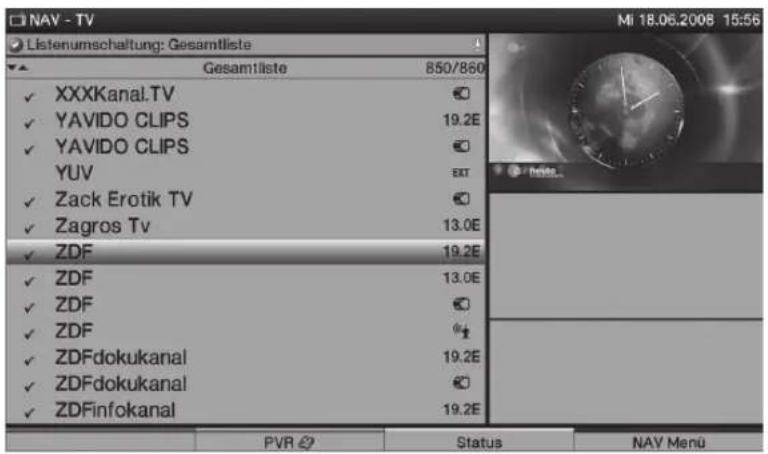
Now select the required programme as described above.
6.2.4 Selection of a regional programme
You selected the preferential regional programmes during the initial installation. If you select one of these regional programmes, you will be informed that further regional programmes are available.

Press the Option key, in order to open the selection screen.
Use the Arrow keys up/down to select the required regional programme and then press OK to confirm. The selected regional programme is set and is now stored as preferential regional programme.
6.2.7 Switching between TV/radio
Switch to the radio mode with the TV/Radio key.
The device switches to the last heard radio programme.
You return to TV mode by renewed pressing of the TV/Radio key.
and therewith to the last adjusted television programme.
6.3 AV source
In order to select a device connected to the Scart sockets, component input, to the HDMI inputs, to the VGA connection or to the AV connection of the TV set, press the AV key.
Select the required source (TV, Radio, EuroAV 1/2, HDMI 1/2/3, VGA, Video / S-Video oder YUV) with the Arrow keys up/down.
Acknowledge with OK to switch to the selected input.
6.4 Programme/Source information
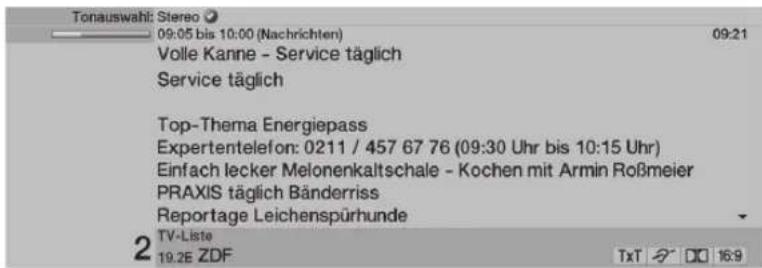
6.4.1 Infobox
An info box always appears on the screen after changing the programme.

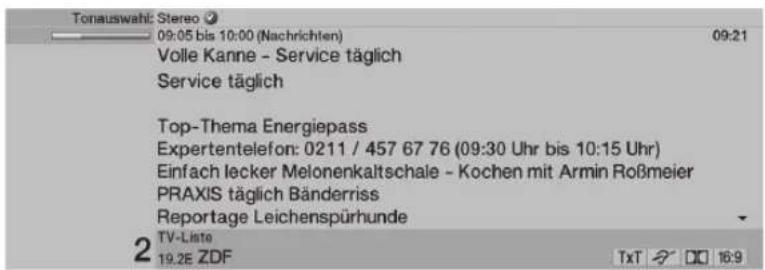
This info box displays the programme position and the programme name of the set programme, the title of the current broadcast, the currently active programme list, and the current time as well as further programme features (e.g. TxT for video text, 16:9 for 16:9 programmes and DQ for Dolby Digital broadcasts).
A progress bar (yellow) is additionally displayed, which indicates the past broadcasting time of the current programme. The running programme has lasted longer than indicated, if the end is red.
6.4.2 Displaying time and programme information/further programme information
Use this function to view information on the program you are watching.
Press the Info key, to display information on the set programme.

As far as the programme is being broadcast, you can call further programme information concerning the viewed programme by pressing the Info key again.
The following programme is displayed, if broadcast, by pressing the Info key again.
Press the Info again to remove the display.
6.5 Reception of encrypted programmes
Insert a CONAX smart card into the slot of the integrated card reader.
(The golden chip should point forwards and in the insertion direction)
or
Insert a CI module into the slot with the top pointing to the rear.
Insert the smart card into the card slot of the CI module.
Make sure that the golden chip of the smart card is pointed to the rear in insertion direction.
If an encrypted programme is set, your TV set will check the CI slot and the card reader automatically and will display the programme unencrypted, if a smart card or an appropriate CI module with a valid smart card has been used.
6.5.1 Smart card PIN code
A child lock can also be implemented to block programmes that are unsuitable for children and are broadcast by encrypted programmes. It is necessary to enter the smart card pin code stored on the smart card, in order to access the respective programme.
Use the numerical keypad to enter the 4-digit smart card PIN-code in order to activate the broadcast.
6.6 Volume control
Adjust the volume of your TV set with the Volume + rocker key louder and with the Volume - rocker key quieter.
6.6.1 Mute function
Pressing the Sound off/on key turns the sound off, renewed pressing of this key turns the sound on again.
6.7 Selection of a different language/sound option
The message Sound Selection is displayed above the info box respectively a Dolby symbol in the info box, if a programme is broadcast in several languages or on several sound channels.
A list of the broadcast languages/sound options is displayed on the screen by pressing the Language Selection key.
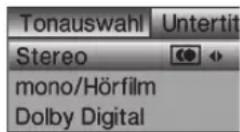
Use the up/down Arrow keys to mark the language that you want and then press OK to confirm.
Please note that the chosen sound selection is stored as preferential audio language for the respective station and is also retained after switching the TV off or changing the programme.
6.8 Sub-titles
The symbol is displayed in the info box when a programme with sub-titles is turned on.
If necessary, press the Option key several times to select sub-titles.
Use the Arrow keys up/down to mark the required sub-title and then press OK to confirm.
6.9 Video text
The symbol The info box shows you, if you have switched to a station offering video text information.
6.9.1 Turning the video text on/off
Select the programme, whose video text you would like to look at.
Pressing the Video text key turns the video text on. This is displayed on the start page 100 (overview).
Renewed pressing of the Video text key switches to mixed operation; the video text is thereby displayed without the video text background and instead with the TV picture in the background.
Press the Video text key a further time, in order to return to the TV mode.
6.9.2 Page selection
Enter the 3-digit page number on the numeric keyboard 0 to 9. Your input is displayed in the upper left corner of the screen.
or
Use the red or green key to scroll forward or backward by one page.
Press the yellow control key to call up the video text group displayed in the yellow window.
Press the blue control key to call up the video text block displayed in the blue window.
6.10 Format change/Zoom
Pressing the Zoom/Format key runs through the various pre-defined formats (original, optimal, always 16:9, full zoom and stretch) and calls the user-defined setting, in which you can adapt the screen according to your requirements.
The following options are available to adapt the picture to your requirements using the user-defined setting:
red/green control key Increase/reduce picture height yellow/blue control key Increase/reduce picture width Arrow key up/down Move picture up/down OK key Run through zoom levels Arrow key left Resetting picture settings
Press the Return key, in order to fade out the format change-over.
6.11 PiP/PaP Function
Your TV set is equipped with both the PiP function (PiP = Picture in Picture) as well as the PaP function (PaP = Picture and Picture).
6.11.1 Calling the PiP-/PaP Function
You can turn the PiP and/or PaP function on by pressing the PIP key.
6.11.2 Exchanging PiP/PaP pictures
Press the Return key to swap the two pictures. The PiP-/PaP picture becomes the main picture and vice versa.
6.11.3 Turning the PiP-/PaP Function off
There are two possibilities to turn the PiP and/or PaP function off. These differ in whether after leaving the PiP /PaP mode the main picture or the PiP /PaP picture is to be represented on the screen.
Pressing the PIP key fades out the main picture and the PiP /PaP picture is now represented as the new main picture.
Press the TV/Radio key, in order to fade out the PiP /PaP picture and to display the main picture on the entire screen.
6.12 Freeze image
Press the Freeze image key to display the TV picture as a frozen image. The sound continues to be transmitted unchanged.
Pressing this key again terminates the freeze image and the TV picture is shown as normal.
6.13 Programme guide "SFI+
Your television set is equipped with an electronic programme guide "SiehFern INFO Plus". This allows you to display programme information of individual or several digital programmes on the screen, in order to gain a quick overview of the currently running programmes or of the programmes of the same day or of one of the following days.
6.13.1 Calling/Exiting the electronic programme guide
> "SFI+" is called by pressing the SFI key.
Press the TV/Radio key, in order to exit "SFI+".
6.13.2 Navigating in the "SFI+
You can move the marking line by line with the Arrow keys up/down and scroll through the pages with the Arrow keys right/ left.
Press the green/yellow control key to execute the function specified in the green/yellow field.
Use the blue control key to call the SFI menu and the red control key to call the timer menu.
You can now use the Arrow keys to select an item and confirm with OK.
Pressing the Info key calls and exits available detailed information.
6.14 Sleep Timer
You can set the turning off time of your TV set with the sleep timer.
In order to activate the sleep timer, press the Sleep Timer key.
01:00 is displayed, in order to check the set remaining time.
Repeated pressing of the Sleep Timer key allows you to adjust the remaining time of the sleep timer from 15 minutes to 2 hours or to turn it off.
6.15 Function selection
Pressing the blue control key opens the navigation menu (NAV menu).
Use the Arrow keys up/down to mark the function (TV, radio, PVR, music or pictures), which you would like to call.
Press OK to select the marked function.
7 Hard disk operation
You do not require any external storage medium for recording (e.g. Video or DVD recorder) anymore due to the integrated hard disk drive and the PVR function (PVR = Personal Video Recorder). The recording capacity depends thereby on the data volume of the broadcast material and on the size of the hard disk. A change of the hard disk not authorised by TechniSat is considered as non-intended and leads to loss of the warranty.
It is possible to record programmes from the sources DVB-S, DVB-C, DVB-T and analogue CT as well as from the external sources EuroAV 1, EuroAV 2 and Video/S-Video on the hard disk. Provided that they are being broadcast, extra audio channels, video text data and sub-titles will also be recorded in addition to the actual audio and video data. You can call these during the following playback.
7.1 Recording
The following recording modes are available for recording programmes on the hard disk.
1. Immediate recording
Select this recording mode to record the current broadcast immediately at the push of a button.
2. Timer-controlled recording
This function will switch your TV set on and off for the selected broadcast, in order to record it on your hard disk, for example during your absence. The timer can be programmed automatically or manually using the "SFI+” function.
3. TIMESHIFT Recording
TIMESHIFT recording makes time delayed TV possible.
You can watch another programme whilst recording and play it back later on.
7.1.1 Immediate recording
Turn the programme/source on from which you would like to carry out a recording.
Press the Record key to record the current programme.
If you want to stop the playback of the current broadcast at a specific place, press the Pause/Playback key.
If you want to continue replaying the broadcast from this position all you have to do is press the Pause/Playback key once again. You will now be watching a time delayed live broadcast (TIMESHIFT), whilst the actual programme is still being recorded in the background.
7.1.2 TIMESHIFT Recording
If you have to interrupt viewing your programme, for example, because of a telephone call, etc., just press the Pause/Playback key to stop this programme from being played and to start recording the current programme at the same time.
If you want to continue replaying the broadcast from this position all you have to do is press the Pause/Playback key once again. You will now be watching a time delayed live broadcast (TIMESHIFT), whilst the actual programme is still being recorded in the background.
7.1.3 Stopping recording manually
First select the recording you want to stop, by calling the Navigator with OK, select Recording with the Arrow keys and acknowledge with OK.
Now press the Stop key. The "Do you want to save or delete the recording?" query will now be displayed.

Select Save with the Arrow keys up/down, in order to store the recording on the hard disk or Reject, in order not to store the programme.
Press OK to confirm your selection.
7.1.4 Stopping recording automatically
Press the Record key.
A pop-up window will now be displayed, listing the available function.
Select the line containing the required action with the Arrow keys up/down, e.g. +1 hour and confirm with OK.
The television will record the selected programme(s) for the specified time period and will automatically stop recording afterwards.
7.1.5 Timer recordings
This function will switch your TV set on and off for the selected broadcast, in order to record it on your hard disk, for example during your absence. The timer can be programmed automatically or manually using the "SFI+" function.
7.2 Replay
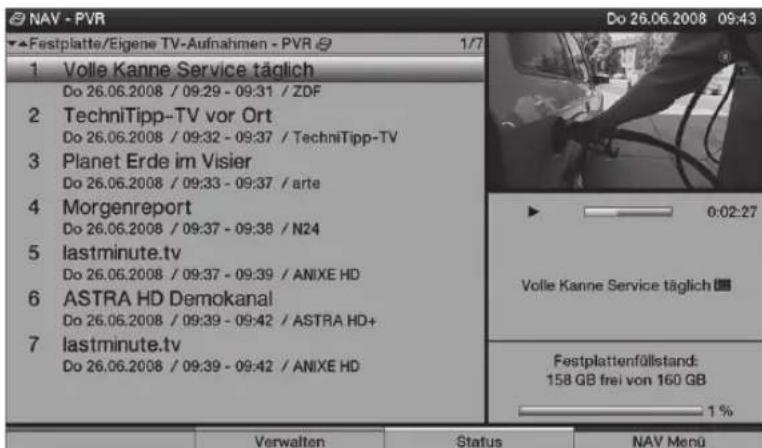
You can access your hard disk recording via the hard disk or PVR Navigator.
7.2.1Playback of hard disk recordings
Call the PVR Navigator by first pressing OK and then the green control key.
Use the up/down Arrow keys to select the recording that you want to replay.
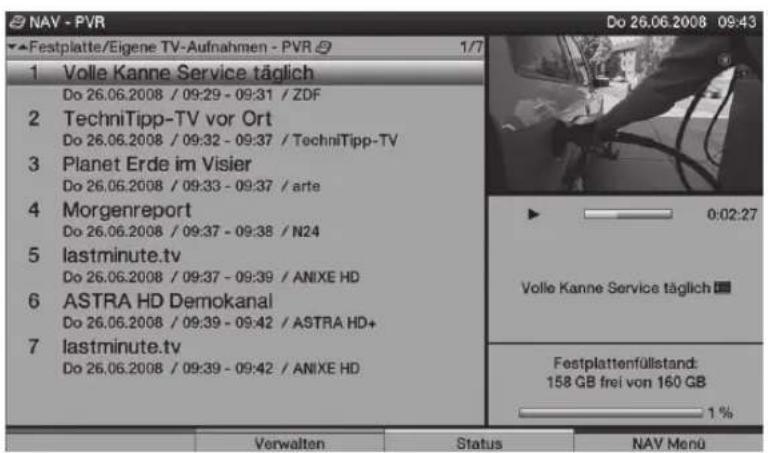
Press OK to start replaying.
The Infobox is displayed briefly showing the entire recording time and the current position as well as the usual information.
7.2.2 Pause/Freeze image
If you want to stop the playback of a recording (Freeze image), press the Pause/Playback key during playback. The insert Pause II is displayed.
Press the Pause/Playback key once again to restart the playback from the same position.
7.2.3 Fast forward and backward winding
Your PVR is equipped with a fast forward and backward function, in order to go to a specific position in a recording.
Press the Fast forward respectively Fast backwards key during playback. Fast forward respectively Fast backward is displayed. The recording will now be replayed at 4-fold speed in the selected direction.
Pressing the Fast forward respectively Fast backward key again increases the speed to 16-fold. Fast forward respectively Fast backward is now displayed.
Pressing the Fast forward respectively Fast backward key again increases the speed to 64-fold. Fast forward respectively Fast backward is displayed.
You can jump forward or backward in 10-minute steps by renewed pressing of the Fast forward or Fast backward control key.
After finding the required position of the recording, press the Pause/Playback control key to return to standard playback operation.
7.2.4 Stopping a playback
Press the Stop control key to exit the playback mode. The playback is terminated and your TV returns to standard operation. The TV however "remembers" the recording position, where you terminated the playback. The receiver will automatically return to the position where you stopped before restarting a playback of this recording.
Your device carries the CE symbol and fulfils all necessary EU standards.
Subject to alterations and printing errors. Version 09/04
Duplication and copying only with permission of the publisher.
HDTV 32, HDTV 32 Plus, HDTV 40, HDTV 40 Plus, HDTV 46 and TechniSat
are registered trademarks of the
mobile phone prices and international calls can deviate.
6.6 Controllo Volume
6.13.2 Navigeren in "SFI+"
6.13 Programguide "SFI+
TV-apparatet ditt er utstyrt med en elektronisk "SiehFern INFO Plus"-programguide.
Denne lar deg vise programinformasjonen for individuelle aller flere digitale programmer na skjernen slick at du fär en hurtig oversikt over hvilke programmer som vises nä aller hvilke programmer som skal vises samme dag erler en av de følgende dager.
6.13.1 Hente/Avslutte den elektroniske programguiden
6.13.2 Navigering i "SFI+
6.13 Programguiden "SFl+
6.13.2 Navigering i "SFI+
5.8 Regionala program
6.13 Programguide "SFl+
Komunikat "Do you want to save or delete the recording?
KpaTKoe pyKOBoIDCTBO NOIb3OBaTeJIa
HDTV 46
HDTV 40 / HDTV 40 Plus
HDTV 32 / HDTV 32 Plus
1 PmcyHKn
IopKJIuOHeNe yCTpoNCTB
1 Pa3bem o6uero nHTeppeica 1
2 Pa3bem o6uero nHTepceca 2
3 YcTpoIcTBo IJIa CHTbIBaHnKaPT (HaKIOHInTe 30IoTnCTyO MKNKpocxemy cMapT- KapTbI CONAX BpePeN iB HappaBHeHn pa3beMa)
4 Pa3beM USB
5 CeTeBoe coeHHeHne (LAN)
6 AHTeHHbI BxOJ (DVB-C, DVB-T, aHaNoRoBbI)
7 BxOaBnIeO,S-Video n aydno
8 BxoJ LNB 2 (DVB-S)
9 BxoI LNB 1 (DVB-S)
10 Pa3beM HDMI 3
11 Pa3beM HDMI 2
12 Pa3beM HDMI 1
13 BxodIy MmKpOoHa (pa3bem 3,5 MM)
14 BbIXoIaI HayHnKOB (pa3beM 3,5 MM)
15 AyINOBbIXoN (I,II)
16 LcHTpaBbIb BbIXoD
17 BbIXoI ca6ByΦepa
18 KomnoHeHTbIe BXOaBi (Y, Pb/Cb, Pr/Cr n aydno)
19 UnpoBoa ayNoBxOa (3neKtpnueckn SPDIF)
20 ΚινφροBoAaydnoBbIXoI (ənektpnueckn SPDIF)
21 CnΦpOBoAayIOBbIXoD (ontnueckn SPDIF)
22 BbIXoI NOCTOaHHOrToKa 12BnIpeKeIHOuAIOeRo HapJxKeHn (BHeuH. ycInTeN)
23 Pa3beM VGA
24 AynoBxoV (VGA/DVI) (pa3beM 3,5 MM)
25 Pa3bem IJIЯ NOdkIIOUeHnI INHaMnKOB
26 Pa3bemДлЯ NOДКЛЮЧЕНЯ Scart (AV1)
27 Pa3bemДЯ NOdkIIOueHnScart(AV2)
28 Pa3bEm IJIЯ NOIDKIOUeHINI NITaHIN
NyIbT IY
4.3 CnyTHMKOBa aHTeHHa
b IopKlnHouHTe BxOndhpie pa3beMbI LNB 1/2 K DByM OTdEJIbHbIM aHTeHHbIM cHepaM, yTO6bl NCnOJIb3OBaTb NOnHbI dHaNa3OH.
NIN
ToIbKO npi HaJIuHn aHTeHHOro cInrHaJa, nOdkJIouHte erO K BxOJHOmy pa3bemy LNB 1.
4.4 DVD nleep
c DVD nleep moKHO NOdkIIOUHTb C NOMOu bHO -ka6eH HDMI K pa3bemy HDMI
IINC NOMOUBIO
- ka6eЯ DVI/HDMI K pa3bemy HDMI, ndoonHntelbHO c nOoBIO aynoka6eJ - KBXODHOMy pa3bemy ayno (VGA/DVI) nnuΦpOBMy aynOBxOy (aJeKtpueckn SPDIF).
IINC NOMOIO
- ka6eJr SCART K pa3bemy SCART
IINC NOMOUBIO
- ka6eJc pa3beMOM RCA K KOMNOHEHTbIM BXoJam KK-TeneBn3opa.
4.5 Ycnilntelb HiFi/npoctpaHCTBeHHoro 3ByuHaH
Дя поуеня ONTIMальб HorO KaueCTBa 3Byka MoXHo NOdkHouHTb XXK-TeJIeBn3Op K yCINITeIHO HiFi/npoctpaHcTBeHHoro 3ByuHn.
dДЯэTORO NOKINOHHTe pa3bEmBi RCA aHANOROBO rayIOBbIXoDa TeNEBn3Opa K BXODHOMy pa3bemyucnntela HiFi (hanpimep, CD nAUX) c nomoubcoOTBETCTByuOero ka6e; O6- patnte BHMaHne! Bxod fohokopkekTopa He noXoNT dIra 3Tnx ceJe!
NNN
Ecn ycnntenb ochaueh COOTBETCTByoumm 3neKtpnueckn m nn ONTnueckn Bxodom (SPDIF), NOkHouTe ufoboa aynoobixoan (3neKtpnueckn nn ONTnueckn) K BXODHomy pa3bemy ycnilnte.
4.6 PoioklioueHne nHTaHnA
KK-TeIeBn3Op cneJyET NOKJIIOuATb K NCTOChNky NITaHn (230 V/50 Hz) TOnbKO nocNe TORO, KaK BCE Ka6eHn ycTpoiCtBa 6yDyT NOKJIIOueHbI K COOTBeTcTBYIOUm pa3beMaM. 3TO pO3BOJNT N36eXaTb NOBpeXeHn I TeIeBn3Opa I dpyrNX KOMNoHEHTOB.
5 HaayanbHa yctaHOBka
Припап ВКлюецни устpoиста abTomatнueckи 3anyckaetca MaCTep abTomatnueckoyn yctaHOBKN; c erO nOMOuь Bbl MOKKeTe BblONHHTb OCHOBhle HAcTpoKn TeJIeBN3opa.
PpInBeHeHHoe HnXe OnncAHne npOceDpybI cNeJeT paccMaTpNbA Tb TOnbKO BaueCTBe PnpMepa.
B kaqdom KOHKpeTHOM cnyuae 3Ta npoceDpya 3abncnT OT Baunx HactpoeK. IOnToMv, npexde Bcero, cne dyET npndepkivBaTbCn HHCTpyKcn Ha ekpaHe.
5.1 RaBik MeHIO
PnBbI6opea3bikaMeH0 3aIyckaetcMaCTep yCTaHOBKn.
BbI6epnte HxKbIy3bIK MeHIO C NOMOcIbIO KHONoK Co cTpeKamn.
B COOTBeTCTBnC BaIIM BbI6OpOM, yCTaHaBnBaTeC TaKKe IpeNouTnteHbIy Ra3bIK ayDINO.
Tekyun KaHAn OTMeueh BbIeJeHHem.
6.2.3.1 BbI6op nporpaMMbl
Tenepb Bbl MojkeTe Bbl6paTb HxKHyIO nporpaMMy C NOMOuBIO KHOJOK CO CTpeKNAMN NIN cHpOBbIX KHOJOK. C NOMOuBIO KHOJOK CO CTpeKNAMBvepx/BHN3 nepemeaIte BblJeHne, a C NOMOuBIO KHOJOK CO CTpeKNAMBnPaBO/BnEBO Bbl MojKeTe nepeINCTbIBaTb CTpaHnCbI CNNcKa BJIIO6OM HaPpABHeHH.
Дя полуеня доюнтельноинфорmaцио Tekyuxпегдачх habKMTe KhoNKy INFO (Инфорmaци).
Дя Вьхда n3 MeHIO Habnraцин HaxMnte KhoNky OK; Na экpahe 6ydET nOKa3aHa Bbl6paHHa npoPpMa.
1) Tôngkǎ nán yu nǚbTa Jy HDTV 32 Plus HDTV 40 Plus.
6.2.3.2 Bb6op cnncka
Дя удобста Noncka KaHaNoB,прдагаetca Heckoьko CnNcKOB nporpaMM.
BbIMoKeTe HcNoJIb3OBaTb CnNCKn H36paHHoro nnIOcmOTpeTB npOrpaMMbl B aIΦaBHTOM
nopAKe C nOMOsbIO 06eero CnNcKa, a TaKke BOCnoJIb3OBaTbcra CnNCKom CTaHcuN
IIIN PnOCMOTpOM NO KaterOpnn.
UTo6bl OTKpbIb aKTINBHyI CNICOK npoRpaMM, HaxMnTe KhoNky OK.
Tenepb Bbl MOxTe OTKpbItb OKHO c pa3nHbIMN cnNCKaMn nporpaMM (cncKn n36paHHoro, o6uN CNcOK, cnNCKn CTaHcN u CNNCKn NO KaTEROpnn) HaxkTneM KhoNkN Option (DononHnteBHo).
C nOMOuBIO KHOJOK CO CTpeKNaMn BBepx/BHn3 Bbl6epnte Huxhbl TnT CNsCKa nn o6nn cnCOK, a 3aTeM HaXMMte OK IJI NaoTBePKeHnI.
Tenepb BbI6epnte HyxHyIO nporpamMy, KaK onucaHO Bblwe.
6.2.4 Bb6op pernohaBHO nporpaMMbl
IHTepecyioune BAC pernoHaBbIe nporpaMMbl 6bln BbIbpaHbl B npocece yCTaHOBKn. Ppi BBIOpe OndHn3 3Tnx pernoHaBbIX nporpaMM Bbl Noluynte yBeOMJIeHne O TOM, UTO DOCTynHbl TaKke DpyrHe pernoHaBbIe nporpaMMbl.

Дя Вьбopa PernoHaJIbHOn IporpaMMbI HaxMnte KhoNky Option (DonoHnTeIbHo).
C nOMOJIbKHO NKONOK CO CTpeIkamn BBepx/BHn3 Bbl6epnte HxKHyOp ernoHaJIbHyIO npOrpaMMy, a 3aTeM HaXMMte OK IJIЯ NOdTBePckDeHH. Bbl6paHna pernoHaJIbHna npOrpaMMbl 6ydt HacTpoEHa N coXpaHeHa B KaueCTBe ppeINOHTeINbHO pernoHaJIbHOB npOrpaMMbl.
6.2.7пеклочене мжду ради n TeleBn30pom
Дляпеклочень ржм paиno haЖмte кногу TV/Radio (TB/Pa). UстpoиCTBOпеклочТса Ha nocleHIOИ cnoIb3OBAWUOCpaNIOCTAHUHO.
ДЯВОЗВРATAВржIMTeLEBn3OpaCHOBAHAKMITEKHONkyTV/Radio; yCTPOIcTBOBepHeTcKnocJeDHeNCSNoB3OBaBWeScTeLEBn3NOHHo nporpaMMe.
6.3 VcToUHK cnHaNA AV
Дя Вьбopa устюсва, полоченог К разьемam Scart, KMонеHTHOMy BXOу, a takke pa3ьемam HDMI, VGA ИИN AV, нажмte конky AV.
Bb6epnte HxHbI nCTouHnK CnHaIa (TB,paNo,EuroAV 1/2,HDMI 1/2/3, VGA,BnDeo/SVideo nn YUV) c NOMOuBIO KhONOK co CTpeNkAmn BBepx/Bn3.
Для подтверждени НжмITE KHONky OK, yTO6bl NepeKlnHouNTbcra Ha BbI6paHHbI NCTOuHnK BXODHOro CnHaHa.
6.4 IHHOpMaun O nporpaMMe/NUCTOuHnke CnHaJa
6.4.1 Okho c KpaTknm onncahnem
Okno c kpaTknm OnncaHne NpBJIeTcH Na 3KpaHe KaJbI pa3 npi CMeHe KaHaHa.

B daHHOM OKHe npINBOHITcH OHomep BbIbpaHHOrO KaHaJa, ero Ha3BaHne, a TaKKe Ha3BaHne TeKyUe nporpaMMbl, TeKyuN aKTNBHbI CNICOK nporpaMM, TeKyuUee BpeMra, a TaKKe DONoJIHNTeJbHa nHΦopMaunr o nporpaMMe (HaNPIMep, TxT dIy TeKCTa Ha 3KpaHe, 16:9 dIy nporpaMM BΦopMaTe 16:9 n DdIy KaHaIOB c IODePxxKoDolby Digital).
Kpome TOrO,Ha 3KpaHe OTo6paKaAeTcJKeIaTn NOoCKa COCToHnI, NOKa3bIBaIOuA BpeM, nCTeKwee C MOMeHTa HauaIa TpaHCnaIeu TeKUe InporpaMMbl. Ecln KOHeU 3ToN IOLOckn cTaHOBITc KpacHbIM, 3TO O3Haayet, yTO TEKUaI npoPamMa npoDoJIkaeTc DOIbWe yKa3aHHOro BpeMeHN.
6.4.2 OTo6paXeHne INΦOpMaUu O BpeMeH N pOporpaMMe/ДоПОнHtEиьХСБeDEHn O npOporpaMMe
3TaФyHKZIa IcNoIb3yeTcIЯ npocMoTp a HΦopMauzn O TeKyuIe nporpaMMe.
Дя npocmoTpa INHΦopMaun O Tekyuuei nporpaMme Haxmnte KhoNky Info (HΦopMaun).

По Мepe TpaHcIaIIN npOrpaMMbI, Bbl MoKTe NOnyUHT bONoHnTeIbHyIO NHΦOpMaIIO O Hei npN NOMoUIN NOBTOpHOrO HaxaTNI KHOJKN Info (HΦOpMaIua).
При NOВTOPHOM HaxkaTIN KHOJKN Info (Инфорmaць) Na зкране повлиетс следуюця пограмma.
UTo6bI y6paTb INHΦopMaunIO C 3KpaHa, cHOBa HaxMnTe KhoNkY Info (INHΦopMaun).
7.2NoBToPHe BocnpOn3BeDHe
BbIMoKeTe NOLyuHTb DOCTyN K 3aPiNCaM Ha JKeCTKOM DnCKe C NOMOuH JKeCTKOTo DnCKa NIn MeHIO BnDeo3aNNc (PVR Navigator).
7.2.1 Bocnpon3BeHne 3aHncs c JxcToO Dncka
OTKpoIe MeHIO BnDeo3aIncs (PVR Navigator), Haxab cHaayana KHO npKy OK, a 3aTeM 3eNeHyO KHO npBneHry.
Bb6epnte Hxkyo 3ainnc bIy Bocpon3BeHnC NOMOuK KOHNOK CO CTePknAm.
UTo6bI HaataB Bocppon3BepeHHe, HaxMMTe OK.
Ha KopoTkoe BpeMa Ha 3KpaHe NOBITc8 OKHO C KpaTKM ONHHeM,
rde 6ydt yka3aHo 06uee BpeMa 3aNcN IN TeKyuaa I03uia, a TaXke ObIuHbIe daHHbIe.
7.2.2 Pay3a / cTOn-kaAp
UTo6bIOCTaHOBnTB BOCpOu3BeDeHne 3aIncn (cTOn-KaIp), HaxMMTe KhoNkY Pause/Playback (Pay3a/BocpOu3BeDeHne). Ha ekpaHe nOraBntc coo6uHne Pause II.
HaxmTe KhoNky Pause/Playback eue pa3, yTo6bl npOJnxTb BocnpOn3BeDeHne c TOrO JKe MeCTa.

- Important note
- Dear customer,
- Remote control / Inserting the batteries
- Connecting
- Connection example
- Antenna/cable connector (analogue and digital)
- Satellite antenna
- DVD player
- HiFi/ Surround amplifier
- Mains connection
- Initial installation
- Operating language
- Setting the country
- Selection of the reception signals
- Antenna signals (DVB-S)
- Antenna configuration (DVB-S)
- Antenna settings (DVB-T)
- Station search run / ISIPRO (only for DVB-S via ASTRA 19.2° East)
- Regional programmes
- Software update (only DVB-S (ASTRA 19.2° East) and DVB-C/DVB-T (when data channel is available)
- Downloading "SFI+" data
- Terminating the installation assistant
- Operation
- Turning the TV set on and off
- Turning on with the mains switch on the TV set
- Turning on from the standby mode
- Switching to the standby mode
- Turning off with the mains switch on the TV set
- Selecting the programme
- By means of the programme up/down keys
- By means of the numeric keyboard
- By means of the programme list
- Selecting the programme
- Select list
- Selection of a regional programme
- Switching between TV/radio
- AV source
- Programme/Source information
- Infobox
- Displaying time and programme information/further programme information
- Reception of encrypted programmes
- Smart card PIN code
- Volume control
- Mute function
- Selection of a different language/sound option
- Sub-titles
- Video text
- Turning the video text on/off
- Page selection
- Format change/Zoom
- PiP/PaP Function
- Calling the PiP-/PaP Function
- Exchanging PiP/PaP pictures
- Turning the PiP-/PaP Function off
- Freeze image
- Programme guide "SFI+
- Calling/Exiting the electronic programme guide
- Navigating in the "SFI+
- Sleep Timer
- Function selection
- Hard disk operation
- Recording
- Immediate recording
- Timer-controlled recording
- TIMESHIFT Recording
- Immediate recording
- TIMESHIFT Recording
- Stopping recording manually
- Stopping recording automatically
- Timer recordings
- Replay
- 7.2.1Playback of hard disk recordings
- Pause/Freeze image
- Fast forward and backward winding
- Stopping a playback
- Controllo Volume
- Navigeren in "SFI+"
- Programguide "SFI+
- Hente/Avslutte den elektroniske programguiden
- Navigering i "SFI+
- Programguiden "SFl+
- Regionala program
- Programguide "SFl+
- KpaTKoe pyKOBoIDCTBO NOIb3OBaTeJIa
- HDTV 46
- HDTV 40 / HDTV 40 Plus
- HDTV 32 / HDTV 32 Plus
- PmcyHKn
- CnyTHMKOBa aHTeHHa
- DVD nleep
- Ycnilntelb HiFi/npoctpaHCTBeHHoro 3ByuHaH
- PoioklioueHne nHTaHnA
- HaayanbHa yctaHOBka
- RaBik MeHIO
- BbI6op nporpaMMbl
- Bb6op cnncka
- Bb6op pernohaBHO nporpaMMbl
- 6.2.7пеклочене мжду ради n TeleBn30pom
- VcToUHK cnHaNA AV
- IHHOpMaun O nporpaMMe/NUCTOuHnke CnHaJa
- Okho c KpaTknm onncahnem
- OTo6paXeHne INΦOpMaUu O BpeMeH N pOporpaMMe/ДоПОнHtEиьХСБeDEHn O npOporpaMMe
- 7.2NoBToPHe BocnpOn3BeDHe
- Bocnpon3BeHne 3aHncs c JxcToO Dncka
- Pay3a / cTOn-kaAp
Brand : TECHNISAT
Model : HDTV 32 Plus
Category : TV