
DVDP763W - DVD player PROLINE - Free user manual and instructions
Find the device manual for free DVDP763W PROLINE in PDF.
| Product Type | Portable DVD Player |
| Brand | Proline |
| Model | DVDP763W |
| Dimensions (L x l x H) | 208 mm x 160 mm x 38 mm |
| Power Supply | AC 110-220V, 50/60 Hz; mains adapter and built-in rechargeable Li-ion polymer battery |
| Power Consumption | 10 W |
| Compatible Discs | DVD, VCD, SVCD, CVD, Audio CD, CD-R/RW, DVD±R/RW |
| Readable File Formats | JPEG, MP3, video (via USB) |
| Ports | 1x USB, 1x composite AV output (3.5mm jack), 1x headphone jack |
| Playback Functions | Play, pause, stop, fast forward/reverse, slow motion, zoom, repeat (chapter/title/all, A-B), program, menu, subtitles, audio languages |
| Parental Control | Yes, levels 1 to 8 with password (default: 8888) |
| Built-in Screen | No, requires TV connection via AV cable |
| Remote Control | Yes, with AAA batteries (2 batteries included) |
| Maintenance | Clean with a soft dry cloth; avoid solvents, alcohol, gasoline |
| Safety Instructions | Do not open the casing (laser radiation), avoid humidity, unplug if not used for a long time, keep batteries out of reach of children |
| Included Accessories | Remote control, mains adapter, car cigarette lighter adapter, AV cable (not explicitly mentioned but probable) |
Frequently Asked Questions - DVDP763W PROLINE
User questions about DVDP763W PROLINE
0 question about this device. Answer the ones you know or ask your own.
Ask a new question about this device
Download the instructions for your DVD player in PDF format for free! Find your manual DVDP763W - PROLINE and take your electronic device back in hand. On this page are published all the documents necessary for the use of your device. DVDP763W by PROLINE.
USER MANUAL DVDP763W PROLINE
IMPORTANT SAFETY INFORMATION. 2
IDENTIFICATION OF CONTROLS 5
UNIT.
REMOTE CONTROL 6
GETTING STARTED 7
INSTALLING REMOTE CONTROL BATTERIES 7
REGION CODE 8
POWER SUPPLY 8
CONNECTION 9
BASIC OPERATION 9
PLAYING A DVD OR VCD DISC 9
PLAYING AN AUDIO CD 12
PLAYING A JPEG DISC 12
USB PLAY 13
EDIT MODE FOR AUDIO CD/JPEG/USB 13
SETUP MENU SETTING 14
PARAMETERS AND MAINTENANCE. 19
TROUBLESHOOTING 20
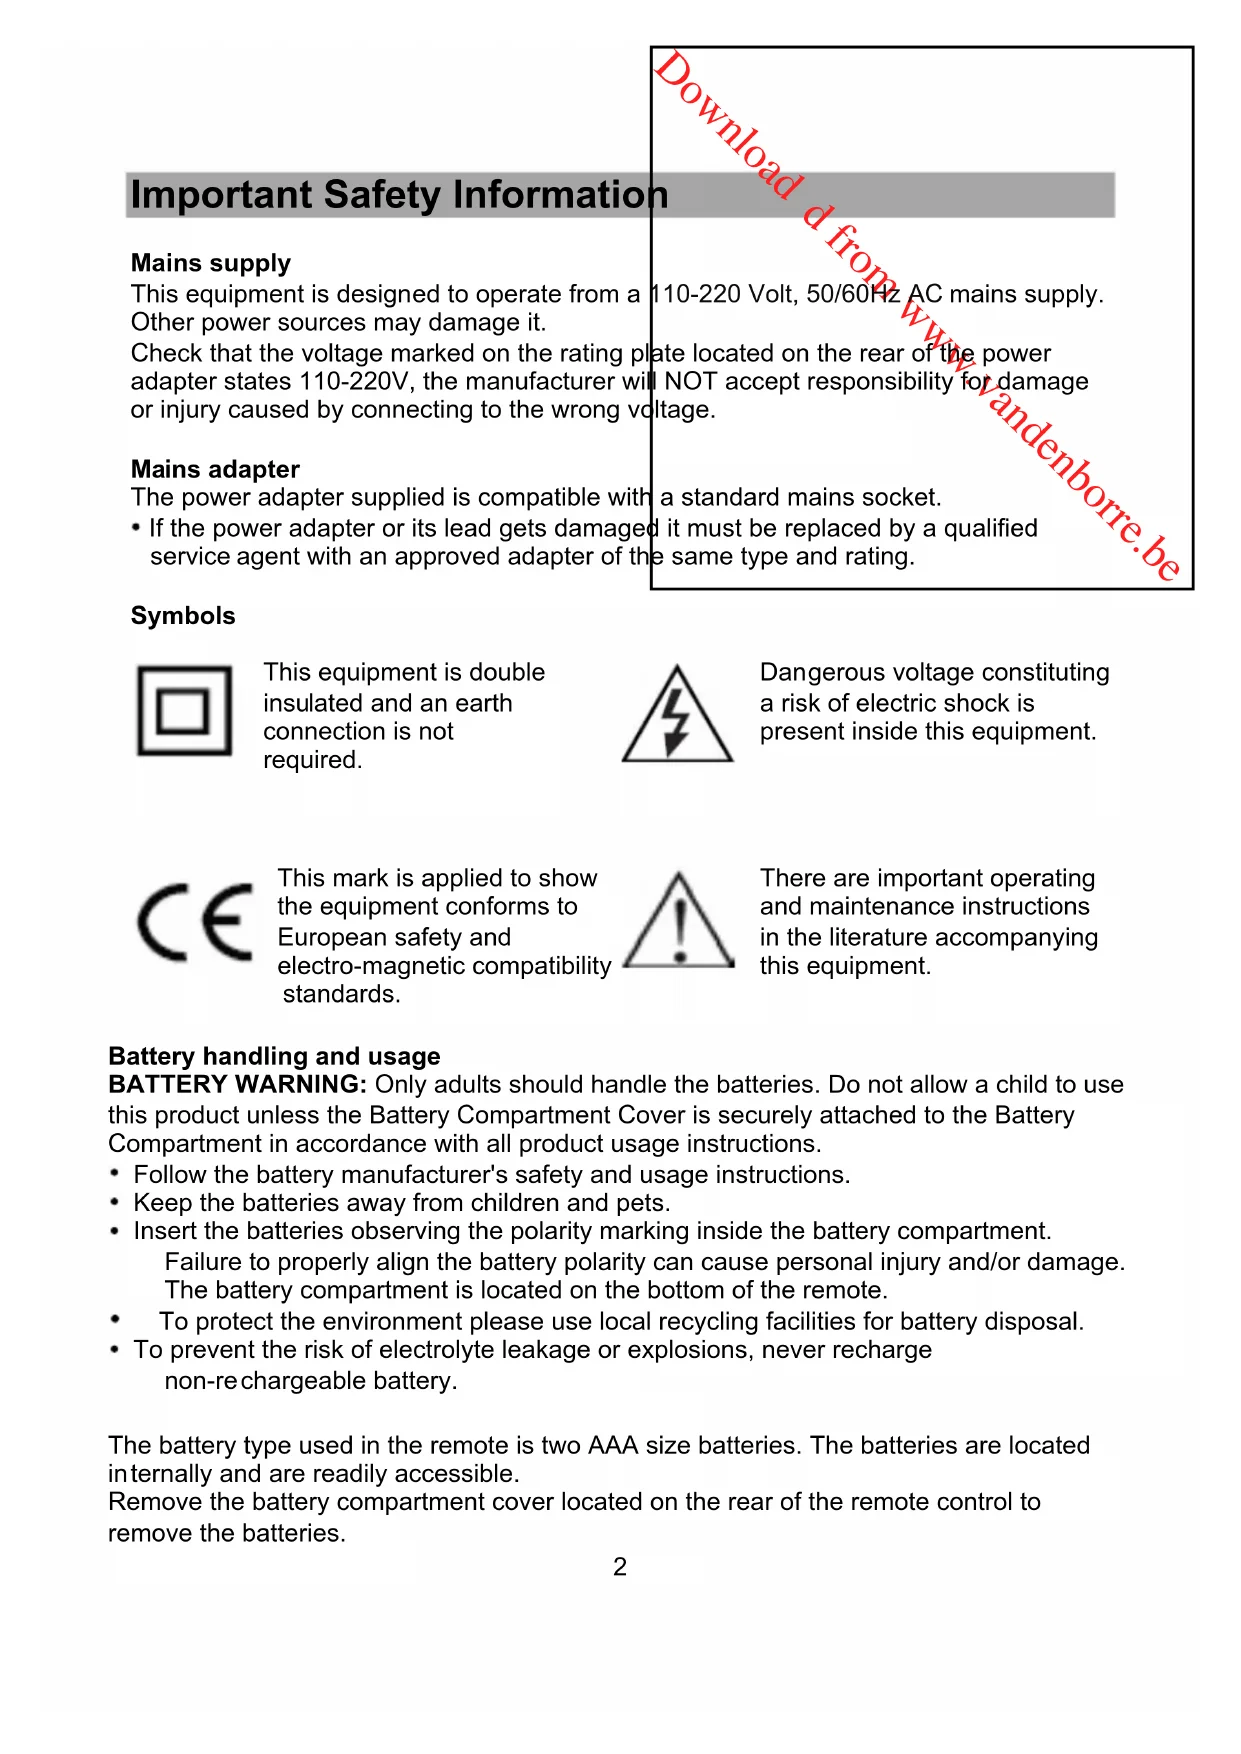
Important Safety Information
Mains supply
This equipment is designed to operate from a Other power sources may damage it.
Check that the voltage marked on the rating pl adapter states 110-220V, the manufacturer will or injury caused by connecting to the wrong vol
110-220 Volt, 50/60Hz AC mains supply.
ate located on the rear of the power I NOT accept responsibility for damage voltage.
Mains adapter
The power adapter supplied is compatible with
- If the power adapter or its lead gets damaged it must be replaced by a qualified service agent with an approved adapter of the same type and rating.
a standard mains socket.
Symbols

This equipment is double insulated and an earth connection is not required.

Dangerous voltage constituting a risk of electric shock is present inside this equipment.

This mark is applied to show the equipment conforms to European safety and electro-magnetic compatibility standards.

There are important operating and maintenance instructions in the literature accompanying this equipment.
Battery handling and usage
BATTERY WARNING: Only adults should handle the batteries. Do not allow a child to use this product unless the Battery Compartment Cover is securely attached to the Battery Compartment in accordance with all product usage instructions.
- Follow the battery manufacturer's safety and usage instructions.
- Keep the batteries away from children and pets.
- Insert the batteries observing the polarity marking inside the battery compartment. Failure to properly align the battery polarity can cause personal injury and/or damage. The battery compartment is located on the bottom of the remote.
To protect the environment please use local recycling facilities for battery disposal. - To prevent the risk of electrolyte leakage or explosions, never recharge non-rechargeable battery.
The battery type used in the remote is two AAA size batteries. The batteries are located internally and are readily accessible.
Remove the battery compartment cover located on the rear of the remote control to remove the batteries.
The battery type used in the unit is one Polymer Li-ion battery. This battery is located internally and is not readily accessible. The battery must be disposed of at your local recycling point.

WARNING:
The mains plug shall be the main disconnect device and shall remain operable at all times.
To save power: switch off mains power or pull out the mains power plug when you are not using the equipment.
- Never let anyone push objects into holes and ventilation slots.
This product is intended for domestic use only, commercial or any other use may invalidate the warranty and might be dangerous.
- Do not expose this product to dripping or splashing or place any objects filled with liquids on or near the product.
Do not place a naked flame source such as lighted candles on or near this product.
- Do not attempt to repair this product yourself, always get a qualified service agent carry out adjustments or repairs.
- Never dispose of batteries in a fire, danger of explosion.
- Never operate the equipment and try to view video while driving a vehicle.
- To prevent injury, this equipment must be securely attached to the car seats as in accordance with the installation instructions.
- Never operate the equipment and try to view video while driving a vehicle.
Class 1 laser product

This product contains a low power laser device. Invisible laser radiation when open and interlocks defeated.
Avoid exposure to beam.


This digital video disc player employs a laser system. Use of controls, adjustments, or the performance of procedures other than those specified herein may result in hazardous radiation Exposure.
To prevent direct exposure to laser beam, do not open the enclosure. Invisible laser radiation when opening.
Never stare directly into the laser beam.
Do not install this product in a confined space such as a book case or similar unit.
Notes on Discs
Handling Discs
Do not touch the play side of the disc. Hold the disc by the edges so that fingerprints do not get on the surface. Never stick paper or tape on the disc.

Storing Discs
After playing, store the disc in its case. Do not expose the disc to direct sunlight or source of heat and never leave it in a parked car exposed to direct sunlight.
Cleaning Discs
Fingerprints and dust on the disc can cause poor picture quality and sound distortion. Before playing, clean the disc with a clean cloth. Wipe the disc from the centre out.

Do not use strong solvents such as alcohol, benzine, thinner, commercially available cleaners, or anti-static spray intended for older vinyl records.
Identification of Controls
Unit


- SETUP button
- AUDIO button
- / Up Arrow / Fast Forward
- PREV/LeftArrow
- / Next/RightArrow
- OK button
- / Down Arrow / Fast Backward
- PLAY/PAUSE
-
TOP
-
OPEN
- OFF/ON switch
- AV OUT jack
- Headphone socket
- VOLUME dial
- Remote Sensor
- USB jack
- DC IN 12V jack
Headphones: Insert a standard 3.5mm headphone into the headphone socket. The speakers will be muted.
HEADPHONE VOLUME WARNING
Connect headphones with volume set low and increase it if required. Prolonged listening through some headphones at high volume settings can result in hearing damage.
Earphones or headphones must comply with EN50332-1 / EN50332-2 to ensure continued protection from excessive sound pressure.

Installing Remote Control Batteries
Always point the remote control directly at the remote sensor on the front of the DVD player, not the TV.
- Remove the battery compartment cover on the rear of the remote control.
- Place two AAA batteries inside the battery compartment observing the polarity markings.
- Replace the battery compartment cover.
CAUTION:
- Danger of damage or injury if the battery is replaced incorrectly. Replace only with the same or equivalent type.
- Do not dispose of battery in a fire as this constitutes an explosion hazard.
Region Code
This DVD player is designed and manufactured for playing of region "2" encoded DVD discs only.

(Region 2)
Playable discs
| DISC TYPE DVD VCD SVCD CVD | CD | |||
| TIME DVD5 | 4.7GB=2 hoursDVD98.5GB=4 hoursDVD109.4GB=4.5 hoursDVD1818GB=9 hours | 650MB74 minuities | 650MB45 minutes | 650MB74 minutes |
| DISC SIZE 12cm / 8 cm 12 cm | 12 cm 12 cm / 8 cm | |||
| CAPTION MAX 32 - 8 - | ||||
| LANGUAGE MAX 8 2 4 - | ||||
| MARKS | VIDEO | VIDEO CD | COMPACTDIGITAL VIDEO | COMPACTDIGITAL AUDIO |
Note:
- The product is designed to playback discs that conform to the Compact Disc (CD) standard.
- Damaged or badly scratched discs and some writeable media may not play.
- DVD-R/RW discs and CD-R/RW discs in DVD-video format can be played. Compatibility may vary under different software systems and conditions.
Power Supply
- To connect power from inside a car, connect the supplied car power cord to the DC IN jack of the unit and to the car cigarette lighter socket.
- To connect power from household power sources: Connect the supplied adapter cable to the DC IN jack of the unit and to the mains socket.
- The unit has a built-in rechargeable battery. Charge the built-in battery before using it for the first time. Slide the power switch to the OFF position. The red charge light comes on. The red light will go out when the built-in battery becomes fully charged.
Caution!
When you unplug the adapter, always pull the plug from the mains socket. Never pull the cord.
Connection
- Connect the single-connector end of the OUT jack of the unit.
-
Connect the triple-connector end of the audio corresponding jacks of the TV display.
-
Match the color of the AV cable with it is for the yellow video jack, the red/wi
audio/video cable (not supplied) to the AV
io/video cable to the
Basic Operation
Buttons on the unit function the same as the c control.
Corresponding buttons on the remote
Playing a DVD or VCD Disc
- Slide the power switch on the DVD player to the ON position. The blue power indicator comes on.
-
Press the eject button on the unit to open the disc tray and insert your chosen disc in the tray, with the label side facing up.
-
Close the tray. Play starts automatically.
- Turn the VOLUME knob to adjust the desired volume.
- To interrupt playing, press . To resume playing, press again.
- To stop playing, press . Press to resume playing. To complete stop the playback, press twice.
- Press MENU/PBC to return to the menu screen. Some discs do not support menus and start to play automatically.
Notes:
- If parental control is set and the disc isn't fit for the rating setting you must input the password. (See "Parental Ctrl").
- DVDs may have a region code. Your player does not play discs that have a region code different from your player.
- Moving to another CHAPTER/TRACK
When a title on a disc has more than one chapter or a disc has more than one track, you can move to another chapter/track as follows:
- Press or briefly during play to select the next or previous chapter/track.
- To go directly to any chapter / track during playback, input the chapter/track number. If the track / chapter number is greater than 9, use the 10+ button to enter the first digit then use the numeric buttons to enter the second digit.
Fast forward and backward
Press or fast forward or backward duri playback has five speeds: x2, x4, x8 and x16
To return to normal playback, press
Muting
Press MUTE to turn off the sound. To resume
Repeat
Press REPEAT repeatedly during play to sele
Repeat Chapter: Repeats the current chapter.
Repeat Title: Repeats the current title.
Repeat All: Repeat all the content.
Repeat off: Repeat is deactivated.
ng playback. Fast forward/backwards
the sound, press MUTE again.
act a desired repeat mode.
Using the display feature
Press DISPLAY repeatedly during playback to show play information. To stop displaying the information, press DISPLAY until the information disappears on the screen.
Selecting the Audio Language
For DVDs that contain two or more audio languages, during play press AUDIO repeatedly until the desired language is selected.
- Selecting the Subtitle Language
For DVDs that contain two or more subtitle languages, during play press SUBTITLE repeatedly until the desired language is selected.
Title
Press TITLE to select the preferred title.
Note: This function works only for discs that have title contents.
- Menu
If the DVD disc has a menu, press MENU/PBC to return to the root menu.
PBC
During VCD playback, press MENU/PBC to turn the unit on or off.
RETURN
During VCD playback (PCB is on), press RETURN to display the root menu.
L/R (Compatible with VCD discs)
Press L/R repeatedly to select the desired audio channel.
Left Right Mix Stereo
Repeat a Specific Segment on the Disc that You Define
During the normal playback,
Press A-B once and "Rep A-" will appear on the screen. This indicates the start of the loop to be repeated.
Press A - B again and "Rep A-B" will appear on the screen. It indicates the end of the loop.
Press A-B a third time to cancel playback repeat.
Multi Speed Slow Motion Playback
Press SLOW repeatedly to select the desired slow motion playback speed.
Slow motion playback has four speeds: 1/2, 1/4, 1/6 and 1/8.
Zoom In on the Image
The zoom function allows you to enlarge the video image.
Press ZOOM repeatedly to change the zoom setting. The zoom setting are zoom 1, zoom 2 and zoom 3.
Use to par across the screen.
GOTO
Press GOTO to display as below:

During DVD playback

During VCD/CD playback
Use to select the desired track or chapter then enter numeric button to input time you want to play. Press ENTER to start playing the selected track/time of title or chapter.
Program Play
- Press PROG to enter program menu.
- Press to highlight the next blank box.
- Press numeric buttons to enter Track or Title then the chapter.
- Repeat the above steps to add more chapters.
5.Use to select Play to start play.
NOTES:
- To clear the programmed order, use to highlight Clear program then press ENTER.
- To modify the programmed order, use to highlight the item to modify then enter the new chapter/track you want to program.
Playing an Audio CD
Once an Audio CD is inserted it will be played to the next / previous tracks or press or n track at different speeds, each press will sele sound will be distorted during search, press selected speed.
automatically. Press or moveeatedly to play (search) the current2X, 4X, 8X or 16X and back to play, theto return to normal play from any
- Press during play.
- To return to play, press .
- Press return to the audio CD menu.

Playing a JPEG Disc
When playing JPEG disc, a navigation menu will display automatically.

In the menu, use to select a file, then press ENTER, the file will be play with a slide-show. Press to pause the current picture for enjoying, when press again, it will return to normal playing. Press ZOOM to start zoom function. Press MENU/PBC to display thumbnail size pictures. Press return to the JPEG menu.
Image Rotation
There are four modes to rotate a picture: "Invert", "Mirror", Left", and "Right". These operations are allowed only when a picture is being displayed normally and will be cancelled automatically when a new picture is displayed. The arrow key is used to select the different rotation modes:
Up -Anvert/Normal
Down Invert/Normal
Left Turn left
Right Turn right
USB Play
The USB socket can be used to supply signals to the main unit from USB sources.
- Insert a USB device into the USB port of following window.
in the unit. Press USB to show the

2.Use A/ to highlight USB then press ENTER to confirm.
3. The following screen will pop up.

- Press A/ to choose the desired folder then press ENTER to play.
- Press to turn to the USB menu.
Edit Mode for Audio CD/JPEG/USB
Press to enter the right menu then scroll through the menu by using / . The menu will display the below option:
Filter (available for JPEG and USB): Press ENTER then press / to select "Audio", "Photo" or "Video";
Repeat: Press ENTER repeatedly to select "Off", "Single", "Folder" or "All";
Mode: Press ENTER repeatedly to select "Normal", "Shuffle" or "Music Intro";
Program edit: Highlight "Edit mode" then press ENTER to confirm. Press to enter the left menu, and use /▲ to highlight the desired audio or photo file, then press ENTER to confirm. Press to enter the right menu and use to highlight "Add to program" then press ENTER to confirm. To playback the edited file, use to highlight "Program view", then press ENTER to enter the audio / photo list, and press to playback.
Program View: You can select Browser View and Clear program.
Browser View: Switch between edited file and all files.
Clear program: In complete stop mode, use select / to highlight "Edit mode" then press ENTER to confirm. Press to enter left list then use to highlight the file you want to clear, press ENTER to confirm. Press to enter the right menu then use / to highlight "Clear program" and press ENTER to clear.
Note: Some of High Definition pictures can't be played.
SETUP Menu Setting
General Operation
Make sure DVD player is in complete stop mode.
- Press SETUP to enter the setup menu.
- Press to highlight the desire menu.
- Press to enter the submenu or return to the previous menu.
- Press to highlight the desired option in the submenu.
- Press ENTER to enter the next level of submenu or confirm your selection.
To exit from the menu
Press SETUP. The settings will be stored in the player's memory.
General Setup Page
The options included in General Setup page are: "Language", "Video", "Audio", "Rating" and "Misc".
Language Setup
You can select your own preferred language settings. This DVD system will automatically switch to the selected language whenever you load a disc. If the language selected is not available on the disc, the disc's default language will be used
instead. The OSD language in the system menu will remain once selected.
- Press / 回 highlight an option.
- Enter its submenu by pressing or ENTER.
- Press to highlight the selected language.
- Press ENTER to confirm.

Video Setup

Aspect Ratio
- Press ↑/tighlight "Aspect Ratio".
- Enter its submenu by pressing or ENTER.
- Press / to highlight the selected item.
- Press ENTER to confirm.
4:3 Normal
If you have a normal TV
16:9 Wide
If you have a wide-screen TV.
View Mode
This function enables you to select the following Scan picture.
g options: Fill, original, Auto fit or Pan
Fill: Choose this mode and the picture will fill the screen.
Original: Choose this mode and the picture will appear in its original size.
Auto Fit: Choose this mode and the picture displayed on screen is the same size as that in the disc.
Pan Scan: Choose this mode and the picture will be extended horizontally.
- Press ↑/f highlight "View Mode".
- Enter its submenu by pressing or ENTER.
- Press / to highlight the selected item.
- Press ENTER to confirm.
TV System
Select the colour system that corresponds to your TV when AV outputs. This DVD Player is compatible with NTSC, PAL and Auto. In order for a DVD disc to play on this Player, the colour system of the Disc, the TV and the DVD Player should match.
- Press ▲/ to highlight "TV System".
- Enter its submenu by pressing or ENTER.
- Use / highlight a TV system suitable for your TV.
- Press ENTER to confirm.
NTSC- Select this if the connected TV is NTSC system. It will change the video signal of a PAL disc and output in NTSC format.
PAL - Select this if the connected TV is PAL system. It will change the video signal of a NTSC disc and output in PAL format.
Smart Picture
This function enables you to select the desired picture effect from the following options: Standard, Bright, Soft and Dynamic.
- Press highlight "Smart Picture".
- Enter its submenu by pressing or ENTER.
- Use / highlight the desired option.
-
Press ENTER to confirm.
-
Standard is for general viewing.
- Bright is for a stronger view.
- Soft is for a weaker view.
- When Dynamic is selected, the window pops up to let you adjust Brightness, Contrast and Color. Highlight the desired option then press ENTER to

confirm. Use to set then press ENTER to confirm. To exit the window, use to highlight "close" then press ENTER to return to the video menu.
Audio Setup

- Press ↑/ to highlight "Audio".
- Enter its submenu by pressing orENTER.
- Enter Night mode options by pressing
- Press / to select the night mode On or Off.
- Press ENTER to confirm.
Rating Setup

Parental Ctrl
Some DVDs may have a parental level assigned to the complete disc or to certain scenes on the disc. This feature lets you set a play limitation level. The rating levels are from 1 to 8 and are country dependent. You can prohibit the playing of certain discs that are not suitable for your children or have certain discs played with alternative scenes.
VCD, SVCD, CD have no level indication, so parental control function has no effect on those kinds of discs. This applies to most illegal DVD discs.
Input the password (initial password: 8888) then press ENTER to enter the submenu from which you can select the preferred rating option.
Set Password
You can change the password, type 4 digits as new password.
Helpful Hint:
Some DVDs are not encoded with a rating though the movie rating may be printed on the Disc cover. The rating level feature does not work for such Discs.
Rating explanations
1. Kid Safe
Kids material; recommended especially for children and viewers of all ages.
2. G
General Audience; recommended as acceptable for viewers of all ages.
3. PG
Parental Guidance suggested.
4. PG-13
Material is unsuitable for children under age 13.
5. PG-R 6.R
Parental Guidance-Restricted; recommended that parents restrict children under 17 from viewing or allow to view only when supervised by a parent or adult guardian.
7. NC-17
No children under age 17; not recommended viewing for children under age 17.
8. ADULT
Mature material; should be viewed only by adults due to graphic sexual material, violence or language.
- Misc Setup

Default
- Press / to highlight "Use Default Settings".
- Press ENTER to see a window pops up.
- Press to select "Yes" or "No" then press ENTER to confirm.
Caution!
When "Yes" is selected, all settings except the password will be reset to factory defaults.
Screen Saver
If the screen saver is On, there will be an anim DVD player is idle for a certain time.
Disc Resume
The function is convenient when you want to c where you were watching before. Unlike the re function is effective even the DVD is removed Disc Resume may not work reliably with some
ated picture on the screen whenever the
ontinue viewing a disc from the point
sume function, the Disc Resume
from the player.
VCD that feature PBC.
Parameters and Maintenance
| Signal System PAL/AUTO/NTSC | |
| Power Supply AC 110-220V 50/60Hz | |
| Power Consumption 10W | |
| Dimensions (L x W x H) | 208(mm)X160(mm)X38(mm) |
| Supported Disc DVD / VCD/CD | |
Maintenance and Service
Refer to the information in this chapter before contacting a service technician.
- When shipping the unit
Please save the original shipping carton and packing materials. If you need to ship the unit, for maximum protection, re-pack the unit as it was originally packed at the factory.
- Keeping the exterior surfaces clean
Do not use volatile liquids such as insecticide spray near the unit. Do not leave rubber or plastic products in contact with the unit for a long period of time since they leave marks on the surface.
- Cleaning the unit
To clean the player, use a soft, dry cloth. If the surfaces are extremely dirty, use a soft cloth lightly moistened with a mild detergent solution. Do not use strong solvents such as alcohol, benzine or thinner, as these might damage the surface of the unit.
- Maintaining the unit
The DVD player is a high-tech, precision device. If the optical pick-up lens and disc drive parts are dirty or worn, the picture quality could be diminished. Depending on the operating environment, regular inspection and maintenance are recommended after
every 1,000 hours of use. For details, please o centre.

Troubleshooting
Before calling for service, you can check the following items on symptoms and solutions.
No sound or distorted sound:
Ensure that the equipment is connected properly.
Ensure that the input settings for the TV and stereo system are proper.
No picture:
Ensure that the equipment is connected properly.
No play:
Condensation has formed: wait about 1 to 2 hours to allow the player to dry out. This player can't play discs other than DVDs and CDs.
The disc may be dirty and require cleaning.
Ensure that the disc is installed with the label side up.
No remote control:
Check the batteries are installed with the correct polarity (+ & -)
The batteries are depleted: replace them with new ones.
Point the remote control at the remote control sensor and operate.
Remove the obstacles between the remote control and the remote control sensor.
No key operation (by the unit and/or the remote control) is effective:
Turn the unit off and then back to on. Alternatively, turn off the unit, disconnect the AC power cord and the re-connect it. (The player may not be operating properly due to lightning, static electricity or some other external factor.)
Play does not commence even when title is selected:
Confirm the "Rating" settings.
Audio soundtrack and/or subtitle language is not the one selected at the initial settings:
If the audio soundtrack and/or subtitle language does not exist on the disc, the language selected at the initial setting will not be seen/heard.
No subtitles:
Subtitles appear only with discs which contain them.
Kesa Electricals ©
George House, George St
Hull, HU1 3AU UK
01/03/2011
Table des matieres
INFORMATIONS IMPORTANTES DE SECURITE 2
IDENTIFICATION DES CONTROLES 4
UNITE
TELECOMMANDE 5
PREPARIATIONS 6
INSTALLATION DES PILES DANS LA TELÉCOMMANDE 6
CODE RÉGIONAL
ALIMENTATION
CONNEXIONS 8
FONCTIONNEMENT 8
LECTURE D'UN DISQUE DVD OU VCD 8
LECTURE D'UN CD AUDIO 11
LECTURE D'UN DISQUE JPEG 11
LECTURE USB. 12
MODEÉDITIONPOURLESDISQUESCDAUDIO/JPEG/USB 12
Bas - Inversion/Normal
George House, George St
Hull, HU1 3AU UK
01/03/2011
Inhoudsopgave
BELANGRIJKE VEILIGHEIDSVOORZORGEN 2
IDENTIFICATIE VAN DE BEDIENINGSTOETSEN 4
HET APPARAAT 4
DEAFSTANDBEDIENING 5
OM VAN START TE GAAN. 2
BATTERIJEN VAN DE AFSTANDBEDIENING INZETTEN 6
REGIOCODE
STROOMVOEDING 7
AANSLUITING 8
BASISBEDIENING 8
EEN DVD OF VCD-DISKS WEERGEVEN 8
AUDIO-CD'S WEERGEVEN 11
JPEG-DISKS WEERGEVEN 11
USB-WEERGAVE 12
AUDIO-CD/JPEG/USB BEWERKEN. 12
INSTELLINGEN IN HET INSTELMENU 13
PARAMETERS EN ONDERHOUD 18
PROBLEM OPLOSSEN 19
Batterijen
:Frans
:Frans
:Frans

Video-installingen

Beeldverholding
George House, George St
Hull, HU1 3AU UK
01/03/2011
#
IMPORTANT INFORMAZIONI SULLA SICUREZZA 2
George House, George St
Hull, HU1 3AU UK
01/03/2011
Obsah
DULEZITÉ BEZPEÇNOSTNI INFORMACE 2
POPI S OVLADACICH PRVKU 4
JEDNOTKA 4
DÁLKOVÉ OVLÁDÁNÍ
ZACINAME 6
VLOZENI BATERI DO DALKOVHO OVLADANI
KóD OBLASTI
NAPAJENI 7
PRIPOJENI 8
ZAKLADNI OBSLUHA 8
PRAVANi DVD NEBO VCD DISKU 8
PRAVANI AUDIO CD 11
PRAVAN DISKU JPEG 11
PRAVANZ USB 12
REZIM UPRAV PRO AUDIO CD/JPEG/USB 12
NABIDKA SETUP (NASTAVENI) 13
PARAMETRY A UDRZBA 18
RESENI PROBLEMU 19
Multi Speed Slow Motion Playback (Vicery)
Opakovanym stisknutim tlacitka SLOW (POMAZpomaleného prehravani.
Slow Motion Playback (zpomalene prehravani)
Zvětseni v obraze
George House, George St
Hull, HU1 3AU UK
01/03/2011
Obsah
DÔLEŽITÉ BEZPEČNOSTNÉ INFORMÁCIE 2 POPIS OVLÁDAČOV 4
ZARIADENIE 4
DIAKOV E OVLADANIE 5
ZACINAME
INSTALÁCIA BATERI'DO DIALKOVEHO OVLÁDANIA 6
REGIONALNY KOD 6
SIETOVE NAPAJANIE
PRIPOJENIE 7
BEZNÁ PREVÁDZKA 7
PREHRÁVANIE DVD ALEBO VCD DISKOV 7
PREHRAVANIE AUDIO CD 10
PREHRÁVANIE DISKOV JPEG 11
Prehravanie z USB. 12
REZIM UPRAV PRE AUDIO CD/JPEG/USB 12
MENUNASTAVENI (SETUP) 13
PARAMETRE A UDRZBA.18
RIESENIE PROBLÉMOV. 19
Manipulácia a použivanie batérii
George House, George St
Hull, HU1 3AU UK
01/03/2011
Indice
INFORMACION IMPORTANTE $OBE SEGURIDAD...... 2
George House, George St
Hull, HU1 3AU UK
01/03/2011
- IMPORTANT SAFETY INFORMATION. 2
- IDENTIFICATION OF CONTROLS 5
- GETTING STARTED 7
- BASIC OPERATION 9
- SETUP MENU SETTING 14
- PARAMETERS AND MAINTENANCE. 19
- TROUBLESHOOTING 20
- Important Safety Information
- Mains supply
- Mains adapter
- Symbols
- Battery handling and usage
- WARNING:
- Class 1 laser product
- Notes on Discs
- Handling Discs
- Storing Discs
- Cleaning Discs
- Identification of Controls
- Unit
- HEADPHONE VOLUME WARNING
- Installing Remote Control Batteries
- CAUTION:
- Region Code
- Note:
- Power Supply
- Caution!
- Connection
- Basic Operation
- Playing a DVD or VCD Disc
- Notes:
- - Moving to another CHAPTER/TRACK
- Fast forward and backward
- Muting
- Repeat
- Using the display feature
- Selecting the Audio Language
- - Selecting the Subtitle Language
- Title
- - Menu
- PBC
- RETURN
- L/R (Compatible with VCD discs)
- Repeat a Specific Segment on the Disc that You Define
- Multi Speed Slow Motion Playback
- Zoom In on the Image
- GOTO
- Program Play
- Playing an Audio CD
- Playing a JPEG Disc
- Image Rotation
- USB Play
- Edit Mode for Audio CD/JPEG/USB
- SETUP Menu Setting
- General Operation
- To exit from the menu
- General Setup Page
- Language Setup
- Video Setup
- Aspect Ratio
- 4:3 Normal
- 16:9 Wide
- View Mode
- TV System
- Smart Picture
- Audio Setup
- Rating Setup
- Parental Ctrl
- Set Password
- Helpful Hint:
- Rating explanations
- Kid Safe
- G
- PG
- PG-13
- PG-R 6.R
- NC-17
- ADULT
- - Misc Setup
- Default
- Screen Saver
- Disc Resume
- Parameters and Maintenance
- Maintenance and Service
- - When shipping the unit
- - Keeping the exterior surfaces clean
- - Cleaning the unit
- - Maintaining the unit
- Troubleshooting
- No sound or distorted sound:
- No picture:
- No play:
- No remote control:
- No key operation (by the unit and/or the remote control) is effective:
- Play does not commence even when title is selected:
- Audio soundtrack and/or subtitle language is not the one selected at the initial settings:
- No subtitles:
- Table des matieres
- INFORMATIONS IMPORTANTES DE SECURITE 2
- IDENTIFICATION DES CONTROLES 4
- PREPARIATIONS 6
- FONCTIONNEMENT 8
- Inhoudsopgave
- BELANGRIJKE VEILIGHEIDSVOORZORGEN 2
- IDENTIFICATIE VAN DE BEDIENINGSTOETSEN 4
- OM VAN START TE GAAN. 2
- BASISBEDIENING 8
- INSTELLINGEN IN HET INSTELMENU 13
- PARAMETERS EN ONDERHOUD 18
- PROBLEM OPLOSSEN 19
- Batterijen
- Video-installingen
- Beeldverholding
- #
- IMPORTANT INFORMAZIONI SULLA SICUREZZA 2
- Obsah
- DULEZITÉ BEZPEÇNOSTNI INFORMACE 2
- POPI S OVLADACICH PRVKU 4
- ZACINAME 6
- ZAKLADNI OBSLUHA 8
- NABIDKA SETUP (NASTAVENI) 13
- PARAMETRY A UDRZBA 18
- RESENI PROBLEMU 19
- DÔLEŽITÉ BEZPEČNOSTNÉ INFORMÁCIE 2 POPIS OVLÁDAČOV 4
- ZACINAME
- BEZNÁ PREVÁDZKA 7
- MENUNASTAVENI (SETUP) 13
- PARAMETRE A UDRZBA.18
- RIESENIE PROBLÉMOV. 19
- Manipulácia a použivanie batérii
- Indice
- INFORMACION IMPORTANTE $OBE SEGURIDAD...... 2
Brand : PROLINE
Model : DVDP763W
Category : DVD player